Rindis.com

All my hobbies, all the time
  • Home
  • My Blog
  • Games
  • History

Categories

  • Books (504)
  • Comics (10)
  • Gaming (918)
    • Boardgaming (674)
      • ASL (155)
      • CC:Ancients (83)
      • F&E (78)
        • BvR – The Wind (26)
        • Four Vassal War (9)
        • Konya wa Hurricane (17)
        • Second Wind (5)
      • SFB (78)
    • Computer games (162)
      • MMO (77)
    • Design and Effect (6)
    • RPGs (66)
      • D&D (25)
        • O2 Blade of Vengeance (3)
      • GURPS (32)
  • History (10)
  • Life (82)
    • Conventions (9)
  • News (29)
  • Technology (6)
  • Video (50)
    • Anime (48)
  • Writing (1)

Patreon

Support Rindis.com on Patreon!
Become a patron at Patreon!

Other blogs:

RSS Inside GMT

RSS Playing at the World

  • Playing at the World 2E V2 Arrives May 5, 2025

RSS Dyson’s Dodecahedron

  • Scavengers’ Deep – Map 33 July 16, 2026

RSS Quest for Fun!

  • The Expense Post May 24, 2026

RSS Bruce Heard and New Stories

  • Pain, Exhaustion, and Morale in D&D BECMI June 7, 2026

RSS Chicago Wargamer

  • The 2 Half-Squads - Episode 310: Cruising Through Crucible of Steel January 27, 2023

RSS CRRPG Addict

  • Game 581: Dragon Quest (1982) July 15, 2026
SF&F blogs:

RSS Fantasy Cafe

  • The Leaning Pile of Books July 5, 2026

RSS Lynn’s Book Blog

  • Friday Face Off: The Raven and the Reindeer by T Kingfisher July 17, 2026
ASL blogs:

RSS Sitrep

  • Cardinal ASL Sins March 18, 2026

RSS Hong Kong Wargamer

  • FT114 Yellow Extract After Action Report (AAR) Advanced Squad Leader scenario April 16, 2025

RSS Hex and Violence

  • This still exists? March 25, 2025

RSS Grumble Jones

  • Grumble Jones July Scenario GJ162 You Will Engage the Enemy July 1, 2026

RSS Desperation Morale

  • How to Learn ASL March 16, 2025

RSS Banzai!!

  • October North Texas Gameday October 21, 2019

RSS A Room Without a LOS

  • [Crossing the Moro CG] T=0902 -- Rough start July 18, 2015
GURPS blogs:

RSS Dungeon Fantastic

  • Felltower - Monsters Fleeing between Sessions vs. PCs replenishing June 28, 2026

RSS Gaming Ballistic

  • B-Scale Detail and Examples July 16, 2026

RSS Ravens N’ Pennies

RSS Let’s GURPS

  • Review: GURPS Realm Management March 29, 2021

RSS No School Grognard

  • It came from the GURPS forums: Low-Tech armor and fire damage January 29, 2018

RSS The Collaborative Gamer

  • Thoughts on a Town Adventures System January 18, 2022

RSS Don’t Forget Your Boots

  • GURPS Supers Newport Academy #7: “Invitation to the future.. of the 1970’s” July 5, 2026

RSS Orbs and Balrogs

  • Bretwalda - Daggers of Oxenaforda pt.4 - Fallen King May 27, 2017

Cataclysm 90 BC

by Rindis on March 18, 2017 at 12:00 pm
Posted In: Books

In 91 BC, the Roman Republic found itself fighting a not-quite civil war, when a large part of Rome’s allies and conquered peoples in Italy rebelled and tried to bring down the Roman Republic. Cataclysm 90 BC is about this conflict, and several directly related subjects.

The “Cataclysm” name is justified in the first chapter with the idea of ‘cataclysmic adjustment’. This is an idea that if an unstable situation is left alone long enough, it will solve itself by turning into a different (generally more severe) problem. This is presented as a pre-existing concept, though I have not run into the phrase before, and while Matyszak is on solid ground in his assertion that the Social War was the opening act in the civil wars that brought about the Roman Empire, use of the word ‘cataclysm’ in the title still feels overly dramatic.

The subtitle ‘The Forgotten War that Almost Destroyed Rome’ is far more justified. As it happened, the two sides were fairly even for the first year or so, and it was quite possible that more of Italy would join the revolt against Rome, and Rome would fall. It might be worth wondering just what the Roman Republic would have been replaced with in such a situation? Likely, the various peoples involved would have tried going their own way, and return to the general situation before Rome dominated the peninsula. But they had just banded together to fight Rome, had adopted some of the forms of the Republic, and the actual cause of the conflict was a desire to be counted as Roman citizens. It is possible that some form of Italian Republic would have emerged, that would have explicitly included full rights for everyone involved, and gone on its business in much the same way as the Roman Republic—just without the Romans. Finally, it is very true that the Social War is not very well known. In popular knowledge, the period between the Punic Wars and Julius Caesar is silent. At the same time, it is somewhat ironic that the events covered here are also covered by two volumes of the fairly recent popular Masters of Rome series by Colleen McCullough, so it is not quite as forgotten as it has been.

Matyszak does a very good job of introducing the general situation, and showing the roots of the conflict. He takes a look at both sides, and shows how the recent history of the Republic had been rife with incompetence. This includes a rundown of reform attempts in the Republic, including the Gracchi brothers and Livius Drusus. The war is also handled well, and gives those details that are available, with appropriate asides about where sources are thin, or disagree. He also continues the narrative into the war between Marius and Sulla, and then Sulla’s campaign in Italy after the Mithradatic War and his attempt to reform the Republic. This is largely there as it follows on so naturally to the main subject, but the fact is that it also saw the last bits of the Social War play out (in further fighting against the Samnites, one of the prominent rebel tribes of the war).

This is a good short overview (only ~160 pages) of about a decade, and would only really benefit from perhaps some further reading suggestions and better maps. The one map provided is quite serviceable, but by no means exceptional. The editing seems fairly good with the only flub I noticed being Marius being introduced as ‘Caius Marius’ the first time, and then called ‘Gaius Marius’ for the rest of the book (both are correct; interestingly, he’s listed as Caius in the index). Speaking of Marius, Matyszak takes a dim view of him, seeing him as overly ambitious and jealous, and seems unconvinced of his military ability, in contrast to McCullough’s glowing depiction. As such, I wish he’d spent a bit more time on the man, because while he’s on solid ground with other historians on the first part, he is bucking the trend in his judgement of military ability.

└ Tags: books, history, reading, review, Rome
 Comment 

Bloody Rules

by Rindis on March 14, 2017 at 12:00 pm
Posted In: Boardgaming

Mark came over on Saturday for some FtF gaming, and brought over Bloody April, which he’s been wanting to try out for a while. We knew that it’d be a day of kicking the tires and exercising the systems, as I think both of us went through the rules and had trouble picturing just how it would all work. Sadly, we didn’t anticipate the parts that really gave us trouble.

We decided to try the second scenario (with Mark taking the RFC, who have more to do), which is the first one rated as a ‘Patrol’, or a small scenario, and started the setup with figuring out our AA deployments. Mark used a log sheet to record his three hidden locations, while went for the planning map, so I could see where they were at a glance (two notes: it would have helped if I’d used colored ink to make them stand out, and the map is just too small in 8 1/2×11; I think a version rotated 90-degrees and just showing the middle part, where most of the plotting should need to be done, could be handy). Then we ran into the biggest problem: three of the four German flights listed no planes. This led to over an hour wasted trying to find something that spelled out what to do, to no avail. Two things were found: A pair of tables on the back cover of the rules that allowed for generating the type and number of planes in a Jasta (the German units that didn’t have a proper OoB), but there was no rule number referenced by the charts (all the others do reference their rule), and no mention of them in the rules. And the following sentence in general setup rules of the Playbook: “Plane(s) will list how many and of which type with XxType meaning the player will roll to see how many planes of that type will be used.” Which means that the scenarios should list the specifics, and when they do… you roll to see how many you get? We eventually decided that had to be reversed, and that Mark really should be using what was stated (there’s no rolling method for it anyway), and that I should use the unmentioned charts. It was the only way to get going anyway.

Physical set up was fairly easy, partly aided by the card listing where all the Aerodromes on the map are. Keeping all the details of the various taskings straight took some doing, but that was where we expected to be spending a fair amount of effort. Another problem cropped up a bit later: The specific description of the Patrol types states that the start and end points of the patrol must be designated, the Recon description does not. However, the separate Flight Navigation section mentions that Recon does have to predetermine what hexes they’re photographing, along with the Patrol start/end hexes, so I had to jot down the itinerary for my Recon Flight when that was discovered few turns in (Mark had recorded his along with his patrols, but that was more for his convenience at the time). A final unanswered question: Does a ‘Defensive Scramble’ get to go up any time it wants (it seems ‘yes’), or does an enemy flight have to be spotted before they can respond (which seems reasonable given the name)?

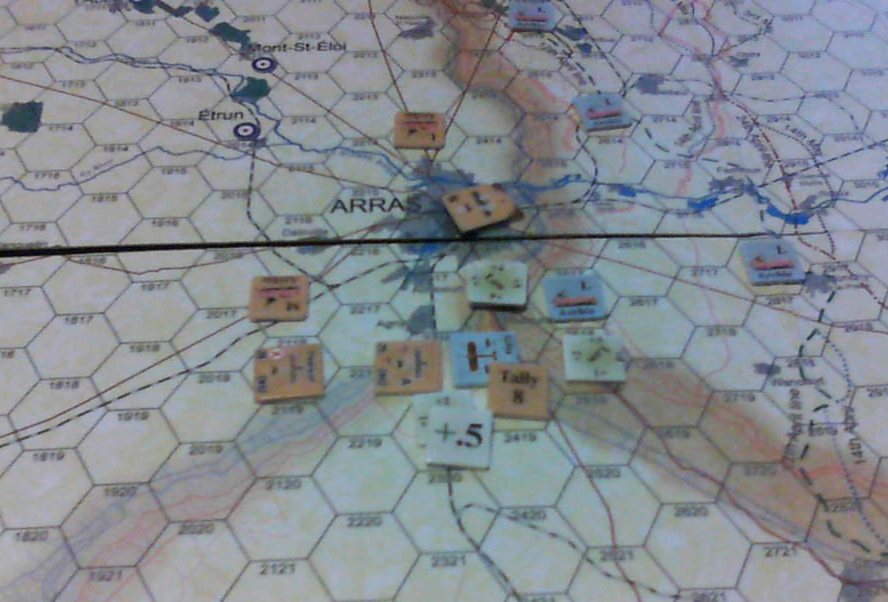
Two of Mark’s flights were entering from off-board at the beginning of the game, and the rest took off the first turn. My recon flight took off, along with my closest ‘defensive’ flight, and my other two took off a few turns later. We voluntarily followed the ‘take off into the wind’ optional rule as it makes a lot of sense. We had generated a 15 MPH wind blowing to the NW at the start of this, so we all took off facing SE, which was good for Mark, as that’s where he was headed, at the southern end of the active trench line (the legal patrol area did not include the very southernmost portion), but bad as he was flying into the wind, and losing half a point of movement each turn (‘drift’ due to wind is 0.5 hexes per 15 MPH). Whereas once my flights got turned around, they started picking up a similar half point of movement from the tail wind, and they started really moving. The maneuver and movement system in the game is pretty good. Going along hexspines is legal, so there’s actually twelve headings that can be used instead of the usual six, and along with altitude markers, flights can pick up -.5 and +.5 markers to represent half hexes that adjust movement. You can only pick up the -.5s from headwinds, but speeds are done in 0.5 increments, so you can have a leftover half hex. In general, turns are meant to be short and fast, and speeds look to top out at about 4 hexes, so you get to see what the enemy is doing develop as your own flights move.

However, there’s a few things here as well. Altitude is marked with markers on each flight (the number of markers starts piling up when there’s clumps of flight nearby), in a ‘Time to Climb’ system that has the same markers meaning different things for different aircraft. In kind of the opposite of the name, the marker means how long the aircraft has been climbing (Time of Climb), as you start at 0, and then climb 1 point each turn (if you want to climb, of course, but we were still clawing for altitude with everybody at the end of the 8 turns we got done), until you hit the maximum value for that aircraft, and trade to 0 in the next ‘altitude band’; the markers are color-coded per altitude band, so you can get some idea of where everyone is at a glance. The data card lists the maximum value for each band for that aircraft as ‘4D’ and the like. The letters are pretty obviously for the band it applies to (‘Deck’), but this is never explicitly stated as a notation method, and its a bit redundant on the data card table (the max value for Deck is 4D, the max for Low is 24L…). Being nitpicky, I’d also appreciate a bald statement that climbing past the max value of a band puts you at +0 of the next band; instead it’s just stated “Flights flying at the lowest level of an altitude band will be marked with Alt Band+0 markers…”.

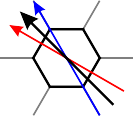
There’s a wind gauge diagram on the map, but there’s just the eight standard Cardinal and Ordinal directions, and they’re presented ‘true’, which means the Ordinals fall midway between the hexspine and alternate-hexspine directions used for maneuvering. So, is a wind blowing NW (black) going along the grid (red), or along the hexside (blue)? We just went with along the grid, but it’s not defined. Also, the Drift rule states “There are 12 possible headings on the map. Five will be with the wind, five will be against the wind and two will be perpendicular and drift in the direction of the wind,” and then goes on to the actual mechanics of drift in those cases. This is actually pretty clear, but a diagram of the twelve directions in relation to the wind direction would be handy for reference, and mentally picturing it in the first place.

As flights drew closer to the trench line, they started coming into observation range. There’s an interesting three-stage detection process, from just moving tracking chits around (which may include dummies), to ones that have been spotted by the ground, to being visually spotted by enemy flights (at which point the actual flight counter is used). Mark started a bit closer, and I started rolling for detection for the last few turns. I rolled horrible. Across maybe four turns, with an average of 3-4 rolls a turn, I detected one flight. For the last couple turns, we had flights in visual range of each other, and Mark spotted one of my flights with one of his, while I failed everything.

For the last turn we had time for, we acted as if I’d actually located one of his flights, as it was the only one that had a shot at combat (his flight had already moved). As it happened, this was Jasta.11, led by the famous Baron von Richthofen, and we got to see the influence of quality difference. Despite the fact that he had me visually identified, he did not engage me, but I engaged him with only an ‘assumed’ detection because of the difference in Aggressiveness Ratings. This is still actual combat with both sides fighting (especially since this was head-on), but I got a good bonus to my roll for surprise, and he got a small penalty. Looking up our actual altitudes turned up another problem, where the tables in the back were mislabled (this has been fixed in the living rules), and we missed the fractional method at the time, which probably would have been fine for us. I had actually gotten to a higher altitude (which, yes, is checked earlier, just to let me try to engage), but while we figured that translated into an Altitude Advantage modifier, weren’t sure, as there’s no definition, and some of the altitude figures break down pretty finely. (Also, calculating this referred to a rule [10.15] that doesn’t exist; or rather, it’s there, but the entire header and rule number is missing so it’s run into 10.14.)

My firepower (a term that was different between the reference cards and rules, but that also got fixed in the living rules) and advantages turned into three ‘shots’ against his flight, while Mark’s squadron wasn’t able to get any. This generated one of his aircraft shot down, and another crippled, with the engine knocked out. Sadly, we didn’t have time left to exercise the gliding rules as the one plane split off and looked for a safe landing. A final bit is that made my ammo depletion roll, sending the flight’s number from 4 to 7. A missed roll would have gotten the number to 10, which is effectively out of ammo! After one pass! A worthwhile lesson for the future. But I got my first kill in the system! Maybe someday I’ll be an ace.

And that is pretty much where we had to pick up. We never even had a random event; Mark kept rolling too high for them. I believe he’s planning on going back to this the next time it’s his pick for one of our games. It actually looks like a good system and game. But this is the least-baked rulebook I’ve seen out of GMT so far.

└ Tags: Bloody April, gaming
 Comment 

Antigonus the One-Eyed

by Rindis on March 10, 2017 at 12:00 pm
Posted In: Books

One of my interests for some time has been getting a better idea of just what happened after Alexander the Great’s death. Often that time period ends up ignored or summarized until Rome comes on the scene. So a book on one of the primary Successors was of decided interest, and the fact that it was by a person who I’d read prior books by only helped.

Despite the fact that this is technically about one person, it is a work of military history, not biography. While it does give as much of Antigonus’ life as is available from the sources, there’s no real attempt to draw from the somewhat sparse records any detailed sense of what he was like. The bulk of the book concerns itself with Antigonus’ campaigns, which did occupy the bulk of his life. In addition, we get some idea of what the other Successors were doing, including in the period right after Alexander’s death, when Antigonus is away from central events, just acting as a governor.

The subtitle ‘Greatest of the Successors’ doesn’t get all that well justified. Certainly, at his high mark, he was by far the most powerful of the Successors, and could draw in a lot of money as tribute/taxes. But it didn’t last long. The Battle of Ipsus killed him, and broke the power of his kingdom, leaving his son, Demetrius (who also gets a lot of attention in this book) to carry on. While he survived, it wasn’t until his son that a stable kingdom formed, and while it had the prestige of being Macedona itself, that wasn’t even part of Antigonus’ kingdom. Now this is more a case of great power attracting great enemies, but it still falls short of the lasting impact of Ptolemy or Seleucus.

Still, it’s a good book that does a good job of trying to put together the chronology of a confusing time (sometimes called the ‘Macedonian Soap Opera’), and comes with decent maps of the action in all the major battles described.

└ Tags: books, history, reading, review
 Comment 

Block Clearing—Offense

by Rindis on March 6, 2017 at 12:00 pm
Posted In: Boardgaming

Patch and I decided to go for a game of Up Front after our big SFB adventure, and again went for the next scenario in line, G “Block Clearing”. One side sets up with a group already in a -3 Building, and some anti-tank weaponry, while other has a squad and an AFV, and must score twice as many VPs as the first side to win. Also, only the defending side can use Sniper cards. I had attacking Americans (with a Sherman and the higher-morale leaders) against Patch’s defending Germans (who have a couple MP 38-armed men in place of standard 98ks, and a pair of PFs). I’m afraid I had a lot of screw ups this time, which we eventually sorted out. (I’m giving the Fire Strength and all the modifiers that applied to attacks; a ‘C’ refers to a concealment card played on it.)

Patch set up in two groups, with the LMG and six men in Group B, which was in the start Building. One PF was in each group, so I split my infantry into to equal groups in A and B, and put the Sherman in Group C, where it was a little further away from one of the PFs, and could concentrate on the larger German group. Neither of us had any additional starting terrain, and Patch started off by Moving Group B closer. The Sherman Fired its MGs at Group A (2) to pin one man. Patch immediately Rallied him and Group B moved into a new -3 Building. I tried more fire, with A Firing at Group B (3 – 3), and pinned three men with good cards, and followed up with more MG Fire from the Sherman at B (5 – 3 – 1C), and pinned two more men, but couldn’t affect the guys already down.

Patch Rallied 2 of his men, and put some Smoke on Group A for protection. I continued pounding Group B with my B Firing (2 – 3) for no effect other than blowing away the smoke, and the Sherman Fired (4 – 3 – 2C), but malfunctioned the MG to halt the attack midway through. Patch Moved up A, and I followed suit, and Patch moved up onto a Hill, and took a Sniper shot at the Sherman, getting a KIA to kill the commander and force it to button up. (This was really bad this early in the game, but I didn’t always remember to apply the commander modifiers on top of the button up.)
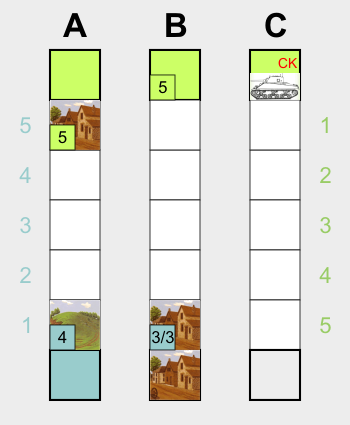
I finished my move into -3 Buildings, and repaired the Sherman’s MG. I tried putting some Wire on Patch’s B, but he immediately Moved off of it. Patch finally opened Fire on my Group B (2 – 1) to pin one man. I Rallied him immediately, and kicked the Sherman into gear to Move to Range 1. Patch finally Rallied the rest of his B, and the Sherman parked in an open field. The plan was to use the Sherman as cover for B when they moved up, but Patch put some Wire on B before they could get started.

The Sherman opened up with MA at B (TH 0), but missed. Patch Fired his B at my B (2 + 1 – 3C), and pinned two men. I Rallied them, and Fired the Sherman’s MA at his B (TH 0-1), and missed again. Patch Fired his B at B again (3 + 1), and pinned the entire group. I Rallied All. Patch Fired his B at my B for the third turn in a row (2 + 1 – 2C), but had no effect, though he did place a Wire on my Group A.

I finally Moved my Group B off their exposed position on the wire. Patch Moved his Group A forward again, and I discarded a Stream onto them. I then Moved both of my infantry groups, getting A off the wire, and finally moving B up to Range 1, and following up with a Wall the next turn.

After that, we had several turns of discards before Patch Fired his B at B (3 – 2) again for no effect. I responded with Firing the MA at his B (TH 0-1) for another miss. After another couple turns of discarding, the MA fired at his B again (TH 0-1) for a hit (4 – 3; it should have had a +1 FS from the hit, but we missed that rule for a while) that pinned one man.

Patch Forded the stream on Group A, and my A Fired on them (1 + 1 – 1C) for no effect. They then occupied some -2 Buildings. The Sherman fired the MA at B again (TH 0-1) for a Hit (4 – 3) to pin two more people. Patch Rallied them all.

I Smoked my Group B before Moving them up to Range 2. Patch Fired on them with his Group B (5 – 2-1+1 – 1C) and pinned two men. They slipped into -3 Buildings before more fire came their way. Patch did Fire on them again with his Group B (4 – 3 – 2C) for no effect. I then Rallied my two men before Patch Fired again (1+3 – 3) to pin one man again. The next turn, Patch Fired B at B again (5 – 3) pinning the rest of the group. I Rallied the group, and Moved up the Sherman to lend a little more protection. It parked in the open again, and then reacquired Group B with the MA (TH 0-1; miss). Patch made another try at Firing on my Group B (2+2 – 3-1), pinning two men again. After a turn, I was able to Rally them, and the Sherman Fired on Patch’s B again (TH 0-2), and hit (4 – 3), pinning everyone but the LMG and his crewman (I slipped up here and read the MG firepower at this range (5) instead of the MA effect (4), but it made no difference to the results). And Patch immediately Rallied them.

I tried discarding some Wire on Patch’s Group B, but he immediately Moved them off it. Then I Fired the MA at Group B again (TH 0-2) and hit (4 – 3) to pin the LMG assistant, who was immediately Rallied. The Sherman Fired again (-1C; TH 0-1) and missed (thanks to the Concealment; that was nearly a hit at +2 FS). Patch then Fired his A at my Group A (3 – 3), pinning one man, who I Rallied.
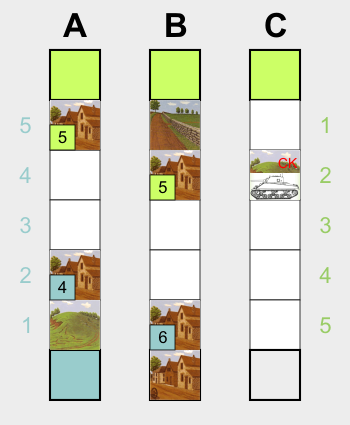
I started the Sherman on a lateral Move, and promptly found a Stream, which I Forded before parking it on a Hill. A Sniper shot at my Group B, but did nothing. Patch’s Group B Fired at my A (4 – 3), but did nothing more than malfunctioning a rifle. The Sherman reacquired Group B again (TH 0-1), and hit (4 – 3) to pin four people. Group B followed that up by Firing at his B (4 – 3 – 2C), and routed one man. My Group B took another Sniper shot, but there was no effect. The Sherman Fired the MA at B again (TH 0-2) and hit (4 – 3 + 2), killing two pinned men (including the LMG assistant) and pinning another. The next turn, the Sherman Fired again (TH 0-2) and hit again (4 – 3 + 2), pinning the only GO man left in B, and killing another.

At this point, Patch decided it was past time to try and take out the Sherman (it was) despite the odds, and played a Hero card on the man with the PF in Group B, and took the shot (H+1; TH 0-1; black only for HD), but missed. I’d taken the position on the hill purely for the HD, and recent events showed why I thought he needed to try for it even with the normal 0 TH odds (which were also true for Group A firing at it).

The next turn, Patch Rallied his LMG. The Sherman shifted its Fire to Group A to have more people to possibly affect (TH 0-1), and hit (4 – 2 +1), pinning one man. Patch put his remaining rifleman as the crew to the LMG in Group B, and Fired at my A with his (3 – 3) for no effect. The next turn, his B Fired at my A (3 – 3), pinning one man. I Rallied him, and the Sherman Fired at his Group A again (TH 0-2), but missed. Patch Fired his B at Group A (2 – 3) and pinned three men. The Sherman Fired on his A (-1C; TH 0-1) and hit (4 – 2) for no effect. Group B followed up (5 – 2), routing the pinned man, and pinning another.

The action slowed a lot as we searched for good cards. I placed Wire on his Group A, and Patch Rallied the pinned man in the group. The Sherman Fired again (-1C; TH 0-1) and missed, and Patch Moved off the wire. I Rallied two men in my Group A. A Sniper shot at my Group A and missed. My Group B Fired on his A (2+1 – 2) for no effect. His B Fired at my A (1 – 3) for no effect. I Rallied my last pinned man in A. A Sniper pinned my Squad Leader in Group A.

I didn’t want to waste a Rally 4 just on him, but after a couple turns used it because the hand limit was a problem. But in the meantime, Group B Fired at his A (4 – 2 – 1), but did nothing other malfunction a rifle. It was repaired at the same time as my rally. The Sherman Fired on A again (TH 0-2) and hit (4 – 2 + 2), pinning two men. Group A followed up with more Fire (2+1 – 2) but had no effect. Patch Rallied both of them. I tried putting Wire on his Group A again, but they immediately Moved off it again. The Sherman Fired on Group A again (TH 0-2) and hit (4 – 2 + 2), and killed a man, ending the game as Patch was under half his original force.

Afterword

I’d actually saved up three more Fire cards, and had finally gotten a Hero. I’d been wanting one since early on to get the Sherman Crew Exposed again, but now was saving it to double the BAR’s firepower the next time I got a big Fire card. If Patch had survived the Sherman’s shot, I would have done a 1+1+3 attack on him (needing 9 firepower) to hopefully finish it.

The ability of ordnance to just throw otherwise useless Fire cards downrange is really nasty, especially if you can get a bonus to the Fire Strength from the hit. Even better, they aren’t as likely to malfunction, as only the To Hit draw can malfunction the gun. The Sherman also has a MG factor that’s really nasty, and was pounding Patch until that Sniper. That forced me to use the MA a lot more than I would have otherwise.

The entire middle part of the game devolved into a stalemate. A scenario that removes Woods cards instead of Buildings allows for much tougher terrain, and we had a hard time getting through the cover available. As things sorted out, I was at 15 VP to his 13 (for groups in cover; his forward group was the smaller one). But then I got a streak with good RNCs, and Patch’s Group B came apart. At that point, it was 22 VP to 10, so I had a likely win, but wanted to shut him down before he could get lucky. Which he did at one point. Thankfully I was able to recover before he could do anything permanent to my Group A.

We had enough fun with this that we’re going to turn it around and play it again. I need to figure out how to deal with his tank.

└ Tags: gaming, Up Front
 Comment 

The Seventh Bride

by Rindis on March 2, 2017 at 12:00 pm
Posted In: Books

“T. Kingfisher” is a pseudonym for Ursula Vernon’s more ‘grown up’ books, but The Seventh Bride is really more Young Adult in my eyes. Certainly, the level of writing is still in that area (that’s not bad, the book just isn’t that horrendously complex or deep). However, setting it apart from more kids-oriented books is a good idea, there’s a few things that get creepy and could be nightmare fuel for younger readers.

There’s also Vernon’s usual bits of magic run amuck (“Potatoes were, for some reason, more prone to fits of random magic than most vegetables. It would take a remarkable magic to affect turnips or kale.”), and an overall a fairy tale tone to the entire book. This last is generally undermined by Rhea’s engaging commentary on everything, but the feel is strong enough to survive that unharmed.

In keeping with the kind-of YA theme, this is a story about growing up. Rhea has to come to terms with the fact that her parents can’t do everything, and that she must confront an unwanted (and frankly dangerous) marriage on her own. I think this isn’t quite as well developed as it needs to be, but the the story itself works, and a lot of fun to read (which is typical for Vernon).

└ Tags: books, fantasy, reading, review
 Comment 
  • Page 174 of 315
  • « First
  • «
  • 172
  • 173
  • 174
  • 175
  • 176
  • »
  • Last »

©2005-2026 Rindis.com | Powered by WordPress with ComicPress | Hosted on Rindis Hobby Den | Subscribe: RSS | Back to Top ↑