Rindis.com

All my hobbies, all the time
  • Home
  • My Blog
  • Games
  • History

Categories

  • Books (504)
  • Comics (10)
  • Gaming (918)
    • Boardgaming (674)
      • ASL (155)
      • CC:Ancients (83)
      • F&E (78)
        • BvR – The Wind (26)
        • Four Vassal War (9)
        • Konya wa Hurricane (17)
        • Second Wind (5)
      • SFB (78)
    • Computer games (162)
      • MMO (77)
    • Design and Effect (6)
    • RPGs (66)
      • D&D (25)
        • O2 Blade of Vengeance (3)
      • GURPS (32)
  • History (10)
  • Life (82)
    • Conventions (9)
  • News (29)
  • Technology (6)
  • Video (50)
    • Anime (48)
  • Writing (1)

Patreon

Support Rindis.com on Patreon!
Become a patron at Patreon!

Other blogs:

RSS Inside GMT

RSS Playing at the World

  • Playing at the World 2E V2 Arrives May 5, 2025

RSS Dyson’s Dodecahedron

  • Scavengers’ Deep – Map 33 July 16, 2026

RSS Quest for Fun!

  • The Expense Post May 24, 2026

RSS Bruce Heard and New Stories

  • Pain, Exhaustion, and Morale in D&D BECMI June 7, 2026

RSS Chicago Wargamer

  • The 2 Half-Squads - Episode 310: Cruising Through Crucible of Steel January 27, 2023

RSS CRRPG Addict

  • Game 581: Dragon Quest (1982) July 15, 2026
SF&F blogs:

RSS Fantasy Cafe

  • The Leaning Pile of Books July 5, 2026

RSS Lynn’s Book Blog

  • Friday Face Off: The Raven and the Reindeer by T Kingfisher July 17, 2026
ASL blogs:

RSS Sitrep

  • Cardinal ASL Sins March 18, 2026

RSS Hong Kong Wargamer

  • FT114 Yellow Extract After Action Report (AAR) Advanced Squad Leader scenario April 16, 2025

RSS Hex and Violence

  • This still exists? March 25, 2025

RSS Grumble Jones

  • Grumble Jones July Scenario GJ162 You Will Engage the Enemy July 1, 2026

RSS Desperation Morale

  • How to Learn ASL March 16, 2025

RSS Banzai!!

  • October North Texas Gameday October 21, 2019

RSS A Room Without a LOS

  • [Crossing the Moro CG] T=0902 -- Rough start July 18, 2015
GURPS blogs:

RSS Dungeon Fantastic

  • Felltower - Monsters Fleeing between Sessions vs. PCs replenishing June 28, 2026

RSS Gaming Ballistic

  • B-Scale Detail and Examples July 16, 2026

RSS Ravens N’ Pennies

RSS Let’s GURPS

  • Review: GURPS Realm Management March 29, 2021

RSS No School Grognard

  • It came from the GURPS forums: Low-Tech armor and fire damage January 29, 2018

RSS The Collaborative Gamer

  • Thoughts on a Town Adventures System January 18, 2022

RSS Don’t Forget Your Boots

  • GURPS Supers Newport Academy #7: “Invitation to the future.. of the 1970’s” July 5, 2026

RSS Orbs and Balrogs

  • Bretwalda - Daggers of Oxenaforda pt.4 - Fallen King May 27, 2017

In the Name of Rome

by Rindis on April 5, 2017 at 12:00 pm
Posted In: Books

Adrian Goldworthy’s In the Name of Rome is something of a mixed bag. It purports itself as being an examination of the Roman style of command by looking at several of its most prominent generals. The selection is constrained to those where there’s enough known to be able to say something intelligent, which warps the coverage somewhat. Goldsworthy covers fifteen generals, with Caesar coming in for extra attention (of course!) and two (Fabius and Marcellus) combined into one chapter, and thus feeling a bit more summarized.

Despite the fact that this is centered around individual people, Goldsworthy actually spends a fair amount of time providing extra background and bridging, and the volume can serve as a decent history of Rome from the Second Punic War through the early Empire. After his chapter on Titus and the siege of Jerusalem, the gaps become too big (mostly because of a lack of sources on individual commanders) and the overall narrative of events breaks down for the final two chapters on Julian and Belisarius, making them feel more like the separate essays you would expect from the general format of the book.

The part that surprised me, is that while the book is supposed to be about Roman command, it seemed like it had more to say about the Roman military itself. He points out early on that the Roman Republic army was set up to be a very non-professional force, with it’s constant cycle of recruiting a legion, training it, and then disbanding it once the immediate goal/campaign is done. This leads to Roman armies having trouble at the start of the Second Punic War when there’s been little training, and doing better as experience is gained. In the years afterward, there’s a good number of veterans that cycle into the new legions, and help power Rome’s growth in the 2nd Century BC. Then the Marian reforms put the legions on a more permanent basis, with long-term training, making it a professional service, and creating the armies that both conquer large portions of the future Empire, and tear the Republic apart as they fight each other.

On the other hand, the last two chapters show just how completely this had all come apart. While the Empire was still a major state, even after the fall of the Western half by the time of Belisarius, and the total number of men under arms could still be fairly large, the actual armies in use were very small in comparison to previous centuries. Goldworthy’s main analysis of Julian is that his successful campaigns against various Germanic tribes would have been handled locally by a provincial governor instead of needing attention from near the very top. His failure against Persia is given as being at least partly due to having to manage a larger army and distances than he had yet had to deal with. Finally, Belisarius’ armies are generally puny, and he has to put up with a lack of discipline and mutiny that would never have been allowed in an early legion.

The stated idea of how Roman generals functioned is discussed throughout the book as well, but it felt less prominent than the arc I just summarized. But the book is large enough to support both threads, while talking about the actual people involved, and threading much of the history together. At the large scale, all the history in here can be found in any number of other places, but this particular presentation is a good one, and does develop its own themes well.

└ Tags: books, history, reading, review, Rome
 Comment 

Two Rounds of Coronea

by Rindis on April 2, 2017 at 12:00 pm
Posted In: CC:Ancients

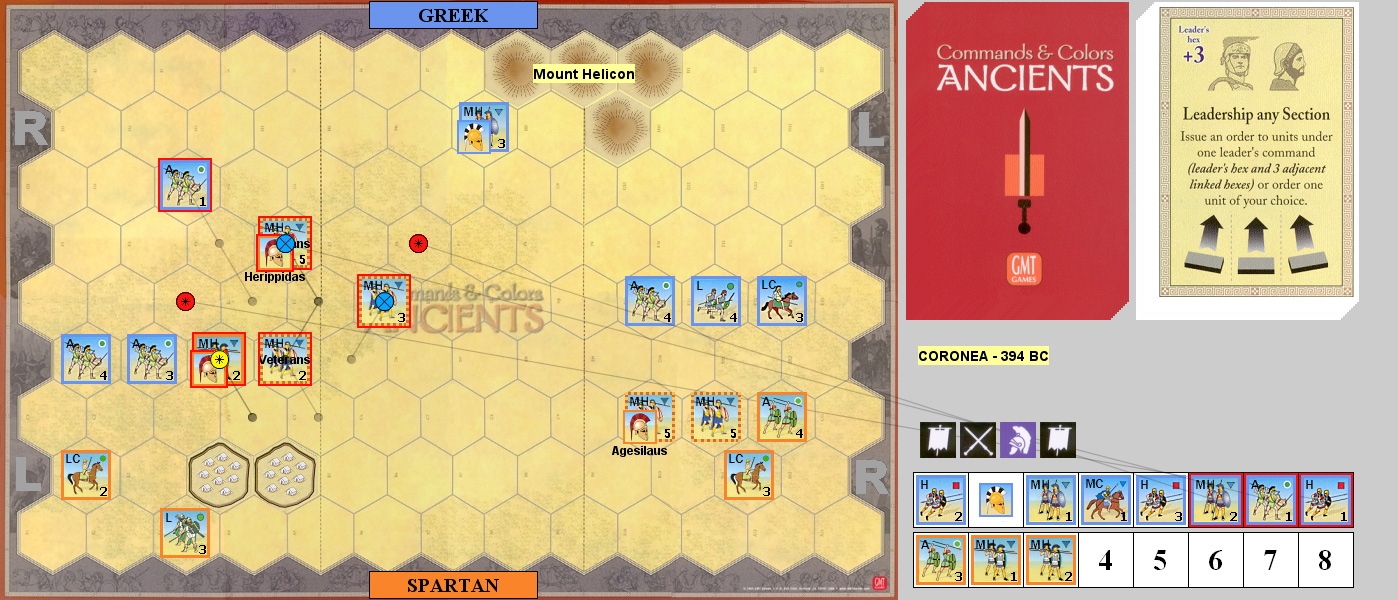
After going a couple rounds in Up Front, Patch and I went back to Commands & Colors: Ancients for a quick pair of games. This time was the Battle of Coronea from Expansion #6 (and as a part two of Anabasis). Unusually for this period, the Greek army has three Heavy units, while the Spartans (the 10,000) have two units of ‘Veteran’ Spartan MH that get an extra die as long as they’re in command range of Herippidas. The lines start relatively close, and there’s two hexes of fortified camps behind the Spartan left, which the Greeks can loot to gain banners. Also, this fight goes to eight banners, promising a long, hard fight.

I had the Greeks the first time, and started with Order Light Troops, close a gap in the center of my line and bring my flanks into archery range. Patch Ordered Three Left, doing one block of damage, and taking one each on two units in return. I Ordered Three Left to bring up a leader who was behind the line without being attached and move up some of my hoplites, before doing a Line Command. That brought most of my heavies in contact on my right, but I refused to come into contact on my left as his line was much heavier there. I knocked out an Aux, and picked off another block.

Patch Ordered Mediums to bring the entire center into contact, and wiped out a Heavy with attached leader, while breaking up my hoplites, doing two blocks to one, three blocks to another while driving it back a hex, and one block to a third, which also retreated three hexes. In return, he two two blocks to a MH, three to another, and three blocks to one of his veterans. I Ordered Three Right to finish off two of his MH and drive off another without damage, after which my MC charged into the gap and drove off another unit without doing damage. Patch Ordered Two Center to finish off one of my units, and drive off another.

I Ordered Three Center to go after his camp, and failed to do more than one block to his remaining MH on that flank, while taking a block on a Heavy, and two on my MC. Patch Double Timed his center over to this fight to knock out my MC and Heavy, but only took one damage when he tried to pick off a MH. I issued a Line Command to bring up my entire right flank, but most of what I faced was now his Spartan hoplites. I only did two blocks to one unit, and in return had two units reduced to one block and forced to retreat. Patch used Leadership to get his solid section in motion, and wiped out three units to finish the game. 3-8

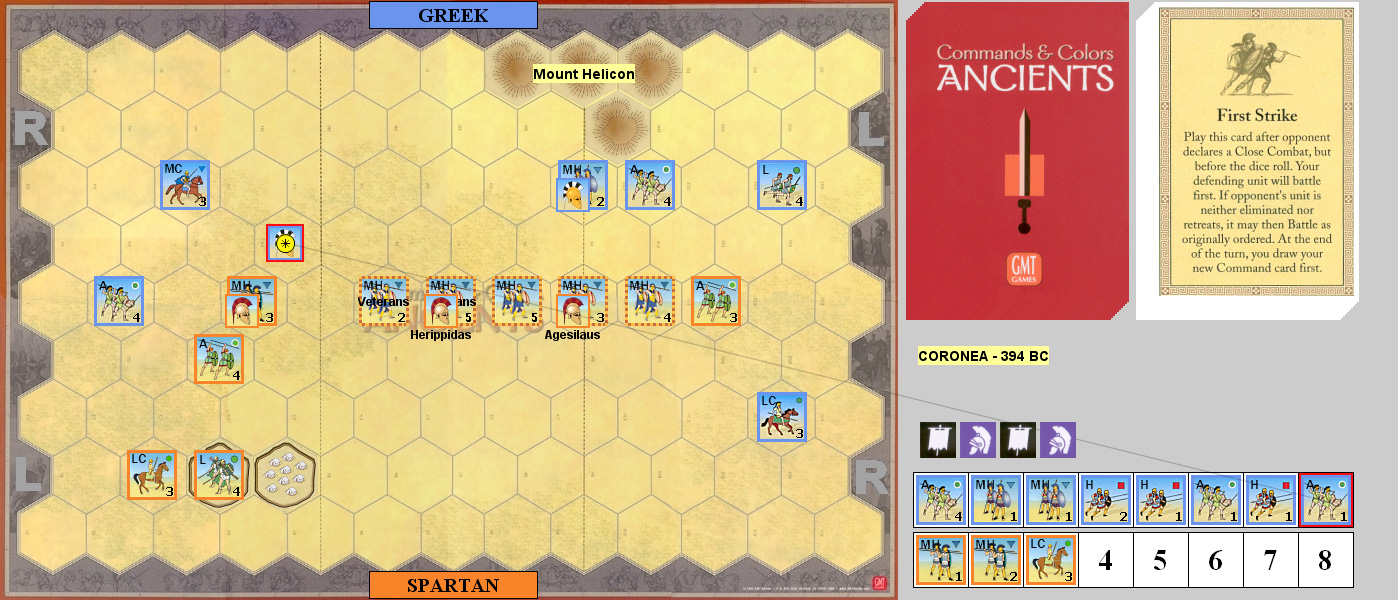
Patch lead off the Athenians with a familiar Order Light Troops to close up the hole in the middle, and I Ordered Four Right to bring that side up. Patch used Line Command, which brought both flanks into contact. No units were eliminated, though one of my MH was reduced to a block, and two of my Spartan hoplites took damage. However, Patch had three units reduced to a block, as well as taking a block on two more, and a couple units were forced back, breaking up his left flank.

I Ordered Three Center, wiping out an Aux, and damaging and driving off a MH for no damage. Patch Ordered Heavies to finish off a MH and do three damage to one of my Veterans, taking five blocks across two of his heavies in return. A Line Command brought the centers into contact, but the right simply flowed around a forward weak Athenian MH, with the rest of the Athenian left out of range. I wiped out four weak units, and reduced his remaining Heavies to a block before driving them off. Patch Out Flanked me to drive off the left end of my main line, and knock out a unit in with Momentum after driving it off with the losses the first time. He also attacked my LC with his. I decided to take his two dice without evading, but he got a banner to cause it to rout off the field.

I Double Timed my left flank up to combat, and while Patch drove off my Lights with no damage to either side, I knocked out two weak units, and reduced a MH to a block. Patch used Clash of Shields to try and use that unit (the only one in contact) to finish off my MH+leader, but a First Strike got him first. 8-3

Afterword:

Both plays were surprisingly fast, with the total playing time being just a bit over an hour and a half on Vassal. The second game was particularly fast thanks to some powerful dice from me, but in general, the 5-dice units on both sides helped promote some aggression that sped things up. In both cases the Athenian army came apart with an ease that seems unlikely given that it’s a pretty good force. The real problem is that they have two leaders to the Spartan’s three, and in my play, the Athenians lost a leader early, and Patch never actually used the unattached one the second time.

└ Tags: C&C Ancients, gaming
 Comment 

The Golem and the Jinni

by Rindis on March 30, 2017 at 12:00 pm
Posted In: Books

Historical, fantasy, or romance…? The Golem and the Jinni is a bit of a mix of all three. The Manhattan of 1899 is almost as much a character as anything else in this novel, but it doesn’t feel like a travelog the way Time and Again does.

The main problem with the book that there’s just enough magic and lost knowledge to make you wonder how it doesn’t more often come to the attention of the modernizing world. Especially when two otherwise normal-human characters experience profound difficulties from their brushes with the… less logical side of the world. But it genre conceit of hidden magic mostly works, and this is a minor problem in a very well put together book.

The titular characters are the viewpoints for the bulk of the book (a few others get to be viewpoint characters for brief stretches as well), and Wecker’s handling of these not-quite-humans is one of the strongest parts of the novel. The structure begins with a typical switching between two independent stories each chapter, and then starts going into backstory, and then gets more complicated as the plot moves forward, and then at the end, it all comes together, and every part of the novel is shown to have its place in the whole.

What makes this all the more impressive is that this is the author’s first book. I definitely look forward to seeing more from Helene Wecker!

└ Tags: books, fantasy, historical, reading, review
 Comment 

Block Clearing—Defense

by Rindis on March 26, 2017 at 12:00 pm
Posted In: Boardgaming

After the smoke cleared, Patch and I decided to give Up Front scenario G another try, with me on the defense. I think we both decided to try out some of the later nationalities this time. I picked the Italians, partially because I knew that they got an ATR and DC in this scenario. Then I read the rules for them and thought maybe it was a bad idea. But, it was a little late for second thoughts, and Patch took the British for his attack. (I’m giving the Fire Strength and all the modifiers that applied to attacks; a ‘C’ refers to a concealment card played on it.)

I set up with one big group (seven men) in the middle with the at-start building and the ATR. Group A got both LMGs (which aren’t as good as most LMGs, but don’t need a second crewman either), and five more men. The last four in Group C were some of the best men I had, including the squad leader, and my one Morale 5 man with the DC. My general plan was to try and get into motion early, since ordnance will miss on any red RNC if the target is moving, and then get into cover. I’d try to keep moving to help keep the ordnance less effective, and if I was lucky, I might get into DC range at some point. Patch deployed his Sexton as Group B, where it could offer cover to everyone else, and split his eight-man squad in half, with his one Bren gun in Group A, and neither of us had any further pre-game terrain.

It took a couple turns for either of us to be able to do anything, and then the Sexton opened Fire on my Group A (TH 0) and missed. The next turn, it Fired again (-1C; TH 0) and hit (5) to kill two men outright (including one of the LMGs) and pinned the rest of the group. (This led to a rules question: An Italian Group surrenders if everyone is pinned at the end of a turn. Is that either player turn, or the Italian player turn? We figured the former is way too punishing, since the only remedy for a strong attack is a Hero card, and played that it surrendered at the end of an Italian turn.)

I Rallied 4, and the Sexton Fired on the Group again (TH 0-1), but missed. One of the riflemen grabbed the loose LMG, and my ATR opened Fire on the Sexton (TH 4) but missed. Patch discarded some Wire onto my Group A, and the ATR took another shot at the Sexton (TH 4) and missed again. Group A then Fired on Sexton as well (1) for no effect. Patch’s Group A returned Fire at my A (1 + 1) to pin three men and rout the one man who was still pinned from earlier. My ATR took another shot at the Sexton (TH 4) and missed. Shortly after, I managed to Rally Group A, and the next turn move them off the wire.

Right after that, the Sexton Fired again (TH 0-1), hitting (5 +1) to kill the second LMG gunner and pinning everyone else. I Rallied the three survivors, and the ATR Fired again (TH 4) and missed. The next turn, Group A recovered the second LMG, the ATR Fired again (TH 4) and missed, and Group C finally Moved forward… and instantly ran into a Stream. Group A Fired at the Sexton (1) for no effect, followed by the ATR Firing again (TH 4) and missing. Group C attempted to ford the stream, but didn’t manage it. The Sexton returned Fire at A (TH 0-1), but missed, and then Fired again (TH 0-1) the next turn, and hit (5) to pin all three survivors of the Group. His Group A then Fired at my A (1) as well, but had no effect). I had no Rally cards left, and Group A surrendered.
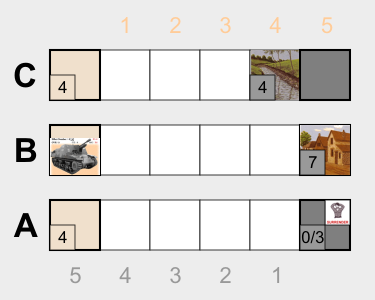
The ATR Fired again (TH 4) and missed. To my surprise, the Sexton then Moved forward, with no other movement to support it. The ATR tried again, before any move could complete (TH Black 3) and missed. The Sexton then moved onto a Hill, and his Group A Moved forward to join it at Range 1. The ATR took another shot at the Sexton (TH 3) and missed, and Patch’s A halted in some Brush. The ATR Fired again (TH 3) and missed. Patch’s Group C then started moving forward. My Group C Fired on them (1 – 1 + 1), but one of the rifles malfunctioned on the first RNC, reducing the Fire Strength to 0 (actually -1, I forgot the stream, while Patch forgot his cover from adjacent armor, so we were both off one for different reasons), though it still managed to pin one man (and still would have even if we had gotten it right). Patch’s C moved into -3 Buildings and Rallied while I repaired the rifle.

The Sexton then Fired on Group C (TH 0-2) and hit (5 + 1), pinning three men, and killing the fourth. I Rallied All to get the Group going again, and Patch Fired on them again (TH 0-3), malfunctioning the gun. My Group C finally got Moving again, successfully fording the stream. The Sexton failed to repair the gun, while C ducked into some -2 Buildings. The ATR Fired on the Sexton twice more (TH 3), and missed both times. Patch’s Group A Moved forward again, while the Sexton repaired its gun, and I got my C Moving forward again. Patch’s A stopped in some Woods, and the Sexton Fired on my C (TH 0-3), hitting (5 – 2 + 1) to pin my SL and kill another man. Group C ducked into more -2 Buildings (I should have been a card down at the end of this turn, but had forgotten that my SL was in that group by that point). I Rallied my SL, and Patch discarded some Wire on my Group B.

The Sexton switched Fire to Group B (TH 0-1) and hit (5 – 3 +1), pinning 5 men. I Rallied 3, and then Moved off the Wire (illegal with pinned men, but Patch didn’t catch it until slightly later, and I was thinking it analogous to playing terrain while pinned). The ATR Fired (which is when Patch noticed) (TH 3), and missed. The Sexton Fired back (TH 0-2) and hit (5 – 3 + 1), pinning four men and killing one of the pinned ones. I Rallied 2, and the Sexton Fired again (-1C; TH 0-1) and missed, and I Rallied 3 to get the entire Group going again. The Sexton Fired again (-3C; TH 1) and missed (thanks to the Concealment; he nearly had a +2 hit). The ATR returned Fire (TH 3) and missed. The Sexton returned that Fire (TH 0-2) and hit (5 – 3 + 1) to pin three men.

I had been considering moving B onto a Hill to get rid of the Hull Down (not that it had made a difference) and possibly get the rest of the oversized group into range for some Fire cards. Now that the Group was pinned, I Moved C forward instead. Patch discarded a Brush onto them in the hopes I’d reject it, but that was better than two Movement cards, so I took it and Moved up to Range 4. Patch’s C fired on my C (3 – 1 + 1) pinning my SL again (I’d still forgotten that my SL wasn’t the ASL in Group B), and Moved his Group A forward. Group C ducked behind a Wall, while Patch’s A moved into some -3 Buildings.
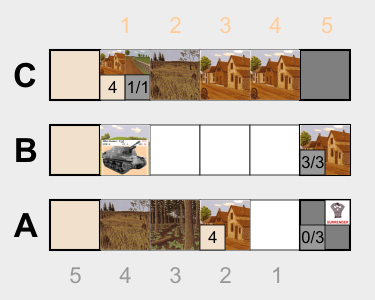
Patch discarded and then apparently realized that he’d missed a shot against my C, with the DC-toting man at Relative Range 5 and unpinned. Speaking of which, he then Infiltrated Patch’s B with the aid of a Movement card to pass the MC, and then passed the Infiltration check as well (got it wrong, but it would have worked anyway). Thanks to us being unfamiliar with Infiltration, DCs, and CC vs armor, we missed the fact that it the attack against the tank should have gone off right then. My Group B Fired on his A (2 – 2) but got no effect (every RNC was 2 or worse…). I finally Rallied the pinned men in B, and we figured out the goof on CC vs the Sexton, and resolved it (+4) and got no effect.

A Sniper forced the Sexton to Button Up, but they immediately Rallied to become CE again. I Rallied my SL in Group C, and then the Sexton Fired on Group C (-2C; TH 0-3) and hit (5 – 1 + 1 + 3) to kill the man who had been carrying the DC and end the game with my squad broken.

Afterword

In between our two games, I saw multiple references online that this scenario is unbalanced. And I can’t argue with that, since in both cases the attacker didn’t even take losses, though Patch made a decent try at running out the clock after killing the commander of my Sherman in the first game.

I’ve been thinking that splitting my Group A in half and put the other half in D. Either A or D would be at longer range to the Sexton, and the only way he could plow through a large group with that big 88mm gun and its ‘5’ effect would be B in the -3 Building. But doing anything effective would still require being able to maneuver, and not being able to draw any Movement cards for nearly half the first deck kept me from getting to cover, or to a range where the rifles could do anything. The ATR at least allowed me to throw a fair amount of Fire cards downrange, and even needing 4s and 3s to hit, I figure I should have connected at some point. Patch was worried he’d just get picked apart by all the Italians out there, but the lack of Movement played into his long-range strengths.

Getting into DC range added some nice excitement to the end of the game though; neither of us expected me to suddenly make it to RR 5. It’s a pity that I still needed a decent RNC to do anything, and couldn’t connect. Patch would still have easily won (off of VPs if not breaking me), but at least I would have vented my frustrations.

└ Tags: gaming, Up Front
 Comment 

Action-Hero Circus

by Rindis on March 22, 2017 at 12:00 pm
Posted In: Boardgaming

Back on Saturday the 11th, we had another group gaming day. There was only four of us (me, Dave, Mark and Jason), and we had decided to go for a round of Circus Maximus followed by other shorter games.

I had decided to go one fast chariot (+2 driver, fast team), and then a slower one that would be as aggressive towards the other teams as I could manage (I chickened out of a heavy chariot, and had high endurance and a 0 driver). The fast chariot rolled decent for the team, and I had a top speed of 22 (including the driver bonus). Only Dave’s red team had a comparable speed, and he did great maneuvering for the corners, gaining a small lead. My second team ended up as part of the main pack, but it never had a good opportunity to try and thin the competition for my lead team. In fact, that happened to just about everyone, and the first lap was fairly peaceful.

But not without incident. I started pushing my cornering speeds early, and my second team, with the slower speed, needed to do it more, with a lower skill…. My die rolls tended to alternate high and low, and while I never had trouble with my high-skill driver, my second team ended up taking a double-sideslip during this. During the second lap, I started getting opportunities. The main event was getting a chance to attack Mark’s lead chariot, and Dave’s lead chariot on the same turn as I came out of the initial turn of the second lap. Notably, I managed to injure Dave’s team to slow him down a little, and then I got him again at the end of the straightway. But, that became largely moot as Dave ended up getting trapped going into the the third lap, and had to brake hard to avoid a crash, and wasted a turn between that and being trapped in the 8-speed lane partway into the turn (he had otherwise been positioning properly to go through the turns cleanly on the 8, which is why he had been in the lead.

Mark was the only one close to my lead chariot after that, and he couldn’t keep up with my high speed. My endurance on that team was low, and I burned through the last of it on the final stretch, but otherwise there were no problems. Meanwhile, my second chariot was still struggling for position, and went into the final turn at 2 over speed… and rolled a 17 to flip the chariot! My driver stayed with the team, but expired as they crossed the finish line.

Final placing:

1 James
2 Mark
3 Jason
4 James Wrecked—Dead
5 Dave
6 Dave
7 Mark
8 Jason

Mark had brought over Betrayal at the House on the Hill, and we tried that out after lunch. Jason was the only person completely unfamiliar with it (Dave had seen the episode of TableTop with it, and I had seen part of a game at a con), and got confused when he ended up being the Haunt. But it wasn’t too hard to set things up for that. The Haunt ended up in the basement, where two of us were, and I had just gotten the spear, and was going to try confronting him on my next turn.

But first, Dave’s character decided he was an action hero. He went into the collapsed room to leap from the top floor to the basement, confronted the Haunt, defeated it, and solved the final problem after that, all in one turn.

Past that, we tried a round of Forbidden Island, and being nearly out of time, hurried through any explanations. We had just enough time to lose due to one of the tiles with a treasure disappearing.

└ Tags: BatHotH, Circus Maximus, Forbidden Island, gaming
 Comment 
  • Page 173 of 315
  • « First
  • «
  • 171
  • 172
  • 173
  • 174
  • 175
  • »
  • Last »

©2005-2026 Rindis.com | Powered by WordPress with ComicPress | Hosted on Rindis Hobby Den | Subscribe: RSS | Back to Top ↑