Rindis.com

All my hobbies, all the time
  • Home
  • My Blog
  • Games
  • History

Categories

  • Books (504)
  • Comics (10)
  • Gaming (918)
    • Boardgaming (674)
      • ASL (155)
      • CC:Ancients (83)
      • F&E (78)
        • BvR – The Wind (26)
        • Four Vassal War (9)
        • Konya wa Hurricane (17)
        • Second Wind (5)
      • SFB (78)
    • Computer games (162)
      • MMO (77)
    • Design and Effect (6)
    • RPGs (66)
      • D&D (25)
        • O2 Blade of Vengeance (3)
      • GURPS (32)
  • History (10)
  • Life (82)
    • Conventions (9)
  • News (29)
  • Technology (6)
  • Video (50)
    • Anime (48)
  • Writing (1)

Patreon

Support Rindis.com on Patreon!
Become a patron at Patreon!

Other blogs:

RSS Inside GMT

RSS Playing at the World

  • Playing at the World 2E V2 Arrives May 5, 2025

RSS Dyson’s Dodecahedron

  • Red Knife Hole July 13, 2026

RSS Quest for Fun!

  • The Expense Post May 24, 2026

RSS Bruce Heard and New Stories

  • Pain, Exhaustion, and Morale in D&D BECMI June 7, 2026

RSS Chicago Wargamer

  • The 2 Half-Squads - Episode 310: Cruising Through Crucible of Steel January 27, 2023

RSS CRRPG Addict

  • Al-Qadim: Over, Sideways, and Under July 13, 2026
SF&F blogs:

RSS Fantasy Cafe

  • The Leaning Pile of Books July 5, 2026

RSS Lynn’s Book Blog

  • Top Ten Tuesday: Books I Want to Read by New to Me Authors  July 14, 2026
ASL blogs:

RSS Sitrep

  • Cardinal ASL Sins March 18, 2026

RSS Hong Kong Wargamer

  • FT114 Yellow Extract After Action Report (AAR) Advanced Squad Leader scenario April 16, 2025

RSS Hex and Violence

  • This still exists? March 25, 2025

RSS Grumble Jones

  • Grumble Jones July Scenario GJ162 You Will Engage the Enemy July 1, 2026

RSS Desperation Morale

  • How to Learn ASL March 16, 2025

RSS Banzai!!

  • October North Texas Gameday October 21, 2019

RSS A Room Without a LOS

  • [Crossing the Moro CG] T=0902 -- Rough start July 18, 2015
GURPS blogs:

RSS Dungeon Fantastic

  • Felltower - Monsters Fleeing between Sessions vs. PCs replenishing June 28, 2026

RSS Gaming Ballistic

  • B-Scale at the Table July 13, 2026

RSS Ravens N’ Pennies

RSS Let’s GURPS

  • Review: GURPS Realm Management March 29, 2021

RSS No School Grognard

  • It came from the GURPS forums: Low-Tech armor and fire damage January 29, 2018

RSS The Collaborative Gamer

  • Thoughts on a Town Adventures System January 18, 2022

RSS Don’t Forget Your Boots

  • GURPS Supers Newport Academy #7: “Invitation to the future.. of the 1970’s” July 5, 2026

RSS Orbs and Balrogs

  • Bretwalda - Daggers of Oxenaforda pt.4 - Fallen King May 27, 2017

PBr CG I “Who Are These Devils?” — July 14 Night

by Rindis on July 5, 2012 at 12:00 pm
Posted In: ASL

[Previous Date: 14 PM]

With British reinforcements due the next morning, my only hope of keeping them from just walking into the main part of the map, and sweeping me off with way too many troops was to use my second (and last) ‘attack chit’ in a night attack to try and take the town. With my purchase limits and the severe German losses in the afternoon, there was a very real chance that I just wouldn’t be able to do it. However, an odd wrinkle of the CG is that the British withdraw everything after the night scenario and have to purchase a new OB. These troops can be put into any portion of his legal setup area, such as the town. But there’s a pillbox at the north end of the bridge. If I took that, then anything he wanted to setup north of the river would have to roll for potential casualties, so it was a main focus of my plan. We got started in September 2007…:

Okay after spending a RePh trying to find the purchase points for some confidence, we started the 14N German Assault on the village tonight.

Not a lot going on yet as the scenario is pretty clunky with lots of Cloaking counters to try and remember the contents of.

Even with the better movement of Cloaking counters, going is very slow as I have to AM my way through a very lit up area.


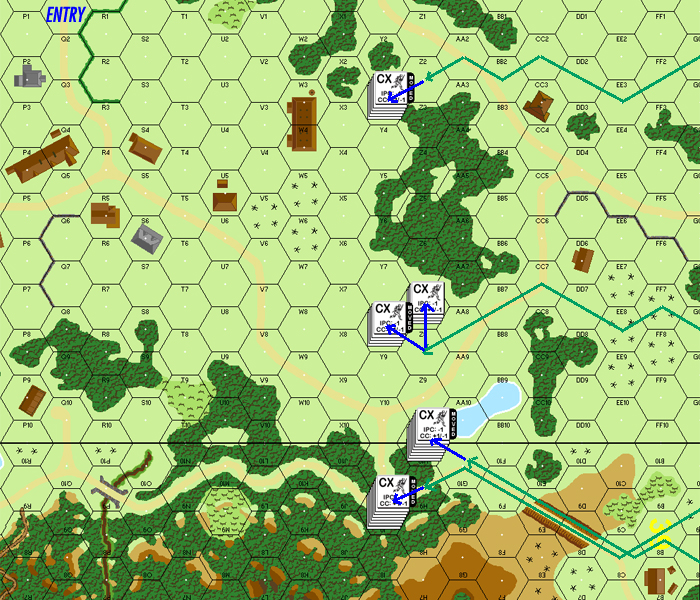
Situation as of AFPh, German Turn 1.

Taking a while for us to remember the Night rules again too. I did some illegal fire before we remembered NVR. Fortunately(?), I missed.
↓ Read the rest of this entry…

└ Tags: AAR In Progress, ASL, gaming, Journal 6, PBr campaign
3 Comments

PBr CG I “Who Are These Devils?” — July 14 PM

by Rindis on June 28, 2012 at 12:00 pm
Posted In: ASL

[Previous Date: 13 N]

In the Primosole Bridge campaign the Axis gets three ‘attack chits’; that is they get to declare three attacks during the campaign. It is obvious that the idea is to give the Axis two-three attempts to push the British forces back south of the river before reinforcements come up and put the Axis solidly on the defensive (and maybe one chance at a later counterattack). I made my purchases, planned out what I was going to do in the morning after the paratroops and gliders came in… and chickened out. I really didn’t think I had what it took to take on the existing British forces. So I went idle for 14 AM, bought more troops, and attacked in the afternoon. For us, the scenario took about a month and a half, starting in July 2007…:

And they’re off!

Just sent the first log file of 14PM off. Not going to be too much going on as the main force blunders through a lot of vineyards and olive groves.


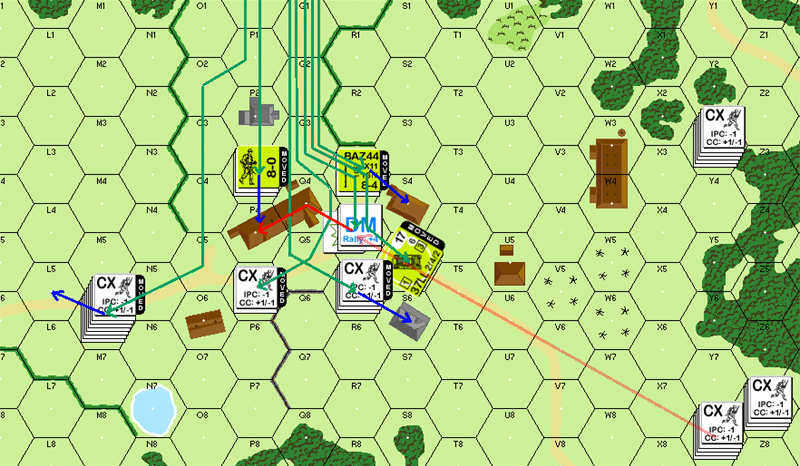
Situation at beginning of 14PM.


Patch’s immediate comment was:

“I was most certainly expecting more units from the east. Going to be a tough fight.”
↓ Read the rest of this entry…

└ Tags: AAR In Progress, ASL, gaming, Journal 6, PBr campaign
2 Comments

J98 Lend-Lease Double Attack

by Rindis on June 24, 2012 at 10:23 pm
Posted In: ASL

Patch came over yesterday for some ASL. It was also my birthday on Friday, so he came over with a cake and a gift: a Sniper effects die from Battle Dice. (They actually come in pairs, Patch kept one and gave one to me.) It’s very attractive, and is supposed to be a precision die, though our first three Sniper checks of the day coming up ‘6’ didn’t exactly endear us to them. 🙂

Anyway, we hadn’t gone into the scheduling with any great plans, so only after a number of suggestions came up with J98 “Lend-Lease Attack” from Journal 6. It seemed nice and quick and small, despite covering all of two boards. We hadn’t come up with any decision on sides, so when I was early getting everything ready, I went ahead and started pushing around the defending Germans.

I immediately started realizing that it is a deceptive scenario. The Germans have a small infantry force (3.5 squads) and two Tiger Is against a small Russian infantry force (4.5 squads), and 6 AFVs—four lend-lease Shermans, and two SU-85s (and a pair of lend-lease trucks transporting the infantry). So, the armor battle is going to be a large part of the scenario. 3:1 odds isn’t good, but the Tigers have the ability to really dominate the Russian AFVs. However, the SU-85s are a real threat, and all four Shermans automatically have Gyrostabilizers.

The real problem is the setup area. The Germans are confined to hexrows G-O of board 4, while the Russians enter at the far end of boards 4 and 19 (half of their force on each of the narrow-end roads), and need to exit off A hexrow of board 4. Not only can the Germans not setup to directly challenge the board 19 advance, but there’s a six-hex gap between the edge of the setup area and the exit area. Overlay Wd5 is placed so as to help block off this area, but there’s a very real possibility of exiting in two turns after going around the Germans. The good news is that with 28 VP needed to win, that force can only generate 24 EVP this won’t be enough, but the Russians also get CVP from any Germans they kill….

A lot of my worries centered around that loose flank, and since I figured most any dash for the exit would probably go through the gap between the board 4 woods near the I1 road and the overlay wood, and any breakthrough on board 4 had a decent chance of going down the center, I placed the one German HIP halfsquad with the PSK in 4G3.


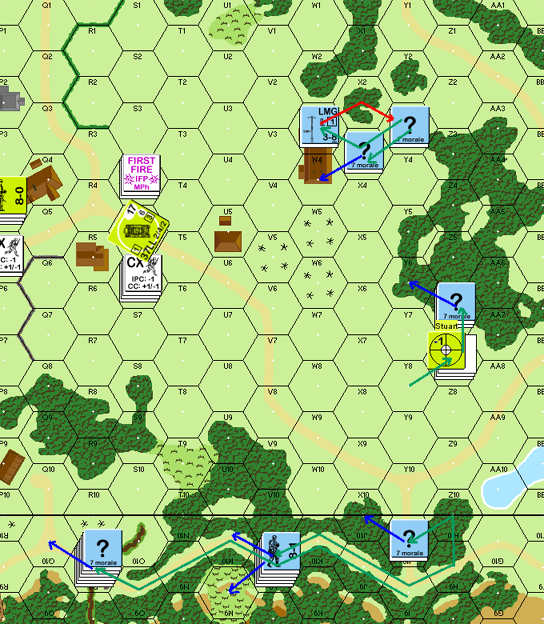
My approximate setup.

Patch arrived, and we got down to business. Patch figured that Russian success rested on knowing and using the abilities of the Russian tanks to the fullest, so everyone came hurrying on board CE, and the Shermans stayed in Motion.

Back in the early-90s when I initially played a bunch of SFB, Colin (who was very good) could send me into analysis paralysis fits where I had zero options I liked. Since getting back into SFB, I haven’t really had that problem. Admittedly, I haven’t played against anyone nearly as good as Colin was, but my ability to work out a plan of action and commit to it seems to have gotten much better. I’m not at that point yet in ASL. I think I spent half an hour trying to find a way for the Tiger tasked with holding down the board 4 side to engage against three AFVs with nicely interlocking fields of fire. I eventually sent him forward into the grain in front of building P6, using the building to guard against rear shots. I initially tried to engage a Sherman before realizing that with it In Motion it would just move out of LOS before I could shoot on his turn.

Meanwhile his infantry had unloaded near 4V3 and 19M9. A SU-85 had stopped on the orchard road on board 19 and placed an ACQ on 19I10, daring the Tiger next door to come out and engage the two Shermans just out of view. I refused and relocated to J1 (not sure which) and tried to engage his infantry and truck. A lucky shot from O5 broke a squad of his in V1. A little pressure abated.

Turn 2 got very exiting as the SU-85 on board 4 tried to take out the Tiger.

Fire — 3! ROF! Bounces off the turret!

Fire — 3! ROF! Bounces off the turret!

Fire — 2! Critical through the hull and the Tiger burns!

It was a whole turn later before I remembered my SAN was 3. If it had gone off, the SU-85 was a very likely target for where the Sniper currently was. Oh well, it was just way too exciting for such small things.

Being down a Tiger that early was certainly off-putting, and it took a while to get my composure back. But it is 1944, I have 5 panzerfausts available, if I can just get infantry in range. Also, while Patch had early on pointed at each of my concealed stacks, and correctly identified them (with that few troops, what else were they going to be?), he had started muttering about my flank being wide open… and I realized that he was convinced that the PSK was HIP (true) somewhere around M8 (way off). He was thinking in terms of outflanking my forces on board 4; I had been worried about an unopposed dash for the exit (/getting taken from the rear from board 19). As long as he stayed away from M8, and didn’t suspect the G3 area… something might be done.

The infantry fight devolved into a kind of brawl in the M1 area. I had to reshuffle constantly to try and fight him off. My remaining Tiger relocated to J5, where it could try and hold off the onrushing forces on board 4, and have a safe back. Patch sent a Sherman around from board 19 through the gap, closer, closer, almost… now! Panzershreck shot at range 2 through the rear, hit, burn!

That was satisfying.

I don’t remember the rest of the scenario all that well. I put up a pretty good defense, considering, though Patch broke my main 8-1/LMG/467 stack, and later surrounded it for a FtR kill. He won fairly easily with a good number of CVP points rounded out by a few EVP. Despite a slowish start, we made good time, so we switched sides and tried it again.

And then things got crazy.

Patch’s set up held to roughly the same patten as mine, though the main LMG stack was in O6h1 (why didn’t I think of that?) and the Tigers started in woods (at O5 and J4, I believe). My turn 1 approach was largely the same, though I think my infantry and SU-85 on board 19 ended up a bit further back than Patch’s did. On his turn he sent a concealed HS around the M1 woods area into 19O8, adjacent to the parked SU-85 in N7. As soon as it started there’d be a PK shot, and I’d likely be out one of my bigger threats against the Tigers. I had a squad adjacent and Preped; no luck.

I turned my attention to swarming everything else on the board. Tiger J4 had moved forward to L1, to pick on the Shermans crossing board 19, while the other was where it started. I sent a Sherman around the south end to get behind him… and sure enough, there was the HIP HS and PSK in M8. PSK shot… miss! Time to beat tracks. I got behind O5, and Shocked him. Patch had Final Fired O6 trying to get the Sherman (CE, thanks), and I sent a squad and leader in to CC the incapacitated Tiger. I then sent a Sherman behind the other Tiger, and it whipped around and killed it.

The other available Sherman moved up to engage, and I think… neither of us did anything, though Patch was able to turn back about to face it. And then… the SU-85 started. PF Check: yes! Fire… miss! Oh, thank goodness. Second check (squad)… Pin! Leader check… no.

Again, my memories are a bit muddled after this, but there was certainly some excitement to go: I killed the Shocked Tiger in CC, I advanced into CC with his SU-hunter squad. That last CC ended up lasting the rest of the game, drawing in more and more units from each side.

Patch’s PSK HS broke to my Sniper. I forget what I rolled a ‘3’ on, but Patch’s Sniper hit my Sherman in the center of board 4 for a Recall. I also managed to disable the MA on the board 4 SU-85. Two more vehicles down… not good. Patch’s units in O6 advanced in to CC with the squad that had taken out the Tiger. My Sherman facing down his Tiger malfunctioned it’s MA on IF. Then Patch disabled the MA on the Tiger. (Yes, we Recalled three out of eight AFVs in one scenario….) That ended it as a threat… but left me with a problem. I was running really thin on points, had lost a fair number of units. If I was going to win, it would really hard to do it without the points for killing the Tiger before it exited.

The CC in O5 took a while to resolve. He eventually got me on a ‘2’ and generated a new 8-1 leader. At the same time, I managed a CR on him and Random Selection killed the existing 8-1 leader in the hex. I poured another squad into the 19O8 CC and lost my 7-0 and a HS. Patch started rushing the victors of O5 to O8, but before he could get there I rolled a ‘2’, generating an 8-1 who joined the squad that he’d just reduced, saving it, while ending the CC. (Patch had also generated an 8-1 in the first game, so that’s three for the day….)

The Tiger set off for the friendly board edge, which is the entire west edge, so the shortest path actually led into board 19. I was unable to get a kill (this might actually be where I Recalled the SU-85…). After some frantic searching around, the thing to do was to take the remaining SU-85, park it on his exit path, and see what could be done. It came down to the MPh where he’d exit… the first shot missed or bounced, leaving me with a IF shot to salvage things with. Patch advised trying APCR at short range as the To Kill picks up nicely at two hexes or less (I should know that, but hadn’t thought of the ASL implementation of APCR in some time), I was pondering a side shot as he went by for reduced armor, despite the +3 CA change. I opted for both. Side shot with APCR; if that hit, that should be a kill, if I didn’t have any, I get a second chance to hit…. APCR fire! Hit! Dead!

And for the first (and only) time that day, it was not a burning wreck. The crew bailed out, PF check… no. PAATC… yes. CC… no. (whew) I sent the Sherman with the bad MA around to try and break crew while the SU desperately fired at point blank for the same thing (I liked my CC chances much better than starting, taking them out of Melee and trying another PF Check.) The crew finally broke during Patch’s next turn, and after that it was time to drive off into the sunset. Between the Tiger kills, CC kills, a HS I got for FtR, and exit, I actually ended up in the mid-30s, though for a long time our calculations were showing that I’d get 29 VP (out of 28 needed) if everything went right.


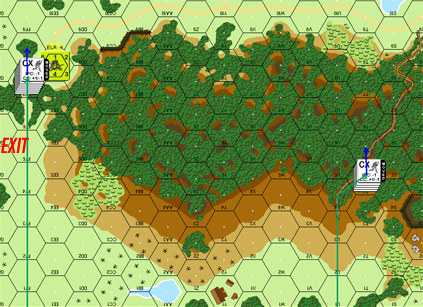
End of the second game.

It’s a great scenario. Despite two Russian wins it seems to be pretty balanced. The Germans have the tools for the job, it’s just getting the job done is very rough. But,  While I was setting up the first time, I had been considering actually keeping the Tigers together and double-teaming any one particular point that looked vulnerable. Patch was thinking along the same lines after his try as the Germans, so I think it bears exploring. At any rate, the scenario will generate a lot of improbable stories if our experience is any guide.

After that, we went out to Mongolian barbeque for a birthday dinner, and then came back for cake.

Thanks Patch! ^_^

└ Tags: ASL, gaming, Journal 6
2 Comments

PBr CG I “Who Are These Devils?” — July 13 Night

by Rindis on June 21, 2012 at 12:00 pm
Posted In: ASL

When Patch and I started playing through the scenarios from Pegasus Bridge, the intention was to follow them up with an actual Campaign Game from that product. However, by the time we had gotten through them all, Journal 6 had come out, with its own mini-HASL, “Primosole Bridge”. I was enthused by it, and talked Patch into getting a copy, and instead of playing a campaign game with British and Germans fighting over a bridge in Normandy, we played one with British and Germans fighting over a bridge in Sicily a year earlier. The original AAR was one big thread for everything, but I’m splitting it up into the various ‘dates’ here, otherwise it’ll be too long even for me. We got going in May 2007…:


And this one is likely to go on for quite a while. Patch and I just started the full 12-date CG for Primosole Bridge from Journal 6. I’m taking the Italian & German forces.

It’s going slightly slowly for us at the moment. It’s been a decade since Patch has played with Night, Gliders or paradrops, and it’s my first time for all three. However, the unit density for the initial scenario is low enough (compared to PB6) that once we’re past the night rules questions it should move pretty fast.

The initial scenario seems like it would make an interesting regular scenario, with a German convoy showing up in the middle of the Brit paratroopers taking out the Italian garrison. Setup was complicated for both sides, and odd for me, since the normal night options are in turn restricted by the fact that I have to be adjacent to the paved road and in a pillbox or building. And all the pillbox and trench locations are specified, so I didn’t bother HIPing them, as it’d only force Patch to re-read the SSR as he moved.

One turn into the date, and not much has happened north of the river. The paratroops scattered all over, and should be about to head for C Di Stephano.

The gliders landed in the south, and he got his reinforcements on turn 1. Not exactly what I was hoping for. However, Things have gone decently well. He discovered a minefield by losing a HS to it, and the losing the other half of the squad as they tried to rout out of it. The M23 pillbox’s MMG managed to nail a stack of his during my turn, breaking a 8-1 and two 648s. He managed to self-rally one of the squads on his turn and get the leader out of DM, so I’m not keeping them down for long. Meanwhile a lowly 346 squad has managed to keep another squad in melee for two CCPhs despite being Ambushed. I moved another group from O24 to the north end of the bridge. I did this in full (concealed) view of Cloak ‘A’, so I’m starting to wonder about him….


Situation south and around the bridge, beginning of British turn 2.


Town and British landings, beginning of British turn 2.

The really troublesome news is that the NVR has already gone down to 2, and I have yet to get a starshell off. Three attempts, and I think they were all 5s. This means he could get scarily close to the town north of the bridge before I see him.

We’re using the PBr VASL map available for download here, but we’ve noticed that the game-internal hexgrid has trouble. Much of it matches, but right at hexrow ‘O’ it suddenly shifts off a hex….
↓ Read the rest of this entry…

└ Tags: AAR In Progress, ASL, gaming, Journal 6, PBr campaign
1 Comment

T1 Gavin Take

by Rindis on June 14, 2012 at 12:00 pm
Posted In: ASL

Every once in a while, I get ambitious enough to cast around for a PBeM game of ASL against someone other than Patch. I wish he’d do the same, I’d like to see how he fares against someone other than me. Of course, if he consistently loses, that could get depressing. So, here’s my first completed game against a different opponent after I met Patch from April 2007:

I advertised for and got a second PBEM game a couple weeks ago. My esteemed opponent, Giasone, “–g–“, from Italy has taken the Americans in “Gavin Take” from ASL Classic. Progress is slightly slow, but we’re certainly far enough in for it to be interesting.

This is my second time playing this scenario. …But I can’t remember the first time at all. Patch had to remind me of the fact that we did do some face-to-face games.

I’ll freely admit I glanced over the scenario analysis in ASL Classic before doing my setup. My defense is inspired by it, but wasn’t dictated by it.

g’s opening seems fairly typical, so far he seems mostly intent on going around me, and getting established south of town before I can shift too much that way. The worst thing is that I’m committing silly rules errors that I should know better on.

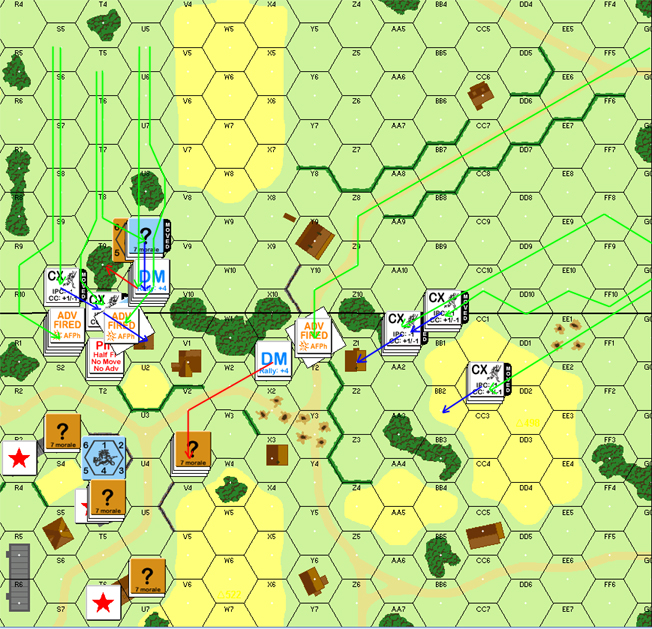
Situation at beginning of German Turn 1, showing later movement (blue) and routs (red).

It’s been a mixed bag, he’s scouting aggressively with HSes, and I’m shooting at everything in sight. Thankfully my Prep took out both squads that he left on the hills. I tried to get the leader in W5, but only pinned him and then turned him heroic (which un-pinned him) on a MMG rate-tear. But now he’s back for more.

After playing the Brits for so long I’m having to continually remind myself to watch for cowering….
↓ Read the rest of this entry…

└ Tags: AAR In Progress, ASL, Classic ASL, gaming
 Comment 
  • Page 248 of 315
  • « First
  • «
  • 246
  • 247
  • 248
  • 249
  • 250
  • »
  • Last »

©2005-2026 Rindis.com | Powered by WordPress with ComicPress | Hosted on Rindis Hobby Den | Subscribe: RSS | Back to Top ↑