
T1 Gavin Take
Every once in a while, I get ambitious enough to cast around for a PBeM game of ASL against someone other than Patch. I wish he’d do the same, I’d like to see how he fares against someone other than me. Of course, if he consistently loses, that could get depressing. So, here’s my first completed game against a different opponent after I met Patch from April 2007:
I advertised for and got a second PBEM game a couple weeks ago. My esteemed opponent, Giasone, “–g–“, from Italy has taken the Americans in “Gavin Take” from ASL Classic. Progress is slightly slow, but we’re certainly far enough in for it to be interesting.
This is my second time playing this scenario. …But I can’t remember the first time at all. Patch had to remind me of the fact that we did do some face-to-face games.
I’ll freely admit I glanced over the scenario analysis in ASL Classic before doing my setup. My defense is inspired by it, but wasn’t dictated by it.
g’s opening seems fairly typical, so far he seems mostly intent on going around me, and getting established south of town before I can shift too much that way. The worst thing is that I’m committing silly rules errors that I should know better on.
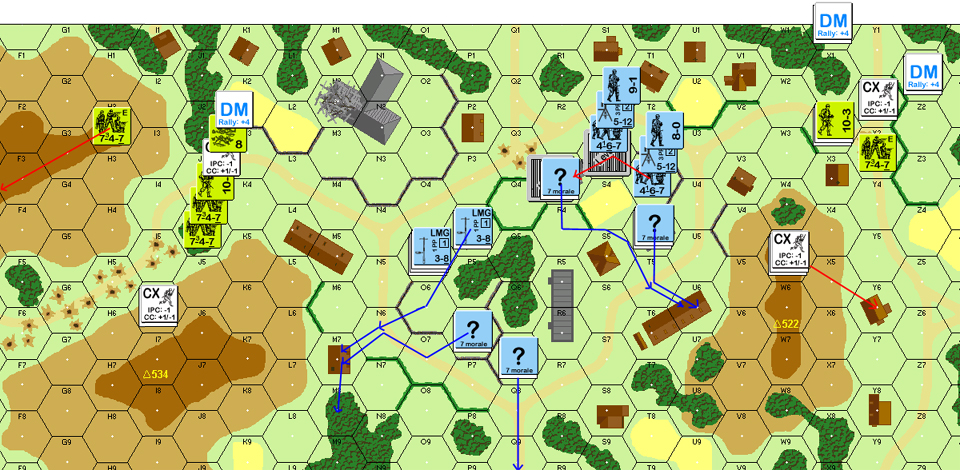
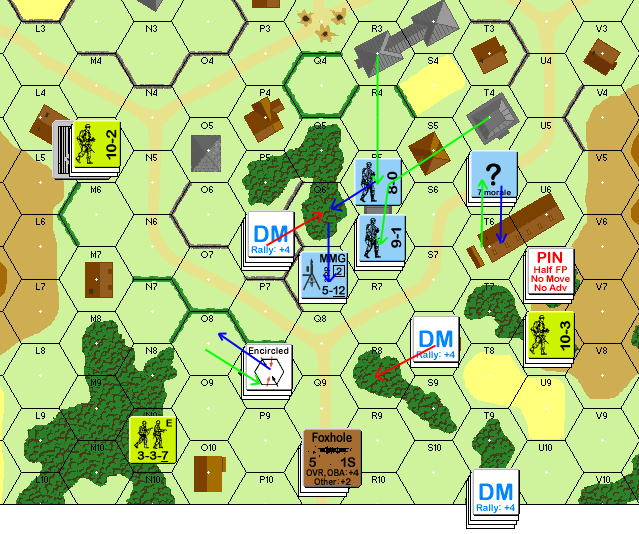
Situation at beginning of German Turn 1, showing later movement (blue) and routs (red).
It’s been a mixed bag, he’s scouting aggressively with HSes, and I’m shooting at everything in sight. Thankfully my Prep took out both squads that he left on the hills. I tried to get the leader in W5, but only pinned him and then turned him heroic (which un-pinned him) on a MMG rate-tear. But now he’s back for more.
After playing the Brits for so long I’m having to continually remind myself to watch for cowering….
applecatcher4 commented:
“Hi”
“I played this recently but as the US. I enjoyed building up some poweful kill stacks and was able to win in the end after many ups and downs. I was lucky in that his fire just seemed to create heroes. “
“A good tip for your opponent is to use spraying fire with those -2 and -3 leaders, preferably with plenty of firepower. I don’t really have any advice for the Germans except don’t let him use those amazing kill stacks on you.”
And SamB joined in:
“This is a great scenario, and IMO one of the best for an infantry only intro to ASL.”
“You let him get a squad (CX) to the top of the hill in W5 on turn 1????”
“Did he try for infantry smoke to mask his movement down the Y1 road?”
“Great scenario. I have lost it in spectacular ways against new players … :D”
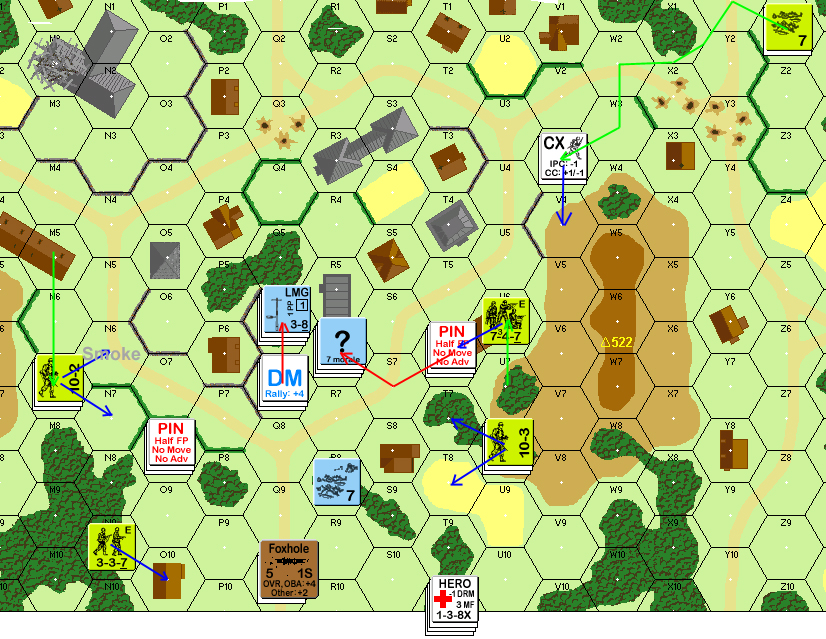
Squad and 8-0. Probably helps that my fire discipline is not the best. But he smoked Y2, and sent this group in bypass of Z1 to X4 and advanced to the hilltop.
The nice thing about this scenario is that the American has so many options on how to proceed. German options at the start are a bit more limited, especially by having to cover all the bases.
And darnit, board 3 is especially nice.
-.-; Right now, I just have to deal with the fact that he’s getting around me faster than I hoped. I may soon prove that I can loose against people other than Patch.
Patch:
“That’s the spirit!”
Thanks. for the vote of support. ^_^ Hey, wait…. >.<
Just going into my second turn.
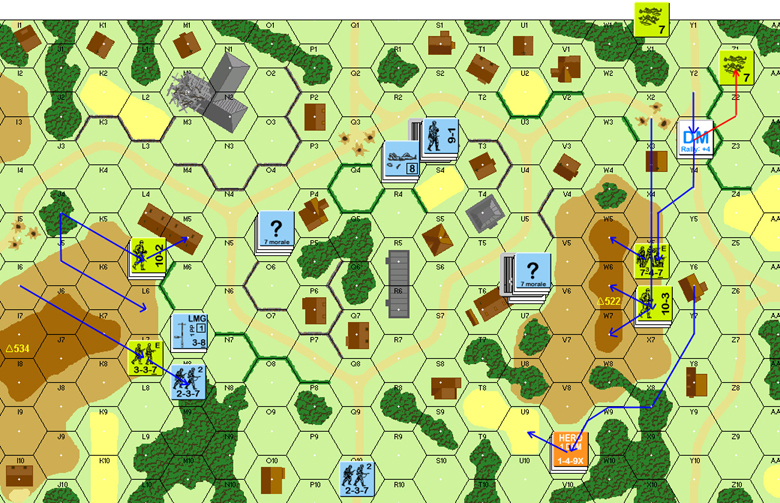
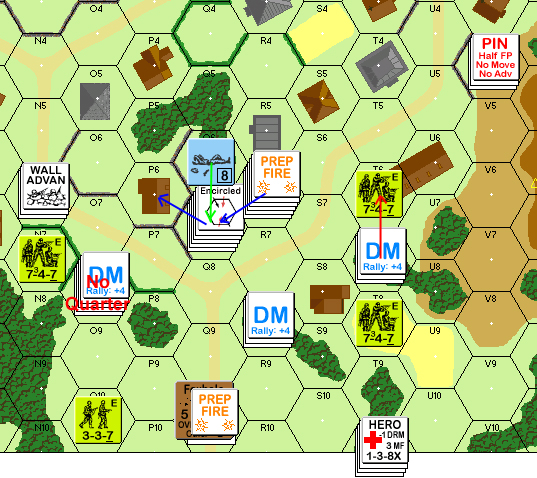
Situation at end of MPh, American Turn 2, showing movement, advance and rout.
Not as good as I might hope. I’m happy with the west side of town. We have a HS Melee in M8, but everyone else is in M5.
The east side of town is downright dangerous, with him advancing onto the entire hill crest. I’d like to sweep him back off the hill, but that requires more people than I can spare. The main dilemma is how to get a few people where I want them.
The good news is that there are currently 2 1/2 squads of GIs lying around in places where they will need time to get back in the fight, even if they Self-Rally. If I can get myself back together, that’ll be a big help.
Thankfully my dice are somewhat better than my mastery of the rules….
Turn 2 German was pretty quiet. I reshuffled my force, we both fired what we could, and no one cared….
Situation end of German Turn 2 MPh, showing movement and advance.
I was proud of the idea of maintaining concealment with U6, AMing him downstairs, firing, and them advancing into T6, where there was no LOS, giving him concealment again.
Sadly, the predictable happened, and the lopsided Melee in M8 ended with no American casualties.
For turn 3, the GIs immediately came off the top of the hill. Predictable enough, but it does relieve some worries I had, as units on the west side of town could have trouble routing with them visible to nearly everyone. G continued to do a good job maneuvering without giving me many shots. In DF, I did find a shot from Q7 to T9 that broke the squad and double-wounded (without killing) the heroic 8-0. Still can’t quite get rid of him…
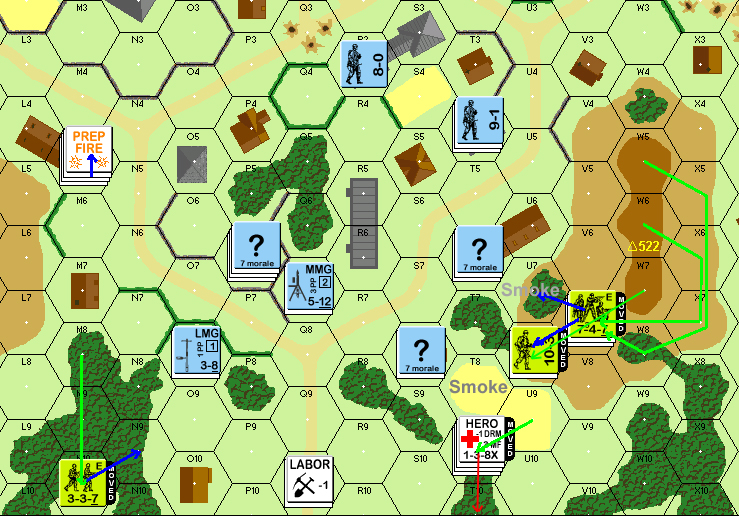
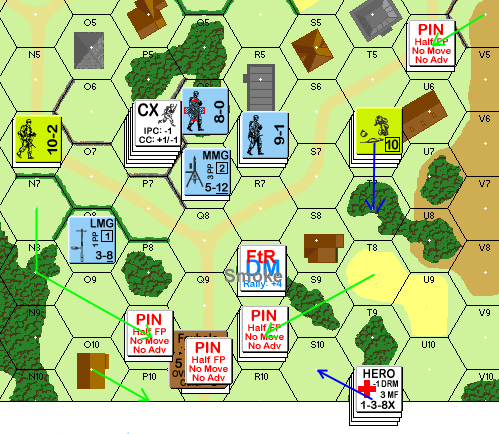
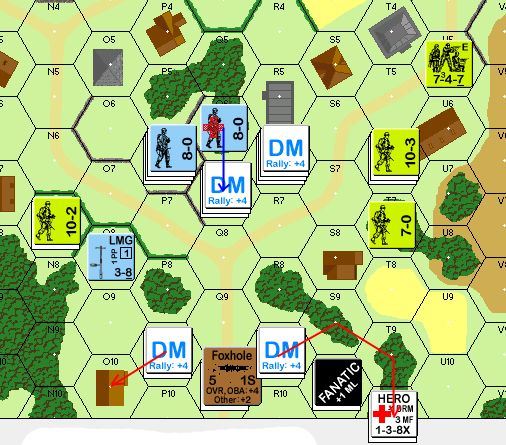
Situation end of American Turn 3 DFPh, showing movement (green), smoke usage, rout (red) and advance (blue).
My Turn 3 was relatively boring. The Americans are largely close to the exit point, but aren’t actually there yet. With another turn or so’s delay, it should start getting mighty uncomfortable for them despite the advantages in firepower and leadership. I moved the other MMG down to cover the exit area, and the HS in Q10 finished digging a foxhole from which to be annoying.
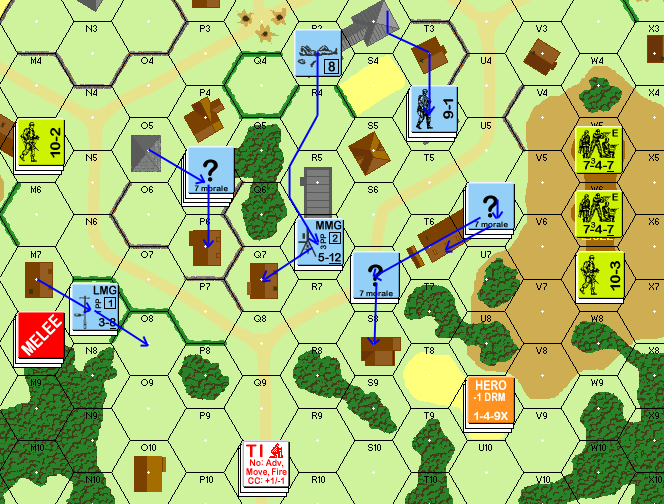
Situation at the end of German Turn 3 AFPh, showing movement, routs, and advances.
The 10-2 did manage to break the P7 group, which while not critical, does give him less to do on that end of town, and made my defense even more compact.
Turn 4 has not been so kind to me. In fact, I may put in an official application of being diced soon. First he finally self-rallied one of his outlying squads. This is expected, but the fact that he didn’t manage it on his last two attempts has been a great relief for me. On the other hand, my just-broken squad in to Q6 recovered (if I’d only known…).
Situation at the end of American Turn 4 AFPh, showing movement and rout.
The best I could manage during the turn were a couple of PTCs that did nothing. His fire did much better. He did pin a couple squads. But the real problem is that his advancing fire from M7 at Q7 got a K/2. Random selection was kind, picking the squad. Then both units rolled 12s, eliminating the remnants of the squad and turning the 8-1 into a wounded 8-0….
Not liking the odds in T6, I self-broke the pinned squad and routed to R6. It turns out that G had already plotted his AFPh and the CCPh in the hopes that I would still be there. not only did I save my guys, but I denied him a new 7-0 by routing out.
applecatcher4 spoke up again:
“Am enjoying the unfolding drama. AAR in this drip feed fashion are great. Well done being bothered.”
Thanks! I like AARs, but managing to put together a coherent one after a long-running PBEM game was nearly impossible, so I went with the “in Progress” series. With this being a small scenario, I’m experimenting with more detailed reporting. Kind of a Series Replay with pictures substituting in for the columns of moves and DRs. I’m definitely happy with the last couple turns worth with the separate colors for movement and advance.
If you have any suggestions on the reporting, mention them, and I’ll consider it. ^_^
Sneak preview: I got lucky at the beginning of my turn, pushed my luck, and the dice immediately went cold. >.>
Sorry for the lack of update. Hadn’t realized just how much more had happened already.
My turn 4 started off poorly when my nemesis, the Heroic leader in T10 rallied a squad, making him Fanatic in the process. Then my first prep fire shot got lucky, and I broke the 10-3 and the squad with him. After some punishing die rolls on the previous turn, I felt that my luck was turning and took a couple of other shots that I wasn’t planning on. The dice rewarded me by instantly going cold, and making me wonder if I hadn’t just thrown away my best chance to get a win.
He broke the squads guarding the exit area. One was stuck where it was, the other was eliminated for FtR/No Quarter.
Situation at end of German Turn 4 AFPh.
The American Turn 5 went better. He got a new 7-0 leader in T6 after failing to rally the 10-3. Prep fire pinned the HS manning the exit foxhole, but didn’t break it. They managed to eliminate a HS that moved adjacent. He then managed to get two more squads adjacent. Covering fire pinned one, and FPF from the HS pinned the other. My MMG in Q7 ended DFPh with Rate, but nothing in LOS.
Situation at end of American Turn 5 AFPh.
This left me in a fairly desperate situation. My HS was still blocking the exit, but there was a lot of FP in adjacent to him….
The next post will probably carry through to the end of the game. We’re just finishing up my Turn 5 now.
“ok!
“this one is over.
“thank to Rindis for the nice game.
“here is the full report in open office calc – zipped (if all works fine).
“cheers!
“g”
My Turn 5 was boring from a maneuver point of view again. Everyone was pretty much where I wanted them, I just had to prevent the Americans from getting where they wanted.
So I prep fired everything that was left.
This paid huge dividends, breaking both squads that were adjacent to my HS courageously defending the exit. Sadly, his return fire was almost as bad, breaking the Q7 and R6 MG nests.
Situation at end of AFPh, German Turn 5.
Under normal circumstances I would have pulled the brokies back to Q6. But with only one more turn, I kept them up front, provided everyone with a leader, and hoped for good dice.
The dice did not deliver, so I started Turn 6 with just a squad+leader+MMG+LMG in P6 and a HS in Q10.
G prepped S10/T10 to no effect, and then eliminated the HS with N7. He then moved the 10-3 and a squad into Q6 and attempted to smoke my last remaining GO units in P6. That failed on a ‘6’. So he took another squad to R7 and attempted to smoke Q8. That failed on a ‘5’.
It should be noted here that these are the only times during the game that he attempted smoke and failed.
This left him to try running the one last available squad through my fire to attempt a win. It reached R9, took a 8FP -2 and was KIA. G, understandably, surrendered at that point.

Situation at end of game.
I would like to thank g for an eye-opening game, as well as putting up with all my rules muffs!
My general strategy going into this was to try to pick off any squads that did not have immediate leader support. There’s no time to go back for them, and as seen here, once the numbers are down, it’s easier to manage the Americans. I’ve learned the hard way that squads stacked with 10-morale leaders are really tough to hurt, so for the most part I didn’t try. That makes it ironic that my best break in the late game was actually breaking the 10-3 and squad on turn 4. It also paid off in that only one of five American squad self rally attempts actually succeeded.
Now that the game was over, -g- did a series of posts of his thoughts on the course of the game, and asked, “Can someone explain me why, when and how I lost this game?”
“My setup was intended to be as adaptable as I could make it.
“My leading mind was to go as far as i could along the side of the hill, on my left wind, and to get at the SO hill on my right one.
“Having the chance, I was going to put my fire groups to hold enemy parties in place and hinder their moves.
“But I don’t like to send on big stacks early in the game, ‘cos a bad roll on ldr MC can easily put 3sqs’ stack at the bay (a llmc at -2/-3 is to roll 5/4 or less on 3sq after rolling for the results that harmed the leader himself)”
“So on my left I satup Ostberg, two squad and two halfsquad with a third squad in reserve.
“On my right Maloney heads the column leading the first platoon, followed by Gavin leading the second one.
“Here a scouting party was almost granted by two possible checks. And so it suddenly was for Malony’s party.”
“By the end turn none of my goals was reached, but my boys efforts got some results in space gain.
“At the cost of three broken out of four, my scouting parties hindered almost all enemy fires.
“And following troops, using also some smoke, got to X2 (Gavin and two squads) Y2 and Y3.
“Gavin directed a fire party that broke an enemy MG firegroup.
“Ostberg – now with the duty to rally an halfsquad in two attempts- was able to reach J4, just below 534 hill, with two squad (all three exausted  )
)
“Furter a halfsquad went -also exausted- to I6, up the hill first level.
“Enemy fires succeeded in breacking a squad in dominant position on H2 hill second level.
“On my left, where Maloney and a squad gained W5 on the second -top- level of 522 hill, german fire broke a squad but made Maloney heroic.
“At no avail, cos he couldn’t hinder, by himself, any ensuing german movements and resolved to reach Y6 to rally his men.”
“thank for reading and to the nextone ;>)”
“g
“p.s.: sorry for my English!”
Patch commented:
“Though I applaud the attempt to use smoke to cover the exit, I don’t think I would have sent the 10-3 where you did. Getting down to just one squad to try and make a run for the exit is too risky. Even without that 1KIA you could have lost the win with a broken unit.”
“I would have tried taking the 10-3 and the 747 CX to S7-S8 (bypass)-R8-try to smoke Q8-Q9-Q10. That only leaves one hex, Q10, where joint residual can nail a unit, and still leaves your smoke opportunities.”
“Overall, I think you did fairly well from what I’ve read. However, you got nailed by the dice at the end.”
From what I can tell, we both had reasonable, flexible plans. Mine was centered around long-term whittling down of your forces, so it’s hard to point at any one thing and say “now I had you.”
Overall, I think the dice favored me just a bit. (I need to go through your spreadsheet and analyze the results.) This meant that throughout the scenario, my force was generally in good shape while yours was slowly getting whittled away. Your superior forces meant that this couldn’t be kept up as evidenced by the losses towards the end and the fact that I only had one stack intact at the end.
Of course, your ending was in trouble as you only had 5 squads from your original force intact at the end (less than half) and you needed good luck for a good chance at exiting. Most importantly, the two guys you got adjacent to the exit hex broke. The fact that they weren’t already in the exit hex and that they broke was due to the MG concentration I had piled up on the south side of town.
You did a good job maneuvering around me, but you also left me free to redeploy the important parts of my OB so as to interdict the approaches and the exit itself. Even with good luck that can get chancy.
Back on Turn 4, the 10-2 had been interdicting the west side of town from M5, and I had no one in P6. I was worried that he’d move into the town and deny P6 to me (or at least keep anyone I moved in there busy). You’d also be threatening Q6, which was my sheltered rally spot. With no one in P6, I wouldn’t be able to fire on anyone from the 10-3’s flank until they were in Q10, not a comfortable prospect.
Not necessarily where you ‘lost’ the game, but something I was worried about.
“Ok, here I’m again.”
“At my second PFPh start my losses were only a halfsquad (CR’d on rally) and three more still broken.”
“Ostberg exploring party (two halfsquad) was to do a very hard work.
“By the end of the turn they cleared the woods SW of the village at the cost of another halfsquad (KIA by fire).
“I’ve discovered pretty uncovered terrain on Ostberg line of advance on the West of the village, so I was not inclined to send him a lot ahead.”
“This is a task I committed Maloney and his squad to. They had to go after the germans entrenching on the street leading South.”
“Gavin was to go to hinder german movements into the village from the top of 522 hill.”
“Again fires go worse than expected, so germans go where they want to the south of the village.”
“Really maybe I ill placed my units, but anyway the fires they had had no effect at all.”
“This turn I think had to risk some more and turn a bit toward the village with my left and to 534 hill on my right”
“thank for reading and to the next ;>)”
“g”
“ps: very thank for your answer”
“Ok, here I’m again.”
“At my third PFPh start my losses were a squad (half CR’d on rally, half KIA by fire) and one and a half more still broken.”
“Feeling good for my space gain my next target was to free by germans woods and buildings South off the village.
“So Ostberg fire base had to cover their exploring halfsquad toward the street.
“While Gavin and his party went against the S-E buildings covering Maloney and his squad were to go against the germans entrenched on the South street.”
“Also this time fires went not so well, but worst a luky shot by german mg nest wounded Maloney and broke his squad. Anyway a mg nest was cleared, almost for some time.
“Gavin attack drove a german squad more routing out of a building, but none of his para’ was able to enter either of the buildings. So also the last german units were free to redeploy on village south borders.”
“thank for reading and to the next ;>)”
“g”
“Ok, here I’m again.”
“At my fourth PFPh start my losses were a squad (half CR’d on rally, half KIA by fire) and two and a half more still broken.”
“At the point Ostberg’s boys must go for the South street. They get to the M7 buildings and on a luky/unluky combine, blow out the germans from Q7.
“The exploring halfsquad get short gaining the victory with another luky shot, but the defending germans hold still. More that, right wing clears the last enemy squad South of the street, on that side.
“Gavin and his party are going bad. They too clear a squad South of the street, but can’t interdict one more from joining the bulk of german defence. Worst: a luky shot breaks Gavin and a squad.
“Maloney rally his men (fanatic) on the second attempt, but they do nothing this time. One of the early brokye rally and hurry up to join the battle.”
“thank for reading and to the next ;>)”
“g”
“Ok, here I’m again.”
“At my fifth PFPh start my losses were a squad (half CR’d on rally, half KIA by fire) and Gavin and three half squad more still broken.”
“Two game turns to the end I think Para’ well positioned, although the entrenched german half squad is a problem that really shorten the game one turn.
“Ostberg and one squad aim to nothing and take away only some bricks, while moving to take unfamous german halfsquad under fire.
“Heroically his remaining exploring party assault on the germans, but are annihilated by fire. An other squad attack from West, but they are pinned first and broken then. They must recover to the near buildings.
“On the left Gavin rallies on the second try, meanwhile his squad self rally directed by Pvt. Turillo ( ;>) ) to Gavin’s order to go help Maloney.
“Maloney and his fanatics bad fire can’t cover the para’ assault on entrenched germans. His last squad go out for them, but adjacent to the foxholes they are pinned by desperate fire from defenders.
“After that -broken- they go to Maloney command post.
“To the end Gavin’s fire almost get two mg nests S-E of the village.”
“thank you for reading and to the last ;>)”
“g”
SamB commented at this point:
“It’s hard to say, and you can lose this scenario in a hundred ways, but my gut feeling is that you are prep firing too much and moving too little.”
“The US 747 prep fires with 7 FP. But if you move and use advancing fire he gets 5 FP. If you end up adjacent to your target and use advancing fire, he fires with 8 FP!!”
“Think about the numbers above. It is almost always better to be moving with units that have assault fire. Their fire in advancing fire is almost as great (especially for units with an “odd” firepower because they round UP and add one to their advancing fire.)”
“And, movement puts preasure on the defender. He has to decide when (and if) to shoot. Move to outflank, surround and cut off retreat. Move to get closer to the exit hex. But if you are thinking about prep firing, think again. MOST OF THE TIME – you should skip prep fire and go directly to movement. This is often true with these troops, and it is especially true in Gavin Take.”
“Remember the two great truths that every new ASL player must learn:”
- Attacking is hard.
- Defending is hard.
“Sam”
Patch responded:
“To second that comment (though I have not poured over the recent posts on this, my comments are earlier), there is a lot to be said about movement.”
“When I started reading this forum, someone remarked, “If you’re Prep Firing, you’re losing.” Now, that may be an extreme comment but there is a lot to be said about foregoing Prep Fire and maneuvering. I have seen many, many games over the last few decades lost because players moved too slow, or not at all. Rindis started off moving slow, but has gotten a lot better over our games. There is risk in moving, but you can’t advance unless you do, and you can’t always wait until all the bad guys are broken before shoving troops forward. This is especially important in short games.”
AlkoNL commented:
“Hey there!”
“I’m currently playing this scenario. I’ve played it once before (lost as the Americans) – and also played the SK1 baby version (S8 I think) (lost again as the Americans).”
“I’m now playing as the Germans.”
“I think it is highly educational to read this AAR! So, thanks for that.
“I especially like the labour that went into the Foxhole at the exit point – great strategy!”
“Cheers,
Allard. :D”
“Ok, here I’m again for the finale.”
“At my sixth PFPh start my losses were three halfsquad (half CR’d on rally, two more KIA by fire) and two squad and three half squad more still broken.”
“This real moment the game is almost lost. The german halfsquad survivors entrenched on the street to the South without any para’ adjacent are the key.
“German first gain a win standing the enemy fire, even broken!!!
“Maloney and his fanatics fire again to nothing, but the luky shot goes to Ostberg (my only last chance was a kia!).
“Now the way has freed!!! But it’s still a hard way, ‘cos of the mg’s nest at the South West on the village. It’s out of any covering fire possibility.
“Only Gavin with his two squads, Turillo and a squad more are on range for a suicidal exit rush.
“But Gavin hasn’t heart to order such a thing. So he order a squad to try smoke to the crossroad, while he himself and his second squad are going to draw fire and smoke the nest directly.
“All goes right, but anyone get the hardly needed smoke. Fantically Turillo and the last squad run in the open. To no avail. The last german holding point carry on his duty.
“A lot of heroic para’ are now lying down down the street.”
“thank you for your patience and for all the answers I got to my question. ;>)”
“g”
Postscript:
It really is a fun little scenario; I should try the rest of the “T series” at some point and see how they hold up.
The illustrations I did here were the start of a long-running effort of mine. They also led to me not reporting ASL games much for a while. I really like having the diagrams showing where everything moved, but it’s a lot of work.
I also need to play various people on the net more often. However, I need them to kick me into action on occasion. I’ve got… two games that kind of wandered off into the weeds unfinished a couple years ago. Still, it’s interesting the people you’ll meet that way. I’ve played against a Frenchman (a pilot in the Armée de l’Air, no less!), an Italian and a Greek so far (as well as a couple Americans).
Discussion ¬