[Last Date: 15 PM]
My surrender at the end of the 15 PM scenario came just about a year after the entire thing had kicked off. After a year of a single campaign dominating my game playing, there was a fair amount of wrap-up celebrations and review…:
benj wrote:
“Congrats to both for this AAR, it has been thrilling from the beginning.”
footsteps added:
“Yes, it’s sad to see this one end. Congrats, guys. Thanks for letting us peer over your shoulders.”
“Alan”
And FMFCB added:
“Enjoyable read and great format with the map.”
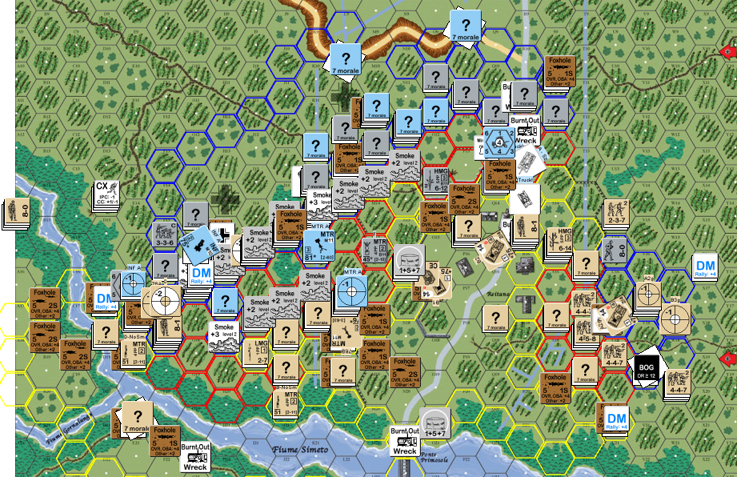
Thank you benj, footsteps, FMFCB and Tork (he repped me for my last post), and everyone who has commented, repped, watched on VASL, or just read this thread for your kind words and interest. If this report inspires more play of anything associated with this HASL map, I think it’ll be well worth it. For how plain the terrain tends to be (vineyard, vineyard, vineyard, orchard, vineyard, village, more vineyard…) it still has subtle bits of interest. When an Orchard becomes a key spot because of the +1 TEM, and you measure Hindrance with the range… well it’s a very different experience.
A quick recap:
13N: Went about as expected. I’m still a little annoyed that I had real problems getting the first starshell off, and the NVR going down early made it even harder to convince the garrison that anything was up. I kind of recommend this campaign as a first time into the night rules. This is a relatively light scenario for the amount of ground it covers, and is so lopsided that I doubt major rules muffs will affect the outcome too much.
14A: I skipped this date to have a truly overwhelming attack late in the day. It would be interesting to see just what could be done with a serious effort at an early attack.
One of my big rules blunders dates from here as this is when I bought the ill-starred 88 section. In general, they’re handy to have around, but at this point, there’s no way to have them where they’re needed. For some reason, I had the delusion that paths would help vehicles, and didn’t snap out of it ’til my first MPh (I knew better, but…). However, looking at the purchase chart again, there’s not a lot of options, as I already had bought just about everything that was available. That leaves more OBA, save the points, or purchase but retain off-map until the north entry is safe (I can’t remember off-hand if they were available past 14N, some groups go away at that point).
One thing I never considered, and should have gotten, was off-board observers. It’s the only way to get above ground level on this map, and that’s really essential with all the Hindrances on this map. As it was, the one OBA Module I bought at this point lasted me the entire campaign as I couldn’t get to a good vantage long enough to call down a FFE before Patch’s fire broke the Observer. As it was, I only got one mission off before he spent the rest of the Date broken again.
14P: And this is where the wheels came off the wagon. I think the general plan was sound, and jumped off properly. The turn 3 breaking of most everything really crunched me, and I didn’t personally recover for a long time. The dice were decidedly against me. I did manage a good number of HoB rallies, but I also lost about 3 squads to RPh ’12’s. Add in some very effective air support for Patch and I was unable to get anywhere meaningful. Commendation to the Fallshrimjaeger weightlifting team for actually shifting an 88 through vineyards.
And it bears mentioning here, as this was where it became really obvious. The Italians can make a threatening show in this campaign, but they crumple very easily. They have an ELR of zero, so every break result lowers their quality, and reduces them to helpless disrupted conscripts way too quickly. But they’re also the only source of real SW during the first day.
14N: The night attack ran into effective opposition, aided by my most serious rules blunder of the game. I completely missed that Fortifications did not get revealed as soon as you got LOS to them at night, which ended up shattering the early main thrust into the town, and my losing control of three MGs. I eventually picked one of them back up, but the other two stayed in no-man’s land in front of the wall until the end of the current Date, where the hex passed into Patch’s hands.
Despite this, this Date seriously tested Patch’s hold on the village. The first of three Dates in a row that ended during the first possible Game turn, it ended just as I was starting to make progress. The east side of the town was in trouble, but may well have held out. I took two of the three foxholes along the wall even after that expensive start, and would have taken the third and last in the next turn. I’d just emptied the bunker on the west side that had been a thorn in both attacks. And I was in CC with the bunker on the north side of the bridge.
That last really hurt as I had realized that that was I really needed to take. That one point could choke off any reinforcements, even in the RePh. Patch didn’t realize it until late, and it is his good fortune that I couldn’t get luckier in my CC rolls.
Patch’s good fortune wasn’t contained to an early end—he managed to kill the only armor I was able to afford in the CG. Two StuGs down with lucky AT Gun shots.
15A: Patch’s counterattack stepped off bright and early the next morning. I’ll admit that I had a rough time wrapping my head around this one. The Brits pull out, but get to purchase fresh troops in the village, having crossed the bridge unopposed under the guns of the nearby Germans?
This cognitive dissonance caused me to take a more aggressive approach than was really called for, and I’m surprised I wasn’t punished more strongly for it. In general, I think things went fairly well. The big trouble was an-ill advised second attempt at the bridge pillbox. I hoped a bold move could get me in there quickly. I just got into trouble quickly.
The AT Guns did their job, killing one Sherman each, one of them on the bridge. the main line west of the village did fairly well, with the highest commendations for the squad manning the MG that anchored the far right of my line. It eventually fell, but seriously held up Patch in the process.
One of the die rolls I most regret is the one that caused my Pioneer company to be the only Depleted formation I got in the entire CG. As they were all I had to the south-east, it seriously compromised any plans for that area.
In fact, this Date’s purchases were a real struggle. There were two different ‘theaters’ with no connection between them. This isn’t too bad except for the ‘everybody goes home’ rule after 14N. This left me trying to purchase all my infantry from scratch. I would have killed to be able to purchase platoons as the companies were too expensive and inflexible for this situation. I ended up with a Gun-heavy main line, and having to hope that I could march reinforcements in on the double. I’m still not sure why it actually worked.
15P: I took some chances with my setup here that were poor ideas. After the last time, I relied on Guns too much, and an actual defensive network of foxholes too little. This led to the early elimination of a couple Guns I should have been shelling Patch at a distance with. Part of this, again, was due to a lack of manpower. I just couldn’t buy troops in the numbers, and number of groups I needed. I really could have used the ability to buy platoons here again.
To top it off, Patch did a really good job showing how to assault light defenses in thick terrain.
“I was a little surprised by Rindis’ surrender as I thought that 15N offered him some opportunities to counterattack, as apparently is the scenario intent. I’m infantried out, having bought 4 companies, while I believe Rindis still has one to go for the day. The third Pioneer company, setting up on-board, can cause a great deal of havoc at night, particularly if he takes the Fanaticism (CG16) option. With 4 FT and 10 DCs, I think he would have hurt me despite the odds. However, that would have left him thin somewhere, and a counterattack by me could exploit and turn around his gains.”
“My overall thoughts on our campaign? Gosh. We started May 20 last year, so this has been a while. Overall Rindis played a good game, and certainly surprised me more than once. However, I think he didn’t push as hard as he could have on the 14PM and 14N dates. I never saw a multiple MG kill stack formed around the 10-2 or the 9-2, which would have hurt, and I never saw Rindis try and dig in against my attacks. One thing about this campaign which looked like a good strategy for the Germans was to dig extensive entrenchments and wait for the Brits to approach, hitting him with point-blank FTs and easy DC placements. This battle was largely fought in the open, which left Rindis exposed to steady attrition over each date.”
“The best British strategy I could think of is smoke, smoke, and more smoke. WP, too, if you have it, though I only ever was able to use it for cover rather than as an offensive weapon. Smoke shields you from the guns and large fire groups by isolating sections of the board, and did help shield my river crossing from a nearby OBA.”
“The 40LL AT guns are very deadly in this game (7 or less TK# against a Sherman at 6 hexes or less, and in the vineyards, combat’s gonna be at 6 hexes or less), and you’ll never suppress them with direct tank fire. You have to smoke them, bury them under OBA, or hit them with infantry.”
“Though I played 15AM and PM very aggressively, hitting Rindis with small platoons as I tried to crack his line, smoke helps you move forces up so you can overwhelm sections of his line and still have portions of your force break. With the AT guns covered, or when non-existent, I threw my tanks right against the foxholes, solving the whole entrenched LOS problem. Better yet, throw on top and freeze the troops so you can advance into CC.”
“I burned a lot of HS searching out concealed Germans, and though they tend to die, they do help strip that nasty concealment for looming CC. They also proved beneficial as I was able to sneak that 248 behind Rindis’ lines, which resulted in the elimination or capture of a sizable amount of Axis troops.”
“The biggest thing I noticed about this game was how different it was from a scenario. If you’ve never played a campaign game before, there appears to be a whole new set of tactics. There’s no ‘victory’ each date, and so the game becomes more about where you want to be the next day, and what you want left. On 14PM, as the game wound down, I decided I didn’t want Rindis to have two -2 leaders on map and so rather than firing on several squads, I directed everything against a 9-2, leading to his elimination through double-break. On 15AM and PM I switched fire several times from Good Order units to broken ones with the hope of double breaking to reduce what I’d face the next game. It’s definitely a different feel.”
“Overall, this was an enjoyable campaign. It has a feel of being very pro-German, though, so I’m somewhat curious to see how others have found this campaign.”
“I was a little surprised by Rindis’ surrender as I thought that 15N offered him some opportunities to counterattack, as apparently is the scenario intent. I’m infantried out, having bought 4 companies, while I believe Rindis still has one to go for the day. The third Pioneer company, setting up on-board, can cause a great deal of havoc at night, particularly if he takes the Fanaticism (CG16) option. With 4 FT and 10 DCs, I think he would have hurt me despite the odds. However, that would have left him thin somewhere, and a counterattack by me could exploit and turn around his gains.”
An interesting thought. I keep getting stuck on the idea that I could buy 3 companies per day, not 4. However, the current manpower ratio is 3-1. Purchasing an extra company would get it down to 2-1, but even with a concentrated Night attack (to keep as much as possible under “No Move”), that’s not great odds. And I have a nasty habit of straying into the darnedest places. @_@
“My overall thoughts on our campaign? Gosh. We started May 20 last year, so this has been a while. Overall Rindis played a good game, and certainly surprised me more than once. However, I think he didn’t push as hard as he could have on the 14PM and 14N dates. I never saw a multiple MG kill stack formed around the 10-2 or the 9-2, which would have hurt, and I never saw Rindis try and dig in against my attacks. One thing about this campaign which looked like a good strategy for the Germans was to dig extensive entrenchments and wait for the Brits to approach, hitting him with point-blank FTs and easy DC placements. This battle was largely fought in the open, which left Rindis exposed to steady attrition over each date.”
Mr 10-2 spent too much of 14PM broken… and I’m still trying to figure out how to assault high-value terrain (+3 buildings, +2 walls). And yes, I really, really should have dug in more. I’m somewhat surprised that 15AM went as well as it did with my bad misreading of the situation. And I let that ‘success’ blind me to digging in for 15PM. The general idea was that I was going to have to restrict your approach, which can’t be done in foxholes in this terrain. I should have had a few more to duck into as you got closer. Engineers in Foxholes were eliminated in 15PM by the need to purchase off-board entry, these guys are expensive!
“The 40LL AT guns are very deadly in this game (7 or less TK# against a Sherman at 6 hexes or less, and in the vineyards, combat’s gonna be at 6 hexes or less), and you’ll never suppress them with direct tank fire. You have to smoke them, bury them under OBA, or hit them with infantry.”
The German AT options are pretty decent, but you have to spend on them. DC would work well in this terrain, but with the amount of infantry support available, I’d be very lucky indeed to get to try it outside of a foxhole. Other than that, it’s ATG, and flank shots with everything else.
I’m pretty happy with my overall performance in this campaign. I’m not great, but I’m getting out of ‘poor’. 😛