
PBr CG I “Who Are These Devils?” — July 14 Night
[Previous Date: 14 PM]
With British reinforcements due the next morning, my only hope of keeping them from just walking into the main part of the map, and sweeping me off with way too many troops was to use my second (and last) ‘attack chit’ in a night attack to try and take the town. With my purchase limits and the severe German losses in the afternoon, there was a very real chance that I just wouldn’t be able to do it. However, an odd wrinkle of the CG is that the British withdraw everything after the night scenario and have to purchase a new OB. These troops can be put into any portion of his legal setup area, such as the town. But there’s a pillbox at the north end of the bridge. If I took that, then anything he wanted to setup north of the river would have to roll for potential casualties, so it was a main focus of my plan. We got started in September 2007…:
Okay after spending a RePh trying to find the purchase points for some confidence, we started the 14N German Assault on the village tonight.
Not a lot going on yet as the scenario is pretty clunky with lots of Cloaking counters to try and remember the contents of.
Even with the better movement of Cloaking counters, going is very slow as I have to AM my way through a very lit up area.
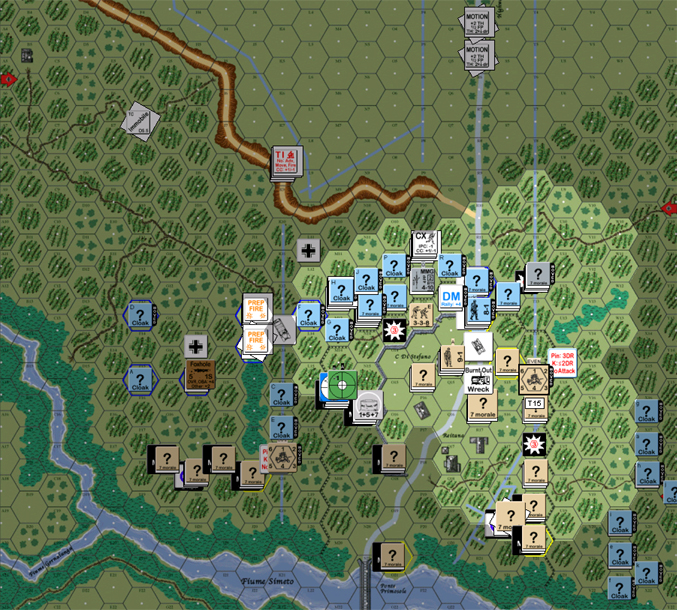
Situation as of AFPh, German Turn 1.
Taking a while for us to remember the Night rules again too. I did some illegal fire before we remembered NVR. Fortunately(?), I missed.
“Aaand… we’re back.”
“Rindis picked a night attack, as was to be expected. He just has to get me out of the town and off the board to have a chance at the rest of the campaign. For his forces he appears to have picked up a pair of StugIIIs, two 81mm Mtrs, and two 75* Inf Guns. No sign of any MG platoons yet.”
“Rindis and I both bought Recon, getting a peek at 10 and 8 locations, respectively. I revealed several dummy cloaking counters across the northern front, and Rindis revealed two of my 3 remaining ATGs and picked off several dummy stacks.”
“Turn 1 Prep fire had a variety of Guns trying to clear my leading “?” stacks to no effect other than 3 SAN rolls by me, one on which was successful in Pinning his Sniper (and at a SAN of 6, the German Sniper damn well needs to be silenced). A plethora of starshells went up as movement began, not quite landing where I wanted but slowing him up a little. A HIP HS that Rindis missed on the far side of the wall managed to break a squad in First Fire, removing a large number of my No Move counters :D. In Final Fire he even hit on the 1(+1) column for a 1MC, but the squad passed. An 8-1 and 467 moving down the road were also hit on a 2(+0), Pinning the squad.”
“Rindis’ Advancing Fire is due in the mail. Soon there’s going to be a great deal of FP against the wall, ready to engage my units in town. I had an edge last game in the form of Air Support and some good fields of fire. I’ve lost all that now, and Rindis is coming on board with large numbers of concealed stacks. I predict a short, bloody fight.”
“Too early to dictate my strategy. I anticipate talking about my plans on turn 2 or 3 when all the ?/HIP is lost. Rindis appears to be making a major push down the road and to the wall angle. We’ll see how that pans out.”
Will Fleming:
“Thanks for the update!! I think this might be the most fun scenario of the CG. I look forward to seeing how it plays out since we will finish @ 14PM with CG3.”
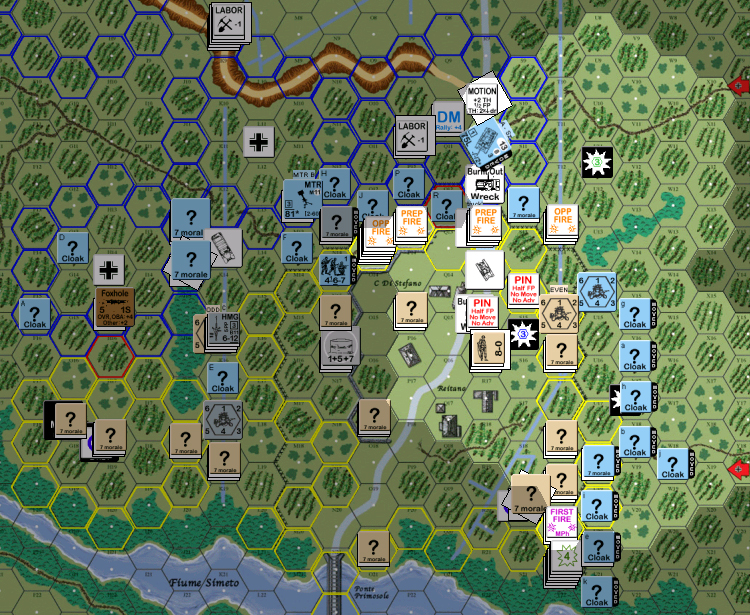
In the middle of my Turn 2 MPh after tonight’s session.
I’ve already lost two squads. Blundered into an HIP unit in advance, who promptly Ambushed me and knocked out a 468(!) and the captured PIAT. While I’m glad it didn’t fall into his hands, I had too many things to do with that in a night scenario…. I piled two squads into his position north of the wall, and we both missed in my CCPh, and we traded low rolls in his CCPh.
Brit 1 was relatively uneventful other than that. I managed to nail a group in R15, revealing a Concealed 8-0 (in addition to a squad and 9-1 I could see), pinning the squad, and wounding the 9-1 on a ’12’. Beyond that the major news is that he’s starting to shift some of the defenders of the western riverbank to the east.
On my turn 2, wind change lowered NVR by two to 1. Patch is having… patchy luck with his starshells, managing 2 on about six rolls. I managed to Pin two squads in place (one of which had been Concealed), but Patch seriously disrupted my south flanking force, breaking a squad, wounding a 8-1, and reducing a squad to a HS (tie on RS).
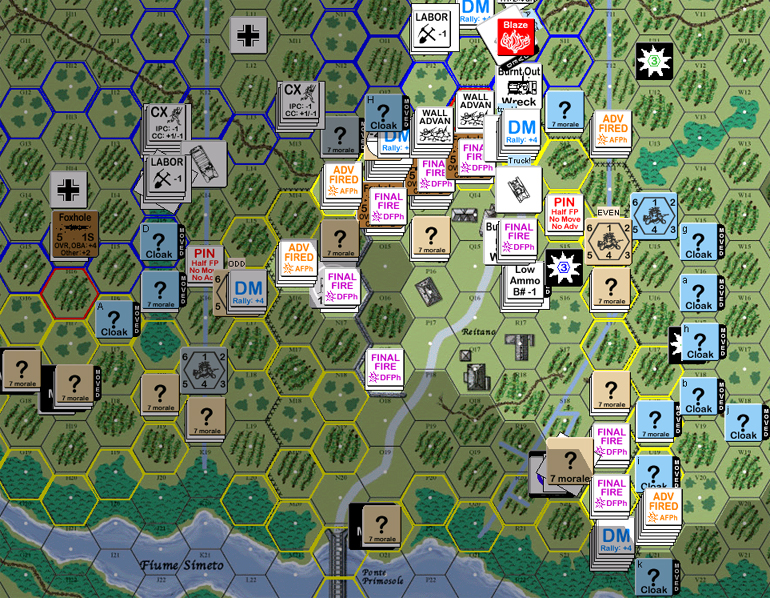
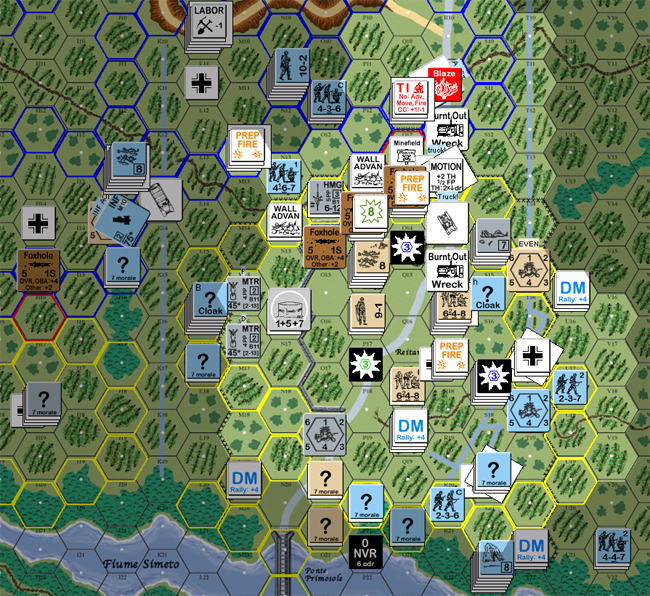
Situation during German Turn 2 MPh. Note the Op Firing Death Star in O13 – I know Patch has. Lead StuG has Schuerzen.
Finished off my turn 2 tonight. Things are not going well.
First, I found out about a mistake the hard way. I had completely missed E1.16 in my readings of the Night rules, and had figured that the only difference on revealing fortifications at night was LOS being restricted by NVR.
So imagine my surprise when I discover a squad and a foxhole with an advancing unit.
It gets better. His ATG goes on a rate tear before finally putting itself under a Low Ammo counter. Before that, it gets a CH on the lead StuG, with predictable results.
And then the rest of the HIP foxhole line behind the wall opens up. His fire doesn’t do as much as might be expected, but a couple PIAT hits make up for it. The death star I’d just moved up gets reduced by a HS, and it and the 10-2 break, leaving a pinned squad with the HMG in place.
On the other side of town things are going a little better. I advanced through the wire into T20 with a strong force and he Ambush Withdrawed out.
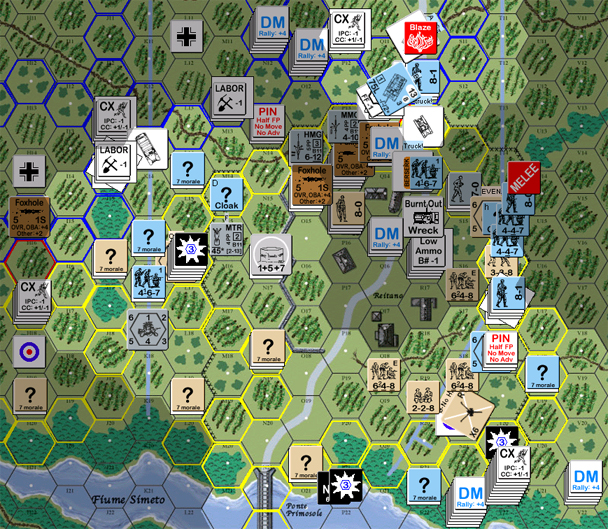
Situation as of the end of German Turn 2 AFPh.
“A bit of a lag getting through this turn, but we are slogging along.”
“I was beginning to seriously wonder if Rindis had missed the Fortification HIP rule, but as my defense depended upon surprise, I was hardly going to inquire.”
“A wandering squad stumbled upon my defense in Q13, revealing the backbone of my defensive line, entrenched behind the wall. A 24 (+2) attack failed miserably, but the follow-up PIAT strike hit with a k/2 result, breaking the 10-2 in his kill stack and the CR’d HS, and Pinning his HMG squad. A follow-up 12(+3) and PIAT shot from O14 got another Pin result to no effect.”
“To the east he continued to creep forward in a continuous line. I’ve found roughly half the units over there, but as to the rest I do not know. He appears to be pushing hard to flank along the riverbank. He did push into CC in the east, the only location where he tried, but I got an ambush and quickly left to an adjacent hex containing a 9-1 and 648. I thought that the potential of a 24(+0) in my Prep Fire was better than risking it all in CC at even odds.”
“In the north, I broke his units on the road, and managed to nail his StgIII with a +7 shot from the ATG when I rolled a CH. Yowza! Was not expecting that result, but I will happily take it.”
“Rindis continues to stray in the west. One Cloaking counter wandered into a stack of my units, which revealed it as a dummy, and his 436 with a mortar rushed forward next to my bunker. My Sniper, after several failed calls to duty, activated and broke his HMG squad in L16. Nice bit of relief there, as there’s no leader nearby that I can see.”
“So as we enter British turn 2, the 10-2 is out of action, but there’s still considerable FP on the other side of the wall as both forces duke it out at point blank range. Where will his remaining tank move? Which forces on the U hexrow are dummies? Tune in next Monday to find out!”
“On vacation here, so lets see what I can do from memory.”
“UK Prep Fire, I chose to stand and fight. He was a little thin, and I thought I could remove some more unbroken units from the board whilst still retaining a front line even if some units broke. To the east, I broke the units that moved adjacent to my 9-1 stack, malfunctioned one ATG, and got a Low Ammo on the other. Very little good on that end of things. To the north, a bit more fun was to be had.”
“I fired the PIAT from my 9-1 stack first, and scored a CH against his HMG squad, breaking and ELRing the unit. The subsequent 24(+2) attack against the MMG squad behind the wall resulted in another broken, ELR’d squad and lifted a dummy CLOAK counter. In movement, I shifted units back to the town and reinforced the east in case he breaks some of my line at that end of things. My units all survived Defensive Fire, and I advanced a HS onto a CLOAKed unit behind the wall, revealing it as a dummy and putting his 10-2 back under DM. All of a sudden, the threat from the north is largely gone for another turn. Dang. Wish I had a map to post.”
“Turn three is beginning, and I don’t know what Rindis has planned next. The losses are 6:1 at the moment, and he’s about a half-dozen units under DM. Turn 3 should be interesting.”
“Game delayed due to a vacation, but we’re back.”
“Turn 3 opened for the Germans with a good number of units broken, and forces solidly thrown back from the wall. Wow. Didn’t think that would happen. Minimal Prep Fire as Rindis used this for a turn of movement. I struggled to get starshells up, but got horrible results. Rindis pushed forward heavily across the north riverbank in the darkness, and shoved two cloaking counters up to the buildings in the east. Rindis moved the remaining StuG up behind the wall and found an AT minefield, which failed to attack and gives Rindis a firm wall position.”
“Defensive fire went amazingly well, and I broke several units, bagged two HS through Casualty Reductions, and stripped the Cloaks advancing on the buildings, revealing them to be dummies. Rindis went on a ROF tear with an Opp Fire Mtr to no effect, but much was revealed in Advance.”
“I had assumed several of the Cloaks along the northern line were dummies and so did not fire to retain my own concealment, but they were actual units and a leader and two 4476s piled onto a 648, and an 8-1 and two 248s jumped onto my Gun crew. The 648 was ambushed and suffered a CR, and failed to do damage in return. No ambush for the Gun, and the crew and a 248 killed each other off. A hole is forming to the NE.”
“Turn 3 begins with some reshuffling needed for the Brit lines. I’ve several close units to remove, and that dang tank to cope with.”
Beginning of UK Turn 3. German thrusts in blue.

Been a while since I’ve chimed in here. Gotten busy on a few things, and, well, morale has been low for a while.
However, this turn is finally shaping up to have something go right.
I hadn’t really planned on the north flank of the eastern movement going like it did, but I had numbers and was right next to him. I was hoping to ambush and retain cloak on one of the two stacks, but my only Ambush only got a CR.
I’m in big trouble to the NW. He’s got a HS wandering around shoving around my brokies, and I just don’t have anything to shove in there to force him back out. Either they have their own problems, or they’re busy trying to suppress the town.
That is starting to go well. I broke two stacks in the NE corner, which means I’m prying the gap open a little wider, and I’m definitely in support range of the units that just cracked the eastern line.
Also, I finally got a Sniper activation (a ‘2’) and he shot up the big stack in T18 that was anchoring the SE corner. He fatally wounded a 9-1, which pinned a 648 and eliminated two dummies. If I can just break something in that area, the lack of leadership should cause problems.
Situation at end of British Turn 3 RtPh.
We’re screwed, mate.
“German turn 4 was certainly the turning point in this game. Rindis shattered my eastern line when he broke two squads with an LMG that went on a brief tear, and his sniper broke a squad moving to reinforce, and the best I could do was break two Italian squads and a Gun crew with my sniper. He has now begun claiming Strategic Locations within the town.”
“The good news, if there is any to be had, it that he is rather thin in the buildings, and to the west, though the 10-2 has finally rallied, he is still a shade disorganized. I may shove him back out, but more are sure to enter next turn. I have little choice to make my next front line the buildings themselves. Anyone who breaks is lost at this point. I am praying to the dice gods for this to end Turn 5.”
“The StgIII reversed out of the minefield and is on the move. Where will it go? What will it do? Will it find any friends?  “
“
Beginning UK Turn 4

Rockford chimed in:
“Well Patch, as someone who has played this one and lost with the Axis, my advice is this: hang on for dear life.”
“I think this campaign is all about the “re-entry” date. In my playing, I failed to kick the Brits off the map, and they massed enough infantry to shove me out of the victory area.”
“However, if the Brits have to re-enter, and re-cross the bridge, it’s hard to see how they can win.”
“My .02.”
“That’s the consensus I’ve gotten from other threads on this campaign. If the Brits have to reenter, the Germans can dig enough trenches and build enough roadblocks that the Brits have an extremely difficult task ahead of them. I do hope to maintain a hold on the town, but this last turn was horrible for me. Of course, to be fair, Rindis has had the worst luck this campaign.”
“There’s only about a 1/6 chance of Rindis getting three more moves out of the game. If he gets one more, I have a chance. If he gets two, I’m in trouble. Three, I’ve lost.”
“–Patch”
We got through all of my turn last week, and all of Patch’s and into my movement this week, so it’s now early in German Turn 5. Potentially the last MPh of the CG date.
So far, Turn 5 is not being kind to me. I’ve rallied a few guys, and Battle Hardened one squad up to second line (rolled a berserk, but no one was close enough).
Speaking of being close enough. Wind Change this last time was 6,1. NVR is now zero. The burning StuG must be throwing quite a glare.
I was able to finally nail a few things down last turn. I eliminated his wandering HS in CC. I’ve claimed one of the foxholes with a 8-1 and squad. An Italian force moved up to the strategic point he took from me last time to find it empty. I have gotten a 447 and 8-0 into the building at R17. Sadly, it’s a rough neighborhood, so I don’t know if I can keep it for long.
Certainly, if it ends at the end of this turn, that building and that foxhole will be a major bone of contention at the beginning of the next date.
Another MTR-toting squad decided to go straying in front of the pillbox and got itself broken. Thing must be magnetized.
It really hard to tell where this thing is going right now. I’ve finally done what had seemed impossible, now if I can just get more troops up in time.
Situation, early German Turn 5 MPh. A Berserk squad charged along the foxhole line, with the usual results.
And we’re into UK Turn 5
“German turn 4 ended with some good points in my favor. Rindis is steadily rallying units here and there, but he’s still scattered about and night is making movement difficult for him. There is an unnerving build-up on units to the west, primed to attack the N16 bunker, and he’s finally regained the wall with his 10-2 as well as two entrenchment hexes.”
“Rindis did punch his way into R17 and claimed a building hex, but was promptly booted out under a 24 (+3) attack, breaking his HMS HS as well. My ATG claimed its second kill, nailing the remaining StgIII. To the south, Rindis continued his riverbank creep and hit the O20 pillbox in CC with an ambush, but failed to kill off the occupants and I, naturally, failed to kill him. He also gained CC in Q18 with a concealed unit and a broken 648 but failed to do anything. I refused to attack, and my mighty concealed unit is prepared to leave next turn to cause more mischief.”
“My ability to maneuver, which was so critical on the previous date, is no longer available. I can’t really rout units, nor can I get them out of DM. It’s a question of who will roll better myself, or Rindis, and if there’s any dr I want to make this game, it’s the end of turn dr coming up.”
End of rally, UK Turn 5.

British Turn 5 Conclusion
“British turn 5. Much drama is to be had as I try to clear out the German units that have advanced close. My goal is to kick them out of the eastern building area (simple enough), and reposition to deal with the coming deluge of units from the south and west.”
“Minimal light goes up in the form of a single starshell in the center of town. My Prep Fire breaks the squad that had closed to the O14 entrenchment, but I’m unable to damage the stack in Q13. Other units Opportunity Fire in the hope of German Starshells revealing more targets, and to permit my concealed unit in the Q18 melee to flee before the impending 24FP +1 attack (the only British unit in that melee is broken, and at a -4 I don’t expect him to survive so why not fire in and break the German squad?). In movement I transfer a leader south in the hopes of picking up whatever survives and routs out of what is left in the melee, and shove the concealed crew south towards the O20 pillbox.”
“Rindis nearly passes on Defensive Fire, but goes ahead anyway without additional light, negating some of my planned Opp Fire. Rindis’ two 81mm mortars go on quite the tear, pounding the N16 pillbox. The +7 TEM made it quite survivable until the dreaded Critical Hit. 30FP -7 just isn’t something you want to see, and I do admit I’ve not seen a 5KIA in some time. With that attack, my western flank has fallen. I’ve nothing available to prevent Rindis from flanking the buildings, and his two mortars will massacre anyone who moves to the walls. In the center, Rindis Battle Hardens my squad in the foxhole, then promptly breaks him with an LMG ROF.”
“Advancing Fire went poorly for me, when my 24FP +1 attack into the melee Pins the German squad and CR’s the broken squad. My other Opp Fire fails as there’s no targets. In Rout I shove everyone I can with a leader, and Rindis evacuates the O14 foxhole.”
“Advance Phase. I realize I erred in moving the wounded leader, as advancing into the buildings is 3MF, which will make him CX and me all the more vulnerable in an ambush. On the off-chance I survive the melee I shove him into Q17 anyway. I’m desperate for units and must rally. The northern buildings reshuffle to shield my flank, and the crew in R16 abandons the ATG and moves to R17, reclaiming the building and putting the adjacent units under DM. My crew advances into the conscript HS hex in P20 adjacent to the pillbox, shielding the fortification from further reinforcement.”
“Close combat! The pillbox continues to resist as Rindis and I fail to damage each other. I ambush the conscript HS, but again, a melee develops. But for the Q18 melee, my broken HS escapes! Tremendous luck there. On to the end of game dr:”
“It was a 1.”
“Ladies and gentlemen, the British still control the town! :D”
End of Game positions, UK 5

“This was indeed a close game. I didn’t realize until late how key the O20 pillbox was to my defense. If Rindis claimed it, even if I won, I couldn’t set-up north of the river. I needed to keep it, and thankfully, I did. The loss of two entrenchments hurts, and certainly makes the next game set-up a mess, but it could be far worse.”
“My strategy for this game was simply to pound the crap out of Rindis. There was little else I could do. I’d lost all maneuvering room, and the added MF cost for terrain at night was simply too restrictive. I figured anything behind the wall would die in Turn 1 Prep, I HIP’d behind the wall, entrenched, to try and pound the first units that approached and gain a turn or two before the assault on the buildings began. It worked wonders, as Rindis didn’t really regain the wall again until Turn 4 and was nailed again with a KIA against a MMG squad when he retook the position. My sacrifice of a 338 to keep his 10-2 DM for as long as possible was a worthwhile exchange, as he wound up contributing nothing to this game date, having spent most of his time broken.”
End of game perimeter

“The start of game set-up is a mess, but I have access to the town and the ability to make a defensive stand in town while my reinforcements enter. Now, to counterattack and take the vineyards! Getting sick of all this damn tea…”
Patch beat me to it, and said it well.
The early end to the game really hurts. Another turn, and I would have had the N16 pillbox (at long last!), and the last of the foxhole line. It would have also been another opportunity to take O20. Patch may not have realized how important it was, but the entire plan from the beginning of the scenario was to take that one hex, even if I couldn’t get into the town, and I failed.
I can only rate this entire exercise as a failure. I’ve brought the lines to at least where they should have been after 14PM, did not take the only goal that counted, and lost two precious StuGs doing it.
This time, at least, it was not the bloodbath that 14PM was. I did get somewhere, and only failed at the end due to an early end. Given another turn, I had a decent shot at O20, and given 2 might have had a decent chunk of town.
The end of date setup areas are just insane.
jrv pointed out:
“Rindis’ two 81mm mortars go on quite the tear, pounding the N16 pillbox. The +7 TEM made it quite survivable until the dreaded Critical Hit. 30FP -7 just isn’t something you want to see, and I do admit I’ve not seen a 5KIA in some time.”
“NRBH but as I recall the NCA DRM of a pillbox is not reversed on a CH, but treated as +0.”
“JR”
“*flip*flip*flip* Whups! You are right, sir! Error on our part.”
[Next Date: 15 AM]
Discussion (3) ¬