
PBr CG I “Who Are These Devils?” — July 14 PM
[Previous Date: 13 N]
In the Primosole Bridge campaign the Axis gets three ‘attack chits’; that is they get to declare three attacks during the campaign. It is obvious that the idea is to give the Axis two-three attempts to push the British forces back south of the river before reinforcements come up and put the Axis solidly on the defensive (and maybe one chance at a later counterattack). I made my purchases, planned out what I was going to do in the morning after the paratroops and gliders came in… and chickened out. I really didn’t think I had what it took to take on the existing British forces. So I went idle for 14 AM, bought more troops, and attacked in the afternoon. For us, the scenario took about a month and a half, starting in July 2007…:
And they’re off!
Just sent the first log file of 14PM off. Not going to be too much going on as the main force blunders through a lot of vineyards and olive groves.
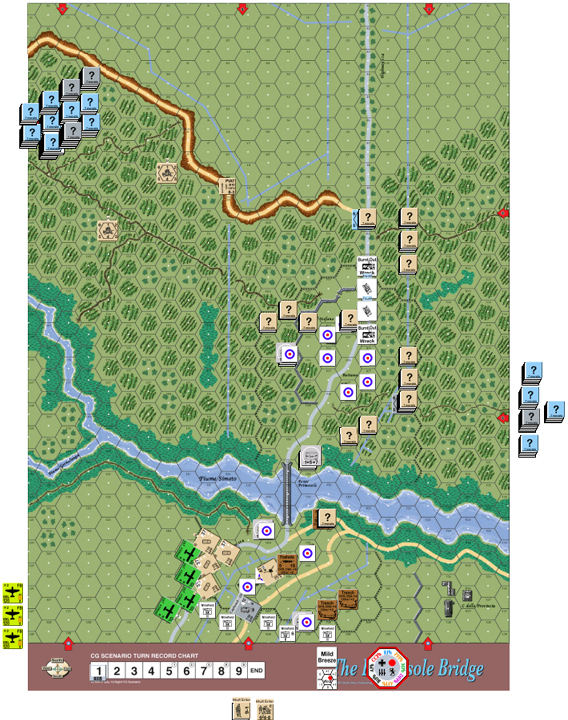
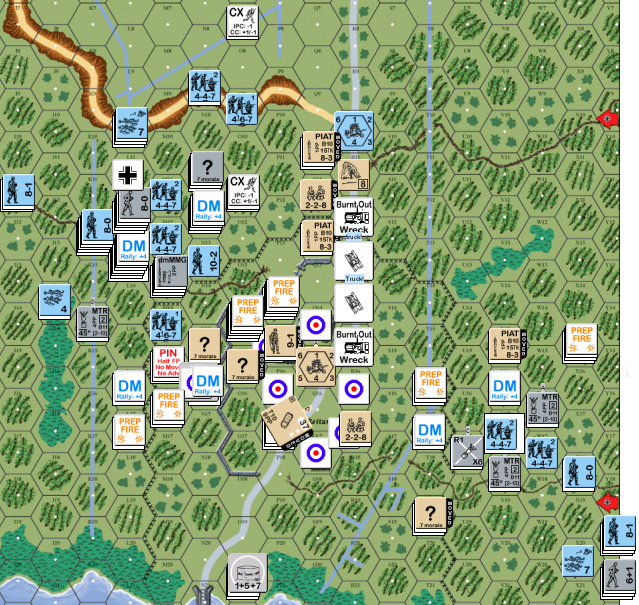
Situation at beginning of 14PM.
Patch’s immediate comment was:
“I was most certainly expecting more units from the east. Going to be a tough fight.”
Got through the remainder of my first turn and all of the British turn tonight.
I… could wish for better. I was probably too impatient, and he nailed two moving leader stacks during my turn (ELRing the Italian leader in the area to a 6+1 in the process). I forgot that paths don’t do a thing for vehicles, so we’re going to have the zany antics of half-tracks struggling through constant Bog Checks for a while yet (assuming that I don’t just Mire them when I try to free them on turn 2).
During his turn, he fired a little, reshuffled more, and started organizing a counter-attack on the east side. The key to that is a 9-1 stack that’s advanced to X13. It’s survived what I’ve managed to throw at it so far, and broke my third leader in the area and another squad with him.
It didn’t all go his way. He managed to HOB one of my squads to a 467, which is nice since it’s all 447s and Italian HSs over there. And I broke all but the leader in the central position of his eastern defense. Since he pinned, he ended up self-breaking anyway.
He unconcealed a ATG on it’s second shot, and I showed him just how open the north flank really can be when a stack of three 467s managed to get PTCs on the crew and and a squad he moved into the hex at long range. Didn’t do any harm, but it unconcealed the squad.
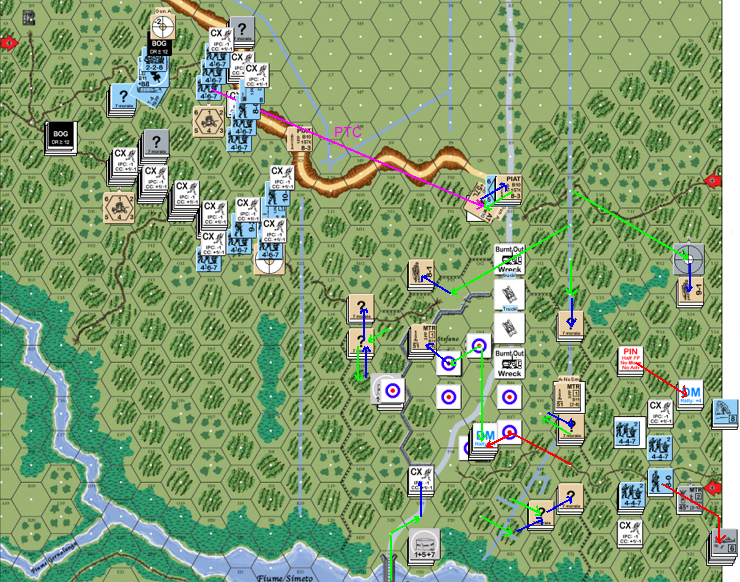
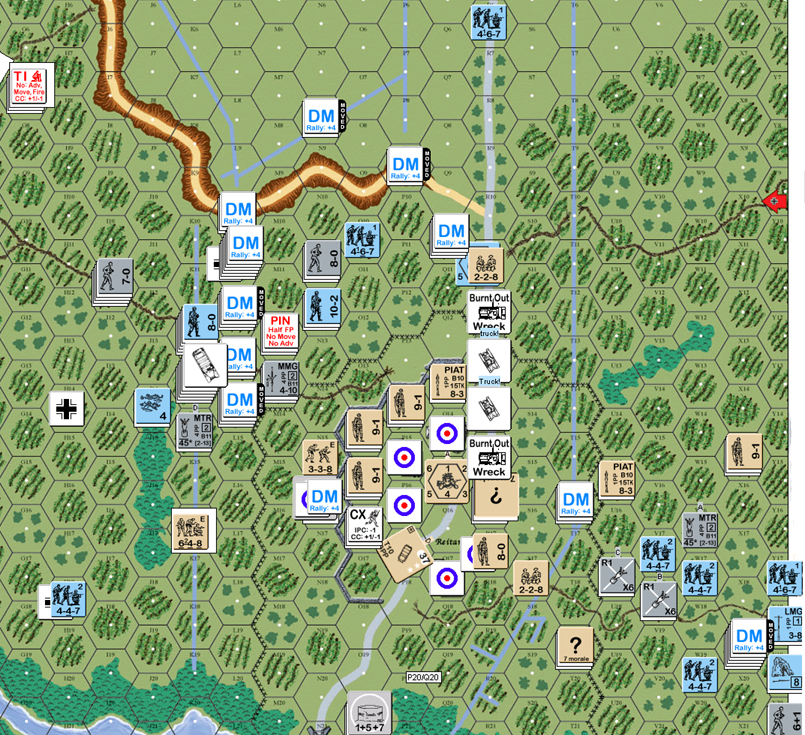
General situation at the end of British Turn 1, showing a fair amount of Brownian motion.
Will Fleming:
“Always a good day when I see this thread in bold. Thanks for the recap!”
Tater:
“Ditto…”
“We are suppose to start our CG this Saturday. I am thinking about posting some up dates here as well…time allowing.”
“(The “here” refers to this forum not this thread)”
“Ah, turn 1. The start of a new day. Shame it’s been spoiled by all these Germans.”
“The German RGs are fairly limited. I’m expecting to get hit with the Italian 1st line units, and both 447 companies with the 467 company. I don’t expect to see the 336 Italians, and that rounds out the available Axis infantry OB. I also anticipated seeing a StuG RG with Stuka support. The shortest rout to the buildings is from the east on the 18 hexrow, and I anticipated the following assault: German 467 and 447 RGs enter on the 18 hexrow trail, with the second 447 entering on the 9 hexrow trail. The Italians will enter from the B4 building area, backed up by the tanks to keep me occupied to the west. I therefore set up heavily to resist an eastern assault, with plans to delay an attack from the west. I bought Air Support with the -2 entry modifier to better my odds this game.”
“Naturally, Rindis went and did something different.”
“A single 447 RG with Italian Mtr support entered on the row 19 trail, with the remaining 3 RG moving down from the B4 building. No Stukas are in evidence, and Rindis did indeed err by placing his 88s in the vineyards where they quickly bogged. One made my life better (and his more entertaining) by bogging in LOS of an ATG, though there are so many hindrances it’s a tough shot. No air support showed this turn, so I’m going to do this with bullet and bayonet for the time being.”
“Facing the hoard of troops coming from the west, I’m seizing an opportunity to counterattack to the east, logic being if I can break up this attack I’m better off handling the western assault. My main stack, a 9-1 and 3 648s, did some damage in Defensive Fire, but Rindis moved forward a large assortment of single and double stacked 447s, priming for a large multi-hex FG that would be difficult to disrupt. Seeing little to gain by falling back (24(+4) or 24(+3) is gonna hurt either way) I tried spraying fire against two adjacent stacks of 2 447s with an 8(+0) and 8(+1). Got a 1MC/NMC, but Rindis passed with flying colors, battle hardening one squad and only failing with one squad. Return fire broke all three squads and Pinned the leader, who voluntarily broke and fell back with the platoon. Seeing that coming, I preemptively moved a leader into position to rally. To the north, my row 9 blocking force falls back, alternatively moving to reinforce the west and counterattacking to the German rear. The Advancing Fire from these units broke the leader and 447 covering this flank, so despite the loss of my main platoon Rindis has some issues to the east.”
“To the west, the plan is delay delay delay. I’m moving units up, forcing Rindis to play cautious or take more risks to achieve a quick win. Falling back will be key to my defense, but I’ve little room to fall back and he should be at the town outskirts turn 3. I hope to know how to handle that particular mess soon. Air support will be key to my defense. If it doesn’t enter turn 2 I’m going to have problems.”
“Wasn’t expecting to see OBA this soon. It will be his 80mm Battalion Mortars. I’m interested to see how that pans out given the limited LOS on this map.”
Got to British Turn 2 AFPh tonight. Well, things are certainly not all going my way, though at the moment, I’d say I’m getting better breaks than Patch.
During my turn 2, one halftrack unbogged, only to get stuck again in the next hex. The other one Immobilized itself. I’ve sent a squad over to see if I can shift the 88 a hex before the scenario ends.
The attack from the west moves like molasses. Sluggish, but steady. I pressed a little, and lost a HS, but I’m starting to break his troops and am forcing them back to the pillbox and the village. The east is starting to recover from the initial setbacks and force the Brits back. The captured 88 turned out to be in S18 (I guess he was really expecting an east attack), and malfed on it’s first shot. His 57mm on the north end also malfed while shooting at the Immobile HT.
I can say my rallies are not doing well. In two turns with plenty to rally in the east, I’ve managed two leaders and a HS. It doesn’t help that the first leader was an Italian 6+1 who’s stacked with an Italian HS (‘4’ broken morale) and two German squads (+2 to rally, they’re effectively ‘5’s).
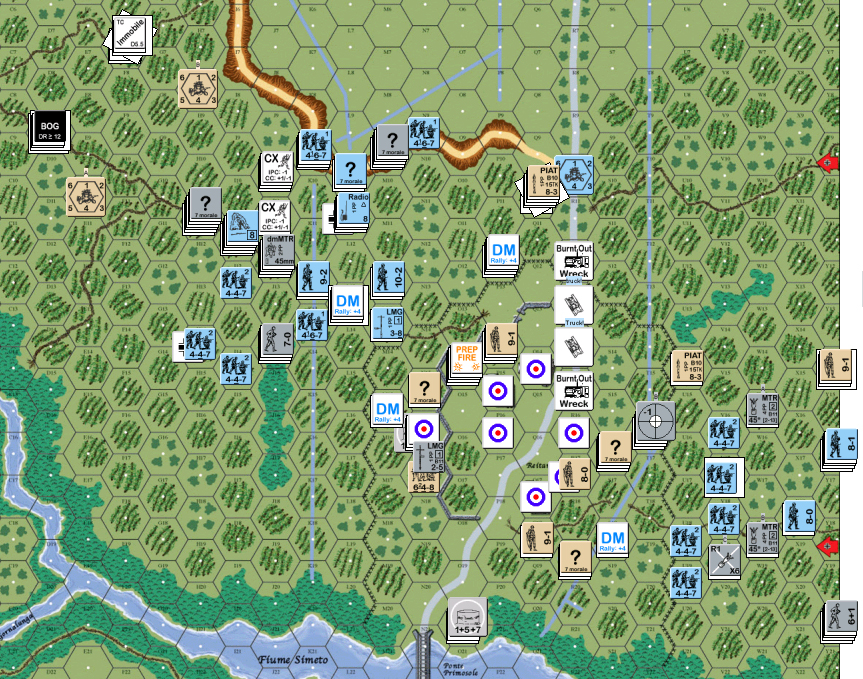
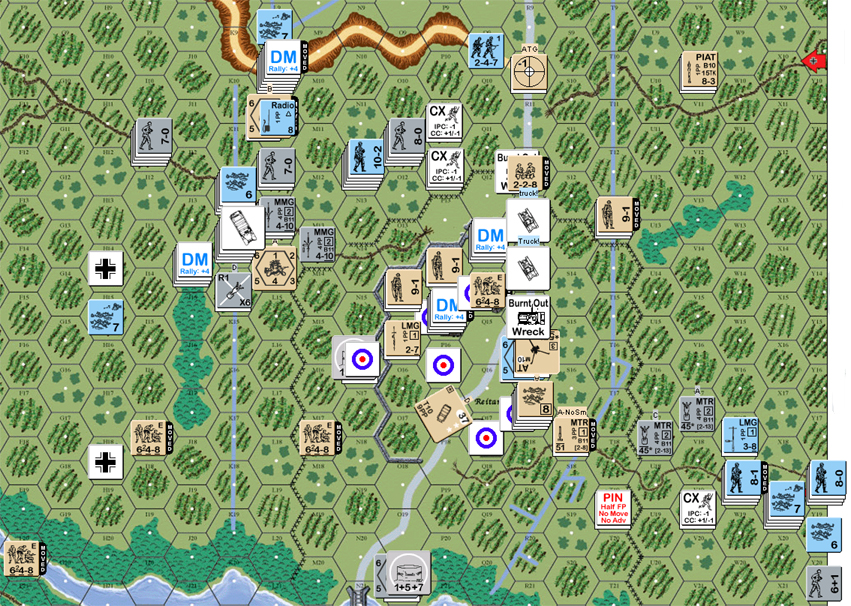
Situation going into British Turn 2 AFPh. He seems to be swapping out the guard in pillbox O16.
By now, I thought I’d mention some of my plans. I very nearly attacked on 14 AM. I bought everything I could at the reduced reserve cost. Because of the distance from the village to the building in B5, I could set up on-map Reserve there. In the end, I chickened out and waited for PM when I could buy a force for a second attack. This seemed pretty obvious to me, so I wasn’t expecting his defense to emphasize the east-side.
“Turn 2 had many disappointments. My air support failed to arrive again, I rolled high on several important attacks, lost the ATG to a Low Ammo malfunction (and losing any hope of nailing the 88 whilst towed) and my first shot with the 88 killed it (and then Rindis broke the crew). On the plus side, I did manage to break 5 or so squads, and I’ll never complain about doing that.”
“I am pushing very hard to the east where I’m trying to break apart the flanking assault with my own flanking maneuver. I don’t have to kill this company of 447’s – just break up the assault. So far it’s working fairly well, though he is creeping forward. Losing the damn 88 hurts. It could have done wonders against this group.”
“I’m also pushing hard to the west, moving up and falling back as I try to get even short term improvements in position for the following German movement. Rindis broke an 8-1 and 648 in the west which will cause problems, but is not an item of high concern at the moment. I think I’m still in good position, especially since two squads from my reinforcement group and their 9-1 have arrived north of the river. I also shuffled the 9-1 and 3 648s from the eastern blocking force to the west, where they broke the 467 shielded by the 10-2 in Advancing Fire. Would liked to have broken him, too, but nailing the squad was nice.”
“I’m having the same feelings this game that I did in our last game at Pegasus Bridge. Very stiff odds allow few mistakes, and I’m agonizing over everything I do. Can I pull this off? Hard to say, but it’s terribly exciting.”
Sorry for the delay in reporting in. Let myself get busy last week, and well… Turn 3 was not kind to me.
I started my half of the turn rallying one squad stacked with my 10-2 and loosing a HS on the east side to a 12. This meant I missed 10 other rally attempts (average DR=8 1/6).
Prep was light, and the only damage I did was a hit with a MTR that caused Patch’s squad to go Fanatic. The MTR broke on the next shot (my average=8, Patch’s=2).
Movement was, as usual, busy. It actually went fairly well, with most of my problems coming down to the fact that I’m getting steadily closer to the solid defenses (My average=7.5; Patch=7.5). I’d have felt better about it if my rallies were anywhere near average though. Advancing Fire, naturally, did nothing (7.8 vs 4).
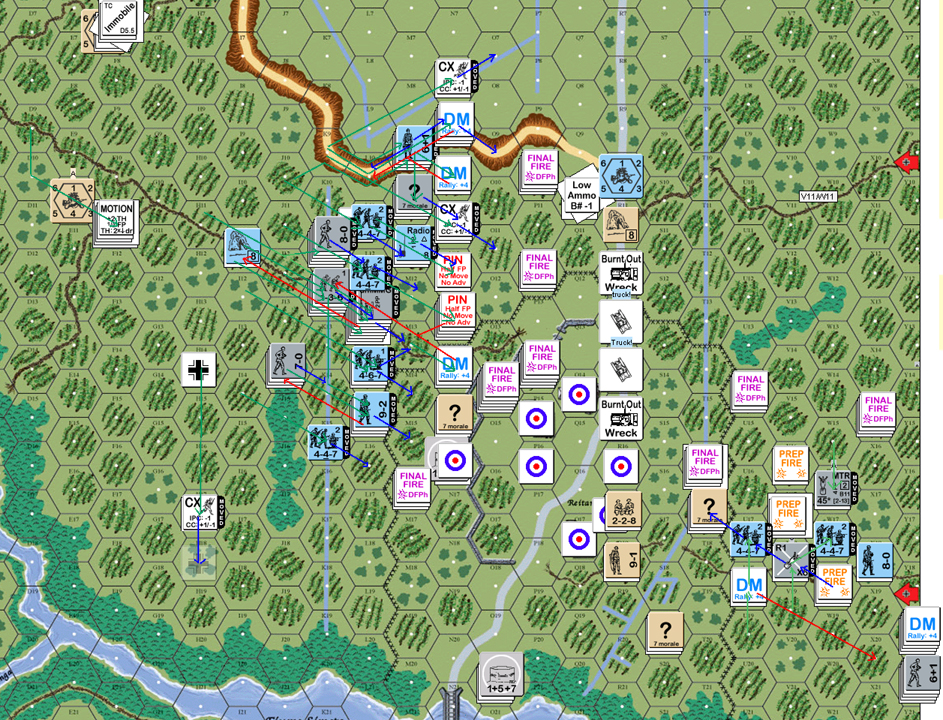
Situation at end of DFPh, German Turn 3, showing too complicated movement paths. The British in T17 are Dummies.
All in all, not too bad of a turn. The attrition on my forces was tolerable. And then for British turn 3 rally. I got a leader back, as well as three squads, one of them Battle Hardening into a 467. (The Italian ELR 0 means they’re falling apart, but the Germans are converting from a second-line force to a first-line one….) And I lost three HSes to ’12’s. Three! It did not put me in a good mood (Average: 9). As for Patch, he got his air support, but lost the ATG on the north side, and failed on his two rallies (7.5).
Then he Prep fired. He got two attacks that broke entire stacks, including the leader with the radio, who was finally ready to try to call down some artillery (6.89 vs 6).
Situation as of end of British Turn 3 MPh. I’m not sure what he’s doing with the Jeep.
We got through movement on my Turn 4 tonight, but I’m going to have to report on that later.
Will Fleming:
“Today is a good day indeed. Thanks for the update.”
“I certainly hope to see some of that German leadership. I will have to check, but for our short CG, I don’t think any Italians are available. After their showing at night, I am not sure I really want them tho.”
At work, but…
As I recall, all the support weapons available are Italian until after 14N. i.e., Italian 45mm MTRs and MMG/HMG platoons.
Given how they’re doing, I’m tempted to recommend you hand all the weapons over to the Germans at the first opportunity and use the Italians as flankers.
“I think Rindis is being easy on himself. Turn 3 was a German disaster.”
“Rindis moved his forces forward, and I broke several units leading the advance. I think he got frustrated next, as he moved his 10-2 and a squad very close to my line of 648s behind the wall. A huge error on my part led to only 2 648s and a 9-1 firing from P14 (I thought the third unit under the leader was a mtr, and missed the third 648 in the hex o.o) I broke the squad and pinned the 10-2, and at the end of the turn the 10-2 was sitting alone with no supporting units. To the east I continued pressure on broken units, maintaining DM in lieu of breaking new units, though I did some of that as well. At the end of the turn Rindis had a large number of units in close proximity to mine. At last, his unit superiority was entering play.”
“My options were to skulk or stand and fire. The problem with skulking is there’s no place to go! Retreating one hex in vineyards offers little survival improvement – 20FP +3 is little better than 20FP +2! I chose to stand and fight, targeting key hexes to break up firegroups. I revealed a hidden squad to the west adjacent to his units and added it to the fray. When the carnage was complete, I had broken 5 squads, 4-5 HS, and CR’d a squad. Rindis’ attack formation was in a shambles. Still, he managed to Pin 3 squads, which hurt end of turn redeployment (indeed, one Pinned squad adjacent to his 9-2 and a 467 was hit by a 1KIA in his turn 4 Prep Fire). I revealed a second HIP squad to the east and threw him against the western front in Movement. If there’s any chance of me winning this game, Turn 3 provided it. It was huge for me, and was at least a 2PMC for Rindis.”
“And Turn 4 is working hard to take it away. Though my 2 FB finally entered, in a preview of things to come, when they strafed a hex containing 3 broken 467s and the radio equipped 8-0, the leader rolled HoB and Battle Hardened. Now his damn radio is back in play early! >.<“
“As for the jeep, I figured it might be handy if I have to throw a HS south of the river later. Don’t know what else to do with the damn things, but I like keeping my options open.”
No, that was just me not thinking ahead to what the enemy can do to me very well. It’s a trap I fall into too often.
Looking back, Turn 3 was better than it felt at the time. But it was bad enough.
In some ways, the worst of it is that it gave him extra time to work out his defenses in relative calm. He’s parked a nice line of two squad stacks behind the wall on the west side of town, with three -1 leaders. This would be less than wise if the east-side force was making any headway, but it’s everything they can do to keep from being pushed off the map or into the river at the rate they’re breaking. I have a very real possibility that they won’t take a single building before game end.
Oh, a final note on turn three. We each had a Sniper activation during the British turn. Patch relocated his into the town, and mine killed off a broken British 8-1 on the north side of town. (If only I can take advantage of it…!)
…Patch? How many -1 leaders did you get anyway?
Rally on 4 got me 3 1/2 squads back… and another HS loss from a ’12’. Prep malfunctioned another MTR. I started with 6, and at this point had 3 malfunctioned, 1 abandoned, 1 still dm, and 1 still firing. I didn’t think B11 would be so bad….
Movement would have been good without the air support. When trying to do the entire ‘crawling blob of firepower’, it’s not really possible not to present great targets for strafing. And… well, I’m certainly not used to the idea. 8FP flat attacks are just nasty. The first one broke 1 1/2 squads, an Italian leader, wiped out an Italian HS on a ’12’, eliminated a German squad, and wounded my 6+1 (which even makes him useless for rushing troops up…). My 8-0 with the radio did Battle Harden to a 8-1 though…. The second one attempted to get the mobile HT as it finally got up to the fighting. Both shots on a point attack just missed on the * Vehicle line, and pinned a leader and HS in the same hex. In a final miracle, I rolled a ‘2’ to actually shift the other 88 forward a hex.
And after all that, he nails the HT in DFPh…. *That* has been a waste of CPP. In return, the 10-2 made his presence felt by breaking part of Patch’s north flank.
I technically have the greater weight of troops, but he’s got better cover and firepower. At the rate he keeps breaking my guys, I really don’t know how I’m going to get to the wall, much less over it.
Situation German Turn 4, middle of RtPh. (After German, before British.) Note the Gun that just broke HIP by changing CA….
benj:
“Wow, that’s a pretty nice line of DM stacks!”
“Thanks to both for this AAR, it is excellent. :-)”
Turn 5 begins
“Ah, so things are coming to an end as we face the first dr for the end of the scenario. Here’s to a quick end! *clink*”
“I’m not good at drawing all those arrows as Rindis is, so here’s the start of turn 5 overview, before Rindis’ rally attempts.”

“Rindis continued pushing forward, and with the CR of my northern squad, a gateway is opening in the north. I’ve a crew holding the R road, which is hardly sufficient given that I moved him into the wrong damn hex. If he can hold through German turn 5 I can reshuffle, but things are slowly falling apart. There are an awful lot of Germans.”
“My turn didn’t go well at all, for the most part. My fire was largely ineffective, and could not break up the growing firegroups, particularly in the east. That force is becoming dangerous. Time for my flanking attack to fall back to the village, job well done. The German sniper became active and broke my ATG crew, and though the east is thinly held, I don’t think its loss is critical for now. Both his HMGs went on a tear but didn’t do any damage. Still, I’m hoping to see more of those Italian ’11’ breakdown numbers. On a high note the first assault on the bunker location was beaten off, letting me get the broken squad out and a HS in.”
“What is interesting is the little squad in K16. Threatening not one but two Strategic locations, Rindis can’t afford to ignore him. I do hope he survives any Prep Fire. I also have a squad in P21 defending the river from a crossing by that 447. I’d rather have him in the town, but I can’t let him cross the river as that makes his victory conditions so much easier.”
“A rather sizable portion of his forces are still broken, but few are under the effects of DM as we enter turn 5 so I expect a sizable number of rallies this turn. I have 8 squads behind the wall, led by three 9-1s and a hero. He’ll have to crack that in turn 5 before he can advance, but he’s running out of time to stand and fight it out. I expect to see some risk taking.”
“Rindis rolled way too many 2’s this game turn. I think he rolled 5 or 6 of the damn things. My attempt to destroy his 10-2 stack with a 24(+2) attack was met with a Battle Hardened squad and a hero. Just what a 10-2 needs, another -1 modifier. However, on the 10-2’s return fire, the British Battle Hardened a squad and generated their own hero. Fair’s fair, I suppose.”
And another bad turn.
My turn 5 rally wasn’t too bad. Notably the east-side force was finally in pretty good shape, and ready to swarm forward again.
That lasted half a turn.
I really haven’t been paying attention to what his Air Support can do, figuring, all in all, that it shouldn’t be too much worse than OBA.
Well, it was worse, much worse. One FB single handedly broke most of the eastern force. His Snipers have been active, breaking the crew and assisting squad for the 88. During his turn, it also killed my 8-1 with the radio.
The best I can say is that I have successfully started shifting my focus to the north, where the wall ends. The 10-2 & Hero are with a HMG, and I managed to break two squads behind the wall, which will thin him out slightly. The east force actually managed a pin and a break with their depleted numbers, taking another break in return. (And with that break, I now have no MTRs in active service, two are abandoned, two are possessed by broken HSs, and the fifth is itself malfed).
I think, even with the current SNAFUs, I can get into the village… given more time than the scenario will allow me.
Situation just after RtPh, British Turn 5. Note that I’m about to lose H18.
A look at the losses so far:
Italians:
2×136
2×126
45mm MTR
Germans:
8-1
2×467
2×247
7×237
236
SdKfz 7 + (88mm AA & 228 as passengers/towed)
British:
8-1
648
338
Italian LMG (captured on 13N)
51mm MTR
This has been a really punishing game for me. Last turn alone was worth 3 PMCs.
Canadian Dude interjected:
“Glad to see this updated. My oppenent and I plan on playing this after we complete one more scenerio. I’ll be the Axis so I’m really eager to see how this date turns out and what the Krauts will do if the Brits stay on board.”
“- The Canadian Dude”
UK Turn 5 comments
“I didn’t get too much done during German turn 5. Rindis continued to maneuver across the north through the olive grove, and his eastern force rallied and pushed west again. Lots of squads moving about. I set up a wall of 648s in the west, led by three 9-1s and a hero. To the east, things are still thin, but the terrain still gives me a turn to reinforce if things fall apart, and the western front is still the biggest concern.”
“I held together during Prep Fire, despite his HMGs up on the line and getting multiple ROF. But the big hit comes in movement. Rindis can’t help but cluster his troops, and my FB come right on top of them. Defensive fire devastates the eastern forces, and 30(+2) and 20(+1) attacks rip apart the -2 led stacks. Still can’t break that damn 10-2, but the 9-2 goes down. The 447 guarding the H18 Strategic Area goes down, leaving it open to me. 3 UK sniper attacks add to the carnage, breaking two squads. My 3 SAN is acting more like a “7”. At the end I’ve broken some 14 units and bagged two more HS. For his bit Rindis does manage to break two units, but not enough to hurt. At the end of the turn I have more unbroken squad equivalents on board than Rindis does.”
“The damage continues in Prep Fire, but not as severely as last turn. A 16(-1) does give me a nice 1KIA against a 467. I take H18, and move a second squad across the river to assist in its defense. Rindis breaks two squads on my main line, and the eastern forces prevent one from routing to cover. I’ve abandoned the eastern flanking attempt and have moved that stack to cover the north, which is under growing pressure. My sniper appears again and nails the 8-1 carrying the radio with a clean kill. In a bit of luck for Rindis, I completely forget to apply the +1 LLMC to the two squads and HS with him.”
“The 648s at the wall are now thinning out so I can build a reserve and reduce the risk of losing the entire line should Rindis have a fire phase like I had in turn 3 and 5. Despite his loses, Rindis is coordinating a large amount of firepower now, and those two HMGs are worrisome.”
“The game is bounding forward into turn 6. Rindis won’t enter town on this turn, but he will creep forward a few more hexes. I’m relying heavily on the planes to keep from being overrun if Rindis has a good Prep Fire, a task for which they have been extremely successful.”
“As we move into Turn 6, there’s one question preying on my mind. What’s coming after H18, and can he retake it? I think not much, and no. Not until Turn 7, and odds are excellent the game will end before then.”
Start of UK Turn 6
“The game enters turn 6!”
“Rindis continues his creep along the northern flank, and once again pushes from the east, his forces there joined by a Hero created during Rally. The eastern forces actually reach the barb wire fence, but are pushed back when only the Hero remains unbroken after Defensive Fire. To the west, Rindis nails a British 9-1 when I roll a “12” on a MC, and several HS move to protect the H14 Strategic Area from capture. I don’t think they’re preparing for a move on H18, as it’s just too far away even for a turn 7 assault. A 467 finally makes contact with the crew holding the 9 road, but is ambushed in CC and the crew withdraws to join an adjacent 9-1 and 648. A bold move by his 9-2 and a pair of 467s brings down the wrath of both FB, resulting in a wounded 9-2 and the loss of a HS. My remaining defensive fire breaks several more units. I have honestly entered the mindset that, when I fire at Germans, they will automatically break, and I’m surprised when they don’t.”
“I’m starting to look more and more at improving not just my position for this game but for subsequent CG dates as well, which is why I focused so heavily on the 9-2 this turn. I want those –2 leaders off the board for the rest of this campaign, and as the date winds to an end I’m taking actions which, though may hurt me in the short term, should benefit in the long term. The barrage of fire with air support against the towed 88 is a good example of this. Outnumbered 2:1, I would have been better off sending the planes and a 24FP attack against his infantry, but when the towed gun got within range of my infantry I made killing the 88 a top priority. Now, when my tanks enter the board on the 15th, there’s only one 88 to deal with. I wish my 57L ATG could have nailed the second, but it was just not to be. I certainly could have hurt his HMG line with one of the planes, but I wanted to double break the 9-2 and eliminate him, so I sent the second plane in.”
“Despite the successes on German turn 6, I cannot capitalize on them in my following turn, which is proving to be a pattern. For the first time ever, I have failed to break any German/Italian units in a fire phase, and malfunctioned two SW. An Italian 136 even survived a 1MC unscathed. I did manage to Pin the squad adjacent to my stack in the north, so I believe it has a change of surviving his return fire. However, his HMG line is intact, and that has the potential to hurt. Hmm.. maybe I should have sent a plane this way.  There is some minor reshuffling of my units as I build a reserve in the buildings to replace front line units when they break.”
“This CG date is about wrapped up. This turn will end on a “3” or less, and if it doesn’t, it will most certainly end after Rindis’ next turn, when the roll is a “5” or less. I don’t believe he can win this one if I simply packed up and left, as he has no one south of the river, and so must capture all building/bunker locations, which he cannot do in the likely one movement phase remaining. But he can perhaps capture one or two, which will improve his position the following date.”
“And when will that be? I’m betting it will be 14N. Rindis got hammered today, and has failed to dislodge me from the town. He needs to take it to keep me from setting up north of the river on the 15th, so I expect him to expend another attack chit for a night assault. The night assault does have me worried. I’m still outnumbered, my air support will be gone, his position is substantially improved, and cloaked units will abound.”
Start of UK Turn 6
German Turn 6 thrusts are in blue.

Thanks for the write-up Patch, I’ve been trying to set aside time to do the entire screenshot thing.
And yes, I went into Turn 5 with some fairly high hopes. Just enough rallied for me to think I could get somewhere, and advanced hoping to finally crack the line.
Well, the HMGs continued to do a good job. If they could have been in position a couple turns earlier, I think things wouldn’t be nearly so awful now.
Patch’s fire was just murder on my troops once again. The only bright spot is that fire from behind the wall and four attacks from his FBs only managed two double-breaks, loosing me a HS and wounding the 9-2 (who refused to die of it). The cloud to go with that silver lining is that I was in the middle of transferring the 9-2 and two squads to the northern front, to put even more pressure on the north wall.
So, the mobile forces at the north end are running out of steam, and the reinforcements are gone.
Will Fleming:
“Our game is so different. I only have 3 coy to choose from and have entered two from the west on 14AM. Allied FB (incl bombs) came on turn 1 and I am pinned down on the western edge. I haven’t even taken a shot and drew a red chit for OBA.”
“Just digging foxholes in hopes of getting a long day on 14PM.”
“FWIW, I strongly suggest the full CG over CG3.”
German mid-turn 7
“UK 6 really didn’t go anywhere as I had my worst turn of the game. I did little damage to his units, but thankfully little was done to mine and the game rolled into turn 7.”
“Rindis had his best rally phase to date, but it’s too little, too late at this point. But geez, three 2’s? >.< Rindis bolstered his force with a new 7-0, a new Hero, and a berserk HS. All I did was rally two units.”
“Rindis continued to hit my main line with his paired HMGs, breaking one squad and pinning a second but leaving the main line intact. To the east, Rindis got another ‘2’ with his Mtr, but the critical hit failed to have an effect.”
“Most of movement centered on retaking H18. It was a longshot move for him, and my two squads with air support made it even longer. H18 is going to stay mine, barring some horrible end of turn rolls. To the east, things got fairly hairy, and he came close to taking the line. I’ve only two up front units there, and one too far back to do any good, so Defensive Fire is lacking. I lost one FB due to a failed Sighting TC, so I couldn’t lend any support once things began moving. Rindis pushed several units right up to the barb wire, and it wasn’t until Final Fire that I finally inflicted the necessary damage to hold the line, breaking most of the units. There is still Advancing Fire to survive, but I’ve some good odds there.”
Beginning of German Advancing Fire, Turn 7
German moves in blue. Defensive Fire in green

Canadian Dude:
“man…. it looks like the german got boned in this scenerio 🙁 weren’t they supposed to take the town in one big attack? What went wrong dude?”
“- The Canadian Dude”
“That’s an excellent question! I believe it boiled down to two key factors.”
“1) Rindis got diced on Turns 3 and 5, with Turn 3 being a key turning point in the game. The western assault was shattered and he was driven soundly back from the wall. He was never again as well prepared to take the town as he was at that point.”
“2) Air support. The ability to hit 8 additional hexes at 8 (+0) is a tremendous advantage, especially as he has no choice but to bunch up. The only way this could have been better is if my air had come in early and I could have strafed the trail.”
“There are several smaller things that also made the difference.”
“3) The 648s are just plain mean. Rindis closed to 2 hexes and ran into a wall of firepower.”
“4) The stone wall is a major strategic location for defense against units attacking through the vineyards. I was hitting him with modified +0/+1 shots, and he was returning fire at +3/+4 or better.”
“5) The eastern flanking attack. I was able to keep units under DM, and he chased me by moving units north, rather than west, which kept the pressure off the town and allowed me to move the vast majority of my units west.”
“6) Rindis bought the 88s rather than armor or air, in an attempt to increase his Strategic Locations as he advanced. That was a mistake as they’re too vulnerable.”
“7) Rindis never organized FG around his -2 leaders until late in the game.”
“8) He’s had a horrible time getting broken units rallied, and many are not in locations with leaders meaning they languish for extended periods.”
Canadian Dude:
“Him, I guess that pretty much sums it up as to what happened. Lots of lesson for me to learn if/when I play this CG (Starting to consider not playing it in exchange for RB or Stumont).”
“- The Canadian Dude”
“But geez, three 2’s? >.<“
Considering I had a RPh with three 12s, fair’s fair.
The end of German 7 was pretty much a non-event. With the spectacular RPh, I had had some hopes of pushing my luck and trying to take something out at the last minute. Defensive fire put an end to that. I got a bunch adjacent to a unit in the east, but the only survivors were a pair of heroes (one wounded), a pair of leaders, and a pinned squad. Everything else, as has been normal, broke. I was looking at a risky move on H18, as I actually had enough to pin down his fire and get someone adjacent, but a FB ended that before I could even draw his fire.
The game ended at the end of my 7, denying my 1:36 chance to squeeze an extra turn out, and we’re starting the RePh.
Overall, this Date has been one of the most abysmal failures I’ve ever had, not only did I not take any objectives near the town, but Patch took one of my Strategic Locations which had been meant to give an extra staging area near the town and threatening a cross-river rush. Instead, it gives him a flanking position.
Major failures:
- I completely failed to appreciate the usefulness of airpower. I figured it’d be in the same class as OBA, and was thoroughly unprepared for strings of 8FP attacks that could appear anytime a couple of valuable units were lined up in the hexgrid anywhere on the board.
- I bought an AA section to move up and provide mobile Strategic Locations in case I had problems getting into the town, and to shell the defenses if needed. I somehow had an idea that paths would help vehicles move, and didn’t snap out of this delusion until Turn 1, when it was far too late. As it was, I lost one, and the other contributed nothing all game. I’m not sure what I should have done with the points, but this wasn’t it.
Minor failures:
- I failed to appreciate the distance from B5 to the village, and just what it would take to get there. The initial turns were extremely disorganized, and I ended up with a more fragmentary western assault than I would have liked. (This is typical of me, I can never set up an attack correctly, but only sort things out after a couple turns of movement.)
- I purchased OBA, and never even attempted to use it. This was not entirely my fault, as my observer-leader broke immediately upon getting where I wanted him twice, and was then killed by a Sniper.
- I failed to realize the Italians have an ELR of 0, until the game was going. I heartily suggest that all SW be handed over to German troops at the earliest opportunity.
- I hung on to the assault of bunker N16 too long. If I had started shifting things north a turn earlier, I might have gotten somewhere.
Good points:
- I actually did a very good job of finding leaders for most of my broken troops. Very few actually spent time without a leader (those who did tended to stay isolated though). The problem was, no one rallied anyway.
(This list may be edited as I think of more…)
As near as I can see, most of the rest of it comes down to an insanely high breakage rate from turns 3-5, which stalled the main effort, and completely halted the eastern side until turn 7 (when everybody promptly broke again).
The good side of my luck is that I had more German squads Battle Harden than fail ELR. Sadly, it was all 447->467 instead of 467->468, and the extra Morale is much handier than extra range on this map.
Now I need to see if I can even put together a creditable attack for 14N. I can’t really afford not to attack then, but I can’t buy any more companies, and my losses have been so severe, I’m not sure that I can attack without guaranteeing a further disaster.
And, for your viewing pleasure, here’s the Setup Area map:
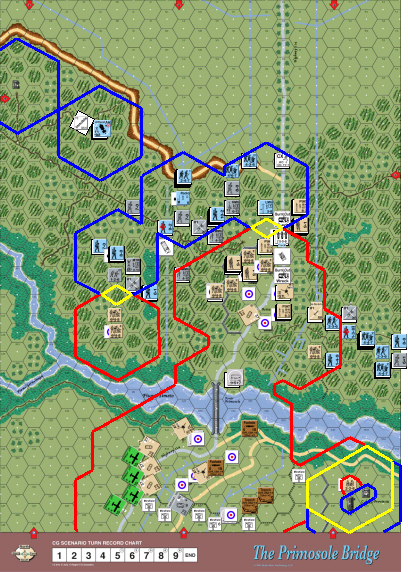
“For my own information, and those playing along, once troops entered the board they can’t pull off and reenter again, they must move to an on-board set-up area? That would seem to be the case, but I will admit I can’t seem to get my head wrapped around a scenario with 20 pages of rules, and I keep missing stuff.”
On Z48 in the charts on what happens to units not in Friendly Setup Areas: Personnel/Mobile-Vehicle – in Uncontrolled Territory: “is Retained into the nearest friendly-Setup/Eligible Entry Area or must attempt Escape (3.6053).”
Other places, such as Z3.6061, say much the same thing.
Note that is also says nearest, which means that I can’t even put the east-side force with everyone else, but they must go back to where they entered from the first time.
[Next date: 14 N]
Discussion (2) ¬