
PBr CG I “Who Are These Devils?” — July 13 Night
When Patch and I started playing through the scenarios from Pegasus Bridge, the intention was to follow them up with an actual Campaign Game from that product. However, by the time we had gotten through them all, Journal 6 had come out, with its own mini-HASL, “Primosole Bridge”. I was enthused by it, and talked Patch into getting a copy, and instead of playing a campaign game with British and Germans fighting over a bridge in Normandy, we played one with British and Germans fighting over a bridge in Sicily a year earlier. The original AAR was one big thread for everything, but I’m splitting it up into the various ‘dates’ here, otherwise it’ll be too long even for me. We got going in May 2007…:
And this one is likely to go on for quite a while. Patch and I just started the full 12-date CG for Primosole Bridge from Journal 6. I’m taking the Italian & German forces.
It’s going slightly slowly for us at the moment. It’s been a decade since Patch has played with Night, Gliders or paradrops, and it’s my first time for all three. However, the unit density for the initial scenario is low enough (compared to PB6) that once we’re past the night rules questions it should move pretty fast.
The initial scenario seems like it would make an interesting regular scenario, with a German convoy showing up in the middle of the Brit paratroopers taking out the Italian garrison. Setup was complicated for both sides, and odd for me, since the normal night options are in turn restricted by the fact that I have to be adjacent to the paved road and in a pillbox or building. And all the pillbox and trench locations are specified, so I didn’t bother HIPing them, as it’d only force Patch to re-read the SSR as he moved.
One turn into the date, and not much has happened north of the river. The paratroops scattered all over, and should be about to head for C Di Stephano.
The gliders landed in the south, and he got his reinforcements on turn 1. Not exactly what I was hoping for. However, Things have gone decently well. He discovered a minefield by losing a HS to it, and the losing the other half of the squad as they tried to rout out of it. The M23 pillbox’s MMG managed to nail a stack of his during my turn, breaking a 8-1 and two 648s. He managed to self-rally one of the squads on his turn and get the leader out of DM, so I’m not keeping them down for long. Meanwhile a lowly 346 squad has managed to keep another squad in melee for two CCPhs despite being Ambushed. I moved another group from O24 to the north end of the bridge. I did this in full (concealed) view of Cloak ‘A’, so I’m starting to wonder about him….
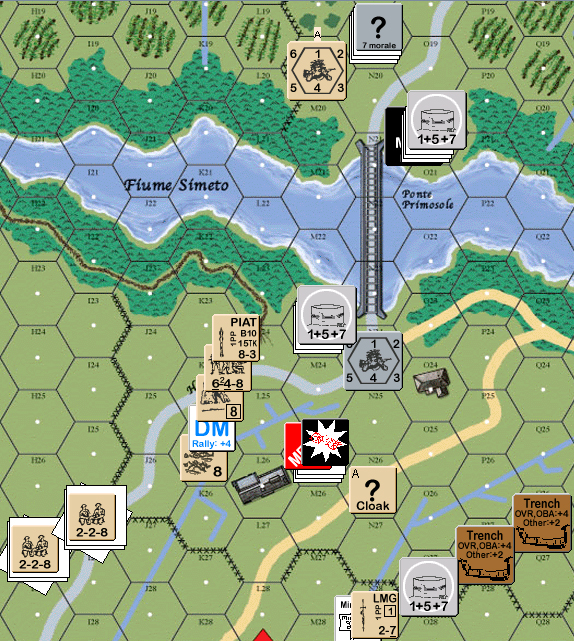
Situation south and around the bridge, beginning of British turn 2.
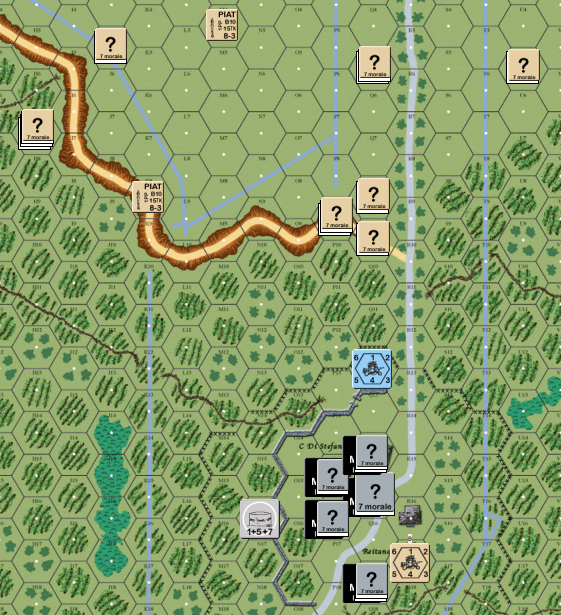
Town and British landings, beginning of British turn 2.
The really troublesome news is that the NVR has already gone down to 2, and I have yet to get a starshell off. Three attempts, and I think they were all 5s. This means he could get scarily close to the town north of the bridge before I see him.
We’re using the PBr VASL map available for download here, but we’ve noticed that the game-internal hexgrid has trouble. Much of it matches, but right at hexrow ‘O’ it suddenly shifts off a hex….
Honza said:
“Sounds interesting”
Patch posted:
“I suppose the best thing that can be said about this turn is that the Italians didn’t push the southern Brits off the board, though they certainly had the opportunity. That would have been embarrassing.”
“Turn 1 was a bit of a mess as Rindis and I got used to Night and Airdrop rules. Once the initial landings were done, things sped up. Now we’re just keeping track of Starshell rules, which are a bit simpler.”
“I dropped both parachute sticks up north, hoping for fast-entering reinforcements to clear the south approach. Luck was in my favor as they entered turn 1. Parachute drift was minor, and both sticks came down fairly accurately. Both gliders also landed successfully.”
“I drove the cloaked units right at the first buildings and pillbox to try and gain some ground, completely forgetting about the fact Rindis has minefields. Rindis rolled a “3” when one squad blundered into one, and he died when I tried to route him out. I got one cloaked squad into CC with a 346, ambushed him, and in what I’m calling typical rabbit luck has been stuck in Melee ever since. Can’t I catch a break this turn? Obviously not, as Rindis then broke the leader and his two squads with a 6(+2) and a 4(+2) shot, leaving that little attack force in serious trouble. Fortune did smile on me when for my first self-rally attempt I brought a squad back on his own, and the leader is no longer DM. With a NVR of 2, I’m in better shape to attack from the north, though the southern end will still take some doing.”
Perry responded:
The initial scenario seems like it would make an interesting regular scenario, with a German convoy showing up in the middle of the Brit paratroopers taking out the Italian garrison. Setup was complicated for both sides, and odd for me, since the normal night options are in turn restricted by the fact that I have to be adjacent to the paved road and in a pillbox or building.
“It sounds like fun, but we couldn’t make it work.”
Well, that explains that….
“Turn 2 could have gone better as the Italians continue to defy the British. I threw the newly rallied squad to the south into the melee against a single 346, and succeeded in only reducing it in CC. Rindis moved the second MMG across the bridge to reinforce the north, and I suspect he’s heading towards the bunker in N16. Rindis tried engaging a rather large stack of mine with a squad and HS in Q14 to no effect, and my return fire broke both with a 4MC (which I now realize should have been a 3MC, but to no difference to result). We can call them safely out of the fight as both ELR’d, and there are no hidden units in *that* hex. I’ve identified 5.5 squads thusfar. Where can the others be?”
“Turn 3 will entail trying to eliminate his forces in the village north of the river. My paratroops are finally entering the fray, but if their die rolls are as bad as I had to the south I may not clear the damn town. Further problems are to be had as I realized too late that the movement penalty for entering concealment terrain applies if you’re on a path. My clever flanking maneuver will take longer than planned. To the south, a slow creep against the bunker begins. Losing the squad in the minefield hurts.”
Beginning UK Turn 3

waltermcwilliam posted:
“My pal Steve and I started this campaign about a year ago but he was deployed to iraq after we finished the first campaign game. I had the Ital/Germ. By turn 2 or 3 the NVR was 1, so his para’s got in close and were no match for my italians in CC, but it was a lot of fun and I hope we can begin again when he returns this month. Have fun, and I look forward to your AAR.”
Turn 4: Can I catch a break against these Italians?
“Turn 3 was the opening onslaught against the northern town as multiple units moved into range. My 9-1 and three squads moved into the Q14 building cluster where they continued to reveal dummies and CR the already broken units, reducing them further. More units moved into the R16 buildings. My two squads south of the river again assaulted the pillbox, but were thrown back with one broken squad. Damn! Rindis’ defensive fire failed to inflict damage, and in CC I captured the truck and further improved my positions to clear out the rest of the town.”
UK/Italian Turn 3 activity

“In his turn, Rindis saw the writing on the walls and commenced Operation Leave. The two ATGs made an appearance and tried to move out of harms way. One failed and had the crew broken in my return fire. The other was successful and moved into O16. Rindis continues to try and get his second MMG into the N16 pillbox, but strayed with Jitter Fire and got stopped short. His pillbox squad and MMG south of the river fired on my units to no effect.”
“Turn 4! So much left to do and more units are entering next turn! I’ve a lot left to do and so little time. The O20 pillbox is going to be a pain.”
Start of UK Turn 4

…My orders for the village have been ‘try to still be putting up a struggle when the Germans arrive.’
It’s certainly interesting. I don’t think either of is happy with what’s going on. The defense south of the bridge is down to a squad in a pillbox. It offers good protection, but it’s a matter of time before the two ATGs aimed at it cause at least a MC. The MMG there broke this turn, which probably spells the end of meaningful resistance.
North of the bridge, things are worse. NVR 2 allowed him to get way too close before I saw him. I made the mistake un-concealing the north-side defenders to fire on his concealed paratroopers. The firepower difference is scary! So now he has about 3/4ths of the village, the truck and one of the ATG (well, he hasn’t actually possessed it yet, but he’s in the hex). I have… not much. For some reason, I didn’t come up with the obvious thought to have one Gun pointing north up the road, and one pointing south. So they’ve been both pointing the wrong way.
Off the screenshots, Patch has a few people on the road north of town. Presumably, they’ll give a hot point-blank reception to the convoy in a little over a turn.
Just need to remember, with these forces, it’s a victory if he doesn’t end up capturing the 88…. 0.0
Off the screenshots, Patch has a few people on the road north of town. Presumably, they’ll give a hot point-blank reception to the convoy in a little over a turn.
“The problem I have with VASL. Big boards, little view windows. I may have forgotten to move him this turn.”
UK Turn 4. The town is mine!
“Well, almost.
“Down south I am successful in getting smoke atop the bunker and move against the squad, wiping him out in CC and clearing away the end of resistance south of the river. To the north, I move into the rest of the town and find the last HIP unit, which wipes out a squad in CC but not before I kill one of the gun crews. In another CC, I kill the second crew.”
“In his turn, Rindis falls back and gains concealment with his two remaining GO squads and leader. I suspect his plan is to use the concealment to counterattack and improve his Ambush rolls in an attempt to take a building or two.”
“The game end is becoming critical now. The convoy enters this turn, but won’t reach the town until turn 6. There’s a 1 in 6 chance it will end before that, and after that another 1 in 6 it will end before turn 7. I need to get my troops in position soon to ensure control of the damn town.”
End Game Turn 4.

I have to say, my best hope is for a short game. I’m having nightmares of seeing the convoy get ambushed and the Brits taking off with the 88, which would put quite crimp in any plans for armor reinforcements.
As it is, he’s captured the truck, is in control of the Locations where the two 47mm ATGs are (but not possessed them) and a MMG (likewise). The other MMG broke right before he took out the pillbox it was in, so he won’t be turning that on me at least.
That leaves the pillbox at the north end of the bridge and two squads to keep him distracted with, and try and keep him from claiming every Strategic Location on the board with….
Will Flemming dropped a line:
“Hmm, I might have to pull this one out and take a look at it as a possible next CG. I always wanted to try it since I have nothing but respect for Randy and his love of the game.”
“It might be fun to follow along and read the rules. I need something to get me thinking about ASL and ready for ASLOK.”
“Ah yes, I can see it now.”
“Focus, and remember not to do what Patch did…”
Turns 5 and 6
“Boy, dump a soda on a keyboard and it never wants to work the same again. I’m afraid this AAR is hampered by a lack of screenshots as I deleted my logs.”
“Turn 5 went fast as I redeployed to harass the units west of town, where I hoped to bag a leader, and moved to prepare an assault on that damn O20 pillbox. I need to get my mortars closer so I can smoke the damn thing and move in for CC. I pinned his 7-0, who broke and routed away with his units to avoid destruction in CC. That was to come in Rally, however, when he rolled a ’12’, died, and took two HS with him. Rindis has two squads, two LMG, and an 8-0 on the east side of town who moved north. I think he’s delaying an attack on the town to coincide with the convoy.”
“Turn 6 heralded the event we had all been waiting for: the destruction of Jared-Syn! No, sorry. The destruction of the German Convoy!”
“I made a mistake chasing his units turn 5. My troops were woefully out of position to adequately deal with the convoy and the remaining Italian units, so my plan this turn was to try and redeploy to eliminate the convoy and hope the Italians would be dealt with along the way. I need to get rid of that 88. My attempt to get concealed units on the east side of town was ruined by a starshell that illuminated the road, keeping me from crossing into the buildings while retaining concealment. This posed a huge problem for me. First, because Rindis actually had decent LOS to most of the town buildings, anyone who wasn’t concealed wasn’t likely to gain concealment. Second, the instant the convoy spotted one of my known units the convoy rules would be lifted. Because of this I had to leave R16 occupied with only a concealed 8-0, and regardless of what else I did the convoy would break apart before completing its full movement. One break I got was the ability to throw a concealed squad up the road where it could interdict the tail end of the convoy. The O20 pillbox was successfully smoked and attacked by several units, but despite 3:1 odds I failed to inflict casualties. South of the river I took control of all strategic locations.”
“Rindis popped the NVR back up to 3, Gusts dispersed my smoke, and the convoy began its run into town. At this point I realized that I had seriously erred and moved a unit into the wrong hex. The convoy would now break apart earlier than expected as it would spot an unconcealed HS. Despite this I killed two trucks and immobilized a third with an 8-0 that tried Street Fighting but got pinned from a failed ATMM attempt. The 88 was at the tail end right where I expected but it survived my Defensive Fire. The Italian counterattack went poorly due to some horrendous Straying rolls, and only one unit was able to exploit the open building hex. Rindis controls part of the town once again. Down at the O20 Pillbox I reduced Rindis to a HS. What’s with me and CC? I just can’t kill these Italians.”
“Great fortune was to be had when the game failed to end this turn and we continue on into Turn 7. It’s 50/50 to end next time, so this is likely my last opportunity to mop things up. I expect the last two trucks to go down (I will hopefully capture the 88 with 2 squads) and should retake the town and that last damn pillbox. If it should continue into Rindis’ turn, I do not expect him to take any other locations as I will have blocking units in place and the FP to hurt him.”
Beginning of Turn 7. The trucks disappeared when wrecked, so we used tanks instead.

Will Flemming:
“Interesting. Seems like this is about how it is supposed to go. Brits take a few casualties, but capture the ATG’s and take out nearly everything.”
“I don’t see how those 3-4-6’s can mount much of a defense. I would like to defend the southern side, but the setup restrictions make it pretty tough.”
Patch:
“I honestly don’t think the Italians are supposed to really mount a defense on this first scenario. I think this is just a placeholder to cover the initial paratroop drop for the battle, but if the Italians manage to retain a Strategic Location or the 88 so much the better.”
Right. My thinking is that the main thing is to see how much equipment the Brits can capture, and how many casualties they take.
Sorry I haven’t been reporting as much as I should have been, I’ve been very distracted for the last couple of weeks.
The Brits pushed the Italians out of town a bit before the convoy showed up, leaving him to deploy for that, clean up the defenders, and knock out the last pillbox at the north end of the bridge. I must say, despite some poor die rolling on Patch’s part, he did a good job of cleaning up the pillboxes, and told me much about how you go about doing it. (I had no idea…!)
Sadly, the convoy hit the center of town before seeing anyone, and the initial attack knocked out the middle two vehicles. As Patch mentioned, he only had a leader on the first vehicle, so I went in, grabbed an adjacent building and tried to support the German HS there. This did not work, and I lost the Italians I sent in, while he captured the Germans. I managed to break some of the troops he sent at the end of the column, but it wasn’t enough, and he captured the crew as well as the 88. T_T
Between this, and the 7-0 killing himself and two HSes on a ’12’, I have a broken HS, a squad with a LMG, and an 8-0—all in different places. Right now, the only option I have is to run and wait for the scenario to end. I’m not running fast enough, and we’re now into Turn 8 with the dr not going below a ‘5’ (+2 for the campaign date)….

Situation at the end of Turn 7.
And that’s a wrap!
Well for 13 Night, anyway. It finally ended at the end of British turn 8.
He caught up to my squad and tried to take it out in CC. I managed a K/2 to get rid of a HS on the way in. He ambushed me and missed (his CC rolls have been sub-par this game), but then I rolled a ’12’ and he withdrew back out rather than be stuck in Melee with a HS+leader vs my squad.
Overall, I feel like I’ve been diced by the game. Patch’s rolls weren’t too bad, but he got his reinforcements as early as possible, The game went longer than it should have (though probably not by too much, statistically speaking), the NVR went down to 2 while he was sneaking up on me, and went back up to 3 after the convoy was safely ambushed.
I also had a heck of a time getting starshells off for the first several turns, when it really could have done some good.
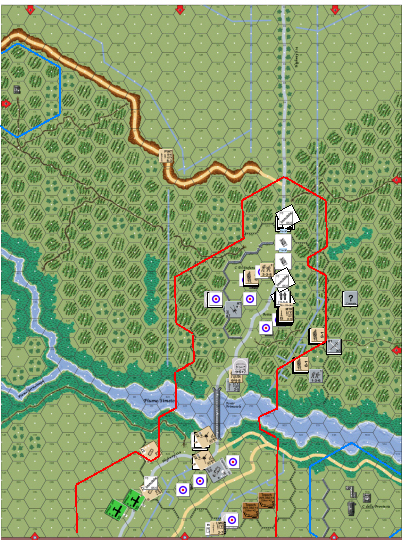
Situation at end of July 13 Night, with Setup Areas defined.
I had broken my last MG to Sustained fire right at the end, and the refit phase eliminated it. The equipment Patch captured about conformed to the 1/2 odds of retention. He lost a MMG, LMG, and 47mm AT Gun, but kept a LMG, the other 47 and… the 88. T_T
Now I get to figure out how to spend 43 CPP and mount a counter attack.
Will Flemming:
“I am not sure about the dice. I agree the early reinforcements were pretty lucky and certainly helped a lot. Overall, this seems to be about what I would expect and is inline with some of the posts Bret and others have made. I figure I will be lucky to get 2 British squads during this scenario, much less any Italians out.”
“Don’t fail your personal MC and give it a go. In the long CG, I think you will probably attack 2 times on the 14th and should be able to retake a lot if not everything north of the bridge. I figured on attacking in 14PM and 14N to take advantage of low ammo and the CPP edge the Germans have. You can save a bit by buying in reserve on 14AM and then entering them on 14PM.”
“How did the British depletion go (if known)? Lose any squads & SW there? I am hoping my opponent does some of my work for me.”
“Note: Did both British G2 RG’s come in depleted? I see only 2 gliders.”
“Edit: Do you guys mind comments here or would you prefer PMs? In either case, just let me know when to stop. :P”
“Edit2: My CG probably won’t start until late July or August :(“
“Don’t fail your personal MC and give it a go.”
No danger of that! I went in understanding that I was going to loose most everything. I am annoyed at how his job was made easer in a few places. If his reinforcements had come in later, I would have made a real try at holding the south side of the bridge. As it is, I may still have panicked too soon, oh well….
In the long CG, I think you will probably attack 2 times on the 14th and should be able to retake a lot if not everything north of the bridge. I figured on attacking in 14PM and 14N to take advantage of low ammo and the CPP edge the Germans have. You can save a bit by buying in reserve on 14AM and then entering them on 14PM.
That seems to be the standard advice. I have to admit I’m looking at the British forces and wondering how I’m going to get enough troops to mount an effective attack, but I haven’t really looked at what toys I get to buy yet.
“How did the British depletion go (if known)? Lose any squads & SW there? I am hoping my opponent does some of my work for me.”
Pre-game? I’d have to check again, but I don’t think he lost anything.
Note: Did both British G2 RG’s come in depleted? I see only 2 gliders.
Well, that’s the way I interpreted it when I pulled the counters, they weren’t at all specific on how that should be handled. I assumed the Guns had crews with them, as I couldn’t even see anything the specified they should have them. Anyway, they had the PP to take everything as I understood it. Patch, you want to double-check me? o.o
Edit: Do you guys mind comments here or would you prefer PMs? In either case, just let me know when to stop. 😛
Comments are always welcome.
Edit2: My CG probably won’t start until late July or August 🙁
Ah… anticipation.
Will Flemming:
“Not sure if I phrased it correctly. The British get 2x G2 RG right? Each G2 RG has two guns I believe (1 if depleted). I only see 2 jeeps, 2 57L ATG and 2 gliders, but the British can get up to 4 of each correct?”
asler confirmed:
“Yes, 4 jeeps, 4 AT guns, and 4 crews. In my game 2 of my gliders crashed eliminating all the contents so I ended up with just 2 of each.”
“Chris”
And Patch chimed in:
“Oh dear. Yes, you shorted me two guns. Should have been two groups of two guns, subject to depletion. We must chat about that little omission. Let’s roll those little dice.”
“‘5’ and an ‘8’. Both groups are full-strength. Yep, ya owe me two guns, two jeeps, and two gliders. Ah, the joy of learning.”
“I had no depleted RGs (12 squads total), but was down one LMG and one Mtr. Not too bad, but I’d rather have the Mtr/LMG than the PIAT at this stage.”
Will Flemming:
“Keep in mind I don’t want any secret info that the opponents don’t both know about. I agree the lt MTR are quite nice for this type of action.”
“There are lots of other threads with people missing the (2x). We actually were thinking that way until we stumbled across someone else pointing it out.”
Will Flemming:
“Just to keep things clear here (and my kibitzing comments). Please let me know when to ‘back off’ if I say anything. I don’t mean to distract from your enjoyment by pointing out (2x) G2 RG or anything.”
“I am under the impression (and I asked) that making some comments here is OK. If not, please let me know and I will hold off until you guys are finished. Both of you seem like nice guys and are doing a service by posting the AAR. Last thing I want to do is ruin your gaming experience.”
Patch:
“Oh, it’s fine. I wouldn’t worry about it. We’re both quiet at the moment as we’re planning for the 14PM game, not because of what you’ve said.”
Will, your comments have been fine.
Patch, the assault will be delayed by purchase violations. I know I went through those notes five or more times while purchasing, and I still managed to get groups that aren’t available yet that I discovered late last night.
Argh.
(Yes, that means no game tonight.)
[Next Date: 14 PM]
Discussion ¬