[Last Date: Sep 16]
CG I is a relatively short campaign, running only eight days. I’m still somewhat embarrassed that I only made it through two. I actually do not remember the campaign in any real detail. I just remember feeling like I was seriously short of troops after about the third turn or so of the initial scenario. Certainly, I felt I had about two-thirds as much as I really needed going into the second day, and most of it was having to enter from off-map. Patch led off the post-game analysis:
“My thoughts?”
“I have no idea how to play this one as the Russians. CVP were about 62 to 17 this date in my favor. I simply annihilated any defense Rindis tried to throw up. I look at these games as “organized losing” — can you lose slow enough to eventually win? In the face of the FP I was throwing out, I don’t know how to do it.”
“What I did notice that may have helped Rindis.”
“1) He never used cellars, and really never used upper levels. In the words of Spock, “his tactics indicate two dimensional thinking”. Rindis should have made me flush him from every nook and cranny.”
“2) Fanatic Strongpoints never got used. I think making the Children’s Home one could have made a difference in the short term.”
“3) Deliberate Immobilization. Rindis kept trying to pierce the front armor of my SPGs hoping for a CH. He should have gone for the immobilization shot. With no turrets, it’s as good as a kill for that date.”
“4) Field Phones. Rindis went for a radio, and could never get radio contact. A field phone would be better. Make the observer HIP and enjoy watching me try to find him to stop the incoming.”
Fireguy commented:
“Hey Patch,”
“I just read your last post there and was thinking about some of your comments in regards to how the Russians can win this. My FtF partner and I are playing this CG game and we are currently on the first night counter attack and I’ll give some insight as to what I’m experiencing as the Germans so far.”
“So far, in terms of FP the Germans have this CG in the bag. The amount of toy’s I’ve got is crazy and almost everywhere you look there is an HMG or DC so it’s easy to say the Germans are far superior in terms of FP. Of course this lends itself to the fact that the Germans have an advantage during the day scenario’s. On our first day Mike setup his Russians in a very forward position (Hex D33 to D44) and I had to fight to get across the road and fight him all the way to the rail station, which I was able to secure on the first day.”
“Now after we did the refit phase he decided to declare a counter attack and we are about half way through the first night scenario. As we’ve played and talked about it we are finding that the night counter attacks are integral to the Russians winning this CG. I’ve haven’t read all the posts from your guys AAR so I don’t know how many or if there were any counter attacks but in this CG the Russians rule at night!”
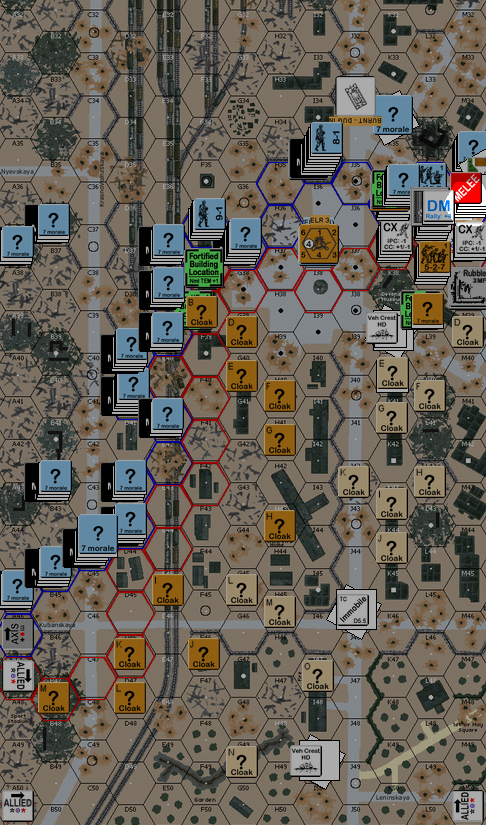
“Mike was able to setup adjacent to me at the rail station and basically put his whole force in a very concentrate area between H36-H39-D41. This was to deny my guys in the north the ability to lose there “No Move” counters so I couldn’t reinforce and also to attempt (I’m glad to say it’s only been an attempt so far… ) to breach my lines so he could rush me and get behind me. His goal has been to maintain cloaking for as long as possible and to attack me in CC, get ambush, and kill me with H-H. He’s been very successful at this with and few exceptions.”
“I feared CC going into this night scenario and was left with the difficuly decision of; do I hold ground at the cost of units or do I fall back and avoid CC and the cost of giving up ground. I’ve so far been able to accomplish a bit of both. In my setup I deployed as much as possible and had a line of HS with kill stacks behind him to hopefully strip his cloaking/concealment in the second turn. I think it’s turn 4 or the beginning of turn 5 and he’s pushed me back to the “C” road and now is pushing me north.”
“I’m not trying to make this my own AAR so I’ll get back to the original questions I was trying to answer. I think (and I’m sure mike will agree with me) that the Russians need to counter attack as much as possible to try and push the Germans back during the night scenario’s. The chances are good that the Germans will be able to move forward during the day and gain ground with their superior FP and so the Russians have to utilise one of their best assets and that’s their night superiority.”
“Matt B”
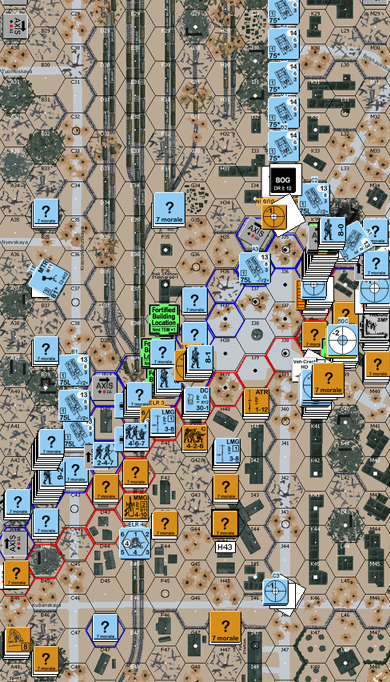
The CG ended at the end of the second day, so there was only one opportunity for a night attack, which I took. It was moderately successful, with 3:2 losses in the German’s favor, but he was trading 1st line troops for my conscripts and losing ground in the process. Some of this was after a disastrous 1st turn assault along the east edge that I ignored my instincts on (felt I had to, as that’s where I had the troops, later events showed I was perfectly capable of moving everyone where I really wanted them in good time). If not for that, it probably would have been closer to 1:1.
You’re certainly correct about the firepower problem. The Germans had multiple MG-heavy stacks wandering around that were pouring out improbable amounts of firepower, and I never figured out what I was supposed to do about it.
One of the things I certainly felt hamstrung by was RP purchases. I lost more than I really wanted to at night, and needed a lot of bodies to hold the line, and even with a good roll and burning the one-time bonus, I could barely afford the minimum of what I felt I needed (a company and a platoon; I really wanted a second company).
Something that probably had long reaching consequences that I need to look up, is that as I recall just about every single purchase for the first day was depleted (including the NKVD unit that gets the bonus).
On the other hand, Patch is certainly correct about the lack of cellar and upper story use. I suppose I’ve just been burned too often on seeing units get trapped in those locations. I tend to think of such things as gambits, to be thrown in after the main defensive line is in place, and this Date my on-board line was dangerously thin, and had to count on the reinforcements coming up.
Deliberate Immobilization and Field Phones never occurred to me…. (I certainly did not expect to have this kind of trouble; I think AT&T needs better coverage in Stalingrad.)
The plan for this date was that Patch would be fighting to get to the Hospital at the end of the Date, which I’d finish fortifying in the next RePh. Three fire phases where entire stacks pretty much evaporated killed that plan. On the east edge, L38/M39 was actually an NKVD strongpoint, but the ability never came up.
Whizbang 1963 asked about:
“CGI-3 RUSSIAN BONUS CPP: 14 Once during the CG, on/after the night of 15 September (but prior to 17 September), the Russian receives a bonus of 7 additional CPP (12.618).
If you made this attack, how did you spend these points? Did you set up in all the frontline locations and go on the offensive against the German?”
“I had it done to me in CG IV at Consimworld last year and got my head handed to me as the German. I played an atypical Russian opponent who went on the offensive every chance he got.”
Ogier300 commented:
“I’d agree that the Russian night counter-attacks are a key component of the defense. In the CGI we’re playing, the German side (mine) also had trouble with dice on day one (we started the day with 41 squads, and finished with just 16; after the night counter-attack, we were down to 12 – we failed to take the Railstation, as well). The Russian players have been very aggressive in the night counter-attacks and have made heavy use of Recon to eliminate dummy stacks and check nooks and crannies.”
I’ll pull out the records of my purchases when I get a chance (file not with me), but I took the bonus for the scenario on the 16th (e.g., this latest one), not the night of the 15th. Short of the initial date, I haven’t been able to afford on-map setup.
Steven Linton commented:
“Interesting stuff.”
“I’m about to start Sep 18 as the Russian, and I’ve still got control of most of the map – the German has gotten an inroad in the east, but is still not over the road to threaten the train station (OK, I did throw him back in the night counter-attack).”
“My basic strategy has been threefold:”
“1) I figure the number of squads the Germans can get for the campaign – putting aside reinforced companies – is about 90 (NRBH). They’re my targets. Set DCs, HIP, mines – whatever it takes to kill the infantry.”
“2) In the night counterattack, I made it a priority to clear the west edge (the if controlled entry area for the Germans just in case my compass is tuffed). It cost a bit and took all scenario due to one guy in the basement, but it shortened my lines considerably, and reduced the German axis of attack.”
“3) Bodies. The more Russians there are, the more the German has to kill. This is a Red Barricades dictum that applies well to VotG (surprise surprise). That and getting the 76Ls in scenario 1 (I wont talk about how I lost two of them due to bad placement in the night counterattack) plus the mortars in the upper level roofless buildings has given me critical firepower to deal with some of those German deathstars.”
“I killed so much German infantry in the first three scens (about 26 squads and 8 leaders) he had to go idle. Loss ratio is slightly in favour of the Russians.”
“My opponent will be facing over 50 Russian squads and OBA and a couple of set DCs next time around, and he’s certainly not going to be happy when he finds out the Guards company rolled a 2 on its strength DR.”
Here’s my schedule of purchases:
15 September Day German attack
I5 NKVD Militia Coy OB MD – 2/5; ATR; {9-0, 8+1}
I4 SMG Coy OB LD – 9^2; 8-0
I5 NKVD Militia Coy 1 4 MD – 2/5; MMG, ATR; {9-0}
I5 NKVD Militia Coy 0 4 HD – 2/4; MMG, ATR; {9-0, 8+1}
A3 T-34 M41 Pltn dug-in 1 3 Full – 3; 9-1 AL
O1 Lt Arty 1 Pre Reg 1 2 Normal
15 September Night Russian counterattack
I3 Rifle Coy Off-map 0 5 HD – 6/3; LMG; 7-0
I2 Guards SMG Pltn Off-map 2 3 FS – 3; DC; 8-1
I6 Storm Group Pltn Off-map 2 4 FS – 3; LMG, FT, 2xDC; 9-1
16 September Day German attack
I1 Guards Rifle Coy Off-map 2 9 FS – 12; HMG, MMG, 2xLMG, 2xATR, 2xMTR; 10-2, 8-1
M1 Fortifications 19 1 40
M2 Sniper 7 1 1
With the reduction for the CG, and the day after a night attack, I got 7 CPP, which wasn’t enough for anything, and with the bonus points thrown in, still wasn’t enough for anything beyond a company. It’s a little hard to read here, but my two of my initial NKVD companies were moderately depleted, and the third heavily depleted. The company I bought that night was also heavily depleted. The two platoons for the night attack and the final company for the 16th were full strength.
BruceC commented:
“Thanks for posting your purchases Rindis. I’m trying to work my way through a Russian purchase. Your initial purchase is about what I would consider a standard buy. I have been wondering about the conscripts you get with the NKVD RGs.”
“With No Quarter in effect, would the Conscripts still be vulnerable to CC capture? I didn’t think so, but then had an opponent run off with a bunch of my front-line conscripts. I respect his rules knowledge and couldn’t find anything in the RB at the time to stop him.”
“Also, more thoughts about the German OB. His MG killstacks must be dealt with somehow, as well as the SPs. My initial thought was to get the 76Ls along with a T34 Pltn, as they are effetive vs both and only available on that first day. Get an NKVD coy and ruminate about paying for entry options for them, balancing this against an on-map/reserve setup and an OBA/fortification purchase.”
“I really want the guns for HIP and hitting those stacks. Getting some extra concealments with a point spent on forts might keep him back enough to save room for future turns when better inf RGs are available. If I can keep the guns intact through the first CG dates they would be hugely useful in the later SP gun brawls.”
“But, those yummy NKVD 6-2-8s are only available on the first date too. 3 coys, about 9 6-2-8s, a nice little force indeed. These decisions require some thought and planning. Now if my opponent would kindly adhere to my expectations, and the dice behave themselves, things will be fine either way….”
“Fat chance.”
Postscript:
When Patch isn’t sure what to do, you’re in trouble. However, it’s obvious other Russian players haven’t had nearly the troubles I did, so there’s something missing. I can say that I really got screwed by the Depletion rolls from the outset, with nothing coming full-strength, including the company with a -2 bonus to the DR. I was down seven squads before the game began, and down another three for the night attack. But that’s certainly not all of it. Certainly the final Date mostly seemed to consist of me putting one defensive point after another together, only to watch them evaporate one after another. I’d sure like to know how someone ever got the Germans down to a mere 12 squads.