Mark and I had some extra time off around the holidays, and we decided to have a couple of extra sessions to try out Operation Mercury, and start remembering the Grand Tactical System rules (which we’ve played years ago with No Question of Surrender).
To this end, we played the training scenario, “Storming the Kastelli”, which features a couple of Greek battalions holding Kastelli against four companies of the 5th Gibirgs Division (plus an AT battery). This is a simplified chit draw, as everything is considered ‘independent’ formations, so there’s no formation chits or dispatch points, and no random events, so there’s just the two division activation chits and direct command chits. Since I was currently attacking in two other games, I volunteered for the defending British/Greek force.
The first turn (of five) starts with the German Direct Command chit, and Mark spent three command points to send all three companies forward, with the first in column and heading around the line of Greek defenders, while the other two headed more directly for the defenders. The second chit was the German division activation (which also meant the arrival of the AT battery, and two airstrikes). One airstrike did nothing but the other caused a step loss on the Kastelli police unit, which is one of the better Greek units in the scenario (there are better ones, but there’s far worse too). The division got 7 CPs, and the lead unit charged towards Kastelli, and took a cohesion hit to get out of column, the next two moved up, and the AT battery mounted up and got into column. Then was the British direct command chit, and I moved two companies up into contact, and onto the road.
The British 2nd NZ Division (nominally in command of the Greeks) was the first chit for the second turn, which got three command points to go with the two left from the start of the game. I moved the western defenders up to Kastelli (putting one into Kastelli itself, along with the police unit). Then the German division activation came out again, but only got a minimal 3 CPs. He used a couple to automatically pass TQCs as units went on forced marches.
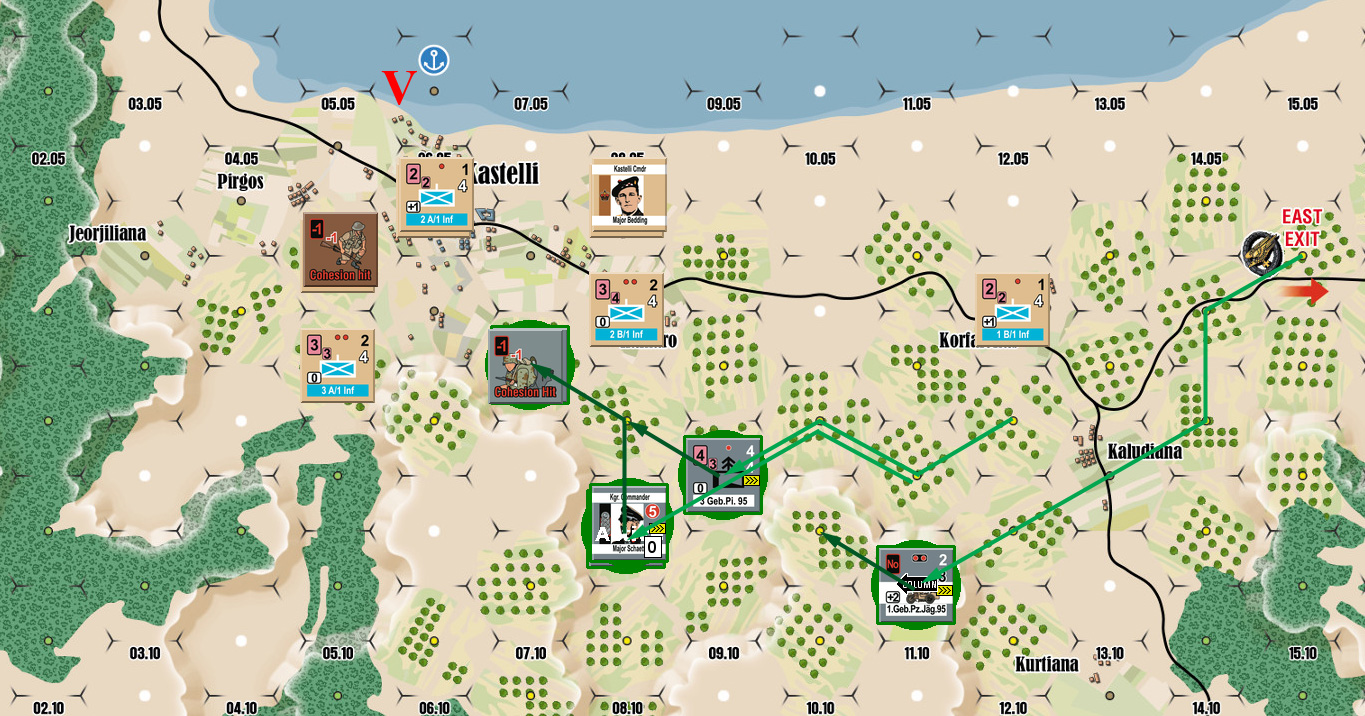
The next chit was the German direct command, and he spent CPs to move closer to Kastelli, and unmount the AT battery in 10.08 (which was a mistake we later figured out, as being on top of a slope seems to offer no LOS advantage).
That left my direct command for the start of the 13:00 (third) turn. I spent 3 of my 4 CPs to rally a cohesion hit, and move two more units into blocking positions of Kastelli. Then came the German direct command, and he assaulted the outlying company in 08.06 with a two-company stack. It went well for the Germans; I got two S?, which he paid command points to automatically pass TQC and avoid any consequences, while the 2 B/1 Inf took two suppression hits (one of which becomes a cohesion hit). They charged for the second round, and I spent my last command point to pass the TQC and not dissolve under pressure, and the Germans got a possible suppression (I passed), and then two cohesion hits (two 0s from the same unit!) to flip to the reduced side. After that, the 3rd company assaulted, with no result in the first round, but a second round charge eliminated the Greeks.
Next came my divisional activation, which got me 6 much-needed CP. I moved up a couple units (including the one who’d gotten bypassed).
That left the German division activation for the start of 15:00. They got 5 CP, and he assaulted the 3 B/1 Inf in 07.06 with the same pair that led off the last set. My fire in the first round got an S and C, which he took as a pair of cohesion hits on his best unit. They did a S?, which I spent CP to avoid, and the second unit did a cohesion hit to me. He charged for the second round, I spent CP to avoid coming apart, and I suppressed the good unit (otherwise, he’d lose a step), and then did a cohesion hit to the second (which was now at two, as it still had one from coming out of column in a hurry early on). After that, the Germans were unable to do any damage to the Greeks. Then the ‘clean-up crew’ from before assaulted, but failed the bravery check.
After that was the German direct command, and Mark rallied the suppression, and moved up the AT battery. My direct command was used to bring up the bypassed unit, and to pull my southern flank back into Kastelli itself.
This left my divisional activation for the start of the last (17:00) turn, and I received 6 CP. I spent two CP on fire attacks on the hurt 2nd company (2.Geb.Pi 95), and suppressed it again. Then the German division activation came up for 5 CPs, and the AT unit fired on the previous assault target to do another cohesion hit to them (converted from a suppression). Mark rallied his 2nd company, but then failed a bravery check to assault again. The final chit draw of the game was my direct command which ended the game with the Germans two hexes short of their goal of the Kastelli port.
Afterword
We’re still sorting out how to conduct an offensive in this system, so the result is not a big surprise. Some lessons learned: Catching low-quality troops in an assault will at the least force the use of a lot of command to keep them from just dissolving under pressure. Also, being suppressed can be deadly under those circumstances. Overall, only one unit was lost on either side, but two German and one Greek unit had taken two cohesion hits, and of course a step had been lost in the initial Luftwaffe attacks.
This scenario doesn’t prepare you for the effects of formation chits. Leaving that out does a lot to simplify things greatly, but formations can really change the tempo of operations, as they can do offensive operations that must otherwise be paid for (really, almost all offensive operations must be paid for in one manner or another here), and we’re still sorting that out in the middle of the first regular scenario.
Getting the AT into action earlier/more consistently would certainly help as the white dual-purpose row they use on the CRT is the best one, but LOS and transport defeated it getting much of a chance. A second go at this would probably see it getting used.