
Operation Dauntless T6-T8
The second ‘getting started’ card for Operation Dauntless has three scenarios meant to get you up and going on the new armor rules (the card is recommended even for those who have played Red Winter). Mark and I tackled them all in our efforts to get a good handle on the game, and played the variants of T6 and T8, with me in my usual role as the British each time.
T6 is meant to showcase Anti-Tank fire and the Armor Reaction Cycle. Five squadrons of Shermans face off with three companies of Pz IVs, trying to get control of a hex in the middle of an open field. Most of the map is closed off thanks to special rules forbidding entry of non-field hexes, nor crossing slopes.
The matchup is interesting, as the Pz IVs have +6 penetration (vs the Shermans), and a range of 6, while the Shermans have +4 vs the Pz IV and a range of 4. Since there’s a -1 per hex of range, it means both sides are rolling at +0 at their maximum range, though the Shermans are always +2 below the Pz IVs. The only British advantage here is the 5:3 odds, especially as the victory hex begins in German hands.
Well, that and going first. I started out with three squadrons running through open terrain to 1209 (hidden behind light hedgerows), taking fire in three hexes, and the first shot hit and reduced one unit. The last two moved forward one hex to just outside the Pz IV’s range. Mark responded by moving up to just out of the second group’s range, with two companies entering LOS of the first group, who reaction fired, but missed. That led to several rounds of Return Fire until a Pz IV connected and reduced another Sherman squadron. The Combat Phase saw one of the reduced squadrons eliminated, but Return Fire reduced a Pz IV company.
I moved the second group up to the victory hex, taking fire from 1511 and 1611, which reduced one squadron, but 1511 was eliminated by Return Fire from my first group. I skipped the Combat Phase entirely, so as not to let Mark get extra shots off. Mark sent the Pz IV in 1611 to join the one in 1411 (staying out of range as he could), while the other fired on 1509 and knocked out the reduced squadron there. In the Combat Phase, they both fired on 1509, and reduced the remaining squadron, which reduced a Pz IV on Return Fire.
I moved the first group from 1209 to 1509, but lost two steps on the way in, leaving me two reduced squadrons in the victory hex. This left Mark four shots (assuming I didn’t start an ARC) to eliminate two steps (since full elimination of one side is also a win…), and indeed got one in the Action Phase, and the other in the Combat Phase.
We tried the “Fire on Their Flanks!” variant, but either we missed something basic, or it just doesn’t work. The main idea is that the Germans get three Panther platoons instead of Pz IVs, but they must drive into a crossfire, as the victory hex moves to 0807, and starts under British control.
The Shermans also start near the new victory location, and the advice is to move them to 1007 and 0609 to force rear shots from one group as the Panthers move/fire on the other. Mark obligingly didn’t drive into the trap, instead stopping in 1009 on the first turn, eliminating a Sherman squadron in 0609 during the Combat Phase. With no cover near 0609 (all of Fontenay is a level down, so LOS is clear to all those fields) the remaining Sherman unit there didn’t dare do anything that’d provoke a Reaction, and the group in 1007 couldn’t do anything either, and reacting to anything they did wouldn’t turn the Panthers away from 0609 either.
So I basically passed my second turn, and Mark killed the second Sherman on his second turn. I could either occupy the victory hex, receiving two short-range shots on the way in, and then watch the Panthers either shoot up what’s left (at a rough average of two kills per three shots, and 8 shots for 6 steps not bad odds), or more likely, charge in for an Assault that the Shermans would have to be pretty lucky to survive (needing lots of 9s and 10s for the flank shots). Or, stay in the corner, and at least try to get a flank shot as the Panthers go for the victory hex on the last turn.
That last is what I did, and I did reduce a Panther with a flank shot on the way in. But it’s the only positive result I got in the scenario.
Neither Mark nor I see just how this should force any real number of flank shots, and without that, the scenario just can’t work.
T7 integrates the basic lessons of armored combat, and applies it to terrain. The British have ten squadrons of Shermans versus nine companies of Pz IVs, but not only move first, but start next to, and control, the victory location of 0903, giving the Germans four turns in which to take it. Thanks to 0802 being a level up, the British have a chance to see into much of the terrain a few hexes from the goal.
I put a full four squadrons into 0802, two in 0903 itself, two more in 0705, which can see some of the southern approaches, and the two faster squadrons went to 1102, where they might see anyone swinging through the rough terrain in the east, and can shift elsewhere with their higher speed. Mark had set up two thirds of his forces in 1107/1207, just north of the woods, while the final group was in 0508. This last moved through cover to 0506, where my Reaction Fire forced a step loss, and then Return Fire reduced a Sherman. The second group moved up to 1204, and an exchange of shots had no result. (The third group did not move; I think I recall that Mark ended up forgetting about them.)
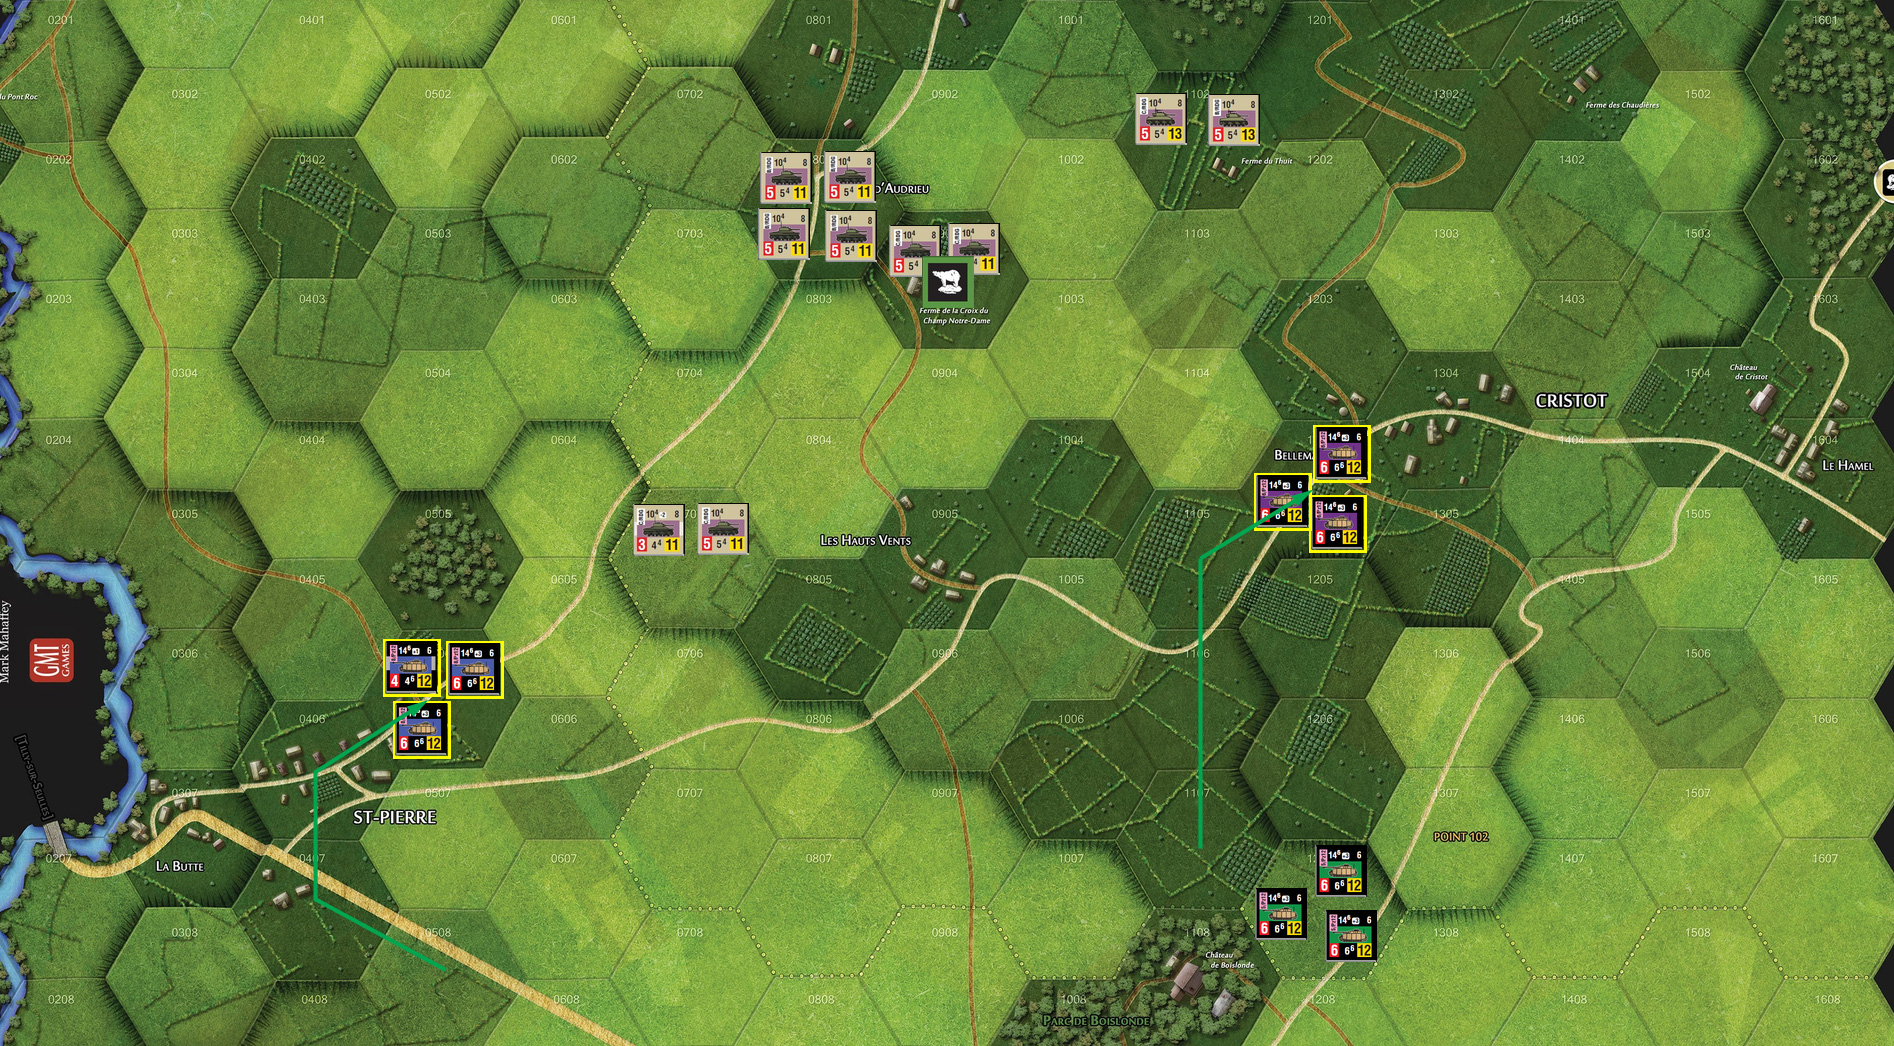
Feeling exposed in 0705, my only action for turn 2 was to pull them back, and relocate to 0602, keeping Mark from trying to swing around the rear. And indeed, the reduced unit shifted to 0405, while the other two moved up to 0402. I didn’t react, being outgunned, and in lighter terrain, but if he wanted to go anywhere from there, he’d have leave the close terrain…. 1204 then moved through the backfield to 1302, and 1207 moved up to 0905, provoking an extended ARC that cost me three steps from Sherman units in 0802 in return for reducing one Pz IV (I had been hoping for a 3:2 ratio…).
Mark had no one he could see, so there was no Combat Phase, and I pulled 0602 back to 0702, and 1102 went up to 1101. Combat saw me shell 0905 with everything available, with sporadic return fire, costing us both one step. Mark then moved up further, pressing forward to 0602 and 1201, while I did not respond, not wanting to start an ARC. In Combat, he fired on 1101, and I used Reaction Move to get to 1001, but both units lost a step in the process. In o602, his luck wasn’t so good, and he did no damage, despite the lighter terrain, and Reaction Fire reduced one of his units.
For my last turn, the survivors of 1001 moved into 0903, and 0702 pulled back to 0901. Mark, out of time, rushed the defenses with his intact group from 1201, and took a loss from Reaction Fire in 1002 before assaulting. That reduced him to equal steps, and assaulting out of a field gave me 5 tactical advantage chit choices, which turned the exercise into a disaster for the Germans. I chose DDA (it was effectively that or No AT Fire, and go through it all again). We each eliminated a reduced enemy unit to keep equal steps, and I chose DDD for two hits, knocking out a second company, and the assault eventually went six rounds before I finally got the last Pz IV company, not letting him fire the entire time.
Mark poured in the rest of his forces, trying to get something to happen, but it was no use. With at least equal steps to any group he had, I had five chit draws because he could only come through fields, and he only got one more shot at me to reduce the only full-strength squadron left in the hex, while I eliminated the Pz IVs at close range (and often, from the flank).
This one’s actually a very interesting situation, where both sides need to think about terrain and covering approaches. At the end, 0802 was as useful for making sure Mark couldn’t assault from cover as actually firing on anything.
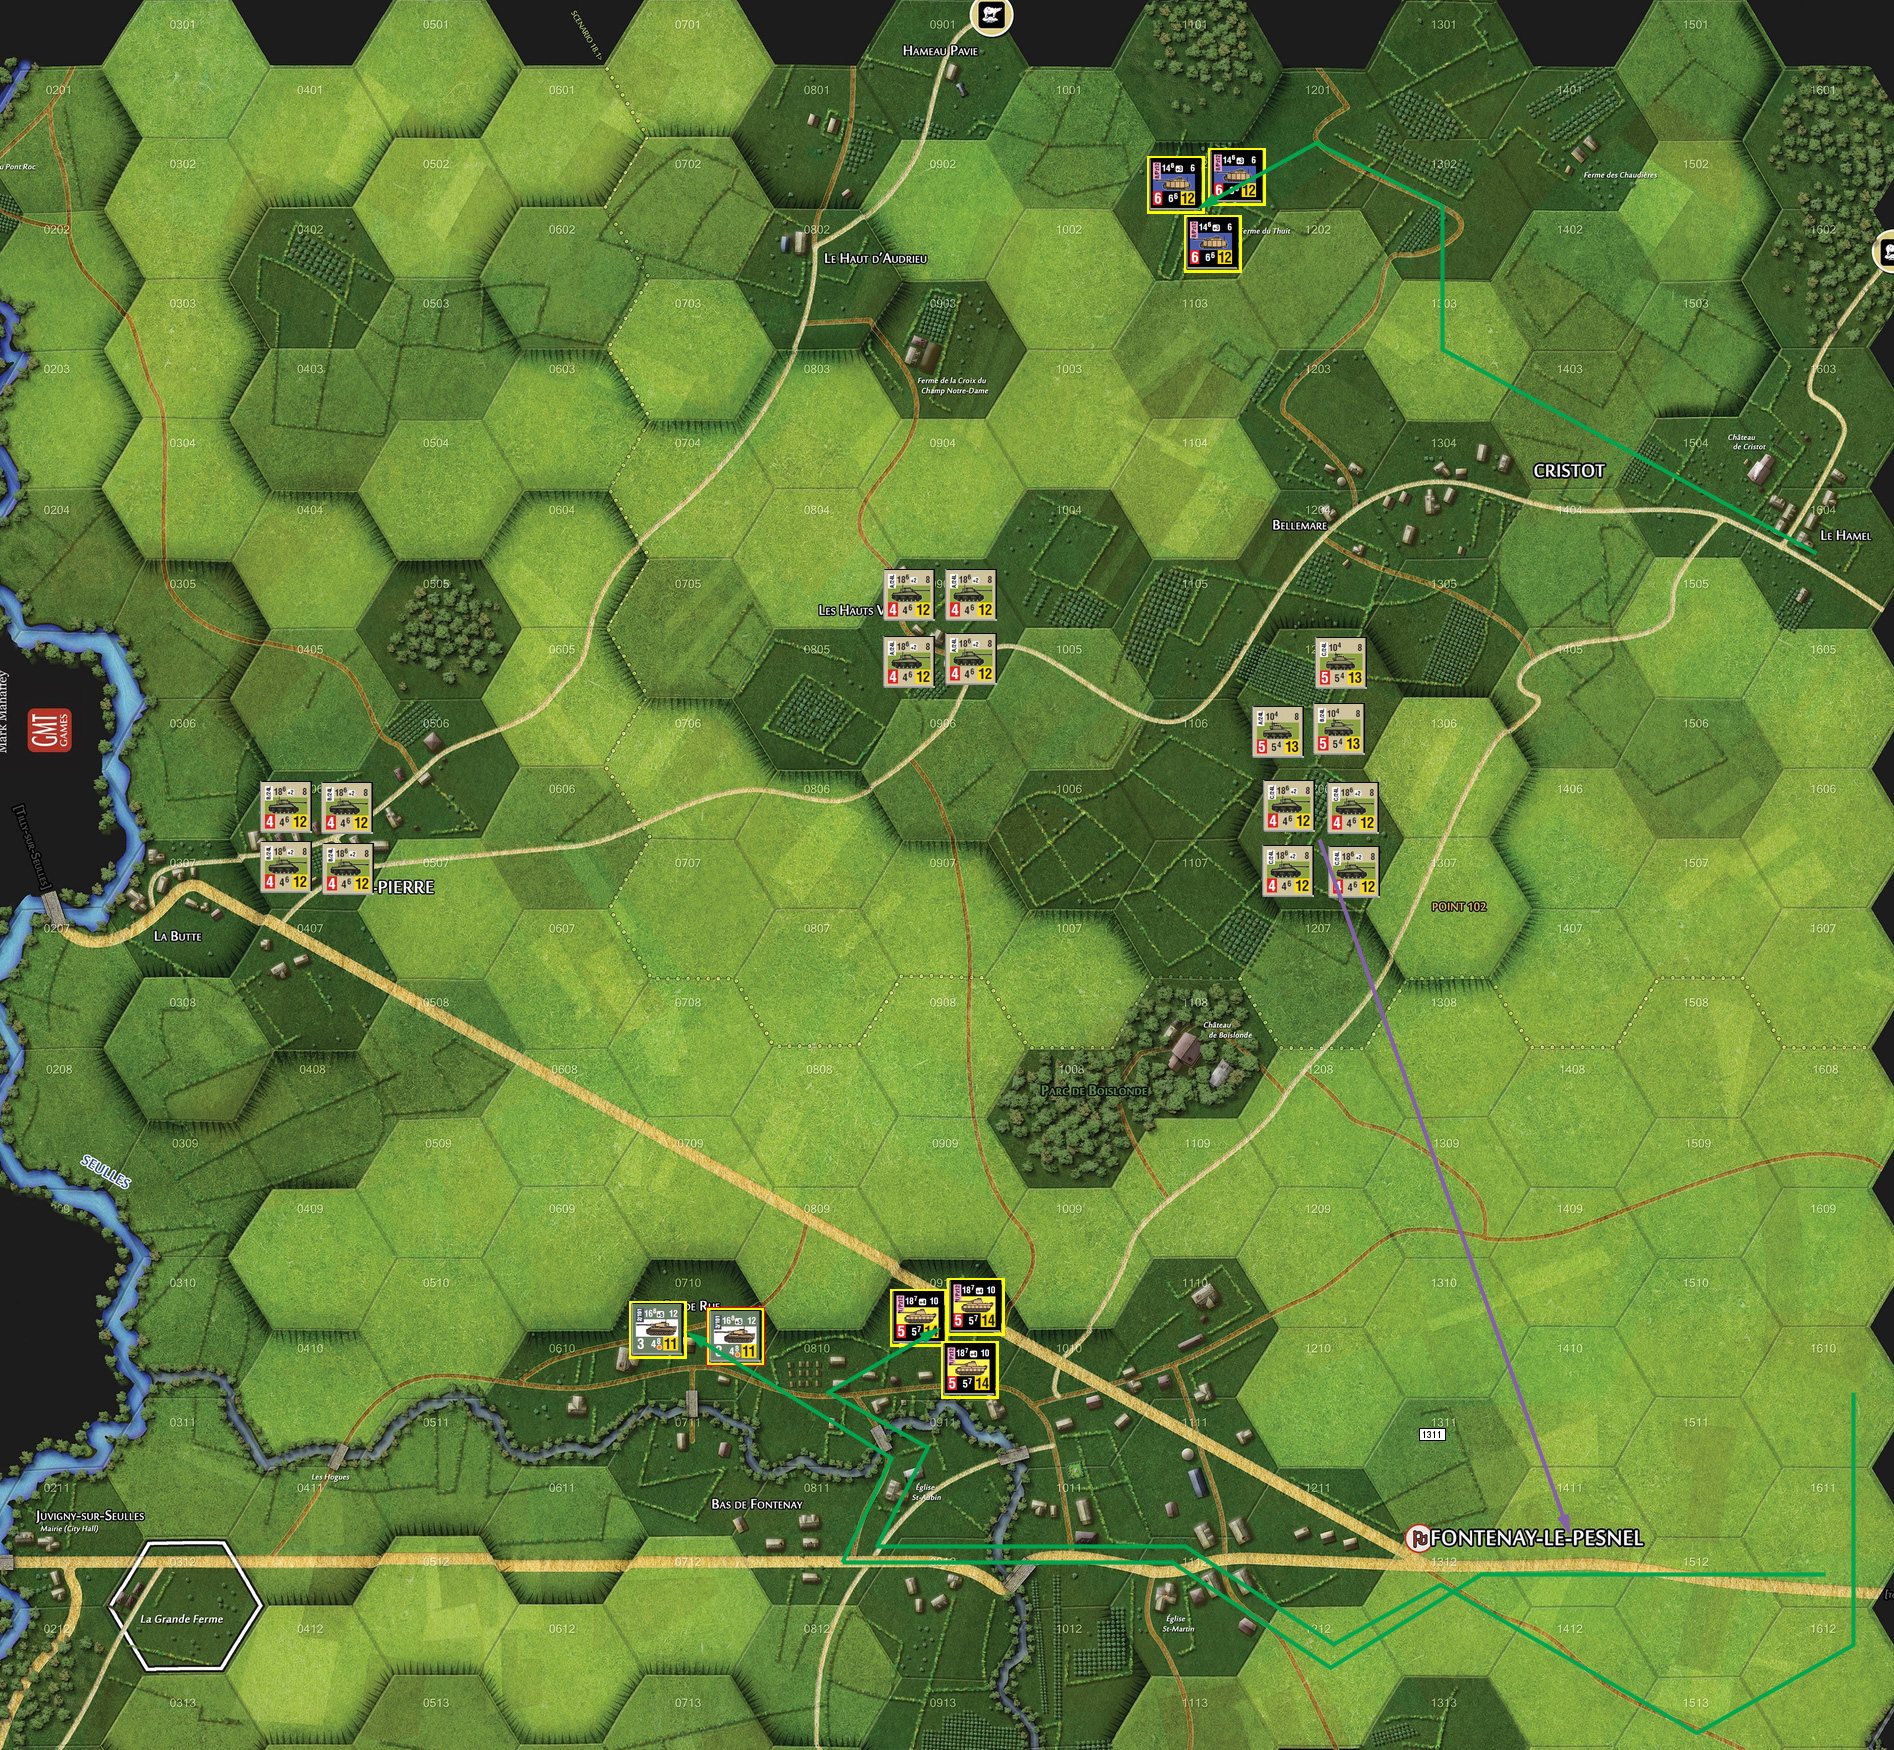
On the surface, T8 is just the previous scenario writ large. The British get fifteen squadrons, and the Germans still only get nine. The goal is moved to 0905, still in LOS of 0802, but not adjacent to it. The start hexes are west and east instead of north and south. Oh, the Germans have an even mix of Pz IVs, Panthers, and Tigers this time (well, almost even, those Tigers are all one-step units). However, all but three of the British units are “Firefly enhanced”, meaning the have a couple of Fireflies along with regular Shermans. They do quite well against even the heavier German tanks, but any loss is considered to take out the Fireflies first, so when a unit flips, it’s down to normal Sherman ratings.
Despite advice against it, Mark set up the Panthers and Tigers at the southern end of his setup area, planning on hooking around to southwest, and giving me worries from that direction, while the Pz IVs took the more direct approach through the heavy terrain. I grouped my three non-Fireflies together, and the rest in three groups of four. One group and the Shermans occupied the dense terrain parts of the forward hill, while another group went in 0406 for a good view of the southern approach, and the last went into the objective of 0905.
Mark started with his Tigers going down the major east-west road, but Reaction Fire and a good roll eliminated one after two hexes. After that, he was out of sight behind hedgerows and Fontenay, but the need to stay away from the northern edge delayed progress. The Panthers had a similar route, and also didn’t get that far, while the Pz IVs swung north. In response, I put a mixed force of Fireflies and regular Shermans into 0802, circled the 0406 force back around to 0805, and sent the spare Sherman squadron to 1004. In Combat, I fired on 1102, reducing one company, and two of them Reaction Moved to 1101.
The Tigers started off, and I picked off a second section on the first hex of movement (it looks like we forgot the -4 for close terrain, but even with that, I still got a 14, thanks to a flank shot). Return Fire from the other Tiger was ineffective, and the Panthers moved north through the woods, which halted them after three hexes. ARC went for six rounds of Reaction Fire before a Panther finally reduced a Firefly, and I passed. The lone Pz IV in 1102 shifted to 1001, where a firefight went quite a while before I finally reduced the company and passed, having lost another Firefly early in the engagement.
I tried finishing off the Pz IV in my Action Phase, and it Reacted to 0901 and then knocked out two more Fireflies before I gave up (I could get really good rolls against his Tigers, but my average in these two engagements was probably around 7 on 2d10). The other two unit in 0802 moved to 0804, and half the 1206 garrison moved to 1005. The hope was to create a gauntlet of fire for him to move through on the way to 0905.
Mark started with the lone Pz IV moving into 0801, where it was eliminated by Reaction Fire. The remaining pair went through the terrain, aiming to assault 0802, and the other reduced unit was eliminated in 0801 by Reaction Fire, for a 2-step to 2-step, all close-terrain assault that generated DADA tactical advantage, that reduced him, and eliminated one of my reduced Shermans, with the other withdrawing to 0903. The Panthers assaulted 1206, and with two extra steps, Mark was able to select AAAA to reduce my two squadrons to one reduced one, which pulled out to 1205. (The Panthers should probably have kept going, but I think we hadn’t digested Overruns yet.) The final Tiger circled back through town to come up behind all the close terrain. Combat phase saw me lose both units in 1005 as I tried getting into a gun fight with the Panthers.

I lost the one in 1205 on my turn as he tried to pull out (no surprise), and lost more Fireflies moving up to 1005. But I put three fresh squadrons into 0905, and ended with someone parked in most of the surrounding hexes, so he’d have assault through them (and take Reaction Fire from adjacent hexes afterward). The Pz IVs tried picking off another Firefly when I moved into 0905, but instead, he lost the Pz IV to Return Fire.
Mark sent the Tiger ahead, who assaulted 1005, and survived a defensive shot (chit pull was DDD), and I pulled back into 0905. (Again, he could have kept going, but we didn’t realize it, not that one Tiger against seven steps was going to work, but maybe he could have cleared Fireflies out of the other hexes.) The Panthers went in, and not only did Reaction Fire not work, but the Tiger Returned Fire to kill the Fireflies in 0906. I had one more step than the Panthers, and he was coming out of light bocage for four chit draws, and I picked DDA for us to both lose a step. The second round was DDA again, for another pair of step losses, and round three was DDD and good rolls (all flanking fire) to do three steps. Mark went for round 4, for DD and I finished off the Panthers for a British victory.
Striking out across open ground really hurt Mark here, as lucky rolls got two of the Tiger sections early. Also, not realizing that vehicles can keep going after an Assault changed things a bit. The final defense wasn’t bad, but I’m not sure how to make a defense in depth really work here. It’s too hard to get defeated in detail instead. At the end, only two full-strength Firefly-enhanced squadrons were left, one of which was in the victory hex. They’re certainly really nice, as they get +6 penetration on even the Tiger Is.
After that, we tried out the variant to T8, which shows off the Fire Control optional rule (T7 has a similar variant, but we forgot to try it then). I wanted to see how it worked before we got to the regular scenarios so we could make informed choices at that point. The rule is effectively a version of the advantage/disadvantage idea from D&D 5; you add a third d10 to the AT Fire roll, and either use the highest two or lowest two rolls.
Well, sometimes. The idea is the system is calibrated around the Sherman being absolutely ‘average’ (which surprises me, since I’m used to that ‘unusually fast and accurate turret traverse’ modifier in ASL), with no FC number, and therefore always rolls 2d10. For other units, the third d10 is red, and you also roll a red d6 with it; if you have a positive FC, and the d6 is that number of less, you use the highest two d10s; if you have a negative FC, and the d6 is that number or less, you use the lowest two d10s. Otherwise, if the d6 is over the FC number, you only pay attention to the black d10s.
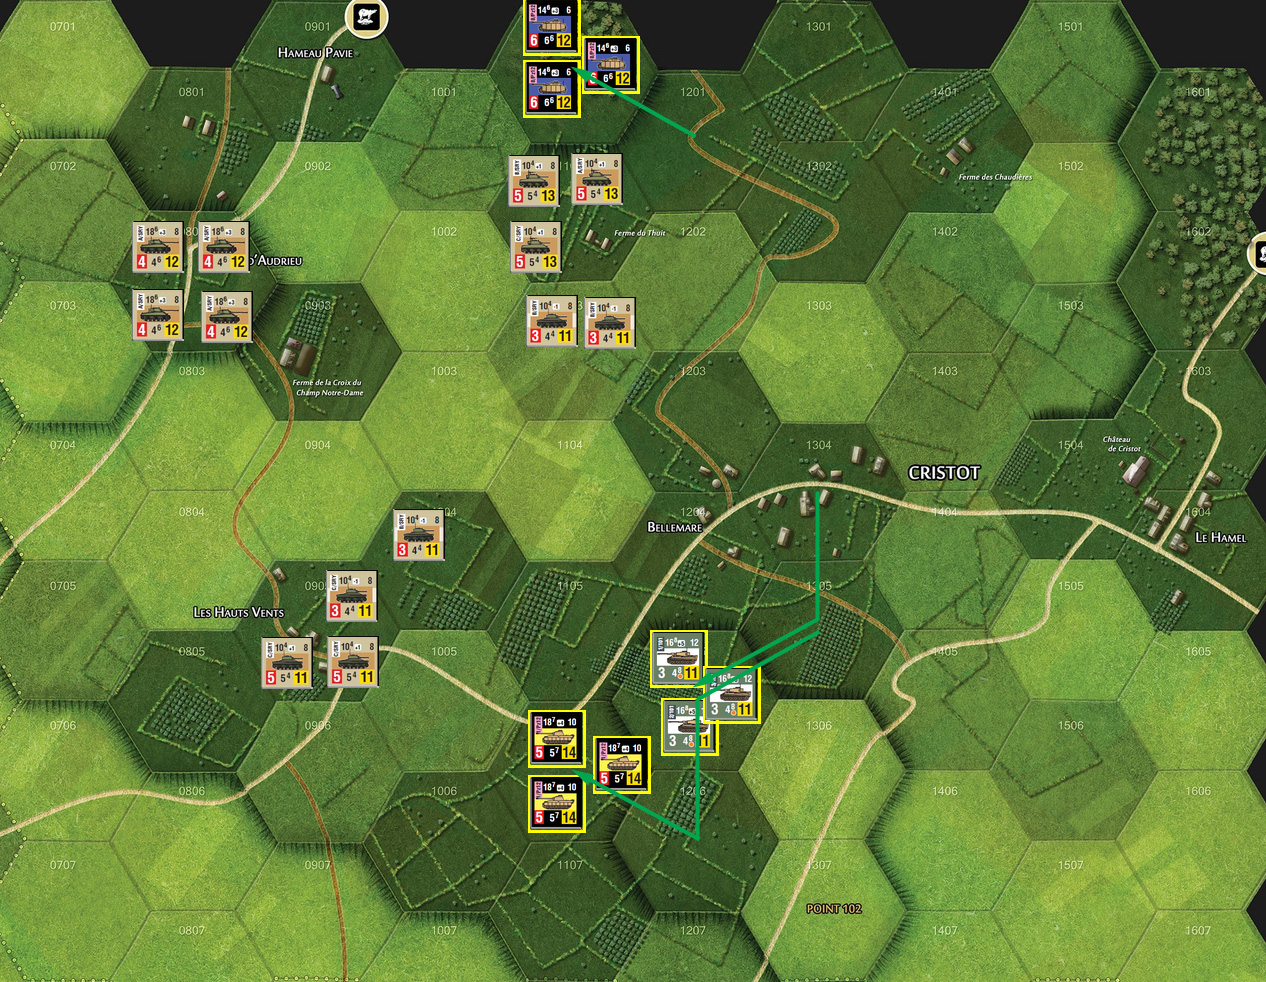
So, in this variant, the British have the same number of units as before, but there’s only four Firefly-enhanced squadrons. However, they are all of the Sherwood Rangers Yeomanry, which is a veteran unit, and so have higher FC numbers (+1 instead of 0…), while the Germans are unchanged (and have FC numbers ranging from +3 to +5).
Mark learned his lesson, and set up towards the north end of the map, but still with the Pz IVs furthest north. If I’d thought about where I’d move, I’d probably have put my Fireflies on the 1205 hilltop, but I couldn’t, so two groups of four Sherman squadrons went to 1205 and 1204, while the Fireflies went to 0802, and the three faster Shermans went to 1102. Mark sent everyone forward to be adjacent to my various groups, but did not assault any of them.
However, in Combat, they were able to use their superior gunnery to devastating effect. The Tigers all fired on 1204 (the targets all Reaction Moved out to 1105), and killed a step each time (Fire Control worked twice, and improved the roll both times as the red d10 was a 10, and in one case actually made a difference). The Panthers followed suit, destroying another three steps (Fire Control worked twice, but wasn’t needed), though with some hope of penetrating their armor at point blank, I stayed to Return fire, with no hits (Fire Control worked once… and shifted me to a 13). The Pz IVs declined to do more than be menacing.
Thankfully, I could move directly out of LOS, since I’d held the high ground, and moved three Shermans (two of which were still full strength) to 0904, while other units scatted to north and south of the line of advance. Mark followed, with the Panthers assaulting a lone Sherman squadron and destroying it (Fire Control allowed it to be on his first shot, which otherwise would have been a Final 8). 11o5 did Reaction Fire, and didn’t secure a hit, even on a flank shot, and the Panthers assaulted him and killed him on the second shot. With that out of the way, the Tigers parked themselves on the hill. The Panzer IVs then went onto the wooded rise in 1101, not bothering to respond to Reaction Fire against them. In Combat, the Tigers knocked out the remaining Shermans in 1004, prompting an exchange of fire between them and 0802, which cost me a Firefly (thanks to Fire Control), and cost him one of the Tiger sections. The Pz IVs fired on 1102 with no result, and I only Returned Fire on the last one (to keep terrain bonuses) with no result.
I moved one of the ‘fast’ Shermans down to join the 0905 garrison, but I lost a step while moving in the open to the Tigers. Two of the remaining Fireflies moved down to 0906, hoping for flank shots… or at least to slow Mark down a little.
The Panthers then moved to assault them… and a reaction shot rolled three 10s…! (Though the third didn’t count, as Fire Control did not activate.) That lowered him to one more step than me, and along with assaulting out of close terrain into light bocage, Mark got to pull three chits… the best of which was No AT Fire, and I withdrew back to 0805. The Panthers pressed on to 0905, and with +2 Tactical Advantage picked AD to reduce a Sherman squadron, while my fire did nothing. For the second round, Mark picked AAA for three hits, reducing me to three reduced Shermans. At that point, I withdrew, and Reaction Fire from 0805 got another Panther step, which lead to a short ARC where I lost another Firefly. Mark ran a Tiger up to 0905, and Reaction Fire did nothing. Mark assaulted 1102, got AA, and eliminated another step before I withdrew to 1103. I did a reaction shot from 0802 which missed, but Mark Returned Fire with the remaining Tiger in 1205 to eliminate the reduced Sherman in 0802 (thanks to Fire Control), and the last Fireflies eliminated it on another stellar roll. The Pz IVs assaulted 1103, got AD for us to trade steps, and I withdrew to 1203, while the Firefly picked off another step.
For my last turn, the final two Fireflies took shots at the Germans sitting on 0905, and picked off another step of Panthers. And at that point I conceded. There just wasn’t anything productive left for me to do. I certainly wasn’t able to really figure out what to do to blunt the German quality advantage, and still couldn’t really force any flank shots. In the previous version, I could use the Fireflies well, but in this there’s just not enough for me to get a handle on it.
Despite my trouble with the scenario, I certainly recommend everyone try the Fire Control system. One point that I haven’t brought up, is that units get a lower FC number when reduced, so they have a lower chance of being effective when there’s fewer tanks without fiddling with the penetration or range data. It’s an interesting wrinkle, but just onerous enough that I see why it’s not a standard rule. If it’s too fiddly for you, I don’t blame you. If not, I think it does improve the game a bit.
Discussion ¬