Rindis.com

All my hobbies, all the time
  • Home
  • My Blog
  • Games
  • History

Categories

  • Books (503)
  • Comics (10)
  • Gaming (917)
    • Boardgaming (673)
      • ASL (154)
      • CC:Ancients (83)
      • F&E (78)
        • BvR – The Wind (26)
        • Four Vassal War (9)
        • Konya wa Hurricane (17)
        • Second Wind (5)
      • SFB (78)
    • Computer games (162)
      • MMO (77)
    • Design and Effect (6)
    • RPGs (66)
      • D&D (25)
        • O2 Blade of Vengeance (3)
      • GURPS (32)
  • History (10)
  • Life (82)
    • Conventions (9)
  • News (29)
  • Technology (6)
  • Video (49)
    • Anime (47)
  • Writing (1)

Patreon

Support Rindis.com on Patreon!
Become a patron at Patreon!

Other blogs:

RSS Inside GMT

  • Foxes and Lions (Part 3): Military Matters, Captains, and Condottieri June 12, 2026

RSS Playing at the World

  • Playing at the World 2E V2 Arrives May 5, 2025

RSS Dyson’s Dodecahedron

  • Hollowshore Cairn June 17, 2026

RSS Quest for Fun!

  • The Expense Post May 24, 2026

RSS Bruce Heard and New Stories

  • Pain, Exhaustion, and Morale in D&D BECMI June 7, 2026

RSS Chicago Wargamer

  • The 2 Half-Squads - Episode 310: Cruising Through Crucible of Steel January 27, 2023

RSS CRRPG Addict

  • Yendorian Tales: Here There Be Dragons June 15, 2026
SF&F blogs:

RSS Fantasy Cafe

  • The Leaning Pile of Books May 24, 2026

RSS Lynn’s Book Blog

  • Summer of Horror: Can’t Wait Wednesday: Sleepers in the Snow by Joanne Harris June 17, 2026
ASL blogs:

RSS Sitrep

  • Cardinal ASL Sins March 18, 2026

RSS Hong Kong Wargamer

  • FT114 Yellow Extract After Action Report (AAR) Advanced Squad Leader scenario April 16, 2025

RSS Hex and Violence

  • This still exists? March 25, 2025

RSS Grumble Jones

  • YouTube AAR for Critical Hit's Gettysburg Turning Point 1863 - ID4 At Will Fire June 16, 2026

RSS Desperation Morale

  • How to Learn ASL March 16, 2025

RSS Banzai!!

  • October North Texas Gameday October 21, 2019

RSS A Room Without a LOS

  • [Crossing the Moro CG] T=0902 -- Rough start July 18, 2015
GURPS blogs:

RSS Dungeon Fantastic

  • Rules & Rulings from Session 224 June 16, 2026

RSS Gaming Ballistic

  • B-Scale: Damage That Scales from Tardigrades to Kaiju June 5, 2026

RSS Ravens N’ Pennies

RSS Let’s GURPS

  • Review: GURPS Realm Management March 29, 2021

RSS No School Grognard

  • It came from the GURPS forums: Low-Tech armor and fire damage January 29, 2018

RSS The Collaborative Gamer

  • Thoughts on a Town Adventures System January 18, 2022

RSS Don’t Forget Your Boots

  • GURPS Supers Newport Academy #6: “Old Friends, New Again” June 7, 2026

RSS Orbs and Balrogs

  • Bretwalda - Daggers of Oxenaforda pt.4 - Fallen King May 27, 2017

Planets of Tripoli Y77 Region 5

by Rindis on July 14, 2022 at 12:00 pm
Posted In: SFB

At the start of April, Mark and I returned to our SFB campaign. This time, we went to the battle at Mark’s third base, in Region 5. This features one of my two main ‘base busting’ fleets, led by a WDN. With it, I had two heavy cruisers and a light cruiser, plus two frigates. With 25 EPV left in my command limit, I could have put in another frigate (the WNF is only 21, though everything else is too big at 31 and up), or used destroyers instead, but I was out of any of those. Mark, limited by the first turn rules, only had a WCA and and WFF with his base, making it a notably smaller force than last time.

Mark set up next to his base rolled low for weapon status 1 again, while I set up behind the ships (at range 35). I came in at speed 10, while the Carnivons went 7. At that speed the WDN and WVF were running with good EW, though the WRL had a minimal 1/0 and the WFF couldn’t manage any. Only the base put up EW for Mark (it is easy to suppose that charging phasers was more than enough power drain as it was).

On turn 2, the Carnivons picked up to speed 11, while I split between 11 and 12. The Carnivon WCA Wolfbite (201) put up a point of ECM, while I generally reduced mine. On impulse 9 the base launched a pair of death bolts at the oncoming fleet. The Carnivon ships slowly turned clockwise, and on impulse 24 I turned towards their new course at range 17 from the base. The Carnivons immediately turned off, presenting a stern chase. On turn 3, he slowed down to 9 and 10, and then continued counter-clockwise, putting the base between the fleets.  I had increased everyone’s speed to 12, and on impulse 11 broke off to turn for a run at the base, which fired its disruptor cannon at WVF USS Intrepid (SF-68) on impulse 17, but missed, thanks to ECM it was running.

On impulse 32 the lead two ships reached range 8 and unloaded. WCA USS Mare Serenitatis (SF-25) and WRL USS Gatherer (SF-70) each hit with one out of two photons (fairly good with a +1 shift, and it would have been all four without it), while the seven phasers from the two ships rolled horribly to do 3 damage. This left the base’s #6 at one box (I regretted that one box, as knocking it down would have forced him to use general reinforcement only on that shield).


Initial maneuvers, turns 1-3.
↓ Read the rest of this entry…

└ Tags: gaming, Planets of Tripoli, SFB, Y77
1 Comment

Planets of Tripoli Y77 Region 1

by Rindis on April 30, 2022 at 12:00 pm
Posted In: SFB

Last December, Mark and I got going on a large project that is going to take us a while: Playing a modified version of the SFB Admiral’s Game campaign from Advanced Missions. Once sorting out the basics was done, we decided to try the first region… first. It features his largest base defense force, and my smallest base assault force, “merely” being lead by a CC (it was also the only force where it was not theoretically possible for me to add another ship). It would also serve as a test of just how tough these early bases were going to be for me. We had the following available:

This was about the only fleet where I tried to stick with one particular member navy. The Andorians (xNx ships) use drones instead of photon torpedoes as heavy weapons, so I figured massing them against a static object for a bombardment would be one of my better options for them. (In this era, speed-8 drones are relatively faster, but still slower than what ships can actually do, so base bombardment is still a good option.) It also features my only ‘pair’ of ships, as the only classes I have more than one of are the four that I built new ones of this turn, and the other three all ended up split up from their sisters.

Mark set up with his two ships a few hexes away from the base, but pointed towards it, and a poor roll left him at Weapon Status-I (with his bonuses, the lowest possible). The rules give the attacker an automatic WS-III, but I have to set up at least 35 hexes from the base, which with these ships is over two turns travel at best speed. With my mix of designs, I ended up with my fleet speed scattered from 11 to 14 even at the beginning, while Mark went 12 (WDN) and 9 (WDD). EW was minimal, with only the base and Mark’s WDN opting for any at all. I set up opposite of the Carnivon fleet and headed in, while they passed through the base’s hex and turned right. On impulse 32, the base fired its two bearing phaser-1s at WND USS Battler (SF-75) at range 25, doing one point to its #1 shield.

For turn 2, I kept to the same speed range, though Battler reduced speed to 11 to repair the shield damage, while the WDN dropped to 8, and the WDD boosted to 13; the WDN boosted ECM to 4 (the maximum in this era), and the WNC and WNL started generating 1 point of ECM. On impulse 12, the base fired on Battler again (range 21) and missed. By impulse 24, the WDN was ten hexes away from the base, and turned towards my oncoming fleet, followed by the WDD on the next impulse. I started slipping that way, and then turned to intercept over the next few impulses.


Turn 3, Impulse 1, showing movement from impulse 24 of turn 2, to impulse 8 of turn 3.
↓ Read the rest of this entry…

└ Tags: gaming, Planets of Tripoli, SFB, Y77
1 Comment

SH7 Rescue the Hostages

by Rindis on March 30, 2022 at 12:00 pm
Posted In: SFB

Last December, Patch and I kicked off the group’s SFB adventures for Y161 with an early historical scenario featuring USS Kongo in its five year mission under Captain Kosnett (last seen here in “Coming of the Meteor“, and is now a CAR). Patch took the Klingons, who are holding a Federation trade commission hostage at the local base station. Kongo has shown up with the commando cruiser Okinawa to rescue them by coup de main.

I made a number of errors in this scenario, and the first one was not appreciating that the base station and accompanying F5 start at weapons status I. This allows them to charge phasers on the first turn, but of course while the base’s ph-4s are really dangerous, that’s a large power drain on something that size (12 out of 22 total power in fact, and another four is needed for housekeeping). The Federation ships enter together, 20 hexes from the station, and the F5 is parked adjacent to it. I planned to force-dock the CMC Okinawa to the base and engage the base directly in a boarding action to get the hostages, and started it with a wild weasel while the CA had a suicide shuttle prepped. Both ships went speed 8, with full ECM up (again, because I didn’t appreciate how power-strapped the base was), while the F5 went speed 12, and the BS lent two ECM to the F5 (making it effectively 4ECM/2ECCM), and lent ECM to itself for 8/0 EW.

Patch launched a pair of shuttles on the first impulse; the BS’s stayed out for possible point defense, while the F5’s landed aboard the base, presumably with boarding parties; the F5 circled behind the base while I cautiously approached. Turn 2 saw a bigger mistake from me as the CMC picked up to speed 10… but was 12 hexes from the base (I honestly don’t know if I hadn’t thought far enough ahead during EA, or if I miscounted the range…). The CA stayed at 8, and F5 stayed at 12. I stayed at full ECM, while the F5 shifted to 3 ECCM and the base to 6/3 EW. During impulse 5, Patch dropped non-facing shields on the F5 and BS, moved to bring the gaps to bear on the next impulse and transported boarding parties from the F5 over to the BS.

By mid-turn the base was starting to loom larger, and the F5 turned in to come in behind my approach course. On impulse 19, the base fired into the CMC at range 7, getting bad rolls at +1 to do seven damage to the #1 shield (I had bricked that as best I could…). On 27, the F5 got to range one of the CMC and unloaded on it, hitting with one disruptor, and poor phaser rolls to knock down the #5 shield and do two points to the armor. Then it slipped into the CMC’s hex and fired a drone and the RX phasers to knock down shield #4 and do two more to the armor. I shot down the drone before it could impact, but the BS launched a second one on 31.


Turn 2, Impulse 27, showing movement throughout the turn.

At this point, I should have been at range 1 to start the docking procedure (which would have forced a range-2 shot at the new drone on 31…), but I was still two hexes out, and the BS fired again with more poor dice to take out shield #6, the last two armor, and do eleven internals, knocking out two warp and a phaser. The CA fired on the F5’s #4 shield with good rolls to do 18 damage, half of which went in to take out two power and a phaser.

For turn 3, the F5 dropped to speed 8, while the CA dropped to 5, and the CMC went 1 as it started it’s extended docking procedure. I kept to full ECM, the F5 went for a 1/3 split, and the base continued loaning to itself for 4/3 EW. The CMC turned off fire control in EA and launched its wild weasel first thing (giving the CMC 12 ECM for as long as it would last…). Patch fired a ph-3 to cripple the shuttle, but kept missing with shots from the BS’s ADD. On two he launched his own shuttle, and then hit with the ADD on 3 to do one damage to the shuttle before his original base shuttle finally killed it with it’s shot.

The F5 missed its overloaded disruptor shot vs the CMC, sideslipped past it, and fired the remaining FX phasers into the CMC for seven damage on a down shield. Only one got in after general reinforcement, and then the explosion period ended and the base fired two ph-4s to do 29 internals (after spending the batteries to stop one damage…). This gutted the CMC (no surprise…), knocking out the barracks and the bulk of the boarding parties, and almost all the shuttles (with more boarding parties on board; another mistake: I should have been launching them, where they’d be separate targets that needed more damage to kill), with the HTS surviving crippled in the bay.

The next impulse, the next pair of ph-4s fired for 30 damage, which nearly did for the CMC (I estimated 9 damage to kill it; more if there were sensor/scanner hits in there). A ph-3 took it down to two excess damage boxes remaining. Meanwhile, the CA had launched all its’ shuttles and the ADD and fire from the Klingon shuttles soon cleared most of them out, and they merely crippled a single Klingon shuttle. On impulse 28, the CA burned batteries to go to 2/4 EW, and fired on the BS at range 2 to do 16 damage with an overloaded photon to shield #5. The next impulse was another photon shot for 16 more damage and 11 internals, which killed one of the hostages. I tried a pair of hit and run raids to rescue a couple of hostages, but got ‘boarding party returns’ results against the guards.

Patch managed a phaser-1 shot against the CA (lack of power) to do 3 damage through the lowered shield for one warp hit. The CA headed back out, trying to de-fang the BS  on the way (it did get the disruptor mount) and firing on the F5 at range 1 on 32 to do 14 internals after crashing the #6 shield.

Afterword

We called it there, with the CA too close to the base, but headed off the fixed map. At its max acceleration, it could go 15, which would bring it to about four hexes from disengaging. If the BS is smart enough to counter any ECM the CA puts out, four ph-4s at the top of the turn will do 40-80 damage at range 4, with a 20-point shield and about five power available to boost it. Fifteen internals isn’t too bad, and the CA would certainly get off without too much more trouble. Sixty-five internals on the other hand…. The F5 would be a serious complication at that point, though it would hopefully still manage to crawl off on the next turn.

Among the other mistakes I’ve mentioned, a big one was letting the CA fall too far behind the CMC. When the F5 did its turn two pass, the CA wasn’t close enough to make it pay, or to distract it. The CA should have been what the F5 encountered first, to act as proper cover for the troops. The general plan for getting the CMC up close and docking looks workable, but you have to do the homework first, and both ships need to be there, and make the Klingon worry that if he fires too much into one ship, he’ll dock the other one, and perhaps transport BPs from one to the other. Still, this a tall order at best. Ph-4s are things I really don’t like messing with at close range.

One question that came up is how the hostages are counted for H&R purposes. By the scenario you can rescue them that way, and they can be guarded, like various non-system boxes. But is each hostage it’s own “box”, being it’s on legal target needing guarding? Or are they all one target, and you can only rescue one a turn (as you can only target an individual SSD box for an H&R mission once per turn)? We considered them two groups of five for these purposes, which seems reasonable.

└ Tags: gaming, SFB, Y161
3 Comments

The Planets of Tripoli

by Rindis on December 7, 2021 at 12:00 pm
Posted In: SFB

Last year, I had an itch to try out “The Admiral’s Game” campaign, especially as re-done by Jeremy Gray and Dale McKee, and reported on in “Day of the Eagle Comes Early” on ADB’s forum.

So, I wrote up a new set of campaign rules, reverse-engineering everything I could from that, and adding a fair number of new things besides. I pitched it to Mark, and talked him into the general concept. My original idea had been to pair off a couple empires contemporary to our main group games (i.e., Y161), and advance the group and the campaign in tandem, but… Mark eventually gravitated towards seeing the Carnivons in action, especially as he’d been going through the General War-era version of them in Module C6.

I don’t have that, but I (and Mark) do have Y1, where they were first introduced. In addition, I had recently read an update for The Admiral’s Game for the Early Years in Captain’s Log #39, where the Federation has to cycle through the various member navy’s ships in the W-era.

So, the campaign got set at the close of the W-era, with the Y-series ships about to come in, with a fight between the Carnivons and the Federation.

Now… “historically” they did not border each other, but there doesn’t seem to be any big technology mis-matches going on, and if they had, it’s not too hard to believe the Federation would quickly get fed up with the constant raids by various “packs” and feel a need to use their new navy to mount an expedition into their space to put an end to the raids on far-flung colonies and merchant vessels. So, I am playing the Federation, which is attacking the Carnivons.

This campaign is starting in Y77, and each strategic turn in it takes one year. One ship can be a prototype each turn, with cruisers available as prototypes one year before their service date, and smaller ships two years. The structure is explicitly allowing me to build a Federation YCA in the second turn, but we’ll both be fielding mostly W-series ships for a long time to come.

Both sides have six each FF, DD, CL, CA, plus 2xCC and 2xDN. On the first turn, the Carnivons do not have access to half of these (strategic surprise). We both get EPV for new ships, refits, and such, but we must build 2xFF and 2xDD each turn, and then get to do what we like with the leftover budget.

Carnivons:

This canine-like species historically existed between the Kzintis and Lyrans, and getting rid of them was one of the few things they’ve ever agreed on. They generally never developed any stable central authority, with lots of temporary ‘packs’ raiding their neighbors.

Their heavy weapons are Death Bolts (a type of drone with annoying problems reloading), and Heel Nippers, a nearly point-blank weapon that automatically destroys one warp box if it hits, and causes the ship to miss its next move, and turn in place. That last is bad enough, but on the early underpowered ships, the idea of guaranteed power hits through shields is scary. In the Y-era, they get Disruptor Cannons, which is a two-turn version of the familiar Disruptor Bolt.

At first, they had somewhat limited ship classes, but Y2 and Y3 built them out so they have CCs and DNs like everyone else. They hit the Y-era slightly later, but they start with the smaller ships, and should be able to eventually refit all the W-series ships up.

Star Fleet:

I’m attacking as the United Star Fleet of the Federation of Planets. As these are all ships converted to tactical warp from the various member planet’s navies, I will be learning to deal with six different design styles. Also, my new W-series ships must cycle through the six different navies, so I can’t just pick a favorite design in each class and go straight to that.

Earth, Alpha-Centauran, Orion, and Rigelian: These all use the good old photon torpedo (though there’s no overloads, and, worse, no proximity fuses, in this era). Phaser coverage and other details vary from fleet to fleet, but I have no feel for common design elements yet. [The Orion national guard ships never actually directly served in the Federation’s early wars, but they were part of Star Fleet, and I figure it’s the only way we’ll ever get around to seeing them in action.]

Andorian: These ships use drones as the heavy weapon. They’re fairly close to Kzinti drones, but not identical, but the only direct-fire weapons are phasers.

Vulcan: Their CA and DD have a pair of special sensors (the only things outside of a base with them in this era; this is important, as I have a bunch of base battles in my future). The others have the usual photon torpedo, and they all mount phaser-1s (everyone else is stuck with ph-2s on their ships in this era).

The nomenclature for the Star Fleet ships is inconsistent (largely in Y1), and I’ve cleaned them up for reporting here (so, they are all prefixed with “W”, and the Orion ships are WOx). Also, trying to back-port earlier NCC numbers is a mess, so I’ve figured that the initial Star Fleet ships got sequential “SF” numbers as they were converted and commissioned into the fleet. Once new ships are built in the Y-series, then they start using “Naval Construction Contract” numbers.

Y77

So, we’ve assembled the fleet lineups, done the initial builds, and finally assigned everything to the eight regions of the first defense line.

We’re trying a system where the Command Rating of a ship is multiplied by 35 times the current year/100, and it can command that many EPV of other ships (this means a CR 10 dreadnought can command 270 EPV this turn, and 273, next time…). This maxes fleets out somewhere around six-seven ships, and I (with all my ships available) couldn’t fill them out.

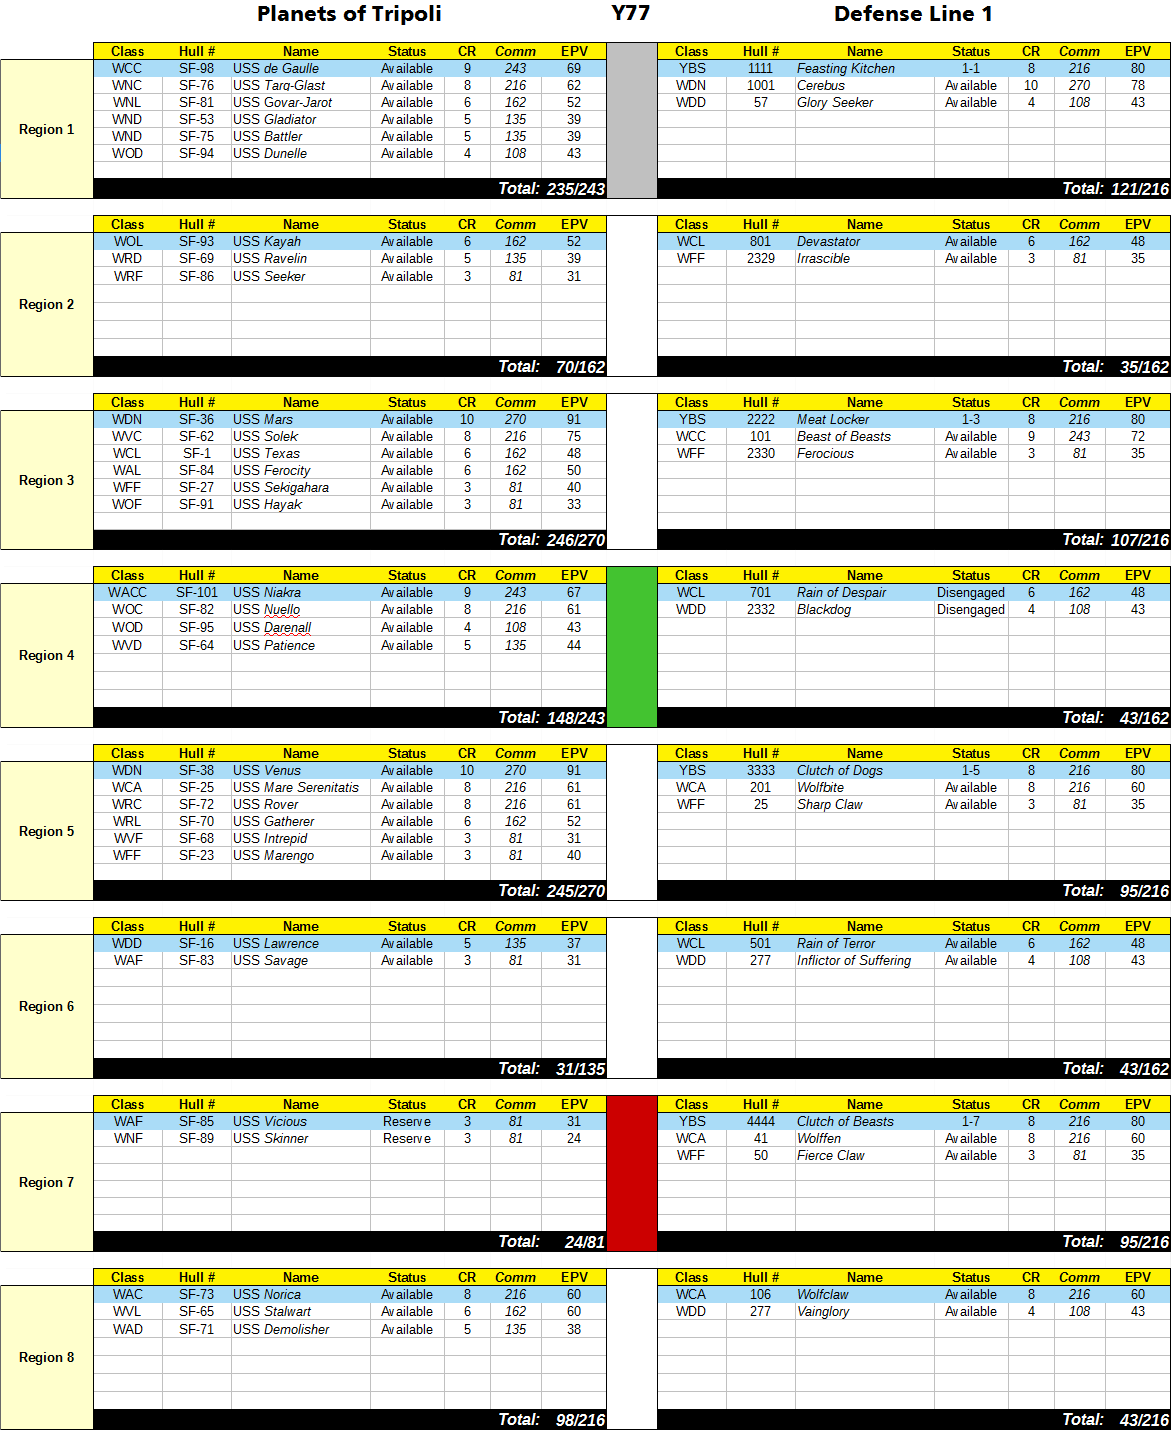
Half of the defender’s fleet is in reserve (not including his five new ships), which gets me a fairly free pass to get through this defense line, and why Mark is so thin on the ground right now. This will change. Any ships of mine that disengage this turn will be unavailable next time.

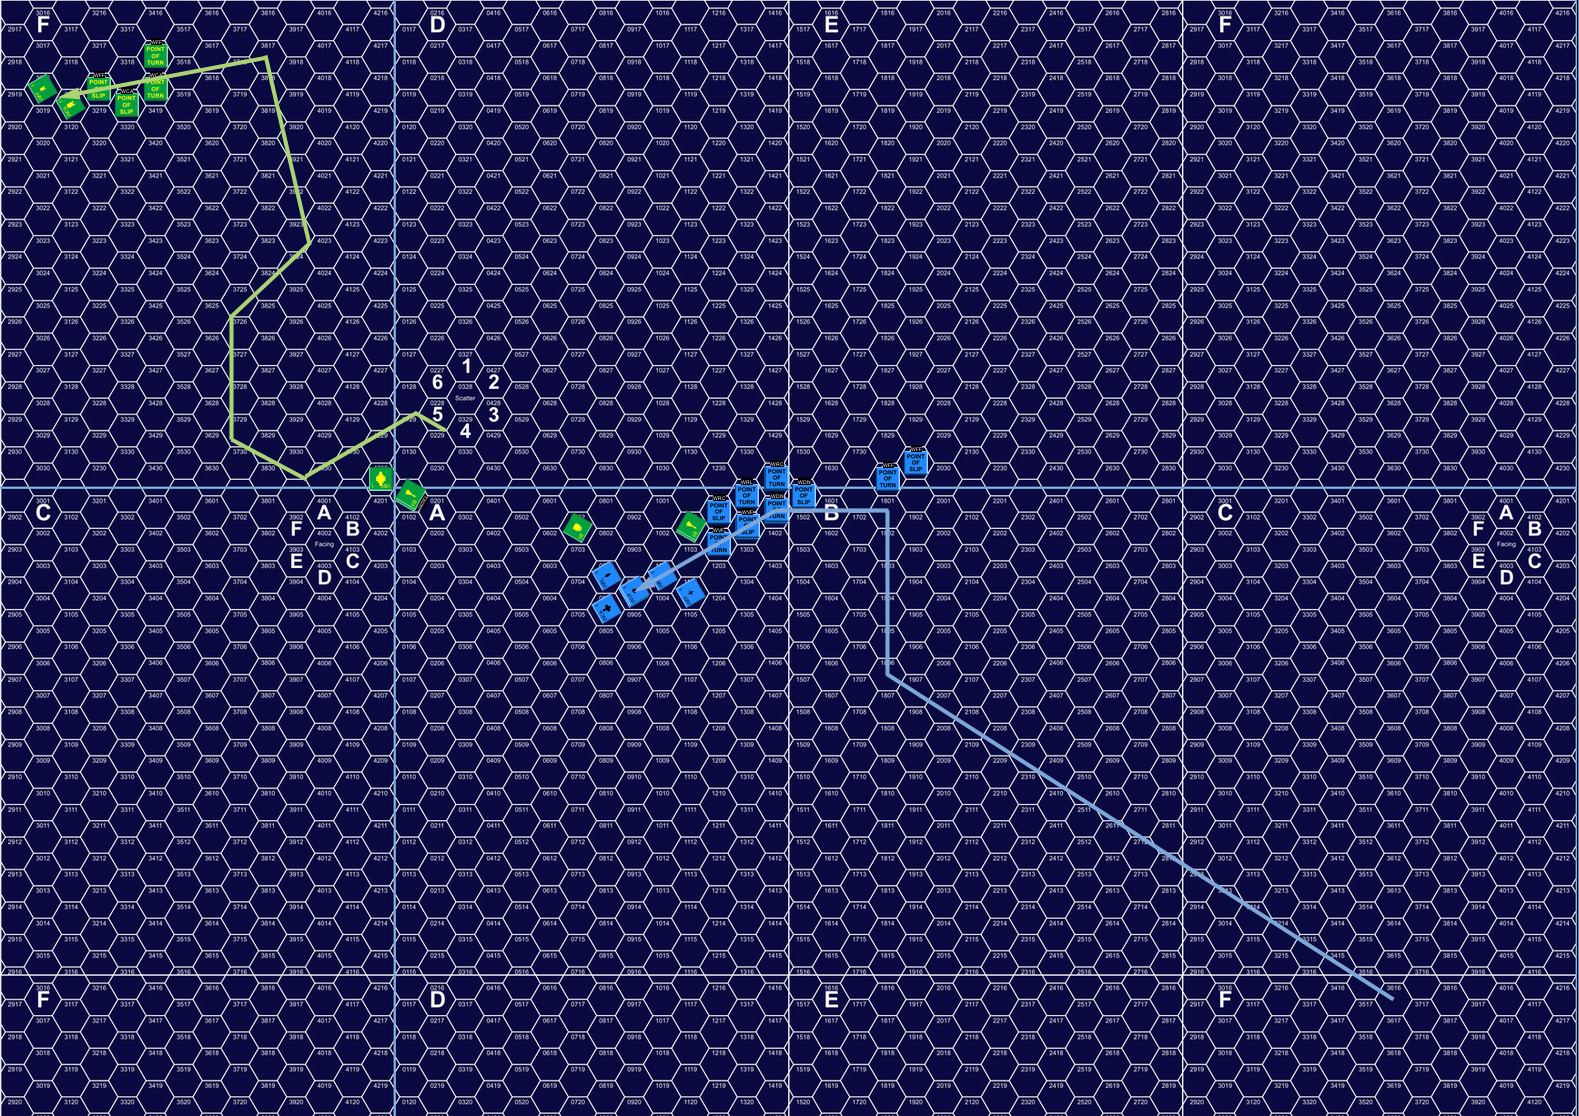
Region 1: Two ships on each side permanently damaged, and the YBS destroyed:
Planets of Tripoli Y77 Region 1

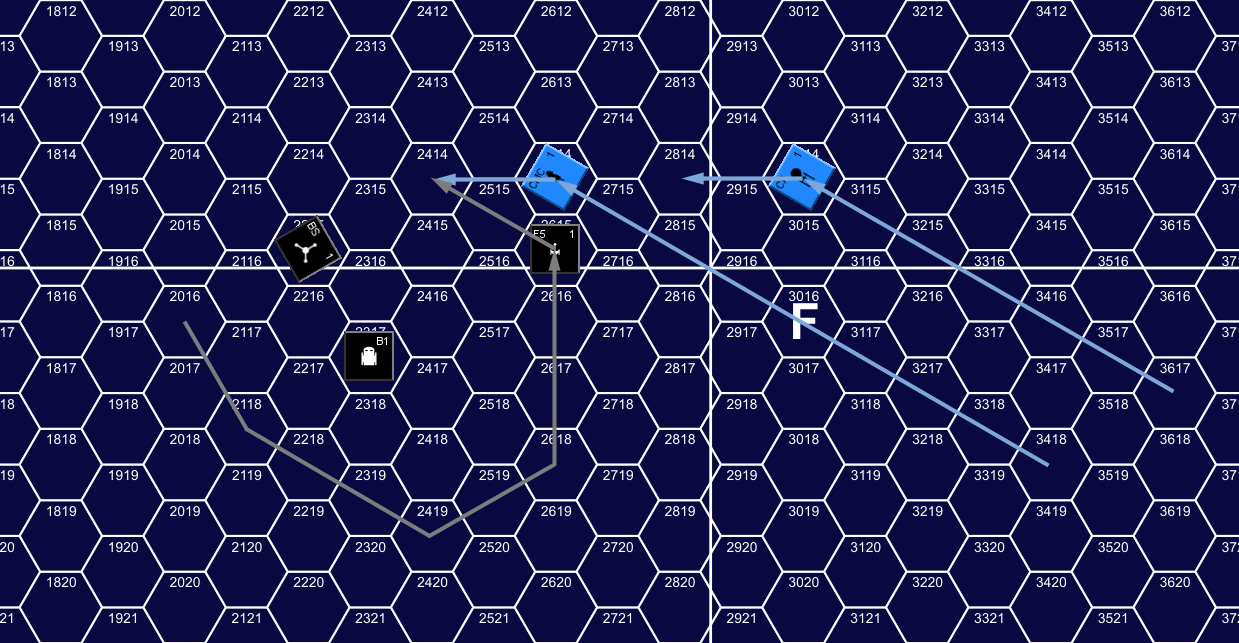
Region 2: Open space fight where a refused close-range pass led to armor being stripped from a C-WCL before disengaging.
UR1 Y77 Planets of Tripoli Region 2

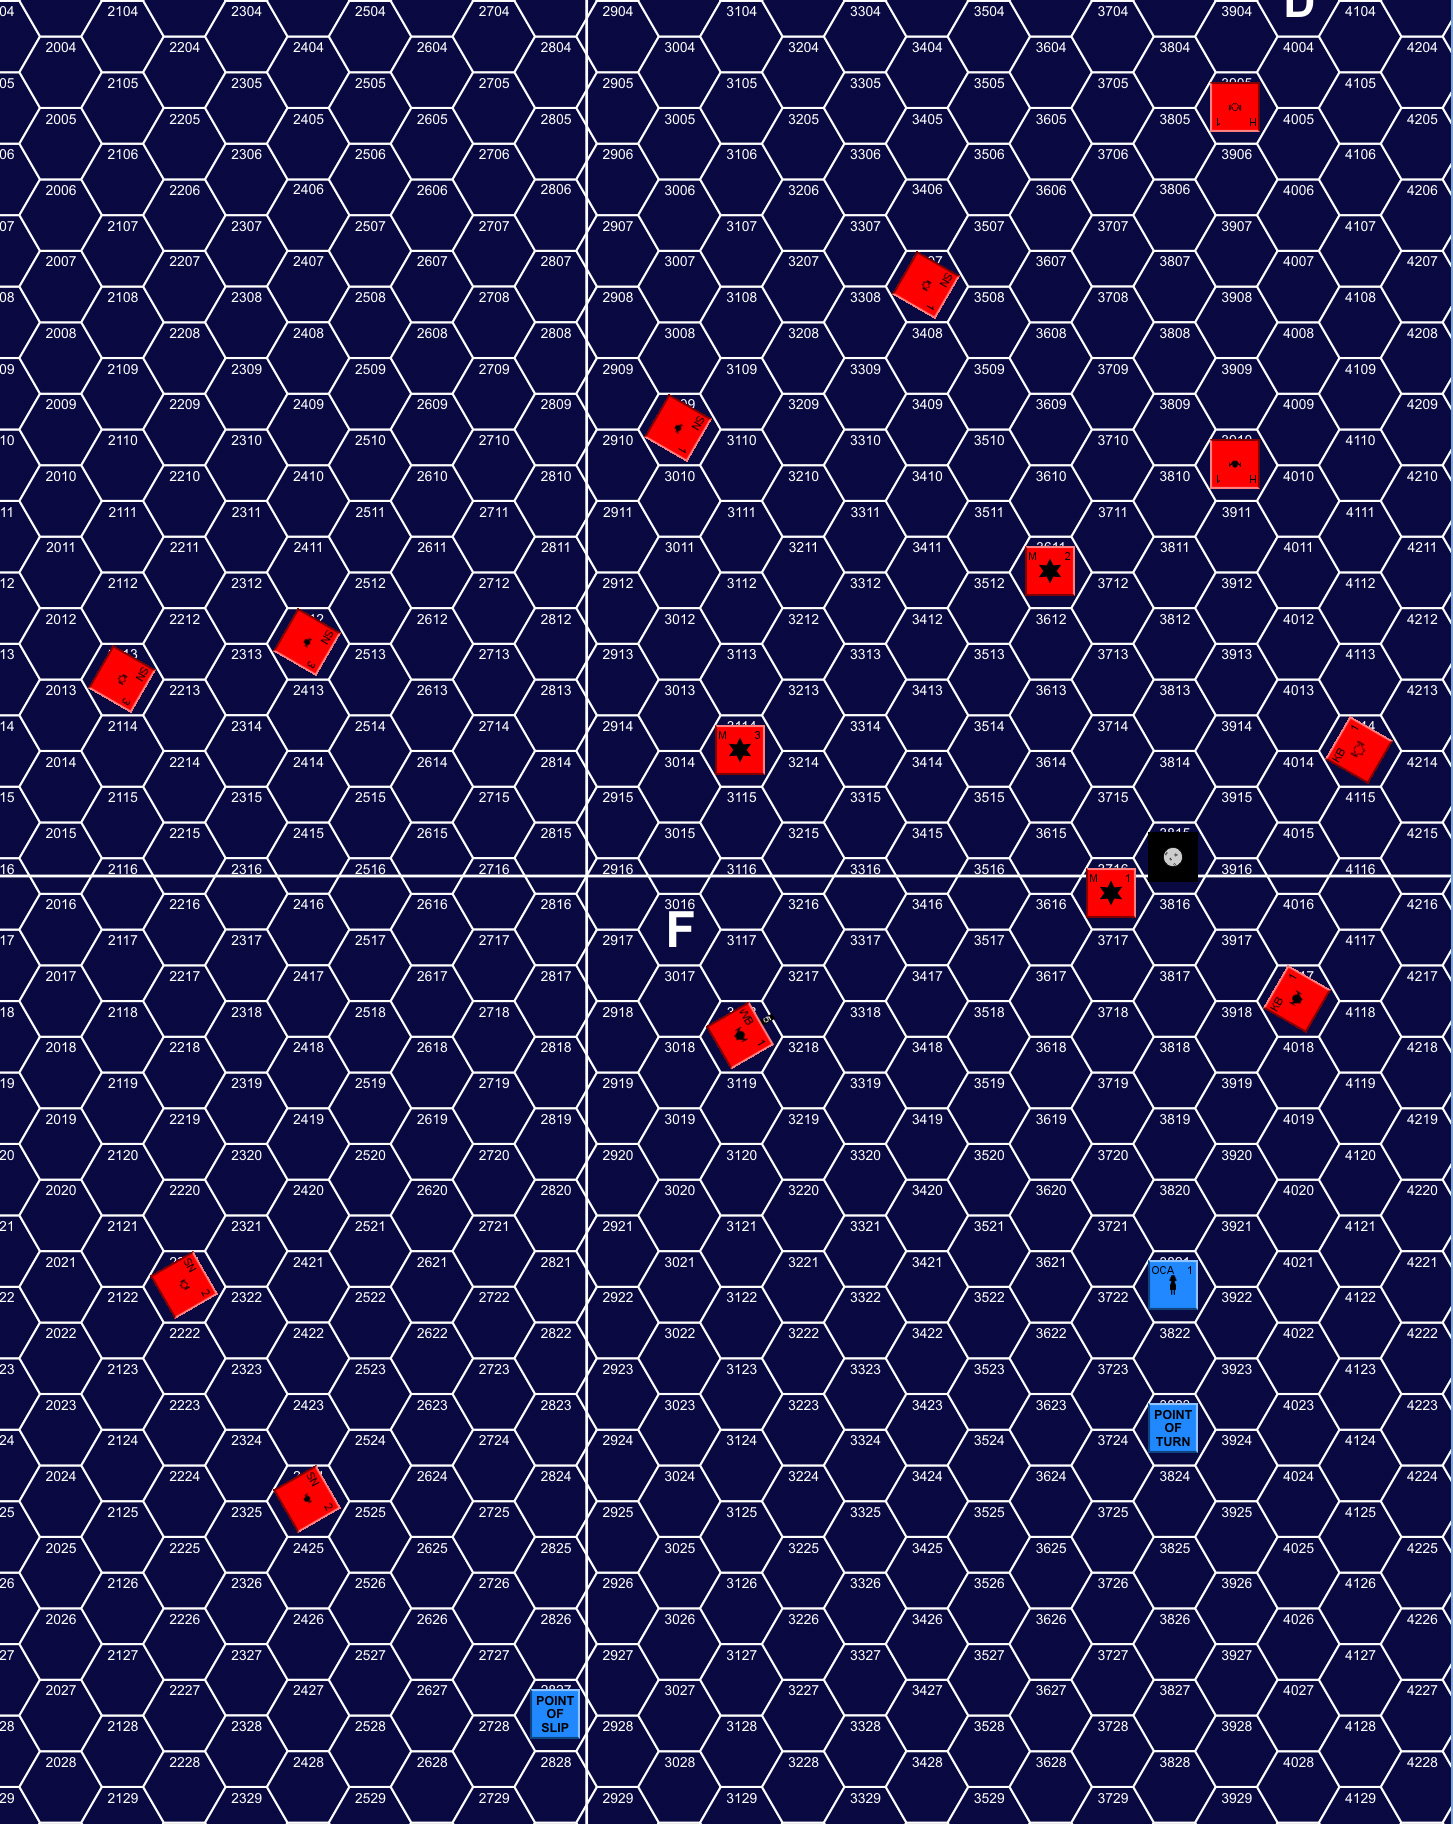
Region 3: Instead of playing another lopsided base battle, we mirrored the approximate results of Regions 1 & 5, with the YBS destroyed and Beast of Beasts and USS Ferocity losing all armor.

Region 4: Mark’s force was completely outmatched, so it was surrendered without a fight.

Region 5: One ship on each side took serious damage, the YBS was destroyed, and USS Mare Serenitatis took two of eight armor damage.
Planets of Tripoli Y77 Region 5

Region 6: My force was not quite minimal in hopes of catching a pair of FFs. Instead, the Carnivons had a heavier force, and I disengaged to Reserve instead of risking my ships.

Region 7: My force was minimal so I could concentrate elsewhere, so I surrendered that region without a fight. And those two ships will be in Reserve next time.

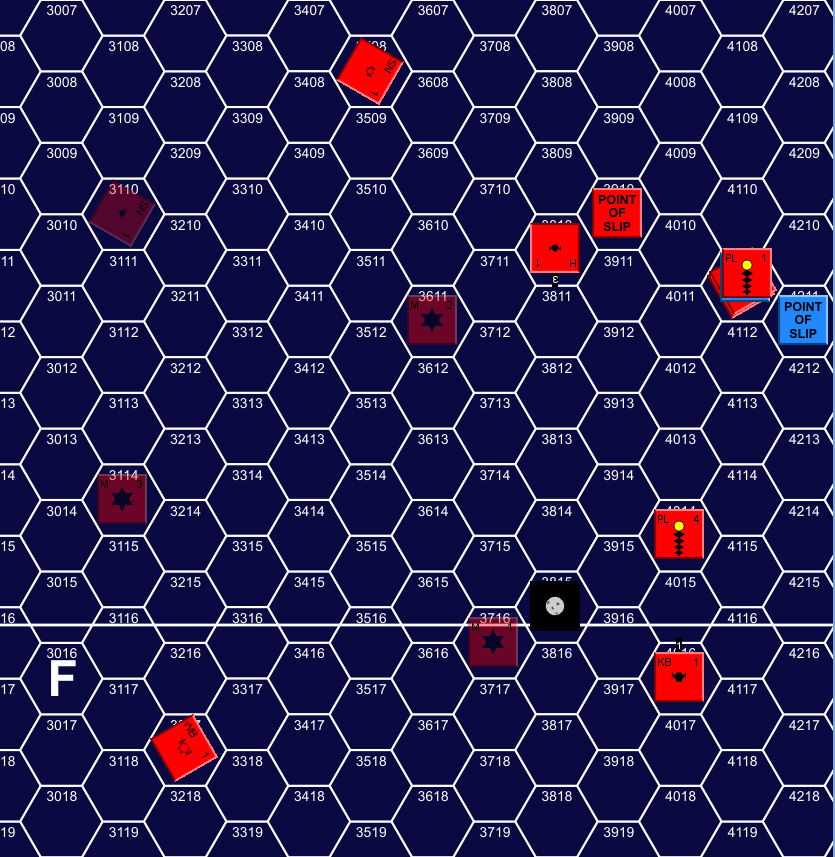
Region 8: Short skirmish that did nothing beyond a few shield boxes:
UR1 Y77 Planets of Tripoli Region 8

└ Tags: gaming, Planets of Tripoli, SFB, Y77
2 Comments

SL298 A Measure of Fear

by Rindis on November 29, 2021 at 12:00 pm
Posted In: SFB

Captain’s Log #43 had a very interesting idea for the main story and associated SFB scenario. The premise is that the Romulans tested Federation neutral zone defenses in two groups. One was a single War Bird which got chased down by the Enterprise as it picked off listening outposts (the episode “Balance of Terror”), while a larger group waited in ambush at the other end of the line. The USS Alfred the Great walked into the trap, and was lost with all hands, after destroying a War Bird with a photon volley.

The story/scenario is about the latter part, with six Romulan ships using hidden cloaking, and able to set up hidden mines. Since there’s no experience with cloaking devices at this point, there’s no tracking of ships at all (normally, with hidden movement, you regularly indicate the general direction of the ship(s)). Once one ship starts decloaking, it is placed on the board, and the others are also placed… somewhere within five hexes of its true position. The Alfred needs to go to a large asteroid (that used to have an outpost on it), and send down a landing party, and get it back a turn later (not 32 impulses, nor even 8, for that matter, just on a different turn), and get off the map, within 5 turns. The Romulans win a marginal victory for destroying the Alfred, with their level of ‘victory’ lowered by one for each ship they lose (two if it’s one of the larger ships, like a War Bird; historically the Romulans had a minor defeat).

This takes place back in Y154 (our group is playing Y161 currently), so Mark and I went back to give it a play. I took the Romulans, and set up my ambush. The King Bird (my command ship) was near the asteroid, with the WB a little further back, and the Hawk on the opposite side. The three Snipes, were further out near various possible approaches. One mine was next to the asteroid with two more five hexes further out (the minimum allowed) on the most likely approaches.

…And we had some confusion about that. Our instincts (and my setup) assumed entry from the top edge of the map, but it seems (and we went with for play) it enters on the left of the map, at maximum distance from the asteroid. This definitely puts time pressure on the Alfred to get there and exit in five turns, after hanging around the asteroid for a turn. Which, it needs to be mentioned, is an unusual ship. It is an “Old” Heavy Cruiser, which is the Federation light cruiser design grown up to heavy cruiser size. It has armor, but the shields are weaker, phaser coverage is better, and there’s slightly more power, but there’s not as much hull to take damage on (actually, it might about the same, but more of it is rear hull, which doesn’t come up quite as often as forward hull). Overall, its very close in capabilities to the regular CA (maybe too close), but it does fight a bit differently.

Mark entered at the lower corner of the map (…and I’d been expecting the upper edge…), at speed 25. (The Romulans are all sublight, and are either tactical impulse or speed 1, and they all went speed 1.) He largely sideslipped over, maneuvering to pass by the asteroid from below. In so doing, he passed a couple hexes behind one of the snipes near the end of the turn, who turned to face where the OCA was going (along with everyone else maneuvering similarly).

On impulse 17, the OCA turned to make its direct run at the planet, and two impulses later, the WB started decloaking, 7 hexes away from it.


At the moment of decloaking. The ‘outline’ ships are the sensor ghosts Mark got to see, while the others are the actual locations.

Mark dropped the forward shield as he came into range and beamed a boarding party down to the asteroid. Mark slipped away from the WB, which also had the effect of passing him directly through the KB’s location. The WB launched its plasma on 23 and immediately started recloaking. On 26, the KB and HK started uncloaking, the KB one hex behind the OCA, and the HK seven hexes in front.

On impulse 31, the KB and HK finished decloaking, and the HK launched both of its torpedoes. The OCA had gotten outside the KB’s firing arc, but it turned on impulse 32… and then held fire until the next turn so it could power the plasma-R torpedo in EA rather than out of batteries. The OCA dropped speed slightly to 23, and fired 2xphotons and the four bearing phasers at the HK on impulse 1, missing with a photon, and getting poor phaser rolls (two 6s) to do 14 points to the Hawk’s #6.


Point of impact

Mark slipped into the plasma-Gs from the HK, which also caused the R from the WB to impact at the same time. But they hit on different shields, and if he had dodged them, they would have all hit on #5 an impulse later. As it was, the #6 and #4 collapsed, going through the armor, for 29 internals. Nine impulses later, the plasma-R from the KB hit, knocking down #5 and doing another 17 internals. During the early part of the turn, he also dropped a shield and recovered the boarding party, getting the shield back up before the final plasma hit. Since the sublight Romulans have very limited range on their lasers, lowering shields around them isn’t a big deal as long as you’re not on top of them.

Afterword

And… that was pretty much that. Even after all the damage, the OCA could do speed 19 on turn 4. As he was still in 2502 (and needed to get to, effectively, 00xx), he wouldn’t get off the board, but he’d be in easy range of it for turn 5.

The OCA had lost all hull, half the lab, all phasers, two photons, all impulse, and ten warp, but still had two APR and 20 warp to work with. It couldn’t fight, but it was comfortably above the 10 warp minimum the scenario gives for disengaging off the map.

I still had the Snipes, but their plasmas didn’t reach out to where the OCA was. The WB was in plasma-R range, but was going into second turn of arming, so all it had was a fast-load F, which is worse the the G’s on the Snipes.

There’s no levels on a Federation victory, which this is. It looked scary while the plasmas were moving, but the OCA had the bulk, and I needed a to get the plasmas on two shields instead of three (which took fancy maneuvering). That said, there’s not a lot better I think I could do in the setup, but more extensive mining near the asteroid is must.

└ Tags: gaming, SFB, Y154
 Comment 
  • Page 4 of 16
  • « First
  • «
  • 2
  • 3
  • 4
  • 5
  • 6
  • »
  • Last »

©2005-2026 Rindis.com | Powered by WordPress with ComicPress | Hosted on Rindis Hobby Den | Subscribe: RSS | Back to Top ↑