
SL298 A Measure of Fear
Captain’s Log #43 had a very interesting idea for the main story and associated SFB scenario. The premise is that the Romulans tested Federation neutral zone defenses in two groups. One was a single War Bird which got chased down by the Enterprise as it picked off listening outposts (the episode “Balance of Terror”), while a larger group waited in ambush at the other end of the line. The USS Alfred the Great walked into the trap, and was lost with all hands, after destroying a War Bird with a photon volley.
The story/scenario is about the latter part, with six Romulan ships using hidden cloaking, and able to set up hidden mines. Since there’s no experience with cloaking devices at this point, there’s no tracking of ships at all (normally, with hidden movement, you regularly indicate the general direction of the ship(s)). Once one ship starts decloaking, it is placed on the board, and the others are also placed… somewhere within five hexes of its true position. The Alfred needs to go to a large asteroid (that used to have an outpost on it), and send down a landing party, and get it back a turn later (not 32 impulses, nor even 8, for that matter, just on a different turn), and get off the map, within 5 turns. The Romulans win a marginal victory for destroying the Alfred, with their level of ‘victory’ lowered by one for each ship they lose (two if it’s one of the larger ships, like a War Bird; historically the Romulans had a minor defeat).
This takes place back in Y154 (our group is playing Y161 currently), so Mark and I went back to give it a play. I took the Romulans, and set up my ambush. The King Bird (my command ship) was near the asteroid, with the WB a little further back, and the Hawk on the opposite side. The three Snipes, were further out near various possible approaches. One mine was next to the asteroid with two more five hexes further out (the minimum allowed) on the most likely approaches.
…And we had some confusion about that. Our instincts (and my setup) assumed entry from the top edge of the map, but it seems (and we went with for play) it enters on the left of the map, at maximum distance from the asteroid. This definitely puts time pressure on the Alfred to get there and exit in five turns, after hanging around the asteroid for a turn. Which, it needs to be mentioned, is an unusual ship. It is an “Old” Heavy Cruiser, which is the Federation light cruiser design grown up to heavy cruiser size. It has armor, but the shields are weaker, phaser coverage is better, and there’s slightly more power, but there’s not as much hull to take damage on (actually, it might about the same, but more of it is rear hull, which doesn’t come up quite as often as forward hull). Overall, its very close in capabilities to the regular CA (maybe too close), but it does fight a bit differently.
Mark entered at the lower corner of the map (…and I’d been expecting the upper edge…), at speed 25. (The Romulans are all sublight, and are either tactical impulse or speed 1, and they all went speed 1.) He largely sideslipped over, maneuvering to pass by the asteroid from below. In so doing, he passed a couple hexes behind one of the snipes near the end of the turn, who turned to face where the OCA was going (along with everyone else maneuvering similarly).
On impulse 17, the OCA turned to make its direct run at the planet, and two impulses later, the WB started decloaking, 7 hexes away from it.
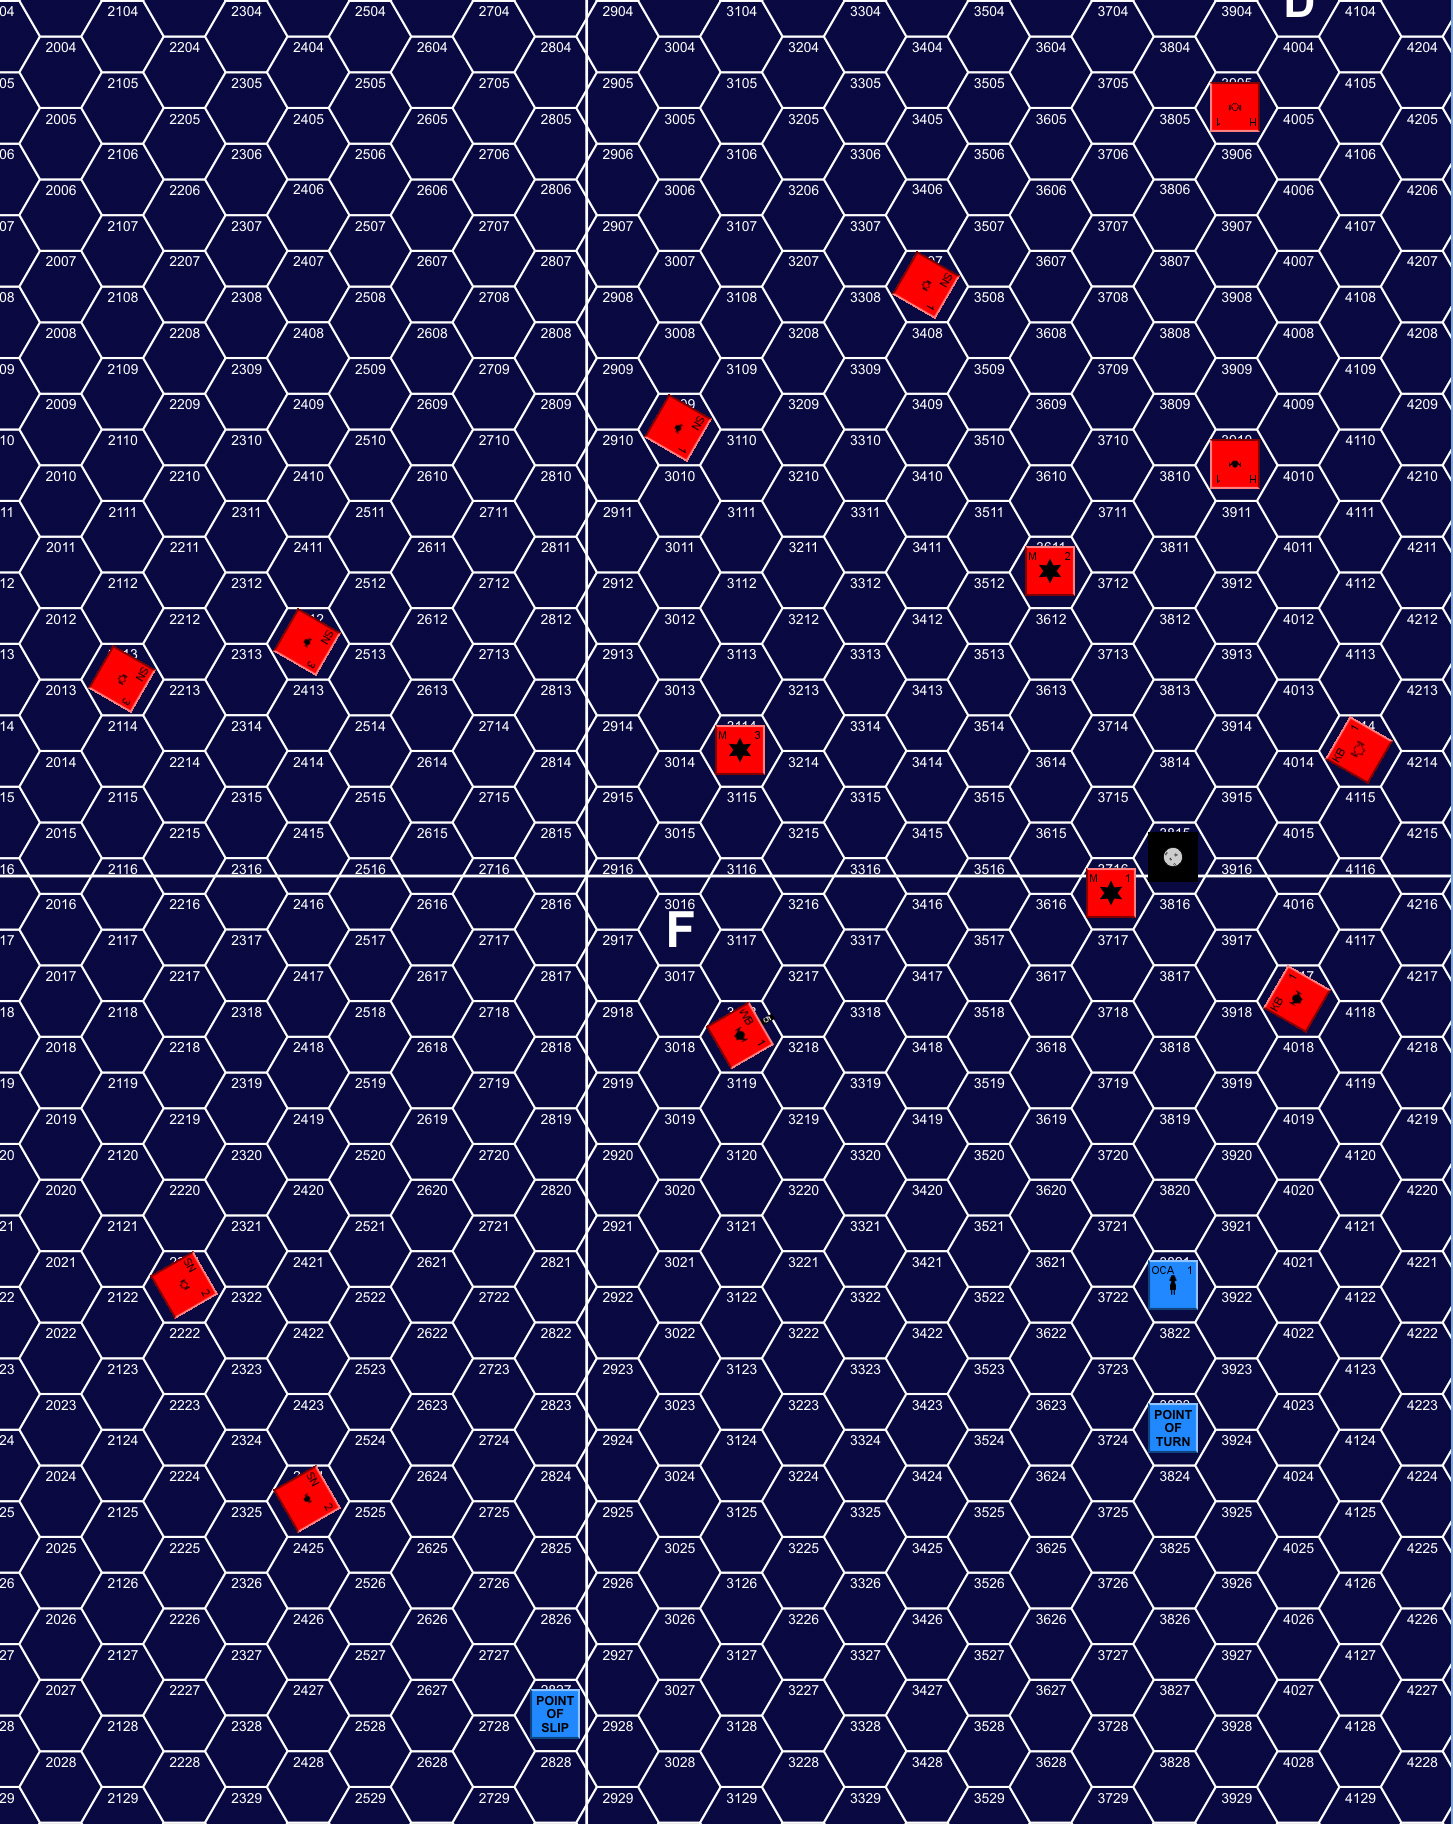
At the moment of decloaking. The ‘outline’ ships are the sensor ghosts Mark got to see, while the others are the actual locations.
Mark dropped the forward shield as he came into range and beamed a boarding party down to the asteroid. Mark slipped away from the WB, which also had the effect of passing him directly through the KB’s location. The WB launched its plasma on 23 and immediately started recloaking. On 26, the KB and HK started uncloaking, the KB one hex behind the OCA, and the HK seven hexes in front.
On impulse 31, the KB and HK finished decloaking, and the HK launched both of its torpedoes. The OCA had gotten outside the KB’s firing arc, but it turned on impulse 32… and then held fire until the next turn so it could power the plasma-R torpedo in EA rather than out of batteries. The OCA dropped speed slightly to 23, and fired 2xphotons and the four bearing phasers at the HK on impulse 1, missing with a photon, and getting poor phaser rolls (two 6s) to do 14 points to the Hawk’s #6.
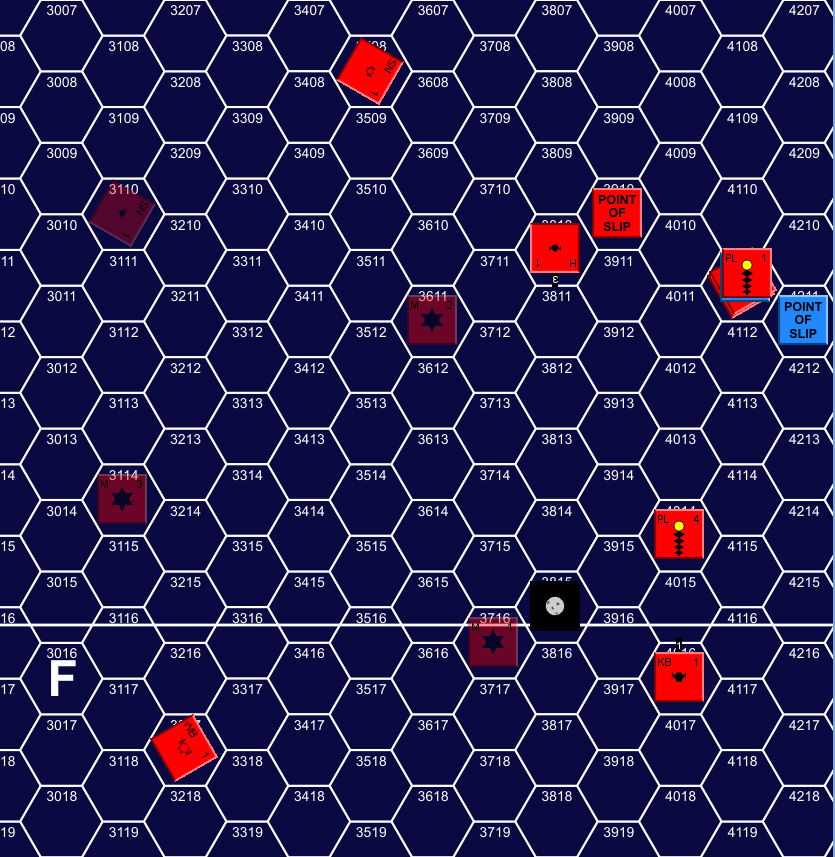
Point of impact
Mark slipped into the plasma-Gs from the HK, which also caused the R from the WB to impact at the same time. But they hit on different shields, and if he had dodged them, they would have all hit on #5 an impulse later. As it was, the #6 and #4 collapsed, going through the armor, for 29 internals. Nine impulses later, the plasma-R from the KB hit, knocking down #5 and doing another 17 internals. During the early part of the turn, he also dropped a shield and recovered the boarding party, getting the shield back up before the final plasma hit. Since the sublight Romulans have very limited range on their lasers, lowering shields around them isn’t a big deal as long as you’re not on top of them.
Afterword
And… that was pretty much that. Even after all the damage, the OCA could do speed 19 on turn 4. As he was still in 2502 (and needed to get to, effectively, 00xx), he wouldn’t get off the board, but he’d be in easy range of it for turn 5.
The OCA had lost all hull, half the lab, all phasers, two photons, all impulse, and ten warp, but still had two APR and 20 warp to work with. It couldn’t fight, but it was comfortably above the 10 warp minimum the scenario gives for disengaging off the map.
I still had the Snipes, but their plasmas didn’t reach out to where the OCA was. The WB was in plasma-R range, but was going into second turn of arming, so all it had was a fast-load F, which is worse the the G’s on the Snipes.
There’s no levels on a Federation victory, which this is. It looked scary while the plasmas were moving, but the OCA had the bulk, and I needed a to get the plasmas on two shields instead of three (which took fancy maneuvering). That said, there’s not a lot better I think I could do in the setup, but more extensive mining near the asteroid is must.
Discussion ¬