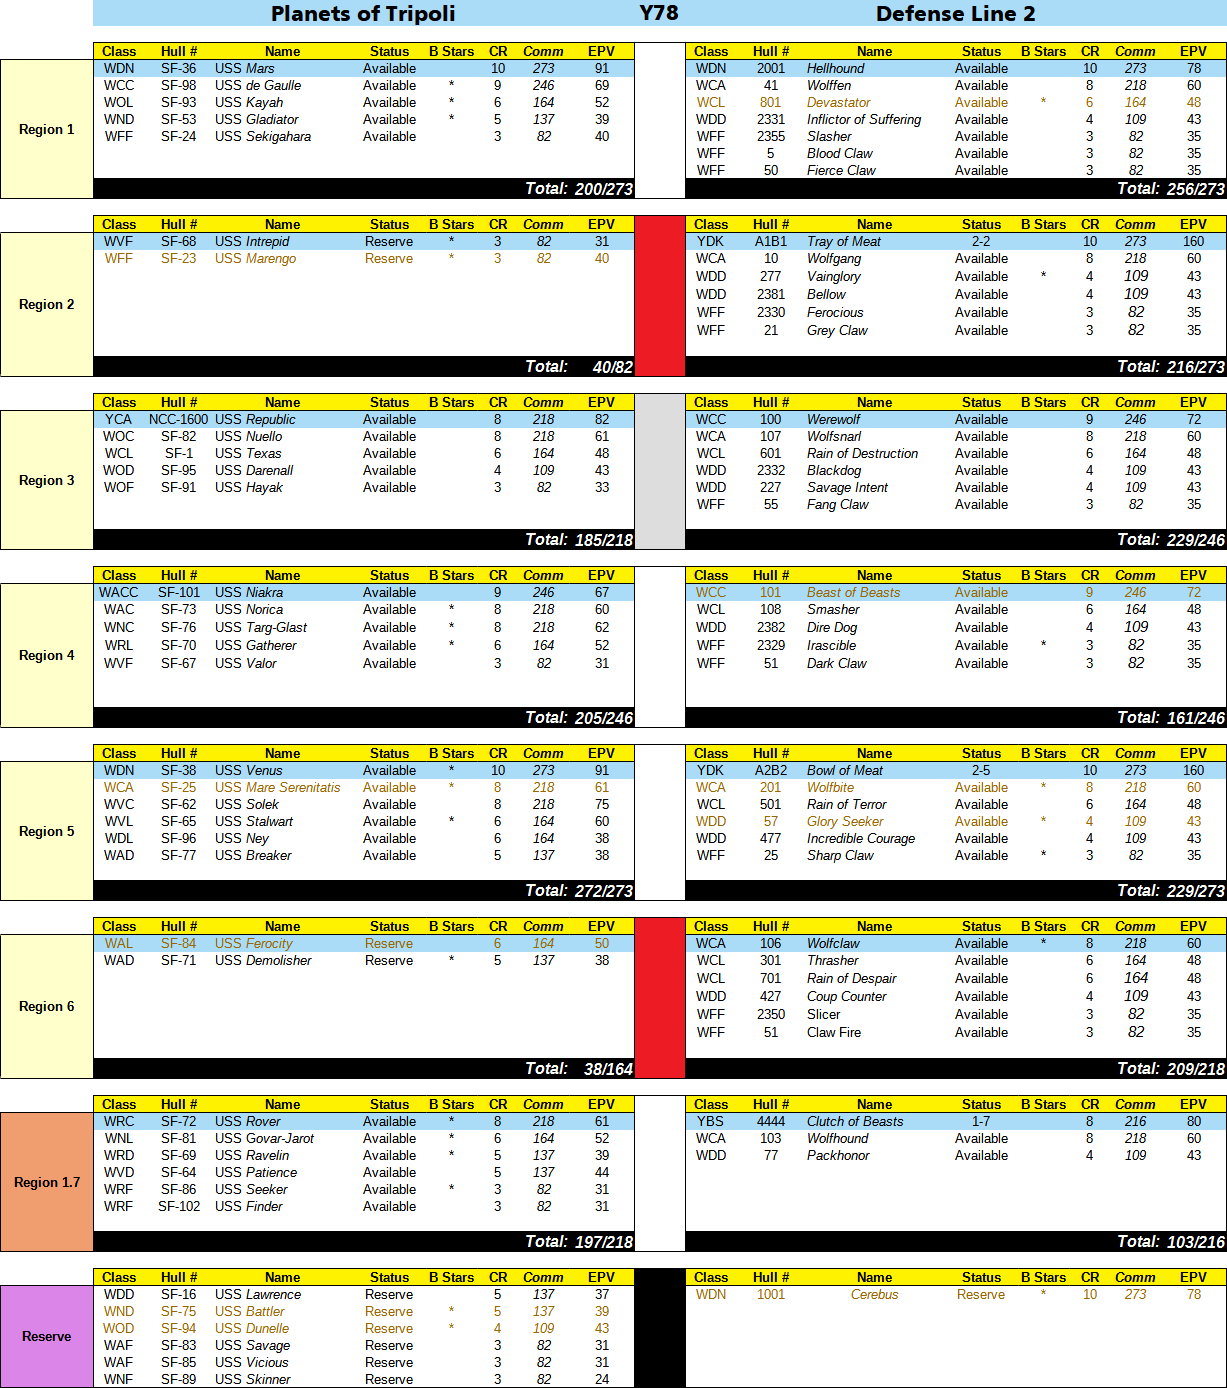
This report has sat for way too long, but Mark and I got to the Region 5 battle in our SFB campaign a while back; this is the primary base battle, where I am attempting to clear one of the two YDKs on defense line 2. I had stuffed as much into my fleet as I could, leading with one of the WDNs, and using two CAs, a CL, and two DDs. USS Mare Serenitatis had taken two hits last year, damaging two out of eight armor, but USS Ney was a just-built destroyer leader, equipped with an extra point of armor as well as two cargo and an extra transporter, and USS Solek has a pair special sensors (unique to Vulcan ships in this era), to combat the EW abilities of the base.
Mark’s fleet wasn’t as heavy, but the YDK is quite large and has a BPV/EPV rating approaching double that of my dreadnought. However, Wolfbite lost all eight of its armor last year, and Glory Seeker had taken heavy damage and is permanently out three hull and the auxiliary bridge until it spends a year getting repaired. The important consideration for my tactics was that the YDK’s disruptor cannons, surprisingly, have a maximum range of 22 hexes. It’s more than large enough that I figured they’d have the full 40-hex range, but this leaves me a fair amount of the map where all the YDK can do is electronic warfare and shots with four banks of three phasers each (which is potentially dangerous enough).

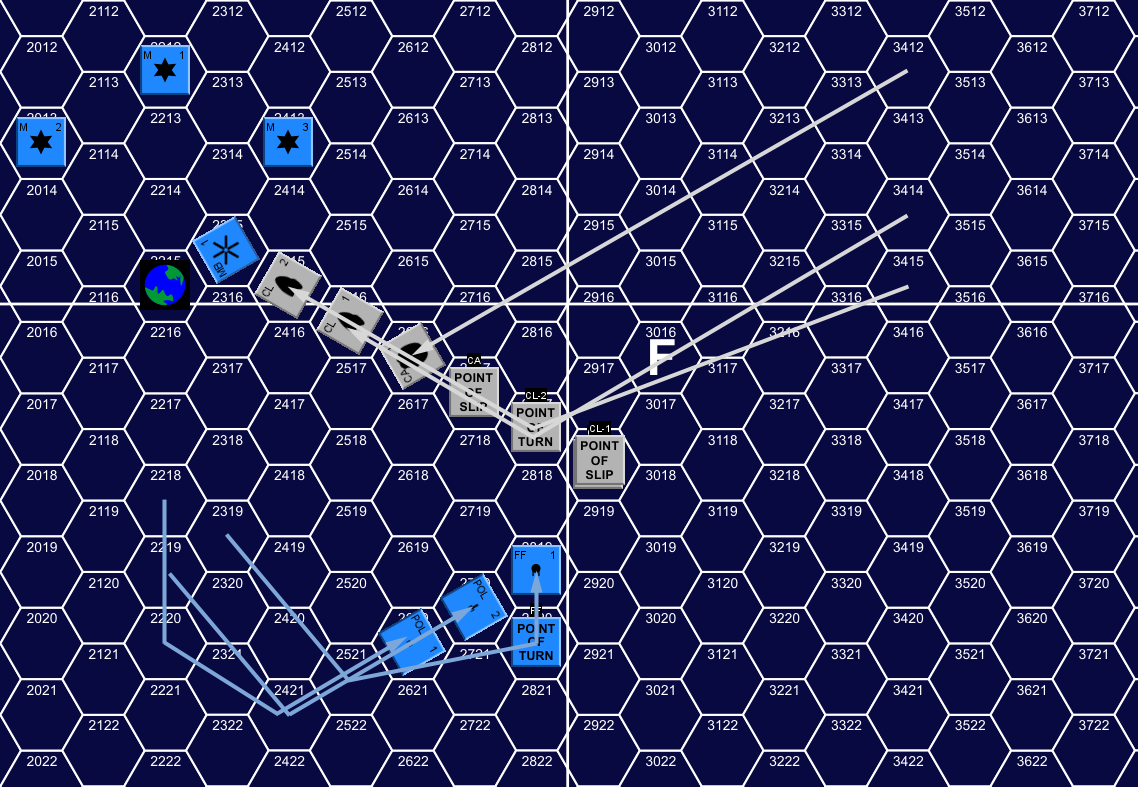
Mark got a good roll for setup, and his ships started at WS-III (the attacker’s ships are always at that for base battles; they know they’re about to show up). I lined up at the range-35 limit and proceeded at speed 10, while Mark started stacked with the base and went speed 12. During the turn, the Carnivons broke into two stacks, and on impulse 24 WCA Wolfbite and WCL Rain of Terror launched death bolts. After that, I turned off of a direct attack run towards the YDK, and headed (roughly) to intercept the enemy fleet. On impulse 29, YDK Bowl of Meat (A2B2) fired 6xphaser-1s at WDL USS Ney (SF-96), doing three damage at range 26.
Turn 2 saw similar plots to the first turn, but Ney slowed down to speed 8 to start repairing the #2 shield. By impulse 6 the entire Carnivon force was running on a parallel course to me, but much closer to the base, ahead of me, and faster, and by impulse 16 had turned off completely, orbiting the base at range 12, before turning in even closer in the second half of the turn. The death bolts came into range on impulse 24, and WVC USS Solek (SF-62) used her special sensors to break the lock-ons of two of them.
At the very end of the turn, I turned in, and declared speed 1 for everyone on turn 3, as I was just outside the range-22 limit. In return, Bowl of Meat fired 6xph-1s at WVL USS Stalwart (SF-65) on impulse 32, doing 2 damage to the #1 shield after reinforcement. This set me up for a potential bombardment of the base if the Carnivon fleet continued to stay away, or a combined bombardment of everything if the Carnivon ships sat close to the base. Without proximity photons, this was unlikely to be a winning strategy for me, but I figured lucky photon volleys could force Carnivon ships off the line, while I could hopefully take the ph-1 bombardment for a while.
As it was, Mark launched a full volley of death bolts on impulse 9, Solek used one channel to break a lock on from the first volley, and Stalwart shot down the remaining one on impulse 21. The Carnivon ships turned to approach around mid turn, and on impulse 25 he fired all the ph-2s and 6xph-1 at WAD USS Breaker (SF-77), doing 2 damage to the #1 after the low speed ‘brick’ and batteries. Bowl of Meat tried again with another 3xph-1 two impulses later, but couldn’t hit. On impulse 30, Breaker and WCA USS Mare Serenitatis (SF-25) fired 2xph-2 each at WCA Wolfbite (201) for two points that did not register on the shields. On impulse 32, I sideslipped to maintain range from the base, and the Carnivon fleet started turning off. Ney fired 2xph-2 along with WDN USS Venus’ (SF-38) 2xphasers and three photon torpedoes at Wolfbite, doing 1 point from poor phaser and photon rolls (taken on battery).
With the Carnivon fleet headed away again, I stuck to speed 1 and a bombardment profile for turn 4, while Mark slowed to speed 9 (7 for Rain of Terror). The base put another three ph-1s into Breaker on impulse 7 but missed (all 3s at a range where damage requires 1s and 2s). The fleet then turned in, and started approaching the Star Fleet force again. Solek turned off two death bolts from last turn’s volley, and the Carnivons got to the oblique around impulse 18, and turned in on 22. USS Breaker fired her photon on 25 and hit Wolfbite (in the lead) to take out nearly half the #1. Bowl of Meat fired three more ph-1s at Breaker on impulse 28 doing 1 point to the #1 on much better rolls after batteries. On 31, the Carnivons launched another full volley of death bolts.
On impulse 32, part of my fleet turned to face the Carnivon ships (Breaker did not to keep the weakened #1 away, and Solek did not as her special sensors didn’t require it). The Carnivons volleyed 6xph-2 at USS Breaker (two from Rain of Terror from outside range 8), and 6xph-1s and 2xdisruptor cannons from Bowl of Meat (she had just hit range 22, and these were on the #1, while the fleet was hitting #2) to do 8 points each to two shields, collapsing both for no internals. Meanwhile, Star Fleet answered with five photon torpedoes at Wolfbite, hitting with two to punch three internals through the #1, including a warp and phaser.
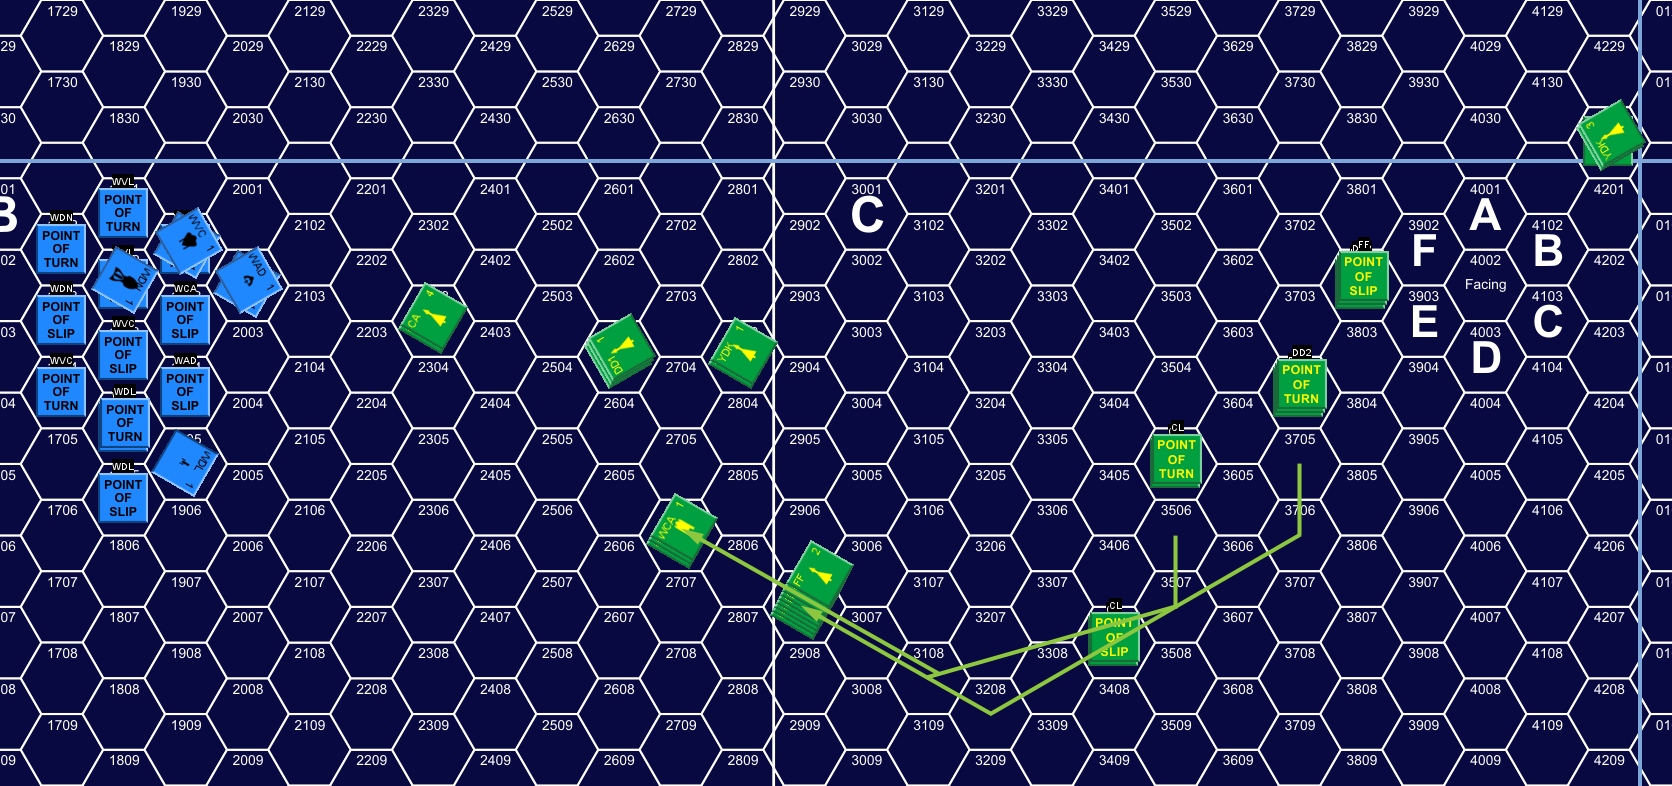
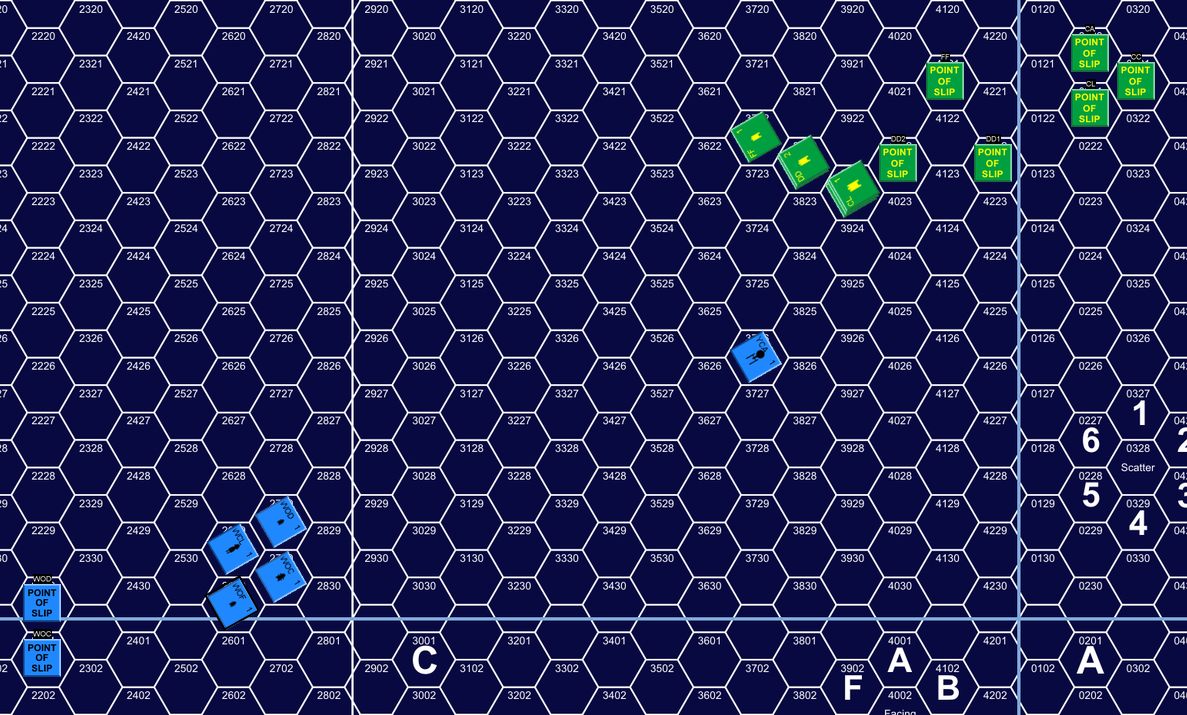
Beginning of Turn 5, showing movement through Turn 4.
For turn 5, the Carnivons sped back up to speed 12 or better, while I went speeds 8 or 9. Breaker and Wolfbite both turned fire control off, and Bowl of Meat lent ECM to Wolfbite and Rain of Terror (for a total of 5 on each). The first part of the turn was nail-biting for me as while Breaker had repaired a box of the #1 shield at the end of the turn, #2 was down, and she had to turn that shield past the base, or go charging into the middle of a bunch of death bolts. Thankfully, she was near a shield boundary, and hit that an impulse before the base’s pre-rotation, giving it a shot at the #3 instead.
Solek managed to turn off two of three of the death bolts in the best position to impact, and on impulses 8 and 9, USS Venus fired, hitting with one photon through a shift, and doing three more damage with phasers, just knocking down Wolfbite‘s #5. The rest of the turn was fairly calm as I worked by the death bolts, and ranges opened up again. Four shields had gone down across two ships, but only three internals had been scored.
I split up to avoid the death bolts, and the Carnivons headed back towards the base, both fleets turned clockwise in the second half of the turn, with Wolfbite continuing towards the base. The Carnivons slowed to speed 6 (except for WFF Sharp Claw (25) which went 9) for turn 6. I spent the turn getting Solek back to the rest of the fleet, turning off a couple death bolts (I continued to succeed about 1/3 the time) as she came back into range. The bulk of the Carnivon fleet followed at a distance, and Breaker was still headed away, trying to get two shields repaired.
I went up to speed 11 for turn 7, and the Carnivons went back to speed 12. As I started clearing impact range of the death bolts, I turned back, eventually aiming towards a range 9 pass at the base, and the Carnivons paralleled me at about range 15+. I got into range on impulse 30, and Bowl of Meat fired the disruptor cannons and 2xph-1s at USS Solek, hitting with one cannon and one point of phaser damage (largely ‘middle’ rolls again, not good enough here), for one point to register on the #1 after batteries.
Turn 8 was much the same, I was slowly heading in for my run, while the Carnivon ships ducked behind the base and headed away. Bowl of Meat and Sharp Claw launched death bolts on 23, and 3xph-1s fired on 27 to do a point of damage to USS Ney‘s #6 after batteries. The turn ended with my main force 11-12 hexes from the base, and speeds went all over as I arranged for photons and everything else to be ready. The Carnivons stayed at 12, with Sharp Claw going 15, and Wolfbite turning off fire control to go 14. On impulse 6, rotation effects let Bowl of Meat fire everything (short of ph-3s) at USS Ney (range 11 down the chord), hitting with one disruptor cannon and good phaser rolls to do 25 damage, punching through the #6 and armor for 14 internals, taking out three power and phasers #1 and #2; leaving the 360 mount, photon and 7 power.
On impulse 9, USS Mare Serenitatis slipped into range 8 and hit with a photon and decent phaser rolls to do 14 damage, 4 of which registered on shield #6. On 13, Venus got into firing position and hit with two photons, with poor phaser rolls to do another 22 damage, bringing shield #6 down to four boxes. One of the latest death bolts caught up to Venus on impulse 28 and hit for six damage on the #5 (after batteries). The other was apparently after Mare Serenitatis (three hexes further away), and the one from Sharp Claw was turned off by Solek (taking all three attempts from a channel).
This largely ended the “active” portion of the battle. Ney turned off after getting pounded, and spent time putting the #6 back together while repairing the #2 phaser. Breaker was trailing well behind the rest of the fleet, and worked on rejoining them while photons rearmed, and took fire from Bowl of Meat at the start of turn 11; both disruptors missed, and the #6 shield took 2 points from phaser fire, and another 3 on impulse 6 as the next bank rotated into arc. The Carnivons had also split up, with Sharp Claw separated from everything else and running ahead of my main force. I determined to run her off the map at the very least, and she exited the map at the very end of turn 10. The rest of the Carnivons were in the upper right corner, and also headed for the map edge, with Wolfbite disengaging on impulse 16, and the rest at the end of turn 11.
After this, Mark gave me notes on the base, and I ran the siege solo. My first job was to collect my scattered forces back together for a more concentrated burn-down. On the other hand, Bowl of Meat was making good progress repairing the #6 shield, undoing what little I had done. A YDK generates 28 power, but also has 10 batteries, which is great short-term, but means power is a problem once its gone, since housekeeping plus shield repair and EW comes to about 2/3rds the power generation. Add in phasers and disruptor cannons, and batteries might become a luxury. As usual with a base, a Power Assist Module can be a great help.
At the start of turn 12, #6 was still down 20 boxes, batteries were nearly full, but there was only 3 power in the capacitors. Bowl of Meat tried a phaser volley on Mare Serenitatis for one damage (bounced off her brick). A long range photon volley got lucky (1 hit out of 5 while needing 1s) to suck down 8 batteries. Follow up phasers from USS Venus did 4 more to do two more damage to the #6. Bowl of Meat ended the turn up one box (from repairs), but with drained batteries and 5.5 in capacitors.
Turn 13 was quieter, with the disruptor cannons firing at USS Breaker for one hit doing 2 damage to the #4. USS Stalwart hit with one photon to mostly drain the batteries again. Bowl of Meat ended the turn up one box (all it could afford), two batteries, and 6 in capacitors. Turn 14 saw Venus and Mare Serenitatis‘ photons online, and a hit drained most of the batteries again, letting Bowl of Meat repair two more boxes and get up to 6.5 in capacitors.
The problem with this bombardment was that I didn’t have the firepower needed to do more than slow the YDK down at this range. With proximity photons, damage is halved, but the odds of hitting are tripled, so the average damage would work out much better. Here, I was getting lucky, but not getting anywhere. On the other hand, there’s not much going on the EW front as once Bowl of Meat announces something, Solek will just counter it an impulse later. Extra EW would kill the budget on batteries, and Solek doesn’t have to do much else, so she can out-loan the base right now. I had also been planning on holding out for Breaker and Ney, but it was taking them forever to rejoin the fleet while repairing shields (at speed 3, they’d need another seven turns), so it was time to engage the YDK more closely.
Not that you could tell on turn 15, with everyone going speeds 2-3. Stalwart got lucky again with one photon hit, and Breaker turned in for distant fire support, and Bowl of Meat fired the disruptor cannons at her (following a strategy of getting rid of the more fragile ships first), and hit with one for 2 damage to the #6. Bowl of Meat ended ahead another two shield boxes and with 7 power in capacitors. Turn 16 saw very good rolls, with two hits from the every-second-turn volley of five photons, to do six damage to the #6 after all batteries. The bombarding force started getting to the 13-15 bracket this turn (no help on photons until 12, but phasers get better), and another set of good rolls did five damage to the #3 shield near the end of the turn. After repairs, batteries were out, and #6 was down four boxes.
During turn 17 Stalwart hit range 12, and fired near the bottom of the turn, hitting with one photon (absorbed in batteries again) thanks to the better range bracket. A phaser-1 missed, and Bowl of Meat‘s two disruptor cannons missed, with a bank of ph-1s only doing one damage (absorbed on battery). Turn 18 saw more good luck with 2 out of 5 photon torpedoes hitting, and two more damage from phasers to do 8 damage to the #6; Bowl of Meat switched from disruptor cannons to increased phaser power, but could not punch any damage through.
Turn 19 was when things finally went wrong for Star Fleet. Both of Stalwart‘s photons missed, as did the ph-1. Meanwhile, with ships in about one-turn travel range of the base, Bowl of Meat fired off a pair of death bolts, with an assumed target of Stalwart. Since I was soloing this part, I rolled at various points to see which way they went, and learn about actual targeting that way, and they went after USS Breaker, just entering the area. She also was a lower shift for the dock, so phasers fired at her, doing three damage to the mostly repaired #6 after batteries at range 13. USS Venus expended 3 phasers killing one of the death bolts (the main point behind this…), leaving one for cleanup by Solek; on impulse 32, the death bolt hit range 10, and she had an unused (and powered) channel which turned off tracking.
Not getting the batteries drained let Bowl of Meat start charging disruptor cannons while nearly filling the phaser capacitor, and self-loan a fifth point of ECM. The latter was immediately countered by Solek loaning extra ECCM to Venus and Mare Serenitatis. Turn 20 saw 1 of 5 photons hit, despite USS Venus firing from range 8. Phasers did another 6 (taking four off the #6, three of which were repaired; at this point there were only 5 boxes left), while Bowl of Meat fired on Mare Serenitatis at the end of the turn, when she slid into range 8, but the low-speed brick blocked almost all of it.
Bowl of Meat unleashed everything it had on Stalwart near the top of 21, hitting with both disruptor cannons and decent phaser rolls to punch 5 internals through the #1, some reinforcement, and batteries to take out a phaser and a warp. Breaker had finally come up, and added her photon (which missed) to Stalwart‘s volley, with a great phaser roll and one hit to get 2 damage past batteries, beating the one box repaired. The main three were all sitting at range 8 now, so Stalwart tacked a fresh shield right after taking damage, though the base was shot out.
The top of turn 22 saw the main volley do well (four photon hits, plus good phaser rolls) for 42 damage that translated into 18 internals after armor, generally hitting fluff, but getting the two special sensors. A follow-up phaser volley also rolled well for another 10 internals, taking out a phaser, death bolt launcher (empty, but being reloaded), and disruptor cannon. Turn 23 saw the base fire 9xphaser-1s at USS Stalwart through a +2 shift for 7 shield damage, while the bombardment did just enough to drain batteries. Turn 24 saw the main volleys do 19 internals, still mostly the insane amount of fluff (but center hull did run out), but got three phasers and the remaining heavy weapons.
Turn 25 was less active. USS Ney and Breaker stood in for Stalwart, but at slightly longer range, all they did was four damage taken on batteries. Bowl of Meat tried a heavy shot at Ney, but only did 1 damage. Turn 26 saw Ney take a point of shield damage, but despite only hitting with two photons, and a brick from leftover power, phasers got in for another 18 internals, including three phasers (which were now disappearing quickly from the front side of the base). Turn 27 saw 5 shield damage to USS Ney, while Stalwart and Breaker managed to get one internal past batteries and the regenerated shield.
Turn 28’s bombardment saw four photon hits, and solid phaser rolls for a total of 38 internals. This finally ran out the repair, and started taking out the cargo (there had been an amazing dearth of 7s, and everything else was a hull hit which translated to repair after that was gone), and allowed the first power hits—2 APR. USS Venus had been moving slowly forward, and was now in the 5 range bracket of phaser-1s, so Bowl of Meat turned its attention to her, but couldn’t get through the brick plus batteries. Turn 29 had Stalwart and Breaker get one more internal through.
By turn 30, USS Venus was re-parked at range 3 on one of the chords. This meant an intact weapon pod could target her at the top of the turn (usually Bowl of Meat had to wait on the even turns for them to swing around), and at range 3 the three ph-1s got through the brick and forced use of two batteries; at the end of the turn the other pod came around and did 6 shield damage. Meanwhile Venus and Mare Serenitatis hit with three photons, and had mediocre phaser rolls to do 36 internals. This finished off the cargo, which exposed the batteries to damage (three were hit), the lab started going fast, and another six APR were destroyed, along with all the L+RA phasers.
Afterword
I called it after that. The point was to see how much damage I’d take in the process of beating the base down, and with 3xph-1, 1xph-3, and a steady loss of power, the writing was finally on the wall. Only Wolfbite, Stalwart and Ney had taken internals; the first two could repair everything (that hadn’t already been destroyed), but Ney was out both cargo, three hull, a lab, a transporter, auxiliary control and the armor after repairs.

In general, firepower in the early era is lower compared to defenses later. And this showed it off well, the YDK has a lot of bulk, and is something I’m not likely to be able to deal with as long as there’s a friendly fleet in the area. I’m not looking forward to taking on the four other docks that exist. It is under-powered, but give it a couple turns and it can get everything up and going again, which is why the constant bombardment was important. I got very lucky early on with more photon hits than the average. Once I settled down to the siege, it was more a case of how long would it take to get the couple of lucky turns needed to start breaking it apart. And then it still took forever, because outside of the once only hits, DAC rows 3-6 and 8-11 resolve to hull, meaning there was 22 hull and 40 repair to break through before a power generation hit was possible. 7s aren’t any better, as they start with cargo (20 internals), and then go to hull.
I could have run the base better. I kept in passive ‘turtle’ mode, but switching things up with occasional 0/4 EW to blast something without a shift would probably have caused more casualties. But the base would take more unshifted phaser shots in return. The real problem is doing that part solo, I don’t outguess myself easily. And the WVC could handle most anything the base did (especially late, it was close enough, and should have just loaned 4 OEW to the base). Sitting nearly still Solek could self-generate 4 ECM, power both channels, and have a full pool of 8 EW to loan.
I think Mark could have done more in the early fleet action phase of the battle. However, I did get the lucky photon hits, leading to Wolfbite taking internals and losing two shields. Without a heavy cruiser present he was at a decided disadvantage, and having it there meant she would likely take a lot more damage, and probably leave the map nearly crippled. That said, accepting even that battle could easily have done enough damage to me so that I couldn’t take on the dock.
All my ships did fairly well, though Ney took serious damage early enough to not have done much. The extra armor and cargo on the leader variant helped at that point. The WDN is an amazing ship for the period, Venus was generally keeping an 8-point brick up for the entire bombardment.
/pic8118885.png)