
UR1 Y77 Planets of Tripoli Region 8
In mid-July, Mark and I returned to our SFB campaign, dealing with one of the small open-space fights we had generated.
But first, we took care of other business. Mark was not really wanting to fight out the last base battle, but didn’t want to let it go without a fight, either. So, we skipped it. We assumed there would be a fight, and it would go much like the last two had: I win, destroying the base, Mark lost all the armor on his large ship (WCC), and I would take a dozen internals on one random ship selected from the two CLs and two FFs present (this would either cause unreparable damage to a frigate, or knock out the armor on a light cruiser).
The roll selected WAL USS Ferocity (SF-84), which took six armor hits, and then would have no trouble repairing the other six. So, another ship that’s perfectly serviceable next round, but less protected, which will be a continuing theme in the campaign.

After that, I also conceded Region 6, putting my two ships into Reserve next time, rather than risk them being crippled and destroyed against a superior Carnivon force. (A light cruiser, given previous experience, may not be that big a deal. But then, neither are my frigates.)

After that, it was time to set up, starting with the terrain rules for the campaign. All bases are automatically far from any kind of terrain, so this is the first time it’s come up. The general idea is like the advanced ‘local conditions’ rule in (S5.4), but without monsters, pirates, and the like, and an initial 2d6 roll with empty space (no terrain) being a 6-8. Both players choose what terrain they’d like to see, with the defender having a better chance of actually getting it. Mark declared for asteroids, I declared for a gas giant, and then the roll went to the actual asteroid field entry. (Getting it on your choice—instead of the normal entry—can give you a greater say in setting it up, though that doesn’t happen with asteroids.) A secondary roll made it a ‘heavy’ field with more asteroid markers than normal.

Set up areas on the large campaign maps are also random (when not at a base), and while I set up fairly forward in one of my central zones, Mark set up close to one edge of one of his rear zones. This put us about 50 hexes away from each other. Longish closing distance for normal ships on a clear map. A bit more of a challenge with asteroids and these more primitive ships.
Weapon status came up as I for both of us, so we had the added challenge of charging everything up too. I wasn’t going to skip the initial volley of photons, but most of these ships can only do speed 0 if you try charging all the phasers while loading photons. I settled for partial charges and going speed 6 (which takes no damage from asteroids), while the Carnivon ships went 8. I sideslipped to go around the cluster directly ahead of me anyway (I’d just be stuck inside it during a turn break anyway, forcing decisions during EA that I didn’t want forced.)
The Carnivons boosted to speed 10 on turn 2, and near the end turned down to avoid a cluster and a direct path to me. Turn 3 saw Mark stay at the same speed, while I went to speeds 8 (WAC) and 9 and some EW as most of the phasers were charged and the photons were all being held. I turned to thread my way nearer, and midway through the turn Carnivon WDD Vainglory (277) turned away, separating from WCA Wolfclaw (106).
On turn 4, Wolfclaw boosted to speed 13, and Vainglory to 16, while I scattered from speeds 12 to 9. On Impulse 3, WAD USS Demolisher (SF-71) and WVL USS Stalwart (SF-65) had fairly clear shots at Wolfclaw (two asteroid hexes, negated by ECCM), but three phasers at range 22-23 only did 2 damage, which did not register on shields.
Turn 5 saw Wolfclaw go down to speed 10, while Vainglory went 17 (with minimal shields and fire control off), and I tightened up my speeds to 12 and 11. Vainglory had continued turning, and now was headed up, far away from the larger ship, while my slower speeds meant my main advantage was the center position I had taken, but now I was slightly faster than Wolfclaw (if 20 hexes away, with lots of asteroids in between). Vainglory started a turn towards the middle of the map, and right afterwards, I turned in that direction too. Mark assumed I was switching to paying more attention to Vainglory, but it was actually just meant to clear the double-mass of asteroids between me and Wolfclaw. Better yet for me, Wolfclaw then turned to parallel me, instead of turning the other way and ducking behind the asteroids I was maneuvering around.
Turn 6 had Vainglory turn everything back on while going 15, and Wolfclaw got back to speed 12, while I continued at 11 and 12. Wolfclaw turned back down, towards the corner instead of heading towards Vainglory. I finally split up during this turn, with Stalwart going one way around an asteroid cluster, while the other two turned to go on the other side of it. As I did so, Wolfclaw launched two death bolts.
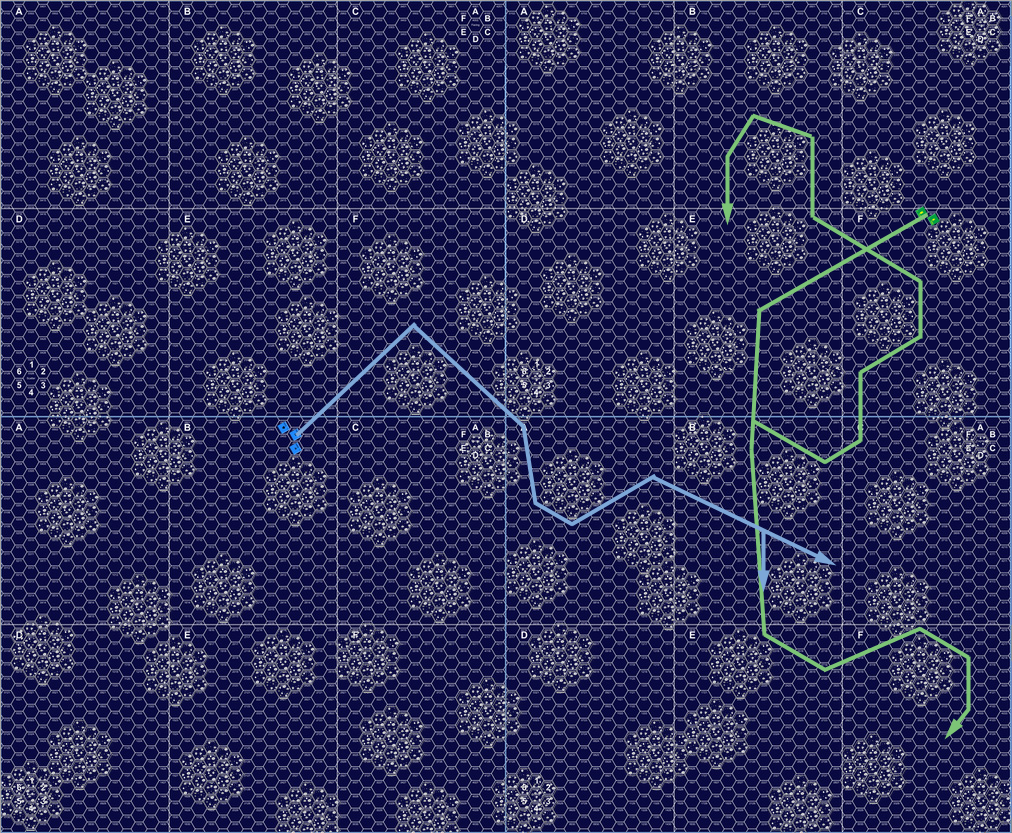
Turns 1-6, showing the full map. Normally, asteroids are in every hex within two hexes of an asteroid counter, here we show them directly.
On turn 7, Wolfbite slowed down to speed 8, while putting up 4 ECM, while Vainglory kept at speed 15. I increased speeds slightly to 12 and 13. The death bolts were forced to move into an asteroid hex on impulse 4, but took no damage. On impulse 8, they were able to slip clear of them, confirming they were targeted on WAC USS Norica (SF-73). Norica kept its distance while the other two moved to chase Wolfbite, which now turned around in the narrow confines between asteroids. On impulse 28, it ended up in the corner cluster, taking 6 damage, none of which registered on the shield (I don’t know if that was all a brick on the #1, or if he blew his four batteries to make up any difference). On 32, Stalwart fired the bearing ph-1 at range 8, but missed Wolfbite.
Wolfbite accelerated to speed 14 on turn 8, while everyone else stayed the same. On impulse 4, the death bolts got to range 1 of Norica, which started downfiring ph-3s at them, finishing the second one off the following impulse. On impulse 10, Wolfbite reached the edge of the map, and launched another pair of death bolts on 11, presumably targeted on Stalwart, along with the bearing ph-2s to do one box to the #1 at range 5. I was waiting for her to turn, and the range to get a bit lower, but instead Wolfbite disengaged, eliminating tracking on the death bolts.
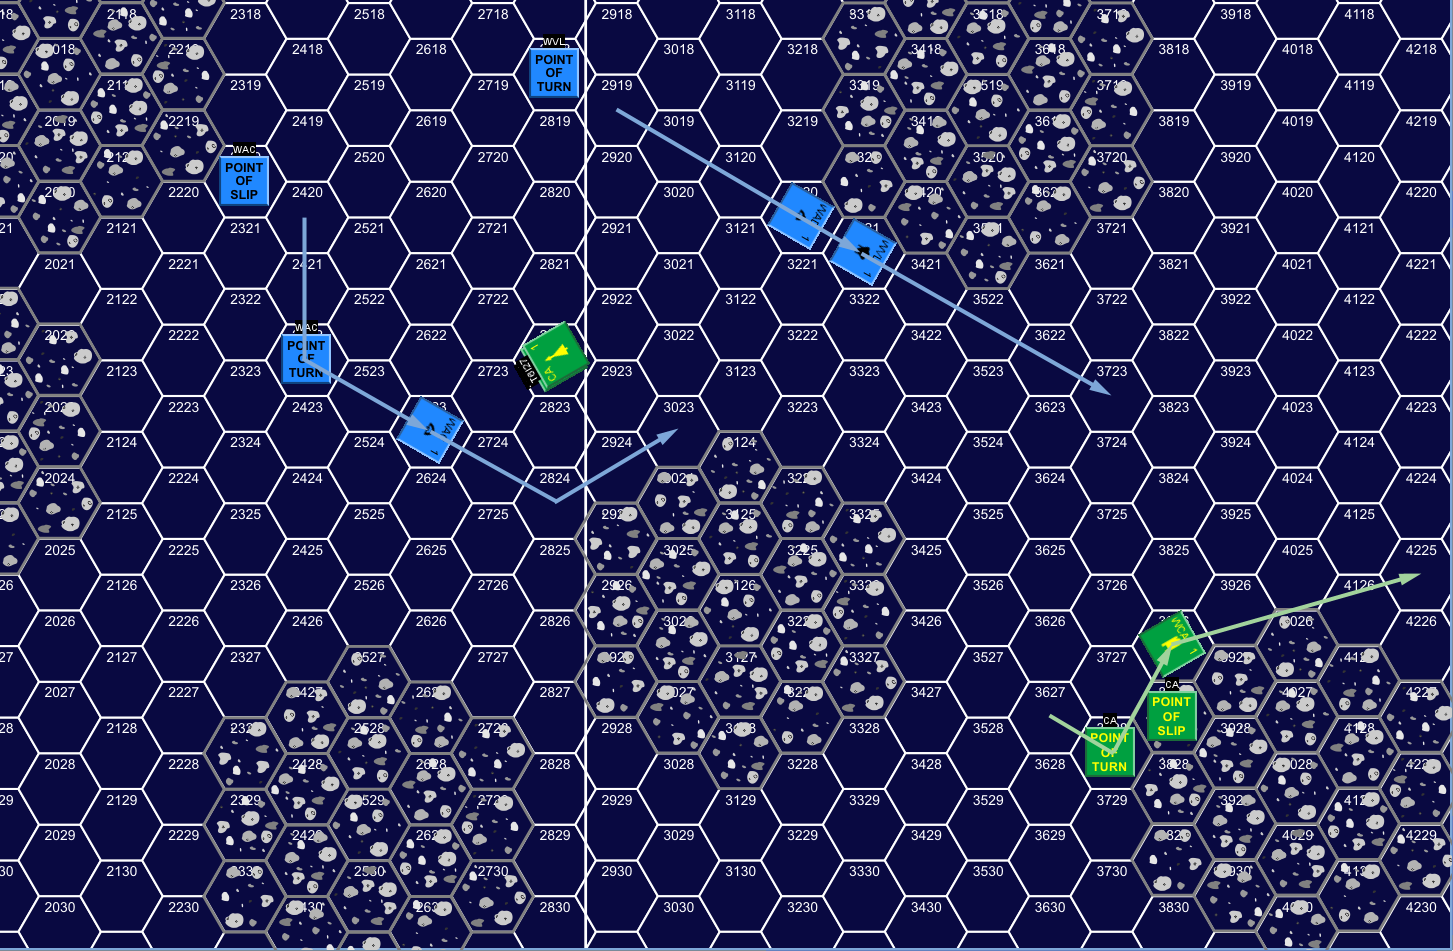
Start of Turn 8, showing movement from 7-24 through 8-11.
Afterword
With a WDD alone, it was obvious I’d force it into a corner and disengage, or it’d get destroyed, and probably do nothing in return.

So, we exchanged a few shots, a few shield boxes were hurt, and nothing else. In a campaign, this is going to be a more common result. Full-on committing to an engagement can lose ships fast, and you’re going to want them later. I would have loved to kill a heavy cruiser, which of course was why Wolfbite was my primary target. I think Mark’s idea on splitting up was to try and get on my rear with one while the other held my attention. Or to get me to split up. I refused to that, and Mark’s split would have worked a lot better if his ships had stayed in supporting range of each other. Instead, the range between them grew too great, and Vainglory couldn’t get close to the action when I finally cornered Wolfbite.
With this little action, there’s no “MVP” for the fight, though the WVL is a nice ship. With 12 warp on move cost 2/3, it is capable of speed 18, which puts in between W- and Y-ships, and with the usual 4 impulse on a Vulcan ship, it is close in power to a 2/3 MC YCL (which would typically have 18 total to the WVL’s 16). It had at least some EW up the entire time
There is now one fight left for the first year of the campaign, and it is something of a repeat of this one in that I have three ships to Mark’s two. Just put in CLs for CAs, DDs for CLs, and FFs for DDs. This was also my fifth win, so it is now certain that I’ll get to defense line 2.
Discussion ¬