
SH7 Rescue the Hostages
Last December, Patch and I kicked off the group’s SFB adventures for Y161 with an early historical scenario featuring USS Kongo in its five year mission under Captain Kosnett (last seen here in “Coming of the Meteor“, and is now a CAR). Patch took the Klingons, who are holding a Federation trade commission hostage at the local base station. Kongo has shown up with the commando cruiser Okinawa to rescue them by coup de main.
I made a number of errors in this scenario, and the first one was not appreciating that the base station and accompanying F5 start at weapons status I. This allows them to charge phasers on the first turn, but of course while the base’s ph-4s are really dangerous, that’s a large power drain on something that size (12 out of 22 total power in fact, and another four is needed for housekeeping). The Federation ships enter together, 20 hexes from the station, and the F5 is parked adjacent to it. I planned to force-dock the CMC Okinawa to the base and engage the base directly in a boarding action to get the hostages, and started it with a wild weasel while the CA had a suicide shuttle prepped. Both ships went speed 8, with full ECM up (again, because I didn’t appreciate how power-strapped the base was), while the F5 went speed 12, and the BS lent two ECM to the F5 (making it effectively 4ECM/2ECCM), and lent ECM to itself for 8/0 EW.
Patch launched a pair of shuttles on the first impulse; the BS’s stayed out for possible point defense, while the F5’s landed aboard the base, presumably with boarding parties; the F5 circled behind the base while I cautiously approached. Turn 2 saw a bigger mistake from me as the CMC picked up to speed 10… but was 12 hexes from the base (I honestly don’t know if I hadn’t thought far enough ahead during EA, or if I miscounted the range…). The CA stayed at 8, and F5 stayed at 12. I stayed at full ECM, while the F5 shifted to 3 ECCM and the base to 6/3 EW. During impulse 5, Patch dropped non-facing shields on the F5 and BS, moved to bring the gaps to bear on the next impulse and transported boarding parties from the F5 over to the BS.
By mid-turn the base was starting to loom larger, and the F5 turned in to come in behind my approach course. On impulse 19, the base fired into the CMC at range 7, getting bad rolls at +1 to do seven damage to the #1 shield (I had bricked that as best I could…). On 27, the F5 got to range one of the CMC and unloaded on it, hitting with one disruptor, and poor phaser rolls to knock down the #5 shield and do two points to the armor. Then it slipped into the CMC’s hex and fired a drone and the RX phasers to knock down shield #4 and do two more to the armor. I shot down the drone before it could impact, but the BS launched a second one on 31.
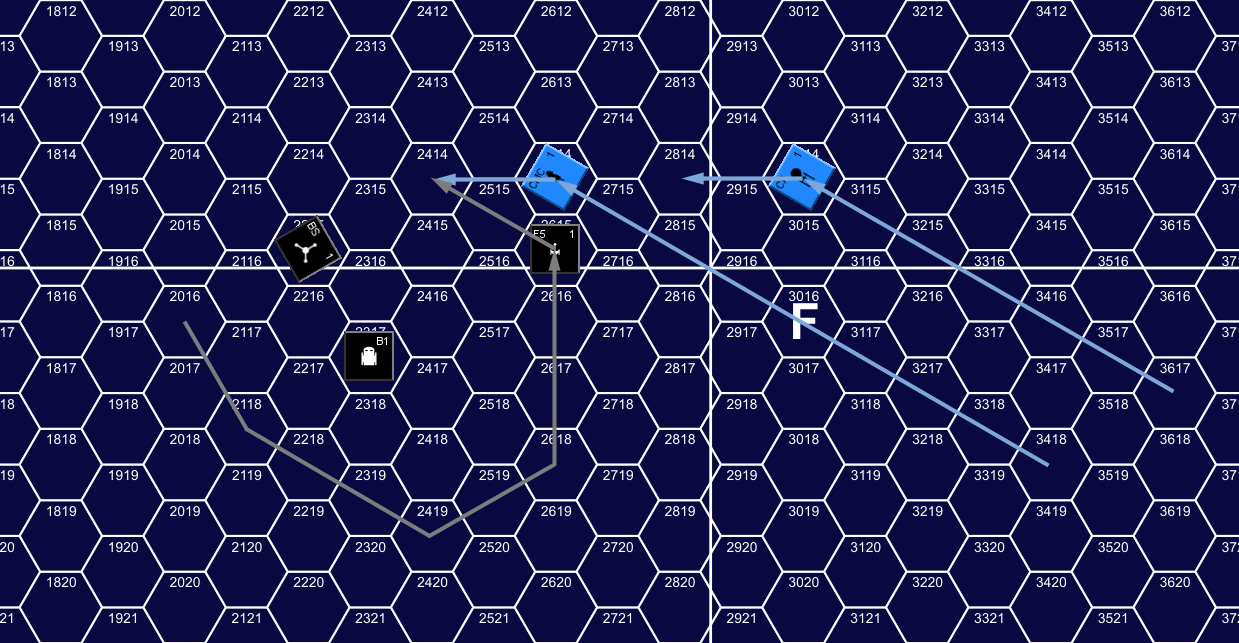
Turn 2, Impulse 27, showing movement throughout the turn.
At this point, I should have been at range 1 to start the docking procedure (which would have forced a range-2 shot at the new drone on 31…), but I was still two hexes out, and the BS fired again with more poor dice to take out shield #6, the last two armor, and do eleven internals, knocking out two warp and a phaser. The CA fired on the F5’s #4 shield with good rolls to do 18 damage, half of which went in to take out two power and a phaser.
For turn 3, the F5 dropped to speed 8, while the CA dropped to 5, and the CMC went 1 as it started it’s extended docking procedure. I kept to full ECM, the F5 went for a 1/3 split, and the base continued loaning to itself for 4/3 EW. The CMC turned off fire control in EA and launched its wild weasel first thing (giving the CMC 12 ECM for as long as it would last…). Patch fired a ph-3 to cripple the shuttle, but kept missing with shots from the BS’s ADD. On two he launched his own shuttle, and then hit with the ADD on 3 to do one damage to the shuttle before his original base shuttle finally killed it with it’s shot.
The F5 missed its overloaded disruptor shot vs the CMC, sideslipped past it, and fired the remaining FX phasers into the CMC for seven damage on a down shield. Only one got in after general reinforcement, and then the explosion period ended and the base fired two ph-4s to do 29 internals (after spending the batteries to stop one damage…). This gutted the CMC (no surprise…), knocking out the barracks and the bulk of the boarding parties, and almost all the shuttles (with more boarding parties on board; another mistake: I should have been launching them, where they’d be separate targets that needed more damage to kill), with the HTS surviving crippled in the bay.
The next impulse, the next pair of ph-4s fired for 30 damage, which nearly did for the CMC (I estimated 9 damage to kill it; more if there were sensor/scanner hits in there). A ph-3 took it down to two excess damage boxes remaining. Meanwhile, the CA had launched all its’ shuttles and the ADD and fire from the Klingon shuttles soon cleared most of them out, and they merely crippled a single Klingon shuttle. On impulse 28, the CA burned batteries to go to 2/4 EW, and fired on the BS at range 2 to do 16 damage with an overloaded photon to shield #5. The next impulse was another photon shot for 16 more damage and 11 internals, which killed one of the hostages. I tried a pair of hit and run raids to rescue a couple of hostages, but got ‘boarding party returns’ results against the guards.
Patch managed a phaser-1 shot against the CA (lack of power) to do 3 damage through the lowered shield for one warp hit. The CA headed back out, trying to de-fang the BS on the way (it did get the disruptor mount) and firing on the F5 at range 1 on 32 to do 14 internals after crashing the #6 shield.
Afterword
We called it there, with the CA too close to the base, but headed off the fixed map. At its max acceleration, it could go 15, which would bring it to about four hexes from disengaging. If the BS is smart enough to counter any ECM the CA puts out, four ph-4s at the top of the turn will do 40-80 damage at range 4, with a 20-point shield and about five power available to boost it. Fifteen internals isn’t too bad, and the CA would certainly get off without too much more trouble. Sixty-five internals on the other hand…. The F5 would be a serious complication at that point, though it would hopefully still manage to crawl off on the next turn.
Among the other mistakes I’ve mentioned, a big one was letting the CA fall too far behind the CMC. When the F5 did its turn two pass, the CA wasn’t close enough to make it pay, or to distract it. The CA should have been what the F5 encountered first, to act as proper cover for the troops. The general plan for getting the CMC up close and docking looks workable, but you have to do the homework first, and both ships need to be there, and make the Klingon worry that if he fires too much into one ship, he’ll dock the other one, and perhaps transport BPs from one to the other. Still, this a tall order at best. Ph-4s are things I really don’t like messing with at close range.
One question that came up is how the hostages are counted for H&R purposes. By the scenario you can rescue them that way, and they can be guarded, like various non-system boxes. But is each hostage it’s own “box”, being it’s on legal target needing guarding? Or are they all one target, and you can only rescue one a turn (as you can only target an individual SSD box for an H&R mission once per turn)? We considered them two groups of five for these purposes, which seems reasonable.
Discussion (3) ¬
I haven’t played anywhere near as many of these kind of scenarios as I’d like. The landing and base combat are part of the appeal, but it feels like the approach battle often prevents it from ever even reaching that stage. Narratively, that makes sense, but it does turn it into a different game experience.
Did you transfer any BPs from Okinawa to Kongo (SH7.45)? I waffled over whether it could open the options on which ship needs to get in there and how, or if it would just diminish the force to the point of ineffectiveness.
I like your H&R solution. Did you opt for Prime Teams and/or using (D16.0) on this?
We stuck with the basics for boarding party combat. Using the advanced rules would be interesting, but would require thinking through even more things on the hostages, and would presumably slow the boarding action down (since you’d most likely need to fight your way into the core), so delaying the Klingon reinforcements may be needed for that. No prime teams either (the scenario’s way older than they are), though that would also be interesting to put in.
I didn’t transfer anyone, but probably should have, but a CMC has a lot of boarding parties to start with. If I’d successfully docked, I might have then transferred some over via transporter now that they wouldn’t just die in the barracks, and would do some good. Transferring to the CA may be a good idea so that both ships are reasonable threats of a forced docking.