Rindis.com

All my hobbies, all the time
  • Home
  • My Blog
  • Games
  • History

Categories

  • Books (504)
  • Comics (10)
  • Gaming (918)
    • Boardgaming (674)
      • ASL (155)
      • CC:Ancients (83)
      • F&E (78)
        • BvR – The Wind (26)
        • Four Vassal War (9)
        • Konya wa Hurricane (17)
        • Second Wind (5)
      • SFB (78)
    • Computer games (162)
      • MMO (77)
    • Design and Effect (6)
    • RPGs (66)
      • D&D (25)
        • O2 Blade of Vengeance (3)
      • GURPS (32)
  • History (10)
  • Life (82)
    • Conventions (9)
  • News (29)
  • Technology (6)
  • Video (50)
    • Anime (48)
  • Writing (1)

Patreon

Support Rindis.com on Patreon!
Become a patron at Patreon!

Other blogs:

RSS Inside GMT

RSS Playing at the World

  • Playing at the World 2E V2 Arrives May 5, 2025

RSS Dyson’s Dodecahedron

  • Scavengers’ Deep – Map 33 July 16, 2026

RSS Quest for Fun!

  • The Expense Post May 24, 2026

RSS Bruce Heard and New Stories

  • Pain, Exhaustion, and Morale in D&D BECMI June 7, 2026

RSS Chicago Wargamer

  • The 2 Half-Squads - Episode 310: Cruising Through Crucible of Steel January 27, 2023

RSS CRRPG Addict

  • Game 581: Dragon Quest (1982) July 15, 2026
SF&F blogs:

RSS Fantasy Cafe

  • The Leaning Pile of Books July 5, 2026

RSS Lynn’s Book Blog

  • Review: The Tinder Box by MR Carey July 16, 2026
ASL blogs:

RSS Sitrep

  • Cardinal ASL Sins March 18, 2026

RSS Hong Kong Wargamer

  • FT114 Yellow Extract After Action Report (AAR) Advanced Squad Leader scenario April 16, 2025

RSS Hex and Violence

  • This still exists? March 25, 2025

RSS Grumble Jones

  • Grumble Jones July Scenario GJ162 You Will Engage the Enemy July 1, 2026

RSS Desperation Morale

  • How to Learn ASL March 16, 2025

RSS Banzai!!

  • October North Texas Gameday October 21, 2019

RSS A Room Without a LOS

  • [Crossing the Moro CG] T=0902 -- Rough start July 18, 2015
GURPS blogs:

RSS Dungeon Fantastic

  • Felltower - Monsters Fleeing between Sessions vs. PCs replenishing June 28, 2026

RSS Gaming Ballistic

  • B-Scale Detail and Examples July 16, 2026

RSS Ravens N’ Pennies

RSS Let’s GURPS

  • Review: GURPS Realm Management March 29, 2021

RSS No School Grognard

  • It came from the GURPS forums: Low-Tech armor and fire damage January 29, 2018

RSS The Collaborative Gamer

  • Thoughts on a Town Adventures System January 18, 2022

RSS Don’t Forget Your Boots

  • GURPS Supers Newport Academy #7: “Invitation to the future.. of the 1970’s” July 5, 2026

RSS Orbs and Balrogs

  • Bretwalda - Daggers of Oxenaforda pt.4 - Fallen King May 27, 2017

Back to War

by Rindis on August 14, 2015 at 12:00 pm
Posted In: D&D

Another year, another Bloodstone module. By 1987, the Forgotten Realms had become a TSR property, but the original box set was still a month away when H3 The Bloodstone Wars was printed, so the back cover got the soon-to-be-familiar gold and stone logo, while the front retained the usual AD&D trade dress. At this point, the entire arc had been set, and the end of the module positively talks about the upcoming conclusion in H4. Reverting to the usual practice of a detached tri-fold cover and 32-page book, H3 also included a poster-sized hex-map of the remnants of the Kingdom of Damara.

The module generally assumes that the players have been through the first two adventures and one of them is now the Baron of Bloodstone (the former Baron having retired at the end of H2). If not, there’s a section that talks about how to get them involved, and does a good job with working them into the first part of the adventure, but fails to discuss anything past that, and the party would not be in the position of authority assumed by the rest of the module.

It is now spring, and the module assumes that the players will, naturally, still be working on loose ends, and the maps of the main mines from H2 are repeated, though no key or description is given. The real concern here boils down to logistics. The mines are open, and producing plenty of valuable unfinished gemstone. Now they need to be converted into something more useful—cash, supplies, troops….

This module features another turn in focus. Whereas H2 had BattleSystem as an afterthought at best, going hard down the line of a tough dungeon, H3 returns to large-scale warfare (with a side-order of killer dungeon). This isn’t as lovingly presented as in H1, but there are proper BattleSystem stats for everything (but no pre-filled out forms), and a set of five scenarios outlined, with a general flow chart of how things should progress. This latter is the idea that I think might have gotten edited out of H2 as the Temple started dominating the entire module.

(Warning: I’m talking about plot, such as it is, from here on.)

At any rate, the module assumes that the party will end up escorting a caravan of bloodstones to the nearest major trade city, and the first part does a good job outlining how that should go, and anticipates possible player actions well (such various methods of flying out there). There’s some hints though this section that there’s warfare in the near future, but I think it might need to be a bit more heavy-handed after how it got blown off in the second module. There is enough build up afterwards that it shouldn’t take the party by surprise, but they can lose some valuable opportunities to prepare at this point.

The second major section of the module details the war. The various (now) independent duchies of southern Damara quickly become jealous of the wealth flowing into Bloodstone again, and threaten and attack. Mostly. There’s some detail given to the start of this process, with the nearest barony, Arcata, given some detail. After that, it kind of comes apart. Carmathan attacks… because. The smaller baronies near the old capital? Because. There’s no sense of the leaders involved, no discussion of attempts to negotiate. They mobilize and attack because Bloodstone is successful.

There is mention that while independent, these duchies and baronies are puppets of the Witch-King of Vasaa, who is unhappy at recent events. But that still doesn’t excuse the entire lack of discussion about the attitudes of the various leaders involved. As a pure miniatures campaign, it’s not bad, featuring a logical series of battles that get progressively tougher, that culminate in a battle that’s supposed to turn into a standoff. The hex map isn’t really needed to control the movement of armies, it can be done by feel and narration, but if the players are into it, it’s very handy for that—except for the fact that it clearly marks the secret location of the Grandfather of Assassin’s citadel. Now, the party will find out about it, and go there at some point (very possibly in the middle of all this), but that’s supposed to be a plot point.

Worse, the final part of the campaign makes no sense by the map. Bloodstone has always been known to be one of a pair of passes over the mountains separating Vasaa and Damara, and the less popular one at that. So having the Vasaan army gather a bit south of the other pass makes some sense. Having it head south to the heart of the old kingdom makes some sense, but going west towards Bloodstone might be more productive (okay, fine, the party’s forces should be in the heart of the old kingdom at this point). But, the Witch-King’s citadel isn’t that far from Bloodstone. There should be some fighting in there, even if the pass is easy to hold. No, nothing, no mention of it at all. What makes it especially odd, is the glacier placed between the two passes, and blocking the citadel from where the Vasaan army is. (Later maps do not have this bit of glacier. I recommend ignoring it if you use this module.)

Apart from all of that, the party’s lives are being complicated by repeated assassination attempts. The module has some kindness in that they are targeted on the PCs, and not hirelings and other lower-level targets. At first. During the war, the assassins start going after the various unit leaders, which will start having bad consequences for BattleSystem leadership if they succeed. Finally, an assassin is captured, and the PCs can use him to find the Grandfather of Assassins’ hidden citadel.

This is a trap of course, and the party will get forced to chase him down a deadly gauntlet where he knows all the traps. This is actually an adaptation of an Ed Greenwood adventure in Dragon #64, but where that was an obstacle course, with blunt arrows, this is full of damage-dealing traps and save-or-die poison (at -5). At this level, fighters and clerics can probably take that, but thieves and magic-users could be in big trouble, especially with things like 100 assassins firing poisoned arrows (okay, while there, the party shouldn’t need to face that, and 2nd level To Hit probabilities help). And when needing to force the PCs into something, the writers need something better than a wall of annihilation. The real problem is that the Grandfather of Assassins pops up at a couple points in this run, but there’s no schedule given of what exactly he does, and how long it takes him to do it. It’s just assumed that he always gets out of view of the party and gets to set up as he wants. Somewhat likely, but don’t count on players to not come up with something clever.

In the end, players who are in it for miniatures battles will get far more of what they want this time around, and players who’d rather just continue their adventuring career get something too. This is probably the best attempt at doing battles and adventure there’s been, but it still marks another frustrating change in direction from the previous module. There’s still frustrations this time, but the jarring inconsistencies of H2 are largely gone. The real problem is a lack of personal interaction. The Grandfather of Assassins just acts like an insane villain for the gauntlet run, destroys his citadel if the players succeed, to show he can be a load-bearing boss too, and the leaders of the opposing forces in the war are not fleshed out at all.

└ Tags: Bloodstone, D&D, Forgotten Realms, gaming, review, rpg
 Comment 

The Barbarian Frontier

by Rindis on August 11, 2015 at 12:00 pm
Posted In: D&D

The fifth FR-series book not only returned to the geography of the Realms, but returned to presenting an area that had already gotten a boost from the rest of the line. It was also a return to “The North” of FR1’s Waterdeep and the North. The latter had given some information on the region, but without proper maps, it hadn’t been very useful. Finally, The Crystal Shard had been a hit early Forgotten Realms novel, making this region supplement highly anticipated. It has continued to be a popular region, seeing more Drizzt novels, the Neverwinter games, and further supplements such as Volo’s Guide to the North and the Sword Coast Adventurer’s Guide.

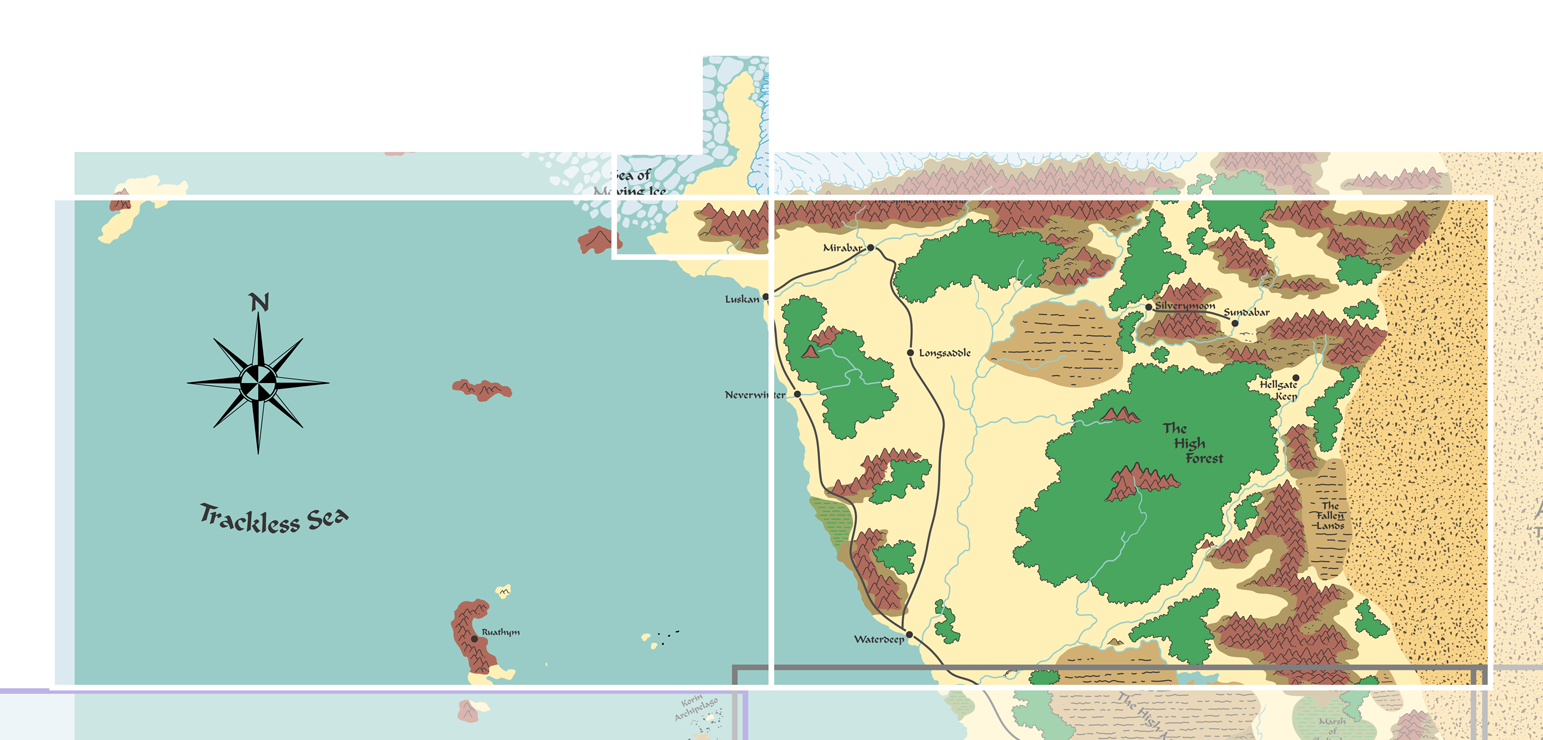
The Savage Frontier is typical of the series as 64-page book with a faux parchment pattern on the pages, a detached trifold cover, and two poster-sized maps. The maps are in the usual 30 miles/inch ‘small’ scale, and join up north of the ones in the original campaign set, covering from a bit south of Waterdeep to the Spine of the World mountains (a somewhat convenient straight east-west mountain chain that defines the northern boundary of livable land), with the main map reaching from The Great Desert in the east to the coast in the west. The coast runs further west near the north, forcing a second map for the last four inches of land, leaving most of that map to be left to ocean, with some fairly major islands scattered about. One quarter of the map is used for insets, including a northern extension to the bit of land in the corner of this map, showing Icewind Dale, as well as a couple location maps. The cover includes a repeat of the main Waterdeep map, and five other locations, making this the first FR book to not leave at least one panel empty.


Region the FR5 maps cover, showing the overlap with the gray box and FR2’s detail maps.

The book is supposedly written by an in-universe character, Amelior Amanitas of Secomber, though this is generally limited to humorous little intros and outros to chapters, and does not affect the main text. (It is also worth noting that he is originally from DQ1 The Shattered Statue, also by Paul Jaquays, which does happen in Cormyr, despite getting no Forgotten Realms logos.) It starts with a two page history, goes on to an overview talking of trade, climate, major factions, and the various peoples of the region. There is then six chapters of geographical description, broken up somewhat oddly. The first one is just cities and towns and the like, and is in a smaller font as well as based off of the similar chapter from FR1 (I don’t think any description is exactly the one from that book, but they’re often about 80% the same). There’s a separate chapter for ‘lost lands, strongholds, & ruins’, each with their own subchapter, then one on pure geographical features (mountains, rivers, etc.), and then a chapter just on the High Forest, which is something of a central focus of the book. And, towards the beginning of all this, is a chapter on the islands, folding all of their towns and geographical features together. So part of the description of the area is broken up by type of feature, and part of it by region. It’s obvious enough to not interfere with looking things up, but it is a bit grating, and presumably partly caused by the reuse of material from FR1.

Overall, a fair amount of attention is given to barbarians in this book. I’m not sure if it was seen as TSR’s best chance at showing how the backgrounds for that character class should work, or what, but there’s a lot here. In the section on the various peoples of the North, the Uthgardt barbarians get five pages, going into detail about various tribes, the broad outlines of society, special shaman powers, and the like. Also, the Northmen (more of the Norse-analogues from FR2, who can be barbarians) get two pages, while everything else (aarakocra, dwarves, orcs, trolls, etc… aaand the barbarians of Icewind Dale) gets two pages. And then there’s a three-page chapter on the ancestor mounds of the various Uthgardt tribes. Three of the location maps are actually of these, one showing ‘typical’ ones, one is an adventure one, and one is… atypical. What makes all this coverage work is that the barbarians are not all the same, and each has it’s own attitudes, from the extremely conservative, to tribes that are settling down and farming and becoming ‘civilized’, to one that is completely under the thumb of devils from Hellgate Keep.

The final chapter of the book is three pages outlining various prominent people, including, of course, the main trio from The Shattered Shard, and another refugee from a different Jaquays project, I12 The Egg of the Phoenix (which, no, is not a Forgotten Realms adventure, he’s been exiled here). And then there’s four appendices in the last four pages, with some new magic items (including a minor artifact), a new non-weapon proficiency, an expansion of one from the Wilderness Survival Guide (plant lore, including a handy table of medicinal plants of the region), a year’s worth of events and rumors (Year of Shadows/DR 1358, the year considered ‘just beginning’ in the original set), and six adventure ideas.

I consider this product one of the highlights of the the FR series, and certainly the best one to this point. Moonshae has mood without detail, Empires of the Sands lacks mood while providing detail. Waterdeep and the North suffers (just a bit) from the chapter on the North that is unusable thanks to the lack of maps. This is a well-rounded supplement that stands well on its own, and you could run games here without ever getting the main boxed set.

└ Tags: D&D, Forgotten Realms, gaming, reading, review, rpg
 Comment 

Same But Different

by Rindis on August 8, 2015 at 12:00 pm
Posted In: Computer games

This is the ninth in a series of reviews of Paradox’s empire management games. See the earlier reviews here:
Europa Universalis II: A Tale of Two Europas
Hearts of Iron: Europa of Iron
Victoria: Nineteenth Century Essay
Crusader Kings: A Dynastic Adventure
Hearts of Iron II: Return Engagement
Europa Universalis III: A Whole New World
Europa Universalis: Rome: Make a Desert and Call it a Game
Hearts of Iron III: One Plus Two Equals Three

When Paradox Interactive polled their fans around 2008, a sequel to Victoria was the most-wanted new game, which caused some controversy as it was the developer’s least successful game (the implosion of the game’s original publisher, Strategy First, carries some of the blame for this). While some important insiders were sure that it could be successful, CEO Fredrik Wester announced that he’d shave his head if the new game ever saw a profit.

Victoria II was released for PC in August 2010, with a Mac version following in September. Wester had had his head shaved in June, on the strength of the pre-orders. There have been expansions since then, but this review is only about the original game.

Not Like the Others

As a sequel, Victoria II is a typical Paradox empire management game, and follows the lead of the original game’s take on the 19th Century fairly closely. A large number of features are not much changed, and are, at most, polishings of the original’s ideas. At the same time, there are some very important differences between it and its predecessor, and other recent Paradox real-time empire management games.

Early Paradox games had the obligatory intro movies, but these were dropped with the introduction of the Clausewitz engine. Victoria II, however, does feature a small intro movie that plays after the launcher, and before the main load of the game, which feels like a sort of celebration of the return of Paradox’s most troubled title.

The usual ability to start at any point in the time period of the game (1836 to 1936, the same as Victoria: Revolutions) is missing this time. The detailed world market was too much to set up for the timeline definitions the other Clausewitz games use, and so the only option is to start on January 1, 1836.

The interface has a set of seven ‘tickers’ along the top, along with the more usual minimal element that identifies who you’re playing as, and is the normal place to get at the rest of the interface in a Paradox game. This top bar is actually equivalent to the overview that the sidemenu in the original Victoria had, but these go directly to much-needed full-screen displays of information, like was introduced in HoI II.

Fully Operational Economy

Victoria II uses a production economy with world market very similar to the original game’s (with 48 instead of 47 commodities), but with some extras.

Like before, each province produces some form of raw resource, and a fair amount of the population is employed in the RGO (resource gathering operation). Unlike before, these are not upgradeable into larger versions that can hire more people to produce more goods. Instead, they they get more efficient, and, generally, smaller, as technology advances, which reduces the amount of labor needed to get full production.

Factories exist at the state level which can take those products and turn them into finished (or intermediate) goods that are more valuable. But, this is not just a resource/factory economy. The population also includes artisans who can produce all the same things that factories do (including machine parts, which was a choke point in the industrializing economy of the first game). And, at the beginning of the game, they do it more efficiently than the factories can. Factories can employ large numbers of people, and overcome the artisans in bulk, but it will take a number of technologies that make factories more efficient to truly make industrialization pay (it has been noted that China’s large population of artisans can wreck an economy that gets too easy access to them).

Every part of the population has has needs (life, everyday, and luxury), and tries to buy the the items for those needs from its cash reserves in the internal and international markets, and can, over time, change into different social status depending on how their needs are being filled and and how much cash they have accumulated. Most of this is the same system as the original game used, but changing population roles was purely up to the player originally, and now has been taken out of his hands.

All of this adds up to a complicated world market with evolving supply and demand, and slowly changing prices. However, the actual market forces are just as primitive as in the original. Prices vary around a baseline target price, there’s no embargoes, or country-specific import/export controls, which were all large parts of 19th Century economics.

And finally, it needs to be noted that it takes a little bit of time for the AI to figure everything in this system out properly, and the current trading solution doesn’t get saved. So on every reload there is a bit of thrashing around until the economy settles down again, and dedicated players avoid closing the game when possible to avoid artificial disruptions to the economy.

I’ll Bid One State

Like almost all Paradox games, Victoria II has a large number of options in diplomacy and warfare. Like with the casus belli system from EU III: Heir to the Throne, a particular goal must be chosen before going to war, but many details are different here. Most notably, you can only receive things in a peace that you have specifically made a goal; in EU III: HttT, you could declare a war over a province you have a claim to, but then take everything but that; here you must have made those other territories goals too.

There are, of course, valid reasons for going to war, such as reclaiming an area that can be seen as rightfully yours, or forcing repayments of debts after a country has declared bankruptcy. Using a legitimate reason is easy, other reasons (say, pure land grab) cost infamy to set as a goal (whereas in other Paradox games, infamy comes when you take it).

The only way to get anything out of a war is to have set it as a goal. This might be ‘cut down to size’, which limits the other country’s military for a while, or indemnities, or becoming a satellite. Each state is a separate war goal, and must be added separately, possibly incurring an infamy cost each time (there are some exceptions that allow taking an entire country at once). The defender of course starts with no war goals, and all he can demand is a return to the status quo. However, he, as well as the aggressor can add war goals as the war grinds on.

Great powers can also intervene in a war, and demand a return to the status quo, which then becomes a war goal.

In addition to the infamy costs of declaring a war goal, failing to get that goal in the peace costs prestige. Of course, getting that goal gains prestige. This means that wars turn into bets, where you spend infamy to bet prestige on the war; loosing an aggressive war can cost you infamy (which makes you unpopular), and prestige (which affects your international standing and trade), and can hurt even if you technically ‘lose’ nothing from it.

Great Power Politics

Like in the first game, the eight highest-ranked countries are ‘Great Powers’, who enjoy extra prestige (one of the things that lets you become a Great Power…). Also, there are eight ‘Secondary Powers’ below them who, like the Great Powers, can colonize the less developed parts of the world.

The Great Powers each have a sphere of influence. A simple version of that concept was actually in EU III: HttT, but it worked very differently there. There a sphere of influence just marked an interest in a country, and provided a casus belli whenever a third country tried interfering with it (wars, annexation…).

Great Powers get to influence other non-great Powers. This turns into a feed of influence points spread across all the countries that it is trying to influence, and those can be spent on a number of unique diplomatic actions. This includes destroying the influence of other Great Powers, but is focused on increasing relations with that country until it is within the Great Power’s sphere of influence. This is separate from the actual diplomatic rating that says how much or little the countries like each other, as it is more to mark that the rest of the world considers the area under your protection (to do with as you will…), but the in-game language confuses the issue.

Once in the sphere of influence, the country’s internal market acts as a part of the Great Power’s internal market, giving the Great Power easy access to its raw materials, and an expanded market for its own goods (…and vice versa, if the sphered country has meaningful production outside of its RGOs). This can also become a bone of contention, as competition between two Great Powers for influence in a country can lower relations, and ‘de-sphering’ a country is a possible war-goal.

Internal Stresses

As with the previous game, Victoria II’s complex population demographics include what ideologies the population follow, what policies matter to them, and just how upset they are over it. It’s a bit finer-grained this time, but there’s still the two basic ideologies of Conservatism and Liberalism at the beginning of the game, with Socialism being introduced later, with Reactionaries, Anarcho-Liberals and Communists and Fascists as the extreme forms of these views.

Politically, this feeds into an ‘upper house’ system using those same ideologies that reflect the overall mood of the country, and is what allows political and social reforms to be enacted or repealed. Liberals want to pass political but not social reforms, Socialists want social but not political reforms, and Conservatives want neither, but will give some limited support to quiet unrest. The various extremists specifically want to repeal all reforms they don’t approve of (i.e., Socialists try to repeal political reforms, and Anarcho-Liberals try to repeal social reforms).

There are a number of political parties shown in the game, with at least one of each ideology for each nation. An authoritarian government can appoint the party it wants to be in charge of the upper house, but democratic ones go through an electoral process every few years. A lingering problem with the system is that while parties come and go during the game, they can only do so in a set schedule, not in response to events. Each party has its own set of policies (trade, economic, religious, citizenship, war) that set limits on what you can do, and modifies how the country acts. The population has desires towards particular policies and reforms, which partially determine what party they back.

If these desires are not met, then the population can get more militant, and if that goes on long enough there will be a revolt. Various revolters have their own goals, and generally, if they can take control of the capital for a while, they will then enforce their demands (which may be a government change). The problem with this is it doesn’t really work. You can’t negotiate with the rebels, and promise reforms, and try to convince them to go back home. Well, you can kind of; if you satisfy the things that are making them militant, the population will lose militancy, and the revolt can actually lose people that way. Worse though, is the fact that there’s very little incentive to not send in the military and crush the revolt. It will reduce the population, but there’s no public opinion to be scandalized by the brutality of your country. While it is possible for a military unit to join a revolt, they will not hesitate to fight against one they are not actually a part of. No hesitation, no units refusing to fire on civilians, just crush them.

Warfare

Victoria II uses the same general combat model originally introduced in EU III. One different feature here is that as technology progresses, the maximum combat width goes down, allowing the number of troops needed to effectively fight a battle to decrease. Cavalry can attack from the flanks, so a lower-tech army could take advantage of a superiority in numbers if it can field large numbers of hussars (the most mobile type). Each unit has an offense and defense rating, and the appropriate one is used in combat (i.e., the defense rating does not mitigate the opponent’s damage, but is the combat rating used when defending).

Past the general combat system almost everything else is much as it was in the first game: Generals and admirals use a combination of traits that produce a wide range of good to poor leaders with different strengths and weaknesses, but even the worst leader is better than the wide-ranging penalties of not having any leader at all.

Nearly any land military improvement also increases supply consumption, making armies more and more expensive to maintain as their effectiveness goes up. Taking over an enemy-held province is a matter of waiting a set amount of time while occupied only by your troops. More men take it faster, but the supply situation can cause large amounts of attrition. Fortresses can be built which both aid in a defensive battle, and make a province harder to take.

Land combat features the usual three arms: infantry, cavalry, artillery. There are four types of infantry: irregulars, regular/infantry, guards and engineers. Irregulars are cheap, but not as effective, while guards are expensive, and better on the offense, but not as defensively capable as regular infantry. Engineers lessen the effects of fortresses in combat and capturing provinces. Cavalry comes in four types: cavalry, dragoon, cuirassier and hussar. Each is generally more expensive and overall more effective through each type, though cuirassier are the only type without a reconnaissance bonus, which helps with the time to take over a province and against the initial fortified defense bonus. Artillery only comes in one type of unit, but gets much more effective over the course of the game compared to other unit types.

Military manpower and the population are directly tied together, with each land unit being supported by a particular province’s soldier population. As a unit takes losses, the population reduces, and if the segment gets too small, it starts taking extra amounts of time for that unit to receive reinforcements. Creating new units requires having enough soldiers to tie a fully-functional unit to (this is complicated by the game’s demographic segregation of different ethnicities and religions), creating some hard limits on army size.

Naval units are comparatively simple, with only nine types of units, including two different types of transports. They aren’t tied to manpower, but all of them do require either clipper or steamer convoys to build (types of commodities; this seems meant to represent the availability of sails, rigging, and engines to build a new capital ship). The units are general types (‘ironclads’), with specific stats resting more on the various advances available, but unlike land units, do not have any strong tendency to become more expensive to maintain as time goes on.

Conclusion

I find that like the original, Victoria II is a game that is supremely fascinating, not for what it is, but for what provides a glimpse of. The first game was a bundle of interesting ideas that didn’t quite make a well-realized design, and Victoria II is an interesting design that doesn’t quite make a well-realized game. There is a good game there, but it lurks around the corners, and behind a model that doesn’t quite work right.

I enjoy the game. I enjoy the little clockwork model world it provides. But it is a bit hard to recommend because it doesn’t quite do any one thing really well. And one final annoyance: many of the events and other descriptive text in the game are full of typos in English (I don’t understand how most of these have not been fixed along the way with all the patches).

└ Tags: gaming, Paradox, review, Victoria
1 Comment

Enter Myzal

by Rindis on August 5, 2015 at 1:30 pm
Posted In: Life

Well. This last weekend was bad.

I’ve been contemplating a minor upgrade to Smudge’s machine, Moebius, for a bit. The case it uses is one we inherited from a friend, and while it’s nice and sturdy and insulated, it has some problems. Mostly, it has a front door that must be opened to get at anything, including the main power button. This is not uncommon, but not a style we go for. More importantly, the door reaches to the bottom of the case, making it difficult to open if it’s standing on carpet. With our current arrangement, it does just that. We ended up putting a wooden box under it as a platform, but it’s not quite as long as the case, so it was resting on the bottom of the case, instead of its feet. Since the side door wraps around the bottom frame a bit, that became hard to open.

Yeah, just get a new case that works the way we want it to.

She also has a video card that was really, really good at the time (two GPUs!), but has been aging. It handles some things better than my cheaper but newer one, and some things much worse. We’ve been wondering about upgrading it, and then AMD updated the drivers and software. The update included automatically trying to record all gameplay to send it to Plays.tv, AMD’s equivalent to Twitch. We were able to turn it off, but it ate her system thanks to the default setting. Later that day, her monitor went dark. A reboot went fine, and I figure that it was part of a driver update, that Smudge thought she’d said ‘not now’ to, and which went forward anyway.

So, I decided it was time to replace the video card as well, if only to get away from automatic video recording shenanigans.

We spent a while going around looking at possibilities with a target budget of ~$300 (ha!). Smudge really liked the Corsair Vengeance C70 case, which looks a lot like an ammo box (very her), and the more we looked around, the more it had good features we wanted. I’m not thrilled by the drive bay set up, but it has nice cable runs behind the base plane. And we got a GTX 960 video card (4GB of video RAM).

I took Friday off to have a full weekend if anything went wrong, but it was really just transferring to a new case and installing a new video card.

…and then, while plugging everything back in, I noticed the data plug on the main hard drive looked odd. I was looking at the four metal pins, without the main plastic key. Looking at the cable, I found the plastic stuck inside the housing there.

This drive is a decade-old SATA-150 drive that started with Micca. It’s been the source of a number of failures, where suddenly the system couldn’t see it anymore. I’d have to open up the system unplug the drives, and re-plug them in for the motherboard to see it again. I’m guessing the plastic had been cracking all this time, and shifting, causing this intermittent problem. It had been fine for a couple of years before happening again a couple months ago, so it too was on the ‘to be upgraded’ list.

So, go down to Computer Central, and spend another $100 on a new 1TB drive (Smudge decided for space over speed). Plug everything in, hit power. Everything spins up, the BIOS splash screen comes up, it POSTs….

And that’s it. No response from the keyboard. Okay, back to a wired keyboard. Nope. Okay, dig out the emergency PS/2 keyboard. Nope.

Pull memory. ‘No memory’ error. Good. Check the sticks one at a time. Nope. Reset CMOS (via jumper, later pulling the battery, etc.). Nope. The motherboard’s not dead, but it might as well be, and the fact that it takes a good quarter minute or so to POST is not a good sign.

And thinking back, the last time the drive failed, it took some effort to get into the BIOS so I could reset the boot drive order. So, this was coming too, though I hadn’t realized it.

That was Friday night. Most of Saturday was spent driving around finding out that noplace in Silicon Valley still had any Socket 1155 boards left. I ended up buying one on NewEgg at 4:30 on a Saturday. And Smudge had no computer.

The board arrived yesterday, and I put the machine together last night, and am taking the day off as we get all the essential software and peripherals working again. This has been a major rework (at about double the budget!), and therefore a new name: Myzal (her Tiefling lightning-mage in Neverwinter).

Intel Core i7-3770 (Ivy Bridge)
ASRock Z75 Pro3
8 GB DDR3 1600 RAM
EVGA GTX 960 SSC; 4GB GDDR5
Windows Experience 5.9 (due to the hard drive, everything else is in the 7s)

It was just supposed to be a minor update!! T_T

└ Tags: life, Moebius, Myzal
2 Comments

Two Rounds of Amphipolis

by Rindis on July 28, 2015 at 10:20 pm
Posted In: CC:Ancients

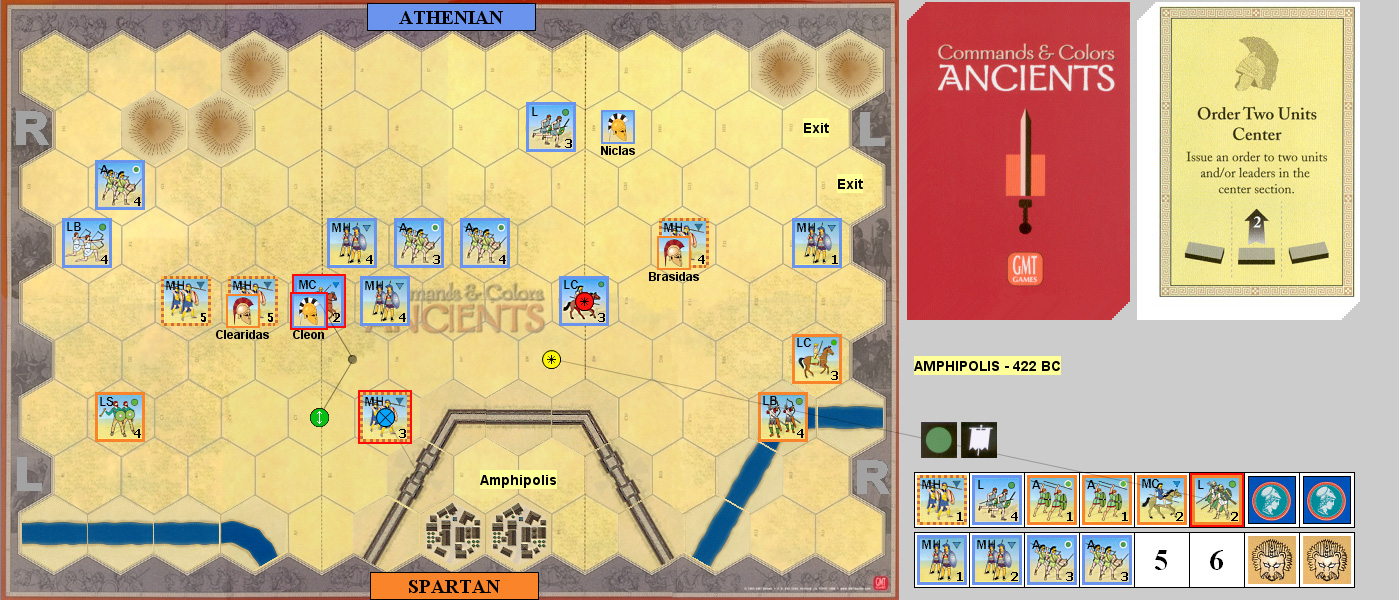
Having finally finished off our SFB game, Patch and I did our usual round of C&C:A between big games tonight. This time was the Battle of Amphipolis from Expansion #6.

This one is different. The Athenians get points for running away. Which is to say, there’s three hexes on their right that they can exit the board from, and get a victory banner per unit. The Spartans are charging out from a fortified city to stop them. As is usual for this period, this is a hoplite battle, though there’s actually light and medium cavalry on each side this time (one unit each).

I had the Athenians first, and Patch started with an Order Light to sort out his line. I did the same to try and assemble a line for a Line Command I was holding. Patch Ordered Three Right, and forced my lights to evade and break the line in two. I used Leadership to bring my line into contact, and move up a leader who started unattached. We did four blocks to each other, all of his on a Spartan MH, and mine spread over two MH.

Patch used Order Medium to move both flanks up, and eliminate my weak MH, while a First Strike knocked out his weak Spartan MH, though without killing his leader. I echoed Order Medium to bring up my center, and nearly wiped out two Aux. Out Flanked put both of his leaders in motion, and killed a fresh MH and Aux. I used Counter Attack to use my flanks, exiting a Light, and managing to finish off an Aux. Patch cried “I Am Spartacus!“… to order one light and one medium (and one heavy, if there were any in the scenario), and picked off an Aux, nearly killed a MH on momentum, and forced my MC to evade.

I responded with Mounted Charge. My LC caused two hits on his light trapped against the city wall, an MH got two blocks on a fresh Spartan MH and forced it back two hexes, while my MC finished off an Aux and MC. Patch Ordered Two Center to activate the units I’d just hit, and I got a hit and banner on battle back against his light unit to end the game (he could have, and should have moved to avoid that). 6-4

Amphipolis-1

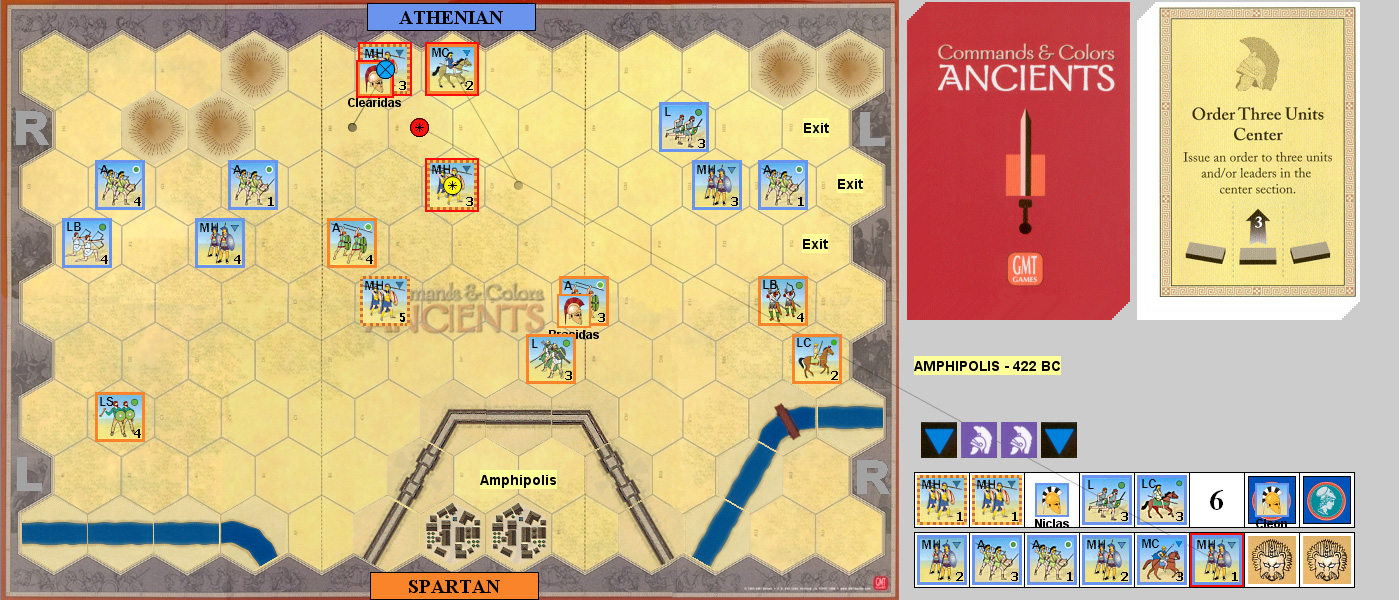
For the second game, I started with Line Command to move up the entire right flank. Patch moved up with an Order Three Center, driving back one unit, and trading three blocks for two against my Spartan MH. I moved forward again with Order Four Right, and drove back three units while reducing an Aux and eliminating a MH. Patch came back with Inspired Left Leadership and drove off my LC.

Since he was sitting too close to the exit with five units, I Ordered Three Right, but only did three blocks to four, and couldn’t eliminate anything. Patch Ordered Two Left, and pressed the attack to finish off a MH and trade blocks with my leader-led MH. Out of right cards, I used Double Time to slam into his center, doing six blocks to zero. Patch Ordered Mounted to eliminate my right-side MH, forcing my leader to escape through his LC to an Aux, while forcing another MH back three hexes!

I used Order Medium to get my center in motion (no Mediums were left anywhere else), and eliminated an Aux. Patch Darkened the Sky to get four blocks, three of which were on my center MHs. Inspired Center Leadership kept my compact center mass moving, eliminating an Aux, MH, MC (on leader momentum), and forcing his leader to evade off-board.

Patch Ordered Three Left to exit his remaining leader, a Light and a LC. Worse, his Aux was in range to exit next turn. As a one-block unit, I would have liked to go after it, but only a couple of lights were in range. I Ordered Three Center to go after his intact MH after cutting off its retreat, and hope he didn’t yahtzee me on a battle back. I got him on the second attack, losing one block in the process. 6-5

Amphipolis-2

Afterword:

It’s a very different and very interesting scenario. There’s no units in range of a one-turn exit at the beginning, but it’s a real possibility, and if the Athenian player can get the right cards could probably get very close to a win without much interference. But that leaves the rest of the battle at a disadvantage in troops. Both games were fairly close, though I had a lot of good cards, even if they weren’t always easy for me to use.

└ Tags: C&C Ancients, gaming
 Comment 
  • Page 202 of 315
  • « First
  • «
  • 200
  • 201
  • 202
  • 203
  • 204
  • »
  • Last »

©2005-2026 Rindis.com | Powered by WordPress with ComicPress | Hosted on Rindis Hobby Den | Subscribe: RSS | Back to Top ↑