
FB18 Red Banner Days
Having spent a little time away, Patch and I went back to working our way through all the Festung Budapest scenarios. This time we went with “Red Banner Days” from Journal 10, which actually happens slightly before “Siesta Time” (and the day after “Waffenbrüderschaft”).
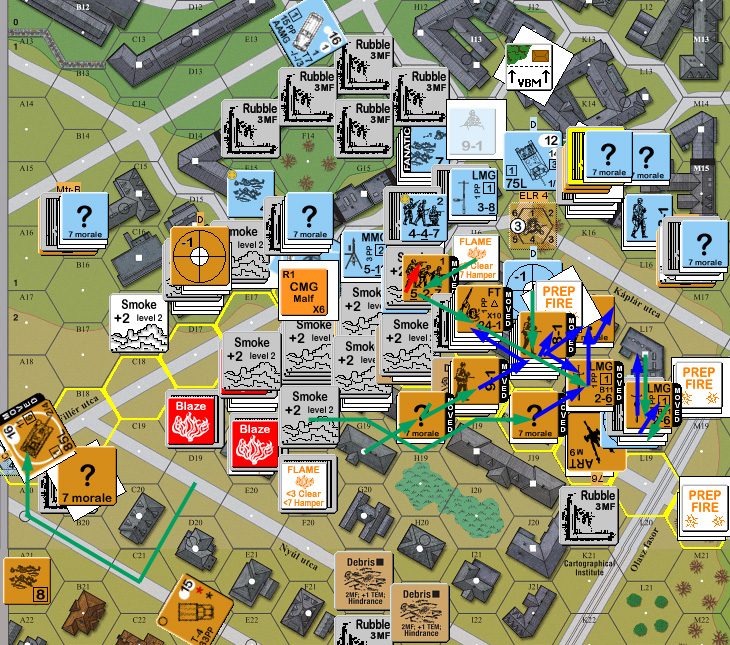
The Germans are preparing to counterattack Russian gains in the NW of the city, when the next Russian attack goes in immediately beforehand. So the Soviets go first, attacking into a tiny Hungarian force, while a large German force is stuck under “No Move” markers for two turns (or until attacked by the Russians). The Russians win by getting 12 VPs, counted by building control, GO squads and T-34s in the area past the Hungarian defenders, with both sides having a 26 CVP cap. Patch took the Russians, and I tried to parse what the heck I was doing as I set up.
The map is between the sizes of the previous two FB scenarios we’ve played, but with the amount of forces available, a 13-hex wide playing area feels cramped. The west edge features the familiar terrain of the cogwheel RR, but the real action is well to the east, where a dense urban zone slopes down into a factory area. Oddly enough, this scenario features random rubble generation, even though the other scenarios we’ve just played did not. I had some interesting luck with the rubble, knocking down most of the D14-H14 block as well as a couple hexes of the Hungarian area, and three on the front line of the Russian set up area. There wasn’t any falling rubble, but there was some falling debris.
If I’d payed more attention to the sheer amount of firepower the Russians have (15 squads, FT, DC, 4xT-34, 4xGuns, including a 152mm ART!) I would have set the Hungarians (4 squads, LMG, leader, 9x’?’) up on the back side of the block, and tried for hide-and-seek. As it was, I tried to keep him cautious about crossing the street, and lost nearly everything in the first turn. Patch led off with a couple hexes of Smoke on the south, and then pounded the center of the line, managing to ELR and reduce a squad on a couple of MCs. The 152 broke my squad on the north corner on a CH, also placing a flame on Level 1.
In movement, the bulk of the line took one big step forward into the street. I only had one effective squad left (not counting the HS and Dummy under Smoke) in G20, and the cowered on their first shot and then broke and ELRed on a second FPF shot.
Then the FT squad ran in, and was unaffected by the Resid.
Advancing fire eliminated G20 including the Dummy there. He advanced into I21 and J21, finding only a Dummy in the latter, but blew his roll in I21 on a 4:1 attack while I stayed concealed, and out of Melee.
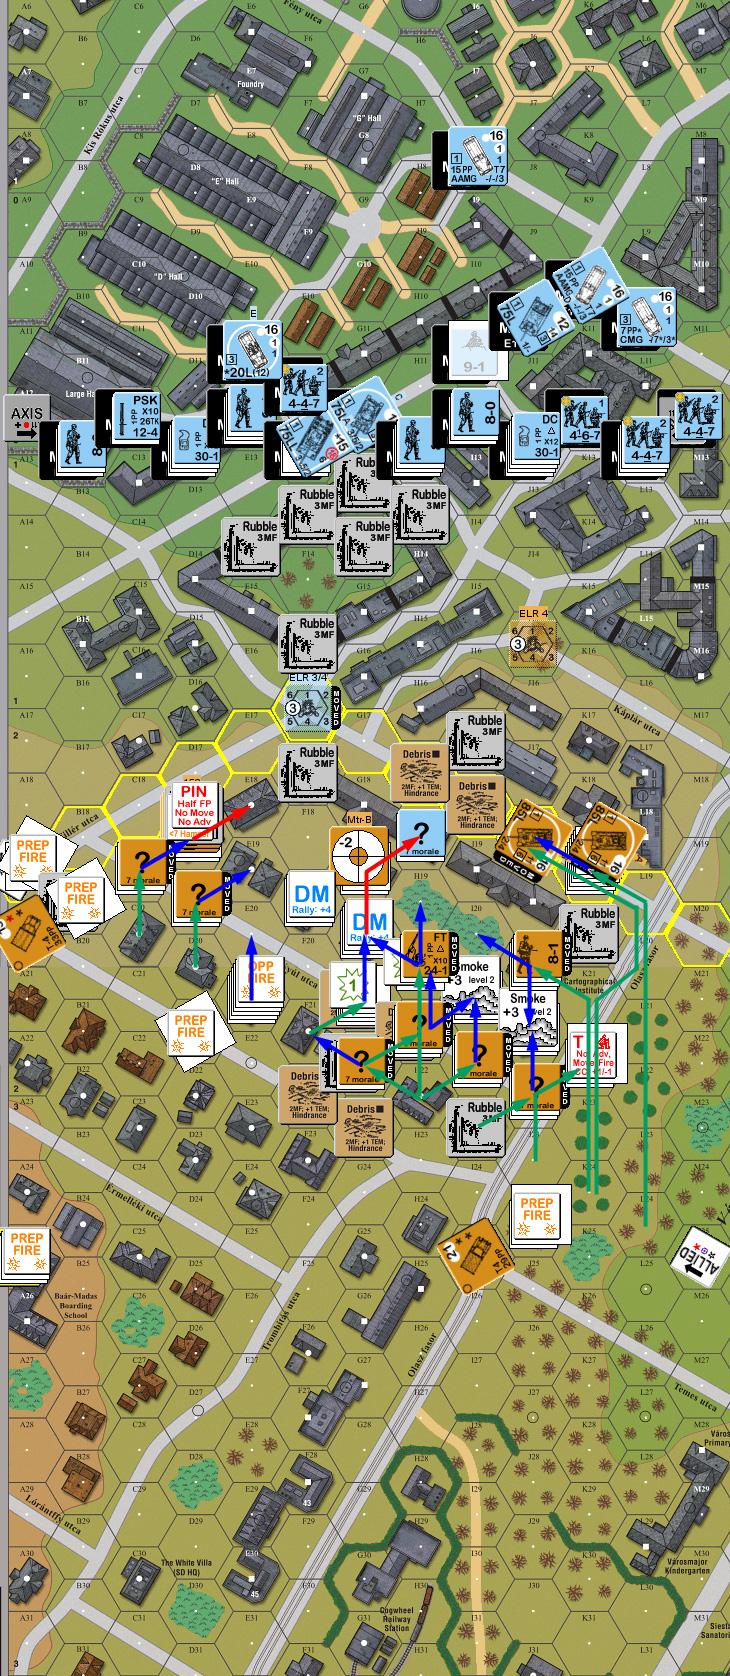
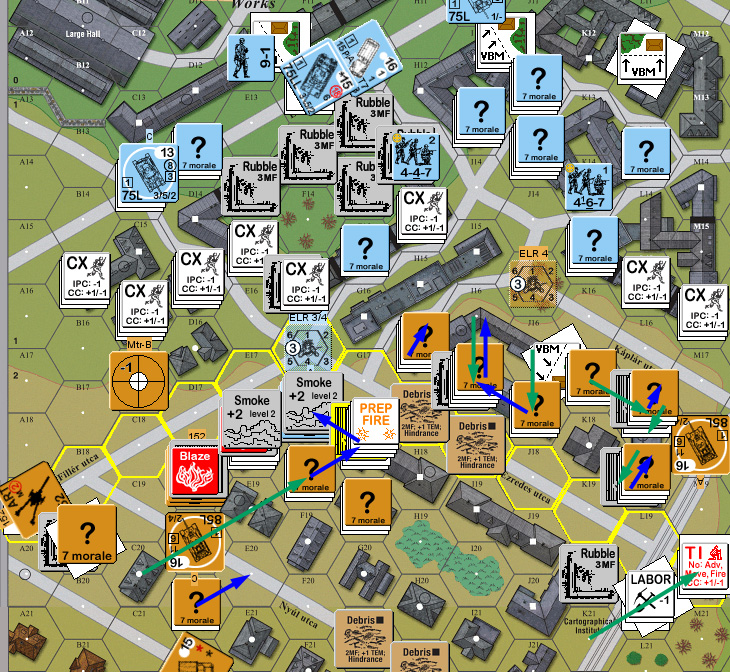
Full scenario area, Russian Turn 1. Yellow hexes are the VP line the Russians need to pass.
There wasn’t much to do in my turn, with hardly anything active still alive. The broken squad in E18 reduced on a ’12’ self-rally. Patch was unable to affect the intact units, but managed to knock out the HS in H18, leaving my LMG abandoned in the hex. And the Flame promoted into a Blaze.
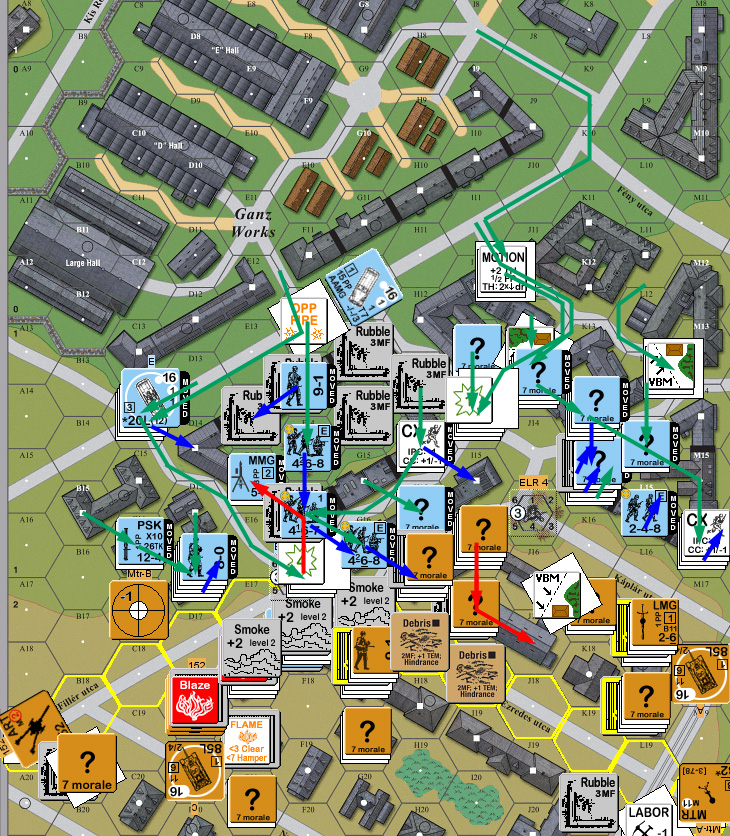
Flight, Axis Turn 1.
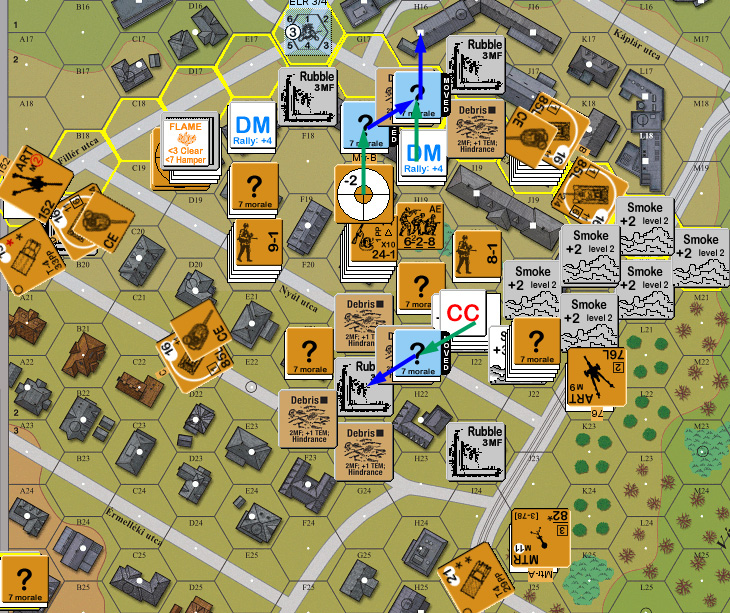
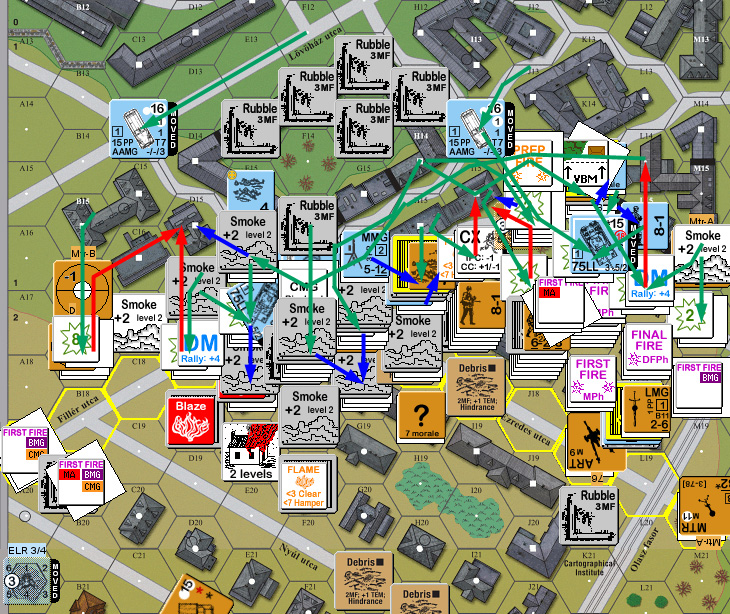
Turn 2 kicked off with good news: an MMG that Patch had malfunctioned went away during RPh. Patch advanced methodically, crossing the VP line in the south and started to occupy the H16-L17 block. I only had one shot, which cowered to no effect, while Patch surrounded and broke the HS in H17 who promptly died of FtR. He also managed to reveal the leader, but couldn’t affect him, but I self-broke him before Patch could get him in CC. He re-engaged the HS that had escaped on the first turn with a pair of squads again, and this time nailed him, and also took out the broken HS in E18 in CC.
Situation, Russian Turn 2. We didn’t realize non-wreck Blazes are +3 smoke for a bit.
My only active unit for the next half-turn was the 9-1 leader, who self-rallied and ran back to the German lines, screaming the “The Russians are coming!” It was only at this point that I thought about the fact that the German should have gained a bunch of concealment. And that led to a fairly confusing ten minutes of debating LOS and blind hexes, thanks to the five level difference from the German starting area to the Russian observer in Level 2 of the Bahr-Madas Boarding School on the hill.
Patch continued occupying the I17-L18 block for his third turn, setting up a dense defensive perimeter for the coming German attack. He carefully stayed out of LOS, leaving me nothing to do but put a ranging round in F17 from one of my Panthers. However, the Blaze spread downwind, setting E18 aflame.
Situation, Russian Turn 3.
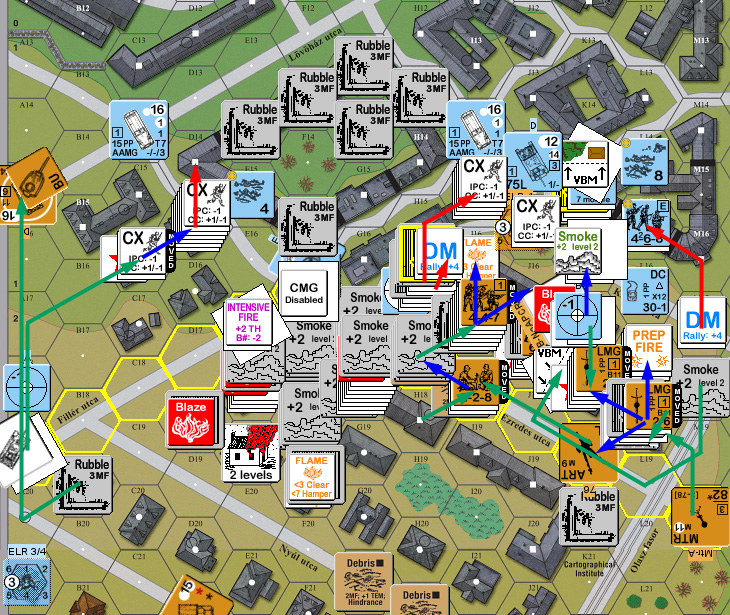
With that, my offensive began. However, the Hungarian troops had generated 8 CVP out of the 26 cap, so while I needed to sweep him out of the H16-L17 block, I needed to avoid casualties doing so. Not knowing what things were going to be like when I set up, the general plan was a broad-front advance, in this case, I wanted to occupy the B15-D16 block before Patch decided to grab more building VPs there, and put some pressure on the adjacent start area to keep him from shifting more troops past the VP line to the south. In the center, I wanted to make building G16 too unhealthy for him to occupy, and start staging for an eventual assault from the K15 rowhouse.
Patch only had limited defensive fire, but managed to break a leader while crossing the street, though the MMG squad he was leading managed to continue on. Movement was complicated by the realization that the entire I13-L11 line was split-level buildings, which we hadn’t appreciate until that point (but going upstairs and then to the adjacent ground Location was a lot easier…).
My plan was derailed when one of my Panthers stalled, and the subsequent DR blew 10 MP on that, leaving 4 for the second attempt, and it didn’t get more than one hex that turn. Worse, there were two other vehicles waiting in line behind him….
The other Panther had stayed to Opportunity Fire at F17, in case he revealed to fire at my advance (and encourage him not to fire…). I managed to get a CH that revealed the entire stack as Dummies, and I had forgotten he had spare ‘?’ in his OB. And while the fire didn’t spread any more, E18h1 got a full-fledged Blaze.

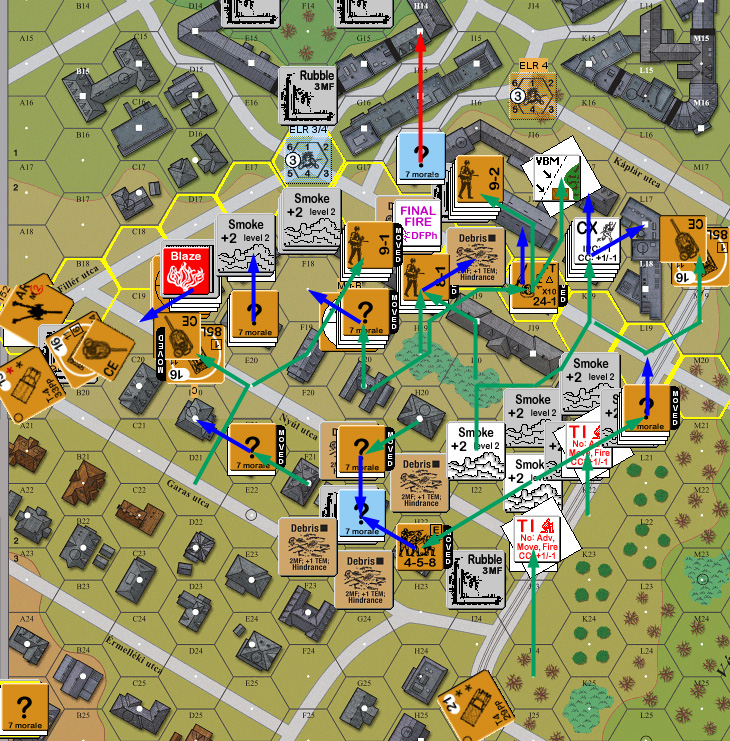
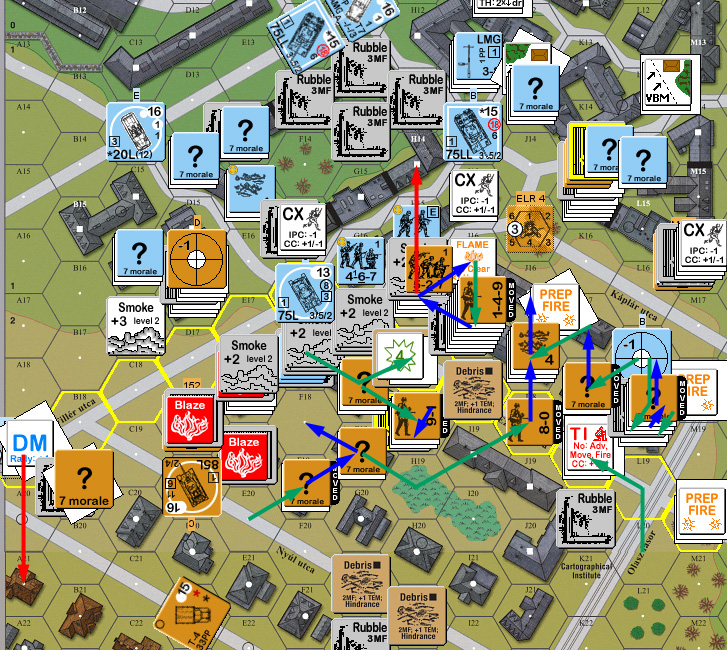
Situation, Axis Turn 3. Counteroffensive.
Patch had malfunctioned a second MMG, and got it back for his rally, while my leader successfully self-rallied.
Patch mostly skulked on his turn, and left me with no shots worth taking. However, a Flame did start in E19h1.
Situation, Russian Turn 4.
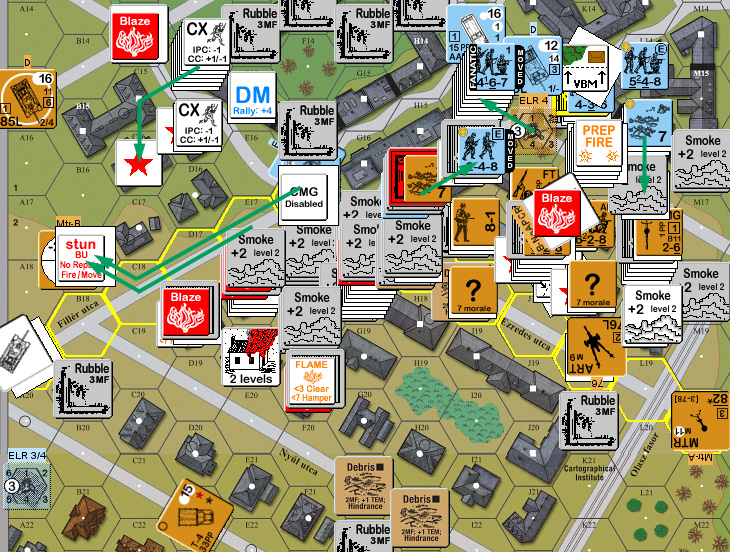
Most of my turn was spent trying to get into position to start being able to attack later. Patch didn’t have a lot of fire, but managed to break a Dashing LMG squad, and ELRed a squad that was moving up with the Pz IV (which he later CRed to a HS). Then during DFPh, Patch revealed his FT in H16, and got a 4MC against my adjacent squad… who rolled a ‘2’ to go Fanatic. He tried another high firepower shot against them, but couldn’t get a result. Next door turned out to have his 9-2 and a couple squads, who also couldn’t do more than a PTC against the HS adjacent to them.
We finally caught that terrain blazes are +3 smoke (instead of the +2 of wreck blazes), and things got much more smoked in during my APh. I revealed my FT at two hex range from the 9-2 stack, and got a 3MC to wound the 9-2 (ELRing to a 9-1 in the process), ELR one squad, Battle Harden + generate a hero on the other one, and start a Flame there.
To round out the phase, the Flame in E19h1 burst into a Blaze, getting us up to three Locations in that area alight.
This left me with a hard decision: the FT in H16 was in range of the Pz IV, and could clear the entire G16-I15 building. But I would have to go upslope (causing CX) to get to it in CC. I decided to go in and try to tie it up in Melee to buy me a turn. To my surprise, the fanatics managed to avoid Ambush and take out the FT squad without taking any losses.
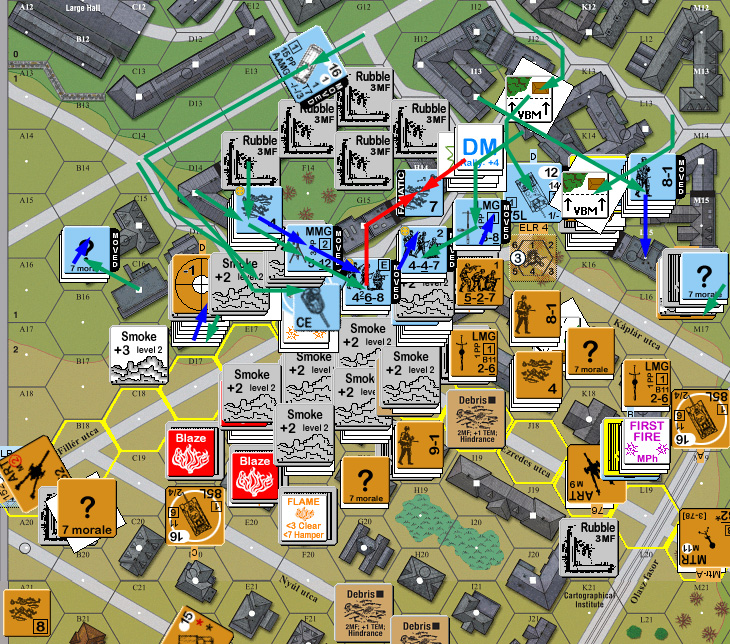
Situation, Axis Turn 4. I had forgotten I had a HT in I8….
The fanatics ended their winning streak when they failed to recover the FT in Patch’s RPh. I had been hoping to pick it up, and either rout out, or destroy it if things looked to bad. My one rally attempt failed, and Patch got a CR on his self-rally attempt.
Patch put down a few smoke rounds on either flank, and then got a CH with a MTR to kill my HS in L15h1. He had a fair amount of other fire, but the only thing that happened was a Sniper activation that broke the crew of his 152mm ART. Patch shuffled and skulked in his chosen block, not giving many opportunities for fire. Things got worse for the fanatic squad as they suffered Ammo Shortage in DFPh, and then broke in AFPh. More smoke covered the board from E19h1, while the downstairs location and F19h1 caught alight.
Situation, Russian Turn 5. There is smoke in M16.
I got nothing for my rally, but Patch rallied his wounded 9-1 as well as recovered his FT with his Hero. The nearby Pz IV opened fire on him, but he passed two MCs generated by the MA, and the CMG malfunctioned. The only other results I got was a PTC that he passed, and I lost my HMG on a ’12’. Patch got a K/4 to cause CR and break two units with his FT.
Situation, Axis Turn 5. Accidentally parked a HT in Bypass of the rubble in F15.
No one got anything back in Rally, and despite several shots, Patch couldn’t get more than a single pin result in Prep Fire. He moved more units into the victory block while not giving me any shots, but I got a ‘2’ on a multi-location FG in DFPh to punch through the smoke and break a squad. E19h0 turned into a Blaze to set the entire building on fire.
Situation, Russian Turn 6. Remember, the bulk of the smoke is coming from Level 1….
I managed to rally a leader and two and a half squads (including the fanatics), but lost the CMG on my Pz IV. Patch didn’t manage to get anything back.
I had been biding my time, waiting for some sort of break, and still moving up guys for some sort of assault on Patch’s position, and now he had gotten even more in there, and set up a really hard nut to crack. I felt that I had possibly blown my best chance on the previous turn, and didn’t like the idea of a last-turn charge where Patch would have even more time to set up. What I didn’t realize at the time was that Patch had exactly 15 VP. He had five buildings, eight squads and two T-34s past the line. Without counting it up (and there was a fair amount of ‘?’ to make it harder), I assumed he had to have some margin other than another couple of squads holding his flank across the street.
So, I went in with ‘the big push’. The first couple moves weren’t bad, but then Patch got a couple low rolls to kill a couple squads outright, though my Sniper eliminated the still-broken 152 ART crew. I really hadn’t appreciated the number of building gaps there were that would allow Patch to fire on the road I was moving into from the far side of the block. The crowning moment was when my 10-2 moved into residual firepower and rolled a ’12’ for a fatal wound on a NMC.
After losing two squads, breaking two more, and pinning a final two (and generating one Hero), I sent in the Panther to engage the two T-34s in the area. I wanted a bit more infantry cover, but that wasn’t happening. But if Patch could just continue his penchant for hull hits, the Panther was pretty safe from the T-34/85s, which had taken a while for me to appreciate. The near T-34 fired, and promptly malfunctioned his gun.
The north flank went a little better, as a couple squads survived intact, while two broke. Sadly, one of them was my PSK squad, leaving the Panther there to face-off with a pair of T34s alone. During DFPh, Patch got six hits against the two Panthers, and only two of them were hull hits. Amazingly, despite a final TK of 6, all four turret hits bounced. Even better, he malfunctioned his MTR. He did eliminate a HS, and break and reduce a squad.
On the other hand, my north flank Panther managed a hit on A19, and killed it, though the crew survived, while flames spread to F19h0. After all that, I managed to get into CC in E18 and G18. Nothing happened in the former location, but I managed to reduce his squad in G18, even after they refused to attack to stay concealed.
All of this put Patch at 20 CVP, dangerously close to my cap. I’d only gotten 6 CVP in comparison, and was about ready to throw in the towel, since I didn’t realize just how close the points were for the main victory condition.
Situation, Axis Turn 6. Playing it didn’t make much more sense.
Patch repaired his MTR and the T-34 crew recovered the 152mm ART for his final rally, while I didn’t get anything back despite a fair number of brokies stacked with leaders. Not having any place better for him to go, my MMG squad had ended up adjacent to his FT, and they predictably broke and ELRed on a 4MC, and then reduced on a subsequent shot. He also broke the squad that had been stranded in M17 by a Pin.
Patch then came up with a new plan, and the crew abandoned the ART they had just taken and ran for the north side of the victory area. Crews don’t count for VP (which Patch didn’t notice at first), but they can take control of buildings. He backed the surviving T-34 on the north side out of the rubble, and ran it along the board edge into the victory area, while the Panther missed on two shots against it. The one on the south edge backed out (after his assault engineers a next to my Panther helpfully smoked it in) and lodged itself between a couple buildings on the back end of the block he was holding. The good news was that I retained ROF after my first shot, and when the T-34 with the bad MA started (and into my hex was the only place it could go—I assume he wanted to impose target selection limitations on me), I got a turret hit and burned the tank (just what we needed—more smoke).
Sadly, the only other thing I could do was suffer Ammo Shortage on another squad.
Patch burned a HT for another couple CVP points. Flames spread to D18h0 (finally), and F19h0 turned into a Blaze.
CC went poorly; I did no damage, and had my squads in both locations reduced, edging Patch up to 25 CVP. Thankfully, his attempt to street fight a Panther failed.
Situation, Russian Turn 7.
Rally gave me what I needed, with a squad rallying in both L14 and D14. Patch sent a squad Berserk in J17. If he had another turn, they would charge the Panther….
Looking it over at this point, I saw that Patch had 9.5 squads, and two T-34s over the line, and controlled seven buildings. The odds were that I’d be able to reclaim C16 & D15 since I got an adjacent squad back. All I had to do was break two squads/kill two T-34s without taking any CVP. (Not darn likely, since I was now likely to lose both CC fights.)
Despite the ‘zerkie, I figured my best chance at havoc was to fire on J17 and hope his adjacent FT would run out of fuel rather than killing the Panther. If I could hit on ATT, there were 3.5 squads that might break in that hex. All he did was disable the MA on the IF shot and malfunction the BMG.
I moved the north Panther up to engage the T-34 there, and needing to improve my odds as best I could, went CE while trying for HD in B17. Not only did I fail the HD attempt, but the spotted MTR got a CH against it, stunning the crew. I sent a squad and leader up to L16, hoping the smoke from the burning T-34 would cover me, and I could attempt a DC toss and get into CC to take a squad out of GO, if I lived, but he broke both units.
Desperate, I sent the Pz IV to do a Panther’s job and moved it to confront the north T-34, and it promptly hit and killed the Pz IV. The crew did not survive, and my CVP went over the cap.
Axis Turn 7; end of game.
Postscript:
I blew it in a few places this scenario. I really didn’t think about just how much firepower the Russians had, and tried to do a fall back defense that instantly evaporated. I’m sure the Hungarians usually don’t have many survivors, but only saving the 9-1, and giving Patch a turn to do whatever he wanted was not a good start.
I had a fair amount of force to move up, but Patch reinforced the victory area pretty thoroughly, and shut me out very effectively. As often happens, I wanted to wait for something to happen, and that kind of die luck just isn’t going to happen within the confines of the scenario. Also, I planned, and moved, for the main thrust to happen along the Kaplar utca (J15-M17), but the real opportunities turned out to be in the G16-I16 area.
The excessive number of smoke counters hampered both of us, though since I needed to maneuver for the attack it was probably a bit worse for me. In person, this probably would have been better, since FB has fairly large hexes, and you can usually split into two stacks. On the other hand, LOS checks would have been a nightmare without a spare copy of the map (which we don’t have).
Discussion (3) ¬