
FB9 The Shooting Gallery
After freezing in the great white north, it was time for Patch and I to return to Budpest for FB9 “The Shooting Gallery”, where it’s early February and there’s also still snow on the ground. I don’t recall how we decided, but I ended up with the Russians who are attacking into the Ganz Works that was on the periphery of the action in “Red Banner Days“.
The Germans get a fairly nice defending force, with 8 1/2 squads, including a pair of 838 Assault Engineers and otherwise split between 468/467s, all from Pz Div 13, with the usual support weapons, with some concealment/Dummies, Wire, mines, a Hungarian Bofors AA, an 88… and a Panther. However, the Panther is Out of Gas, and therefore Immobile, and the Axis troops are at Ammo Shortage Level 4, the worst we’ve seen, and the second-worst possible in FB.
The Russians enter with 11 squads and 4 T-34/85s, plus three squads (and 8-0 leader) of the Buda Volunteer Regiment. These are Hungarians who have joined up with the Russians, and use the standard Hungarian/Axis Minor stats, except with counters bordered with Russian brown instead of German blue. The primary goal is to take ten stone buildings in the central area of the map in seven turns, but both sides have a CVP cap of 35.
The Russians enter in the west, but can also enter along most of the north edge if they wait until turn 2. Both sides get six ‘purchase points’ of reinforcements for each of the first three turns, with the Russians entering in the north and west and the Axis entering in the east and some of the south. Oh, and the Axis gets a couple squads of conscript Hungarians and a 7-0 when/if the Panther dies.
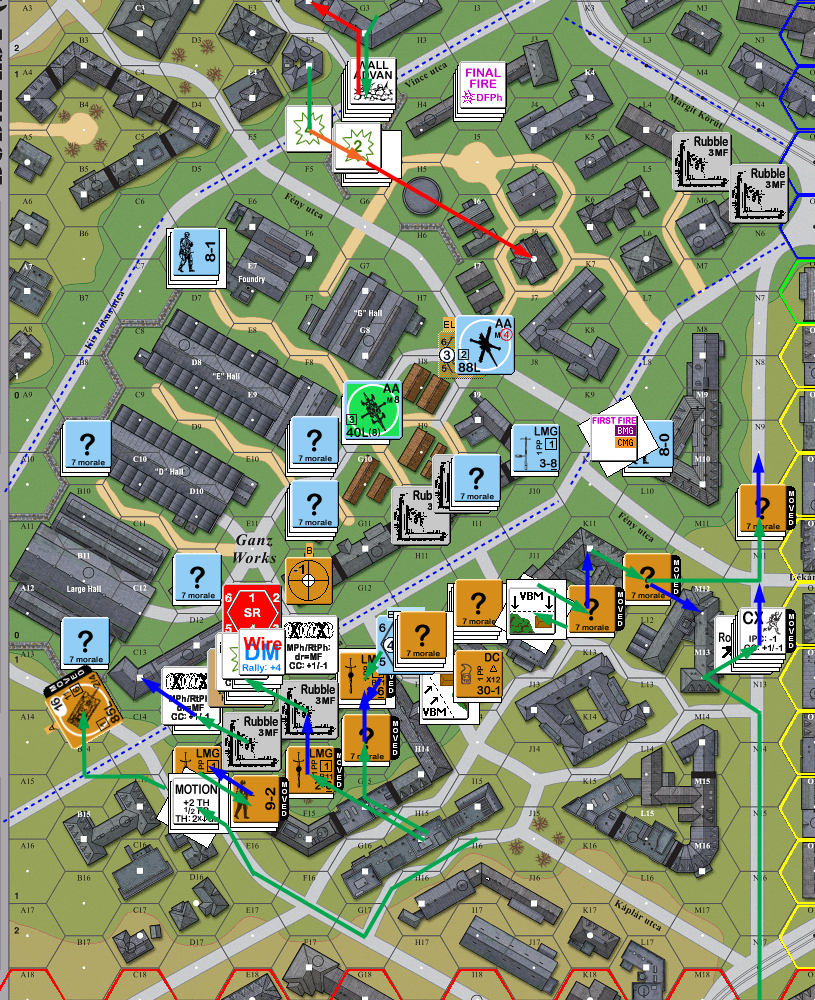
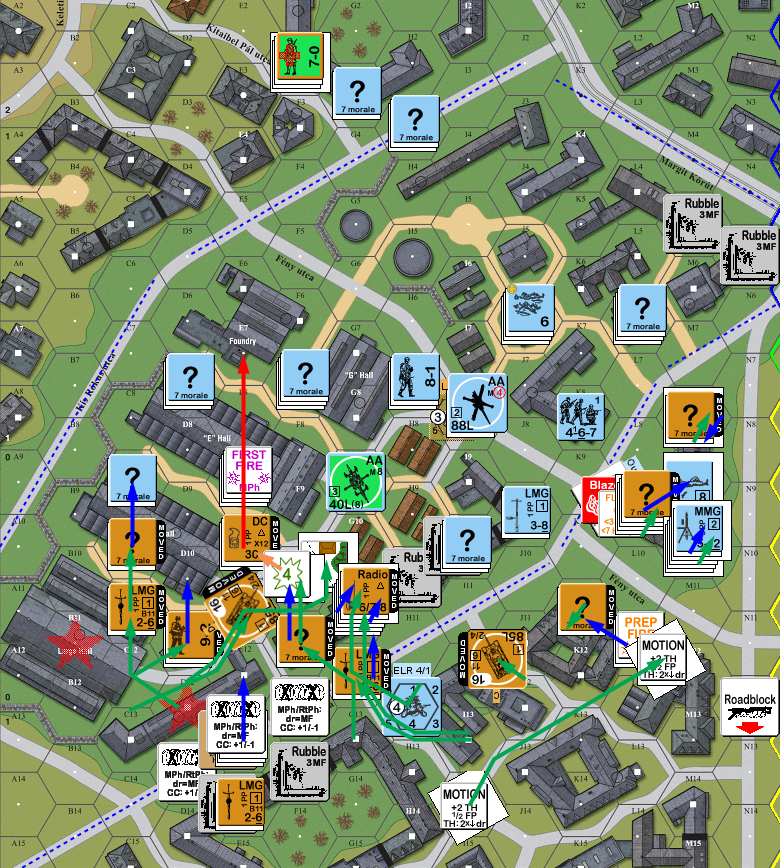
My general plan was to enter everything immediately, and try to drive for the far end of the victory area, where there’s more, smaller buildings. I would buy all the BVR troops available on the second turn, and enter them in the rear of the German lines; if they got lucky, they might get into the area. If not, they would keep Patch’s attention divided, and the BVR units do not count against my CVP cap, so a lone platoon getting cut off and killed was not a real worry, so long as it kept Germans busy. Since all the BVR troops together cost seven points, I needed to save one from the first turn, and I decided to go for the 100+mm OBA module… partly to get the 8-0 leader with it. This meant my other goal was to find an observation post for him as soon as possible. My setup was a little hurried, which lead to two of the T-34s being a hex further out than needed (J18 & K19 instead of I18 & J18), but they didn’t have far to go the first turn anyway.
The bulk of Patch’s setup was within the victory area, but the first thing I had to deal with was a pair of “?” in H13h2, but Patch didn’t force me to strip concealment on anyone approaching him. Until the last move, when he opened fire from F11h1, who had also been quiescent until that point. The resulting 8 -4 shot broke my squad, but it also malfunctioned Patch’s HMG.
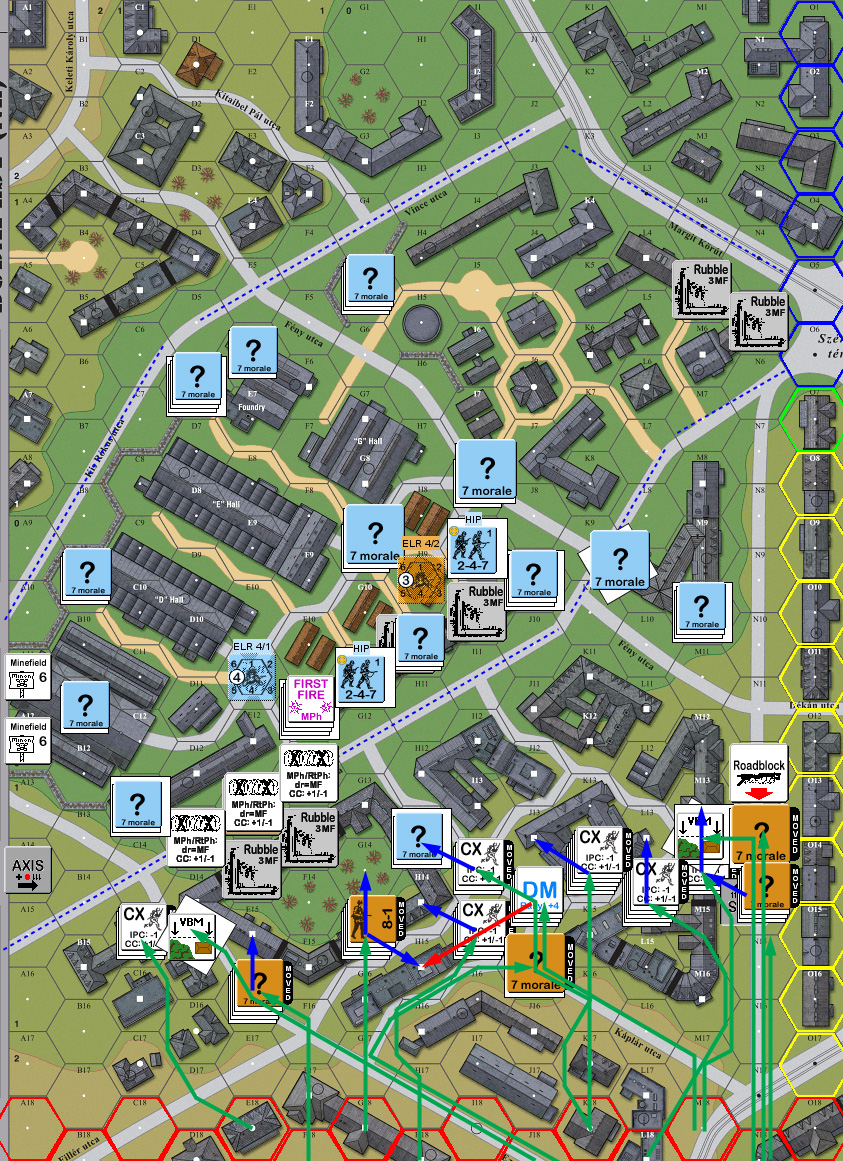
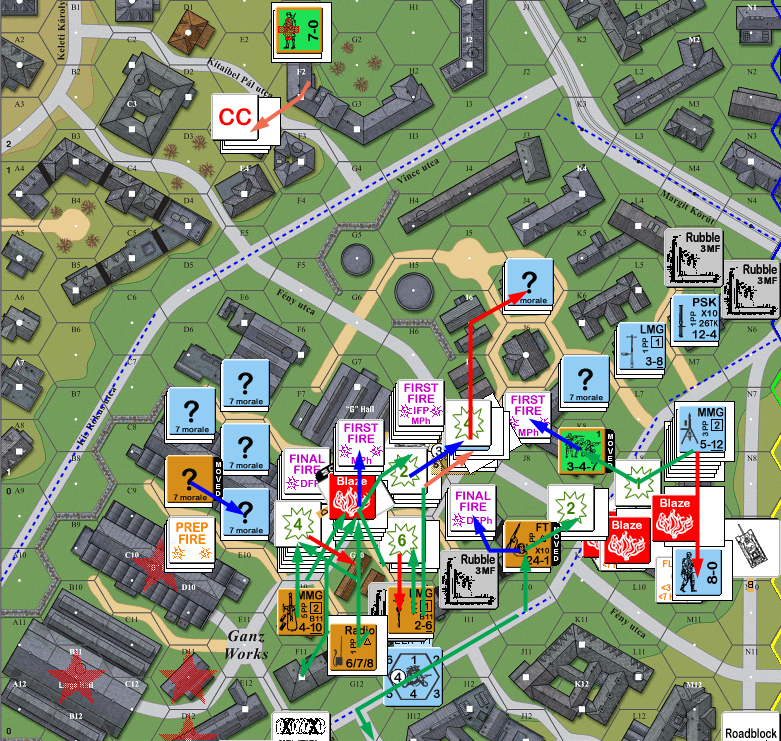
Situation, Russian Turn 1, showing full playing area; north is to the left. Red hexes are the Russian entry area, blue hexes are the German entry area, the blue dashed lines define the victory area. Patch’s hidden mines and pair of HS are also shown.
My squad rolled an ’11’ to give me flashbacks to the extreme winter of our previous scenario, and sadly, Patch repaired his HMG. Patch bought a 8-0, 468 and MMG, and set him up in O6 (as far west as he could enter) to shore up the Panther in L9, who was more exposed than Patch had realized, and there was a significant Russian force headed his way. Mostly, he skulked, and the stack holding his NW flank went down and stayed downstairs rather than face ATT shots from a T-34, which left me free access to much of the level 1 ground in that area (well, except for his lookout post in D6h2, which was partially blocked). One T-34 had parked itself behind the roadblock and shelled M10, and scored an ATT CH to reveal that Patch’s troops there were Dummies, making his reinforcements into the area even more desperately needed.
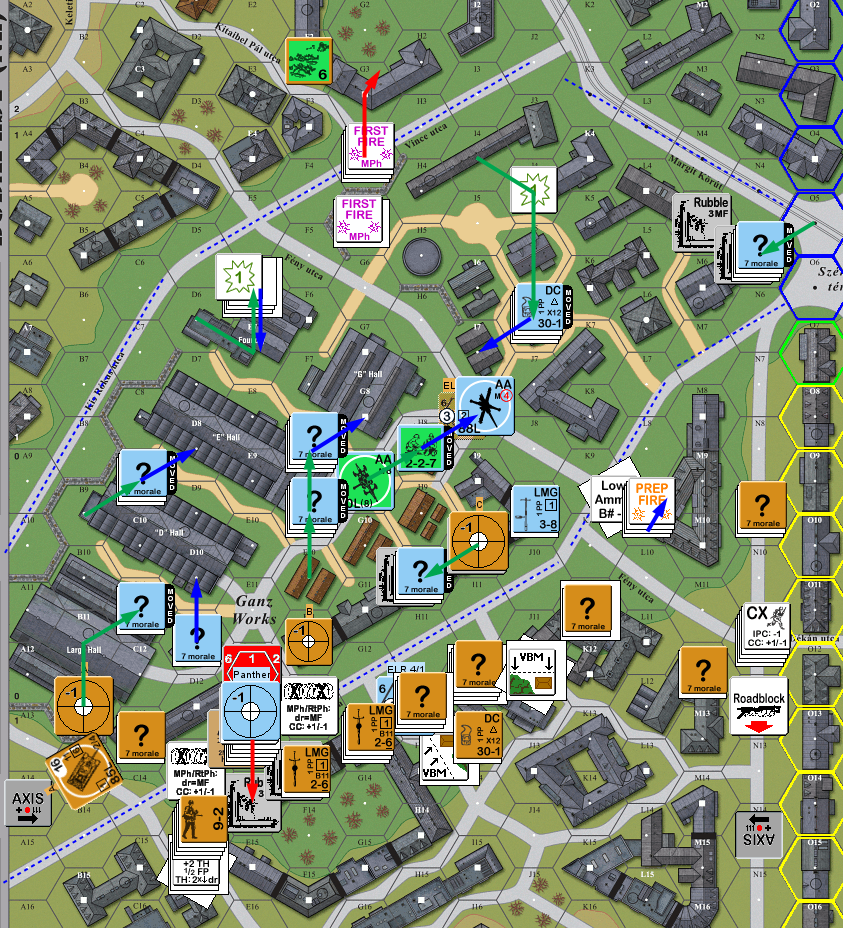
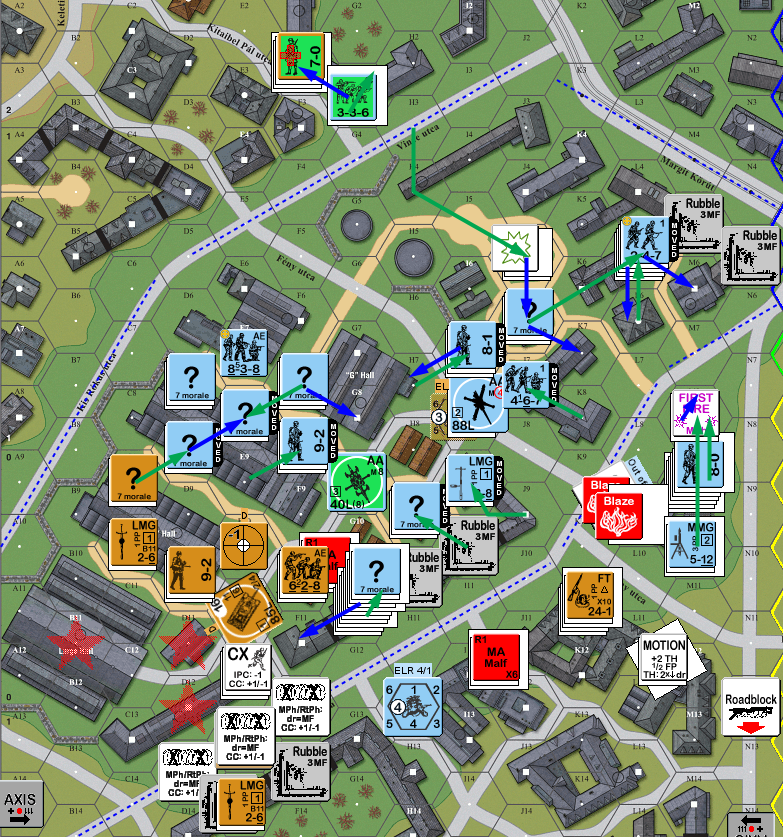
Situation, German Turn 1.
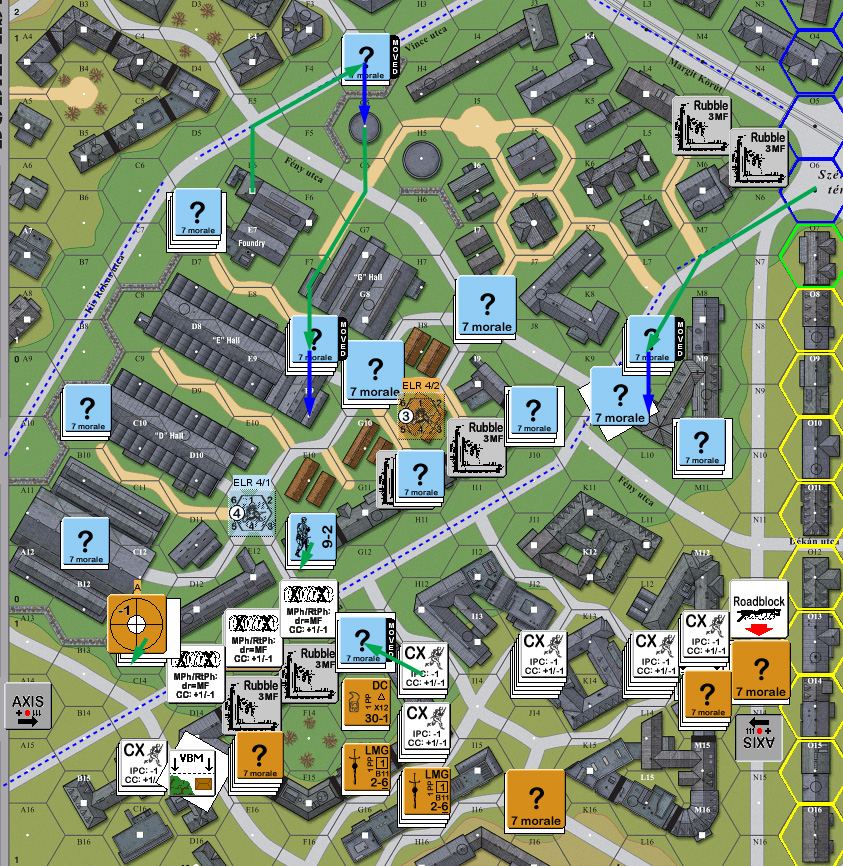
I set up BVR reinforcements (7-0 & 3×347) just off of A5, to enter into the north side in the middle of a built up area overlooking the center of the victory area. Unfortunately, my broken squad still refused to rally, leaving my 8-1 to fall behind the advance. My MMG & 9-2 prepped at his HMG, and pinned the squad.
Patch revealed a squad and LMG in J9 on my second move, and killed a squad as I attempted to get into the M10 building. However, my Sniper went off, and landed directly between his two Guns. I chose I8, and broke the crew of his 88. Between that and the reinforcements rushing in, the SE corner wasn’t looking as good as I’d hoped, and I started shifting towards a push on the center of the line, with the T-34 who had parked at the roadblock turning around and heading for the NW end. Two of the others started focusing on the HMG position, to try and force him to get out of the way. During APh, I put up a continuous line from L11 to D14, advanced two squads into the Wire, and discovered that there was indeed no one in G13h2.
Situation, Russian Turn 2.
Patch bought a 7-0, 467 and DC for his second turn and set them up in O5, next to were the last set had come in. He rolled a ’12’ to eliminate his broken crew, leaving the 88 unmanned, and giving me 2 CVP. Then my broken squad rolled a ’12’ as a lesson in humility. Patch’s Prep fire was fairly effective, breaking B13 and one of the squad attempting to get through the Wire. Also, his Sniper went off and broke a squad in the same hex as my artillery observer (nearly killed him instead!). But he lived, so it was time for him to… fail the radio contact attempt. Worse, the guys on the Wire couldn’t get under it to move (‘6’), and died of FtR. Meanwhile, most everyone else skulked, and the reinforcements headed to the back side to hold off my reinforcements.
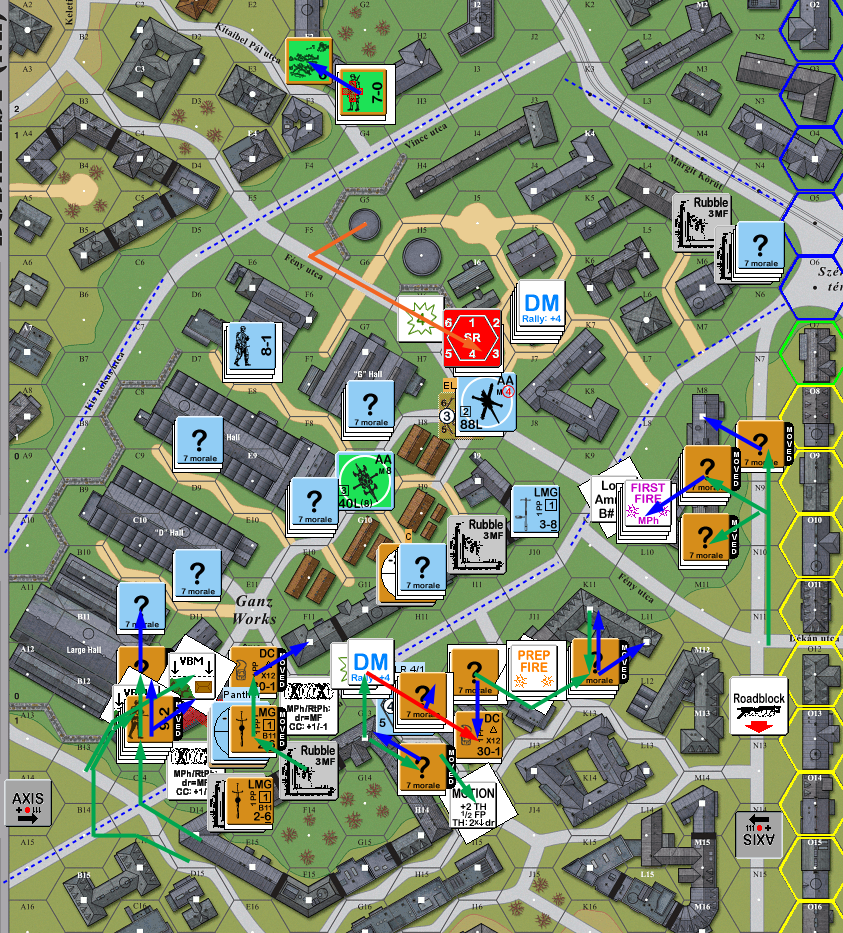
Situation, German Turn 2.
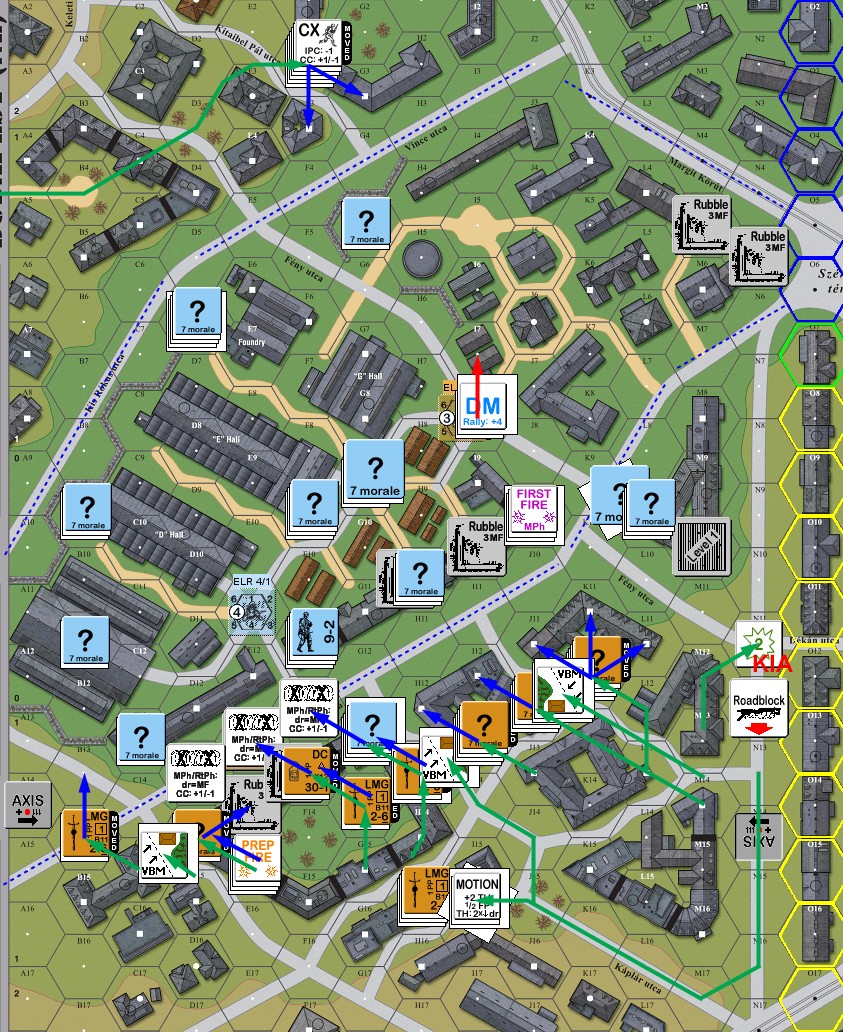
For my final purchase, I took the 8-1, a 628 and a DC, and set up in N18, ready to go straight east down the Retek utca and the SE end of the line. The HS in H15 finally rallied, but neither of my broken squads did. This time I managed Radio Contact, and put an AR down in J9, with the SR landing over in E12. (Visible from I12, but not a particularly great location.)
I had been starting to wonder about the one “?” that was still guarding the back side in G5 from the beginning of the game, but as some of the BVR approached, it turned out to be a 467, who fired on them… driving them berserk! They charged across the wall, unfazed by SFF. The rest of the platoon went over to join in, but Patch’s new 467 in I4 managed to break a squad as the moved up.
Meanwhile, the not only did the reinforcements get past the roadblock, but I got another group around towards the last building before the victory area on that end without Patch being able to see him. I sent two more squads into the Wire, and Patch broke one, and then I thought to attempt to move the first guy out after there was resid in the Location. He made it under, but Pinned in the process. The second new squad got a good roll and managed to get under even while using AM. The Panther tried shelling the hex it could see, but only picked up a Low Ammo counter.
Patch’s squad in G5 broke in AFPh, and they successfully routed away.
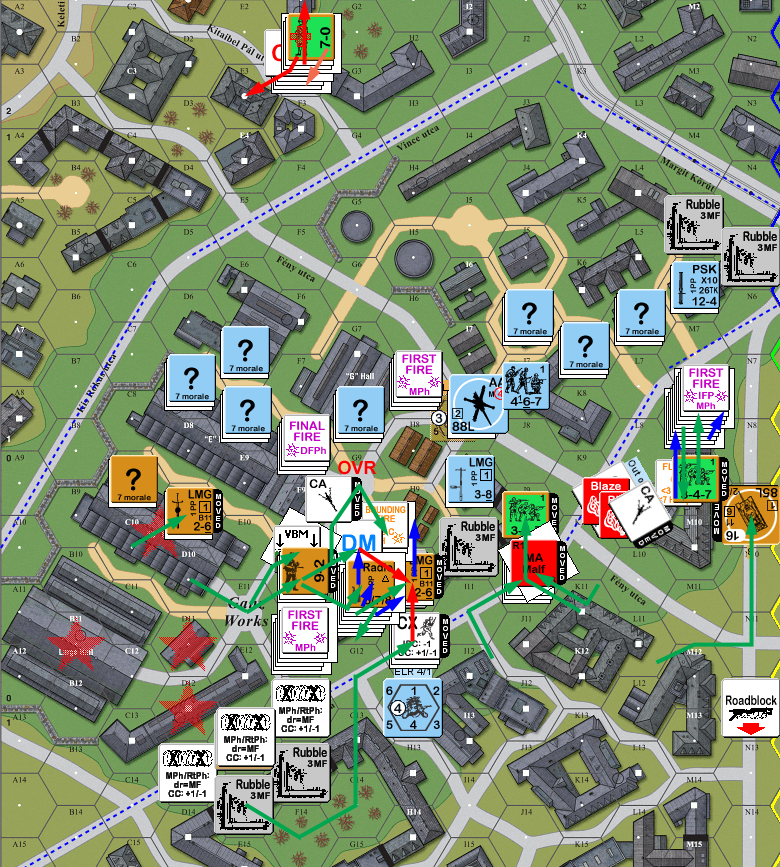
Situation, Russian Turn 3.
Patch bought a 467 with LMG and PSK for his final purchase and set them up in O5 again. I managed to rally the (now) conscript squad in D14. Patch continued to skulk around, and only AMed his reinforcements into N5. I corrected the SR into J9, which then wandered to J7… out of LOS. Patch also shifted his MMG nest to see the back side where the Hungarians were, and nailed the main stack with a K/1 that wounded the 7-0 and reduced and broke/ELR the squad with him. Since another squad had already broken, that just the left the ‘zerkie of the turn two platoon.
The thing that surprised me was that now that I had a single squad across the Lovohaz utca (the eponymous ‘shooting gallery’, he largely pulled back out of that corner, rather than make me contest getting a foothold at all. He also transferred his Hungarian crew to man the German 88, which made sense, but was going to be even more prone to malfunction.
Situation, German Turn 3.
Neither of us got anything back for my rally, which was a bit of an annoyance. I hadn’t realized that the forced Correction on the OBA would also cause the full extent of error. So, the next spotting round skipped off out of LOS to I7. Not helpful. The ‘zerkie ended up charging I7, and died to a K/2 and a ’12’ on a SFF 1MC.
By now, the NW end had become my main focus, since that had become my easiest crossing point. I got another three squads across, including the MMG and 9-2. Two of the T-34s pressed into the area for support, though I was fearful that Patch would start risking backblast and take one out with a PF shot. I tried to Dash a squad across into G11, but Patch’s MMG broke him in the street. However, I was finally rearranging my line so that my FT could try to take out the MMG next turn, and I was getting three squads (two BVR) into the M10 building. Sadly, had also forgotten about an extra leader during movement, and one of my leaders just ended up bouncing around doing nothing, when he could have gotten to a broken squad.
I was focused on blocking up the stairwells for upper level encirclement in L9 (forgetting that that doesn’t work without Known units blocking access to the ground floor), and didn’t even think about the fact that one of the Locations needed had the Panther in Bypass. But, with Ambush, an 8-1, and it being Immobile, I burned it easily. In C11, I found out that I’d gotten into CC with a concealed 838, and we both refused to attack.
Situation, Russian Turn 4.
Patch brought on his two new Hungarian squads and 7-0 (from the Panther being killed) at I0, and I managed to rally one squad. Instead of firing at TPBF, the 838 in C11 AMed out into the next factory over. The Hungarians decided to go bother the remnants of the BVR and keep them under DM (considering that they nearly set up in J0—which is on board—on the other side of the J1-J2 building, I assume that was not the initial plan). While he mostly skulked, Patch did two surprising things: the MMG in E7h2 left it’s high-level post and started moving towards the front line (it was time for that, but it still caught me by surprise), and his other MMG in L9h2 moved away from the smoke to M10, instead of going to the much less visible M9 (and advancing into M10).
I had thought that I had advanced my observer into a position to see the SR in I7, but that was incorrect. When the Mandatory Correction bounced over to D11, it was obviously time to give up and start over from somewhere else, and hope I could get a fast cycle this time. I revealed the FT in L11, and broke the 8-0 leader, but only pinned the squad. The Blaze from the Panther then spread into L9h0.
Situation, German Turn 4.
Despite good odds, I couldn’t self-rally the squad in E14 (if I’d payed more attention last turn, he would have barely rallied with the 8-1’s help). I did get a squad back in I13, and Patch reduced a squad on a ’12’. The observer hung up the phone in order to get into G11 and try to observe over the rooftops of all the small wooden buildings just east of there. The FT & squad in L11 failed to phase Patch’s MMG squad, which meant I was still too busy to really worry about the line Patch had guarding the victory area. Over on the other end, I was still trying to figure out how to advance with all the chancy LOS, possible point-blank (desperation) PF shots, and just lots of firepower and good leadership available. And I still had no idea where Patch’s HIP squad was.
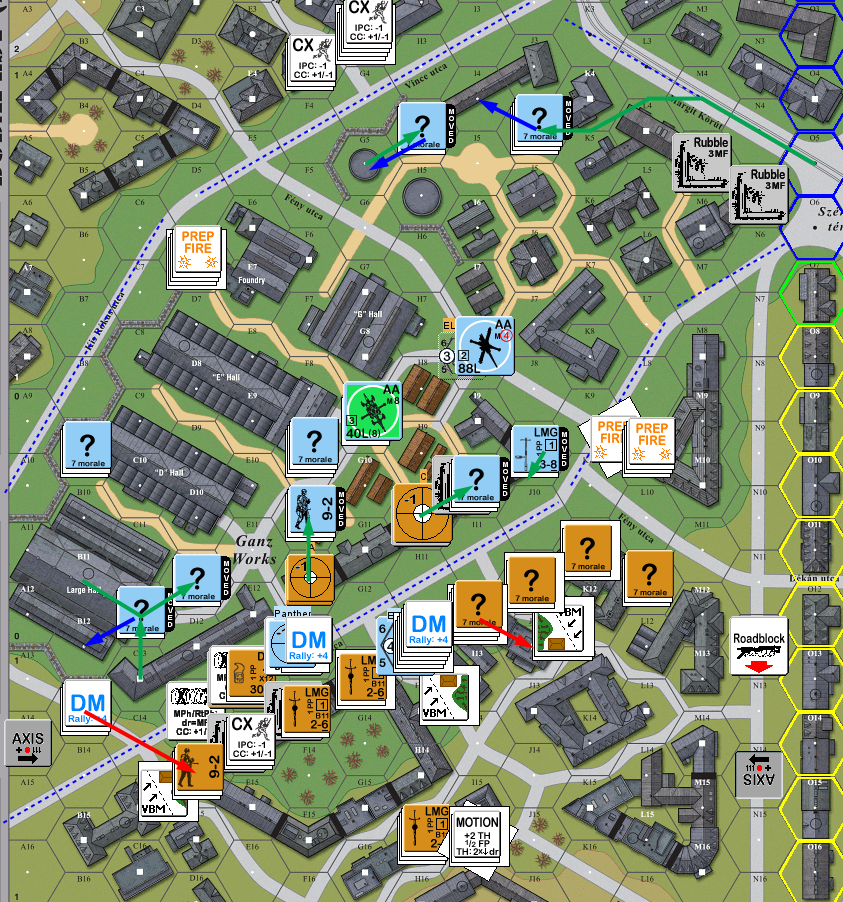
However, I was able to get another couple of squads and leaders into the victory area, while pressing slowly forward. I dropped a DC on E10, and since Patch didn’t want to give up “?” with him, I only had to take a shot from the HMG and 9-2 in E9… which I passed. Sadly, the DC only did a PTC to reveal Patch’s other 838. They passed that, but did eventually pin to other fire. I was considering whether to tie him up in CC with a single 628, but Patch self-broke him into safety.
Then things went bad. I malfunctioned the MAs on two T-34s in a row (the ‘advanced’ one in the victory area, and the one still trying to help clear the I10/J9 area) during AFPh. My observer advanced into G11h2… and ran into a HIP HS who killed him in Ambush. I advanced back into CC with the first concealed 838, and we both passed on attacking again. I advanced a BRV squad and leader into M10h2 and failed to get Ambush, and died for no losses against his MMG squad.
Situation, Russian Turn 5.
Patch rolled Gusts for his fifth turn, which forced the flame in L9 into a blaze, but the random wind direction blew the blaze from the Panther down the Feny utca, where there wasn’t anything to catch fire. He got all of his rallies, including the self-rally of the 838, while I still couldn’t get anywhere with the remnants of the BVR in F2, who were out from under DM for the moment, nor either of the malfunctioned MA.
Patch gave me one decent shot during movement as I used a LOS down path between M8 and J5, but I rolled high and didn’t do anything. The HIP HS moved up to the rooftop to get away from any point-blank fire, and the Blaze spread into M9. I did finally get a result on a stack that had been bouncing back and forth in the rubble (H10/I10), and revealed him to be Dummies. I’d been pretty sure of that for some time, but confronting him had meant playing target practice for the Panther and MMG for most of the game.
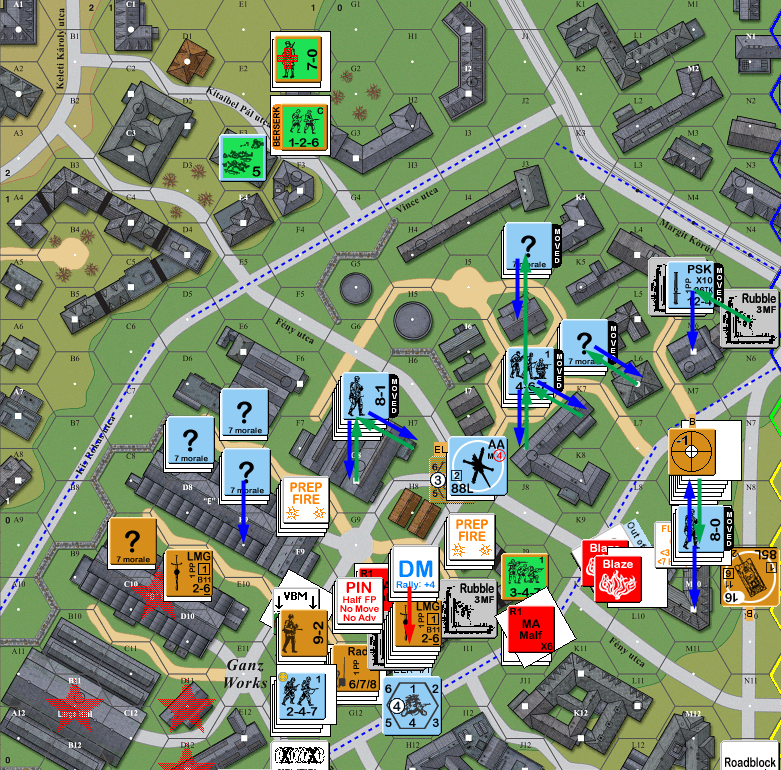
Situation, German Turn 5.
It was during this turn that I made my biggest mistake, I lost track of what turn it was. I was behind schedule, and no where near any sort of victory condition going into the second-to-last turn, but slowly mentally slipped back to thinking I had a couple more turns to go, and continued to cautiously press forward, looking for a way to open up the dense wall of Germans, instead of forcing things. E14 finally rallied, and the BVR HS rolled a ‘2’ to generate the highest Final HoB DR I’m likely to ever see: 16 (12 + broken, conscript, Russian). Since No Quarter in effect, they charged down the stairs at the Hungarian squad that was keeping the bunch under DM. The squad then rolled an 11 for Ammo Shortage and broke!
Patch had finally abandoned J9, and and I got a squad across into there, but the FT squad got pinned in the street. The lead T-34 overran the abandoned Bofors Gun, auto-destroying it for 2 CVP. We had a bit of discussion on whether that counted as bounding fire for the MGs, we’re pretty sure it is, even though they aren’t needed for the attack. I would have liked to have also fired on the 9-2, but it just wasn’t possible, and I backed into a safer position in Bypass of G10. I parked a T-34 adjacent to M9, around AFPh I realized that was a mistake: the squad in M8/r could easily move up to where the height difference was too great for me to fire, and fire a PF. My advancing fire didn’t do anything except set off Patch’s Sniper, who re-broke the squad from E14.
Situation, Russian Turn 6.
I got one squad back in Patch’s RPh, but still wasn’t getting any results from the MAs. It was around now that I realized that I’d wasted a turn I didn’t have, and didn’t have a hope of winning, but decided to stick it out to see what I could do. Patch prepped with a couple units, and the 9-2/HMG managed to break one squad and pin another before malfunctioning on an ’11’.
I only had a couple defensive shots (and had forgotten to recover the radio, so no last-second AR-SR-Correct/Convert-to-FFE and PRAY either), but finally managed to break his formerly-HIP HS, who died of FtR. As expected, his group on the roof of M8 shifted inside the range of the T-34 and killed it with a PF. Meanwhile the flame on the ground floor of M9 turned into a blaze, and the previous blaze spread into M10 and the cellar of L9.
Situation, German Turn 6.
So, going into my final turn, I had control of four buildings out of ten (assuming that the extra HIP HS wasn’t hiding in one of them), and I had 13 CVP, and Patch had 15. There was no way I was going to get another six buildings… and really no way to get 22 CVP either. Especially without losing 20 CVP myself. But I gave it a try. I managed to rally one squad, but another reduced on a ’12’ (16 CVP for Patch…), and recalled the T-34 in J10 without getting a result on the other. The remaining BVP squad also failed to rally, so they couldn’t go take building I4.
I took one shot in Prep, trying to get a result on E9, so I could better see what was in that factory, but had no luck. I sent a HS into G9 to either attract fire (nope) or help reduce SFF later. The malfunctioned T-34 tried to get at the 88, but it swung around and killed the tank before it could get into the hex, but the crew bailed out (21 CVP). I tried sending a BVR squad into K7 to see if it was real, but they pinned in the street before getting close.
An attempt to get close to H7, broke and reduced to a HS on a ’12’ MC (22 CVP) in H9. The next attempt got to H8, took a LMG shot (malfunction due to ammo), a hit from the 88 (’12’ for no effect), and a CH from the 88. The leader took the CH, and merely broke to the resulting 3MC, while the squad went berserk. They charged the Gun, took another hit without flinching (exhausting ROF), and then CRed to a HS on a K/3 from the MMG/8-1 in H7 (23 CVP).
I tried placing a DC on the 9-2, but broke to a K/2 (24 CVP). A second attempt to get close pinned the squad, but left my 9-2 mobile. I sent the second T-34 in to try and take out the 88, now that it was already looking at CC, but Patch finally took a backblast shot, and burned it with a PSK (31 CVP), passing the resultant 1MC.
Patch managed to pin my 8-1 in M8h2 with Final Fire (I’d been keeping “?”, but Patch rightly pointed out I should have tried placing a DC on his guys on the roof) before malfunctioning his MMG. The other MMG in H7 finally finished off my ‘zerkie before they could try to get the crew of the 88 (32 CVP). My AF managed to pin the 9-2, 88 crew, and J7… and broke M8/r. I’d kind of been hoping for another pin on that last one. And all but one flame spread roll produced results, causing a Blaze in M10, and flames in M8, M9/c, L9/c and M9h1. I lost my 9-1 to FtR (34 CVP). Patch self-broke the 88 crew to get them out of the way of my adjacent vehicular crew.
Despite all the carnage, I managed to advance into CC with Patch in four places. In J7, a BVR squad took on a pinned 467, and got Ambush to kill them in HtH (15 CVP for me). In I9, my FT 628 took on a 467, got Ambush and killed them in HtH (17 CVP). In G8, I had a CX 237 & 8-1 vs the PST HS that took out the last T-34, despite missing Ambush, I took them out in HtH for no losses (18 CVP). In E9, a 447 found a 7-0 leader by himself, and died to his 1:4 HtH attack while they missed. 36 German CVP and the game.
Situation, Russian Turn 7.
Afterword:
Beyond messing up how much time I had left, and a number of annoying small errors along the way, I let this one slip by. The initial idea was to thrust towards the M8 building fast, while keeping the rest of the line engaged. But I let too much effort go into the latter, and got more involved with crossing the street through the wire, where there was a little bit of debris as cover. It actually worked out, but I suffered from a lack of focus. By the time I got to turn 5, I was already well behind where I needed to be, and wasn’t finding any good way out of the trap. Then the string of bad luck there pretty much meant that it wasn’t going to happen.
Patch commented at the end that he was rethinking his idea that I needed to be more aggressive with my tanks. ^_^ Which was a problem; T-34/85s will die to just about anything that can hit them at this point. Patch put mines in A11 & A12 to make me pay for a cheap entry into the factory from offboard; something I hadn’t even considered. In all Patch’s defense was quite tight, and the main problem was the location of the Panther. There was only a Dummy stack covering it; the MMG section that gave me so much trouble was his first turn reinforcement, rushed in after he realized the problem. The OBA was something of a gamble, though I half took it just for the extra leader. Another hex or two of rubble to open up LOS, and it might have paid off.
I certainly learned a few things; I’ve barely ever had to deal with Wire, and getting across wasn’t as bad as might be imagined. But it was slow. And the final, very remarkable CCPh was a note worth going out on.
Discussion ¬