

After going up the hill in Tunsia, Patch and I decided to go back to Budapest for our next round of ASL in Europe with FB10 “Return of the Black Company”. Patch didn’t want to have to deal with Ammo Shortage again, so I got the defending Germans.
It’s now Feb 3, and things are getting desperate for the Axis forces. The special rules for lack of food and fuel kick in a day or two after this scenario, but Axis forces are still at Ammo Shortage level 4. Both sides have largely variable forces as they struggle over an area near the Kiralyhgo ter on the SW board (which is an area we haven’t seen before, though it’s not too far from a couple of the ‘big hill’ scenarios). Oddly, both sides have a 5 SAN, but a ‘1’ SAN roll is either treated as a ‘2’ (pin/wound), or it can be used to battle harden your own troops.
The Germans get six SS squads (split between 658 and 468), MGs, a DC, and a few concealment markers. They get a leadership choice between a 9-2 and two 7-0 with a FT and a more mixed set with a HMG and PSK. For me, choice A2 was obvious, since even with the shortage, an HMG would be a big help, and I didn’t want most of my leadership as 7-0s. They have a supplemental infantry choice of 3.5 447 SS squads with a leader and LMG, or 5 Hungarian 347s with two leaders and two MGs. This was a tough choice, and even though I felt short of bodies, I went with B1 as I felt I needed a flexible defense, and I didn’t want to have to worry about keeping the Hungarian units together. There’s a Gun/Vehicle choice, and I went with C2 for an extra M15/42(i), as they are part of the victory conditions and the 105 gun on the Zrinyi II, though a 75mm AT as part of the final defense may have been a better idea. For the fortification choice, I went with D2 for two fortified building Locations and mines instead of wire, even though the fanatic unit that comes with the latter was tempting.
The Russians enter along the west or most of the north side on turn 1, and have a (pre-game) choice between three victory conditions. They can go for 18 CVP, or for a pair of buildings, or for a pair of hexes (and all the hexes adjacent to them). In all cases, the Russians only win if the Axis do not control XX29, and have a functioning M15/42(i) in the hex at the end of the Game Turn. With 5.5 turns, I felt I had to try and slow the Russians down for a couple turns before going to the final defenses, and with such a large entry area, I was worried he’d just find a way around one flank and make good progress on the first turn. I especially gave some thought to entry at the NE extreme and going downhill around the bulk of the level 1 playing area, and straight at one of the option 2 victory buildings from behind.
Pre-game rubble checks did very little (three hexes, one of which fell into the street, but that was well out of the likely area of action), and I ended up positioning my mines for a west entry as there were a couple hexes that seemed inevitable if the Russians were in the area at all. I put my roadblock in YY33/YY34 to block access to the heart of the VC area and provide cover for the AA gun, which went behind it. One fortified building Location went in YY30, next to the German victory hex, and the other in CCC32, one of the hexes the Russians needed for their third option. My Zrinyi II went in AAA32, where it was very hard to get at, but could protect CCC32. The HMG went in YY28h1, where it had some decent LOS down the main north-side street, and could protect against an east-side thrust.
Patch ended up going for a NW corner setup. A lot entered along the west side, but three large stacks were at the west side of the north edge. He had contemplated the main north-south road in the middle of the north edge, but decided it was too vulnerable. He chose A2 (fewer leaders, but with a hero), B2 (more men, no Assault Engineers, and only one FT), and C2 (two T-34/85s instead of four vulnerable SU-76s). His first unit found the mines in ZZ38, but were unharmed by them. Despite some fire from BBB36h1, his entire west force entered without incident.
His first two units from the north edge Searched near my “?” but while the first found a HS+DC, the second rolled poorly and failed to search anything, preserving my Dummies. TT35 threw his DC in DFPh at TT36, breaking one squad and ELRing another while staying unharmed. AFPh broke my squad in BBB36 and revealed the Dummy in VV36 on a PTC. Beyond that, his two T-34/85s got acquisition on the buildings flanking my roadblock, which I considered the anchor of my defense in that direction.
He advanced into the street on the south side, and got his squad out of the mines without incident. There was only one squad left adjacent to TT35, but he was concealed and killed the HS in a successful Ambush.
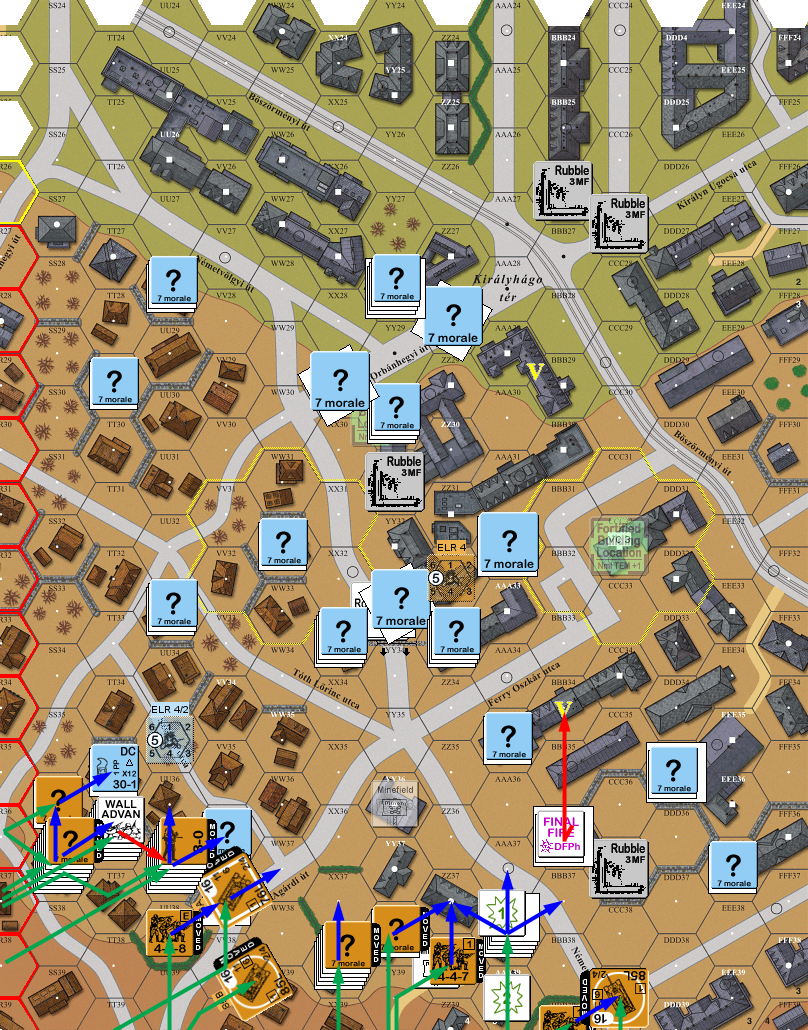
Situation, Russian Turn 1, showing the full playing area, and the hidden parts of my setup. North is to the left; yellow ‘V’s are the second option victory buildings, and the yellow circles are the third option victory areas.
↓ Read the rest of this entry…