
21 Among the Ruins
A while back, Tom Arnold contacted me interested in playing an ASL game over Vassal. We ended up going for a scenario from the just-rereleased Yanks. I ended up taking the Germans in this late-’44 scenario set in Aachen (a popular location for scenarios).
The Germans defend two of the city boards with twelve squads, two HMG and MMG each, and a quad-20mm AA Gun. The Americans have twenty-three squads with four MMGs and three Shermans. They need to cross the majority of the boards longways and exit nine squads in 9.5 turns (this is down one squad from the original, which is surprising, since ROAR shows the scenario as being very balanced). The Germans get to place ten rubble counters to block off easy passage of key points, and get to place some of them on non-building hexes, as long as they’re adjacent to rubbled buildings.
They also get to HIP two squads and use Bore Sighting and Sewer Movement. I got so involved with trying various schemes with placing rubble that I completely forgot about those parts (I have a decided tendency to forget about HIP while setting up). At least I remembered that everything gets to be Concealed. Those goofs did me no favors, though at least my rubble layout was pretty solid, giving me some cover in convenient places, some protection to lateral lines of movement, and clearing up some fields of fire (particularly around 20T3—I rubbled two adjacent hexes to give a HMG+9-2 nest lots of field of fire). The major problem of the setup was figuring how to protect a 20-hex wide front so that I could then concentrate where the main push was.
However, Tom attacked on a broad front. His major concentration was in the east, but there was another sizable group in the west, and another three squad group right in the center. After deploying a number of squads, initial Prep was limited to firing on a large stack in 21S8, which turned out to be a HS that broke and a bunch of Dummies. Opening moves started working the flanks, with an 8-0 leader rushing forward to prove that my stack in 20O8 was dummies, though fire from my 9-2 led HMG in 20T3h2 broke him. A Dash in the center section ended (just barely) in LOS of a MMG, which got a KIA to kill the squad (it would later break another squad). A HS Searched L9, convinced there had to be something nearby (even if I had remembered HIP, I wouldn’t have had anything that far forward).
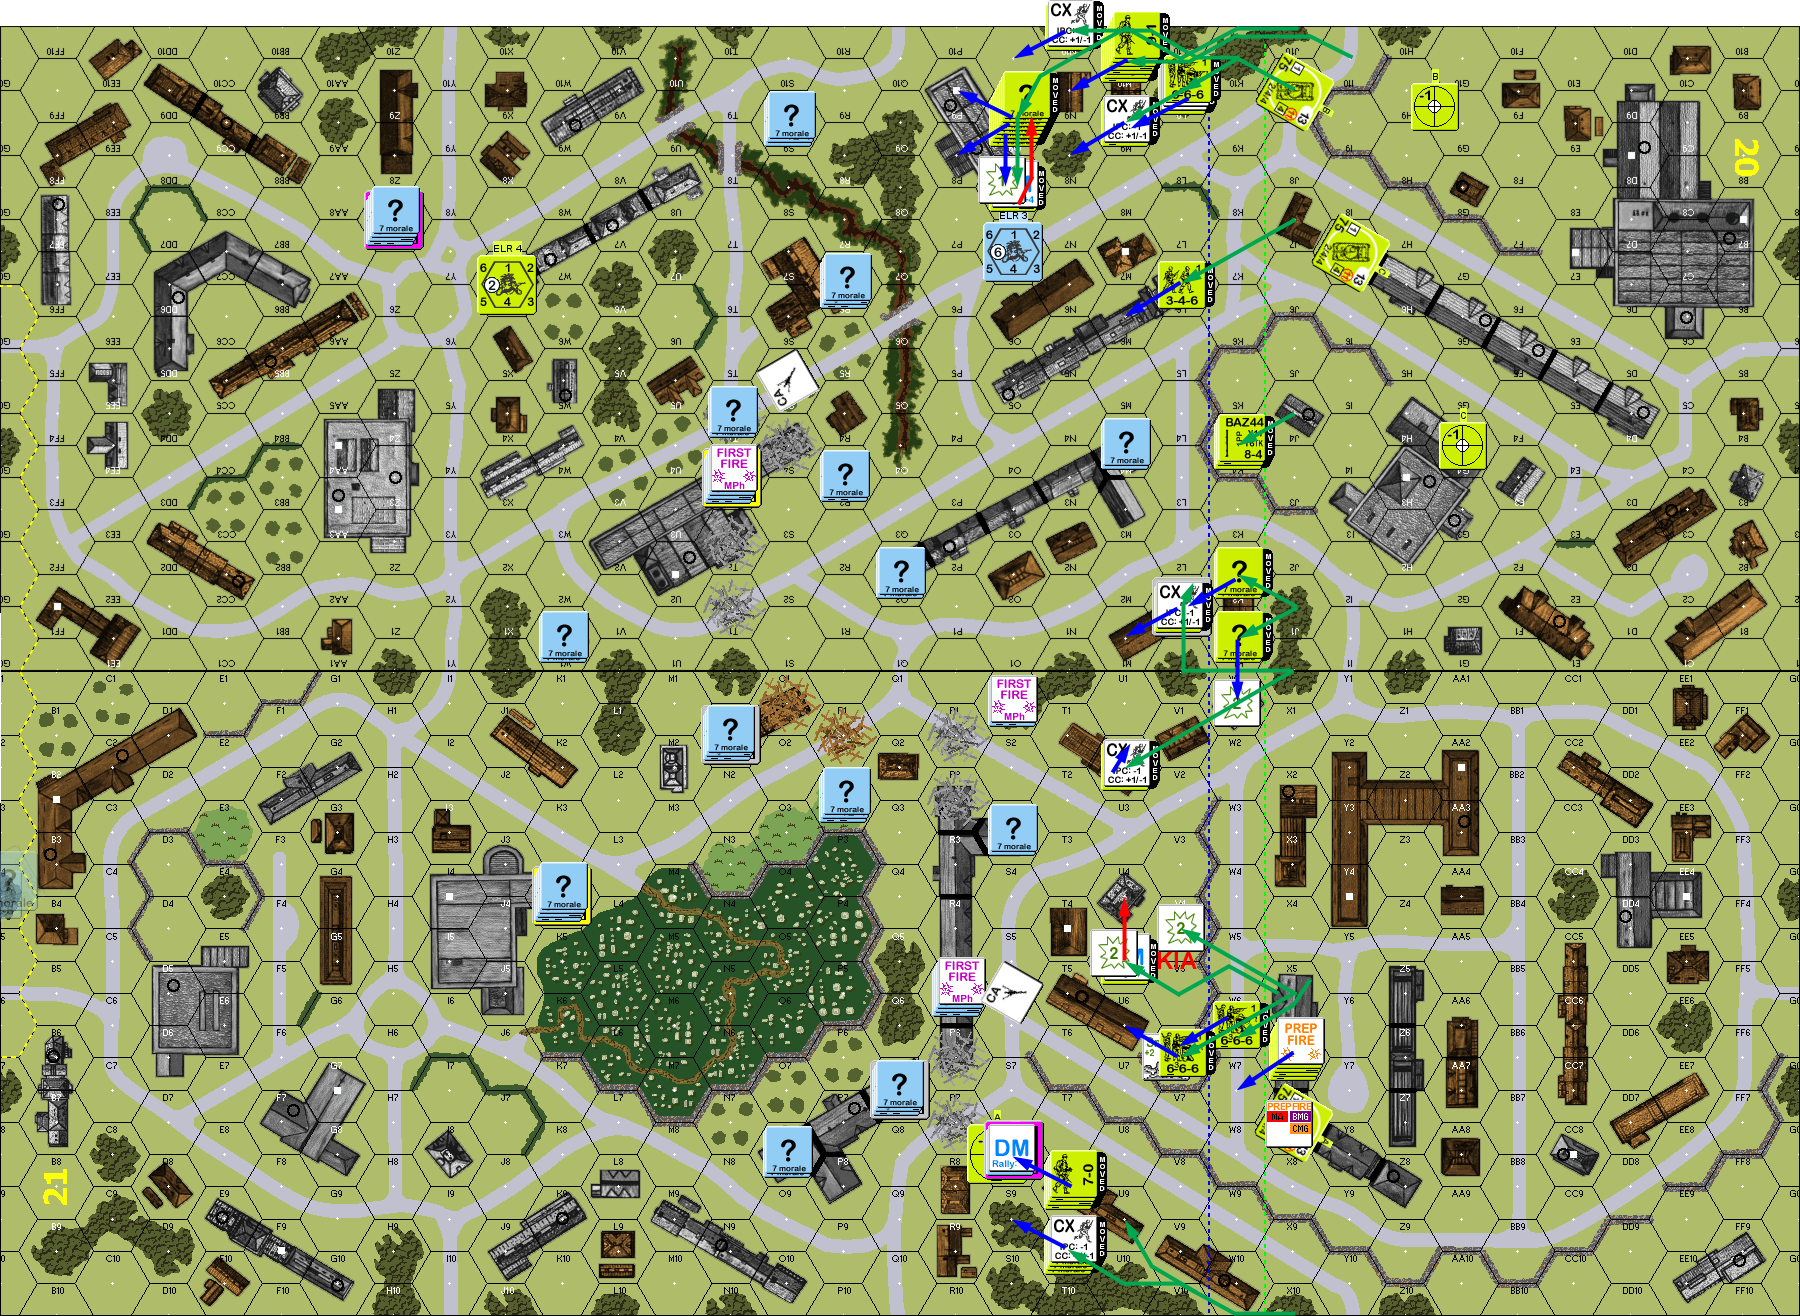
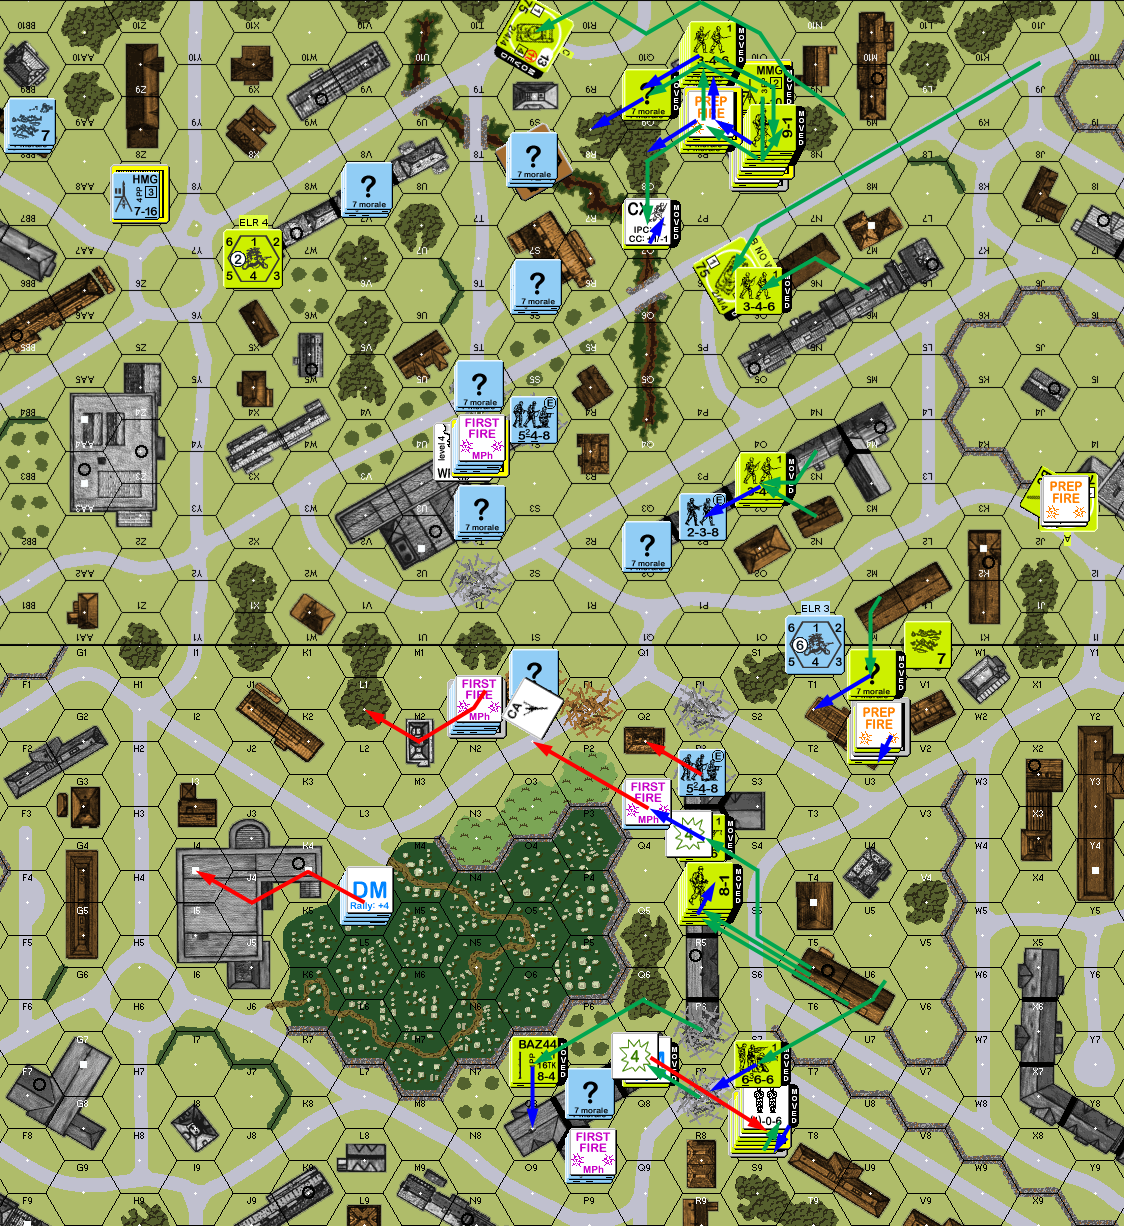
Situation, American Turn 1, showing the entire board. North is to the left.
Naturally, my only broken unit, a HS trapped in the upper levels of 21S8, failed to self-rally on my turn. I prepped with a couple of the MGs, but with bad rolls couldn’t get a result. My plan had been to collapse my defense on whatever point that Tom picked to attack, but this broad-front attack meant I couldn’t do that. My main idea at this point was to try and break up the weak center and then move everyone from there to the east, where the main force was. As a start to that, I shifted a LMG and PSK squad in the center over to east, and then shifted my rear MMG in the west to the center. There was little fire, and none of it had any effect.
Situation, German Turn 1.
Tom didn’t even get his broken leader (now no longer under DM) back for his turn. He smoked in 20T3 with WP from a Sherman, and Mopped Up 20M6 to find there was no one in the entire building (another position I considered too far forward and hard to get out of). To my surprise, instead of moving forward in the east and leaving the MMGs in building 20O8 to provide covering fire, just about everything in the area ended up in the building. I failed to nail the 9-1 with a couple of good shots as it moved up in the building, but I did break the squad with him, and my Sniper activated to reduce his only previously broken squad to a HS.
He also reshuffled his tanks, sending the west-most Sherman east, probably to get near the one easy way through the rubble that I had left, but he cruised along CE, and a low roll from a MMG stunned the crew. Sadly, that was the last dramatic result, and Final Fire only pinned a couple units, even though most of my MGs still had rate.
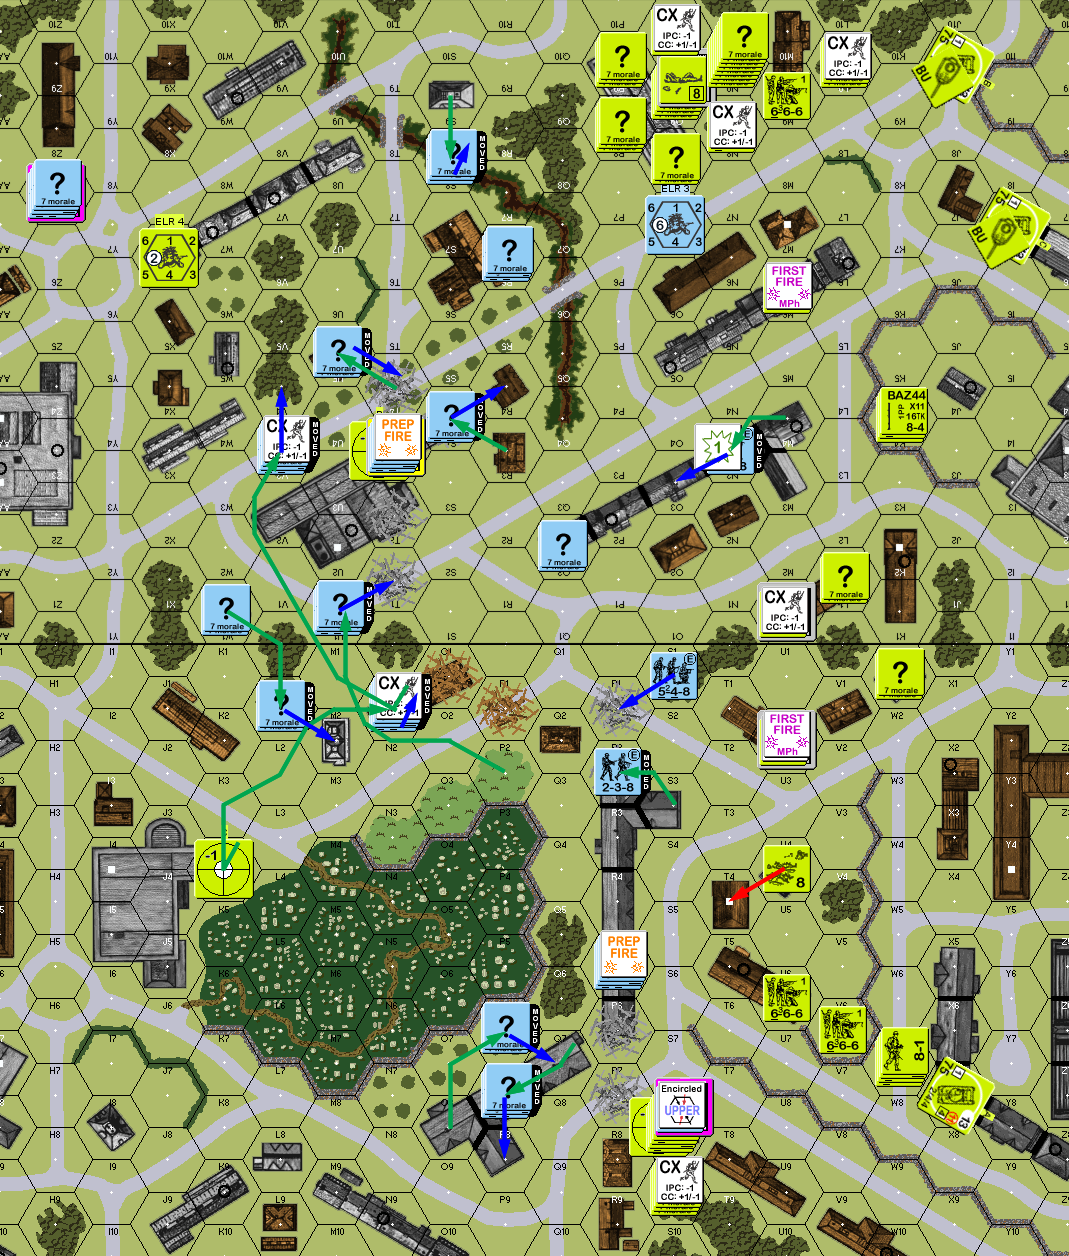
Situation, American Turn 2.
My turn had Gusts, which dispersed the WP covering 20T3 early, which wasn’t entirely a good thing, as it wasn’t going to obstruct the view as I skulked. Tom had advanced to ADJACENT to my trapped HS, which failed to rally thanks to the DM. Meanwhile, he rallied his 8-0 and a squad in 20O9h1. I skulked instead of firing, and there was little he could do to interfere with most of it, but he did break a LMG squad in the west, and pin the leader with him (which necessitated self-breaking him), and pinned a HS that I attempted to move into the hole.
However, in Final Fire, he put together a 24 FP group that broke and ELRed the HMG squad in 20Z7 (though it only battle-hardened the leader into an 8-0). It was easy enough to get him to a sheltered rally location, but there was nothing in range of 21Q5, and the trapped HS in S8 surrendered.
Situation, German Turn 2.
Tom missed his self-rally attempt on a HS, but got his only broken HS back; with DM, I couldn’t get either of my eligible rallies. He smoked (with WP) 20T3 in again, but it took two tries, with the first Sherman having no more WP. He also took a couple shots at the broken group in 21L3 and the MMG in 21N1, but couldn’t get any results. By now, he’d realized that I probably didn’t have any HIP, and started pressing forward with more energy.
I had set up a PSK HS in 20S9 as that area was free of rubble, and a better place for the Shermans to advance. He had hung around hoping for a shot to present itself, but now Tom started moving into the woods and gully there and gave him few good options. Also, while a Sherman did move into the area I’d been expecting, he found a rout that gave me no good shots. On the west side, a couple shots failed to have any effect against a squad that moved into the R3 building, and then a MMG squad moved in after my fire was already tied up. However, an attempt to get into the P7 building failed on a break to my LMG squad. However, the squad that had made it last turn worked around the back, and cut him off from any good way out of the building and it had to be obvious by this point that the backup in there were Dummies.
Final Fire pinned a squad in 21U2, and activated my Sniper, who broke a HS. Advancing Fire broke and ELRed the leader and MMG squad in 21N1, meaning that the entire west half of my defenses didn’t have any backup any more. I self-broke 21Q3 and R2 to get them away from potential lopsided CCs, but the squad could only go a hex, and the HS died to Interdiction (didn’t see the possibility until I was there). He did go into CC in 20P2, but both sides missed to generate a Melee.
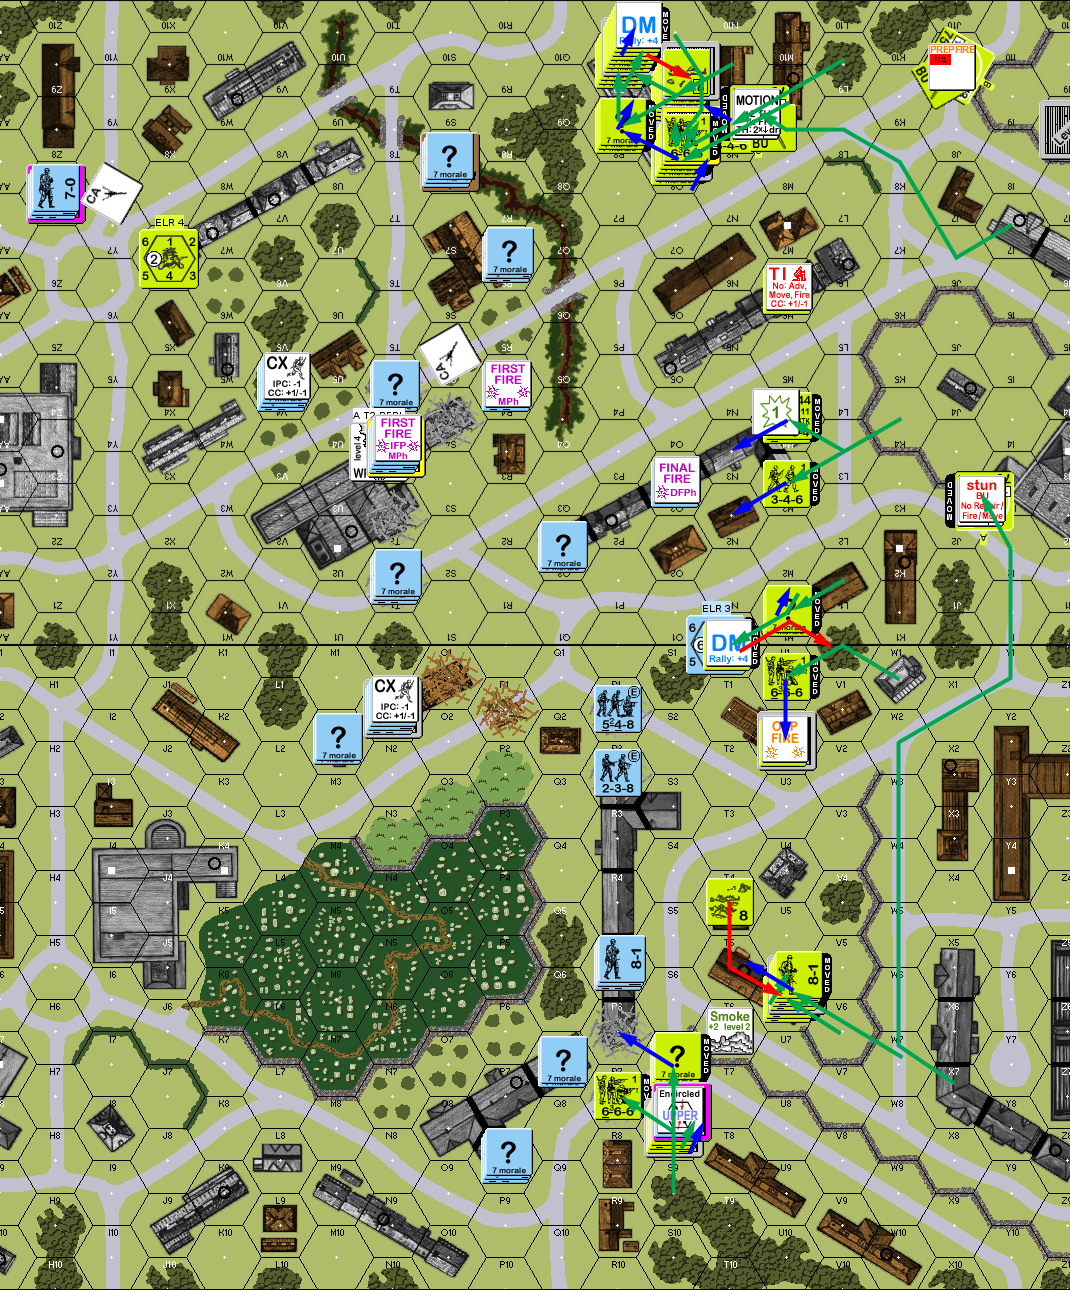
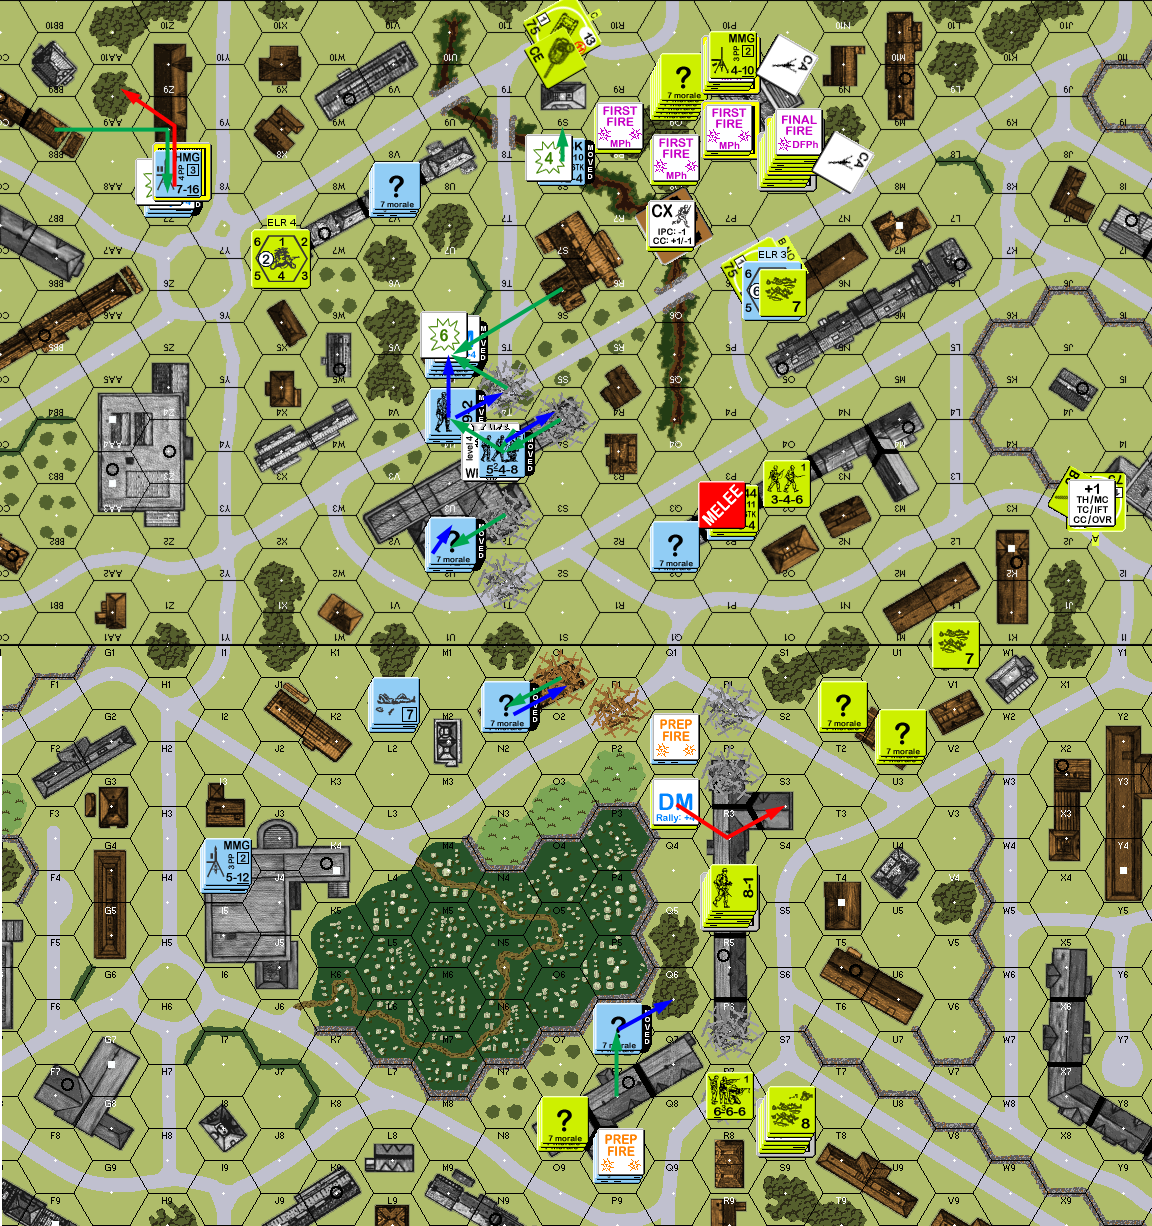
Situation, American Turn 3. There’s even more activity in building 20O8 than shown here.
For my turn, the self-broke squad in 21Q2 self-rallied, and the squad in 20BB8 rallied, but both of my leader self-rallies failed. The self-rallied squad prepped at the squad in the open adjacent to it, and reduced it to a broken 2nd Line HS on a K/2. 21P8, having nowhere safe to go, also prepped, but got no result.
Not having any better places to go, my PSK HS attempted to move out of the gully into 20S9, but he died to a ’12’ on a 2MC before he could exit the hex. Worse, the attempt to move back to the HMG nest in 20Z7 failed when both the leader and squad rolled ’11’s on a 2MC. Happy that I’d tied him up in 20O8 for a turn, I started pulling back in the east, but he managed to break the squad from S6 after it Dashed to safety. The 9-2 went to rally him while the HMG went to T4, where it could fire straight down two roads. The Melee in 20P2 continued with no losses.
Situation, German Turn 3.
In Tom’s RPh, his only activity was self-rallying a HS in 20O6, and transferring prisoners. My just re-broken HMG leader and squad in the northeast both rolled ‘2’s and battle hardened (the leader would have gone berserk if anyone had been in LOS) and the squad generated a Hero. Additionally, the squad in 20U5 rallied. However, the leader self-rallies in 21L1 and 21I4 both failed, leaving both MMGs completely out of commission, and leaving me with no backup for the very thin western side for his turn.
Prep fire from the 20O8 building generated two shots at U5, a 1MC and NE, which knocked out a Dummy, but otherwise had no effect. Unfortunately, all my DFF had no effect, including a fairly nice 8FP +0 shot at 1.5 squads +8-0 w/FT (I did get a PTC against the FT, but he passed). During DFPh, I did pin a squad in 20O8h2, but that’s the only effect I had on him during the turn. He advanced another HS into the Melee, but it was unneeded as he finally got a low roll, while my 2FP HS was able to CR his HS on a 1:2 attack.

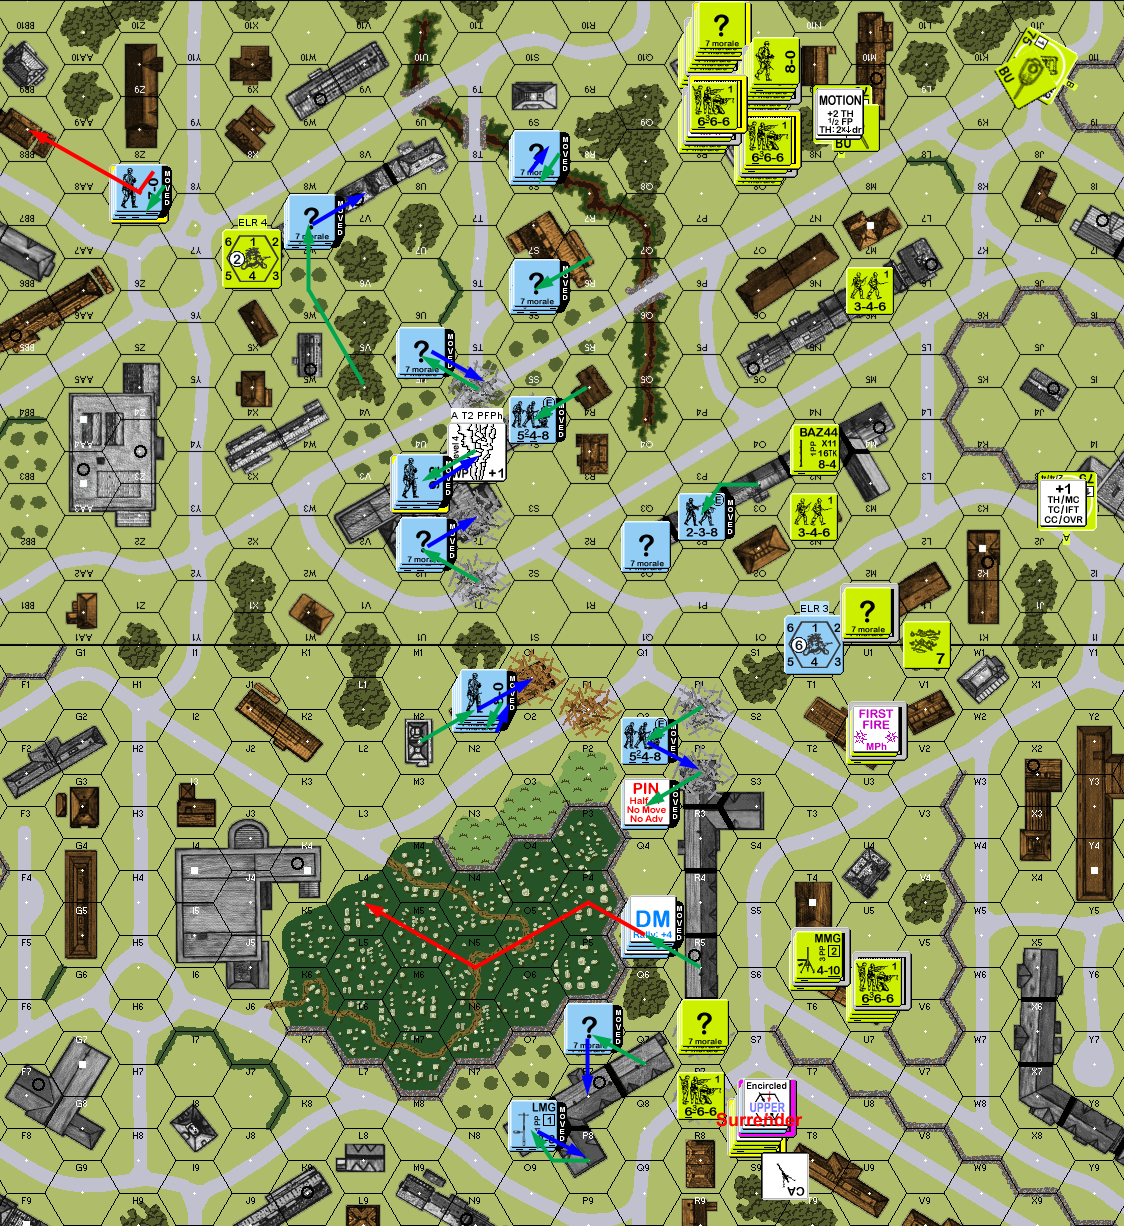
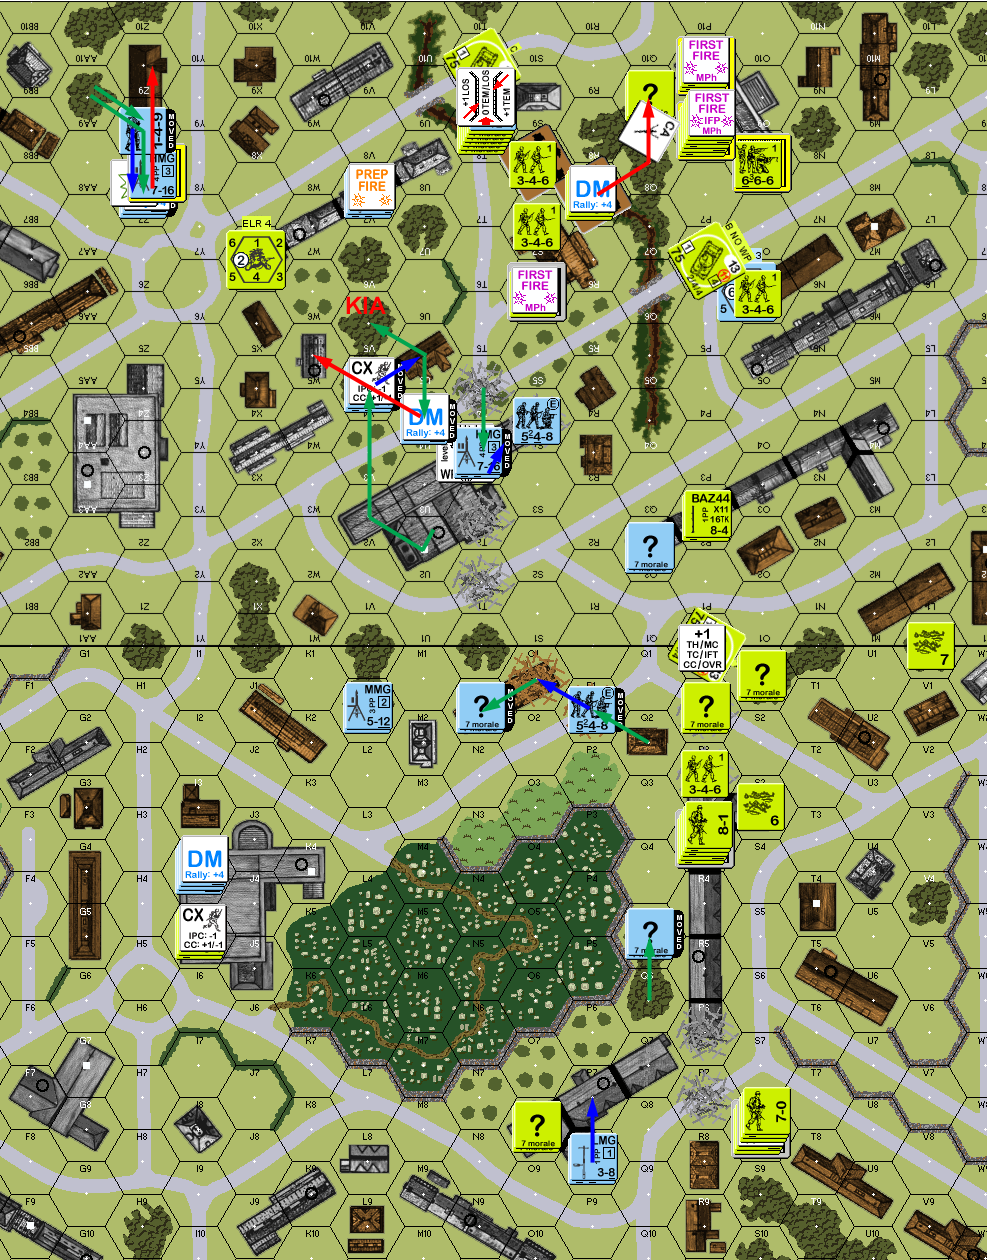
Situation, American Turn 4.
My turn started even worse, as not only did nothing rally, but my leader in 21L1 died of a wound generated by a ’12’ rally. Meanwhile, Tom rallied a squad in 21S8 that he had forgotten last time. I Prepped with 20V7, and this time he broke and ELRed a squad hiding in the nearby gully.
My second attempt to get back to the HMG in 20Z7 went almost as bad as the first one as a 20FP shot generated a 3MC that broke the leader and squad (but didn’t ELR them this time). I started shifting to east again, to get in the way of the large number of Americans crossing the gully, but lost a squad+LMG to a 1KIA, and then the 9-2 broke to a NMC as he tried to Dash across to the U2 building. A fair amount of Final Fire didn’t do any more damage, despite pounding a couple positions.
Situation, German Turn 4.
Tom self-rallied a HS in 21V0 and got his squad back for his RPh, while none of my DMed leaders could rally. I had made the mistake of thinking in terms of familiar East Front No Quarter games, and routed my guys inside of building 21J3, and Tom just Mopped Up the building to capture them. Of course, the only other choice had been I3, and they would have been trapped and surrendered in the RPh, as there was no place left to go. Meanwhile, a fair amount of his forced Prepped again, smoking in 20T3 again (much more effective without the 9-2 present), and broke U5 and V7, leaving me very little still active on the board, and most of that in the center.
With much of the front wide open, he rushed guys forward, infiltrating around broken units to DM guys in the back, and force surrenders. Most of what fire I had was ineffective, but 21O1 managed to kill a HS with a K/1, and force a passing Sherman to BU with a Pin.
In APh, he moved in and eliminated a couple of Dummy stacks that were still wandering around, and engaged 21P7 and O1 in CC (the latter had also been Pinned by his advancing fire). Despite the disadvantage in FP and the Pin, both CCs went into Melee with no losses.
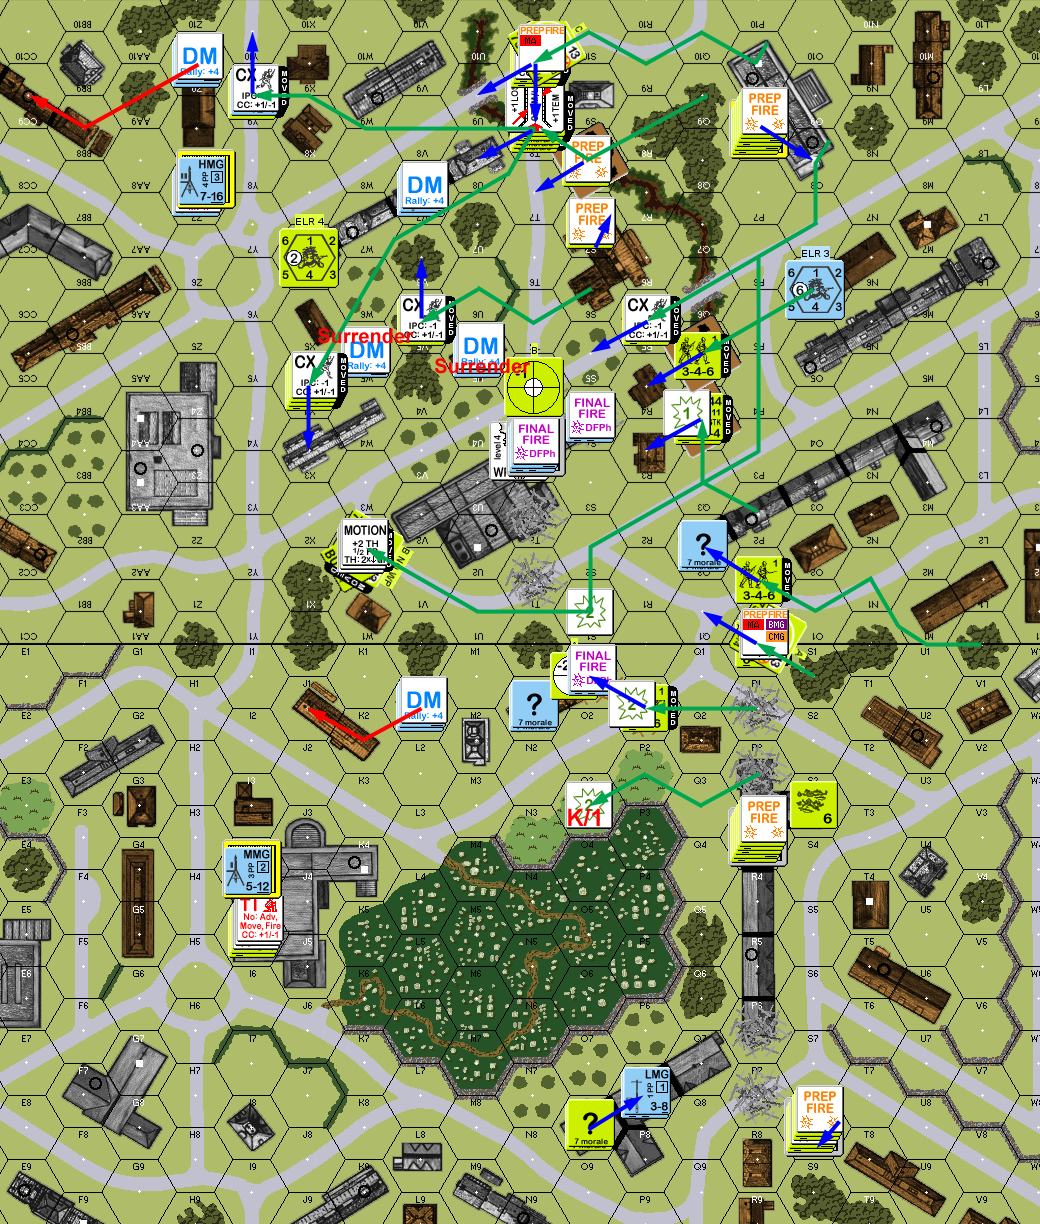
Situation, American Turn 5.
Afterword
I didn’t actually concede the game until the American Turn 7, but that was the effective end of the game, and the following two turns were an exercise in making sure Tom did not screw up securing his victory. At this point, I had the AA (hidden in the back-row woods hex of 21A4), two GO squads (one with a HMG), and no leaders. By two turns later, 21P7 was still in Melee, and the AA crew had just revealed themselves after missing a PF shot at an adjacent Sherman. Everything else was gone, and he was set up to exit most of his forces on the following turn.
I’m still fairly happy with my setup, and Tom complemented the rubble, which accomplished the twin goals of making it difficult for the Shermans to advance with the infantry, and give me cover if I needed to laterally shift my troops. I felt that he invested way too much in shooting it out from the 20O8 building, and held up his advance too much, even with a generous 9.5 turn schedule, but it certainly worked for him. Doing it again with HIP… I’d probably put the PSK HS in 20T10, and wait for a Sherman to get close to what was deliberately one of the best ways through. Considering the importance of O8, I’d be tempted to HIP a squad in O9h2, and try to Ambush a MMG squad (it is the one place he didn’t move through at first), but with 5:6 FP in CC, that’s just not a good deal.
Maybe it’d be better to just rubble 20O8 and P10 (the two stairwell hexes) to get rid of the only large building near the jumpoff line. 20Z7 was a mistake. HMG nests need other ways to get into and out of them, and I just couldn’t stand up to the FP he could send in there. T3 with S4 and T2 rubbled worked about as well as I expected, even with it being smoked in all the time (I was hoping for more ammo depletion on the WP).
Things really started to turn south during turn 3, when both MMG units broke, which got rid of most of my ability to protect the thin front line. It went from bad to terminal during turn 4, when both failed to rally on multiple good rolls, and then one leader died. Speaking of luck, I’ll note that I’ve had a ‘6’ SAN completely save a game for me before, but he only went off twice here. Which is a fairly good result for the number of checks there were, which says something about how rare ‘6’s were from Tom.
…Most importantly though, Tom outmaneuvered me. The extreme west end had a hole in it, and he got his guys into it, and slowly wedged that hole into a complete collapse on that end. In the east, he slowly pressed his way into, and across, the gully, and when I broke there, he made sure I’d never get a chance to recover. I probably should have pulled back a little faster in that region, which would helped, but with the time he had, I needed to keep him to a fairly slow crawl, and that worked out—to a point.
Discussion ¬