Rindis.com

All my hobbies, all the time
  • Home
  • My Blog
  • Games
  • History

Categories

  • Books (504)
  • Comics (10)
  • Gaming (919)
    • Boardgaming (675)
      • ASL (155)
      • CC:Ancients (83)
      • F&E (78)
        • BvR – The Wind (26)
        • Four Vassal War (9)
        • Konya wa Hurricane (17)
        • Second Wind (5)
      • SFB (78)
    • Computer games (162)
      • MMO (77)
    • Design and Effect (6)
    • RPGs (66)
      • D&D (25)
        • O2 Blade of Vengeance (3)
      • GURPS (32)
  • History (10)
  • Life (82)
    • Conventions (9)
  • News (29)
  • Technology (6)
  • Video (50)
    • Anime (48)
  • Writing (1)

Patreon

Support Rindis.com on Patreon!
Become a patron at Patreon!

Other blogs:

RSS Inside GMT

  • Defiance AAR: North Jersey, July 2026 — Chili Dogs and Chit Pulls July 20, 2026

RSS Playing at the World

  • Playing at the World 2E V2 Arrives May 5, 2025

RSS Dyson’s Dodecahedron

  • Barin’s Stonehold July 20, 2026

RSS Quest for Fun!

  • The Expense Post May 24, 2026

RSS Bruce Heard and New Stories

  • Pain, Exhaustion, and Morale in D&D BECMI June 7, 2026

RSS Chicago Wargamer

  • The 2 Half-Squads - Episode 310: Cruising Through Crucible of Steel January 27, 2023

RSS CRRPG Addict

  • Al-Qadim: Bottle Shock July 20, 2026
SF&F blogs:

RSS Fantasy Cafe

  • The Leaning Pile of Books July 5, 2026

RSS Lynn’s Book Blog

  • Top Ten Tuesday: I’ve gone with a freebie July 21, 2026
ASL blogs:

RSS Sitrep

  • Cardinal ASL Sins March 18, 2026

RSS Hong Kong Wargamer

  • FT114 Yellow Extract After Action Report (AAR) Advanced Squad Leader scenario April 16, 2025

RSS Hex and Violence

  • This still exists? March 25, 2025

RSS Grumble Jones

  • Grumble Jones AAR for Crucible of Steel Scenarios on the YouTube page. July 20, 2026

RSS Desperation Morale

  • How to Learn ASL March 16, 2025

RSS Banzai!!

  • October North Texas Gameday October 21, 2019

RSS A Room Without a LOS

  • [Crossing the Moro CG] T=0902 -- Rough start July 18, 2015
GURPS blogs:

RSS Dungeon Fantastic

  • Felltower - Monsters Fleeing between Sessions vs. PCs replenishing June 28, 2026

RSS Gaming Ballistic

  • Mission X and Genre Fidelity in Combat July 19, 2026

RSS Ravens N’ Pennies

RSS Let’s GURPS

  • Review: GURPS Realm Management March 29, 2021

RSS No School Grognard

  • It came from the GURPS forums: Low-Tech armor and fire damage January 29, 2018

RSS The Collaborative Gamer

  • Thoughts on a Town Adventures System January 18, 2022

RSS Don’t Forget Your Boots

  • GURPS Supers Newport Academy #7: “Invitation to the future.. of the 1970’s” July 5, 2026

RSS Orbs and Balrogs

  • Bretwalda - Daggers of Oxenaforda pt.4 - Fallen King May 27, 2017

The King’s Own

by Rindis on June 26, 2019 at 12:00 pm
Posted In: Books

Covenants, the first book of Lorna Freeman’s Borderlands series circles around and comes to an end pretty much where it started. The King’s Own picks up very shortly after this, and has the further adventures of Rabbit after the Border Patrol returns to Freston.

However, while Rabbit is still the central character, there’s a fairly extensive changeover in the rest of the cast. Some carry over, but Suiden and most of Rabbit’s unit are largely absent as Rabbit gets transferred from the Border Patrol (Horse) to the King’s Own Guard. This means that King Jusson IV and his inner circle take over as the bulk of the supporting cast, and the King is visiting as part of a progress to make sure everything’s nailed down after some of the events of the first book.

Of course, Freston, a place so safe that politically sensitive officers and men can be assigned to it isn’t safe. Whereas the first book was an extended trip with three major locales during the course of it, everything here happens in or around Freston itself. There’s some really annoying parts, where important happenings get basically ignored for other events until things circle around and the first bit bites everyone again. There’s a lot of that here, and one part of it is more a problem with delivery. Someone is trying to meddle with Rabbit through his dreams, and this doesn’t really go anywhere because, well, they’re dreams, and Rabbit doesn’t have any clear memory of them when he wakes up. But it’s told clearly with Rabbit’s normal lucid narrative, so you get even more info that the characters aren’t acting on.

However, some of the problems of the first book are much improved. Freeman had a habit of dropping wild, over-dramatic pronouncements as a end-of chapter… ‘cliffhanger’, and then the next chapter would pick up a few minutes later after things have been partially sorted out and calmed down again. There’s some true cliffhangerish bits here, but the bait-and-switch melodrama is gone, which really makes the entire book flow better.

As can be expected, there’s a fairly large cast, lots of action, lots of Rabbit (less, actually) being clueless, and something of a pretty creepy mystery for the first half. Sadly, there is still something of a habit of perfectly competent bad guys suddenly throwing out their smarts in a panic when Rabbit gets near, though there’s much better reasons for most of that this time. Overall, still an extremely good story, with some real improvements over the original.

└ Tags: books, fantasy, reading, review
 Comment 

Konya wa Hurricane Alliance Turn 18

by Rindis on June 22, 2019 at 12:00 pm
Posted In: F&E

My ongoing F&E game with Byron continues to go slow; both of us have delays, though I’ll admit to being the bigger source of them.

The overall Alliance economy grew 32EPs this turn (after exhaustion effects. The Kzinti capital came out from devastation to pump another 13 points into their economy (before exhaustion), the Federation is still liberating their territory and picked up 23 points, and the Gorns picked up a province. The Hydrans lost a point, but the situation there is becoming more and more untenable for the Coalition there, and there is now a Hydran BATS over the capital.

Builds:
Federation: DVL, BC, TG, NCA, 10xNCL, NVH, NSC, 3xDW, 2xDWA, 5xFF, 4xFFE, NCL->NSC
Kzinti: CV, NCA, 2xCM, MEC, 3xDW, 4xFKE, CV->CVH
Gorn: DNH, BC, CMV, HD, TG, LTT, BDE, 4xDD, CL->CLE
Hydran: LGE, RN, MKE, DWE, 3xCU, PGC, PDU

Despite having a couple B10s available, the heavy ship situation is sliding away from me with Byron building two excellent heavy raiders, and the Gorns already having their DNH. He’s also getting into heavy fighters, though I have a few of those already thanks to the Lyran CSV.

The Hydrans moved the LGE and new PGC into the Raid Pool and concentrated on picking off garrisons in their space, killing a LTS, crippled F5, and F5S as well as disrupting a Lyran province. The Kzinti disrupted one Lyran province, one Klingon province as well as hitting a Lyran-held Kzinti province and killed a Lyran DW garrisoning Kzinti space. The Federation put the DVL into the Pool and hit three garrisons in their space and disrupted three Klingon provinces. The Gorns hit two ships in their space (one of which evaded, and the other was lost), and two more in Federation space. A DNL took a lucky hit from the Klingons to be crippled, while a WE reacted out of a Federation Raid to a Gorn one (targeting a SNB), the WE then evaded, but the SNB failed its cloak roll and was killed.

There is always some gratification in seeing a fair number of crippled enemy ships heading out of your space for repairs; sadly he has the money and facilities to make sure they return while I continue to struggle with my backlog. And another note to show how things are going is that Byron moved the Kzinti FRD in the Barony into the capital.

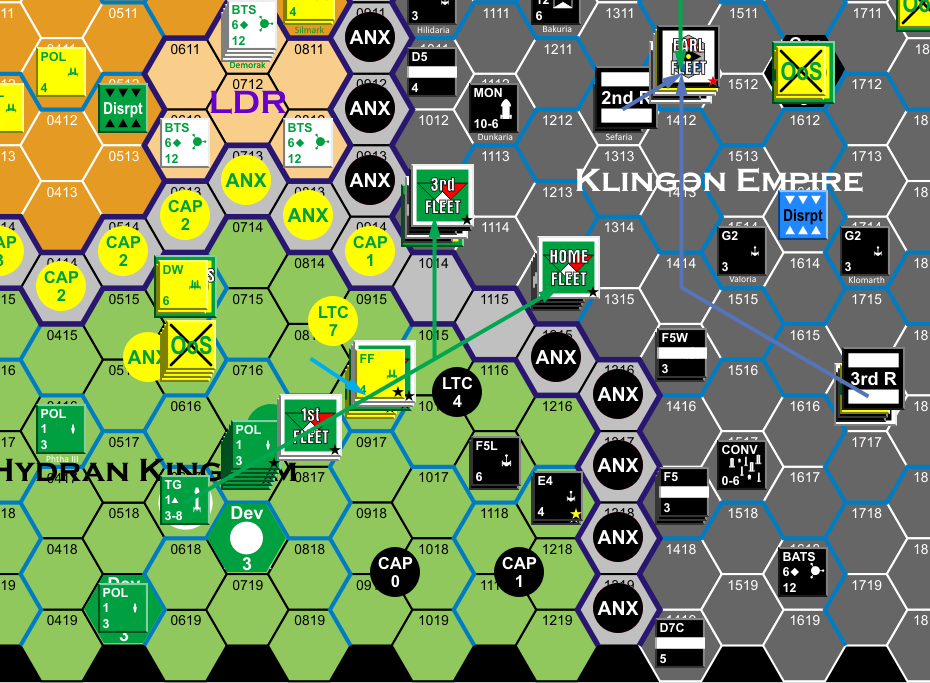
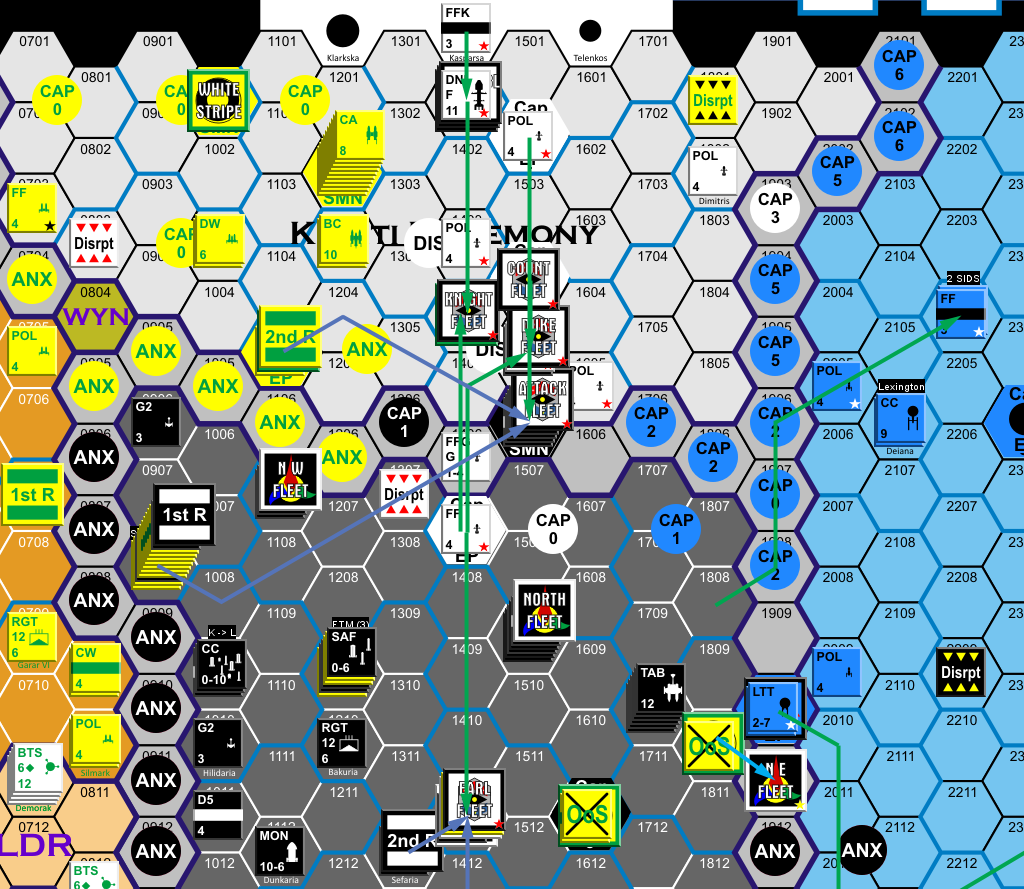
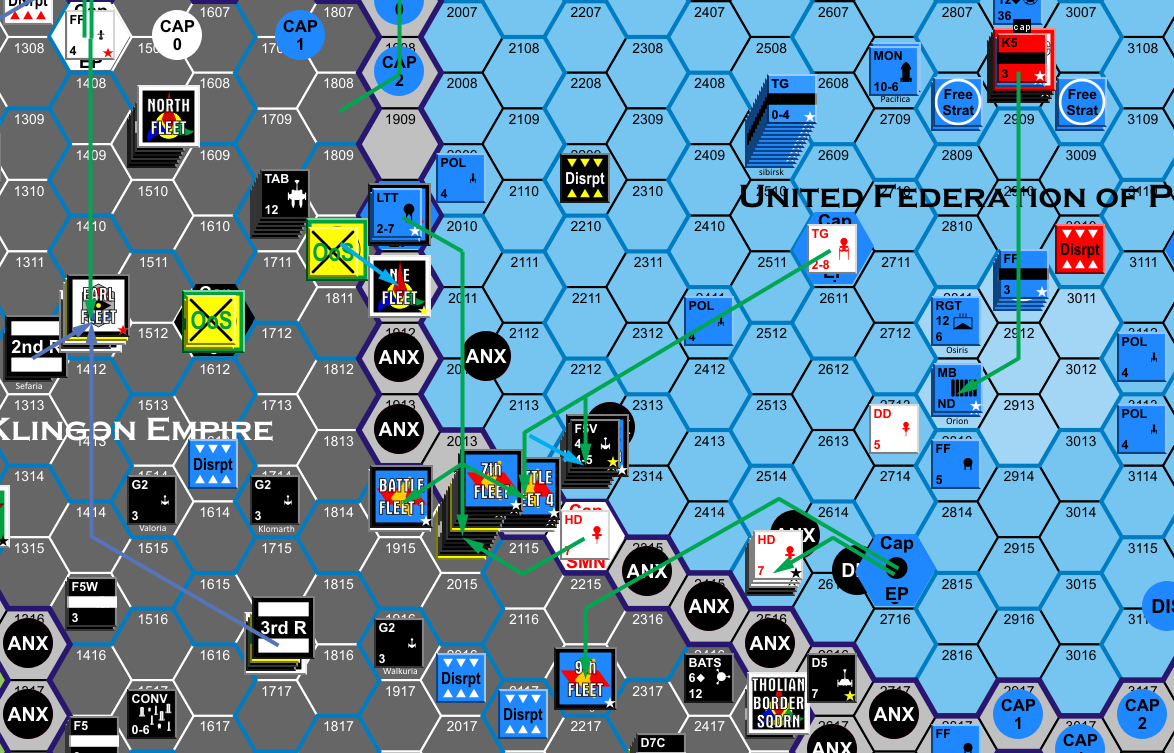
The Hydran fleet moved out to Klingon space, overwhelming my remaining pinning forces again, and hit the next BATS in line. The Kzinti mostly occupied themselves fighting in their own space on the supply line to 1407, but also sent a fleet back to the Klingon capital. Meanwhile, Federation moves concentrated in southern Klingon space, largely going after my depot in 2014 (original Klingon border BATS + Lyran BATS + auxiliaries), as well as the minor planet in 2216.

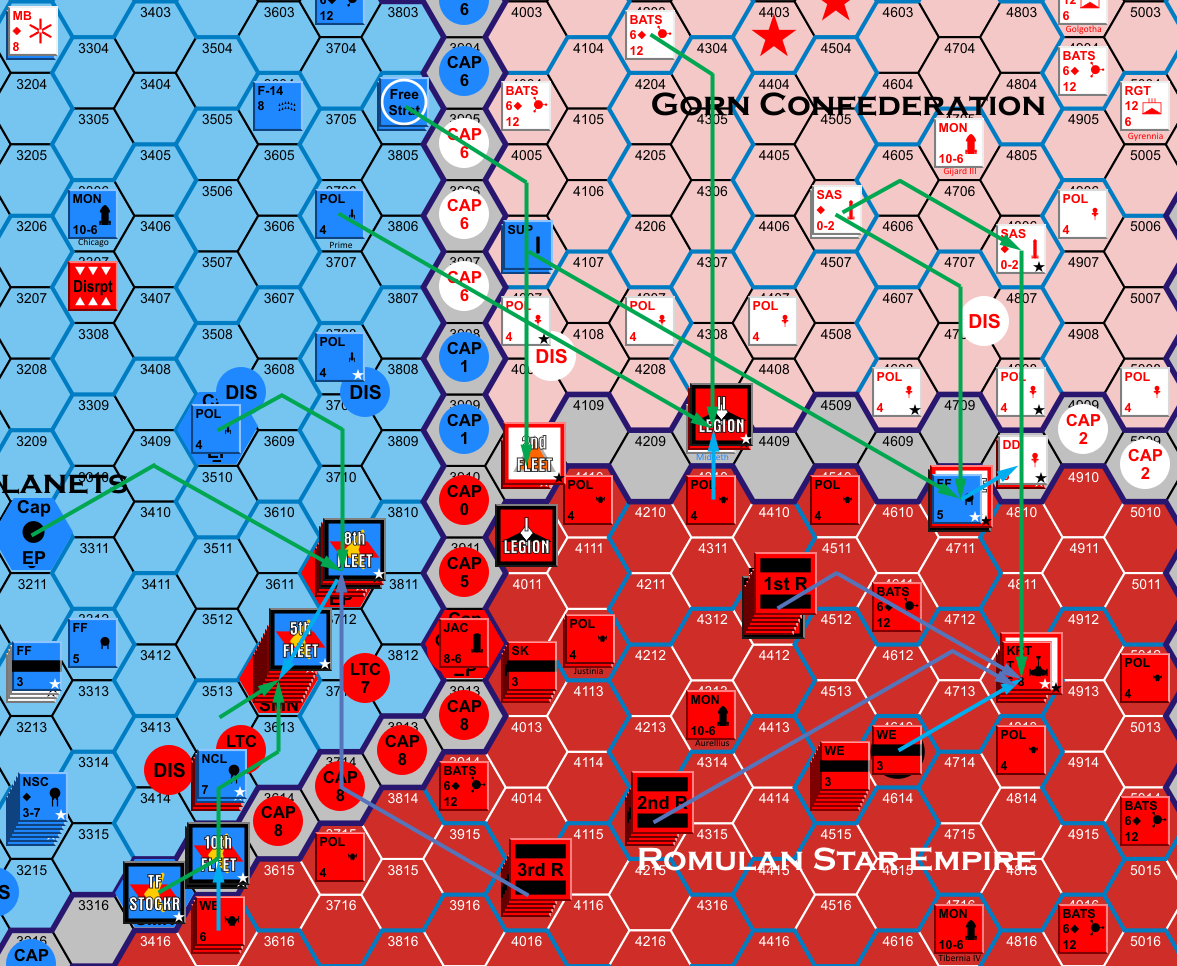
On the Romulan border, Federation forces shifted back northward (not everything shifted, but there were no offensives in the SW ‘wing’ of Romulan space), putting a large number of ships on the two Federation planets just within their border. The Gorns tried to draw the Romulans out with moves that stopped just short of the border. One happened late, and landed on the NZ planet with intent to take it, so I reacted out to defend it. Over in the east, he pinned a force on the last BATS in line while moving a fleet unopposed to the 4812 SB.


Hydran theater.


Kzinti theater.


Klingon theater.


Romulan theater.

While the Romulan priority has been to try and hold on to the planets at the corner of Federation space, the SB trumps that and two reserves went there, leaving only one to go to 3711. Similarly, two Klingon reserves went to their capital to try and keep the Kzinti out while the mess there is cleaned up. A Klingon and Lyran reserve went to save 1506, and one Lyran reserve was out of range of all combat (the third one was already at the Klingon capital).

Battles:
1505: SSC: Klingon: dest F5L
2515: SSC: Klingon retreat
3514: SSC: Romulan withdrawl + cloaked evasion
4009: Romulan: dest SN
1013: Klingon: dest F5; Hydran: dest CU
1214: Klingon: dest BATS, 2xcripF5
0916: Lyran: crip CW, DWG, FF; Hydran: dest CU
0816: Klingon: dest E4; Hydran: dest DG
1404: Lyran: dest DWS
1506: Lyran: dest FF; Kzinti: dest EFF
1411: Klingon: crip F5E; Kzinti: dest FFK
2216: Klingon: dest 2xPDU; planet captured
2213: Klingon: dest cripF5
2014: Klingon: dest BATS, LAV, 2xFTL, crip AD5, E4A, capture NCL; Lyran: dest BATS; Federation: dest NCL
2114: Klingon: dest D6; Gorn: crip CMC, capture D6
1914: Klingon: dest D7; Federation: dest FFE, crip FF
3515: Romulan: crip SKE; Federation: dest FF
3612: Romulan: dest KE; planet captured
3711: Romulan: dest NH, KRC, KE, 2xSP, SKE, 3xSN, crip SPB, SPM, SK; Federation: dest CF, crip 2xCA, 5xNCL, DW, DWA, FFB, FFE, planet recaptured; Gorn: dest DD, crip CLE, COM, 2xBD
4309: Romulan: dest SKG; Federation: dest 2xNCL
4710: Retreat after refused approach
4809: Romulan: dest CE
4812: Retreat after refused approach

The Gorns tried to pick off a pair of D5s in 2515 with a HD, BD, BDS squadron (giving me a -4 disadvantage in SSC), but the Gorns were way too overconfident (‘2’ on 2d6…) so the Klingons pulled out with no damage to find a better day to die.

Mostly the Hydran front was a bunch of walk overs where they sacrificed frigates (often with half their line consisting of such, including one ad hoced into the outer escort slot of a carrier) for better damage, but in 0816 a good Klingon force, good die rolls and a heavy EW advantage allowed me to kill a cruiser.

The Alliance’s return visit to the Klingon capital took some thought. My reserves plus BG Harbinger was a good force, but the Kzinti fleet was also large (though bulked out with FFs) with good fighter reserves. I eventually decided to accept approach and try to do some damage before he came in to finish off the crippled secondary SB. I managed a denser line (B10V Insatiable was a big help), and a 1-5 split on the die rolls allowed me to do twice as much damage, and the Kzinti left. With my denser line, I had an advantage on approach, I had a D5M to kill ships, and if it went the full three rounds of approach, the Kzinti force wouldn’t be very effective when he finally got to the defenses.

Klingon infrastructure continues to collapse with the Federation taking a planet in the southern Empire, and the loss of the dual BATS (Klingon/Lyran) in 2014. I still had a number of auxiliaries staged there and lost them all for little more than fighters. I did have enough to direct on an NCL the first round, and a lucky ‘2’ captured it, and it survived pursuit. In the next battle, the Gorns returned the favor to capture a D6. Byron isn’t too big on using captured ships (…and he is building enough already), so he may scrap it. Certainly the expense of turning it into something good like a D6S seems a bit excessive.

The Romulans aren’t entirely out of Federation space yet, but Byron did a good job getting them off of the two planets there. I had a single small line at 3612, and retreated out rather than see half of it crippled, giving up a KE in the process (I had hoped to evade out, but the VUL failed on the first roll). The combined Fed/Gorn fleet over 3711 was a lot bigger than mine, though my fighter reserve was a little bigger. I stuck it out a few rounds, forcing him to take decent casualties with overall good rolls, while losing ships to the DNT. Byron crippled an entire SPB group on the first round, which gave me a real problem as it was going to be vulnerable in a retreat. Stuffing a BHF into the group and going for -3 leftover points helped, but I did also run him out of a lot of ships including parts of his carrier groups and all the fighters.

Meanwhile, in 4309 we had a round of combat that neither of us wanted over the neutral planet in the Gorn-Rom NZ. Byron was going to retreat out after offering approach, but I didn’t want him stripping the defense PDUs to make seizing it easier later, so I accepted. I certainly came out ahead, but the Romulan navy is still feeling a bit fragile.


Coalition: 381.3 EP (x2) + 520 (bases) + 795 ships (/5) = 1600.6
Alliance: 446.4 EP (x2) + 445 (bases) + 860 ships (/5) = 1681.8

So not only has the tide turned, but the Alliance is now officially winning on VPs, much earlier than I had expected. This is a combination of the Coalition economy contracting at a furious pace, and the Alliance picking up about 100 VPs. Most of that is also the economy, and the fact that most of that is the unreduced Federation economy just makes it worse. Overall, my ship count is almost exactly the same as last turn, but the Romulans lost 8 ships overall, which was made up for by the Lyrans having a quiet turn. The Alliance has picked up 45 ships overall; more or less spread around, though the Federation alone is up by 23.

The good news is that I had no real disasters this time. Losing the double-BATS at 2014 for relatively cheap hurts some, but it was certainly an important target, and I do have bigger worries. I’m more surprised that the Kzinti did not spend any real effort trying to take half their space back from the Lyrans, or that if they were going to to go for the Klingon capital again, that there was no Federation help.

└ Tags: bgg blog, F&E, gaming, KwH
2 Comments

A Minor EU

by Rindis on June 18, 2019 at 12:00 pm
Posted In: Computer games

This is the twelfth in a series of reviews of Paradox’s empire management games. See the earlier reviews here:
Europa Universalis II: A Tale of Two Europas
Hearts of Iron: Europa of Iron
Victoria: Nineteenth Century Essay
Crusader Kings: A Dynastic Adventure
Hearts of Iron II: Return Engagement
Europa Universalis III: A Whole New World
Europa Universalis: Rome: Make a Desert and Call it a Game
Hearts of Iron III: One Plus Two Equals Three
Victoria II: Same But Different
Sengoku: Shogun: Only War
Crusader Kings II: The Second Crusade

At the end of 2009, French independent development studio AGEOD was acquired by Paradox Interactive, and renamed ‘Paradox France’ as a separate internal development studio. The first/primary project of the new arrangement was to take one of their best titles (Napoleon’s Campaigns), and do a sequel in Paradox’s Clausewitz engine. Unfortunately, this did not work out, and Paradox France, while still owned by Paradox Interactive, was eventually renamed back to AGEOD, and still develops games under its own AGE engine.

Napoleon’s Campaigns II was retitled March of the Eagles and brought over to Paradox Development Studio for a complete rework. The final game is in many ways typical of Paradox’s pausable real-time empire management series (as opposed to the turn-based, and more traditionally wargame mechanic feel of AGEOD’s games), and was released for PC in February 2013, and on Mac in May. There were two minor patches, but the game did not get any long-term attention.

Locale

MotE covers 15 years of the Napoleonic Era, from 1805 to 1820, with an area map that covers Europe, North Africa, and the Middle East (Crusader Kings II provided the initial basis of the map). Like all of PDS’s other games, this is a pauseable real-time game, though with the short time scale, there’s eight periods per day, instead everything happening purely by each day. This mostly just gives battles more chances for events, as movement, construction, and so on, just happens at the start of each day.

The map is fairly detailed, with lots of provinces, but some are much more important than others. All of them have terrain, a development level, and roads, but only some have cities, or fortresses which form the basis of war goals, and taxes. While all provinces have a name that appears if you zoom in close enough, cities and fortresses have name plates that appear much further out, which also indicate that they can be garrisoned with military units stationed inside them (and those that are garrisoned will have an appropriate national flag next to the name plate).

Each province can be built up, but only cities will ever generate taxes, and most things are fairly expensive. With the relatively short time-span, improvements have to carefully judged. Depots can be established to improve local supply limits, recruiting times, and manpower. Roads also help with supply as well as speeding movement; development of a province does the same, but also increases the amount of money generated (with a multiple, and most provinces have a base tax of ‘0’), but this can be very expensive.

Forts and ports can also be built and upgraded in each province, with the fairly obvious defensive military benefits for forts, while ports help with shipbuilding and repair, and also provide some money from harbor taxes. There’s no technological or other restrictions on any of these, just the fact that it’s a big world, and there’s only so much time.

Dominating Europe

As usual with a Paradox game, you can play as any country you like on the map. However, only the eight major powers have proper goals. Like in Sengoku, there is an actual goal to work towards: establish both land and naval dominance.

Each of the major powers has its own list of ten provinces for land dominance, and ten more for naval dominance. Any country that can get seven of it’s list can gain dominance, and if it can be dominant in both, it wins at that point. France and Britain are accorded their central place in the period by France already having land dominance when the game starts, and Britain already has naval dominance. Complicating dominance gain is that you cannot become dominant in a category if someone else already is, so victory probably means defeating another power (or two); however, dominance is judged by current control, so a temporary shift in control during a war is enough for a change-over.

If no one manages to hit both lists of goals in fifteen years, then the country with the highest prestige will win a minor victory, so a smaller country could win by going the full distance, and picking up lots of prestige in the process.

Ideas

There’s a number of ways that each country is a bit different from the others: the ruler and his abilities (and historical changes are given in events), different government types, and bonuses they give, and the available generals and admirals are based on actual historical performance and availability.

However, each country has the ability to adopt ideas as the game goes on to emphasize certain traits and gain bonuses. There are seven general categories with five ideas each (which must be gotten in sequence), and then the major powers each have a unique eighth category as well.

This general concept had shown up previously in EU III and EU: Rome, where some of them were available at the start, and others became available as technology progressed. Here, you can only get at later ideas in a group by getting all the preceding ones. Since some of them mix and match naval and land bonuses, this can cause annoyance for a country focused more on one or the other. Also, unlike the other two games, you cannot change out an idea you’ve taken for a different one; it’s purely building up bonuses, instead of determining what you need right now.

Each month, every country gains 15 points for spending on ideas. Some countries get events that grant more points in a lump sum, or as a bonus every month for a year or the like. Gaining an idea costs 200 points, and when that number of points has been stored up, an alert appears letting you know you can get a new bonus. In addition, you can easily see what ideas other countries have gotten by looking at their diplomatic view.

Finally, every battle fought generates idea points. Both sides can get points, but the side that was defeated will generally get a lot more than the winner. So a country that experiences a string of defeats will get new idea(s) much earlier than their opponents, and can leverage that to come back more capable later.

Diplomacy

Diplomatic options work much the same here as they do in the EU series, if cut down a little. You have diplomats to do actions with, and you get more each month; every country has a bilateral relationship value with every other country that gets modified for actions between them. There’s no dynastic options for royal marriages, and in fact, there’s no alliances. Instead, there are coalitions.

A coalition is basically an alliance, but it is aimed against a particular country, in particular, it must be against one that currently has dominance of either type. Anyone else, including the other dominant power, can start a coalition against that power, to try and bring enough force to bear to force it out of its dominant position. Generally, the country starting a coalition will promise some money each month as a subsidy until the coalition disbands.

You can can have vassals and satellite nations, you can guarantee a country against attack, and give military access to another country so that they have an easier time getting to their enemy…. Generally, other than coalitions, and the mentioned exceptions, it follows the EU diplomatic model fairly closely.

Armies

As with other Paradox games, armies are assembled from discrete brigades of different types. Here, there’s a fair amount of detail, and different countries get access to slightly different types of brigades, but that’s generally down to details, and not very noticeable.

An assembled army in the field has a fair number of options on its own. These are generally available as a series of buttons at the top of the army listing. A small army could be set to hide inside a fortress if an enemy army catches it (instantly making it an enlarged garrison that will be tougher to beat until—hopefully—help arrives). At the same time, or alternatively, it can be instructed to avoid battle, but that one is fairly chancy, and the possibility of a battle is checked each day that it is in the same province as an enemy army.

There’s a few things that are only enabled by taking certain ideas. ‘March to the Sound of Guns’, causes an army to attempt to automatically join a battle in an adjacent province. Unfortunately, you then need to remember to turn if off again if a large army becomes depleted and no longer capable of helping much in a battle. ‘Forced March’ just causes an army to move faster, but also increases attrition.

Inside the army, there’s enough going on that there’s three different views of an army in the game. The most collapsed view is all you’ll ever get if you’ve selected multiple armies, and just gives the name of the army, overall commander, and current strength of the army, along with the controls just mentioned. An expanded view gives similar details for each flank of the army, as well as a breakdown of overall strength by each general troop type. And then the most expanded view shows exactly what brigades are in each flank, and what order they’ll generally enter combat in.

There are seven general troop types, with four of them being infantry. Guard infantry are considered their own type, who are some of the best units in the game, with good morale, but only some generals can use them at all. At the opposite end are militiamen, who’s advantages are numbers and being cheap to recruit. In between are line and light infantry, the main ‘regular’ formations. Cavalry and Artillery only consist one general type, though of course there are different types of brigades within them, including, confusingly, guard cavalry brigades, which are indeed high-quality heavy cavalry, but don’t require special commanders to utilize.

There are also brigades that are suitable for garrison use, including fortress artillery with almost no mobility. And the seventh general troop type is ‘service’, which is just for supply train brigades. Supply is a fairly important part of MotE, and army can take its own supplies with it to supplement shortfalls from being far from home. It is sadly hard to get a real handle on how supplies are working as most of it is hidden from view, though the outliner breaks down each separate area that armies are attempting to take supplies from, and how well supplied that area is.

Combat

Once a land battle is joined, it works much like it does in CK II. There’s three flanks, and each flank has its own units and commanders. The commanders pick tactics that modify performance, and those can lead to events that add another layer to what happens.

In addition to this, there is also the reserve, with an overall commander who also makes a lesser contribution improving the troops’ performance. More importantly, he directs the commitment of reserves to the flanks, and can also pull out spent units into the reserve. This is probably the most detailed representation of combat Paradox has done yet.

While the eight periods per day doesn’t mean a whole lot elsewhere, it does here, as each period is a time when events can happen. This is also a small problem, as in each period commanders are picking options, the overall commander observes part of the battlefield, and events happen, and all of these go by too fast to really understand just what is going on. Also, a decision point seems to be reached more quickly, and along with the eight periods per day, battles tend to take 2-3 days, which is a bit long for Napoleonic battles, but far shorter than it takes in all of Paradox’s other games, where you have to figure a ‘battle’ is more of a representation of possibly several conflicts as two forces maneuver within the province.

Conclusion

This was Paradox’s second ‘small’ game within a couple of years, and also their last one so far, with no hints that they’ll ever do a more limited game like this again. Sengoku can be seen as a ‘lighter’ version of Crusader Kings II, and this game ended up feeling like a limited version of Europa Universalis. Notably, while there has been an ‘idea’ system in other Paradox games going back to EU III, this particular version most strongly resembles the one that would show up in EU IV later in the year.

While this game was probably no more successful than Sengoku (I note the Metacritic scores are nearly identical), I actually enjoy it more. Sengoku is a game I want to enjoy more than I actually do, as it just feels a bit limited and empty. MotE successfully limits its focus so that it feels like a much more complete game. Some of this, I think, is because of its roots, it retains a more wargame focus. Either I’m just very used to those, or… there’s a good reason why they’re a successful formula. As a final note, I’ll mention that many reviews have pointed it out as a good multiplayer game, because it’s much shorter than a lot of grand strategy games.

└ Tags: gaming, March of the Eagles, Paradox, review
1 Comment

Candidate Maximus

by Rindis on June 14, 2019 at 12:00 pm
Posted In: Boardgaming

Had the gang over for gaming back on the day before Memorial Day. We actually had five over (me, Dave, Mark, Jason, and Patch), which is everyone at the moment. After some indecision, we’d gone for a day of smaller games, though we only ended up playing two moderate-sized games.

First up was Circus Maximus, which I like to start with on these days, as it generally takes us right up to lunch. Lunch ended up being slightly late as we needed to refamiliarize ourselves with the game after the last couple years of minimal gaming. With five of us, me, Dave, and Jason ended up with second teams to keep the field properly crowded. I went for an all speed design on my primary (Red) team (+2 driver, max team speed), and a high endurance team for the other (Yellow; max endurance, light chariot). I’m not sure what everyone else took, but I know there weren’t any heavy chariots in the field.

My Red team got a good start, and mostly stayed out of trouble as the lead slowly lengthened. There wasn’t a lot of combat this game, though there were a couple of incidents. I had planned on being more aggressive with my Yellow team, but they ended up out of the running, and never had a chance to do anything for the last lap. I did push the cornering a fair amount. Dave has long since mastered the idea of ending at the start of a curve at the innermost lane, which will get you exactly through and out it with no strain. My red team managed about three curves with similar placement on the 15 lane. By straining the corner at 17, you can do a similar trick, and have more options if someone’s ahead of you. With the -2 to the roll (for the good driver) I didn’t have too much to worry about, though I did injure a horse on one flubbed roll.

Everyone else was speeding around the corners too, and the dice were nice and friendly about it for the first lap or so. After that, things got a bit more exciting. There was a couple of horse injuries, and a fair numbered of ‘jostled’ results that caused trouble since it put people to negative driver modifiers, and you can only do things like strain once your modifier hits zero again. Going into the third lap, I got a SS, ‘double sideslip’, result as my Yellow team tried to speed through the turn, which was annoying enough, except that I had nowhere to go, with two other chariots in the way. This injured a horse, and shifted my result to a double jostle, putting my current driver modifier to -5! It took five turns to get back to 0, and with the speed problems that also caused, put me a turn behind everyone else.

Patch’s Purple team had a run a poor luck, with a couple of different jostles keeping him from straining, and then jostling again as he tried to make up time. However, in the same corner that I had trouble, he rolled an 18, and the chariot flipped. The driver managed to cut himself free a couple turns later and escape over the wall. There were a number of people who could have tried running him down, but it would slow them down, and no one wanted to do that. If it had been some sort of campaign, I think it’d be more likely.

My Red team ended up finishing two turns ahead of everyone else, though as the lead team was one space shy of finishing the next turn, it’s not quite as bad as it sounds. However, the rest of the pack was very close together (see the table below to see the number of spaces past the finish they made on that second turn), with Jason’s Black team coming in a turn after that, and then my Yellow team.

Final placing:

1 James
2 Dave +20
3 Jason +19
4 Mark +18
5 Dave +15
6 Patch +6 [horses only]
7 Jason
8 James

I was a bit late getting back after lunch, and was a bit surprised to see Candidate being laid out; I hadn’t thought it was a leading contender. Its only the second time we’ve played it, and last time was with four, so it was Mark’s first time with the game. There was a long time of getting a grasp of what was going on again.

I don’t have any detailed notes of who ended up with how many votes or anything. But in the second round, I managed to take Texas (and the bullseye) with use of Favored Son, which gave me a nice lead in votes for a bit. Patch started getting a nice collection of states, along with Mark, while Dave and Jason struggled to get past about two states for a long time. Mark was in the lead by mid-game, and I handed him Favored Son on a small state so he couldn’t use it to win something bigger later.

By the end of the Primaries, Patch and Mark were in the lead, with me in a close third, and Dave in fourth. There were about 4-5 states unclaimed including California (thankfully Deadlocked, as I’d had no chance at it). Jason was in last, but had done well enough that he could still turn things around. I had another poor hand for the start of the convention, and took a chance that someone would use a scandal to force a second round. I thought that Dave (going first), had played one card (which would presumably be a Scandal), but it turned out he’d used three, they were just stacked so I didn’t make them out. Mark (going second), had put down a couple cards, but that was a bluff, and one was a Scandal. I used mine in the second round before using my low-value cards for the third round, and managed a win.

After that, Jason was out as the lowest candidate, and I forget who manged to pick up his votes (it might even have been me). After that, Dave was eliminated as the #4 candidate. The annoying thing was that at this point I was the front runner, and if I’d won Dave’s votes, I would have been about four off of a majority. But I didn’t quite have what I needed, and they went to Patch. Mark was eliminated as the #3 candidate… and I still couldn’t get a good hand. I didn’t even have a Scandal to try and hold him off with, and Patch took the nomination (and his third win out of four for the last couple of game days).

Given how poor my hands tended to be for the entire second half of the game, I’m surprised I did so well. I managed to leverage a poor hand going into the convention, but couldn’t get any more tricks up my sleeve after that.

└ Tags: candidate, Circus Maximus, gaming
 Comment 

Patricians and Emperors

by Rindis on June 10, 2019 at 12:00 pm
Posted In: Books

Hughes provides a good overview of the end of the western Empire in this volume. He does analyze things, and come to conclusions, but the primary focus is providing a chronological outline of events.

That latter is the primary value as it can be hard to find any coherent look at the four decades from the death of Aetius to the death of Odovacer. There’s no central figure, which is part of the point, political power and fortunes were so fractured by this period that no one entirely rises above the other players.

However, Ricimer (who should be more prominent in synopses of this era) does provide the central focus for part of this book (enough so that I wonder if Hughes really should have focused in a little bit more and done a book purely on him). He is generally considered to have been the ‘power behind the throne’ for, oh, maybe fifteen years, and often takes the fall for the instability of the West. Hughes gives good reasons to believe that this is not the case, and that his actions were often in response to other political pressures.

This largely comes down to the Roman Senate, which, like in his book on Stilicho, takes the blame for a fair number of ills without introducing any real evidence. He may reference some pertinent sources in the end notes (which I have not gone through), but there is nothing in the main body. Nobody from the senate is mentioned by name. No description of what the senate was like in the Fifth Century is provided. Now he ascribes the senators as a whole with motives that are likely (protecting their own position, and the safety of their own lands), but there’s nothing here to actually support these assertions, so it’s nothing more than an axiom of the book.

Other than that hole, there’s a lot of interest here. Beyond any problems with the Senate, problems of the division of the Empire between East and West are made manfest. Thanks to a lack of a stable dynasty, and a horde of ongoing problems, in the West, the Eastern Empire has become the senior political partner, which ends up crucially weakening the West. Any time an Emperor dies (too common), there is a wait while the choice of a new Western Emperor is coordinated with the East. If the Eastern court doesn’t care for what’s going on, political and military support can get withdrawn, which leaves the West’s leadership high and dry. Additionally, Marcellinus maintains an almost independent existence as comes rei militaris Dalmatiae for almost this entire period as he’s supported by the East, but refuses to work with Ricimer’s administration of the West.

And of course, at the same time there is growing ‘barbarian’ influence in the territories outside Italy and Dalmatia. The book has about one map per chapter showing the slowly shifting patterns of who had control of what. Now, these groups are settled in the Empire by agreement, and acknowledge it’s authority. Mostly. Even the better actors, like the Visigoths under Theoderic acted largely independently of the administration in Italy, even when pursing the same goals. Meanwhile, Vandal kingdom in Africa raided Italy regularly, and the book shows two attempts to counterinvade that came apart utterly, and likely recriminations did much to make the situation in Italy worse. Hughes figures Gaiseric to be the most able leader and diplomat of the period to explain his long stable reign, and the Empire’s inability to reclaim Africa.

Hughes sticks to a largely chronological format, which means he doesn’t give any one subject his full attention as nothing got wrapped up neatly within one year. Mostly, this is well handled, but with some real long-term trends going on here, I think seeing something concentrating on just one of them would be a real plus. I don’t recommend this one for a more casual read because of this, but it is definitely a great framework for anyone in an interest in the last years of the Western Empire.

└ Tags: books, history, reading, review, Rome
 Comment 
  • Page 132 of 315
  • « First
  • «
  • 130
  • 131
  • 132
  • 133
  • 134
  • »
  • Last »

©2005-2026 Rindis.com | Powered by WordPress with ComicPress | Hosted on Rindis Hobby Den | Subscribe: RSS | Back to Top ↑