
5 In Sight of the Volga
In my efforts to finally play all the original Beyond Valor scenarios for ASL, I’ve had two attempts on scenario 5, In Sight of the Volga. As is popular for the system, it’s a Stalingrad scenario. This one takes place in September ’42 on boards 1 and 20, with the large board 20 building counted as a factory near the banks of the Volga. The Germans are trying to get into the factory, and have more GO squads in it with a LOS off the board edge than the Russians have GO squads in the building, presumably so they can prevent further reinforcements from being ferried over.
Which is a concern here. The Russians start with 20 squads (in a mix of 1st Line types), with decent leadership, a pair of MMG, a 76mm INF, some “?”, 6 trenches, and 4 squads HIP. Every turn, they roll a Reinforcement DR, and if the colored die is less than the turn #, they get that many 628 squads, and the total DR determines if a leader comes with them. Also, the Russians are suffering from Ammo Shortage, and if the DR is doubles, supplies arrive, and the shortage ends. There are ten full turns, so while the Germans have time, there will be a good number of reinforcements over the course of the scenario.
The Germans are attacking with 25 467 squads, with good leadership, including a 10-2 and 9-2, and comparatively few MGs for the number of squads. Considering the distance to go, the relative number of squads, and the reinforcements, they have a tough job. But the initial concentration vs a defender that needs to defend across two boards can do a lot. Also, they can exit men off the board to stop future reinforcements (at a rate of stopping one squad per HS exited). Complicating matters, a fair number of building hexes have been rubbled, with more rubble spilling out into the streets. The Russians also have a SAN of 7(!), while the Germans only have a 3.
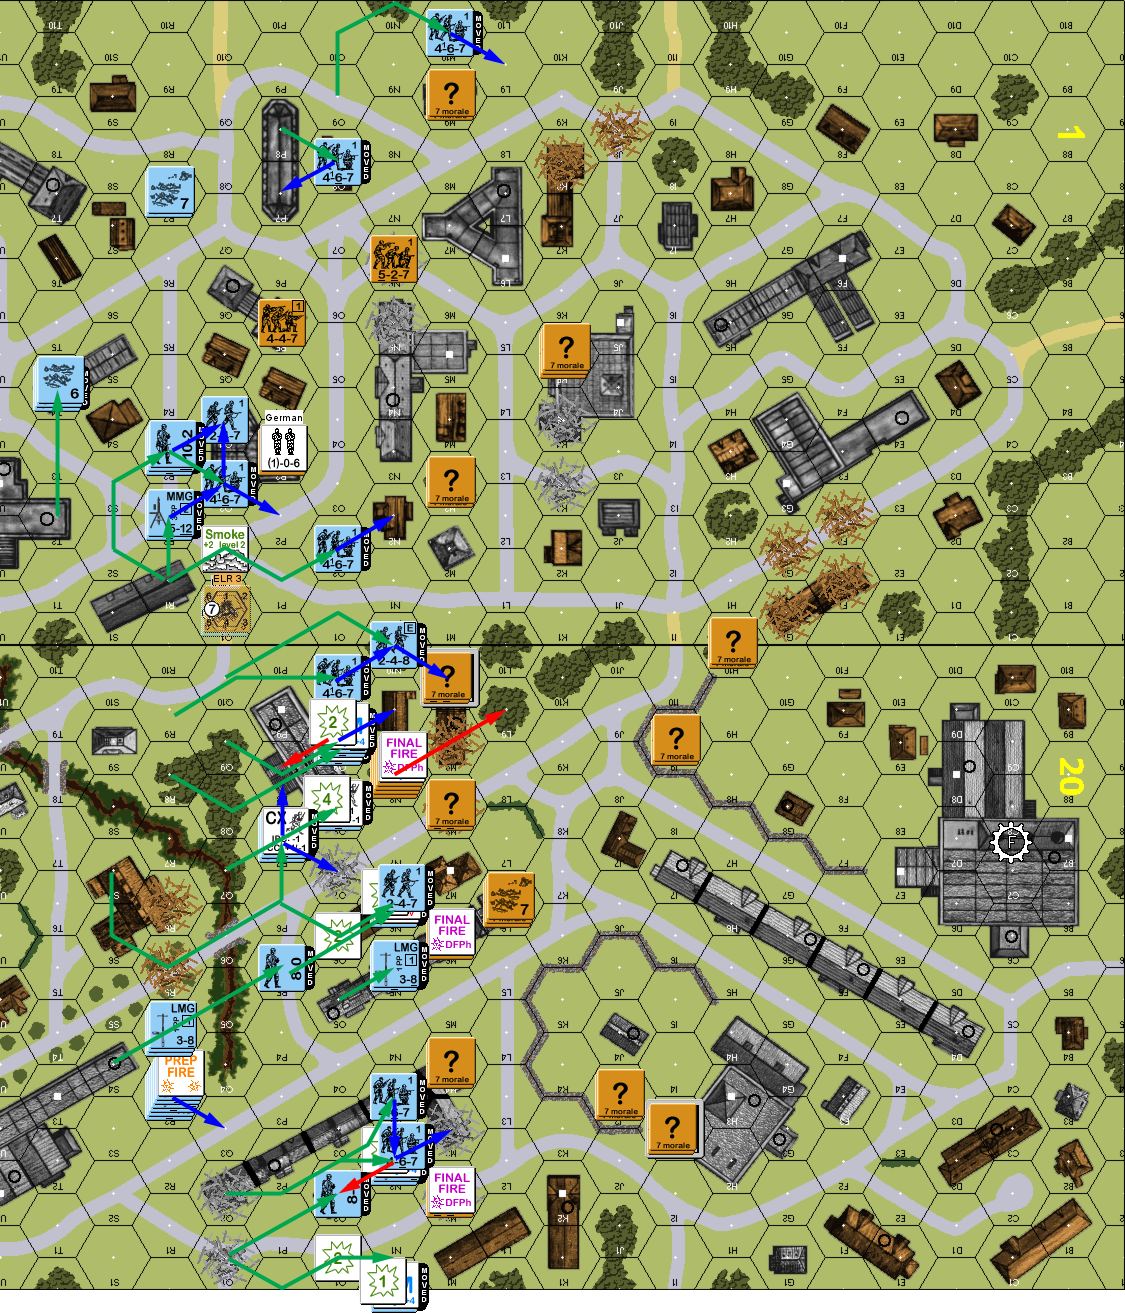
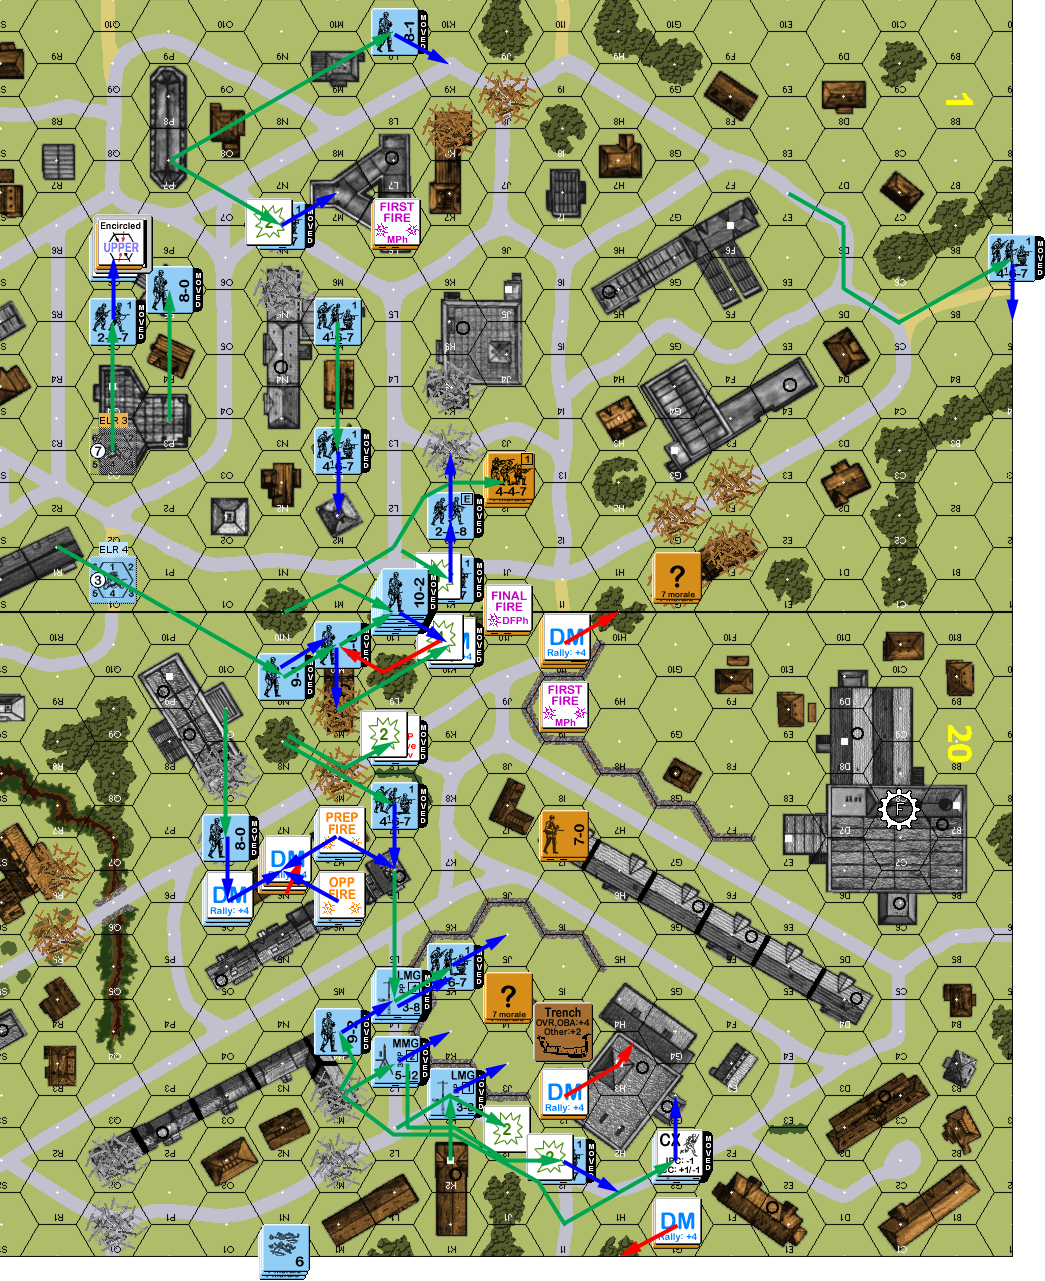
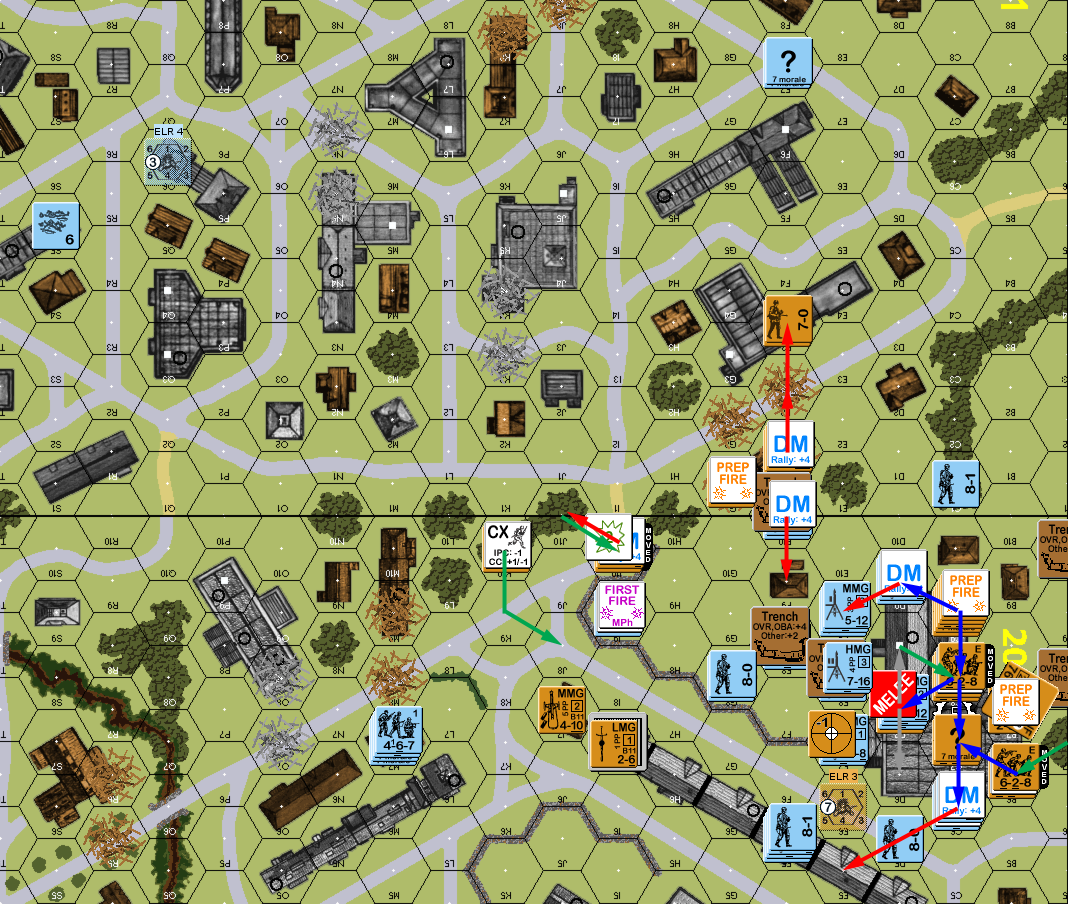
Back in 2013, I advertised for a game of this, and set up with Luke Sineath, and took the attacking Germans. He concentrated his defense on board 20, so I lined up on board 1, and did my best to overrun the defenders there. This is what things looked like at the end of the first movement phase:
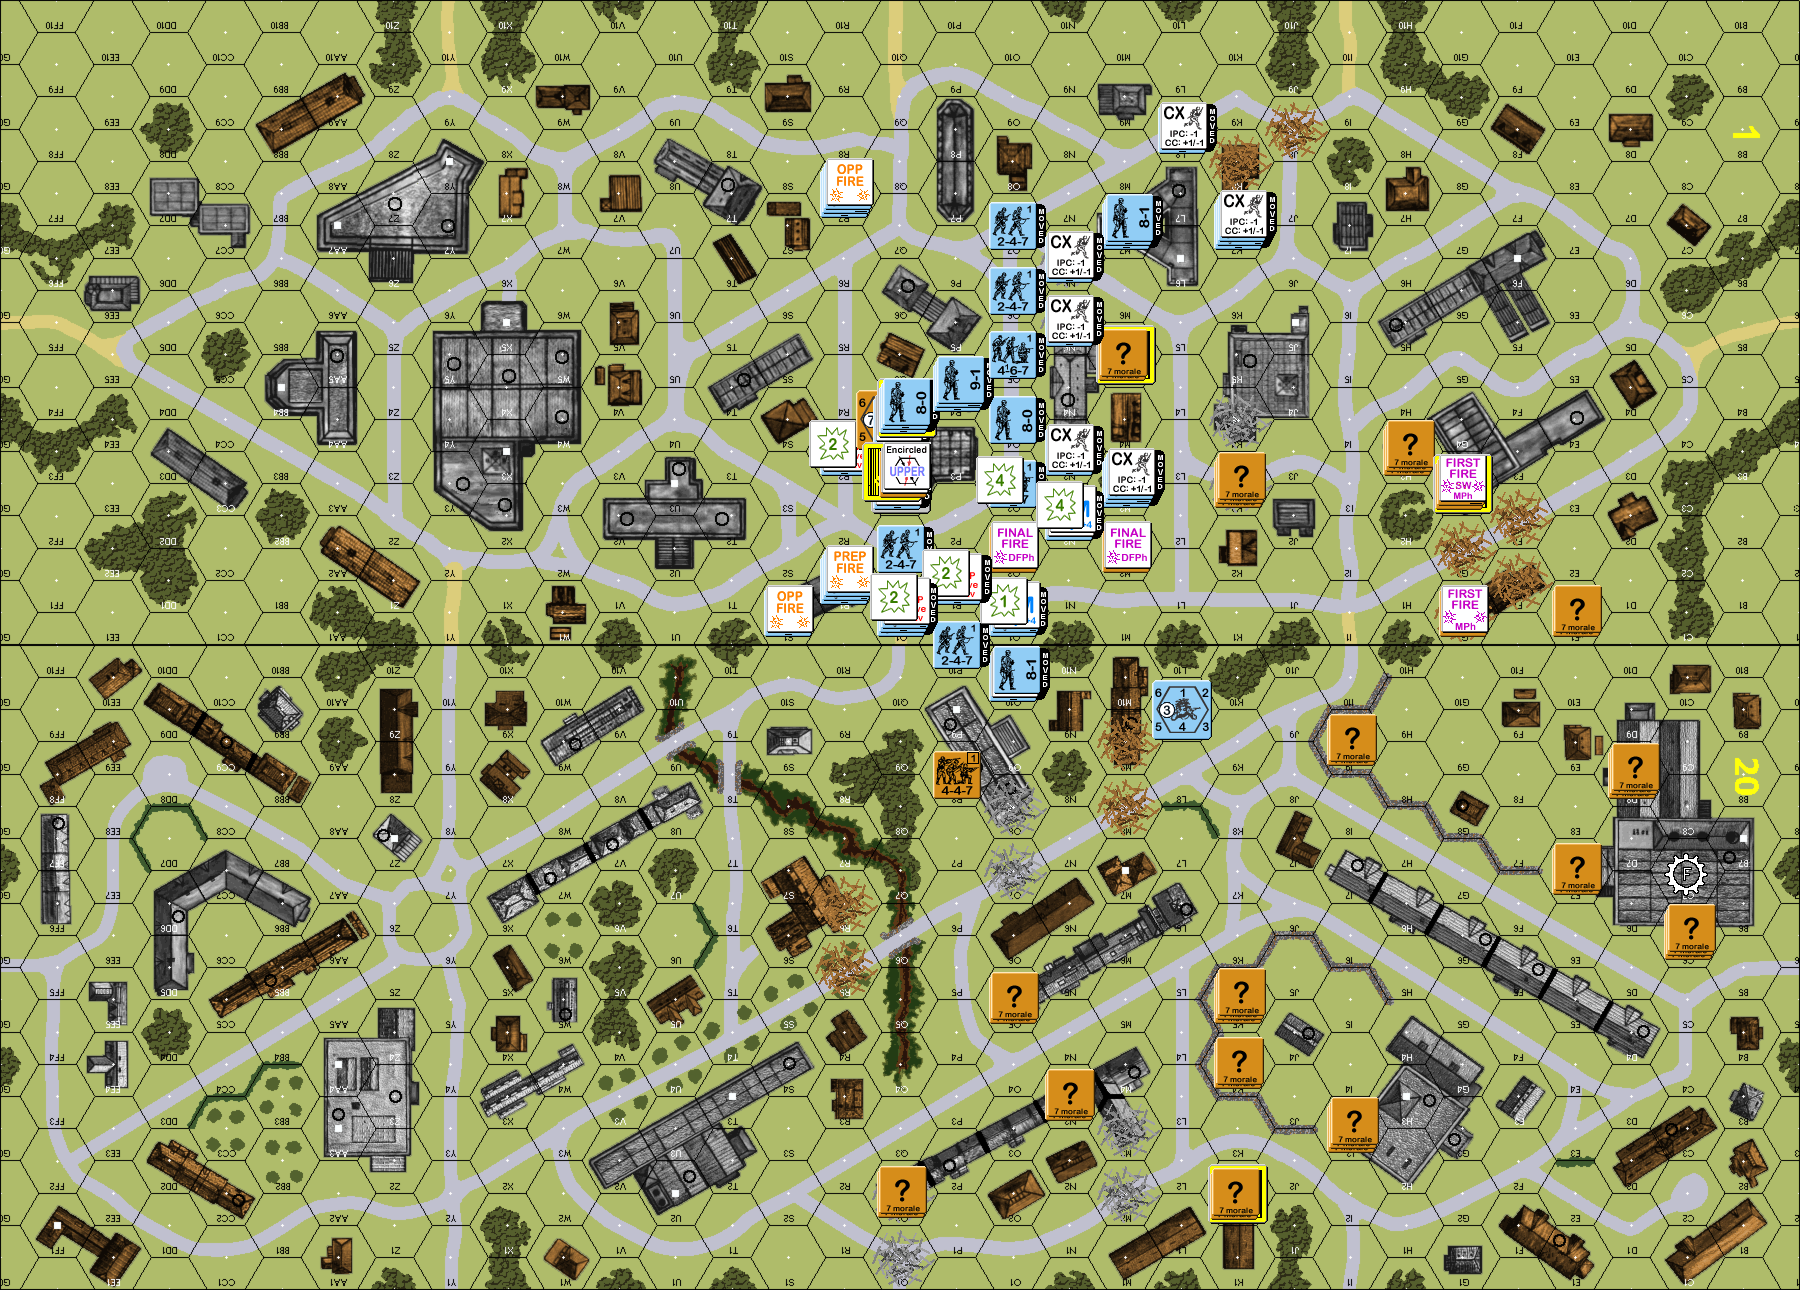
As you can see, I was directly threatening the forward few squads on board 1, and was already moving around the end of the line. Things continued in this vein, with the Russian defense struggling to re-orient, and a nasty fight developing in front of the factory. Sadly for me, he had good luck with his Reinforcement DRs, so he was able to feed 628s directly into it before I could arrive. The INF turned out to be in 20B4, and that clear shot all the way to L9 was a major problem for me. By turn 5, almost all resistance outside the INF and the factory had collapsed, and I was struggling with how to leverage what was left of my forces to blast my way inside before the reinforcements got even worse.
That is what things looked like during my Turn 5, when Luke just… vanished. On me, and several other PBeM players. I’ve always regretted this game going unfinished. I’d managed to pry apart the defenders, but the trickle of new 628s meant I still had a challenge, and I had a real struggle in front of me.
So, late last year, I finally got around to asking for a replacement game of In Sight of the Volga, and got a response from Martin Marquis. Since I’d had the Germans last time, I took the attacking Russians for this game. My first goal in setup was to have a more balanced defense so that board 1 wasn’t so invitingly empty. At the same time, I didn’t want to be too spread out, especially as I needed multiple lines of defense. To that end, a Dummy held down the north end in 1M9, while three squads (two concealed) held the rest of the front line on that board. The more direct route of board 20 got a more concentrated defense, and the 7-0 was in 20K10 as a backup/rally post for nearly everyone.
The factory itself was very thin on guards, with two “?” out in front of it, one of which was a Dummy. I borrowed a number of ideas from Luke’s set up, and nearly put the INF in 20B4 as it had been a big problem for me, but let myself be talked into placing it in the factory by another AAR. As most any approach to the factory is likely to go near, if not through, the big board 20 rowhouse, I put one MMG w/8-1 HIP in 20J7, and then a LMG squad in I7 to back it up as a double surprise. The other MMG went HIP in 1G3h2 with the 9-1 where it could command almost any approach to the factory, and back up the other MMG. The last HIP squad was in 1M5h2. Board 1 was a bit weak, and if he went that way, the rubble in N5 gave it a good field of fire for the approach to the building. Also, the ‘seam’ between the two boards looked like a possible route, and it could actually cover parts of that. The trenches were mostly placed to give access from building 1G3 to the factory without ever needing to leave cover. (If anyone’s got better ideas about those trenches, I’d love to hear about it, the paved roads really limit where they can go.)
Martin set up with his main group centered around 20R4, ready to cross the gully, and drive right towards the factory. A secondary group had the 10-2 and 9-1 right near the seam between the boards. Then there were three full platoons with 8-1s, one on each extreme flank, and one in the middle, with a couple HS to hold the middle of board 1.
Naturally, he started with some Prep to break up the initial defense. Thankfully, the 10-2’s attacks against my exposed 527 in 20P9 only did a 2MC I passed, and then a no effect. In the meantime, my sniper went off and pinned his. The 9-2 stack did break my 447 in O5. His first moves showed a version of scouting I hadn’t expected: he just ran HSs directly into my “?” hexes, so I can fire and reveal, or just let him bounce out after revealing me, though on the second try, I pinned the HS with other fire before he could reveal a squad+8-0, but he sent in a second and forced reveal of the squad. Sadly, fire on another scout merely Battle Hardened him to Elite. Largely, I ignored the scouts to threaten fire on any followup movement. However, my sniper went off again, and broke one of them in the street.
His south-flank platoon started spreading out to surround my forward defender in 20Q2; fire broke one of the squads involved, but another came down from the north to make the problem worse. Naturally, the entire middle got very busy, and I put up the best wall of residual I could, though I don’t think any ever had an effect. I only got to the point of using FPF once, which thankfully worked and broke a squad. Overall, the cost of the turn for him was four broken squads, a broken HS, and 2.5 pinned squads.
Advancing fire broke 20Q9, who had a good escape route, but was otherwise ineffective. Two of his units were forced to surrender. However, one of them was surrendering to a squad that was encircled and obviously about to die to overwhelming CC. Since that’d just free and re-arm his squad, I declared No Quarter to eliminate him. However, he resolved that one second, so I still took the other squad prisoner. My squad in 20Q7 self-broke to get out of the gully before a concealed unit could take him on in CC. And indeed, 20Q2 faced a 3:1 CC, which only reduced him to a HS, but I couldn’t do anything in return.
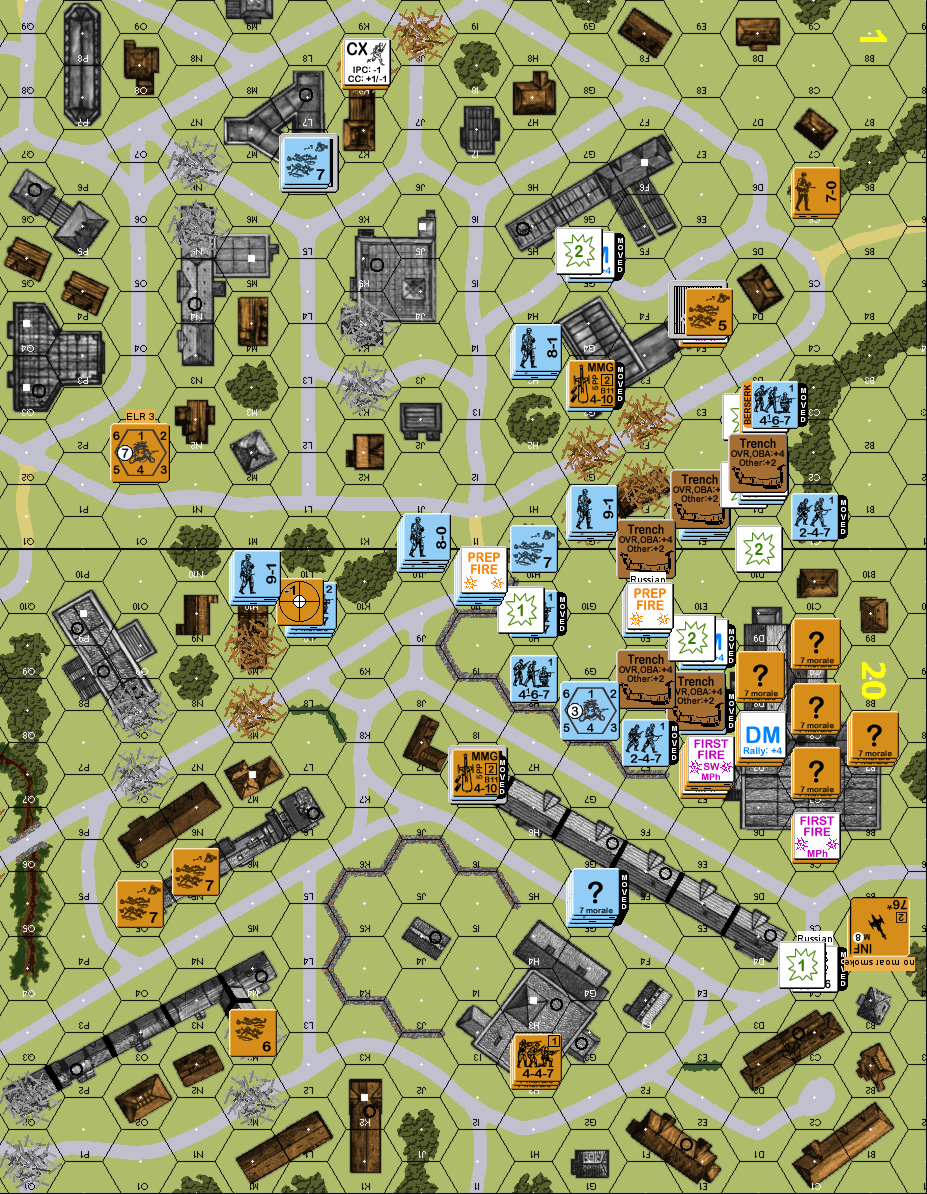
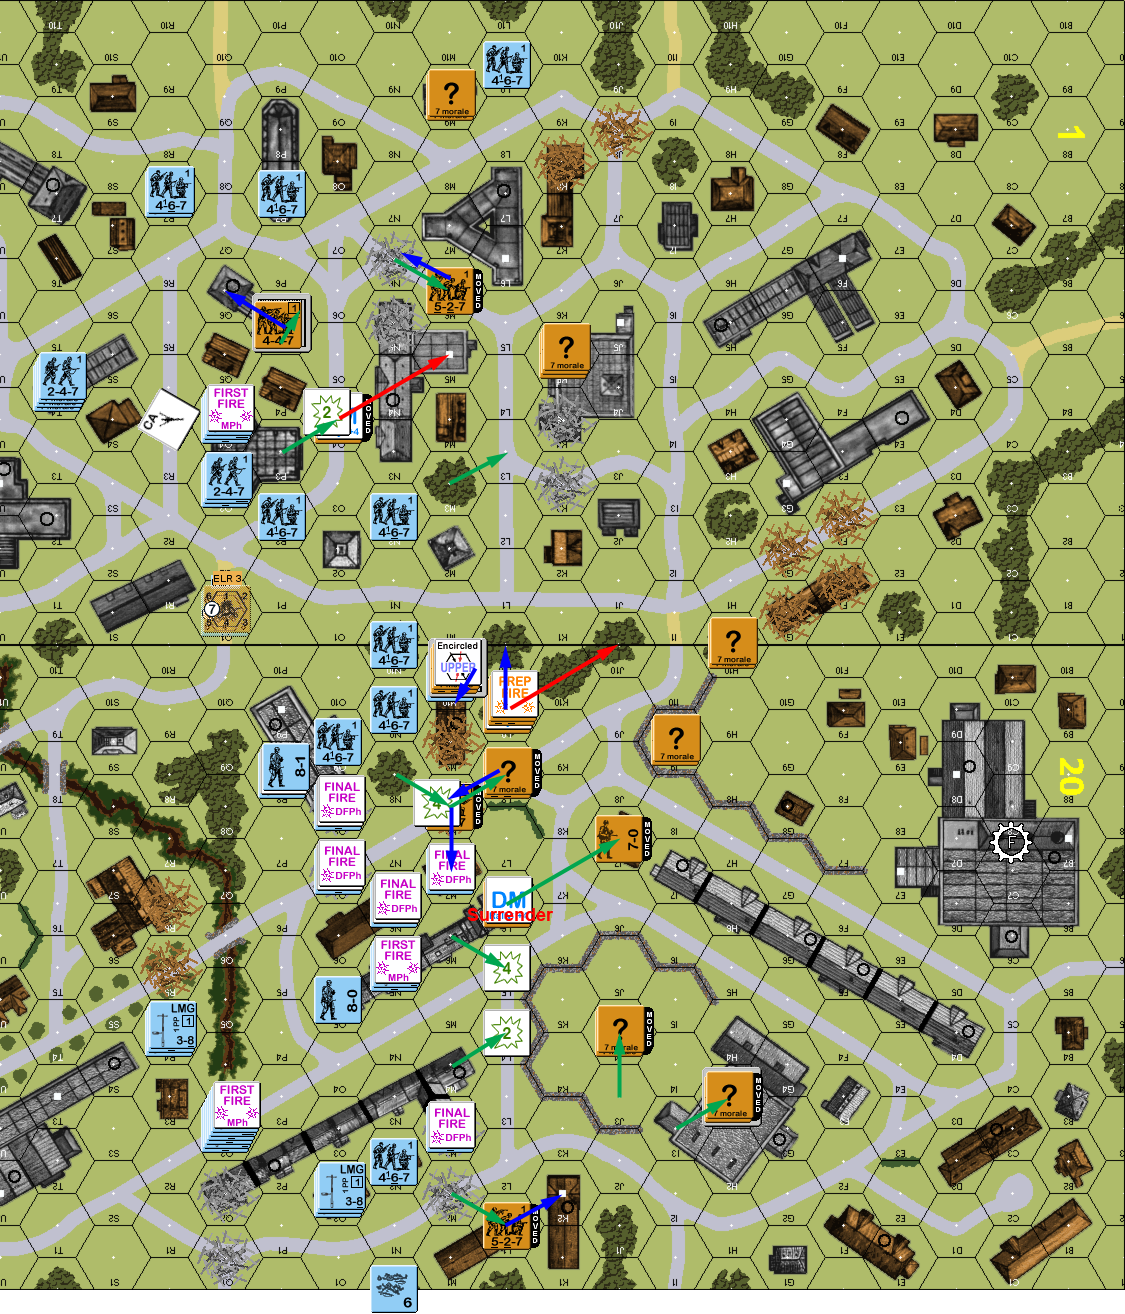
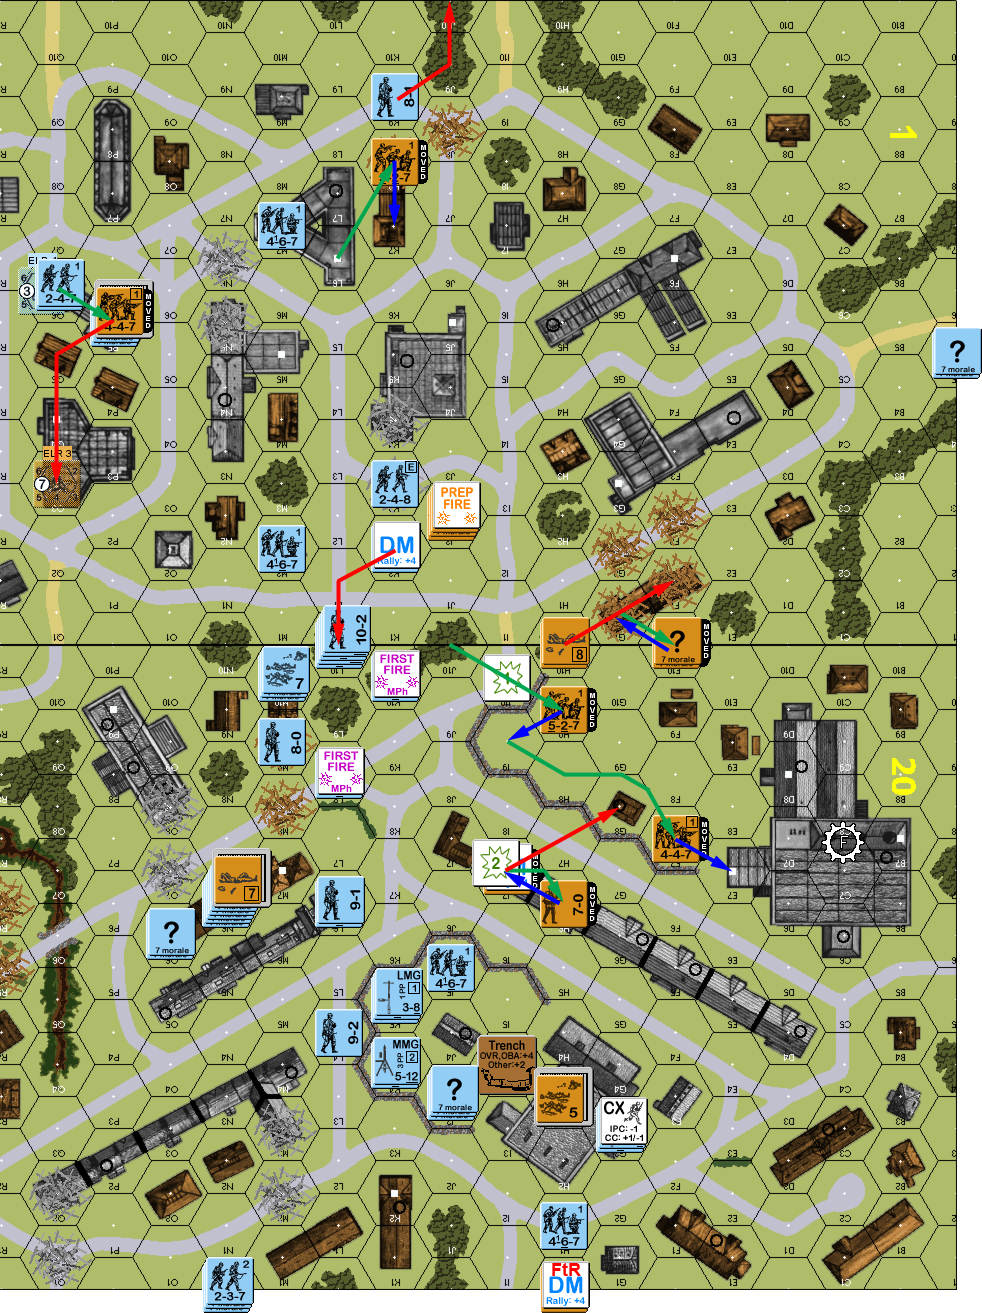
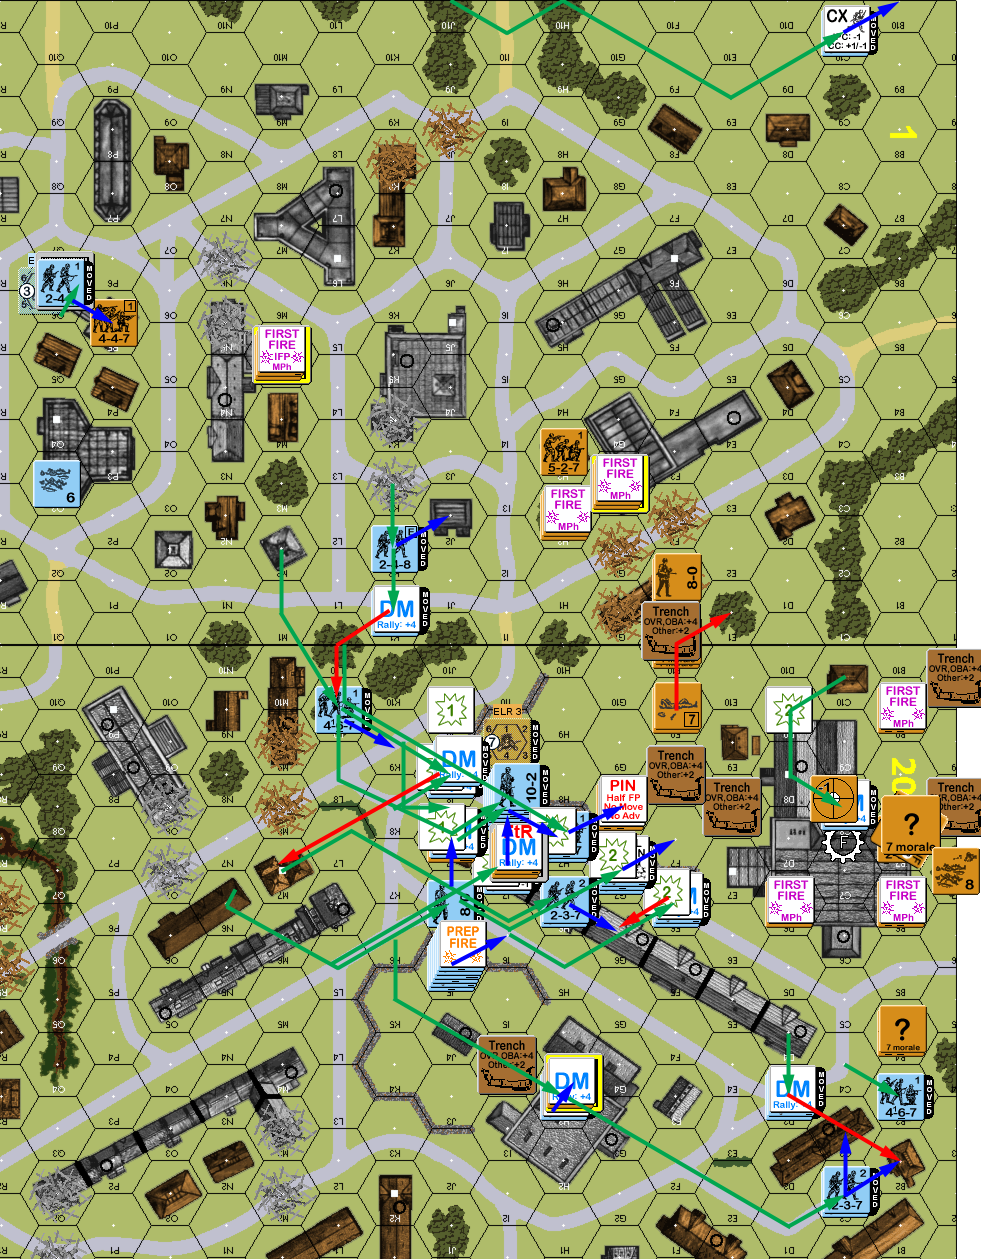
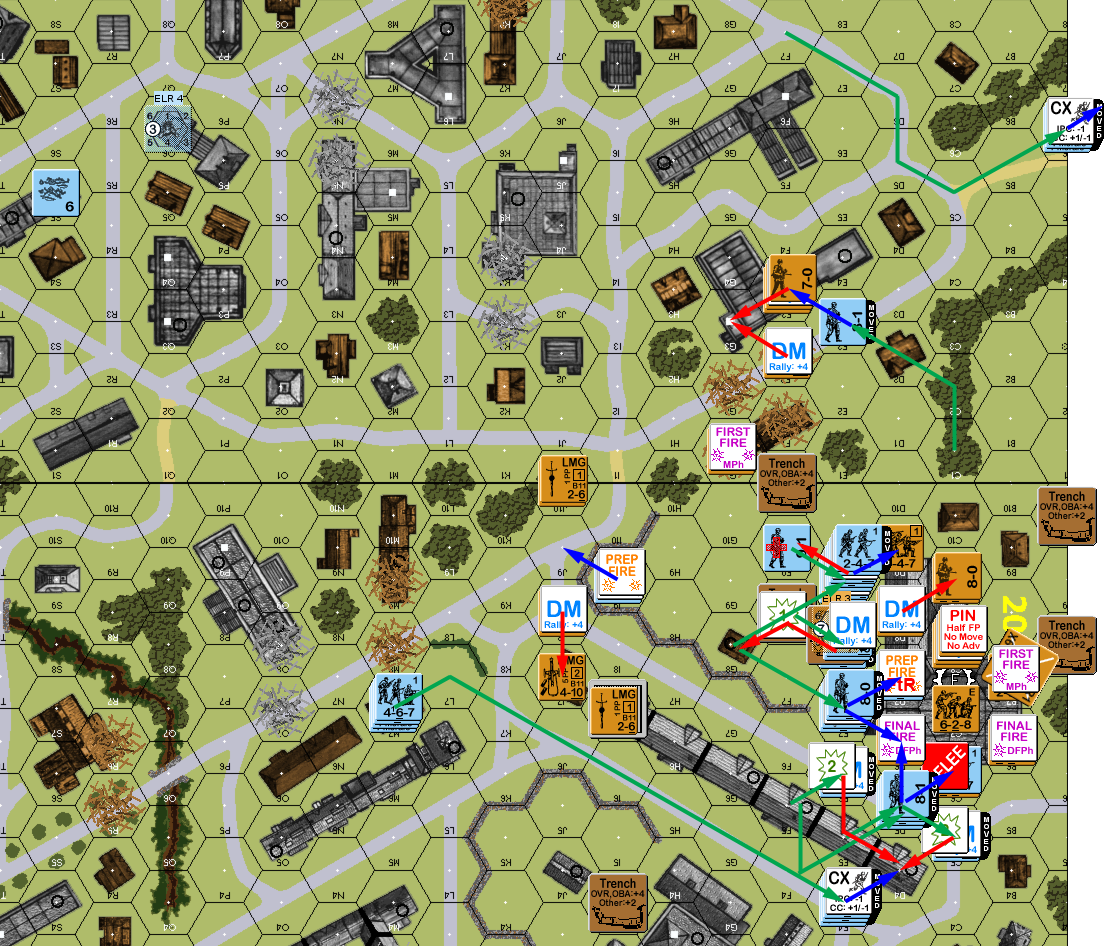
Situation, German Turn 1, showing the full board and my HIP. Only Dummy stacks are expanded.
Nothing rallied for either of us on my turn. My main activity was skulking out of sight, and pulling back to try and form another line that might delay Martin a bit better. Since he was coming across the gully in force, I concentrated a decent amount of force around the buildings and rubble of that area. The rubble of 20M8 and O7 seemed like a good barrier to organize around. My squad in 1Q3 pulled out of sight of his guys in the street, and while his adjacent HS did nothing to me, his fire set off my sniper again… who pinned his sniper again. If those had been ‘1’s, his sniper would be gone, and mine could concentrate on better targets….
In DFPh, a 24FP +0 shot on my broken squad failed to do anything (I had a habit of rolling well on MCs caused by his 10-2 at this point…), and a firegroup went after the squad in 1P3, but only reduced the prisoners. However, my AFPh broke a squad in the street in 1Q8… who routed to an adjacent leader. At 6:1, Martin CRed my HS to end the melee (think about that a moment).
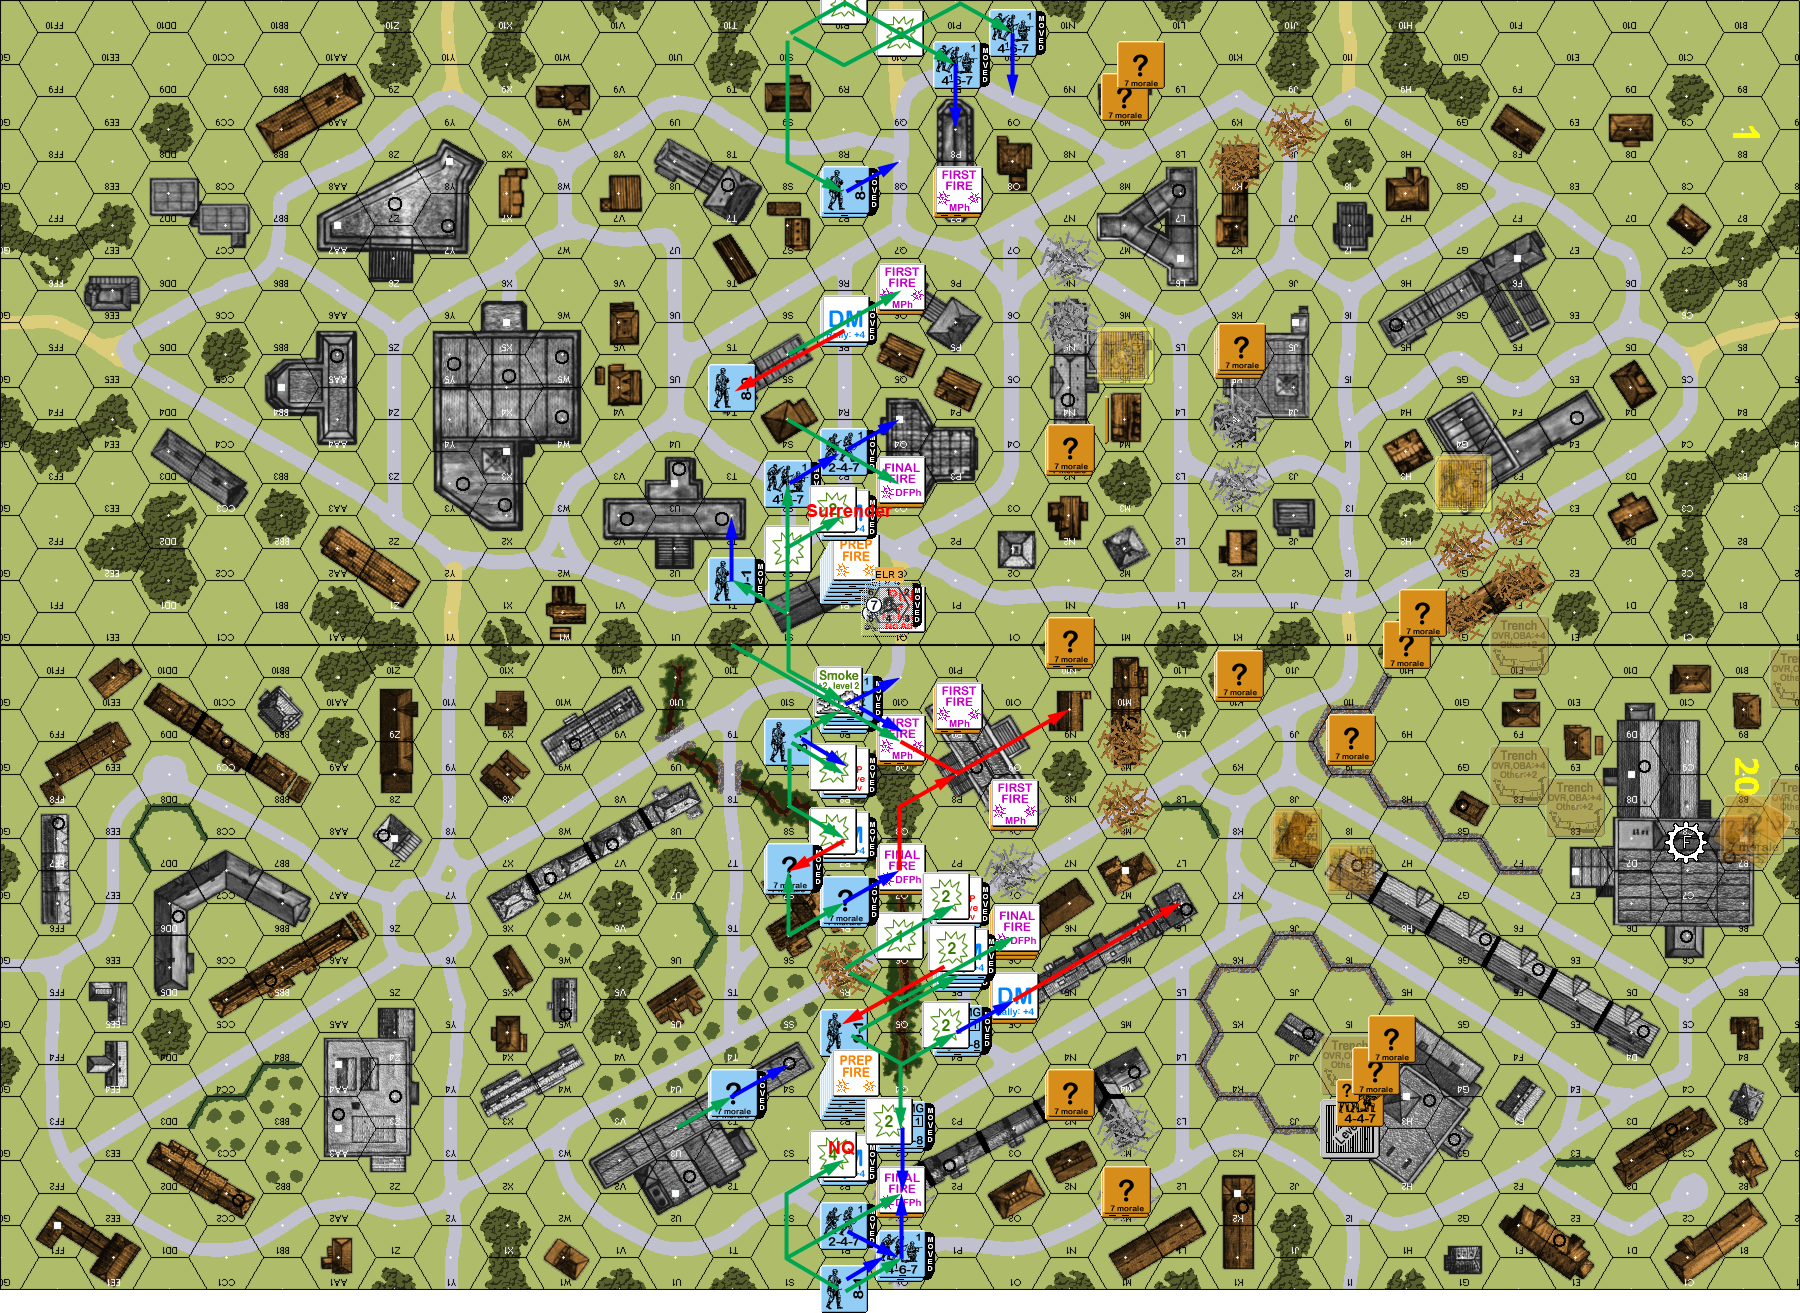
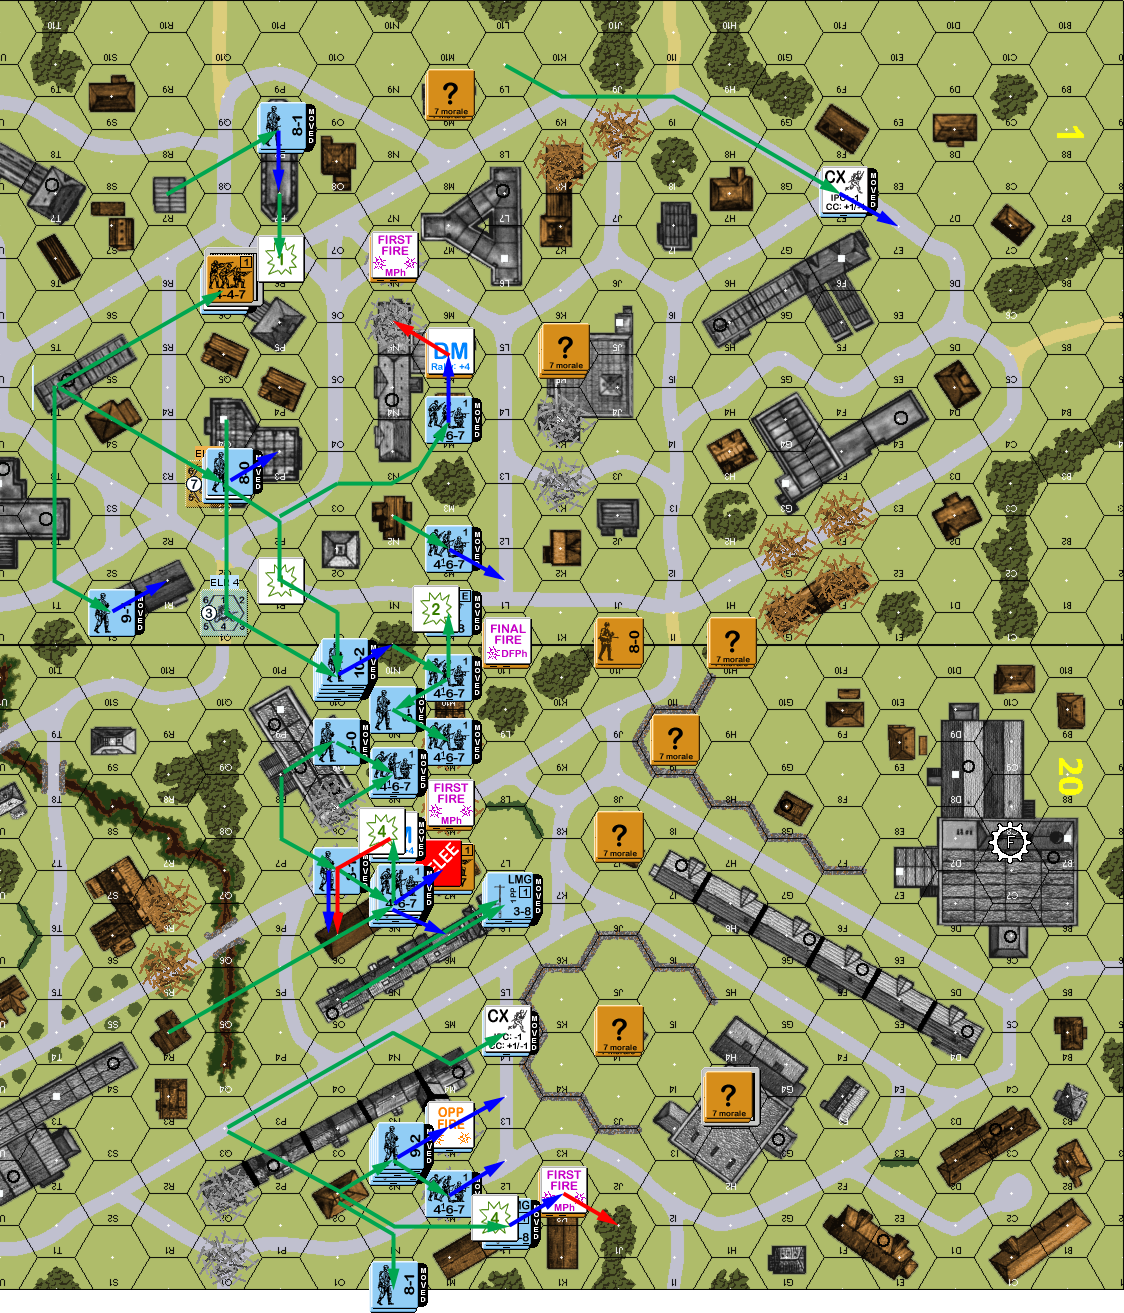
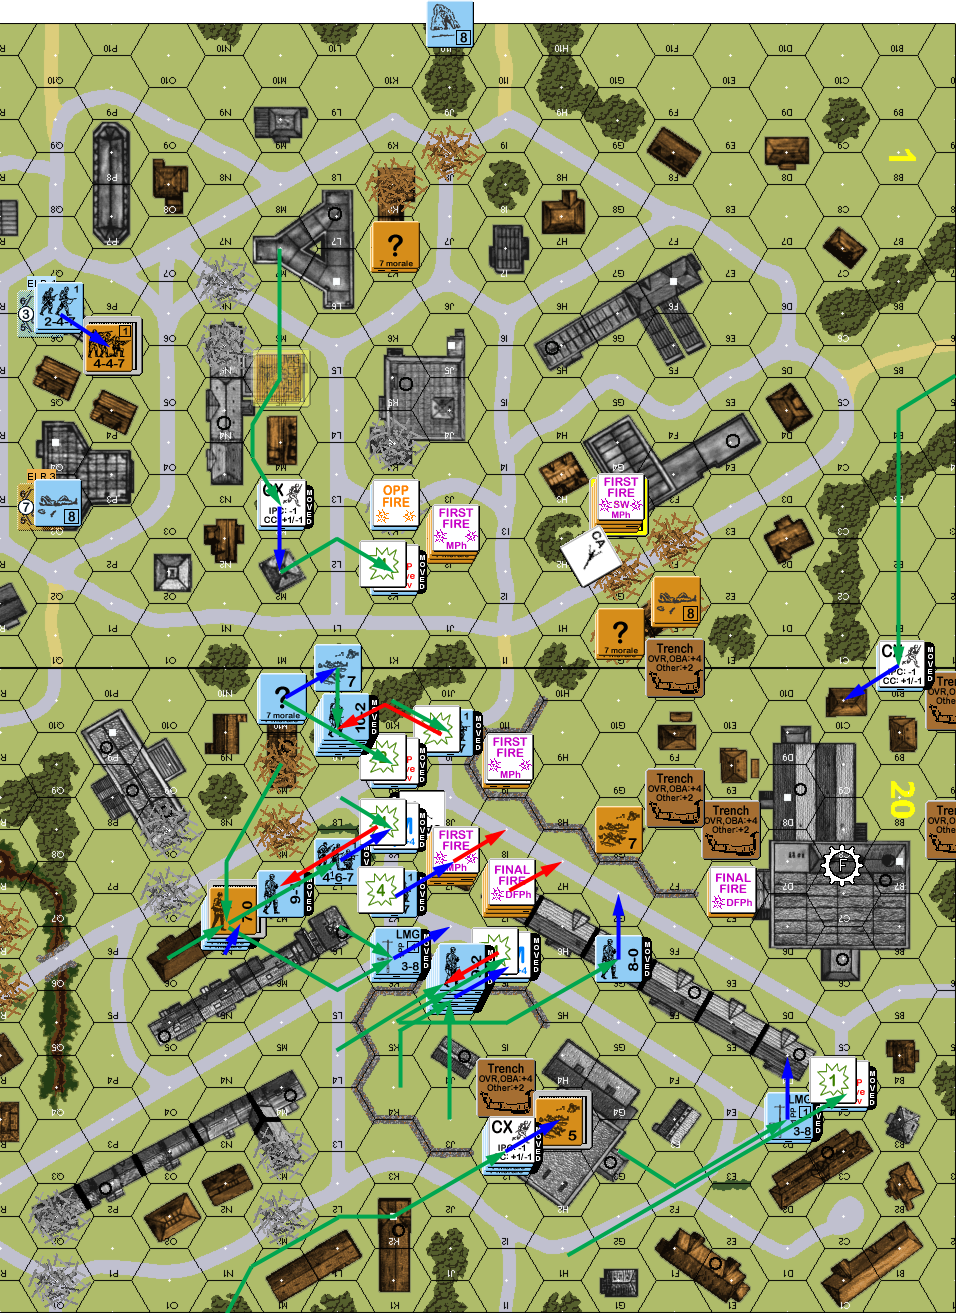
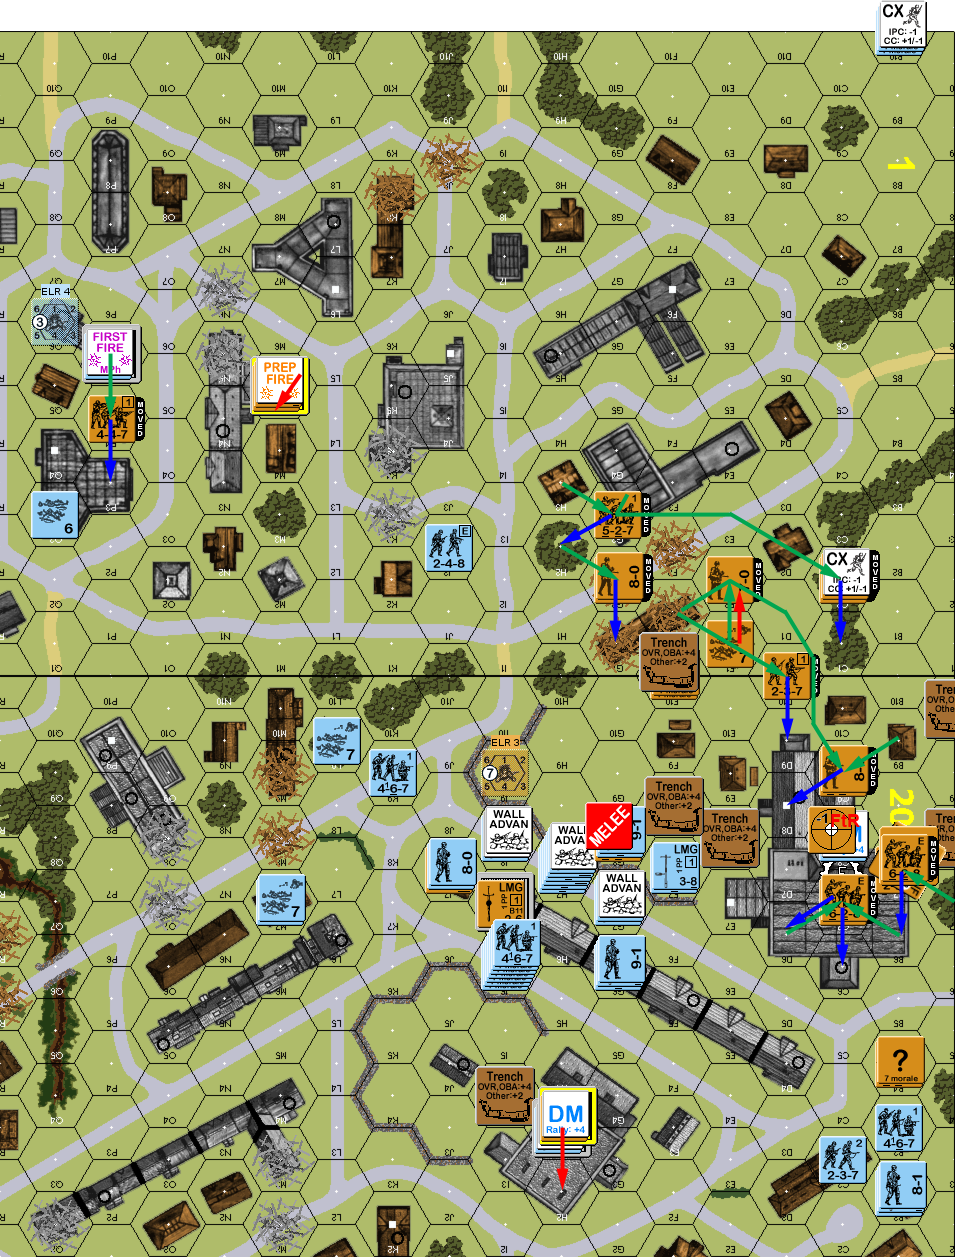
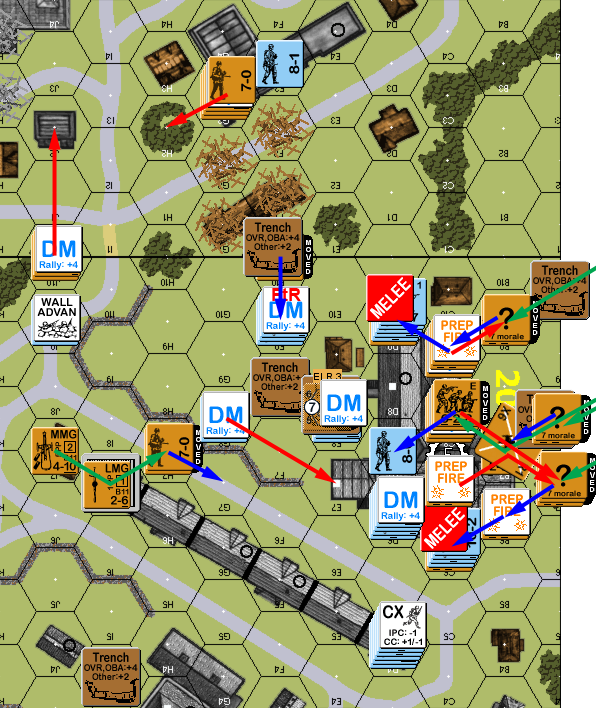
Situation, Russian Turn 1. Yes, the movement in 20I3 is illegal. It wasn’t noticed until next turn.
Martin got one squad out of four back for his second turn, while all I did was lose a HS in 20N8 on a ’12’. However, a MMG malfunctioned on the only Prep shot. He tried crawling along the south edge past my flank with a HS, but I managed to ELR him on the second shot as he bypassed some woods. The next squad tried closing in with my just-revealed 527, but he broke to FPF, but the squad after that one made it without issue. In fact, he walked through a fair amount or residual this turn, without any of it doing anything. After one such, the squad in 20N8, desperate to keep him from swarming my rally point, FPF to break a squad.
My squad in 20M2h1 was obviously going to be a bit far forward, and probably trapped upstairs, so I kept them concealed… even when the 10-2 group wandered into the street in front of him. To my surprise, they headed north, pressing into the P3 area, when I was expecting motion more directly towards the factory. DFPh and AFPh didn’t accomplish anything, except my sniper pinned his again, which immediately prevented two sniper checks when both of my units in 20N8 passed a PTC with ‘3’s. Somewhat to my surprise, he didn’t directly confront me anywhere in CC. He did continue infiltrating my forward line, giving me plenty of poor choices, but I at least expected to see an attempt on 1P3, though moving the 10-2 adjacent was certainly problem enough. Similarly, going into 20M2 would be a bad decision as he’d be at a disadvantage against a 527, and he’d beaten off everyone else.
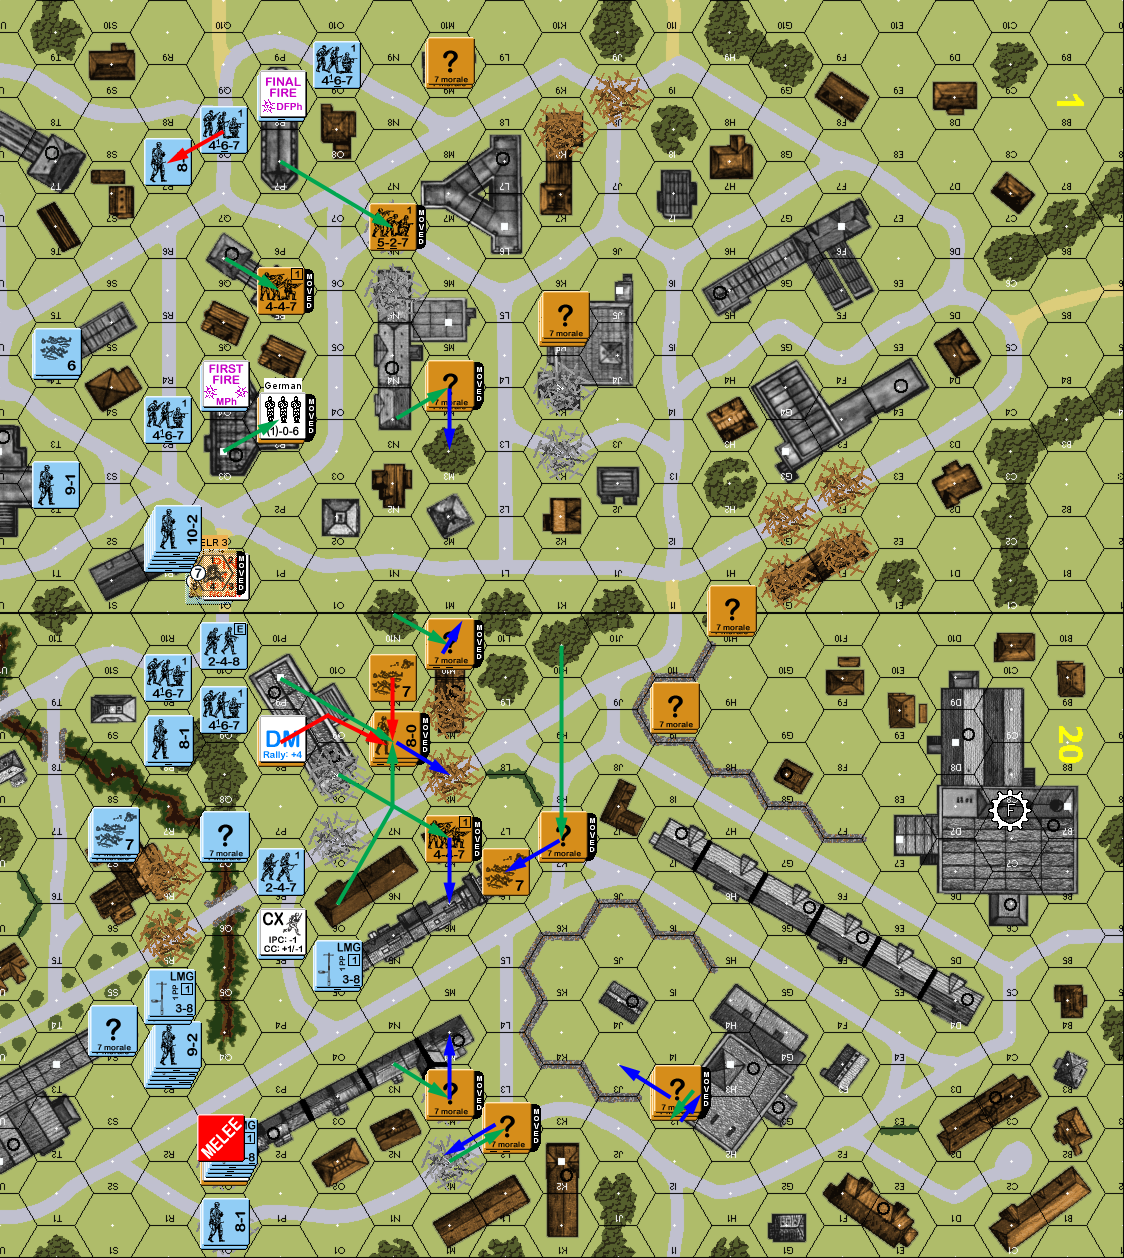
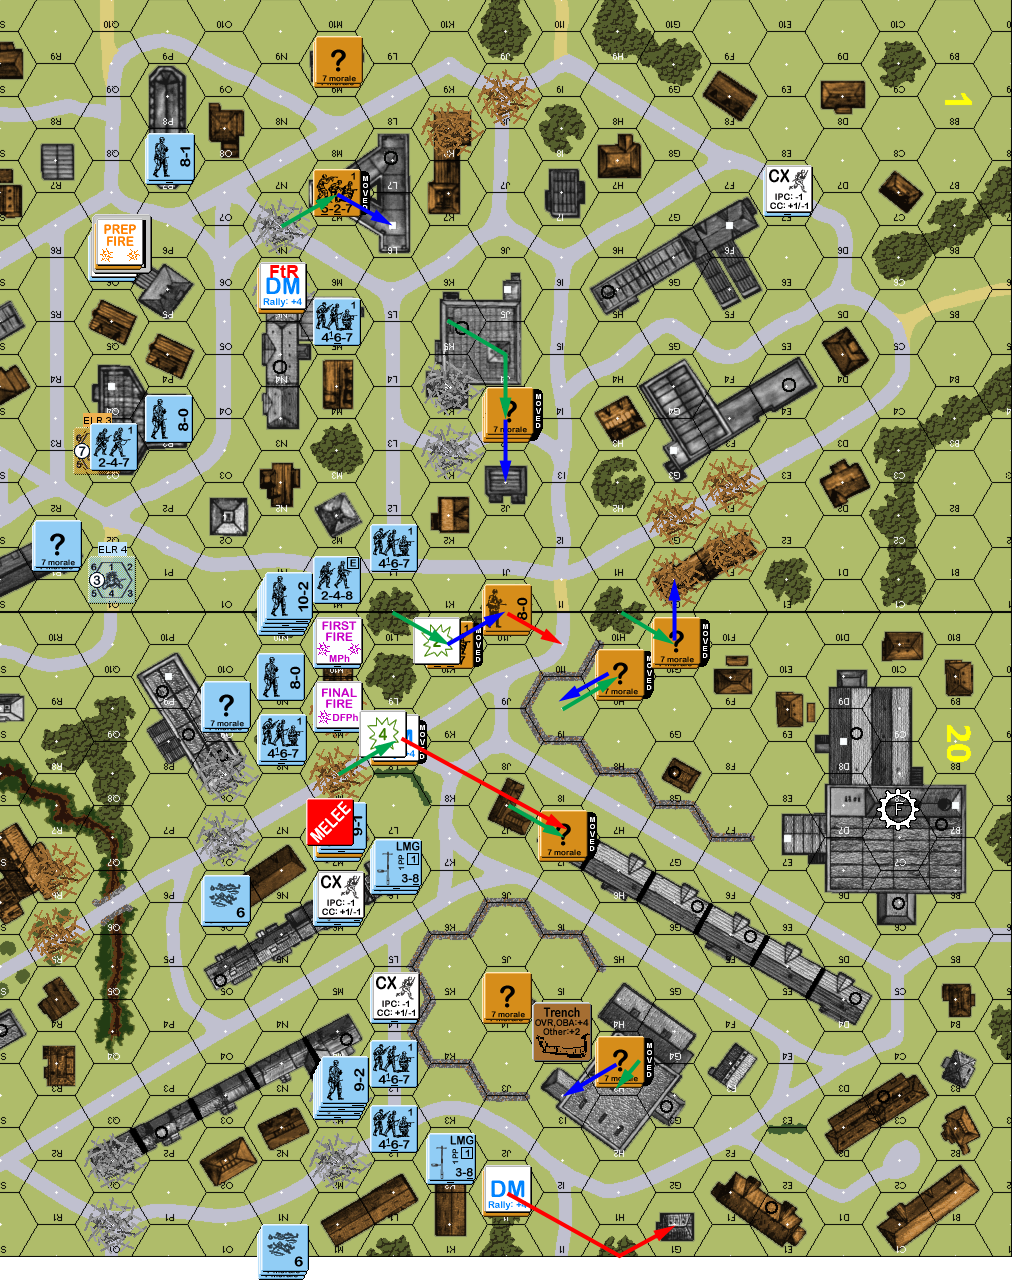
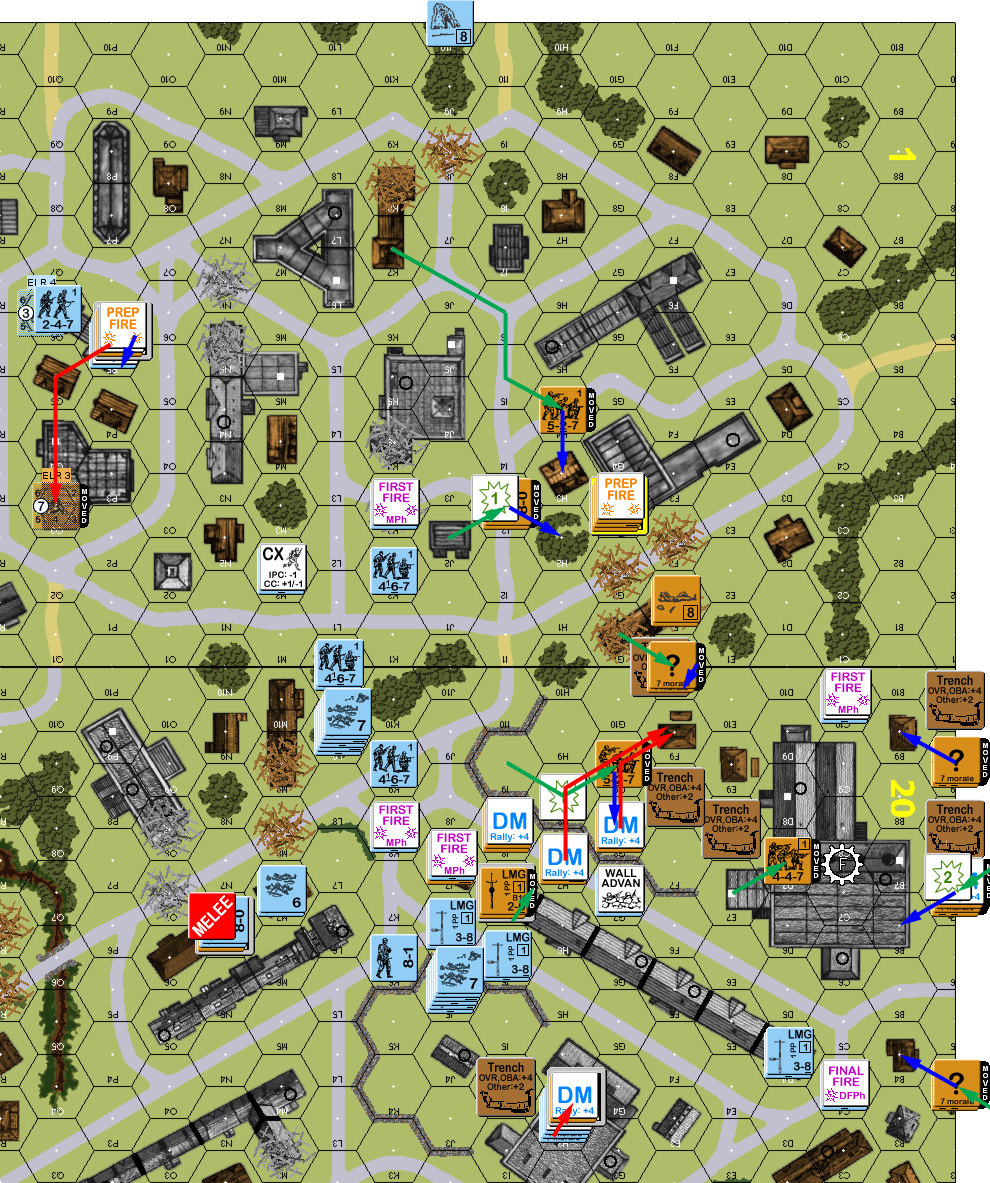
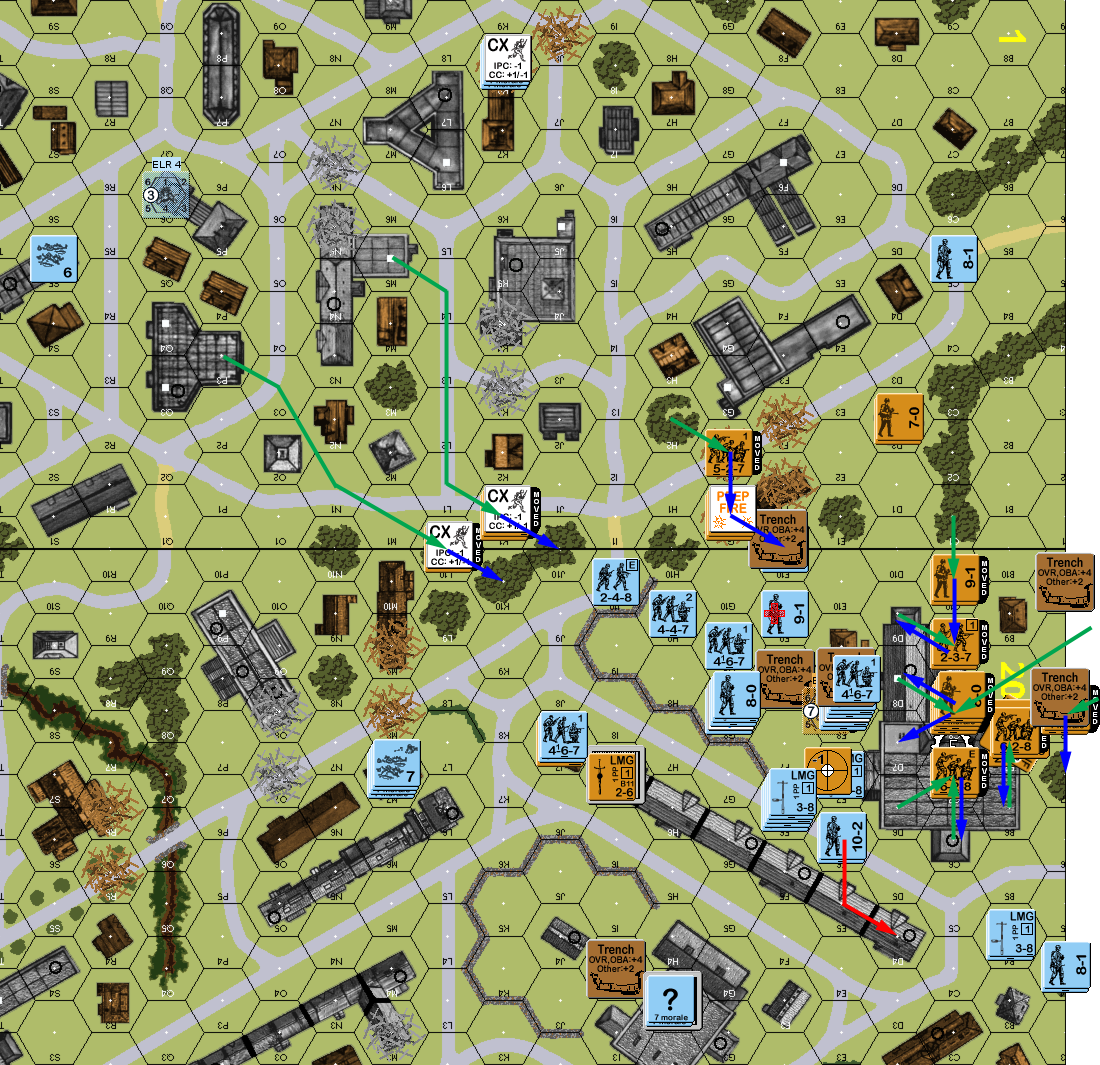
Situation, German Turn 2.
My first Reinforcement DR was 4,4; no help. However, I did rally one out of three squads (all DM), while Martin rallied all but one squad and repaired the MMG. This left him a single broken HS who was was away from leader support. But he had advanced his 9-2 stack into 20Q3… a straight range-8 shot down the street from the HIP LMG in I7. I contemplated revealing and trying to get a result, and if it had been the MMG, I would have. But a 4FP +0 shot just wasn’t good enough, and I decided to wait until he got closer. Maybe he’d stay in the nice ‘safe’ open street.
The recovered squad in 20L9 prepped at the adjacent HS, but rolled a ’12’… and we both forgot about the Ammo Shortage. Movement wasn’t better. I mostly skulked again, but the squad in 20M6 tried to dash across to the walled area of J4, but took a KIA from the 9-2 (just falling back to L6 and taking his chances with getting swarmed would probably have been better than an 8FP -4 shot…), another squad dashed from M4, and took two shots, the first of which broke him and the second eliminated him with a failed K/2, and my attempt to escape from 1P3 took a 3MC to eliminate the remaining prisoners and ELR my squad to conscripts. I also lost a Dummy (in 1L3) when I missed someone who could see him.
DFPh didn’t do any more damage, other than setting off my sniper, who moved closer to the 10-2 and pinned a HS. In RtPh, my squad in 20L6 attempted to surrender, but Martin declared NQ. Which was a good idea, because I advanced a squad into the only HS who could accept them, and he could have been in big trouble at that point. As it was, nothing happened and we entered Melee. Meanwhile, my still-concealed 527 in M10 advanced downstairs to attack the German HS there. I missed Ambush, the squad missed, and then the HS rolled a ‘2’, to wipe me out and generate a new 8-0.
There are no winners in CC, only losers.
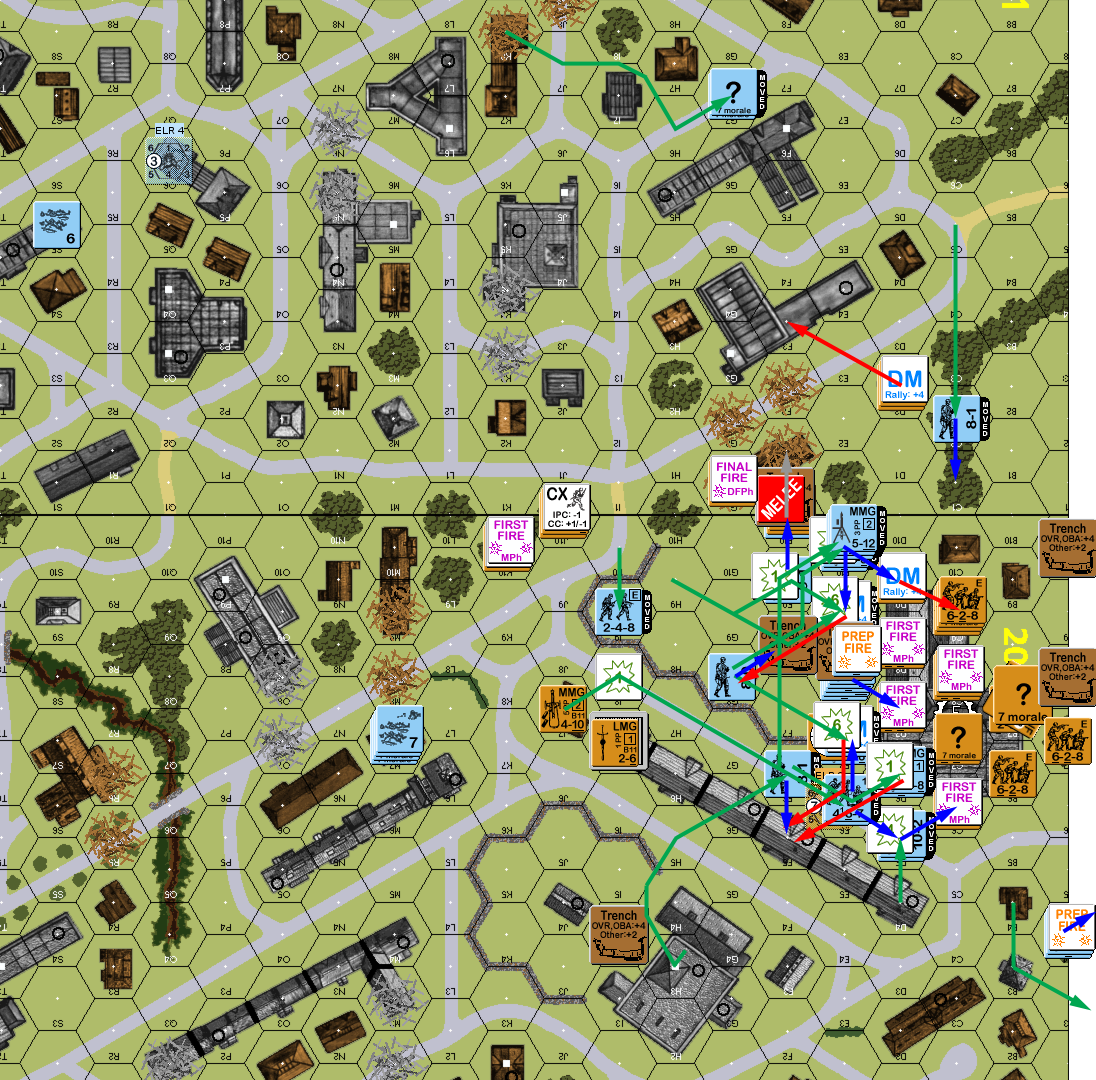
Situation, Russian Turn 2.
Martin rallied a squad for his turn 3, while I missed on a HS that was the only roll I had. He declared OpFire in 20M3 and went straight into movement. This mostly swarmed into the center, including the MG section that had wandered north moving back south again. I managed a shot at the MMG squad, but it didn’t do anything. Similarly, a shot at the squad pressing on the southern flank didn’t do anything either. But I did some results: a shot at another forcibly scouting HS in 20N7 broke it, and a squad that planned on causing upper-level encirclement in 1P5 took a KIA while Dashing across the street.
One squad from the 9-2 stack moved up the street, and I was strongly tempted to open fire, but held for the leader, who instead went south through the rowhouse. Final Fire against 20N8 pinned two squads, saving mine from facing 12:5 odds in CC. Thankfully, most Advancing Fire did nothing, though he did break the squad in 20K2 and Encircled 20M8. A squad and 9-1 piled into the Melee, reversing the odds from my turn, but both sides missed.
Situation, German Turn 3.
The second Reinforcement roll was 3,6; still no help, but tantalizingly close. Neither of us managed any rallies, and my only Prep (1Q6h1 @ h0) had no effect. With the center getting solidly squeezed, I finally moved the board 1 backstop out from 1K5 to where he could hit the flank of that advance. The 527 moved out the Encircled rubble, but broke to adjacent fire, though he later survived interdiction to join the 7-0 in 20I7. Final Fire managed to pin 1Q6, keeping him from advancing down to take the HS in CC. He also broke the 8-0 in 20J10 who was still trying to rally refugees of the initial defense. In the Melee, facing a 3:2 -1 attack, I got a ‘2’ to eliminate the HS and generate a 7-0. I then Withdrew into N6, avoiding the 9-1 & 467’s attack, and re-DMing a HS in O6.
There are no winners in CC.
Situation, Russian Turn 3.
Martin got nothing back for his turn, but I rallied the 527 in I7, stiffening the next line of defense a bit. I just hoped he didn’t get any fire on it that would reveal the 447+LMG ahead of time. Prep fire broke my new 7-0 and pinned the squad with him, and he declared OpFire with 1Q6 and 20M6. He was getting close to my final lines, but held fire looking for shots that could cause as much confusion as possible. He mostly pressed towards 20H3 this time, and a squad found out that I3 was real when it got adjacent and took a 1KIA. However, the shot had cowered, so when he put another squad into I2, FPF ELRed my squad into broken conscripts.
I also broke a squad that was advancing on 20J10, and in Final Fire, the pinned squad in 20N6 got a NMC on O6, which didn’t affect the 8-1, but did eliminate the HS he was trying to rally. A big AFPh FG got a PTC on J4 to reveal it as a Dummy. My 7-0 in 20N6 routed upstairs, and he advanced two squads and a 8-1 into the hex with the pinned 447 and got Ambush to kill him. He had moved a squad to the edge of board 1, but then advanced along the edge instead of exiting. It turned out that he had worries over how the prevent reinforcement SSR was worded.
Situation, German Turn 4.
For my turn 4, the Reinforcement DR was… 4,1. Still nothing, and I was feeling desperate. I had five intact squads on board against a nearly intact German horde. The good news was that I still had all my leaders, and of course, I had yet to reveal any of my HIP units, but that still made for long odds. An odd bit of other good news is that Martin had concealed units for being out of LOS unbroken units of mine, and despite a light poke I gave him, he didn’t realize that that that was breaking upper-level encirclement, as there no longer known units blocking the way down (from later, it seems he didn’t appreciate the differences between the two types and that upper-level encirclement can go away without moving). I didn’t manage any rallies, and Martin finally rallied the HS in 20N0.
I prepped with 1J2 and broke the adjacent squad, leaving him only to deal with a HS and the oncoming tide. I managed to evacuate the squad in 20J10 to the walled area in front of the factory, and that left me free to move the 447 already there cover further south, in/near the factory. I tried moving the squad+7-0 down for similar reasons, but 1MC while bypassing the black bar broke the squad. Even with all the other troubles, I cornered a couple of lone German leaders during movement, and Martin self broke them to keep them from getting killed in CC. I sent the broken squad back towards the factory, thankfully surviving Interdiction, and with a squad possibly coming down the board edge to get into the factory, considered turning the INF to face it, but decided to stay HIP since he couldn’t get there in one turn.
Situation, Russian Turn 4.
Martin rallied a squad for his fifth turn, while my 7-0 in 20N6 self-rallied since everyone below him was concealed and not keeping him DM. MPh showed that he was definitely starting to wonder about my defenses, as he started with a squad moving up to 20D3 and Searching. The second move, a 467 moved out of the walled area in J4… and was promptly broken by fire from the HIP 447 in I7. Then another squad moved into K7, only to be fired on by the squad in J7, but he was fine. His south-end squad moved up the road, but took fire from E7 and pinned. Another squad advanced to the wall in J9, and attempted to throw smoke grenades, but both my fire and his attempt had no effect. He dashed a squad to confront 1J2 again, and I managed to pin him to prevent any possible CC. Another squad tried AMing up to 20J7, but the MMG reduced it to a broken 2nd Line HS (’12’ on a 2MC).
…And then another squad tried moving to J8 and cut off the rowhouse block, and 1G3h2’s MMG opened up to pin him in the middle of the street. This apparently changed his edge-squad’s move, and they ended up heading straight for the factory, after getting the the shadow of some woods. Final Fire from 20I9 managed to break the adjacent squad, and another shot caused a passed PTC that set off my sniper… who pinned one of the HSs in 1Q6. Advancing Fire put together a large fire group that promptly broke the MMG squad in 20J7, and the 9-2 lead a stack that broke the 7-0 in I7 and pinned the LMG squad.
Overall, the turn had seen a fair number of Cowers on my fire, and that limited the damage I did. Annoyingly, adjacent -2 shots hadn’t gotten better than 2MCs, so while some guys did break, I’d been hoping to see a KIA in there. Worse, my breaks meant what I had hoped to be a main line of defense evaporated almost immediately. I tried withdrawing the two broken units across the street towards G8, but they both pinned on Interdiction. To my surprise, he advanced two 8-0 into CC with my 7-0 in 20N6h1. I hoped to get lucky with a 1:2 attack, but neither of us got anywhere.
Situation, German Turn 5.
My Reinforcement roll for turn 5 was 4,2. Yes! Four squads, right when I really needed them! Sadly, I still couldn’t rally anything, while Martin rallied an 8-0, and a squad in 20L10. The MMG+squad+9-1 in 1G3 wasn’t able to get any results in Prep, but the squad still trapped in 1P5 broke the HS below him.
I set up a squad each to AM into 20A4, A7, and A9. The fourth tried to move directly into the south end of the factory, but he broke before he could get there. This forced me to have to shift the remaining defenders south, and largely give up the outer wall. As I contemplated 20I7, I realized he just wasn’t going to get out of there, and that I should have just prep fired him. But, for the moment he was safe, only suffering a NMC during Final Fire, which he passed. However, he did get a 1KIA on I6, killing the 8-1 and eliminating the broken squad from the LLMC. I tried to take on both 8-0s in N6 again, but rolled a ’12’, and then the 8-0s got me.
Situation, Russian Turn 5.
Martin rallied two and half squads for his turn 6, along with the 8-1 up in 1J10. I finally rallied the 8-0 in 1F1, but couldn’t get anything else. This time, Martin’s first shot broke 20I7, but at least it tied up a full platoon with the 9-2, and reinforcements were getting more likely by the turn. The 467 in C10 went into the factory, presumably trying to avoid point blank shots, when the INF fired from the next hex and broke him while retaining rate.
His first attempt at the wall, met fire from 1H2 which broke that squad. It also set off my sniper (‘2′), so I relocated him to 20I9. Then an LMG squad came through the rowhouse, but broke to fire from 20D6. An 8-0 raced into I7, which would kill my squad for FtR, so I fired the remaining MMG in 1G3 at him, hoping to break him, and at least force someone else to try that (as he’d rout first), but he passed the 1MC, so I took a ROF shot… and rolled an ’11’, which with Ammo Shortage eliminated the MMG.
A squad tried going around the residual by bypassing J7, but the squad in 1G3 broke him on a 1MC. The squad in K2 started moving towards the factory, but by now it was obvious I wasn’t getting any good shots at leaders or MG-squads from 1M5, so he finally revealed, and ELRed the squad. Another attempt to confront the 527 in 20G7 moved through the rowhouse, and survived a 1MC, and sadly my squad cowered on the shot. Another squad at the wall… of residual I’d built, and he broke. This was followed by a squad+9-1 who walked through the residual, and took no result on FPF from G7 which pinned him.
After that, most of my fire was exhausted, and he could move more freely. Notably the 10-2 with a MMG and HMG squad moved up to the wall. He also repositioned to do something about my new 628 in B4, surprisingly even attempting to Dash the LMG squad at the end of the rowhouse back behind him, but fire from B6 broke him in the street. This was more like what I’d needed last turn; it certainly had Martin mourning all the broken troops he suddenly had. The main problem was the 10-2 was on the scene with a lot of firepower, and I’d permanently lost the MMG before it had had much chance to affect things.
I contemplated self-breaking G7 to save him, but left him in place as I was having trouble rallying, and hopefully he could tie things up in CC for a bit. Despite being pinned, and going against a 9-1 leader, he got Ambush and wounded the 9-1, while he did nothing.
Situation, German Turn 6.
My reinforcement DR was 6,5. Hold until relieved. My 628 in 20A7 self-rallied along with the 7-0 in 1E1 and the HS in F1 was finally rallied by the 8-0, while Martin rallied a squad in 20G6. This gave me enough to work with. My squads skulked to the interior of the factory, which also surrounded his broken squad, and I got the 8-0 over into it, and the HS positioned to advance in. The 9-1 and MMG-less squad hurried out of the building and towards the factory, while everyone else in that area slid closer to it. Sadly, the 10-2 managed to break my LMG squad in 1M5h2, and his fire managed to reveal my last Dummies in 20F10.
I had the factory fairly well covered, and +3 terrain was going to help…. Sadly, the Melee in G8 ended with the Germans wiping out my squad.
Situation, Russian Turn 6.
Martin rallied two squads (one self-rallied) for his turn 7. He skipped prep, went straight to pressing ever closer to the factory, and I started putting up another wall or residual. His first two attempts broke in three shots. Then he got a couple people over the wall, and one HS went to 20G10 to tie up SFF from 1G1. Then, another squad entered the factory after surviving fire from D6. The Inf fired, hit and kept rate… ‘2’ on the IFT. The squad died, leaving a bloody LMG in the factory. His next squad followed the trail of residual, and pinned right outside the factory.
Sadly, after that, things went better for him. On the other hand, he didn’t try to move anyone else adjacent to the factory either. Final Fire didn’t do any more damage, but his advancing fire broke the 628 in 20B4. While firing at D6, he activated my sniper, who wounded the 9-2. The 628 managed to flee into the factory without losing anyone to Interdiction, and Martin exited a HS in APh.

Situation, German Turn 7.
My turn 7 Reinforcement DR was 4,2; after adjusting for the HS, another three 628s. I self-rallied the LMG squad in 1M5, while Martin rallied a squad in 20J7 and a squad in G8 battle hardened. My prep was a single shot dedicated to keeping the other squad in that last hex under DM. As last time, I skulked into the interior of the factory, and moved two new squads directly in, while the third went into the A8 trench to advance into A7. I looked for ways for my two free squads on board 1 to get at 20M7 to get them under DM, but just couldn’t do it, so they went for the woods line near the factory wall that had so recently been occupied by Germans.
Martin tried a few shots at the new troops, but they were blocked, and several more at my flanking troops. Those didn’t do anything, but my sniper went off twice, first pinning a HMG squad, and then breaking the squad with the 10-2. I redistributed the troops to have a double-line of defenders, largely staying away from the Germans, but putting two new (and concealed) squads into 20D7 & D8; with the adjacent kill-stack, they might go down, but they’d chew up precious time being shot at. The 447+8-0 in 1G1 went into CC with a HS F1, while a 527 took over his post covering the field. Despite attacking at better than 2:1, I did nothing, and my leader was wounded.
Situation, Russian Turn 7.
The two squads in 20M7 still didn’t rally for their time without DM, while the second squad in G8 did, and the squad with the 10-2 did. Meanwhile, I got a 628 back. The big stack in E8 did spraying fire against my two new squads, and revealed them with a 1MC, but neither broke. Fire from A4 revealed the other new squad in A7, but didn’t break it either. The first squad to come up to the factory this time had buildings as cover, and both of my shots at it cowered, including the first one suffering ammo shortage, to reduce 1G1 to a conscript squad.
In fact, I had a lot of ineffective fire to start with, including a squad moving into E7, the INF firing on it (with Acq), hitting and keeping rate twice, and not affecting the squad. At that point, D7 opened up and got a K/3 that ELRed the remaining HS. Another squad came up to E9, survived residual, the other 628 fired, and broke it. He moved a squad around the north side of the factory, and my HS used FPF… which broke the HS. During DFPh, I pinned the one squad outside the trench in E8, and the INF fired on D6, finally revealing itself on a cdr of 6, but breaking the target squad with a 2MC. In return, advancing fire pinned C6, and broke both of my guys in the F10 Melee while only pinning his HS.
Advance went all over the place, with Germans spreading out into available portions of the factory, and starting two close combats in D7 and C6. He also fed the wounded 9-1 into the E10 Melee, though it didn’t help, and my guys successfully Withdrew out of it. He managed Ambush in D7 and reduced me to a HS, but didn’t manage an Ambush in C6 despite the 10-2 and me being pinned, but still wiped me out for no losses.
Situation, German Turn 8.
Martin had exited a squad during MPh, and another squad+8-1 in APh for a reduction of five in my reinforcements. Naturally, the DR was 5,3, which just knocked off his suppression of them. My HS came back, but I couldn’t rally anything outside the factory, while Martin finally got his two squads in 20M7, and got the squad and a half that had just routed to F5.
My back was getting against the wall, so there was a fair amount of prep. Of course, with fire inside a factory only being +1 (plus Hindrance…), this was also the time for it. My first shot broke the squad in D9, and took a fair amount of pressure off, since it meant I was no longer being squeezed on north and south. Even better, next I broke the 10-2 in C6, and pinned the squad with him. Finally, I broke the HS in F10.
My main gambit this turn was to get at my abandoned MMG in 20J7. I sent one of my squads forward, and he broke from his guarding HS’s fire. The second one swung around… and was pinned by SFF. At least he could still fire on the two recovered squads if they took a direct path to the factory. I continued shuffling around in the factory, and reinforced the Melee with a 628 (for 9:8 total), and moved into C6 with a concealed 628 against his pinned squad. I missed the Ambush (despite -2 vs +1…), but reduced him to a HS, while in D7, I attacked the MMG squad… ‘2’! A new 7-0 promoted, the MMG was destroyed, and I withdrew out to D8 and D6.
Situation, Russian Turn 8.
Martin had a good RPh for his ninth turn, getting his 10-2 back, battle hardening a squad and a half, and getting a hero. With everyone in close proximity, PFPh was very active. The HMG in E8 opened, up, breaking my new 7-0 while retaining rate, and set off my sniper, who… went to E8, and put another bullet into the wounded 9-2, who died this time, and the LLMC broke the squad. The MMG in E9 fired and broke the squad with the 7-0 while also killing him. The squad in D7 managed to pin my 9-1 in C8 and break the squad and a half with him.
I was happy when a squad moved into E7, where the INF already had acquisition… until it malfunctioned, putting what had been a major part of my defense out of action. An 8-0 tried to move around behind the factory, only to be wounded and broken as soon as he came in sight of B6. He sent a HS out to draw fire from my HS, which worked, and he was able to put a squad and two leaders into D5 without trouble, but at least I broke the HS. During DFPh, I managed to break the squad in D7, who then died from FtR… part of the reason for picking on them in particular. The other part is it made things a lot easier for my broken units in D8 and C8.
Even more troops advanced into the factory, with more men joining the Melee, and two new CCs being declared. In 20D9, he took on a 447 squad with a squad and a half, 9-1, and the hero. He managed to miss Ambush, and there were no results. In D6 two squads and a 8-1 took on my HS, and killed it handily. He brought in a squad and 10-2 to the Melee in C6 against my 628, and neither of us got a result.
Situation, German Turn 9.
Martin had exited another HS during advance, and my Reinforcement DR was 5,4 to bring in another four squads and a 9-1 leader. My squad in 20J7 managed self-rally on a ‘2’, bringing in a new 7-0 (my third of the game!). The bad news was that nothing else rallied, including the 2.5 broken squads in the factory. Martin didn’t rally anyone, but did pick the HMG back up. While he had four squads and two HS in the factory, only one squad and a HS was currently had LOS off the edge, and they were tied up in Melee. Martin only had one more turn left to get in position, so my primary goal was to feed more men into the Melees and keep them going, so they couldn’t move (and in a pinch not even be GO in another turn), while blocking access to the few squads still outside.
For prep, C7 fired on D6, breaking the 8-1 and one squad, and activating my sniper, who then broke the HMG squad in E8. B6 also fired on D6, for no effect, and, feeling desperate, C9 fired into the Melee in D9 for no effect. I fed one new squad directly into C8, while the others stayed safely concealed with shorter goals. I tried to recover my MMG, but failed, before moving out to interdict the street between his last real reserve and the factory.
Final fire broke the squad in C7, and reduced the broken squad in J10. Martin lost a squad in F9 to FtR, leaving a wounded 9-1 alone there. I had an adjacent squad… of conscripts, who going out of a trench into a building went CX, so I really had to consider if I wanted to attack that leader, but in the end I went for it. I moved new units into the edge of the factory, while reinforcing each Melee with a squad, and sending one to take out the lone 8-0 in D7.
In D7, 6:1 odds were sufficient to kill a lone leader (barely), and in F9, the conscript squad was able to do the same. In D9 the overall odds were 10:8, and I attacked the squad+SMC at 1:1 and the HS at 2:1, while Martin went for a single big 1:2, with only the attack on the HS working. In C6 the overall odds were 12:7, and my 628s split up again for a 1:1 and 3:1 while he went for a big 1:2 again, and I got KIAs on both attacks, while losing a HS in return.
Situation, Russian Turn 9.
Afterword
At that point Martin conceded. There wasn’t much left, it probably wasn’t getting into the factory, and he was out of negative modifier leaders to put the dice in his favor with.
He congratulated me on a nearly perfect fallback defense. It sure didn’t feel like it at the time. I was trading space and men for time, and not feeling like I was getting enough of the latter for the number of men (I was happier with the rate he was advancing). A single early 628 would have left me feeling a lot better, as then I’d have someone directly in the factory other than the INF. I had two “?” nearby that could help, but one was a Dummy, just to convince him I had more ready for a final defense of the factory than I did.
I also had somewhat higher hopes for my sniper than was the case. It did go off several times in the early game, but mostly just pinned the German sniper instead of eliminating it or causing havoc in the German lines. After being quiet in the middle game, it came back active for the end, and really did some important work, killing a leader, which broke the HMG squad, and then later breaking a new HMG squad. However, MVP goes to the INF gun crew. They saved the day when his initial squad got in, and then helped out with a timely KIA as he got in again; it definitely bought some much needed time.
No matter what, the initial turns are going to be very rough on the Russians. While the number of squads isn’t too different, and the Germans don’t have any special toys of FTs or DCs in heavy terrain, the Russians have to put an initial defense across a 20-hex front, and the Germans mass a concentrated push. If the Russians don’t defend the entire area, they risk something like my first game, where I shredded what little was on board 1, and rendered a fair ammount of the setup useless.
I’m not sure where Martin went wrong, though he certainly fell down at around the same place I was afraid of in my first play: getting into the factory and staying there is tough. He had a fairly cohesive force until he reached the factory. The main thing I see on on turn 2, he sent a decent force north to deal with board 1 defenders who were still in place, and then moved them back south again on turn 3. I think if the 10-2 and the MGs had been consistently pressing towards the factory in that time, he might have gotten there a bit faster.
At any rate, it was a very tense scenario all the way to the end!
Question
SSR5 says “Future Russian reinforcements are lessened by one squad in the next RPh in which the Russian would otherwise receive reinforcements for every German HS equivalent … off the east edge”. Martin was initially worried that this meant the exited Germans only counted for the turn they left (‘the next RPh’), but I pointed out that a fuller reading was fairly clear that the Russians had to have a successful roll first (so a ‘5’ cdr on turn 4 isn’t a RPh where they’d ‘otherwise receive reinforcements’).
That still leaves the hair split of say, the Germans exit two squads on turn 7, which would reduce reinforcements by four squads, but the Russian has a cdr of ‘2’. It’s still a ‘RPh in which the Russian would otherwise receive reinforcements’, so are the extra two lost squads… lost? Or do they carry over to the next RPh still? I tend to think the intent was for them to carry over, but a strict reading of the language tends to say they don’t.
Discussion ¬