Rindis.com

All my hobbies, all the time
  • Home
  • My Blog
  • Games
  • History

Categories

  • Books (503)
  • Comics (10)
  • Gaming (917)
    • Boardgaming (673)
      • ASL (154)
      • CC:Ancients (83)
      • F&E (78)
        • BvR – The Wind (26)
        • Four Vassal War (9)
        • Konya wa Hurricane (17)
        • Second Wind (5)
      • SFB (78)
    • Computer games (162)
      • MMO (77)
    • Design and Effect (6)
    • RPGs (66)
      • D&D (25)
        • O2 Blade of Vengeance (3)
      • GURPS (32)
  • History (10)
  • Life (82)
    • Conventions (9)
  • News (29)
  • Technology (6)
  • Video (49)
    • Anime (47)
  • Writing (1)

Patreon

Support Rindis.com on Patreon!
Become a patron at Patreon!

Other blogs:

RSS Inside GMT

  • Meet The Northern Wei: A Civilization of GMT’s Ancient Civilizations of East Asia  June 19, 2026

RSS Playing at the World

  • Playing at the World 2E V2 Arrives May 5, 2025

RSS Dyson’s Dodecahedron

  • Blog Updates June 20, 2026

RSS Quest for Fun!

  • The Expense Post May 24, 2026

RSS Bruce Heard and New Stories

  • Pain, Exhaustion, and Morale in D&D BECMI June 7, 2026

RSS Chicago Wargamer

  • The 2 Half-Squads - Episode 310: Cruising Through Crucible of Steel January 27, 2023

RSS CRRPG Addict

  • The Search for Freedom: Our Repeated Petitions June 20, 2026
SF&F blogs:

RSS Fantasy Cafe

  • The Leaning Pile of Books May 24, 2026

RSS Lynn’s Book Blog

  • Summer of Horror: Can’t Wait Wednesday: Sleepers in the Snow by Joanne Harris June 17, 2026
ASL blogs:

RSS Sitrep

  • Cardinal ASL Sins March 18, 2026

RSS Hong Kong Wargamer

  • FT114 Yellow Extract After Action Report (AAR) Advanced Squad Leader scenario April 16, 2025

RSS Hex and Violence

  • This still exists? March 25, 2025

RSS Grumble Jones

  • YouTube AAR for Critical Hit's Gettysburg Turning Point 1863 - ID4 At Will Fire June 16, 2026

RSS Desperation Morale

  • How to Learn ASL March 16, 2025

RSS Banzai!!

  • October North Texas Gameday October 21, 2019

RSS A Room Without a LOS

  • [Crossing the Moro CG] T=0902 -- Rough start July 18, 2015
GURPS blogs:

RSS Dungeon Fantastic

  • GMing Shortcuts in Felltower June 17, 2026

RSS Gaming Ballistic

  • B-Scale: Damage That Scales from Tardigrades to Kaiju June 5, 2026

RSS Ravens N’ Pennies

RSS Let’s GURPS

  • Review: GURPS Realm Management March 29, 2021

RSS No School Grognard

  • It came from the GURPS forums: Low-Tech armor and fire damage January 29, 2018

RSS The Collaborative Gamer

  • Thoughts on a Town Adventures System January 18, 2022

RSS Don’t Forget Your Boots

  • GURPS Supers Newport Academy #6: “Old Friends, New Again” June 7, 2026

RSS Orbs and Balrogs

  • Bretwalda - Daggers of Oxenaforda pt.4 - Fallen King May 27, 2017

SH53 Border Incident

by Rindis on December 29, 2017 at 12:00 pm
Posted In: SFB

Crossposted from the SFU blog on BGG

After our last big game, Patch suggested we do an SFB game next. After rooting around in the scenarios for our current year (Y160) a little, we decided upon “Border Incident”, a scenario originally meant to showcase a miniatures boxed set, and featuring the new Romulan KR ships.

The Romulans created an incident designed to test their new ships in battle—a battle balanced well in their favor. An old “Warbird” ship attacked a Federation outpost and then fled into the Neutral Zone, drawing a Federation CA after it. The new Romulan ships Proconsul and Tribune were waiting in ambush, and the first test of these ships seemed well under control. Unfortunately for the Romulans, it did not go according to plan.

The scenario starts with the CA closing in on the WB+, with a KR and K5R showing up on turn 3. A Gorn CL shows up to help the CA on turn 4. Patch volunteered to take the ‘allies’ in the scenario, so he wouldn’t have to worry about reading the cloaking rules in detail (only the WB+ cloaks, the KRs don’t have them for this scenario), but ran into trouble. A 50-point plasma torpedo requires a lot of respect, but I don’t think he really comprehended just how limited a sublight ship is even with cloaking reducing damage. The WB has three choices, move one hex on impulse 32, do one impulse tactical move (turn) anytime from Impulse 2 on, or spend no energy, and get one free turn in place on impulse 32. This means where it is is a given, and only facing could be variable. With the WB+ facing away from the CA at start, staying out of arc of the Pl-R on approach is easy.

Studying the situation again now, I’d go speed 21 (the WB+ is 20 hexes away) to get into its hex on impulse 31. Assuming the WB+ goes, and stays, cloaked for this, 6xPh-1 at effective range 5 should do 12 points of damage (after reduction from cloaking effects). The Photons should be half full overload, and half standard (all allowed as prior arming for WS-III; no further overloading is done for flexibility and lack of energy), and then reserve power dumped into the photons to overload them for the point-blank shot. And that’s where this plan is iffy, since there’s a decent chance that all four will miss (1:16), but with full reserve power put in, there should be 2×16 and 2×12 point shots, and lucky rolls will easily kill the WB+ (average looks to be ~16, for a total of 28, or not enough to get through the armor, more’s the pity). No matter what happens (well, other than the WB+ blowing up), on impulse 32 watch the WB+ move first (if it didn’t Tac), and move into a hex it’s not in. On turn 2, go speed 4 and launch a Wild Weasel while reinforcing the shield facing the WB+. The WB+ probably started decloaking on Impulse 32, and fires (after Tacing to face the CA) on Impulse 5, and the WW moves on 6 before it impacts, so the only damage done will be from the phasers. If the WB+ doesn’t launch the R, there’s a problem, as you’ll still be ~5 hexes away at the end of the turn, and limited to speed 14, with the KRs coming on.

And it’s the KRs on turn 3 that keep this from being a walkover. With one more turn, the CA can counter anything the WB+ did to counter all of that, and two-three would allow another pass that can probably punch through whatever’s left on the rear shield and do damage that it can’t recover from. As it is, it should be noted that with 9 total power, shield damage is probably permanent, as there’s not enough to regenerate them with (I’ll note here we used the original Basic Set WB+, not the Y1 version with two more impulse power as the scenario was published ages before that came out).

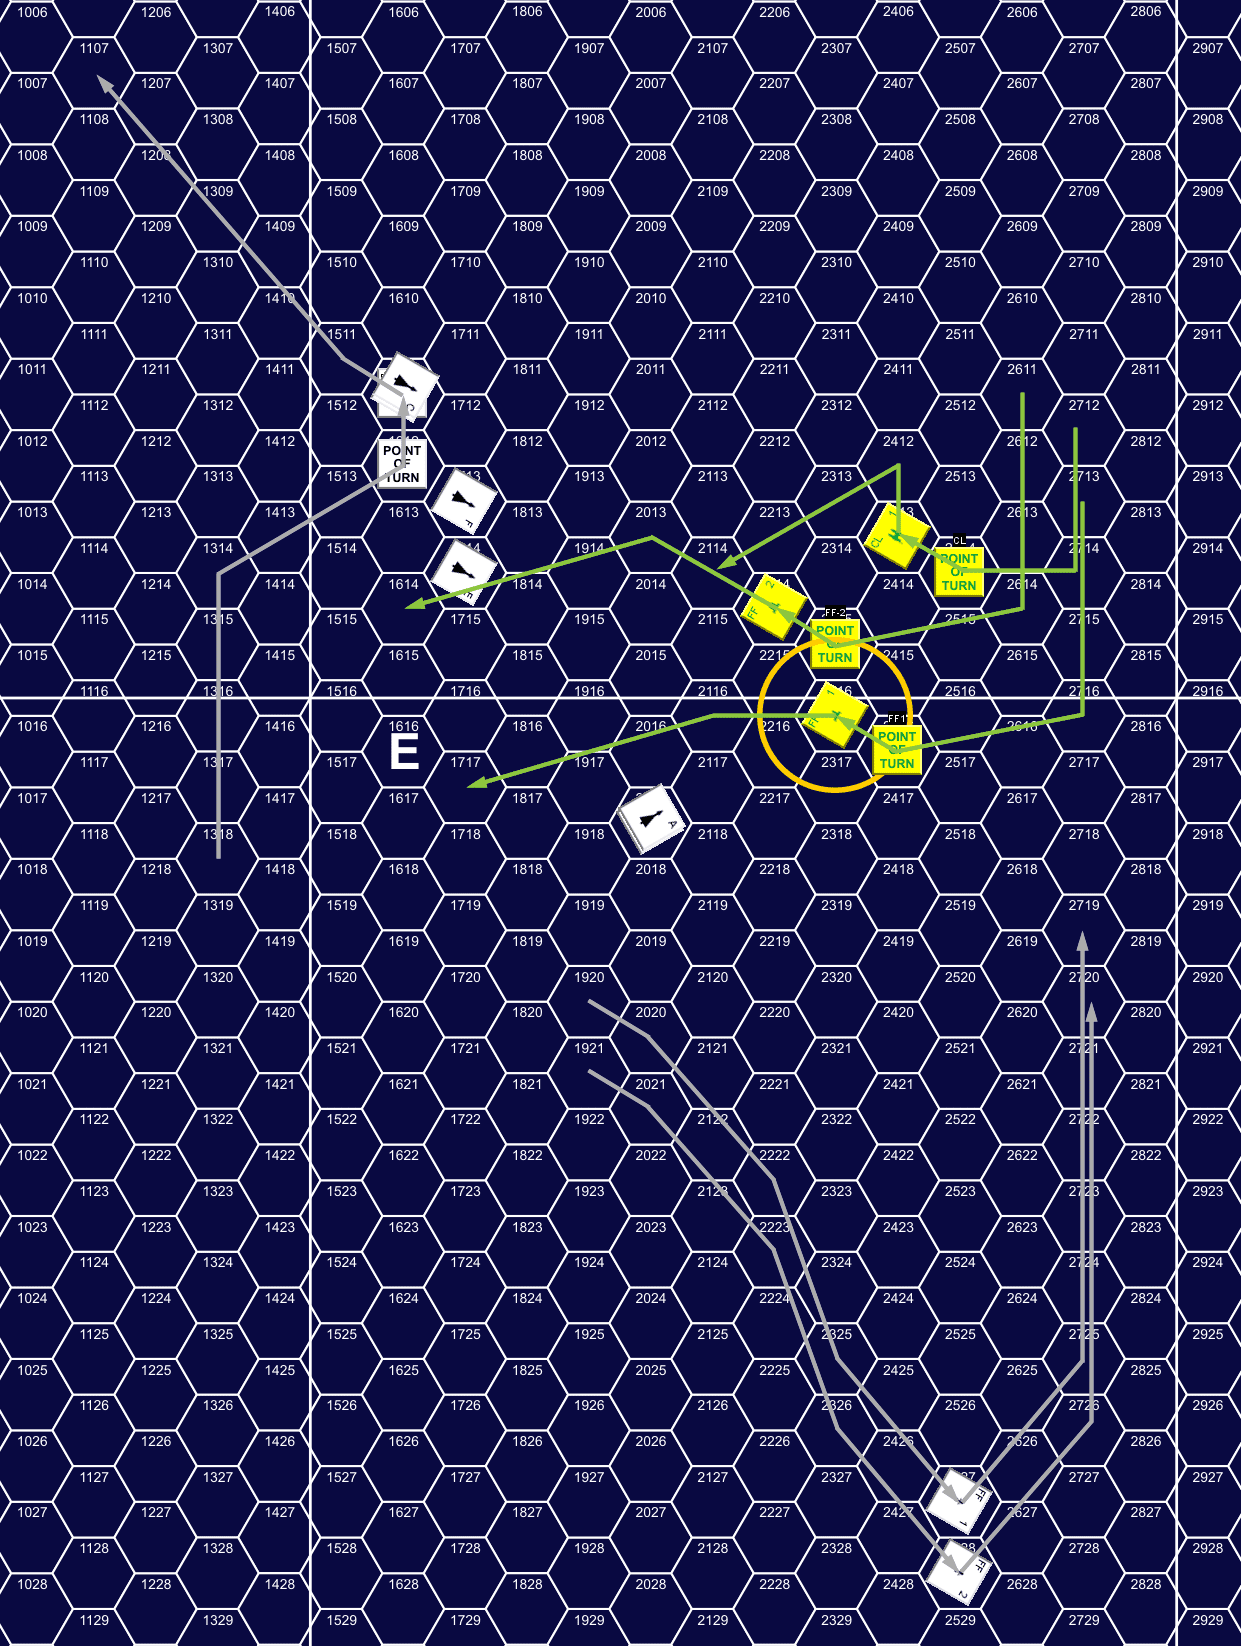
As it was, I went speed 1 to get a little closer to where the KRs would show up, and Patch went speed 20, cautiously approaching from one side and behind. Not liking how things looked, Patch aborted the attack run on Turn 2, boosting speed to 22 and ejecting all four torpedoes to re-arm them as standard/proxes. He held to speed 22 on Turn 3, and I entered at the bottom right with the KR doing 21 and the K5R at 23. Patch basically went straight for the Gorn entry point, while I tried to close the distance. Towards the end of the turn, the CA started turning around, and hit the K5R with one out of two prox photons.
↓ Read the rest of this entry…

└ Tags: bgg blog, gaming, SFB, Y160
2 Comments

Destroyer Demolition Derby

by Rindis on February 6, 2017 at 12:00 pm
Posted In: SFB

Crossposted from the SFU blog on BGG

Somewhat to my surprise, after Patch and I finished up “Arctic Crossroads” he suggested an SFB game. He wanted smaller ships, and something other than Klingons, so I looked to a Kzinti-Lyran fight (appropriate as they’re also involved in the Four Powers War right now) with squadrons using ships smaller than CAs.

The Kzinti produce their first Destroyer in Y159 (our current playing date), and I certainly wanted to show it off, as I don’t think it appears in many scenarios. It’s mostly known as an ‘also ran’ ship, as production is halted in favor of the later Medium Cruiser, and it is relegated to second-line duty during the General War. But right now, it is brand new, and effectively the one of the most advanced designs around, and certainly the best ship the Kzinti have for the tonnage. At a Move Cost of 1/2, it has 24 power, 2xdisruptors, 4xph-1, 2xph-3, and 4xdrone racks. This is more power and firepower than the larger Light Cruiser class, which it is effectively replacing (the CL will be refitted to have more power, more disruptors, and bring its drone racks up to 4, but that’s a few years away still). It shows a shift from ph-3 to ph-1s, and an increase in drone throw weight (eventually, just about all Kzinti ships have at least four drone racks, but until now, that’s only been true on the much larger CS/CA/CC hull as well as the seven racks on the much larger DNE).

Then I chose a Lyran Light Cruiser to lead the opposite squadron. It has the exact same BPV as the DD (after adjusting for the lack of ESG capacitors), and while larger with more internals, and it has slightly better phasers (4xph-1, 4xph-3), coverage isn’t quite as good, and its shields are slightly weaker than the DD’s.

Both sides’ squadrons were rounded out by a pair of frigates, which also happen to have the exact same BPV, and fairly similar characteristics. Patch, as it turned out, went for a full load of Type-II (speed 12) drones, with no larger Type-Vs, for a total cost of 16 BPV. I vaguely contemplated taking some transporter bombs, and I should have, but neither of us took any.

We set up, and rolled randomly for Weapon Status (with a +1 for a war zone), and ended up with WS III. That was to my advantage, as the Kzinti don’t have any multi-turn weapons, and it meant my ESGs were already fully charged. I also had a suicide shuttle pre-charged on the CL. The Kzinti squadron went speed 15 for the first turn, as did my CL, while my FFs went 16. We simply closed the range for the first half of the turn, but the DD turned off at about range 25. During impulses 28-30, we fired as ships hit range 15. I stuck to disruptors, which all missed with six straight 5s. Patch launched half his drones on each ship, and volleyed all his disruptors, which all missed with three 6s and a 4, while four phasers he fired also missed on “better” rolls (two 3s and two 4s). On impulse 32, I turned towards the Kzinti FFs to see if could engage them separately from the DD.

With ranges coming down fast, I decided to put power into overloads on CL, and EW on the FFs, and went speed 9 for the CL and speed 13 on the FFs. Meanwhile, Patch sped up to 19 on his FFs while the DD stayed 15. Patch was surprised I hadn’t boosted speed as well, which I had considered, but I wanted to be prepared for a close-range pass (and the FFs stayed on regular disruptors in case something like this happened). Sadly, I only had slightly better EW than Patch, but it meant I would have even shots at his FFs while everyone else was at a +1 to fire at each other.

Patch’s FFs turned off on Impulse 4, confirming my fears that he would just dance around my slower-moving squadron this turn. On Impulse 10, I turned towards the gap between Patch’s forces and starting warming up an ESG to tackle the wave of drones that was in there. To my surprise, Patch turned his DD in shortly after, allowing me to get closer to it. Things started coming to a head on Impulse 15, when my FF-1 started sweeping the drones with its ESG, and my FF-2 and the DD traded shots. Both ships hit with one disruptor, and missed with the other, and had similar phaser rolls, though the ph-2s on my FF led to less damage being done.

On Impulse 18, I turned towards the DD, as it turned back away, launching its last two drones for the turn (the other racks had staggered fire over the previous few impulses). The DD scored another 4 points on the front shield of FF-2 with the 360-phasers, while the CL did 15 points to shield #3 of the DD, hitting with both disruptors and one good phaser roll (a second phaser missed entirely…). The next impulse, FF-2 announced its ESG, and I fired another three phasers at the DD. FF-1’s phaser missed, but the remaining ph-1s on the CL both rolled 1s to knock down the shield and do 5 internals, including a ph-3 and two power. That was pretty much it for the turn, though on Impulse 28, the two Kzinti FFs fired disruptors at my FF-1, with one hitting, and on the next couple impulses, they launched drones.


Turn 2, Impulse 18, showing movement throughout the turn.
↓ Read the rest of this entry…

└ Tags: bgg blog, gaming, SFB, Y159
 Comment 

SL294 Operation Stabilize

by Rindis on January 5, 2017 at 12:00 pm
Posted In: SFB

Crossposted from the SFU blog on BGG

Just as Patch and I were gearing up for an SFB battle in Y159, I got Captain’s Log #42, which featured a scenario set in Y158. Mark and I found time to give it a try this last Monday, since we were both still off work for New Year’s. We had a lot of catching up and chatting to do, which was great, but did hold us to only getting four turns in.

One particular action early in the operation involved two Hydran frigates: the Brazen and the newly commissioned Catkiller. The Catkiller was one of the first of the new hellbore-equipped ships. The two frigates were returning after not having found anything worth attacking when they picked up a small Lyran convoy nearing a base station. The frigate commanders diverted to attempt to destroy the convoy before it could reach the station. The convoy’s escort, a Leopard destroyer, had been called away to another location during the earlier stages of the Hydran raids. Those Hydrans had been driven off before it arrived. It returned to its original mission just in time to attempt to protect the freighters from the Brazen and Catkiller long enough for the convoy to get under the umbrella of the base station’s weapons.

It’s yet another battle that features early use of the new hellbore torpedo, though it doesn’t headline the scenario the way it does for “Where Wisdom Fails” or “Catching Hell”. We had to review the hellbore/ESG interaction rules, since they just haven’t come up for our group before. The setup is on two maps, with the freighters about 50 hexes from the base station, and the DD actually a few hexes in front of them, while the Hydrans come on the board 26 hexes away from the freighters and slightly in advance of them. While the BS’s ph-4s can reach that far, they don’t do much (or possibly any) damage at that range, and lending EW only works out to 15 hexes, so it’s mostly an appropriate ‘end goal’ for much of the game. Victory is with a unique schedule of points that mostly revolve around destroying cargo boxes on the freighters.

Mark had the Hydrans went fast the first turn, 21, while the DD went 15 with one overloaded disruptor, and the freighters kept together at speed 10 (which is the best the F-S can do without turning off fire control completely). The initial pass weakened shields, and I did a few internals to the CU, knocking out a phaser and a little power, but no more than that.


The main action after Turn 1.

The second turn featured some slowing down to charge everything up. I interposed the DD between the Hydrans and freighters, and was about to announce the ESG to force him to turn off (since the hellbore had fired last turn) when Mark did so anyway. In the maneuvering that followed, he got a few internals on the DD and took out a disruptor and the ESG, which gave him greater freedom to maneuver.


End of Turn 2.

Mark pounded the small freighter during turn 3, and completely depowered it. The main action over the next turn was grabbing the large freighter in a tractor and trying to haul it back away from the BS, since it was nearly to range 15, where it could loan ECM, and the ph-4s on the base would get even more dangerous. However, this was a slow process, as the F-L was larger, and still going at a good speed. Given a little time, he could depower it some more to help, but the DD would eventually come back to help. Meanwhile, the DD had tractored the F-S, and was hauling it closer to the base.

It’s hard to say just where the scenario was going at the point where we had to leave it. Certainly, if Mark managed to completely destroy the F-L, he’d have 93 points (including destroyed cargo on the F-S), but both of his ships had been damaged, for a final total of 83, and a Tactical Victory. However, since the DD was in generally good shape (though with two down shields), it would not be that easy. Quite likely, at least one of the frigates would be crippled, which would drop him down to 68 points and a Marginal Victory. If I drove him off with the F-L, say, half-destroyed, that’d be… (call it 28 cargo vs. two crippled frigates) -8 for a Tactical Defeat. I’d say we were headed for a draw or Marginal Victory for him.

It’s hard to properly protect the freighters, but Mark was rightly worried about the fact that they were getting closer to the BS (which is why he tractored the F-L). Sacrificing the DD will actually work if it can buy enough time to save the freighters. Mark got lucky that the ESG was hit early, before I had a chance to use it, but the HN had taken 14 internals, and the CU had taken 21, including the hellbore, and the Scanner was down to ‘5’. The DD had taken 11, but its shields were in better shape, and it was about to repair the second disruptor as a range-10 version. It’s easy to ignore the BS in the early game, but it should be taking some potshots with the ph-4s and the disruptor, while keeping self-generated ECCM up.

└ Tags: bgg blog, gaming, SFB, Y158
 Comment 

SM2 The Space Amoeba

by Rindis on December 18, 2016 at 12:00 pm
Posted In: SFB

Crossposted from the SFU blog on BGG.

Last year, after running through the first SFB monster scenario, I figured I’d try to run through one of those each ‘game calendar’ year. Recently, Patch and I started up the ‘main’ fight for Y159 for us, so while I was down visiting my dad, I started up this scenario, which is loosely based on the original series episode “The Immunity Syndrome”.

It’s mostly an exercise in the lab and research rules. The ship needs to generate research points, and when it has enough, it rolls for a random method to win the scenario. Shuttles, probes, and special sensors can also aid in this (scouts and survey vessels have a fairly easy time with this scenario), and range to the monster matters for how much information is collected. In the meantime, the monster does damage to the ship by rolling on the same information table, but scores damage from it. It only does one point of damage to shuttles each turn, but it also has MCIDS, so they are unlikely to live at range 3 or closer.

This leads to some timing issues: You base information (/damage) off of your ‘closest pass’ during the turn, but don’t resolve it until after the impulse sequence is over (which is natural, under the circumstances), meaning you have to record that info, and update it as the turn progresses. In this case, you also have to keep track of what shield the monster was on when you first hit that range, as that’s where damage will be scored. The major question is at what point in the turn sequence is the damage done? If it’s step 8C, Final Records Stage (when information from the labs is rolled, using the same table), then it happens after shield repairs are done (8A).

The minor (nitpicky and technical) question deals with what part of the impulse is range for information gathering determined in? A ship could tow a shuttle into range three, and then use the Special Landing Procedure to get it back out again (or just get it into the ship, which is also at range 3). Since MCIDS is in the Direct Fire Weapons chapter, it should fire at that point, and would get the shuttle out of harm’s way before MCIDS fires (though it does specifically fire at anything about to hit it during the Movement step, so maybe MCIDS doesn’t ever fire in 6D?). The only lab function that takes place during an impulse, identifying seeking weapons, happens in 6B4, which implies to me that range for information purposes might be best resolved then, which is before the shuttle shuts down as part of the landing procedure in Step 6B8.

A year ago, I was thinking of just going with Kzinti cruisers each year, and watching them upgrade. But currently I’ve been playing as Lyrans (I’ve got a Lyran squadron in the current fight, and should be playing as them against Mark soon), so I thought I’d get some time in on their CA. That may have been a mistake. It’s a good combat cruiser, with a higher-than-normal BPV of 131 (reduced for being before ESG capacitors), but it only has two shuttles and four lab boxes, meaning it doesn’t gain information particularly fast, but at least it has good shields. This meant that I needed 419 points from the labs instead of the normal 400.

Another wrinkle is that shield reinforcement doesn’t work on damage from the amoeba, so the only way to resist shield damage is by using damage control to repair damage done. Finally, the entire scenario is on a timer, after 20 turns the amoeba splits, and information gathering has to start over on both of them. So retreating out of range for a while to repair shields isn’t really an option either.

I initially approached at speed 18 to get close to the monster on the first turn, and then went speed 12 for the rest of the scenario, as that is a handy speed for managing shuttles (going faster than 12 makes it possible to kill your own shuttle once tractored, though good timing can still avoid that). The monster only goes speed 4, but moves completely randomly, meaning that it can be hard to get exactly the pass you want. With only two shuttles, and one of the possible solutions being a suicide shuttle, I flew them very conservatively to keep out of MCIDS range, and then played lots deck crew games to repair the shuttles in rotation.

By the end of turn 7, every shield had taken significant damage. #3 and #5 were nearly down, and were out of action for the rest of the scenario. A range 0 pass on the amoeba caused a 20-point hit on shield #1 while generating 40 points of information, and then I took the damage on #4 the next turn, which took out about half the shield, but only generated 4 points of information. In fact, the monster tended to roll slightly better on the table than I did for much of the scenario.

After that, I tried keeping to further passes, accepting slower information gathering (and trying to rely on the two poor shuttles more) while working the #2 and #6 shields, and concentrating repairs on them (and eventually all on #2 after a bad turn put it most of the way down, but #6 held out for a while). Turn 8 saw the use of the last probe (the fifth one being kept in reserve, as it is needed for one of the possible solutions), and I was getting worried about the time limit.

Eventually, another close pass (range 2, closer than intended) got a good roll, while doing minimal damage to shield #1 (8 out of the remaining 13), followed by two more good rolls got me to exactly the 419 points needed at the end of turn 16.


Log of information gathered during the scenario.

The roll for the solution… 3! Do 200 points of damage to the monster to destroy it! …I was really glad to not get the ‘try again after another 100 points of information’. Between the damage and timing, that probably would have been a loss. I had already done 34 points early in the game (up to 50 points are allowed without voiding one of the other results), and now I overloaded the disruptors, released the ESGs, and did a range 1 pass that did 154 points of damage and knocked my #6 shield down to two boxes. The next turn, I went back and at range 1 finished it off with a second volley. That also collapsed the #2 shield, and if the damage should happen before the repairs, took two internals (F Hull and an ESG).

I spent quite a while on this scenario, playing one or two turns at a time. Once through the initial setup, and done getting into the groove, it was fairly tedious, and too much of an accounting exercise to really enjoy. I should also note that the random movement of the monster also tended to be biased in direction ‘1’. Over the course of 18 turns, it moved from 2115 to 2001. There was a fair amount of wandering back and forth (it went 14 hexes in 18 turns at speed 4), but it did keep drifting to the top of the board, and it was happenstance that I didn’t need to adjust things at the end. I don’t even recommend this as a good way to get used to operating a ship, as there’s too few demands on power. On the other hand, it is very good for getting used to maneuvering a ship, and possibly using shuttles more.

└ Tags: bgg blog, gaming, SFB, Y159
 Comment 

SL254 Catching Hell

by Rindis on April 18, 2016 at 12:00 pm
Posted In: SFB

Crossposted from the SFU blog on BGG.

Patch and I recently finished off this Captain’s Log scenario from the early Four Powers War that also serves as a bit of a sequel to the “Where Wisdom Fails” mini-campaign we played a year and a half ago.

It’s still early in the 4PW (Y159) and wild reports have been circulating about the new Hydran weapon (the hellbore torpedo), and the high command wants one captured so that it can be studied.

“It was several weeks before a target of opportunity emerged. An F5 squadron was in position to intercept an inferior Hydran force that was believed to contain at least one ship armed with the new weapon. Fearing Hydran reinforcements if they waited for a battlecruiser (with copious transporters and marines) to join the fray, the F5 squadron commander decided to risk an attempt at capture.”

The Klingons get an F5C and two F5s, while the Hydrans get a destroyer and a frigate/police ship with a random reinforcement a random number of turns later (1d6 per turn, shows up when the total reaches 13). An interesting twist is that while one of the ships will have a hellbore, the Hydran player gets to decide if the DD or the FF is the hellbore-armed ship, and the Klingon player doesn’t find out what he’s facing until after setup is done. The map is fixed until the Hydran reinforcement arrives, after which it goes to a floating map.

The Klingons need to capture the hellbore-armed ship for a victory, though they can still get a minor one by wiping out the Hydran force. The Hydrans treat this as a normal battle and just use normal points-based Modified Victory Conditions.

I went with the “historical” force of a Lancer DD (for the four Stinger-1s) and Cuirassier FF. Patch set up his force at the center top of the board, about as close as he could get to my setup area in the center. The LN was slightly forward and went speed 19 while the CU went speed 22. As the goal of the scenario, the CU was going to avoid direct contact as best as possible; besides, the hellbore is a good moderate range weapon compared to the point-blank fusions. The entire Klingon squadron went speed 17.

Maneuvering stayed fairly simple with me going straight and slipping out to maintain distance, while the Klingons maneuvered to my shield three and tried a volley of disruptors (one per ship) at range 12-14 on impulse 15 at the LN, with one hit. Shortly after that, I turned off for an eventual loop around to a pass on the opposite side from the starting position.

For turn 2, the LN slowed down to 13 to overload a fusion beam, while the Klingons boosted speed to 21, and the initial reinforcement roll was a ‘5’. On impulse 2, the LN launched all four of its Stinger-1s. I was wondering if Patch would try to get at the CU, but on Impulse 10, he turned in for a direct pass at the LN. On Impulse 13, the Klingons launched (what turned out to be Type-V) drones at range 3/4 from the LN. They then sideslipped out, and with ships going out of FA arc both sides opened fire.

I fired a fusion at the second F5, doing 1 damage at range 4, and the CU’s hellbore hit to sandpaper it’s shields as well as nearly bringing the #4 down. Meanwhile the F5C and F5-1 each fired two phasers and a disruptor at the LN at range 3, doing 27 damage on really good rolls (all but one phaser rolled a 1) and doing 8 internals through the #6 shield, getting all three bearing phasers.


Turn 2, impulses 1-13.
↓ Read the rest of this entry…

└ Tags: bgg blog, gaming, SFB
 Comment 
  • Page 7 of 16
  • « First
  • «
  • 5
  • 6
  • 7
  • 8
  • 9
  • »
  • Last »

©2005-2026 Rindis.com | Powered by WordPress with ComicPress | Hosted on Rindis Hobby Den | Subscribe: RSS | Back to Top ↑