
Destroyer Demolition Derby
Crossposted from the SFU blog on BGG
Somewhat to my surprise, after Patch and I finished up “Arctic Crossroads” he suggested an SFB game. He wanted smaller ships, and something other than Klingons, so I looked to a Kzinti-Lyran fight (appropriate as they’re also involved in the Four Powers War right now) with squadrons using ships smaller than CAs.
The Kzinti produce their first Destroyer in Y159 (our current playing date), and I certainly wanted to show it off, as I don’t think it appears in many scenarios. It’s mostly known as an ‘also ran’ ship, as production is halted in favor of the later Medium Cruiser, and it is relegated to second-line duty during the General War. But right now, it is brand new, and effectively the one of the most advanced designs around, and certainly the best ship the Kzinti have for the tonnage. At a Move Cost of 1/2, it has 24 power, 2xdisruptors, 4xph-1, 2xph-3, and 4xdrone racks. This is more power and firepower than the larger Light Cruiser class, which it is effectively replacing (the CL will be refitted to have more power, more disruptors, and bring its drone racks up to 4, but that’s a few years away still). It shows a shift from ph-3 to ph-1s, and an increase in drone throw weight (eventually, just about all Kzinti ships have at least four drone racks, but until now, that’s only been true on the much larger CS/CA/CC hull as well as the seven racks on the much larger DNE).
Then I chose a Lyran Light Cruiser to lead the opposite squadron. It has the exact same BPV as the DD (after adjusting for the lack of ESG capacitors), and while larger with more internals, and it has slightly better phasers (4xph-1, 4xph-3), coverage isn’t quite as good, and its shields are slightly weaker than the DD’s.
Both sides’ squadrons were rounded out by a pair of frigates, which also happen to have the exact same BPV, and fairly similar characteristics. Patch, as it turned out, went for a full load of Type-II (speed 12) drones, with no larger Type-Vs, for a total cost of 16 BPV. I vaguely contemplated taking some transporter bombs, and I should have, but neither of us took any.
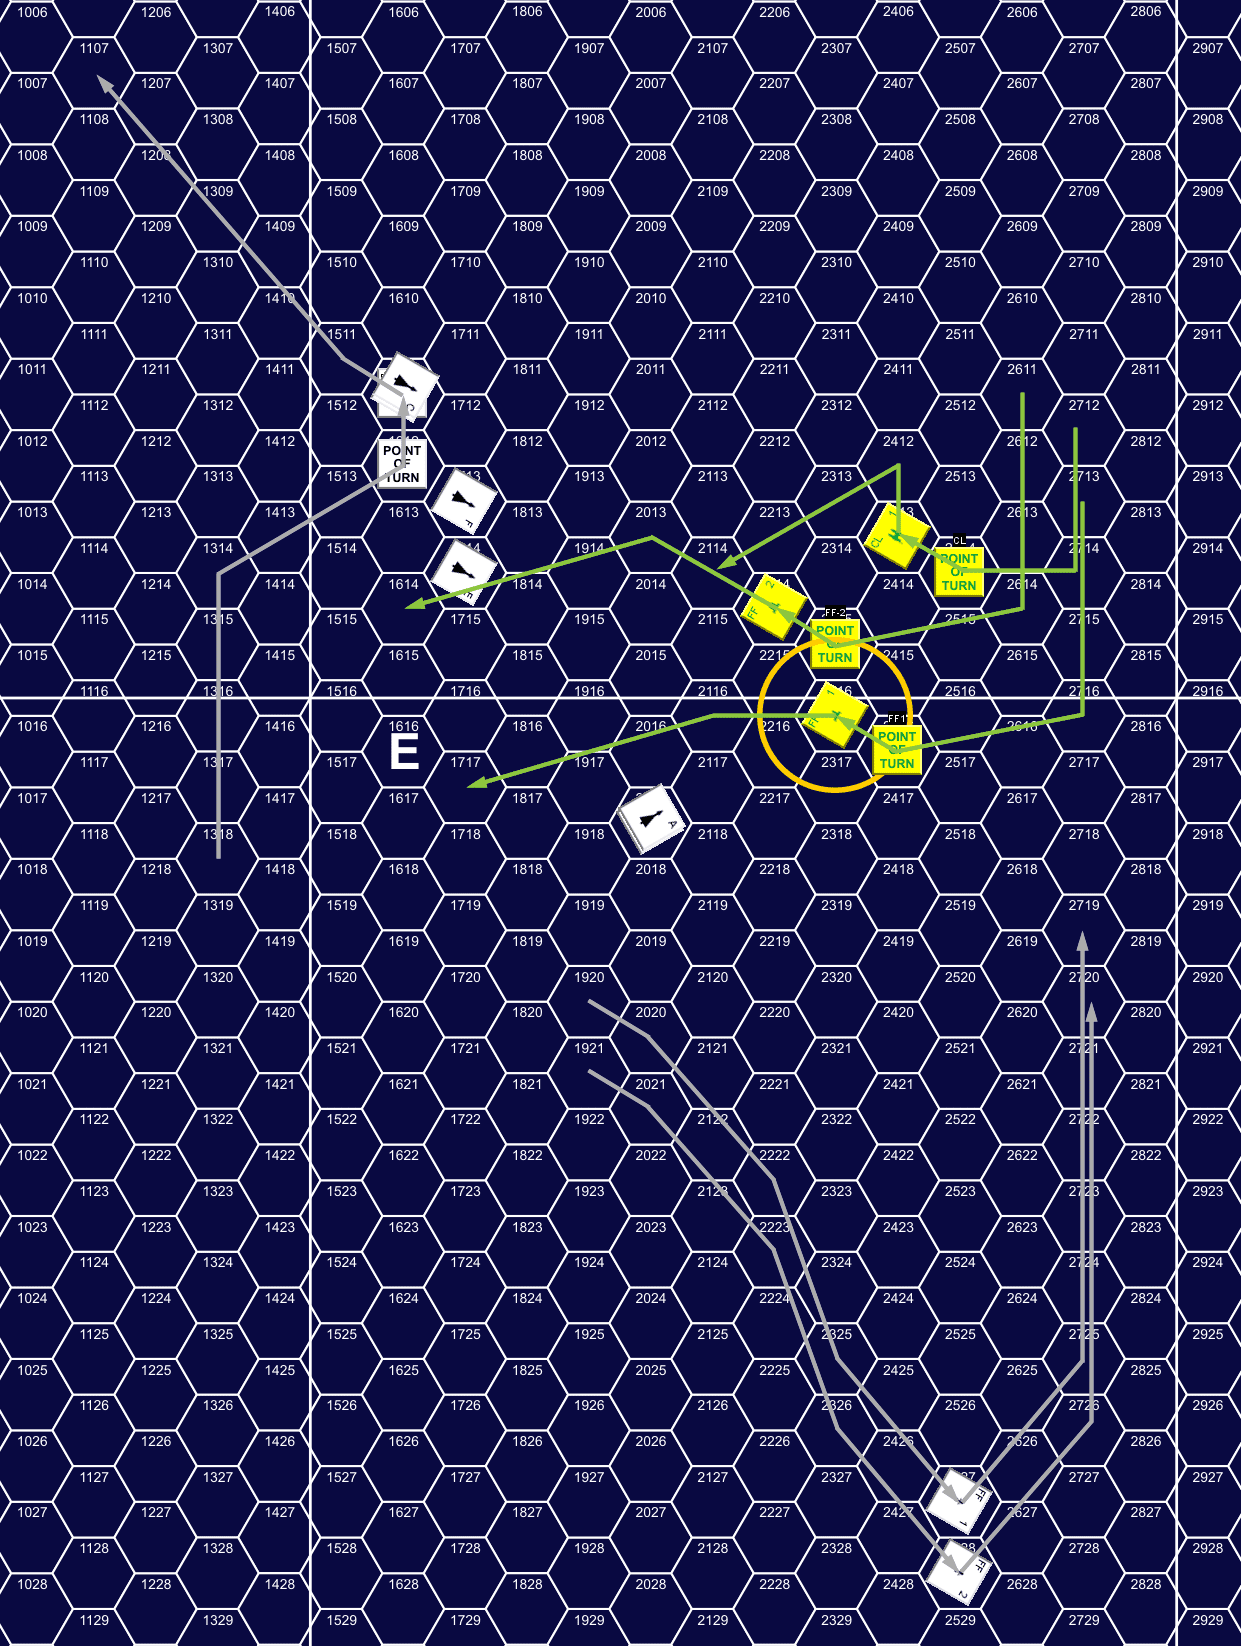
We set up, and rolled randomly for Weapon Status (with a +1 for a war zone), and ended up with WS III. That was to my advantage, as the Kzinti don’t have any multi-turn weapons, and it meant my ESGs were already fully charged. I also had a suicide shuttle pre-charged on the CL. The Kzinti squadron went speed 15 for the first turn, as did my CL, while my FFs went 16. We simply closed the range for the first half of the turn, but the DD turned off at about range 25. During impulses 28-30, we fired as ships hit range 15. I stuck to disruptors, which all missed with six straight 5s. Patch launched half his drones on each ship, and volleyed all his disruptors, which all missed with three 6s and a 4, while four phasers he fired also missed on “better” rolls (two 3s and two 4s). On impulse 32, I turned towards the Kzinti FFs to see if could engage them separately from the DD.
With ranges coming down fast, I decided to put power into overloads on CL, and EW on the FFs, and went speed 9 for the CL and speed 13 on the FFs. Meanwhile, Patch sped up to 19 on his FFs while the DD stayed 15. Patch was surprised I hadn’t boosted speed as well, which I had considered, but I wanted to be prepared for a close-range pass (and the FFs stayed on regular disruptors in case something like this happened). Sadly, I only had slightly better EW than Patch, but it meant I would have even shots at his FFs while everyone else was at a +1 to fire at each other.
Patch’s FFs turned off on Impulse 4, confirming my fears that he would just dance around my slower-moving squadron this turn. On Impulse 10, I turned towards the gap between Patch’s forces and starting warming up an ESG to tackle the wave of drones that was in there. To my surprise, Patch turned his DD in shortly after, allowing me to get closer to it. Things started coming to a head on Impulse 15, when my FF-1 started sweeping the drones with its ESG, and my FF-2 and the DD traded shots. Both ships hit with one disruptor, and missed with the other, and had similar phaser rolls, though the ph-2s on my FF led to less damage being done.
On Impulse 18, I turned towards the DD, as it turned back away, launching its last two drones for the turn (the other racks had staggered fire over the previous few impulses). The DD scored another 4 points on the front shield of FF-2 with the 360-phasers, while the CL did 15 points to shield #3 of the DD, hitting with both disruptors and one good phaser roll (a second phaser missed entirely…). The next impulse, FF-2 announced its ESG, and I fired another three phasers at the DD. FF-1’s phaser missed, but the remaining ph-1s on the CL both rolled 1s to knock down the shield and do 5 internals, including a ph-3 and two power. That was pretty much it for the turn, though on Impulse 28, the two Kzinti FFs fired disruptors at my FF-1, with one hitting, and on the next couple impulses, they launched drones.
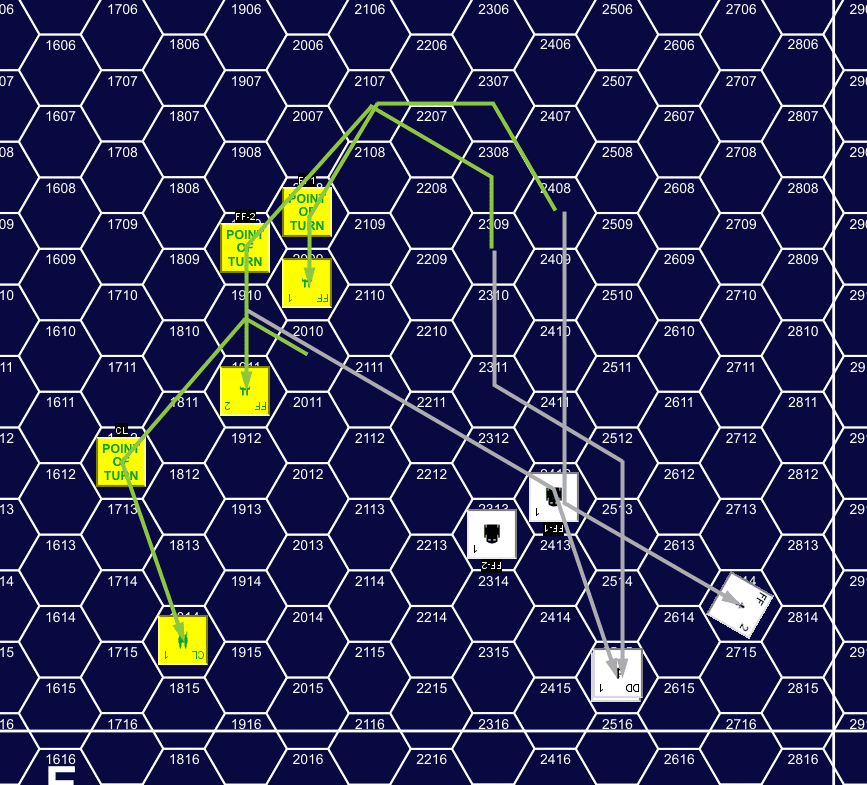
Turn 2, Impulse 18, showing movement throughout the turn.
Patch’s FFs slowed to speed 16 for Turn 3, but everything else sped up, with his DD going 20, while my CL went 15, and the FFs got up to 17. Speeding up meant dropping some of my EW, and the FFs only powered one disruptor each, as they started trickling power into the ESGs. I was mostly planning on trying to get the ESGs partly charged before having another real pass, and Patch was going faster than I could really catch him anyway. As soon as they cleared to fire, the Kzinti FFs fired their disruptors at the CL, hitting with one for 6 damage on shield #5, and then turned in a couple impulses later. Phaser fire knocked down the shield, but didn’t get any internals. Meanwhile, I maneuvered to keep away from the wave of drones and shut down the ESGs (which each had a couple points of damage left) so I could bring them back up earlier next turn. On Impulse 25, Patch launched another two drones from the DD, and my FFs fired their powered disruptors at his FF-1, but missed with both.
Both of us were feeling out of position this turn. Patch had wanted to reunite his squadron, but the FFs were still 16 hexes from the DD (though at least I was now far behind both sets of ships), and my attempt to avoid spending power by just avoiding the drone wave from his FFs kept me from being able to engage them when they got a bit close. Instead, I lost a shield on the CL and didn’t do anything in return.
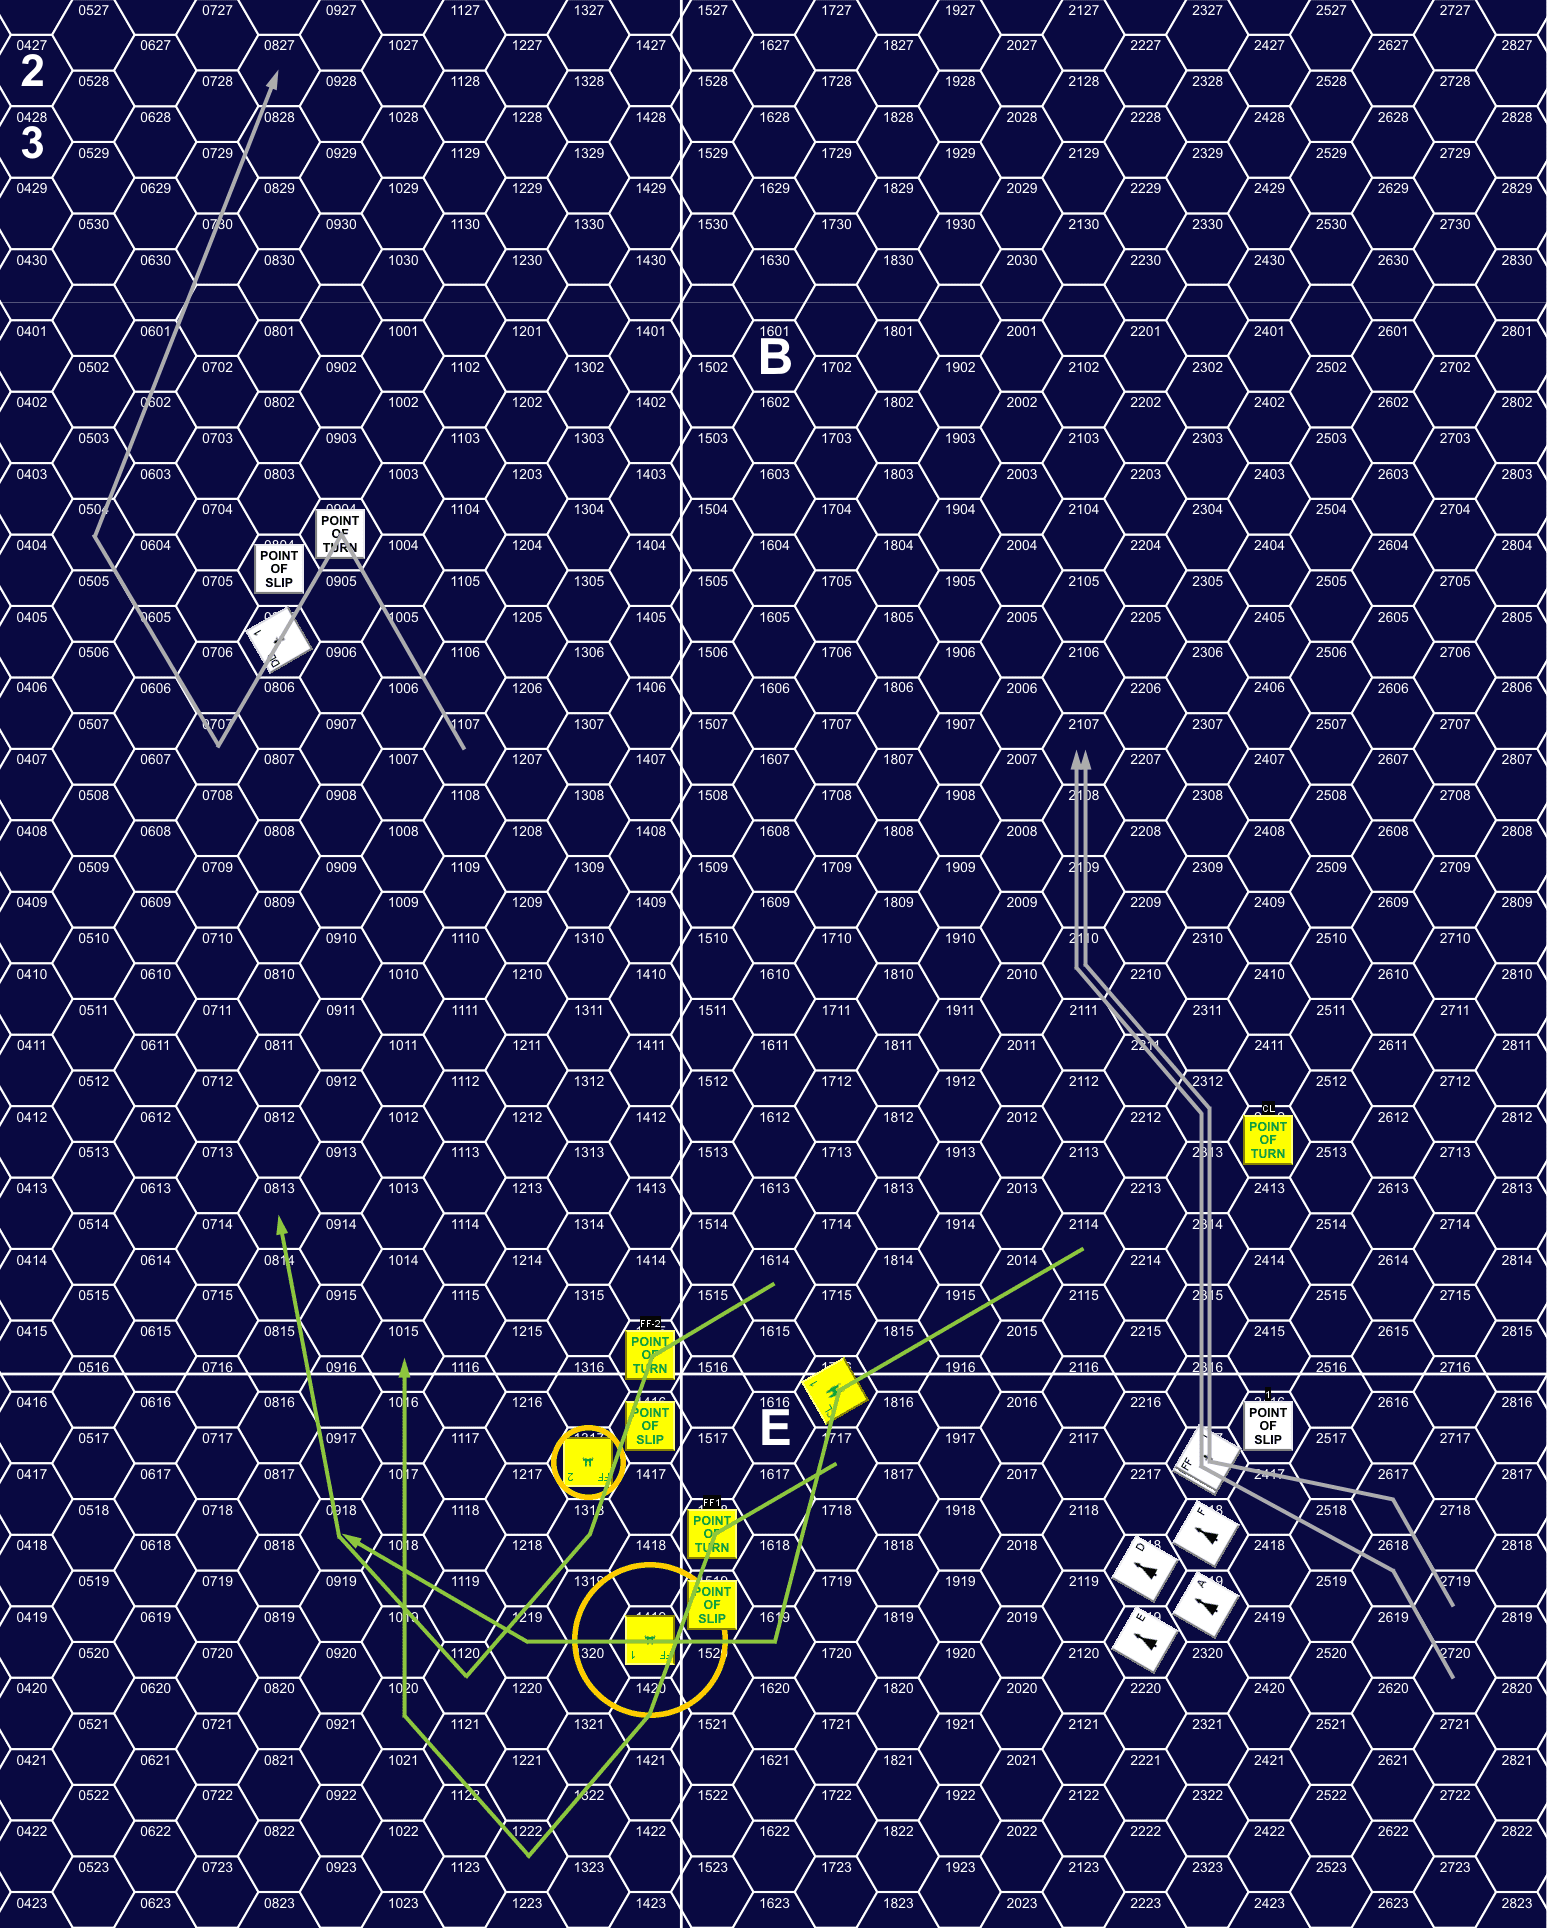
Turn 3, Impulse 10, showing movement throughout the turn.
For Turn 4, Patch sprinted his FFs at 25, while the DD slowed to 15. However, I stayed a speed 15 for the CL, while the FFs dropped by 1 to speed 16. The phasers were completely charged, the FF’s ESGs were each up to 3 power, and the FFs were able to charge both disruptors this time. EW fell off for both of us this turn, with 1 or 2 points of ECM and no ECCM on all ships. Looking at the long ranges and his high speeds, I fired all the FFs’ disruptors at his FF-1 on Impulse 3, hitting with two of them.
I successfully left the previous wave of drones behind, but got into trouble with the two drones the DD launched last turn. Not paying enough attention, I ended up two hexes away with them with my FFs scheduled to move at the same time as the drones; I killed them with two phaser-3 shots each, but only after using a lab to figure out which FF they were targeted on, and play with the movement. Patch turned in towards me at the last third of the turn, and the range started dropping fast. Patch fired most everything on Impulse 25, with the FFs knocking down shield #3 on my FF-2, while the DD’s disruptors did six points to the #1. With his FFs coming in fast, I turned towards them, which prompted drone launches, and then the DD turned in to close with the still separated FFs, and launched a full spread of four drones. In response, both of my FFs announced ESGs (which wouldn’t go up until Impulse 1 of the next turn, when they’d have further power from my EA).
On Impulse 28, both sides opened fire, with Patch’s two FFs each firing a ph-1 at my FF-2, doing 2 internals through the #1 shield. Meanwhile my CL fired its disruptors, 2xph-1, and FF-2 fired 2xph-2s at his FF-2. Ironically, the closer FF-2 missed with both, while the CL had good rolls to do 13 damage, and knock down the #6 shield.
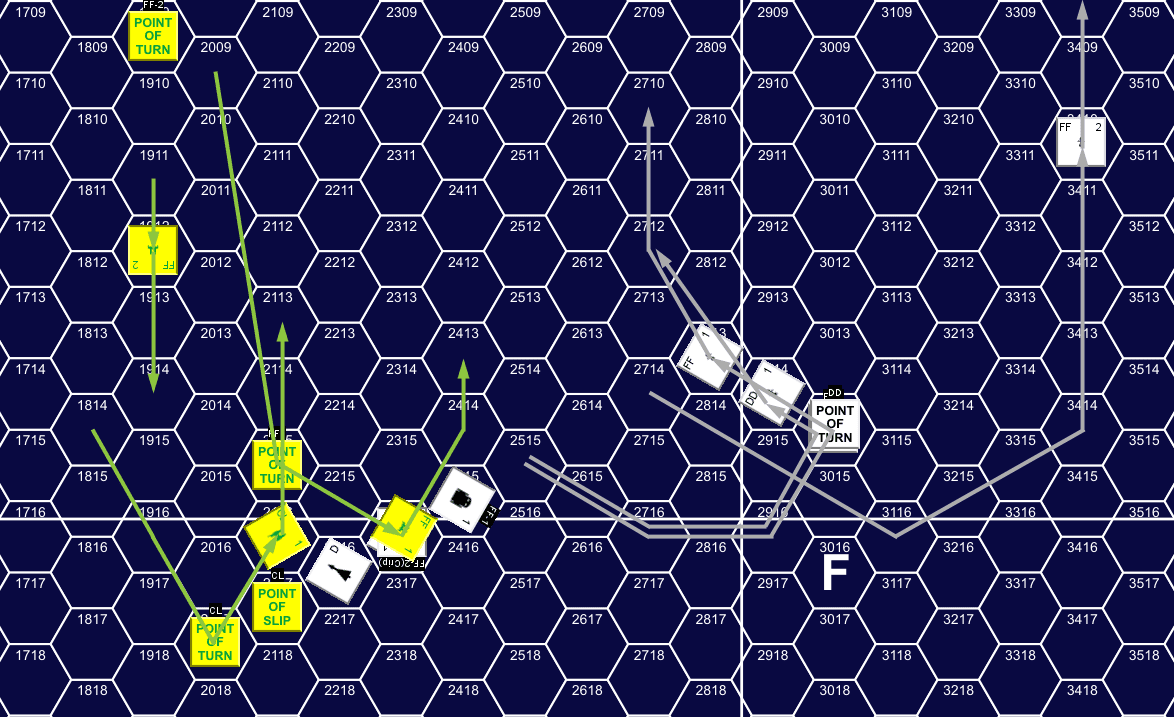
Turn 4, Impulse 25, showing movement from Impulses 16 to 31.
I was a little surprised when the FF moved on the next impulse and it slipped away, but did not turn the down shield away. I fired FF-1’s ph-2s at it, but poor rolls did no damage. On Impulse 32, both FFs turned in, going for a point-blank run with my FFs, with plenty of drones right there. With Turn 5 starting at everyone at close range, speeds dropped. My CL went 12, with the FFs going 10, while the DD went 14, though the Kzinti FFs slowed to 9. My CL put up 3 ECM, and 1 ECCM, but that was the only EW active. The ESGs came up on Impulse 1 (at 4 power) with the drones a hex away, but I shot up a couple of them anyway to preserve the ESGs for later and possible further drone launches.
…And FF-1 launched a new drone the next Impulse. The CL announced an ESG on Impulse 3, and my FF-2 moved onto his FF-2’s down shield #6, but missed on a disruptor shot at range 2. On Impulse 4, both of his FFs slipped left, and my FF-2 moved into the hex, hitting them with it’s strength-12 ESG, and FF-1 slipped to line up a similar shot. However, Patch tractored my FFs with his, more or less halting my planned battle pass (and, annoyingly, tractoring my FF-1 with his FF-2, and vice versa), and launched two more drones. I immediately knocked them down with ph-3 fire from FF-2, and did one internal to his FF-2 with horrible rolls (6,6) from a pair of ph-2s. My FF-2 took 29 internals from a ph-1 and overloaded disruptor from each of his FFs. (And I just realized that we missed doing the feedback damage of range-0 disruptors. Not a big deal for his FF-1, but that’s another 2 internals on FF-2.) This pretty much crippled my FF, though it had decent weapons left.
On Impulse 5, the CL announced its second ESG, Patch’s FF-2 did 7 damage to the #1 of FF-1 with a pair of ph-3s, and I did 10 internals to FF-2 with an overloaded disruptor from FF-1. On 6, the CL turned to engage the DD, while two drones hit FF-1’s ESG, leaving 8 strength on it. Patch launched the final available drone, transported 3 boarding parties onto FF-2, and launched shuttles from both FFs. This time his FF-1 fired ph-3s, doing 7 more damage, and almost knocking down my FF-1’s #1. I knocked down the latest drone with a ph-3, and did five more internals to his FF-2 from a disruptor fired by FF-1.
On Impulse 7, the DD approached to range 1 of the CL and tractored it while launching a full set of drones it just as a range 0 ESG came up. The DD fired off almost everything, doing 15 internals to the CL. The CL responded in kind, but missed with an overloaded disruptor to only do 7 internals. The CL mostly lost padding, but did lose the #2 ESG before it could even come up. FF-1 plinked his FF-2 for another three internals, but still wasn’t getting the hits I wanted (I’d really been hoping to knock out the tractor beam). On Impulse 8, Patch dropped his tractor on my FF-1, and fired a ph-1 at each of my ships with a spare on each of his ships. This merely damaged shields on the FFs, but the CL took another 4 internals, and lost a disruptor. Meanwhile, the remaining-ph-3s on the CL took out all but one drone from the second wave from the DD, leaving it with a 4-point ESG and one drone left for it to handle. On the next Impulse, Patch dropped the tractor on FF-2, and transported three boarding parties over to the CL.
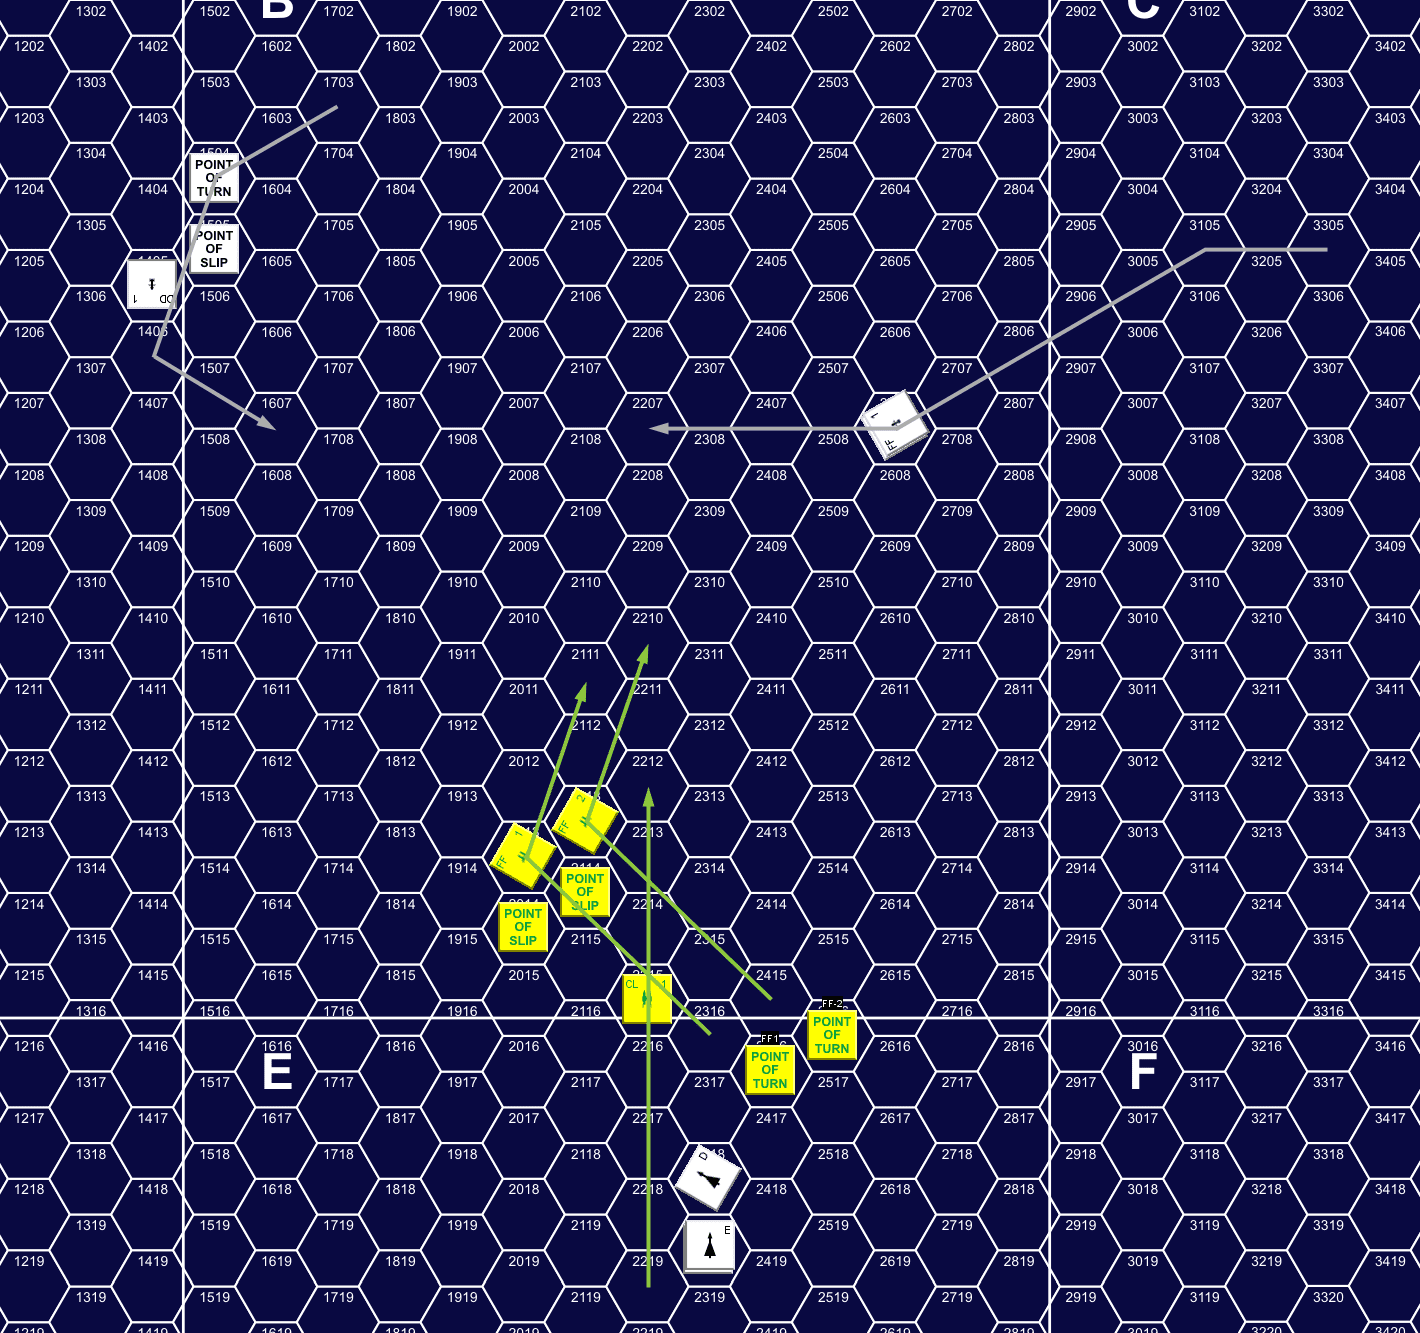
Turn 5, Impulse 4, showing movement from Impulses 1 to 8.
With them released from tractors, my FFs moved on Impulse 10, and FF-1 slipped in to hit Patch’s FF-2 for eight points with the ESG (on the intact shield #2, sadly), and followed it up with a ph-1 and 2xph-3 shot at range 0 with good dice to do 10 internals. At this point, it only had the 360 ph-1 and a drone rack left, and all three front shields were down. On Impulse 14, Patch’s shuttles are clear to fire, and they do 3 points to shield #4 of FF-2. On 15, Patch drops the tractor on the CL, which is very fortuitous timing for him. Otherwise, I would have launched the suicide shuttle which would have traveled down the tractor beam on 16 and detonated. If he’d released earlier, I may have been able to maneuver to drop the shuttle on him at this point. If I’d launched earlier, it would have smacked into the ESG before it got the drone. As it was, I never got a good chance to use it.
All shot out, we slowly worked apart for the rest of the turn; Patch kept together, but I was still trying to re-form at the end of the turn. Patch’s boarding parties killed two of the four on FF-2, while I only killed one in return. On the CL, his three BPs didn’t do any damage, while the nine there wiped him out.
Turn 5, Impulse 32, showing movement from Impulses 9 to 32.
The CL dropped to speed 9 for Turn 6 as it struggled to recharge batteries, patch up shields and put some power into the phasers and ESG. FF-1 went speed 10 with similar problems, while FF-2 was down to 5 power. It only went speed 4, partly because I charged the remaining disruptor. The DD went speed 10, Patch’s FF-1 12, and his FF-2, with power but no weapons, 16. In addition, his FF-2 was only using minimum shields, and mine was using Low-Power Fire Control. On Impulse 1, Patch’s FF-2 fired a drone from the remaining drone rack before pulling out of the fight. On 5, FF-2 fired the disruptor at his FF-1, but missed. On 8, Patch launched drones from the DD and FF-1, while my FF-1 fired disruptors at the DD as it went out of arc and hit with one. On Impulse 10, FF-1 fired a pair of ph-3s at a shuttle, and crippled it, though there had been good odds of killing it.
The other shuttle fired on the next impulse, doing 4 points to FF-1’s #6, and the CL hit with both disruptors on the DD’s #4. The latest wave of drones became a real problem as I struggled to get FF-1 in range to help the CL (who was definitely the target) deal with them. The CL got one on Impulse 17 with a downfired phaser. Then I turned the CL so that it would start drawing the drones closer to FF-1.
This was a mistake, as it also turned the down #1 towards the Kzinti, who were 8 hexes away at that point.
On Impulse 19, his FF-1 hit with a disruptor and ph-1, doing 7 internals through the down #1, taking out 3 phasers and the remaining ESG. On Impulse 22, the CL downfired the remaining ph-1s at the drones, and killed 2. FF-1 killed the damaged one and the fourth on the following impulse. At the same time, the DD and Patch’s FF-1 fired on my FF-1, hitting with two disruptors and a ph-1 to do six internals through the #6 shield, knocking out two phasers. On 26, the DD and FF-1 each fired another ph-1 to do 5 more internals through the #1 shield of my FF-1, getting 4 hull… and the ESG. The next impulse, the DD fired two more ph-1s to do 8 internals to FF-1, taking out another phaser and a disruptor.
Boarding party combat continued on FF-2 with both sides killing one boarding party to reduce both to one BP left. The CL emergency repaired the second disruptor as a range-10 version.
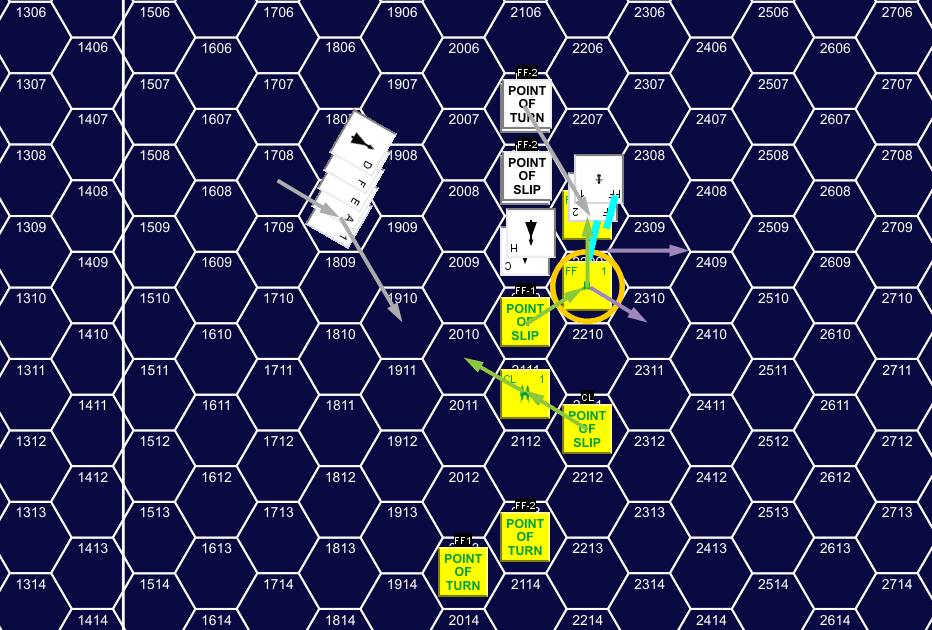
Turn 6, Impulse 23, showing movement throughout the turn.
Somewhat by happenstance, all my ships ended up going speed 12 for Turn 7. The CL had lost three power on Turn 5, and one more on 6, and was slowly putting some shields back together. FF-1 had only lost two power, but needed to recharge the remaining phasers, while FF-2 abandoned the disruptor and went max speed other than shields. The DD went 10, Patch’s FF-1 went 12, and his FF-2 went 18. His intact ships put up one point each of ECM and ECCM, but I had no power to spare for EW.
After the big pass on turn 5, my plan was to stick around; I was in about as good shape as Patch’s squadron, and FF-2 could be a decent phaser boat, while Patch made it obvious that his was leaving. After losing all my ESGs and a number of ph-3s last turn at was at a serious disadvantage as long as Patch’s drones held out. So I started preparations to disengage. The problem was that FF-2 didn’t have the power to disengage by acceleration. We played out the turn, but neither of us really engaged and ended up paralleling each other in direction F at several hexes distance, with the DD slowly losing ground.
Meanwhile, Patch’s FF-2 headed off to disengage, and my FF-2 headed away to gain distance. At the end of the turn, Patch’s ship made the jump to high warp, and my FF-2 was at range 20 to Patch’s nearest ship. Boarding party combat went well with my last BP killing his, while he did nothing. FF-2 also finished repairs on an APR that turn, so would be able to go 15 on Turn 8 (using the APR for shields, and putting all 5 warp into movement). I discussed with Patch that my goal was to keep him from going after FF-2 until it could get to 50 hex range and disengage by separation, and then disengage by acceleration, and we called the game there with me disengaging.
The victory points surprised me:
| Lyran | Kzinti | ||
| CL | Disengaged | 22.5 | |
| FF-1 | Disengaged | 15.5 | |
| FF-2 | Crippled | 31 | |
| DD | Damaged | 17 | |
| FF-1 | 4 | ||
| FF-2 | Crippled | 35 | |
| Total | 56 | 69 | |
| 123% | |||
| Marginal Victory | |||
All the Type-II drones Patch had bought gave me 2 Victory Points per drone rack, and with eight racks, 16 VP was a noticeable amount of our totals. If I’d bought four transporter bombs, it would have equaled that out (and pushed Patch to a Tactical Victory), and I could have used some more drone defense. (I probably would have just bought two, if I’d done more than vaguely think about it.)
I did well in the early part of the game, but things started going wrong on turn 5. I didn’t think about tractor beams, and paid for it. The plan with the CL was to overrun the DD, with the second ESG coming up at range-1, and probably hitting the DD as I moved out of its hex. As it was, I figured I’d still come out slightly ahead until the CL’s second disruptor missed. With it, the two big ships would have taken nearly equal internals, and the since the CL is a slightly bigger ship, should absorb it better. Without it, I just didn’t do much to the DD.
With my FF-2 still technically combat capable, I figured I still had a good shot at things, but my turn into him on 6 was a major mistake that cost me most of my anti-drone capabilities. Losing the final ESG in my squadron was what decided me to disengage. Of course, I was trying to solve two problems there; I needed to deal with more drones, and my FF-2 was lagging behind, and it looked like Patch was going to go finish it off. I saved FF-2, but at the cost of continuing the battle. The big mistake of course was assuming the battle would move away and stay away from the ship, and going speed 4 to power the disruptor. I should have maneuvered FF-2 until I knew it was safer, and then tried to get a couple shield boxes up and return to battle. Of course, that would have taken quite a while…
Discussion ¬