
161 Arctic Crossroads
For our latest ASL game, Patch and I decided to try out the first scenario in Hakkaa Päälle. “Arctic Crossroads” is an unusual scenario in multiple ways. First, it’s happening in the polar night/dawn, and instead of the usual LV that might imply, the scenario has you use a subset of the Night rules, with no cloaking, or straying, or jitter fire, but there is a permanent 4-hex NVR that keeps things isolated. Also, it uses the new light woods terrain, where woods are a Hindrance rather than an obstacle to LOS. Moreover, they’re only +1/per hex instead of the normal +2.
As to the actual forces involved, the Finns start with seven squads, with a couple of MGs defending a couple ART that the Russians are trying to capture. (They also have a fairly nasty .30-cal AA mount with 8 IFE.) The Russians have eighteen squads, but look like something out of the original Squad Leader, with only three leaders, none of which is better than 8-0, with a MMG, a couple of LMG, and a light MTR (with a minimum range of 3 hexes, and max sighting is generally 4…). Overall, the Finns (who can self-rally) have better leadership, and the Russians are only ELR 2. On turn 4 (of 10) the Finns get another seven squads (with a HMG towed along on the new Akhio), which should enter behind the advancing Russians. The Russians need to end the scenario on turn 9 with 12 EVP past the setup line for the ART, and can get 3 extra VP for each one whose Location they Control.
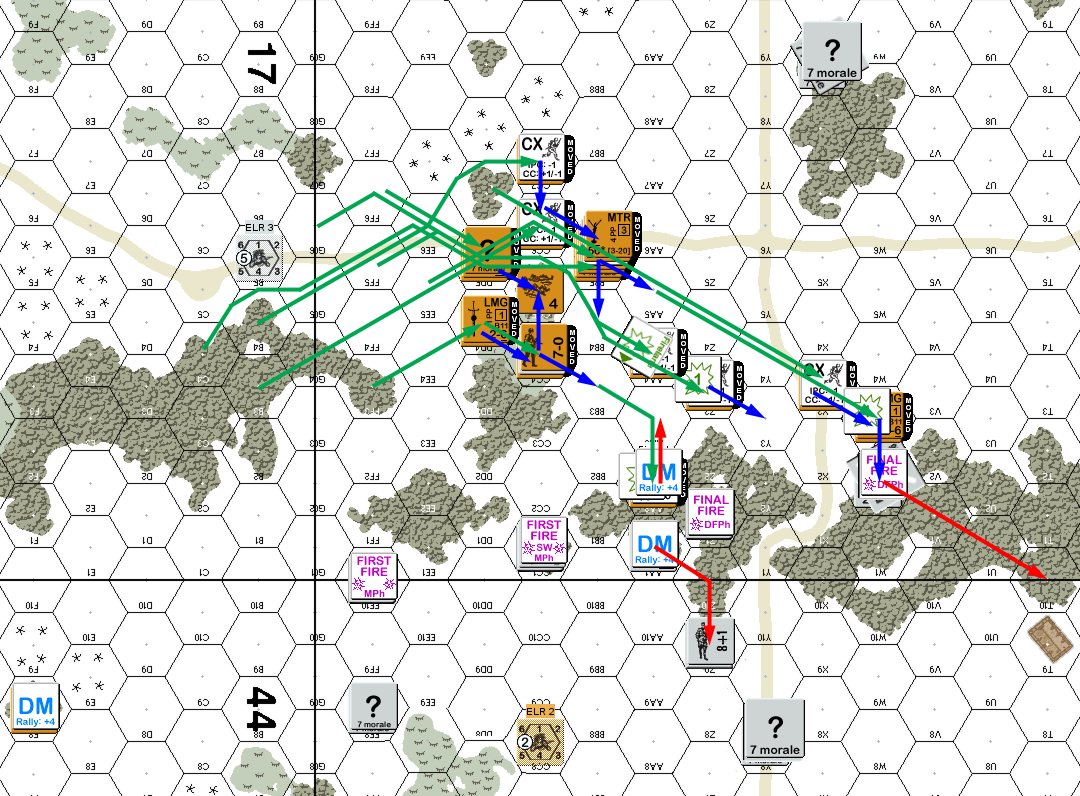
I had the Russians and started out trying to set up on the wrong side of the board (I didn’t notice that the setup area excluded the edge where the Finns later come in). I then set to advance down the middle of board 17, with woods and brush on the flanks, but clear terrain in the center. I tried to force the extreme east flank of Patch’s line, but but his first shot was a 2KIA to eliminate my first squad. My second move generated a PTC that I passed, but it activated his Sniper who then broke the squad. The third squad broke to a NMC.
My fourth squad passed a 1MC. By that point, however, it was obvious I wouldn’t be forcing my way close to anything. I started lining up at and just beyond extreme visual range (4 hexes), and lost another HS to residual (and then the remainder disrupted on a HoB), and then another squad to further fire.
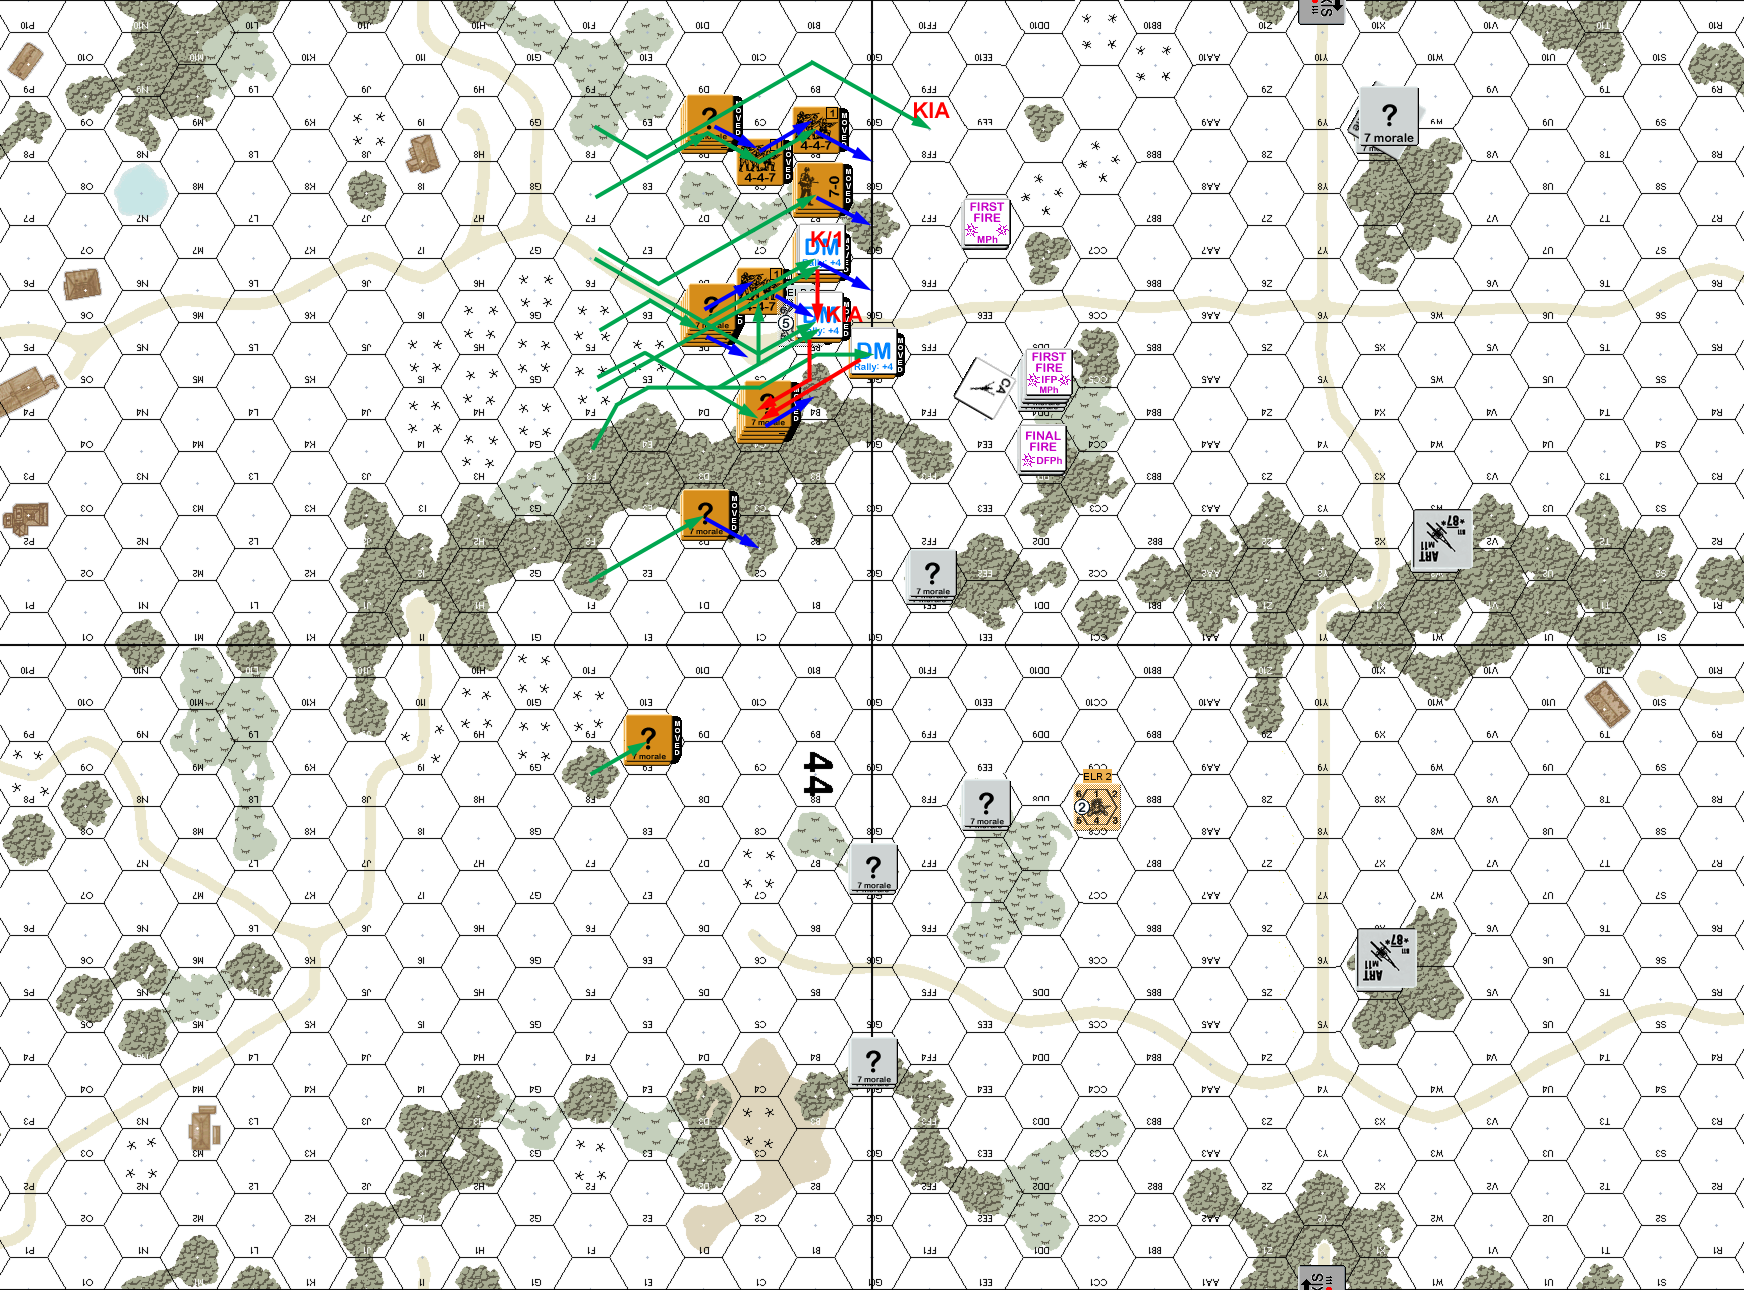
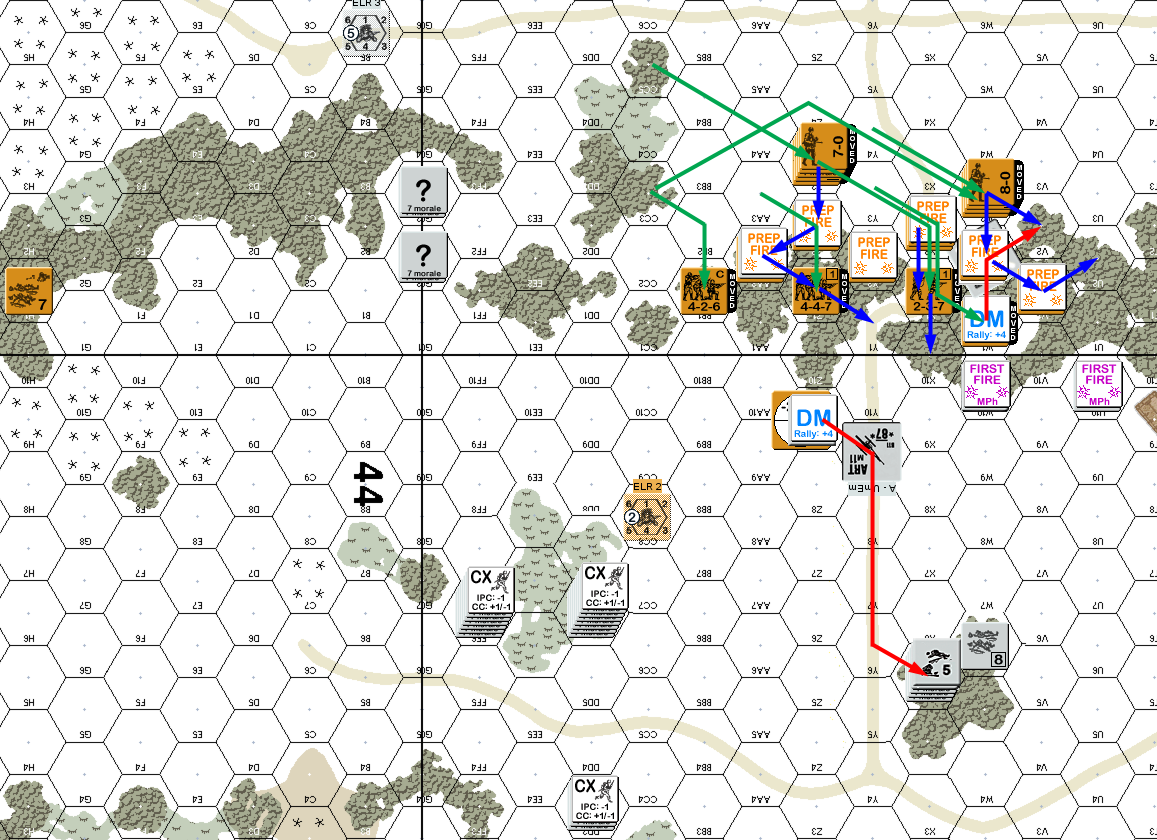
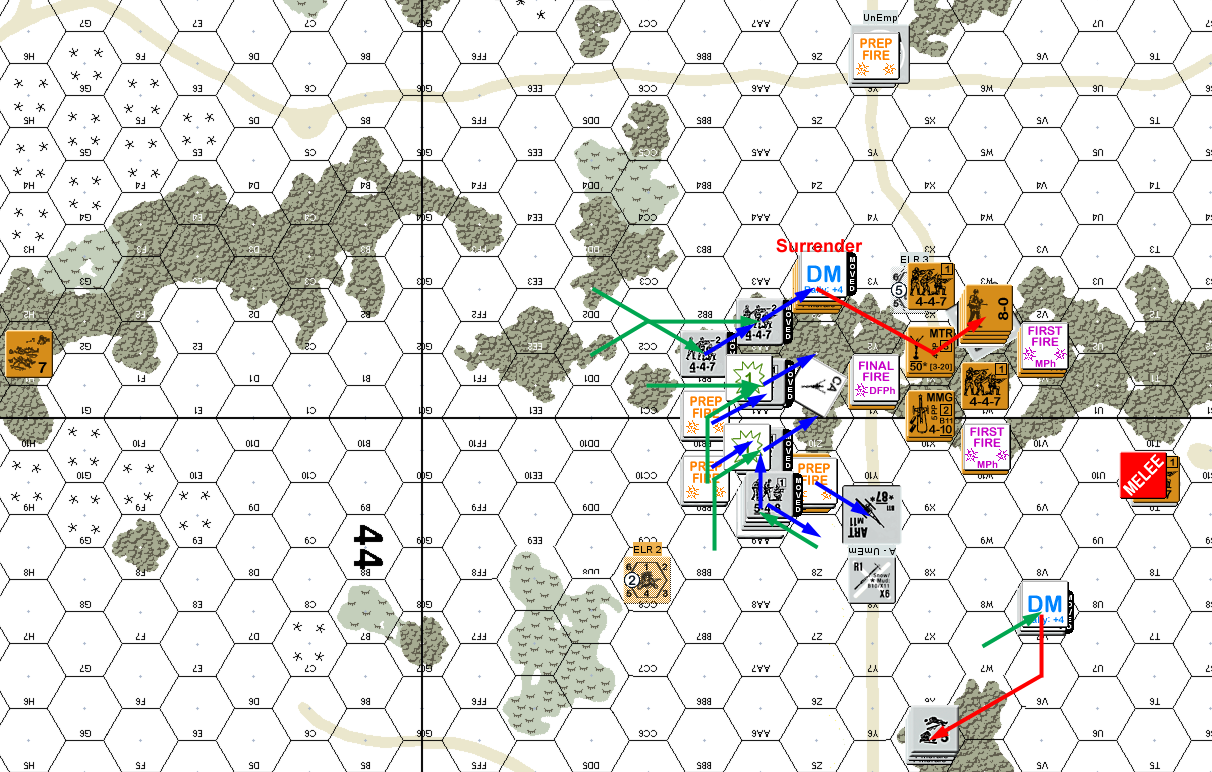
Situation, Russian Turn 1, showing the full board. North is to the left.
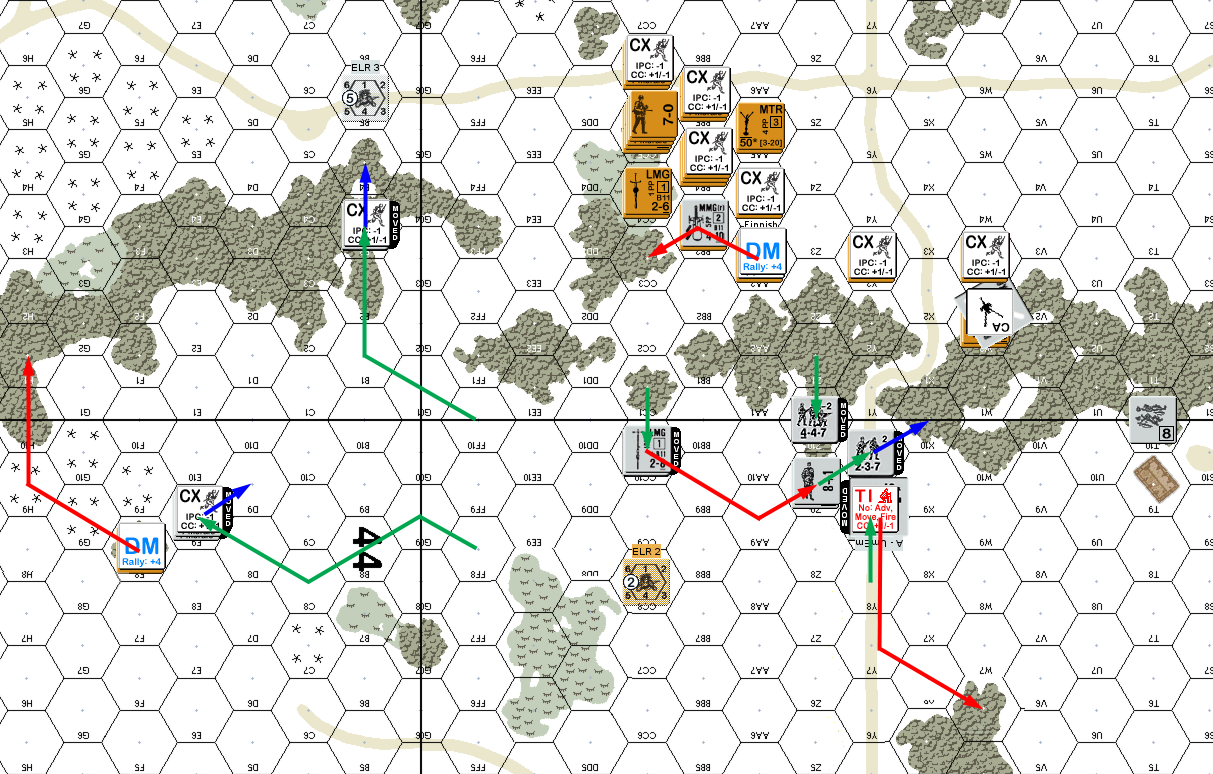
Naturally, nothing came back for the first RPh. Patch considered falling back, but fired the main part of his line in hopes of saving his forward 548 on the flank, but rolled an ’11’ to malfunction his MMG. Proceeding to movement, he started shifting his west flank towards the action, including manhandling one of the ARTs a couple hexes. In the DFPh, my MMG (plus a couple squads) managed to break his MMG squad and pin the leader with them. An even larger group managed a NMC which broke the squad on the flank. Then I managed a 2MC on the remaining squad in that part of the line, but he passed.
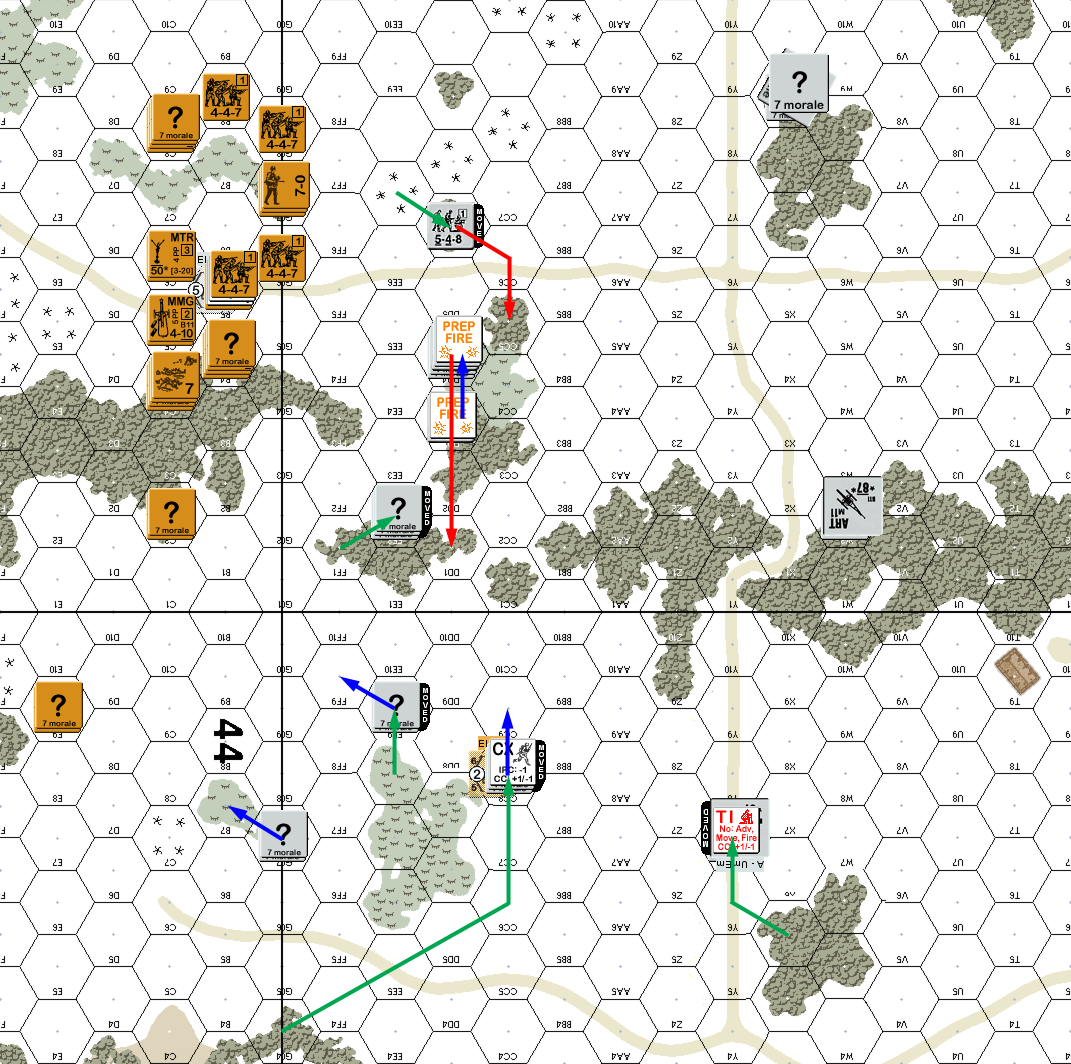
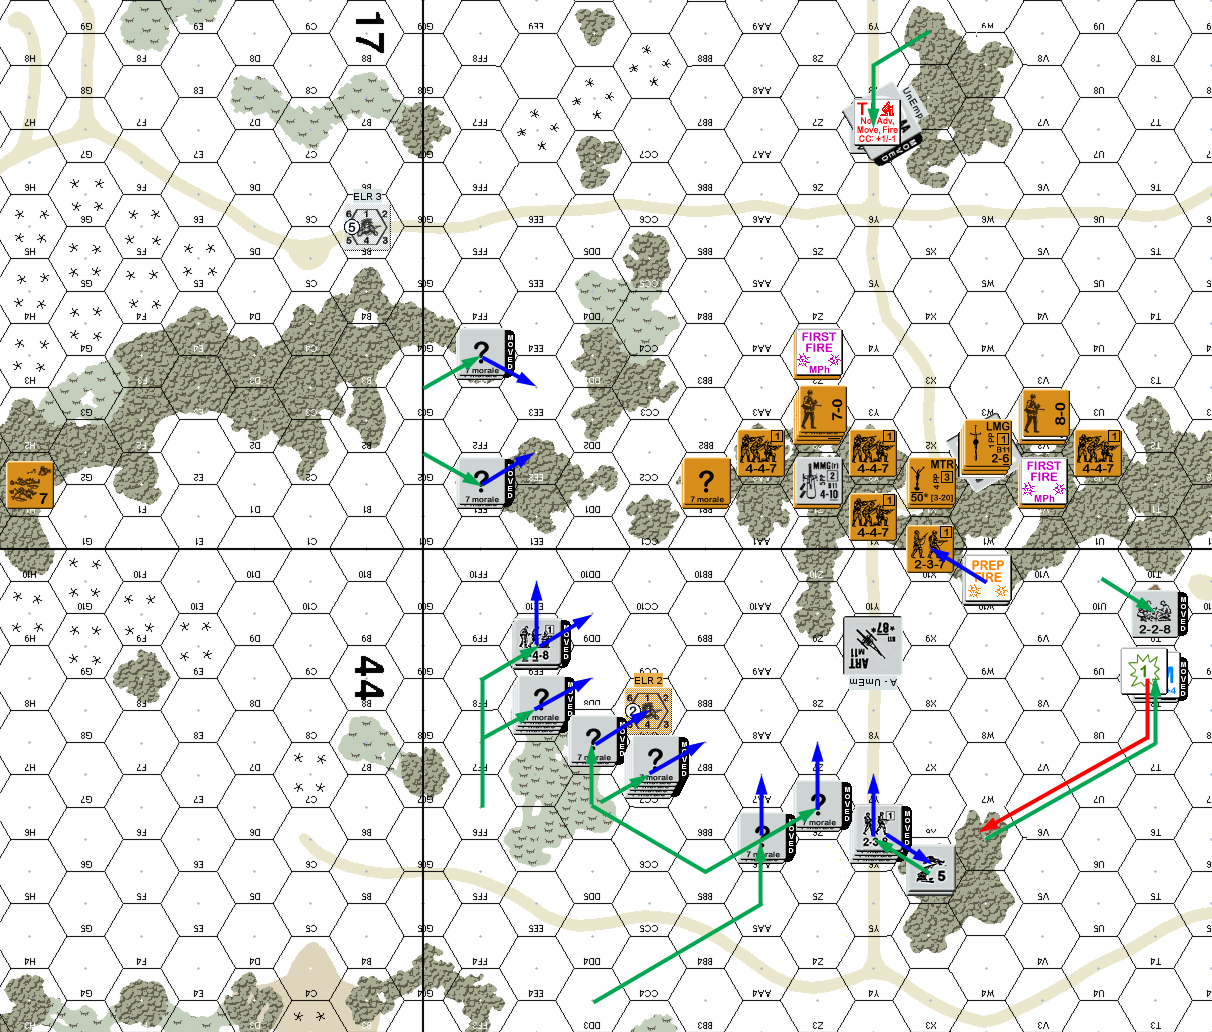
Situation, Finnish Turn 1.
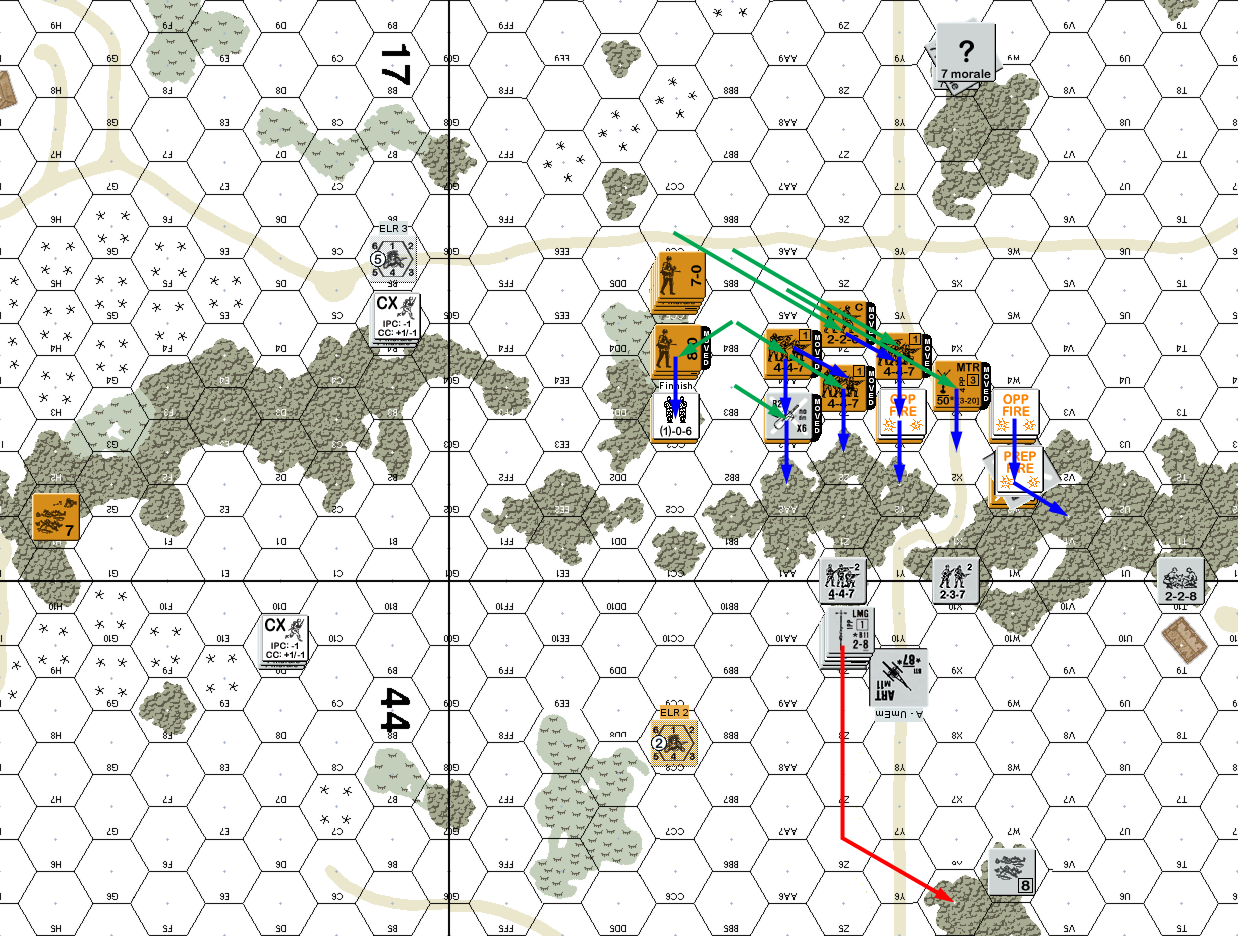
I rallied one squad for my rally while neither of Patch’s squads managed to self-rally, but he managed to recover the malfunctioned MMG. The center of my line prep fired, and broke and ELRed the leader and squad in DD4. I attempted to get on both sides of his knot of broken units, but Patch managed a K/2 to eliminate another HS and break the remainder to conscript. I attempted to get at the squad+LMG that did that, but a ‘2’ SFF wiped out my squad cleanly. I had also been planning on trying to get closer to his AA Gun, and hoping that a CA Change would help, but Patch got a 1MC against the one squad in range 4 and a ’12’ from him turned him into a broken conscript HS.
The good news is that one squad still ended up surrendering to me, while the other one ended up abandoning the malfunctioned MMG again.
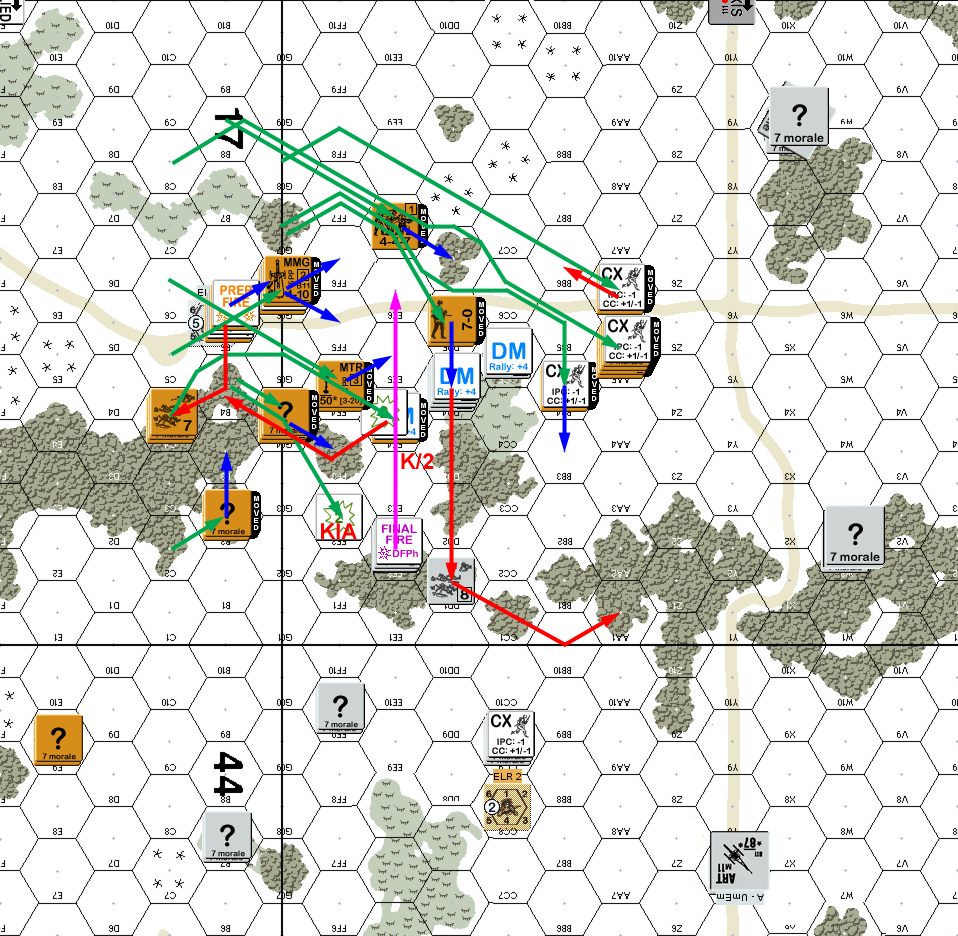
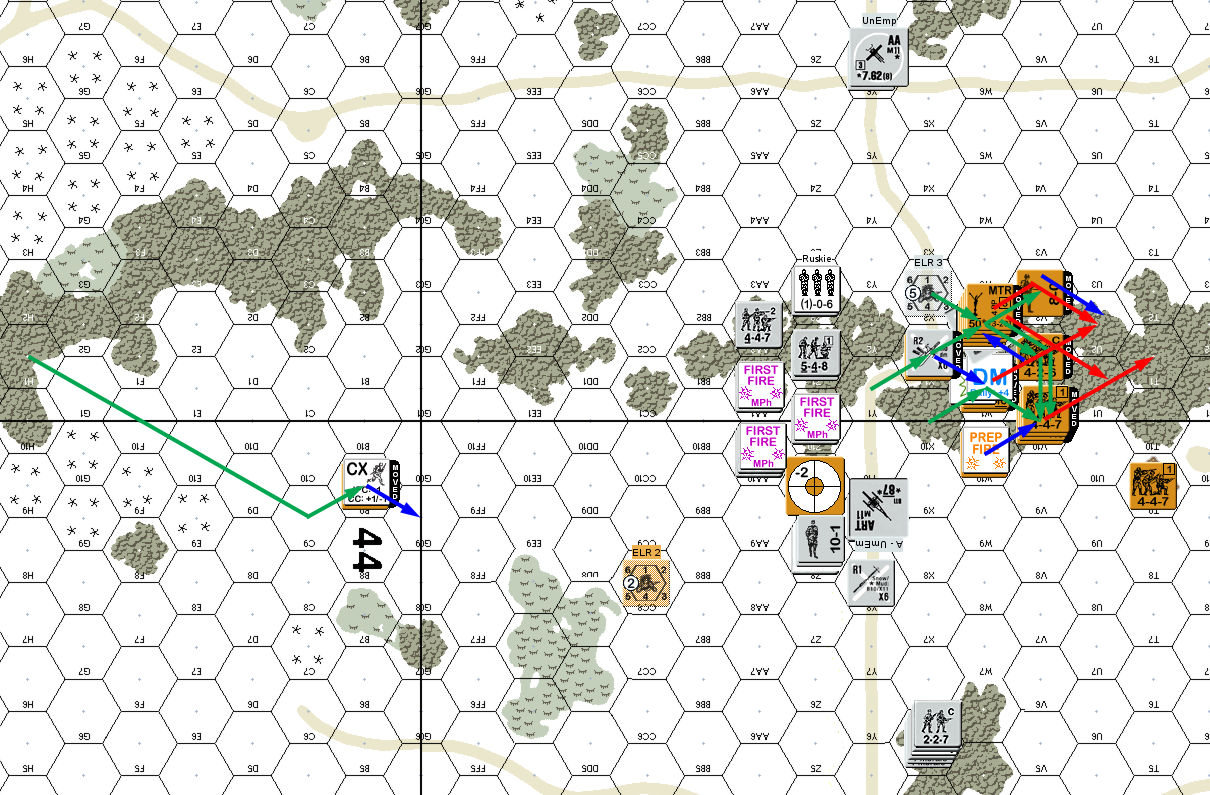
Situation, Russian Turn 2.
Patch didn’t manage to rally anything for his turn, though I got one squad back, and recovered the MMG (which as a ‘MMG (r)’, I could repair and use). I had a few shots at his movement, but only managed to get a single Pin result. The big annoyance is that my far NW flanker (44E9) took the only shot he was going to get and stripped “?” off Patch’s similar unit, but failed to do anything to him, but he then broke my squad. (And then he regained “?” anyway as he was out of range 4/LOS of everyone by that point.)
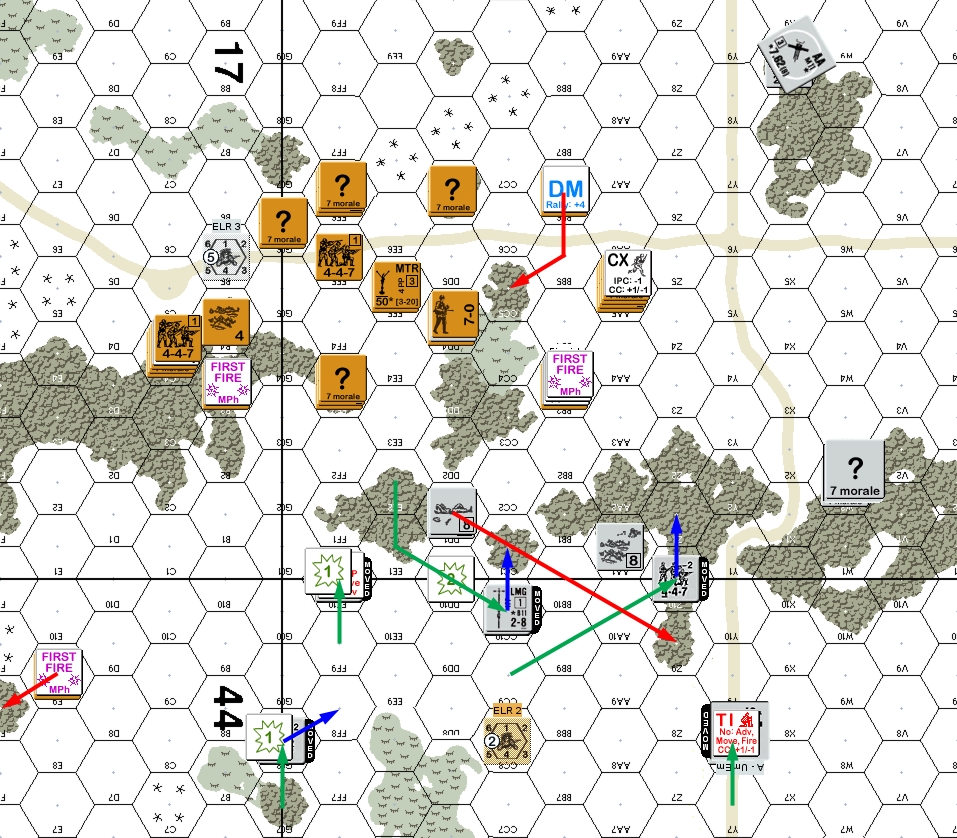
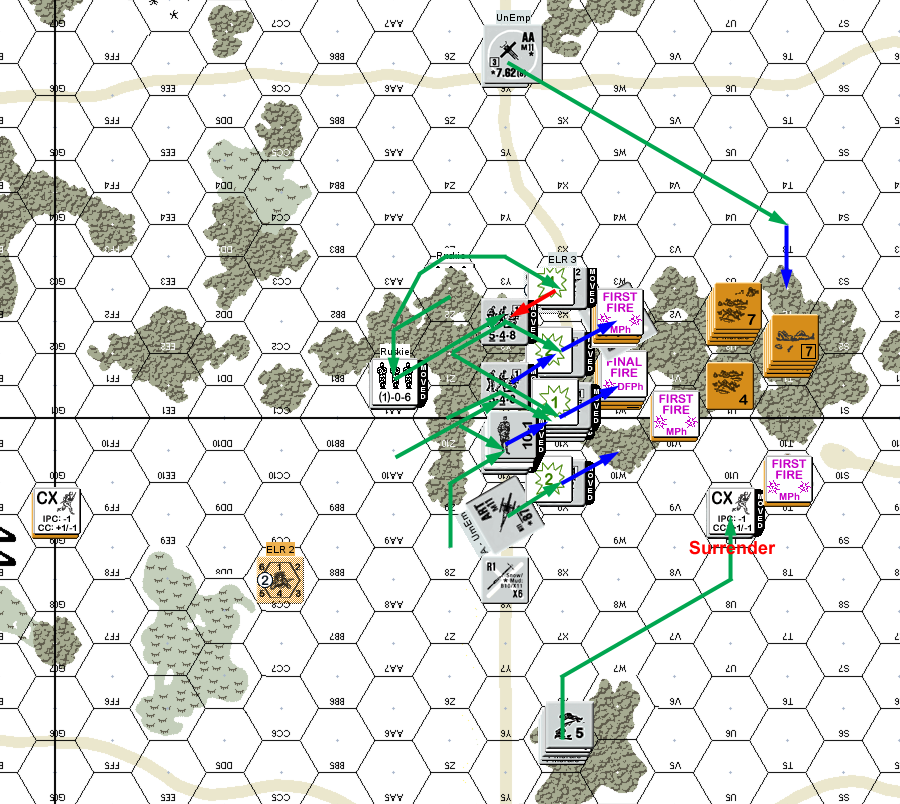
Situation, Finnish Turn 2.
I got lucky in my RPh and got my lone HS in B4 back as well as the disrupted HS in C4, as well as repairing the liberated MMG. Patch rallied his leader, but the squad with him rolled a ’12’ to reduce to a HS. This turn was mostly about skirting around some of his defenders to get at the squad in Z1 and the ART behind it. As soon as I came in view, the ART opened up… and malfunctioned on the first shot. The next squad took and survived more fire, so I sent my closest squad to the 447 in, but he broke to point-blank fire. A squad and leader rushed the Gun itself and took a K/2 from the crew to kill the leader, but the squad was unharmed. The crew then self-broke before I could move in to assault the Gun.
Situation, Russian Turn 3.
Patch got a HS in 16Z9 back for his turn, but the squad there reduced to a HS on a ’12’. Movement mostly consisted of skulking for position, but he sent one squad back around where I’d just left to provide some pressure in there. The liberated MMG had one good shot that reduced his LMG squad to a HS (’12’ on 2MC) and then malfunctioned on the next shot. My squad with the ART managed another good shot to break the crew of the other ART that had been moving up.
Situation, Finnish Turn 3.
I didn’t get anything for my RPh, but Patch self-rallied the first ART crew, while his 8+1 grabbed the LMG from the broken HS. With Patch’s reinforcements about to enter, I mostly just slowly moved up on the remaining Finns to push them out of the woods. Patch’s only shots were horrible (11s), but while I had one good shot, it just pinned a HS. The guards for my prisoners had broken last turn, and this turn they tried to escape, but were killed in CC.
Situation, Russian Turn 4.
Patch naturally set his reinforcements up as close to the action as he could, with two large groups and one extra squad. Neither of us rallied anything, but I managed to repair the liberated MMG again. The reinforcements were a long way off, and the few remaining units in the woods with me skulked, and all I could do was pin a couple of them.
Situation, Finnish Turn 4.
My lone squad in the boonies failed his self-rally roll, but everything else rallied, though I lost the LMG that had malfunctioned about a turn ago. Patch managed to rally a single HS. I Prepped with everyone who was already in the central woods area that I was planning on making my stand in, and broke the squad in 16Z9. Mostly, I shifted further down the line of woods and pulled out of CC3-CC5, but another attempt to get close failed when the squad broke to a 1MC in W1 (and if he’d reversed the order of his shots, it’d have been a K/1). I possibly should have pressed harder on his remaining units in advance, but was getting leery of just how long it might take to rally anyone who broke at this point.
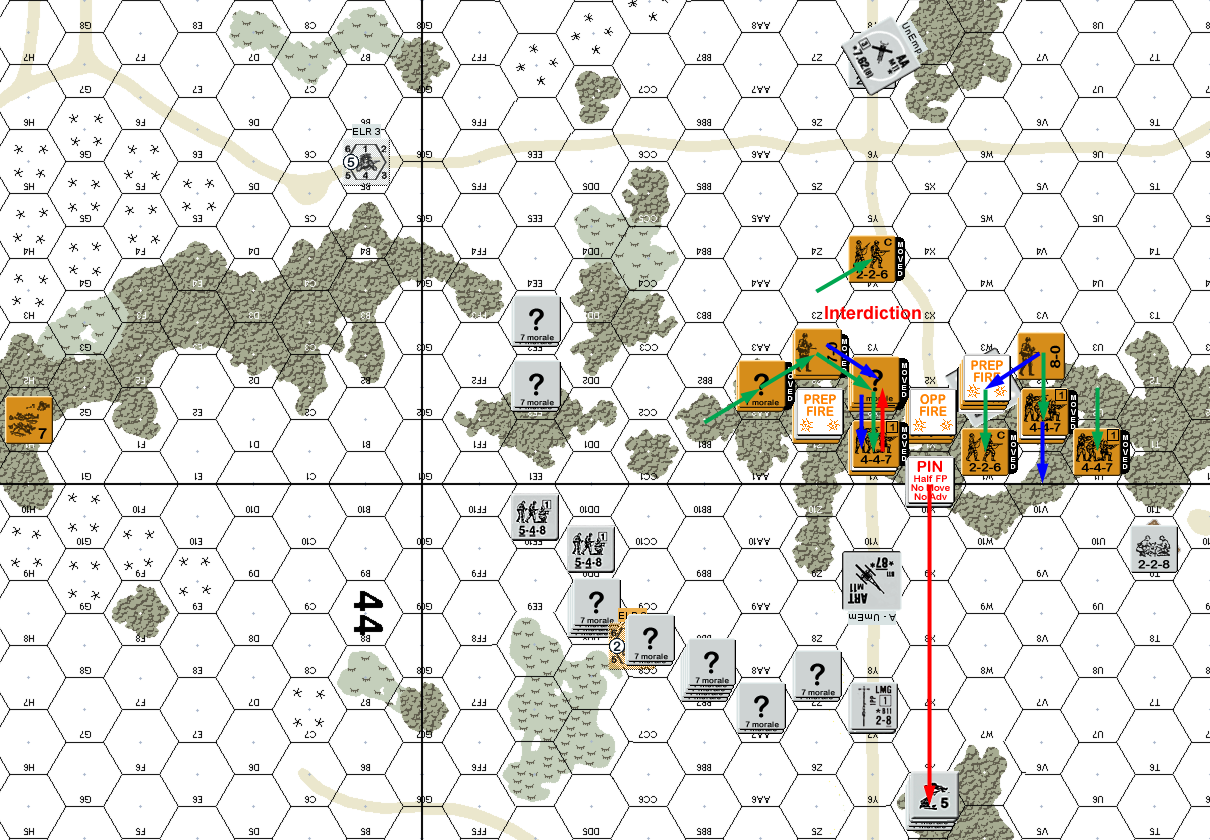
Situation, Russian Turn 5.
Patch’s other crew self-rallied at this point, but he still missed on the squad and a half in 16X5. My only rally attempt was a ‘2’… for a surrender, which, with no one around, turned into a Disrupt. Patch moved everyone into position just out of visual range in a fairly solid semicircle. Additionally, the AA Gun finally abandoned its position as the crew started manhandling it west towards me. The one thing that went wrong was his second ART crew tried to join the first, but broke to my fire, sending him back towards the rally woods again. The only other result either of us got in the turn was me malfunctioning another LMG.
Advance started putting him just inside four hexes, and his remaining HS took on mine in CC, and killed it, leaving him uncomfortably close to my MTR squad.
Situation, Finnish Turn 5.
My lone squad still didn’t self-rally, but I got the one that had disrupted last time back. Patch’s crew was lost on a ’12’ self-rally, but he finally got the squad in X5 back. I prep fired four squads before finally pinning the close-in HS. Despite this, he got a NMC on a stack of two squads in DFPh and broke both of them. Feeling the lack of room, my movement had just been slow shifting around that Patch hadn’t fired at. The AA Gun broke and disrupted the HS that had tried getting into effective range, leaving me still with no good options for dealing with it.
The troublesome HS finally broke during AFPh, but that activated Patch’s Sniper, which he relocated to the current action. My broken HS died to interdiction as he couldn’t Low Crawl while disrupted.
Situation, Russian Turn 6.
Neither of us got anything back for Patch’s RPh, and he only prep fired with the crew in T9, which got a 1MC to no effect. Patch generally just AMed slightly closer to my positions, and between concealment and light woods Hindrances, there weren’t many good shots. The one good shot I did have killed a HS that had a LMG from the original guys, leaving it abandoned and malfunctioned next to the the ART. He also continued manhandling the AA into range, but I pinned the crew after the first hex.
Because of the clear MMG fire to BB8, Patch refused to move into it, which surprised me despite the danger, as if a unit survived in there he’d have a continuous line to assemble very flexible fire groups out of. DFPh and AFPh saw a fair number of shots, but the only result was pinning one of my squads, and re-DMing last turn’s broken squads.

Situation, Finnish Turn 6.
My lone squad failed self-rally again, but I got one squad back, while Patch repaired a LMG. I only prepped with the MTR, but Patch passed the 1MC it generated, and the squad only pinned a Finish squad in the open.
I continued shifting around, trying to make an efficient group that could cover all the bodies coming in. The big movement was shifting my MMG away from the north flank, which naturally attracted a lot of fire. The first squad broke immediately, but the second passed several morale checks intact, until finally breaking on Patch’s last DFPh shot. Meanwhile, I’d gotten adjacent to building T9 and pinned the crew in there. That kept them from Ambushing me when I went in, but neither side did anything in CC.
Situation, Russian Turn 7.
I rallied the last squad from a turn ago, and managed to retrieve both MMGs. Patch preped with a decent number of guys, but didn’t do anything other than eliminate his own LMG (guns that lower their B# in snow is really bad news for Finns…). Patch pressed in on the north flank, and I couldn’t get a decent result, malfunctioning the liberated MMG on a Sustained Fire shot in the process. I did manage to break (and Disrupt) a squad that tried to reinforce the CC in T9.
My disrupted squad in Z2 surrendered, leaving the 7-0 who had gone in to try and retrieve him to self-break and avoid a 4:1 CC. The CC in T9 ended successfully with my squad taking out the crew for no losses.
Situation, Finnish Turn 7.
For my turn 8, the stranded squad rallied, now that everything had moved far away from him, and there wasn’t really anything he could do in the remaining two turns. I also rallied one squad in W2, while Patch rallied one HS and recovered the ART in Y9. If I had repaired the MMG I would have preped both of them, hoping for good rolls to break up the solid line of grey that had gotten too close. As it was, I just prepped the HS in W10 at the squad that now had the ART, but cowered for no effect.
Patch managed to break the squad with the functioning MMG as it skulked before disaster really struck in DFPh. I was seriously running out of room, and had to stack much more than I really wanted to before redeploying in APh. A couple of good rolls generated a 2MC and 1MC on these stacks, and my rolls were horrible (half of them were ’11’s), to break five squads to conscripts, and reduce the one already broken squad already there. The only thing that passed the MCs was my broken 7-0.
Situation, Russian Turn 8.
That was pretty close to the end of the game right there. I had 11 out of 12 VP, and getting any more would mean rallying, probably under DM, and only one squad and a leader were better than a 5 morale. Never mind if something else broke.
Patch deployed a squad, while I recovered the abandoned MTR, while failing to get the MMG. Patch walked up to what was left of my line, and I cowered on the first shot for no effect. The second shot wasn’t much better, but a shot from the MTR squad in the clear got a 2MC… which he passed. At this point, the AA crew abandoned its Gun and ran for the back rally area, and I had nothing left to respond with.
He also ran a HS up to my squad in T9, but I ignored them for a later shot at X9. That didn’t do anything, but Final Fire did Disrupt his HS, and Final Fire from the MTR squad also broke the squad they hadn’t quite gotten before. Advancing Fire pinned the MMG squad, and he advanced a squad and a half into that hex, and another HS onto the MTR squad.
Patch’s die rolls were terrible, with the W2 CC being a ’12’ for him. I declined to withdraw and wiped out the HS. In W1, I managed to Ambush him, and spent a little bit thinking over the options. Being pinned, it was a 4:1 to take on the stack, and a 1:1 to take out a HS. Given how desperate the situation was, I should have gone all-in, but took what would normally be the better option against the HS. Even worse(?), I rolled the ‘3’ I would have needed to kill the stack. His surviving squad CRed mine.
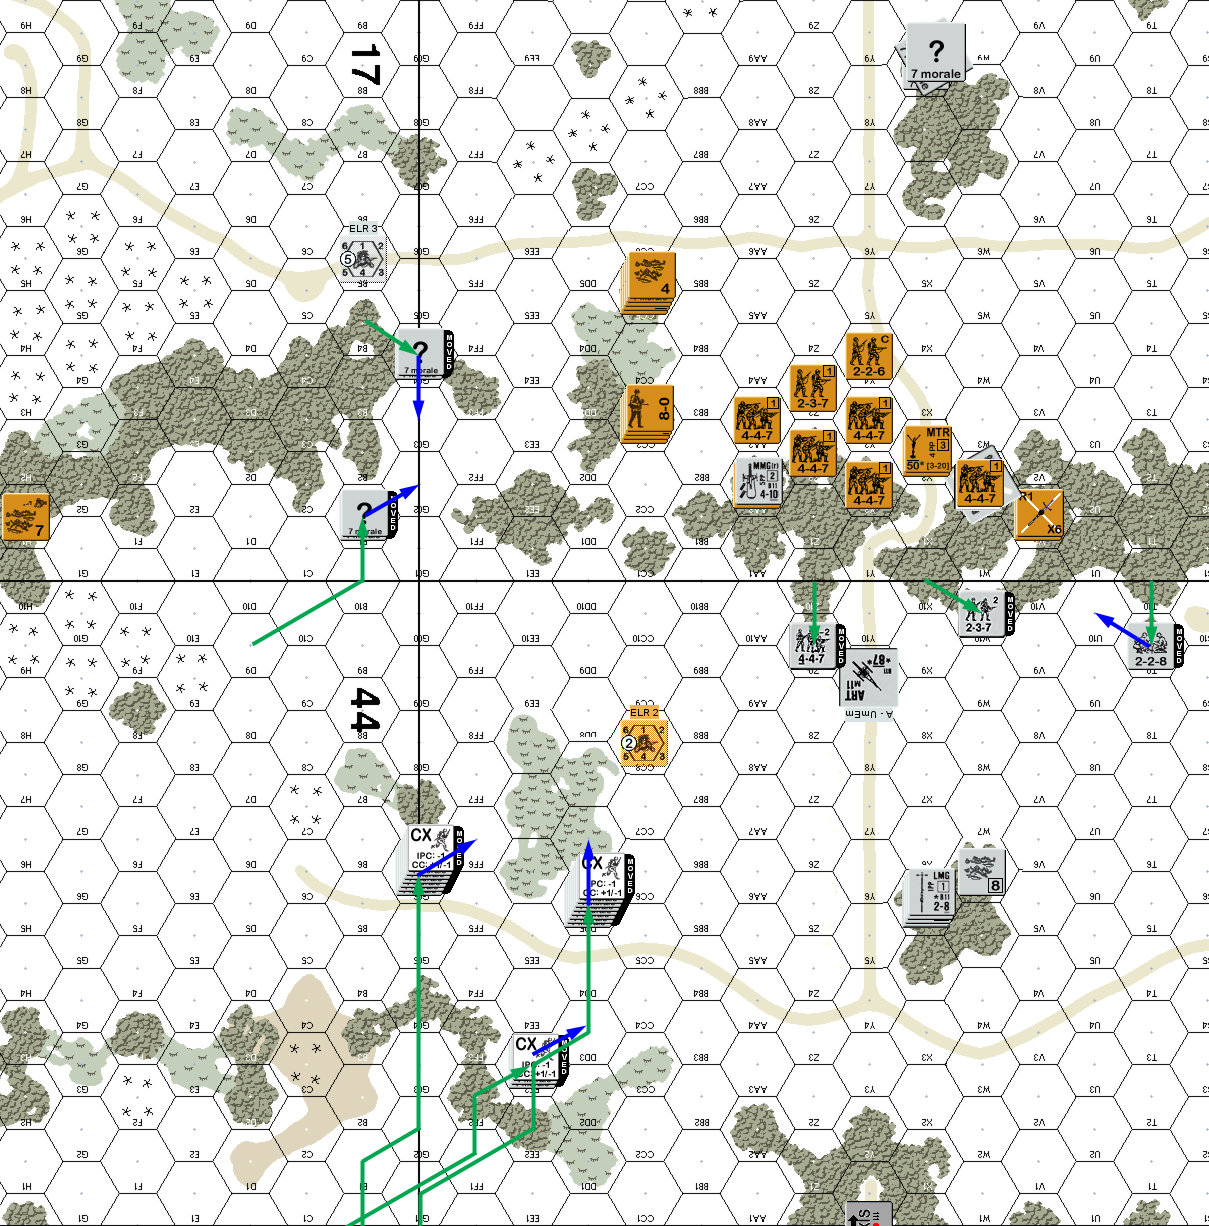
At the beginning of the final turn, I conceded when I failed to get anything back in my RPh, leaving me with 2 1/2 GO squads and a lot of Finnish firepower close by.
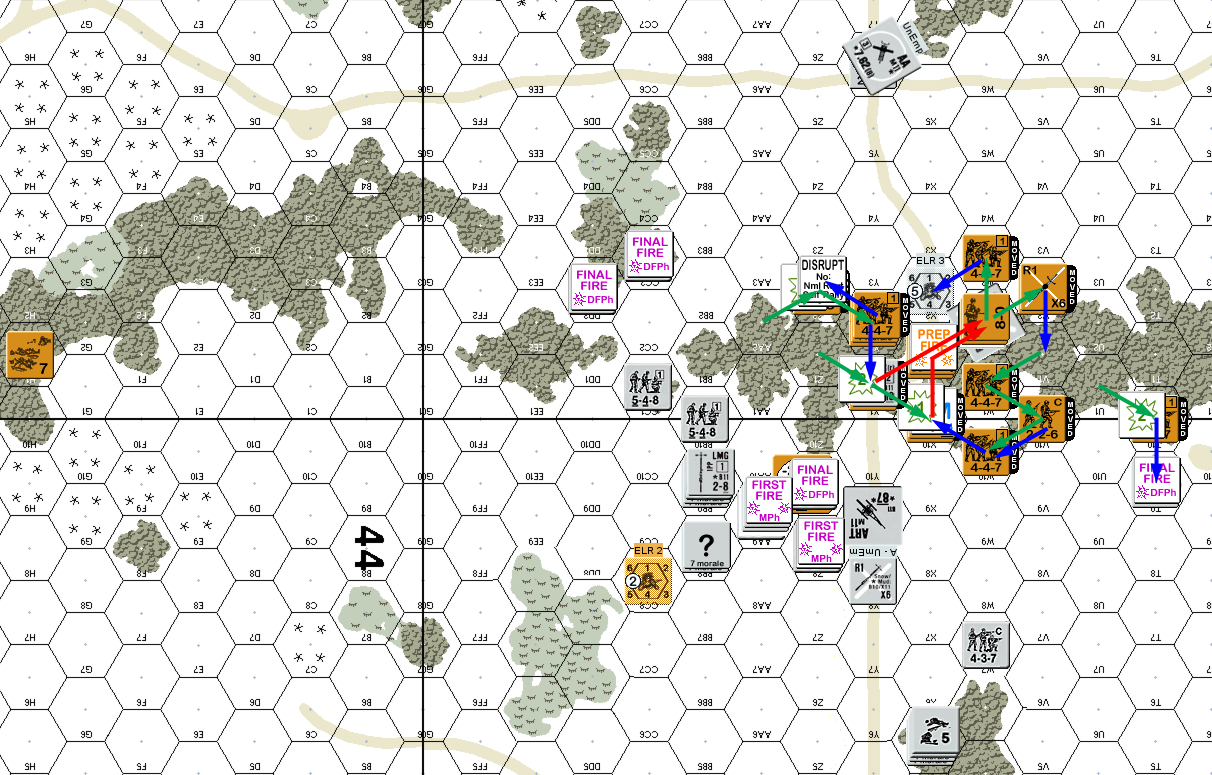
Situation, Finnish Turn 8, and end of game.
Afterword
It took a little getting used to the short vision range and woods-as-Hindrance, but it really added up to a very claustrophobic fight. I’m still not sure if I was too cautious or not cautious enough in the initial turns. I broke Patch’s initial force pretty thoroughly, but took a lot of permanent casualties in the process. His initial bad luck with the MMG and ART did a lot to let me get in and break him up, and I’m not sure what I would have done if those had still been active.
Patch was understandably unhappy with how much I shoved him around in the first half, but getting those two squads on the north flank right before the reinforcements came in is a lot of what gave me trouble later. I think he moved up the second ART too far too fast, which allowed me to keep it out of action for the entire game. If I’d had another turn before the reinforcements, I might have had a real shot at capturing it too. On the other hand, I think he should have been more active with the AA earlier. The few shots it got were very effective, and it needed to do more.
I was thinking I’d be scattering broken units all over, but other than the one squad who was written off from the start, that didn’t happen. I think I did a better job than normal keeping my force together and cohesive. I also got some decent use out of the MTR, despite the range problems (and I made sure it and the MMG had decent LOS to the AA in the early game if it fired and allowed them to fire at the gunflash), but I never got more than two shots with it at a time. I really could have used some rate-tears from it or the MMG as Patch was coming in. In fact, the big problem I had was that I couldn’t keep him from getting that big string of guys from getting closer each turn.
Discussion ¬