
SL254 Catching Hell
Crossposted from the SFU blog on BGG.
Patch and I recently finished off this Captain’s Log scenario from the early Four Powers War that also serves as a bit of a sequel to the “Where Wisdom Fails” mini-campaign we played a year and a half ago.
It’s still early in the 4PW (Y159) and wild reports have been circulating about the new Hydran weapon (the hellbore torpedo), and the high command wants one captured so that it can be studied.
“It was several weeks before a target of opportunity emerged. An F5 squadron was in position to intercept an inferior Hydran force that was believed to contain at least one ship armed with the new weapon. Fearing Hydran reinforcements if they waited for a battlecruiser (with copious transporters and marines) to join the fray, the F5 squadron commander decided to risk an attempt at capture.”
The Klingons get an F5C and two F5s, while the Hydrans get a destroyer and a frigate/police ship with a random reinforcement a random number of turns later (1d6 per turn, shows up when the total reaches 13). An interesting twist is that while one of the ships will have a hellbore, the Hydran player gets to decide if the DD or the FF is the hellbore-armed ship, and the Klingon player doesn’t find out what he’s facing until after setup is done. The map is fixed until the Hydran reinforcement arrives, after which it goes to a floating map.
The Klingons need to capture the hellbore-armed ship for a victory, though they can still get a minor one by wiping out the Hydran force. The Hydrans treat this as a normal battle and just use normal points-based Modified Victory Conditions.
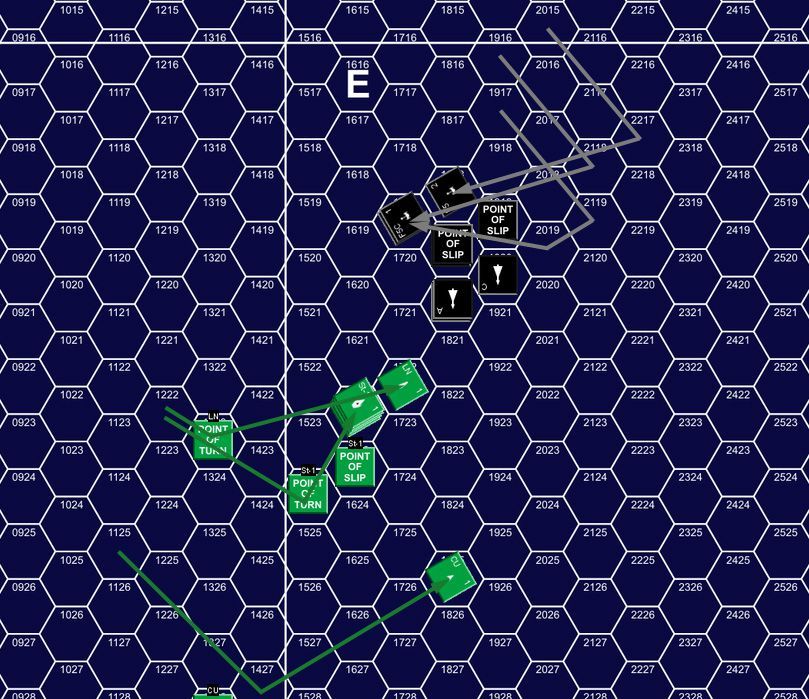
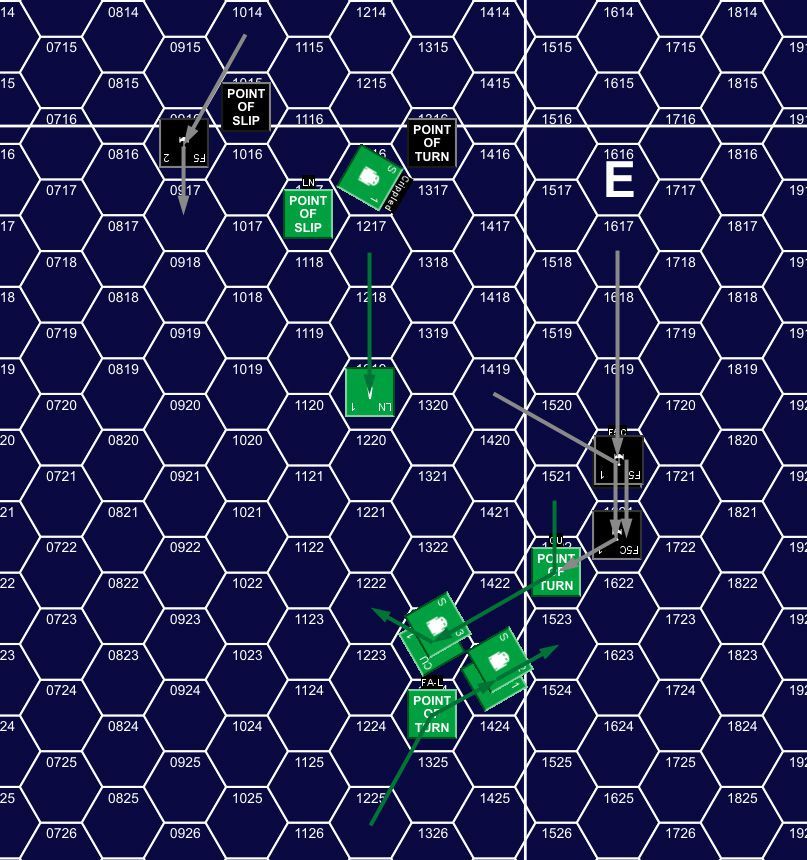
I went with the “historical” force of a Lancer DD (for the four Stinger-1s) and Cuirassier FF. Patch set up his force at the center top of the board, about as close as he could get to my setup area in the center. The LN was slightly forward and went speed 19 while the CU went speed 22. As the goal of the scenario, the CU was going to avoid direct contact as best as possible; besides, the hellbore is a good moderate range weapon compared to the point-blank fusions. The entire Klingon squadron went speed 17.
Maneuvering stayed fairly simple with me going straight and slipping out to maintain distance, while the Klingons maneuvered to my shield three and tried a volley of disruptors (one per ship) at range 12-14 on impulse 15 at the LN, with one hit. Shortly after that, I turned off for an eventual loop around to a pass on the opposite side from the starting position.
For turn 2, the LN slowed down to 13 to overload a fusion beam, while the Klingons boosted speed to 21, and the initial reinforcement roll was a ‘5’. On impulse 2, the LN launched all four of its Stinger-1s. I was wondering if Patch would try to get at the CU, but on Impulse 10, he turned in for a direct pass at the LN. On Impulse 13, the Klingons launched (what turned out to be Type-V) drones at range 3/4 from the LN. They then sideslipped out, and with ships going out of FA arc both sides opened fire.
I fired a fusion at the second F5, doing 1 damage at range 4, and the CU’s hellbore hit to sandpaper it’s shields as well as nearly bringing the #4 down. Meanwhile the F5C and F5-1 each fired two phasers and a disruptor at the LN at range 3, doing 27 damage on really good rolls (all but one phaser rolled a 1) and doing 8 internals through the #6 shield, getting all three bearing phasers.
Turn 2, impulses 1-13.
After that, the F5 squadron and the LN turned off, and the Stingers swept up the drones with phaser fire with some help from the LN’s ph-Gs (which was when I found they where two space drones…).
For turn 3, the LN boosted speed to 20, while the CU maintained 22 and the Klingons maintained 21. The reinforcement roll was ‘1’ for a total of 6.
My goal was to delay, since if I could hold out until the reinforcement came, it’d be 3 vs 3, but the fixed map interfered with that. Patch started turning back in at the top of the turn, while I was trying to get back around to be fighting off the right side, where the LN still had shields, and I had to be careful not to exit the board.
By Impulse 20 the range was 4 from the F5s to the LN and dropping rapidly. The F5C’s ADD opened up on the slightly closer Stingers, missing the first time, but did 5 points vs St #1 on impulse 21. The F5C fired the disruptors and forward phasers at the LN doing 15 points to shield #2 with one disruptor and good phaser rolls, while F5-1 crippled St #3 with its forward phasers.
Turn 3, Impulses 1-21, showing positions on both 1 and 21.
On Impulse 22 another ADD missed, the disruptors on F5-1 both missed the LN, and F5-2 fired both disruptors against St #4, killing it with a pair of hits. On Impulse 23 the LN slipped closer while the Klingons started turning off to avoid range 1 to the RA ph-Gs. The gatlings got a couple good rolls and a lot of 5s and 6s to do 21 points to #2 of F5-2 (which, a hex further back, had not turned off yet), doing 5 internals.
Meanwhile all nine RX phasers hit the LN for 29 points on the #3 despite poor rolls (nothing better than ‘3’) and a +1 shift against most of them to do 15 internals. This blew through most of the hull and took out a fusion beam (the one on cooldown), but thankfully missed hitting the phasers.
On Impulse 24 the LN turned the down shield away, and the F5C tractored it at range 2, while the squadron launched a wave of four Type-V drones. Both ships had a pseudo-speed of 10, and largely struggled against each other, drifting one hex in direction A over 5 impulses before the tractor was finally dropped. The CU got to range 1 of the drones on Impulse 29 and killed three of them with phasers while tractoring the fourth, and putting the last phaser into the F5C’s #3 to ding it for 3. Patch dropped the tractor on Impulse 30, and managed to put 1 point on St #2 with another ADD on 31.
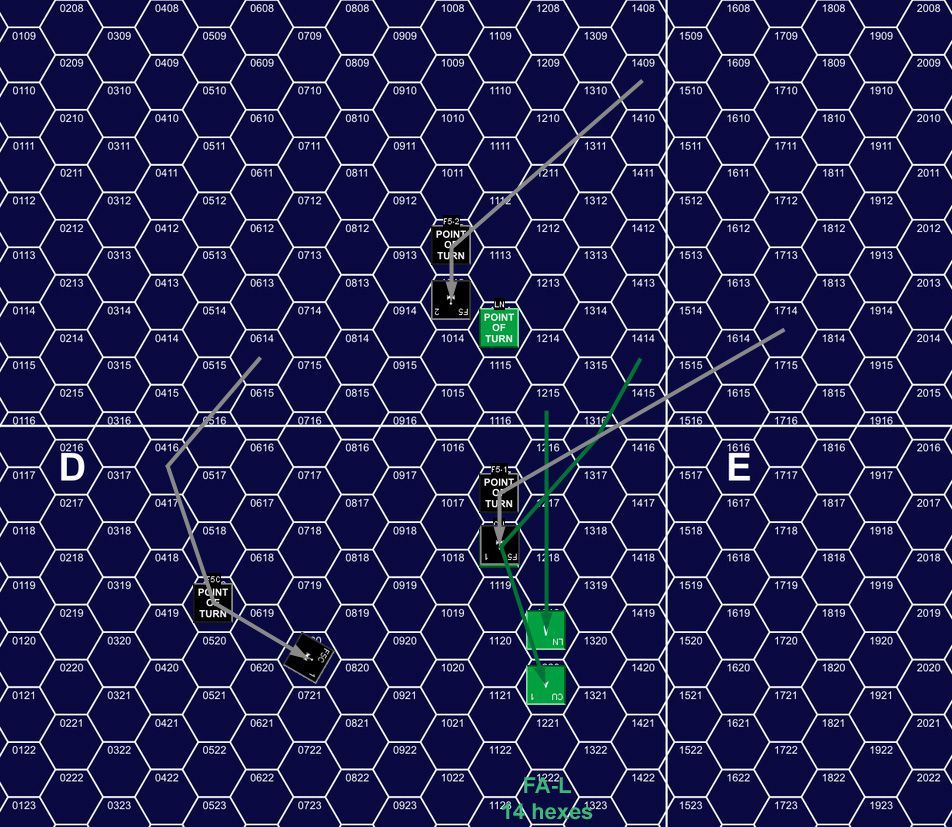
For turn 4, the CU dropped to speed 10 while overloading its hellbore torpedo and the LN dropped to 11 so it could recover the Stingers. The F5C maintained speed 21 and the two F5s slowed slightly to 19. The reinforcement roll was a ‘6’ for a total of 12, guaranteeing that it would show up for turn 5.
The CU fired it’s overloaded hellbore at F5-2 on impulse 1, knocking down the #4 and doing 10 internals through the down #2, getting one phaser, the drone rack and five power. On Impulse 2 the F5C killed St #3 with an ADD shot. The other Stingers made it to the LN’s hex on 3 and landed aboard on 3 and 5.
Turn 3, Impulse 24, showing movement from 21 to Turn 4 Impulse 3. (Yep. Complicated.)
The F5s circled around to their left, while the F5C went right, putting the Hydrans bewtween them as the CU got itself turned around to rejoin the LN after its hellbore shot, downing the last drone on Impulse 13. The faster speed of the F5C allowed it to pass the LN and get on its down #6 while paralleling its course, putting 15 internals in on Impulse 20 knocking out the bulk of the power as the center warp engine took a bunch of hits.
The LN then turned towards the F5C and did 4 internals through the #3 shield with a decent range 2 fusion shot on Impulse 21. Meanwhile, the F5s opened up on the CU doing 8 points to the #3 shield with poor rolls on three phasers at range 3. On Impulse 22, F5-1 followed up with a disruptor but missed, and the CU dinged its shield #1 for 4 points with a phaser.
With everyone strung out in a line, the LN re-launched the Stingers on Impulse 23, after deck crews had managed to repair one point of damage on each. On Impulse 29, with the Stingers getting very close, the F5s split up, one chasing after the CU, and the other turning the opposite way to get a range 1 shot with the RX phasers at the Stingers, killing both of them two impulses before they were clear to fire.
On Impulse 31 F5-1 and the CU traded shots, with the CU doing 5 points to the #2 shield on a good roll, and the F5 exactly knocking down the CUs #5 with poor rolls on the RX phasers.
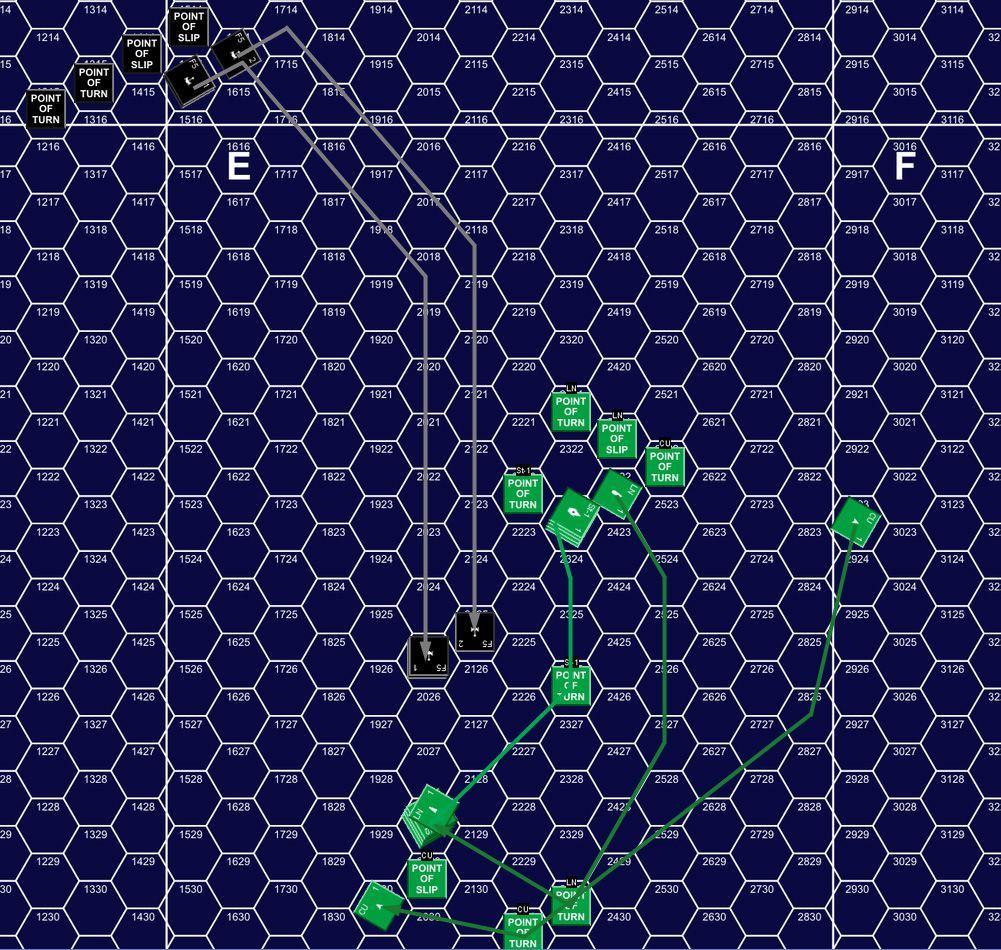
Post turn, the LN repaired a shield box on #3 and brought it’s 360 ph-2 mount back on line. The reinforcement arrived, and turned out to be a large fusion-armed freighter. Worth a fair amount of BPV, a short-ranged ship wasn’t what I really needed. (It’s technically the second-worst roll, though Large Q-Ship would have been even slower, and I needed to move. I really needed the Lancer, pair of Hunters, or the Crusader to show up.)
The FA-L showed up 35 hexes in direction D from the ship furthest in that direction, which was the LN. It’d be worse if it had been one of the Klingon ships instead, but but it was going to be a long turn of trying to get everything together. The FA-L went nearly flat out at speed 23, charging one fusion beam, while the CU went to speed 19 and the LN limped along at 10. The F5C went 19 and F5-1 18, while F5-2 went a comparatively slow 14.
The CU took another shot at F5-1 on Impulse 2 to ding the #2 shield again. It then turned away from F5-1 to get a nearly down shield away from it, but F5-2 then hit with a range 6 disruptor shot to get 1 internal, which got a phaser. The CU turned back a few Impulses later, keeping the rear shield to F5-1, but by this point the F5C was angling in, and it hit with a disruptor on the down #3 on Impulse 13. The next Impulse, the forward ph-1s fired and did another 9 points on good rolls, knocking out the other right-side phaser and the 360 ph-G, and hit the Scanner (killing the only ‘0’ box). On Impulse 15, the other disruptor fired, for another 4-point hit.
Turn 5, Impulse 15, showing movement from the start of the turn.
On Impulse 18 F5-1 flew by the LN, which emptied it’s ph-Gs into it, getting 14 internals through the 12-point #2. This knocked out a little power, a phaser, and increased it’s Scanner to 1. This may have been a mistake, as F5-1 then launched a drone at the LN on 20. I contemplated using the LN’s suicide shuttle at the drone, but then remembered what would happen when the drone moved into the LN’s hex before the either the LN or shuttle moved. So, I launched the shuttle at F5-1 before the bay could be destroyed.
The F5C fired on the shuttle on 21, but only did 3 points, not even crippling it. On Impulse 22, F5-1 slipped out to avoid the shuttle, and the LN took 10 internals through the #5 shield from the drone, which knocked out a fair amount of the warp engine, and reduced the sensors to 5. A follow-up shot from the F5C crippled the shuttle. On 25 F5-1 fired a disruptor at range 3, doing 4 internals through the CU’s down #5.
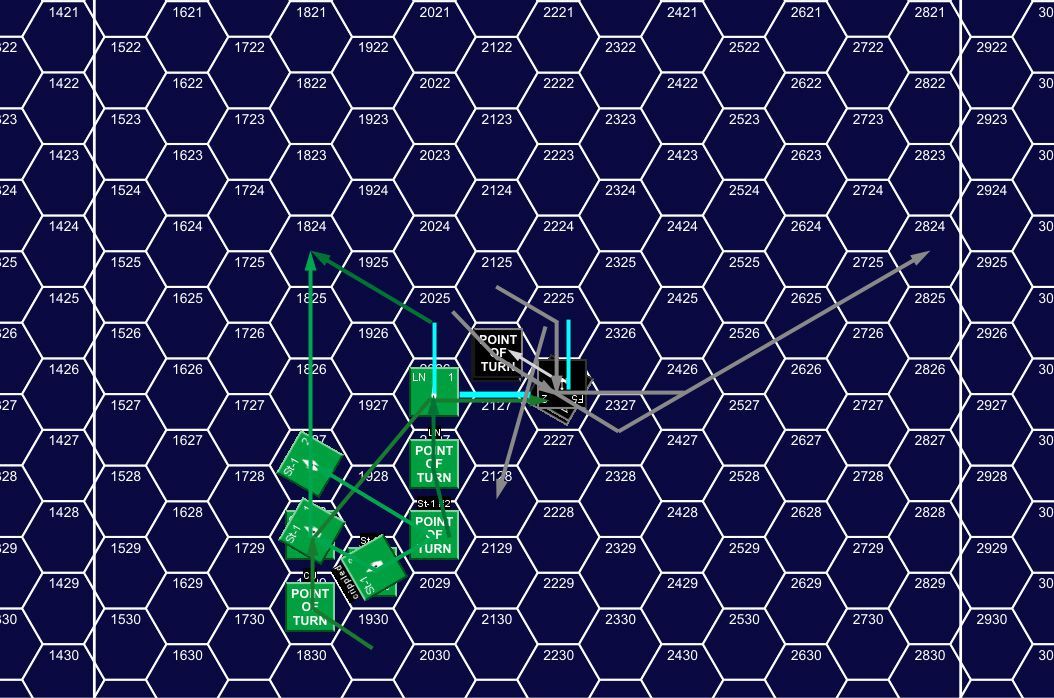
On Impulse 32, the FA-L was finally getting into range, and tried a range 3 shot at the F5-C, doing no damage on a ‘6’ with a +1 shift from EW. The Klingons and the FA-L all prepared for a turn 6 confrontation, with the FA-L overloading both fusion beams, a point of tractors, and went speed 11, while the Klingons all went speed 10. The LN turned off everything but the shields (only two were left) and went 9, while the CU maneuvered away at 16, after launching a shuttle on impulse 1.
The F5C fired an ADD at the CU’s shuttle on impulse 2, crippling it, while F5-2 fired a disruptor at the CU and missed. On Impulse 3, F5-2 fired the second disruptor and hit the CU for 3 internals through the down #3, all power.
On Impulse 4, the F5C hit range 1 to the FA-L and both sides opened fire. The FA-L fired one phaser and one fusion, hoping for a range 0 shot later, and did 15 with a poor phaser and great fusion roll on the #1. The F5C’s forward phasers and overloaded disruptors did 29 damage for 14 internals through the #6. The really bad news was that the FA-L’s tractor beam was destroyed, which meant it would be unable to tractor the drone that the F5C had launched, and that the FA-L didn’t dare go to range 0 (since it’d hit the drone).
Beginning of Turn 6, showing movement from Turn 5, Impulse 30, through Impulse 4 of 6.
On the other hand, the F5C then tried to tractor the FA-L, and the tractor energy I’d allocated allowed me to defeat the attempt. I fired the other in arc phaser (illegally, I’d forgotten the Impulse 32 shot from the previous session) and fusion for another 16 points, doing 5 internals.
The FA-L was still clearing its turn mode, so on Impulse 7, the F5C turned and put the RX phasers into it for 14 internals. On Impulse 8, F5-1 hit it with 2 overloaded disruptors and the forward phasers for another 30 internals. This eliminated all power of the FA-L and started getting cargo on Excess Damage hits (though we actually missed the ‘Any Weapon’ hits).
The one final act of the turn after that is that the CU and F5-2 did a pass, but the hellbore missed on a range 2 shot (12!), though it did 7 internals through #4 with the remaining phasers a few Impulses later.
We effectively called it after that. The CU had enough power left to disengage by acceleration at the end of turn 7, and running through things real fast for that turn showed that Patch couldn’t do enough damage to prevent it. The FA-L was completely helpless, and we figured there’d be no problem taking out the LN, which couldn’t disengage, and only had a couple ph-Gs.
I got a couple victory points for Patch’s use of speed-12 drones, and I had gotten internals on all three Klingon ships. But, I hadn’t crippled any of them, two of my ships were destroyed, and the CU disengaged for a total of 27.6 to 122.25, a Crushing Defeat.
On the other hand, Patch hadn’t carried out his mission, so it was a Defeat for him too!
I think Patch stayed too cautious for this one. He had the firepower advantage, and should have been trying to swarm marines on the CU whenever he could. Turn 4 especially had a good moment for him, after I fired weapons, so lowering a shield wasn’t a problem. He was worried about the odds on the combat, but the CU only has 6 boarding parties, and each of his ships had two transporters, so he could get to 4-6 odds with only two ships, and a repeat on the next turn would probably get him good odds. Also, engaging in some hit and runs would force me to divert boarding parties to guarding the hellbore instead of participating in combat.
My general plan went okay, but I found it too hard to keep my distance on the fixed map. Neither of us expected the FA-L to go down so hard. I keep having problems using Stingers properly (they keep just serving as target practice for Patch), though the second go round very nearly worked, and could have wrecked an F5. We really need to start using Erratic Maneuvers.
Discussion ¬