Rindis.com

All my hobbies, all the time
  • Home
  • My Blog
  • Games
  • History

Categories

  • Books (509)
  • Comics (10)
  • Gaming (924)
    • Boardgaming (680)
      • ASL (155)
      • CC:Ancients (84)
      • F&E (78)
        • BvR – The Wind (26)
        • Four Vassal War (9)
        • Konya wa Hurricane (17)
        • Second Wind (5)
      • SFB (81)
    • Computer games (162)
      • MMO (77)
    • Design and Effect (6)
    • RPGs (66)
      • D&D (25)
        • O2 Blade of Vengeance (3)
      • GURPS (32)
  • History (10)
  • Life (82)
    • Conventions (9)
  • News (29)
  • Technology (6)
  • Video (50)
    • Anime (48)
  • Writing (1)

Patreon

Support Rindis.com on Patreon!
Become a patron at Patreon!

Other blogs:

RSS feed: Inside GMT Inside GMT

  • Chalice of Poison: The Combat Procedure August 27, 2026

RSS feed: Playing at the World Playing at the World

  • Playing at the World 2E V2 Arrives May 5, 2025

RSS feed: Dyson’s Dodecahedron Dyson’s Dodecahedron

  • Greenrise Farmstead August 28, 2026

RSS feed: Quest for Fun! Quest for Fun!

  • The $139 Board Game August 7, 2026

RSS feed: Bruce Heard and New Stories Bruce Heard and New Stories

  • Pain, Exhaustion, and Morale in D&D BECMI June 7, 2026

RSS feed: Chicago Wargamer Chicago Wargamer

  • The 2 Half-Squads - Episode 310: Cruising Through Crucible of Steel January 27, 2023

RSS feed: CRRPG Addict CRRPG Addict

  • Pagan: Look at Me Now August 27, 2026
SF&F blogs:

RSS feed: Fantasy Cafe Fantasy Cafe

  • August 2026 Book Recommendations Video August 21, 2026

RSS feed: Lynn’s Book Blog Lynn’s Book Blog

  • Review: They Say a Girl Died Here by Sarah Pinborough August 27, 2026
ASL blogs:

RSS feed: Sitrep Sitrep

  • Fireweed Sale August 7, 2026

RSS feed: Hong Kong Wargamer Hong Kong Wargamer

  • FT114 Yellow Extract After Action Report (AAR) Advanced Squad Leader scenario April 16, 2025

RSS feed: Hex and Violence Hex and Violence

  • This still exists? March 25, 2025

RSS feed: Grumble Jones Grumble Jones

  • Grumble Jones August Scenario GJ163 Guderian's Foxes August 5, 2026

RSS feed: Desperation Morale Desperation Morale

  • How to Learn ASL March 16, 2025

RSS feed: Banzai!! Banzai!!

  • October North Texas Gameday October 21, 2019

RSS feed: A Room Without a LOS A Room Without a LOS

  • [Crossing the Moro CG] T=0902 -- Rough start July 18, 2015
GURPS blogs:

RSS feed: Dungeon Fantastic Dungeon Fantastic

  • Revised GURPS Basic Set & DF Felltower August 23, 2026

RSS feed: Gaming Ballistic Gaming Ballistic

  • Not Just Breadth: Specialize for Customization July 31, 2026

RSS feed: Ravens N’ Pennies Ravens N’ Pennies

RSS feed: Let’s GURPS Let’s GURPS

  • Review: GURPS Realm Management March 29, 2021

RSS feed: No School Grognard No School Grognard

  • It came from the GURPS forums: Low-Tech armor and fire damage January 29, 2018

RSS feed: The Collaborative Gamer The Collaborative Gamer

  • Thoughts on a Town Adventures System January 18, 2022

RSS feed: Don’t Forget Your Boots Don’t Forget Your Boots

  • GURPS Supers Newport Academy #8: “Invitation to the future.. of the 1970’s: Part II” August 2, 2026

RSS feed: Orbs and Balrogs Orbs and Balrogs

  • Bretwalda - Daggers of Oxenaforda pt.4 - Fallen King May 27, 2017

DA8 Gruppo Mobile

by Rindis on November 29, 2012 at 12:00 pm
Posted In: ASL

Patch and I actually ended up getting together for our first face-to-face game of ASL in years in April 2010. I didn’t really have a camera, so he ended up reporting all the visuals…:

Well… it’s been a rough month for gaming. Mark is always busy during April, but this month has been worse than normal, with work putting a lot of extra stress on his schedule. Jason was busy, and Zjonni had some free time, but is already being buried under classes again.

So, our big game day yesterday turned into just me and Patch. In deciding what to do, ASL was initially decided against because of prep and setup time. But, I pointed out we were due to start a scenario Monday night, and we had our setups worked out already. So, we ended up playing DA8, Gruppo Mobile, FtF for the first time in… 5 years (yikes).

Sicily, 1943, six elite American squads versus nine Italian MR/35(f)s. Since they’re worth 6 VP each, the Italians have to exit four of them off the south edge after moving through one and a half deluxe boards lengthwise (22 hexes). They’re not very fast, but the American anti-tank abilities are a little limited: two DCs, two BAZ, and a 37mm ATG that enters on the first turn. Bad news for the Italians is they only have five turns. Bad news for the Americans is that the ATG comes with a HS instead of a crew.

By ROAR, the scenario is tilted towards the Americans, so Patch took the Italians with the balance (8 morale for the Inherent crews). He missed the SSR about the tanks only having half movement on the first turn, so he had to re-do his opening setup and was forced to use both roads onto the board to get everyone into play.

My setup was not bad, but it was a little too forward, and when I had him right in front of me on the first turn, I tried to engage instead of falling back to keep in front of him as I should have. My die luck was not what I could have hoped for. One BAZ went away on its second shot, and while the first shot hit, it failed to penetrate.

However, while things really got away from me on the east side on the second turn, I stunned three of his tanks as they tried to get going on the west side. I did knock one out in the east, but the other three got away from me. I had set up the ATG on the west road, and Patch barely managed an OVR, which didn’t do anything to either side, leaving a MR/35, ATG, 10-2, and Jeep all in the same hex.

On my second turn, I rushed after his fleeing tanks with most of my forces, while leaving a couple squads to deal with the stunned (now flipped to +1) tanks. One squad successfully ran up and placed a DC, blowing his rear tank in the east. (Cool! I’ve only had DCs a couple times, and it’s the first time I’ve used one….)

The third turn really broke things open for him. Patch exited two tanks, and had two more ready to exit. I was only able to reach one of them in my turn, so I would have to kill it and try to stop everything else he had. Not that it had been that easy for him. He had broken the second DC squad on my turn two as it raced up to kill another tank, and I had moved the 10-2 to rally him. Since they were positioned adjacent to the road the three stunned tanks had to use, and he was using CE to get distance, he ate a lot of attacks. With a 667 and 10-2, there was a six resid, and a pair of 2 resids to go through, and they made five FPF attacks against them as they went roaring by. And they threw the DC, but couldn’t connect.

In my turn three, I missed with another BAZ shot, failed PAATCs on two CCs, and failed CC on the tank I had to kill. Game over at the start of turn 4.

It’s actually a nice scenario, I recommend playing it—once. There’s not a lot of great decision making for the Italians, which hurts, but the Americans need thought since the AT capabilities are a bit limited. I also think it’s a bit more balanced than ROAR indicates, because I get the feeling that much of the time the Italians don’t pay enough attention to a tight schedule (don’t let the turn 4 win fool you, there’s not a lot of movement to spare), rather like the typical beginner problem with “Fighting Withdrawal”.


Blind Sniper cheered:

“As always great report! Thanks James :)”


“Ok, as Rindis said, our planned multi-player game fell through, so after some discussion we decided to give our planned VASL game a go instead. We’d been talking about playing a DASL scenario, and I was intrigued by playing with Italians again. We don’t see much of them, and I like getting the little grey counters out now and then.”

“I have the Italians in this one, and I take the balance (8ML AFV crews) as it’s a fairly unbalanced scenario. Once we got my turn 1 movement restrictions sorted out, I took a new look at the board. There’s no way I can enter everyone on the same road, so I have to break this apart. This sucks, as I do not like how things look to the east. I decided to enter 4 tanks and the 9-1AL on the eastern road, and the remaining 5 tanks and the 9-2AL to the west. Both armor leaders are a few tanks back so they don’t die up front, but their modifiers will counter any wrecks they fire past.”

“My thoughts on Rindis’ set-up are below. The 8-1 and MMG is obvious, as it’s the highest stack. The bazookas are trickier. I figure they’re in bI1 and dF2 as I like the LOS from those positions. I place the 8-0 in bF3, and that leaves the DC in bF1 and dF4.”

“The turns are blending in my memory, so the sequence of events may be a little off.”

Turn 1
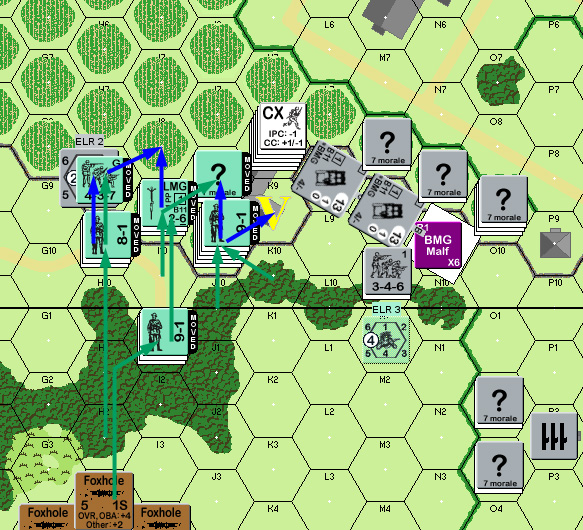
“I enter CE to get those few extra hexes of movement, and button up as soon as I get close to the Americans. Rindis tries a Street Fighting Reaction Fire attack from 8B3 right off the bat, and I’m pleased to see I was right about the 8-0. The tanks pile up behind him, and I stop short of the bridge to the east to prevent a PB bazooka shot. I stop two tanks so I have some firing options, but leave the others in motion. I discover that I was wrong about the bazookas, and one is sitting happily in bF1. Rindis gets a shot off and hits, but the thick French armor saves me. The second time he fires in his turn he rolls a 10 and the bazooka goes away (he was in dF1 with the goal of moving to dG1 to avoid backblast penalties, but t’was not to be). Lots of Street Fighting once again, to no effect. I malfunction the MA of my 9-1 AL’s tank on its first shot of the game. >.< I elect not to repair it, as with the AL on board it’s still worth 7 VP, and I do not want to Recall it. Rindis enters his ATG and unloads it in bO3.”

Turn 1 entry

Turn 2
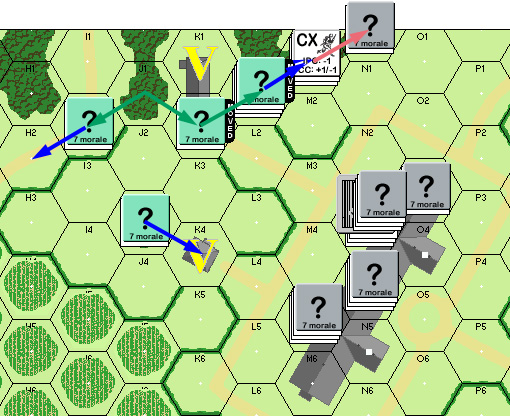
“I push to the east, and find that the bazooka is in dF4 when it fires and misses. On the other hand, Rindis nails a MR/35 with Street Fighting in dG3. With lots of FF counters about, I go CE and make a run for it and get to the orchard road area. To the west, I’m really concerned by that ATG. I decide to swarm it, with the alternative option of stopping before it and getting sandwiched between the ATG and three squads. I get one tank into bypass in dM2 to fire on the ATG later, but use ESB (it’s a final +4 modifier – yes, I was that desperate) to enter dO3 for the overrun. I had to do this while CE, and only then realize that these are 1MT tanks! The 2FP overrun has no effect, and Rindis stuns my 9-2AL when I go CE and try to rush past the northern blockade, along with 2 other tanks! Gaaah! I have swarmed an ATG and a 10-2 with… 2 tanks. I start wondering what our gaming plans will be when this ends in about 30 minutes. I have 5 tanks in a very precarious position. That turns around for me, however. Although Rindis does rush a MR/35 to the east and kills it with a DC, I break a DC squad to the west and he cannot kill the overrunning tank in dO3, and he fails to kill any of the three tanks in dF2/dG2 in CC.”

Disaster! 3 tanks go down

Turn 3
“I break the ATG crew, which opens the door to the west. I exit one tank on the eastern road, and one on the western. Two more tanks are poised to exit. I make another CE blitz and get two more tanks to mid-board, but Rindis is using FPF like mad with a 10-2 and 667 in dK2 and finally gets a double stun result, forcing a Mk/35 into Recall. The Stunned tank is a blessing in disguise, however, as Rindis makes a run at my remaining tanks, but the vehicle in dK2 is enough to keep Rindis from reaching the ones he needs with the units he requires, and in Advance two squads, including one with the 10-2, fail their PAATC. He fails to kill any vehicles, and there’s nothing preventing me from exiting two more tanks in Turn 4, even with the threat of a bazooka he shuffled over to aK1.”

Italian Turn 3 Movement

Conclusions
“Looking at the map now, I think the eastern road offers the better entry option. The bh1-dH4 road is much easier to navigate moving east to west, than west to east. Also, you can switch over from dL4-dL5:dM5-bM1-dM2:dN1-dO2. It will take a turn, but it’s doable. No such straight shot exists for the other direction.”

“The 347 for the ATG crew is a nightmare, making a base +5 TH for any shot against the MR/35s. Knowing that, an overrun of the Gun is certainly the order of the day. I don’t see any really nice other hexes to place it that aren’t OG, and I was on Rindis too fast for him to move it into, say, dN3. Getting it into cB2 on turn 1 is an alternative, with an attempt to push it into cB2 and close off the eastern road, but still… a +5 TH makes the ATG anything but the magic tank killer it appears to be.”

“I think the Americans have to set up in two defensive lines. The first is set to engage the expected end point for the Italian Turn 1 movement (and don’t forget the MMG can boresight to keep those hatched buttoned), and the second is set to intercept the expected turn 2 end point. That way the US can’t get bypassed like I did with Rindis.”

“The Italian needs to movemovemove. A single 667 needs a 5(+1) to kill a moving tank in CC with Street Fighting, which are not bad odds given there are 6 squads on the board. The 8-1 and a squad needs a 6(+0) for a kill. I realized too late how effective the DC can be, and you can expect those nasty blocks of HE on the back of at least one of your tanks. The balance option of the 8ML was a big factor in my decision to remain CE during movement, although it really only affected one result. Neither of the ALs made a difference in the game. When they took MCs, they passed easily or failed miserably. Still, nice to have for those overruns when they pop up.”

“An interesting scenario, but as Rindis points out, there’s not much for the Italians to actually do. It’s much more of a puzzle for the US to figure out”

Victory and a late counterattack


JMichael commented:

“Agree about the lack of fun for the Italians – their biggest point of decision is the CE/buttoned choice. When I played this as the Americans I had a lot more success in killing/immobilizing tanks with Street-Fighting and CC Reaction Fire than anything else.”
└ Tags: Annual 91, ASL, DASL, gaming
1 Comment

137 Italian Brothers

by Rindis on November 22, 2012 at 12:00 pm
Posted In: ASL

After our previous early-war scenario, Patch and I moved on to something even earlier, the Spanish Civil War, in March 2010…:

As the previous scenario between me and Patch wound down, we had a chance to talk about what we wanted to do next. Patch mentioned that it had been a while since we’d seen the Italians (in fact, since our Primosole Bridge CG, where they didn’t do so well thanks an ELR of 0). Having recently gotten Doomed Battalions, and busy obsessing over that, I immediately mentioned the old A72 “Italian Brothers” which featured two Italian units fighting on opposite sides of the Spanish Civil War using Italian and Allied Minor counters, and which was updated in the new edition of DB. And so here we are.

I can say that the scenario would be a lot easier to set up if it mentioned which side was the Nationalists, and which side was the Republicans somewhere other than the background text. (Okay, the side symbols also are a guide, but both of us missed that.)

As it is, I’m the Nationalist/Black Flame/Italian forces. Technically, I set up first, but all I have on board are three pitiful non-turreted L3/35 AFVs, with fixed positions and CA, and in Motion. The only real choice I see is whether I want to be BU/CE. (BU, thanks.) Patch is the Republican/Garibaldi/Allied Minors, who set up in two groups, one on board 17 near my L3s, and the other on board 6, set to advance on the manor house. If he can take it, he wins immediately. Otherwise one of us has to have 3 out of 4 other stone buildings, mostly concentrated in front of the manor house, at the end of 6 turns. Otherwise, may he with the most CVP win! (Nationalists win ties.)

Patch set up as expected, took a couple MG shots at the L3s, and started moving for victory buildings. (Two hits, but couldn’t manage the 4 TK….) I fired as he moved out, but only managed to malfunction a BMG/MA for my trouble.

Originally, my plan as I entered with the bulk of my forces was to take 6N4 (of course), 17P2 (also of course), and dash across and advance in to 6K4. With only a single squad in position to take it, I should have a decent chance at it, especially as I had the troops holding N4 to back up my move. As I moved, however, I realized I could get into 6K8 without him being able to do anything about it, and I could make his move in much more difficult, so I went for that instead.


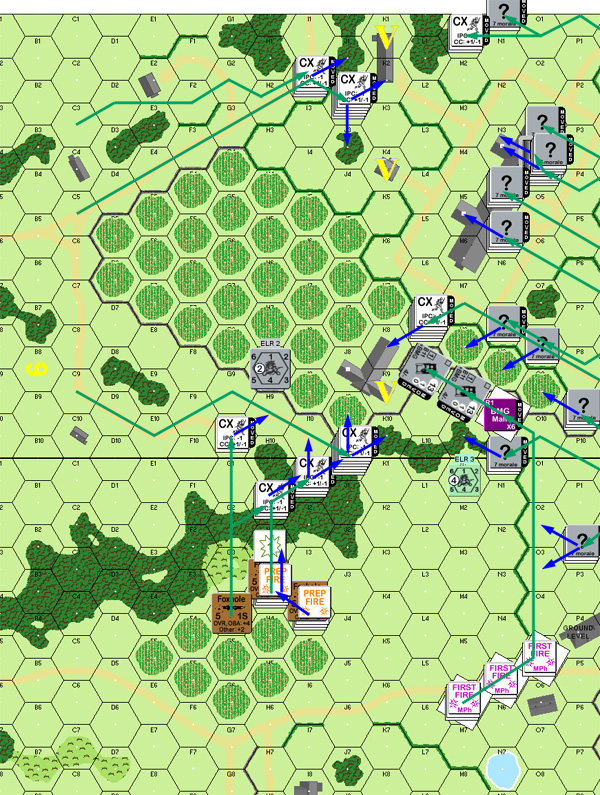
Situation, Turn 1, showing both side’s movement.

Patch had to spend quite a while pondering what to do next after that, but he eventually shuffled a big stack into 6J9, obviously preparing to advance into the blind side of the building, J8. All I could do was pin a single squad. Without much going on in the west (top), I just had a single ineffective shot while assembling my MMGs.

He advanced into CC in 6M1, which pointed out just how vulnerable I am, since I am Lax and have lower FP. However, after successfully Ambushing me, he rolled a ’12’, and I thankfully withdrew back to N0.


Fight for 6N4, Republican turn 2.


Fight for 6K8, Republican turn 2.
↓ Read the rest of this entry…

└ Tags: AAR In Progress, ASL, Doomed Battalions, gaming
2 Comments

Dominant Insects

by Rindis on November 20, 2012 at 11:01 pm
Posted In: Boardgaming

Finally had a group day again on Sunday. The best we could manage was three of the regulars (me, Dave and Jason), though my roommate Baron was available and willing to spend part of the day playing games, so we were figuring on doing a bunch of little games.

However, Jason showed off Dominant Species, which he’d gotten recently, and we decided to give that a try. That took up the entire day (with a slightly early end), but was well worth the time.

It’s a fairly interesting game, and probably the best evolution-themed game I’ve heard of. I know just enough of Euro-games to recognize the action selection mechanic, though I assume it’s a bit more involved here. Certainly, the planning stage at the beginning of each turn where the players declare what kind of actions they will take during the turn out of the limited pool available makes for an interesting mini-game. Then the chart guides you through everything in order; very neat.

We drew random animals to start, with me getting the Arachnids. It took a bit for everyone’s ‘super power’ to sink in, but once it did I tried to emphasize it by picking at least one competition action a turn in addition to the freebie I got. Jason got off to an early lead with the Amphibians with me and Baron following a bit behind, and Dave trailing in last. I came up with a long-term plan to try to reduce Jason’s position (since he not only was in the lead but had prior experience) by going for two glaciation actions in a row. Since there’s only one of these actions a turn, and the rest wait in a queue, this left me with fewer actions than normal, but allowed me to direct the expansion of tundra into his high-scoring stronghold.

Dave had the Insects, and by mid-game was using their high initiative to get two of the five domination (scoring) actions each turn, so he caught up, and pulled ahead by the time my plan to contain Jason went off. By the end of the game he had an extremely dominating lead. Meanwhile, my VP collection had just puttered along, and I had fell well behind everyone.

Part of the problem was our inexperience; it was easy during our game to have a high-scoring tile with no one else on it to give points for second to. I’m sure that will change next game. Baron did pretty well for himself as the Mammals, who he shifted up to second in the initiative order, and had a nice little area without the really big (sea) tiles, but not much competition until the last couple turns.

When the Ice Age card (for the end of the game) came up, I had a decent position, even if I had few VPs, and came up with a desperate plan. I would try to hold dominance on as many tiles as possible, to get a lot of bonus points which would turn into a good number of VPs. At the same time, this allowed me to try and get the Survival bonus (which had pretty well migrated around the table every turn). A Cataclysm card seemed to put an end to the latter as Jason used it to clear out a decent stretch of tundra. I got the last ‘special effect’ card, which allowed me to place an extra tile of tundra. For a while, it seemed like there was no way for it to help, but I finally realized I could use it to knock out two water food sources that Jason was relying on, and clear him off the tundra. As it turned out, all four of us tied with three species each on the tundra for the last turn and no Survival bonus to anyone.

My plan to Dominate my way to victory worked out well, with 8 dominated tiles, and 36 VPs. This put me at 101 VP to squeak out a second place above Baron (95), and Jason (90). Dave was nowhere in reach at a final total of 142(!) VPs.

It was a fun and interesting game, and I’d like to see it with six players; I think the extra crowding on the action chart will lead to some very interesting fights.

└ Tags: Dominant Species, gaming
 Comment 

New Infantry, New Weapons

by Rindis on November 15, 2012 at 10:22 pm
Posted In: Books, History

Part two of Osprey’s survey of European Medieval Tactics is much like the first volume. Unfortunately, while I felt the first volume started strong and finished somewhat weaker, all of this volume is at the level of the later portions of the first.

The main problem is that the first one started with a fairly solid thesis, and then lost its way in the later part of the period. This volume is still useful as a general introduction to a subject that gets too little attention, but it just wanders from place to place, and time to time, without any central ideas stated.

There are another thirteen small battle diagrams included (compared to seven in the first volume), which seem to be more crowded and harder to follow than before. This may indicate the battles are getting more complicated. I don’t know this period as well, so fewer of the battles discussed there or in the eight color plates are familiar to me, though there were still a few I knew.

I’ll also note that Osprey has a volume on Pike and Shot Tactics 1590—1660. I wonder if they have anything planned for 1500—1590?

└ Tags: books, Elite, history, Osprey, reading, review
 Comment 

J67 The Lawless Roads

by Rindis on November 15, 2012 at 12:00 pm
Posted In: ASL

Journal 4 had an article on the British Universal Carrier, and some scenarios featuring them. I managed to talk Patch into one of them, but I’d still like to try the other scenarios. We got going in January 2010…:

After finishing the Market-Garden set, Patch and I are playing one of the early-war scenarios in Journal 4 featuring Carriers. The British are trying to clear a road through a village (no GO Germans on or adjacent to it), but the Germans are already strongly defending the town. In addition to needing to chase the Germans away from the road, the British will lose if more than four of their AFVs are killed (or if four tanks/tankettes are killed).

Given a choice, and remembering Patch’s problems with a similar set of victory conditions in Khopra’s Crossing, I take the defending Germans. They don’t get any vehicles of their own, and the anti-tank capability isn’t great, but the Brits don’t have anything heavier than an A10. Patch will have to be cautious, especially with two 37mm ‘doorknockers’ hidden somewhere.

Board 12 is an unusual mix of terrain for an early board, and there’s a few of the hedgerow overlays in play (though bocage is not in play—a hedge is a hedge here) and I have to spend some time deciding how to defend. The real target is the road itself, but if I concentrate on that, he could easily bypass part of the defense and strike towards the middle or back end, hoping to leave me without fallback positions. So I opt to defend the entire front with an eye towards hustling towards the road if he attacks down it as expected. The four OB-given ‘?’ are used to conceal where the good leaders, MMGs and ATRs are. The MTR doesn’t have any place with a good LOS and end up on the hill in T1 when I forget that Orchards block non-same level LOS.

Patch setup near the road and got to work clearing it immediately. With some concentrated firepower, and a ROF-tear on his MTR, he broke a leader and LMG squad, and pinned another LMG squad. I was able to do far less to his initial advance than I would have liked. The worst part was that he put three squads past the hedgerow between V and W, and got into the first of the stone buildings. I had figured I’d keep him out of there a while longer.


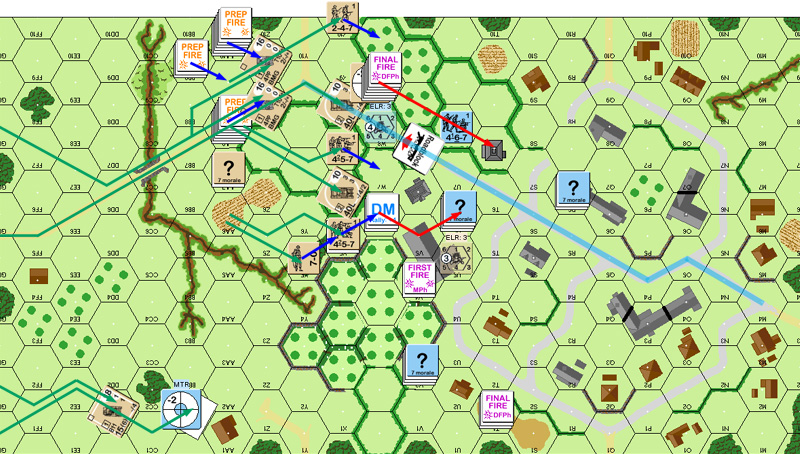
Situation, British Turn 1 DFPh. The blue ribbon is the victory road, note that an SSR turns a graveyard into an orchard and you can still see pieces of it poking through the overlays.

Even with my broken squad having made it back to my 9-1 leader, I got nothing back on my rally. I wasn’t sure how to reorganize my defense. In general, the plan was to shift for more defense in depth along the road, but he had the two Mk VIs crawling along the south edge of the board, and I didn’t want them getting into my rear unopposed. My opening MTR shot on the lead one hit and got a ‘2’ result on the IFT to kill it with no survivors, that simplified things greatly. A shot from U8 broke W7, taking some more pressure off me, and I decided to gamble with a stone building and a -1 leader and stand up to the rest of his breakthrough in W6. A shot from U6 broke one of the two squads there. Things were looking up.

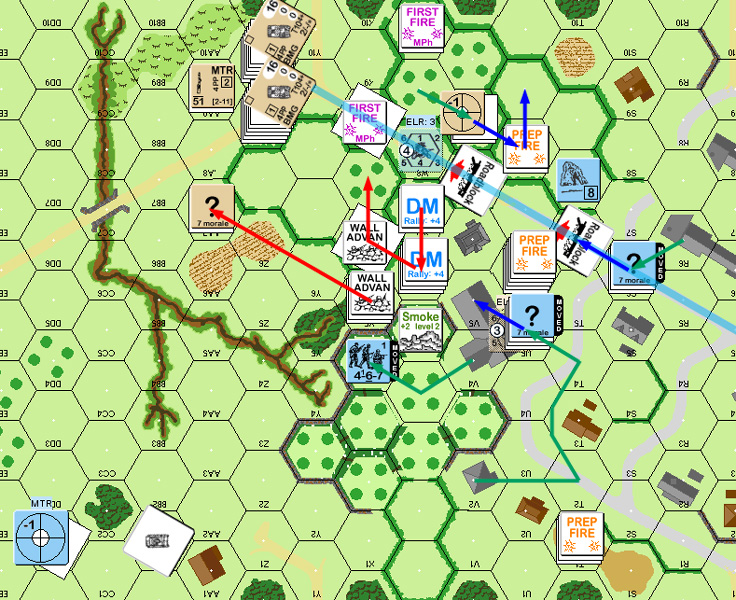
I pulled out of V2, taking a roundabout route to make sure he couldn’t strip concealment. As I moved other forces around, I came up with a sneaky little plan. First, V4 smoked W5. If that hadn’t worked, I’m not sure I would have gone through with it, but with the smoke (only on a ‘1’!), I put the squad in V4 into X4, where he could cause problems for the broken squad in W6, and was adjacent to the British 7-0 in X5. Sadly, I couldn’t get him in Advancing Fire, and he self-broke to rout away before I could go for CC with him.


Situation, German Turn 1, end of MPh.


Gunner Scott commented:

“Hi-“

“Thats one hell of a scenario. Been a long time since I played it, but I do remember those little carriers giving the Germans grief as they would race to cut rout paths.”

“Scott”
↓ Read the rest of this entry…

└ Tags: AAR In Progress, ASL, gaming, Journal 4
1 Comment
  • Page 241 of 317
  • « First
  • «
  • 239
  • 240
  • 241
  • 242
  • 243
  • »
  • Last »

©2005-2026 Rindis.com | Powered by WordPress with ComicPress | Hosted on Rindis Hobby Den | Subscribe: RSS | Back to Top ↑