
A34 Lash Out
Patch and I actually flipped sides a fair amount during our play the M-G scenarios in Annual ’91, to keep from constantly being on the attack or defense. I ended up defending as the Americans in “Lash Out” at the end of July 2009…:
Okay, this one really is going quick.
I completely blew my defensive setup. “Lash Out” is a bit like A33 “Tettau’s Attack”, with the Germans trying to exit units off the narrow (east) edge of the board. This time their quality is a bit better, and while the scenario is 3 turns shorter, and they need to exit twice as much (6VP), they also start about 5 hexes closer to the goal. Also, this time Patch is playing the attacking Germans.
Board 16 is mostly grain, with a couple long hedgerows, and three wooden buildings, one of which (L6) the Germans set up at. This building is nearly surrounded by a stone wall, and the only multi-hex building on the board is close by at the edge of the American set-up zone in O3/O4. I decided to mostly set up in a line a couple hexes back in a grainfield to threaten high-FP (and high-Hindrance) multi-location attacks, while anchoring the north side on O4 with the 9-2 and MMG. On this board it fairly well dominates the terrain, and I didn’t want him to just walk into it.
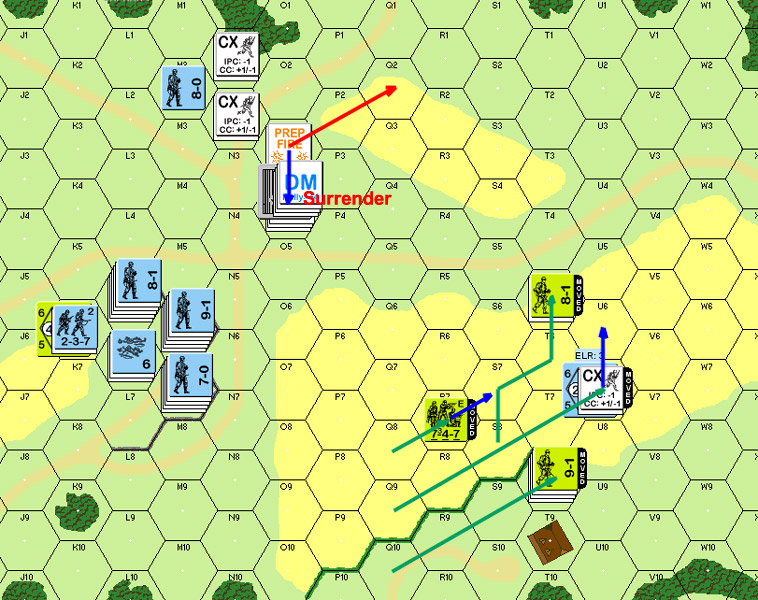
Patch set up a lot of firepower facing O4 and rolled poorly on a 36 +1 attack breaking the 747 manning the MMG. (I wish I’d listened to the tiny voice saying to set up behind the building….) Further fire broke the squad and a half on the north end of my main line. Admittedly, part of my idea had been to slow him down by virtue of him prep firing instead of moving, but I hadn’t fully thought it out. My Sniper thankfully pinned a couple units, and defensive fire broke a HS, but the building was looking awfully lonely and exposed….

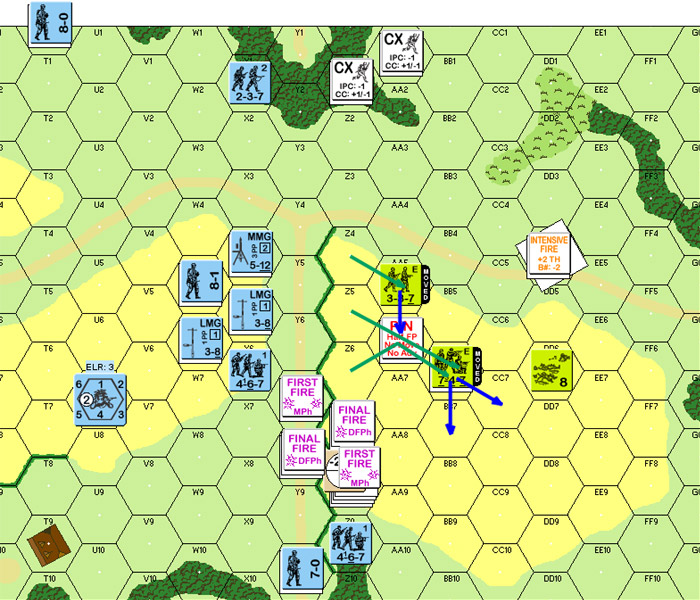
Situation, German Turn 1, end of MPh.
On a good roll, the squad in S8 recovered. I would have gladly swapped that roll with the one for the squad in O4h1. Meanwhile, Patch discovered a small flaw in his setup when I realized the unit in L6 was not a leader, giving him an MMC that had done nothing, and no way to rally the unit that had routed there.
Needing to save O4, O3 Prepped, but a lousy roll got no result. My turn was mostly spent running away, as I tried to figure out what I was going to do for the next defensive line with what was left. Patch’s Defensive fire didn’t go entirely his way; HoB created a Hero in O3. But then he broke the squad there, and also pinned the 9-2 and CRed the squad in O4h1. My advancing fire managed to Pin the HS in O4.
Naturally, the squad in O4h1 surrendered (which was accepted), having nowhere to go. The real bad news is that I had planned to take out the HS in CC, but but was down to the Hero. Even with just the 9-2 helping, I could probably take him out, and then tie Patch up for another turn since he’d have to get rid of two ML 9 units that could generate 1FP -3 shots before any other mods.
As it was, the Hero went in alone, barely managed an Ambush, and with a -3 for (enemy) CX, Hero, and Ambush, barely managed to take out the HS, rearming the prisoners as a Green HS with the German’s guns.
I really wished the 9-2 was there to help. As it was, he recovered the MMG during RPh.
Situation, American Turn 1, end of MPh.
O4 drew the same 36 +1 shot as before, and the 3KIA made me quite happy that the 9-2 hadn’t gone downstairs….
He then cut off the fleeing survivors in Q2, forcing them to surrender (invoking NQ this time), and started to occupy the grainfield I was abandoning. He also sent a HS after the 9-2, which was pinned in O3h1. I did manage to nail a squad moving into O2 with a K/1.
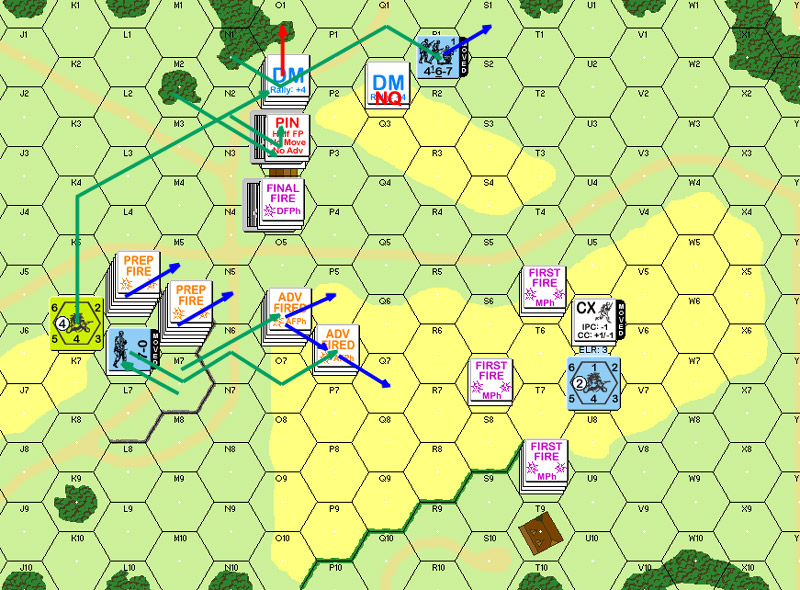
Situation, German Turn 2, end of MPh.
The 8-1 and 747 Preped to no effect, and the 9-2, seeing the trap closing on him, spiked the MMG before it could fall into German hands. I maneuvered to start setting up near the Y/Z hedgerow.
Then fate decided my job wasn’t tough enough and Patch got a 2KIA result against the 747 and 8-1 in T5. It took him several shots, but he managed to break the 9-2 as well.
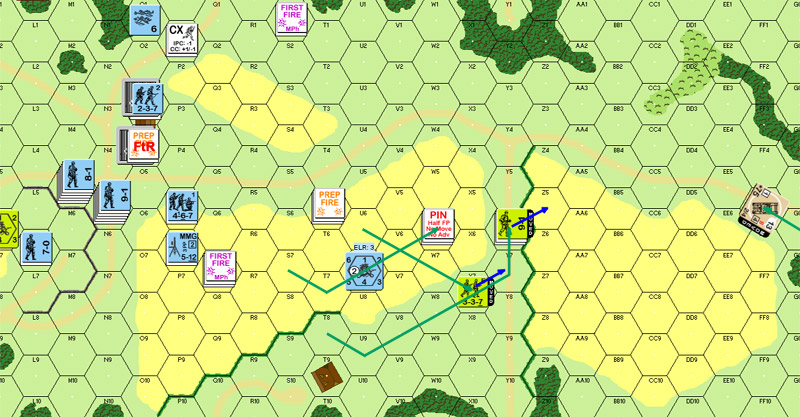
Situation, American Turn 2, end of MPh.
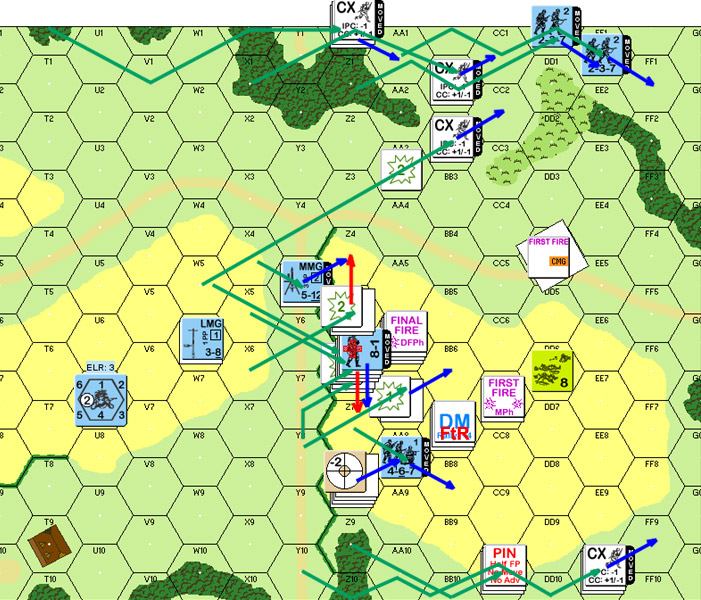
Patch in his turn rushed forward with everything. Considering that I didn’t have much to resist with, there certainly was no real reason not to. I did manage to break a HS creeping along the north edge though. Also, the Sherman started making itself felt by breaking a HS in U2.
Situation, German Turn 3, end of MPh.
My next turn started out with Gusts. I didn’t have many ways left to use smoke anyway, so that wasn’t too important. I prepped with my squad and leader, for no result. In movement, my HS’s positioned themselves behind the hedgerow and the squad stuck in W6 tried to get away, only to break after the first hex. The Sherman moved up a couple hexes to get a better view of what was going on, and no one managed to do anything else effective. I made one of my more troubling mistakes at this point, as I left my unbroken troops in a line from Z4-Z6. The HS in the south should have moved down to Z7 to cover the south edge a little more effectively.

Situation, American Turn 3, end of MPh.
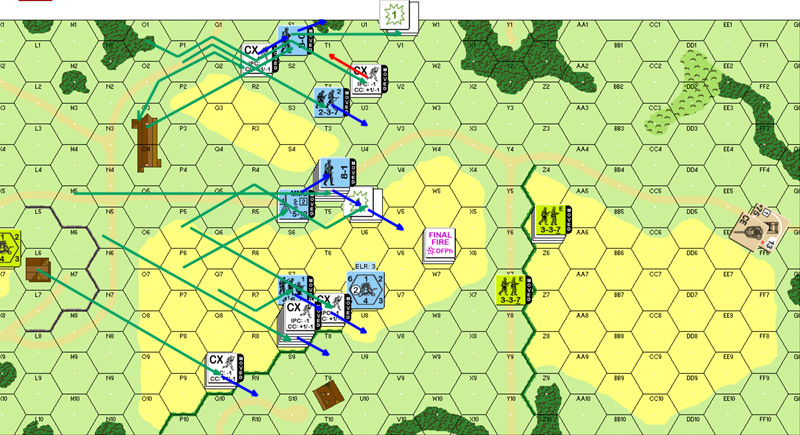
Patch got his HS in V0 back in rally, which was annoying as it was the unit closest to the exit on the undefended north edge. Patch quickly took advantage of my problems with the south edge, and left me unable to do much about most of his move unless I wanted to forgo all chance of stopping his guys in the center. I withheld my fire, not liking the chances, and hoping that I could smash the center enough to have a chance to stall the south edge in relative peace.
What Defensive Fire I got went pretty well, breaking two squads, both of which suffered ELR failure, and one CRed. While he had a bunch of stuff in the north looking to exit, I eventually decided I had to stop up the south, or he’d just overrun me, and and I used Final Fire to turn the Sherman that way.

Situation, German Turn 4, end of MPh.
On my turn, my only broken unit failed to rally, but Patch got his HS in T0 back. My Sherman fired on Patch’s stack in Z8 with everything he had, but could only pin a squad for his trouble. The initial plan was to drop back slightly with the HSes, and march the 9-1 and squad around to CC8 and have a nice picket line anchored on the south, which should keep him cautious. However, he pinned the 9-1 in AA6, and wrecked that plan, since I didn’t really have the movement to get ahead of him any more.
Situation, American Turn 4, end of MPh.
Patch managed to get the squad I’d broken back, leaving him with a single broken HS. He prepped with a single unit, but only got a malfunctioned LMG for his trouble.
There wasn’t much I could do in the way of DF, and the grainfield made it much more difficult, as it’s nearly impossible to place any residual fire. Not only that, but what residual I got down didn’t do anything. So it didn’t take nearly as much effort as I would have liked to start slipping units past me. It wasn’t long before I was down to FPF, which broke my own HS. However, I generally got good rolls and broke two squads (one on a k/1) and wounded his 8-1. The situation was probably unrepairable, but it was still costing Patch.
During MPh, the Sherman had swung the turret back to the west on a CMG shot, DFPh shots malfed the BMG, but the MA fired at Z6 and broke a squad, CRed the broken one, and pinned the HS in the hex, leaving only the wounded leader in GO. Patch’s advancing fire didn’t do more than pin, but he did pin just about everything.
Situation, German Turn 5, end of MPh.
Rally failed to do anything for me, but Patch lost his malfed LMG. I figured at this point that my main hope was to cut down some of the forces that were close to exiting, and hope that the trek across the wheatfield would be too much for the rest. Patch was really close to winning, but with only two MPhs left, it was still possible to pull something out.
So, the Sherman swung the turret back around to the north and killed a HS and broke his 8-0 on an k/3 IF shot. What to do about AA6 was trickier. Anything I tried to do was going to result in taking a lot of fire. I eventually decided to try taking out the only source of ROF, the MMG, which didn’t work. I then tried to move my remaining squad down to FF8 where he’d try to stop Patch’s advanced units in the south, and be in the way of anyone else skirting the edge of the grain, but he was pinned after the first hex.
His DF broke the 9-1 and HS in AA6, who were eliminated for FtR, and the squad in DD7. After that, there was nothing but the Sherman left, and I had no real choice but to concede the game.
Given the disastrous nature of my setup, I think I did quite well. In fact, if Patch hadn’t been lucky enough to kill the second leader and squad during turn 2, the defense probably would have held up quite well, and it would have been a really close game. I needed luck with those setbacks, and I got it, but I just couldn’t pull any game winners out of it.
Tork pointed out:
“It does reduce the exit VPs available, but if the Germans can get some MGs onto the level one of building O3/O4, then the Americans are constantly running into negative mod attacks as they try to fall back. Being able to see over the hedge and the grain can paralyze the Amis as they try to move.”
You’ll have ask Patch why he didn’t do that. But that type of thing is why I didn’t want him marching in for free first thing. I assume that he wanted to get everyone moving after the delay fighting over O3/O4.
“Ok, this one looks to be a bit of a bear at first glance. Similar to Tettau’s Attack, the Germans are struggling to exit off the far board edge. The advantages are they’re closer to the edge this time and have better infantry. The disadvantages are the shorter time frame, more Allied troops, and higher VP exit requirements. I counted several paths of travel, and the Germans need to be moving this game. However, I do notice in ROAR that this one is favored for the Germans. We’ll see how it goes.”
German Set-up
“Rindis dumped the 9-2, MMG, and two squads in the O3 building. I can see why, but the entire building is prone to 36FP attacks from my initial set-up area. Why not? My plan is to pepper the 9-2, hopefully killing it with a 36 (+1) FG, and have enough stuff moving north that the remaining 747 can’t deal with it all. There will be a slow advance across the wall, and I’ll head into the grain on turn 2. Two squads are deployed into HS to complicate Rindis’ Defensive Fire options.”
German Turn 1
“The 747 manning the MMG falls to my Prep, but the 9-2 survives! He’ll now need a 7 or less to rally, making an advance across the wall very unwise. A second stack in M7, with my MMG, breaks a 747 and 337 in Q6 and Q7. Love the hole — no one left to exploit it. Rindis’ sniper activates and Pins a squad and HS I had flagged for my northern flanking movement. Drat!”
“A leader, squad, and HS make it up to the N1 area. A HS breaks in N5, and I get one into O5 (then O4 in Advance). I had a 7-0 in L6 in earlier set-up, then moved him elsewhere to direct fire and prevent cowering, but I forgot about this little change. Turns out there’s actually a squad there, as I discover in Rally, who is completely useless for rallying the broken HS headed his way. The 9-2 and squad with the MMG flee upstairs in Rout, their only option.”
US Turn 1
“Rindis rallies a broken squad in the grain, but fails to rally the squad in O4h1. Rindis PRep Fires against my HS in O4h0, to no effect. In the grain, Rindis falls back in the face of my firepower. I fire another 36 (+1) against O4h1, and only CR the squad. In O3 I roll snakes on an 8FP +3 attack, Rindis rolls snakes for his MC, and then rolls snakes for his HoB result. 3 in a row! I do hope the dice bot isn’t flawed. And when does this magical 36 (+1) column start doing anything for me??? Further fire at least breaks the squad in O3.”
“The HS in O4h1 surrenders for FtR. Meanwhile, the hero leaps into CC with my HS and his prisoner unit, killing it in CC and rearming the HS (legal? Doesn’t the broken unit have to do the killing to rearm?).”
German Turn 2
“The 9-2 grabs the MMG, and once again there’s nasties blocking my advance.”
“The 36 (+1) finally pays off and I nail the hero and 336 with a 3KIA. With just the SMC-manned MMG upstairs, I resolve to take the fire and move. I get multiple units across the road into the grain, and get behind the R2 grain to block off any more routs. Rindis takes a long shot and gets a k/1 against O2, and enough gets stopped that I can’t kill the 9-2 in CC. I go across the wall with my 36FP platoons, ready to take out the 9-2 in Defensive Fire. I’m a little behind schedule, but not horribly worried.”
US Turn 2
“Rindis doesn’t take a shot with his MMG, instead spiking the gun knowing he’s not long to live. Other units continue moving to the rear. I break the 9-2, and with no one else to shoot at, I take a shot at T5 and kill an 8-1 and 747 with a 2KIA. Turn 2 and half the American forces are dead, but the tank is now on board.”
German Turn 3
“I need to make up some time, no Americans are anywhere near a position to interfere, so everyone runs forward. As others noted, the MMG did not go upstairs. The MMG was not part of my two-hex 36FP group, instead rounding out a 16FP stack, so when the time came to move in Turn 2, he headed east. Sending him back now would keep him out of action for another 2 turns (unable to reach h1 until German turn 5 movement), and I just didn’t see that as a good use for him. Half the American forces are dead, and I think his FP is better served on the front lines. Rindis only breaks a HS in U2 and V0. Overall a good turn for me.”
US Turn 3
“Gusts take effect, but who cares? No smoke in this game thusfar, and can’t see it being used this turn.”
“Prep does little, and Rindis reshuffles for “Line of Paratroops 2: Back to the Hedge”. I break a squad trying to join the party.”
“The central position of his forces really leaves the south open for me. Rindis is right. The HS should have been positioned further south.”
German Turn 4
“V0 self rallies Hooray! Looking at the firing decisions Rindis has to make this turn, I complicate matters and deploy another squad in U8. Sadly a lot of my troops are CX, but they’ll reach the Y column hedge no problem.”
“I start in the south, and everyone moves one at a time. I think Rindis is more concerned with the stacks in T4 and U5, as he holds fire with his 9-1. There’s too many troops and too little 337, and I overwhelm the south.”
“Getting cocky now, instead of using AM and advancing into position for next turn, I move. Despite low FP attacks, Rindis does a lot of damage, breaking and ELRing a squad, and CR and ELRing a second. The center FP stack is now somewhat ragged. To the north, I continue flanking with no resistance. There’s just nothing Rindis can do.”
US Turn 4
“Rindis takes a heavy hindrance shot across the grain and scores a hit, to no effect, Intensive Fires and scores a hit, but still gets no effect. Everyone else moves, and I Pin the 9-1 in AA6, hindering his redeployment plans. Lots of other fire does absolutely nothing except kill an LMG on a SubFF shot.”
German Turn 5
“Getting close to the end. I have 5 VP to the north, but would like to expand on that if I could. If I can threaten both board edges with 6VP, I’ll have this in the bag.”
“AA6 has a 9-1 and a 337, BB7 has a 337, and CC7 has the 747. I decide to get gutsy and see if I can’t overwhelm the leading units and take them in CC. BIG mistake. The 337 in BB7 falls to a ‘9’ on a FPF shot, but the 9-1 and 337 cause no end of trouble, breaking several units and wounding my 8-1. My clever plan has gone down the tubes! With the center a mess, I take a chance and send a squad across the board to the north to at least draw fire from the tank, taking the heat off my southern units. He makes it, and now there’s 7VP in the north. I consider moving into the brush to threaten the tank, but panzerfaust attempts with CX HSs just won’t work. I stay back to use the brush for cover.”
“In Advancing Fire, I completely forget to fire on DD6, and Rindis now has an opportunity to bring another squad into the fray. With units dwindling, I decide to get sneaky and pass on 1:1 CC odds and advance past his units into BB8 and BB6. I send the MMG and 467 into Z4 to take on the CE tank.”
US Turn 5
“Score! The broken 747 in DD6 fails to rally.”
“The tank slews its 75mm around and promptly hammers my 8-0 stack in AA1 on an IF shot that breaks the 8-0 and CR’s the squad. Still 5 mobile VP up there, but I don’t like the fact that the tank is facing that way. Still, there’s enough to the south that can still exit in 2 turns. Rindis tries fleeing AA6 in movement and fails when I break both units. I then break the 747 in CC7, leaving the tank as the only GO unit left. Rindis concedes.”
Reflections
“Certainly a hard one for the Americans, especially if there’s a German MMG in the O3 building. I wonder if a better SSR would be to make that building single story. Setting the 9-2 and MMG up front certainly hurt Rindis when he lost them both early. I think the 9-2 and mg are better served back in the grain where the 9-2 can even some odds and set up FL through the grain.”
“There definitely is time pressure on the Germans in this one. The grain is a huge slowdown, as there’s little to do but move through it. As well as it went for me, it was still a tough victory. If the US can force the Germans through the grain, and make them Prep Fire, they have a chance to slow them down for the win.”
Postscript:
The biggest problem with making mistakes when playing against Patch, is that he will take advantage of them, and I’m unlikely to see any serious errors in return.
Discussion ¬