Rindis.com

All my hobbies, all the time
  • Home
  • My Blog
  • Games
  • History

Categories

  • Books (509)
  • Comics (10)
  • Gaming (924)
    • Boardgaming (680)
      • ASL (155)
      • CC:Ancients (84)
      • F&E (78)
        • BvR – The Wind (26)
        • Four Vassal War (9)
        • Konya wa Hurricane (17)
        • Second Wind (5)
      • SFB (81)
    • Computer games (162)
      • MMO (77)
    • Design and Effect (6)
    • RPGs (66)
      • D&D (25)
        • O2 Blade of Vengeance (3)
      • GURPS (32)
  • History (10)
  • Life (82)
    • Conventions (9)
  • News (29)
  • Technology (6)
  • Video (50)
    • Anime (48)
  • Writing (1)

Patreon

Support Rindis.com on Patreon!
Become a patron at Patreon!

Other blogs:

RSS feed: Inside GMT Inside GMT

  • Chalice of Poison: The Combat Procedure August 27, 2026

RSS feed: Playing at the World Playing at the World

  • Playing at the World 2E V2 Arrives May 5, 2025

RSS feed: Dyson’s Dodecahedron Dyson’s Dodecahedron

  • Greenrise Farmstead August 28, 2026

RSS feed: Quest for Fun! Quest for Fun!

  • The $139 Board Game August 7, 2026

RSS feed: Bruce Heard and New Stories Bruce Heard and New Stories

  • Pain, Exhaustion, and Morale in D&D BECMI June 7, 2026

RSS feed: Chicago Wargamer Chicago Wargamer

  • The 2 Half-Squads - Episode 310: Cruising Through Crucible of Steel January 27, 2023

RSS feed: CRRPG Addict CRRPG Addict

  • Upcoming Games: Rogue II: Return to the Dungeon (1986), Jiji and the Mysterious Forest, Chapter 1 (1994), The Bard's Tale II: The Destiny Knight (1986), Aethra Chronicles: Volume One - Celystra's Bane (1994), Graal (1986), Hexx: Heresy of the Wizard (1994) August 29, 2026
SF&F blogs:

RSS feed: Fantasy Cafe Fantasy Cafe

  • August 2026 Book Recommendations Video August 21, 2026

RSS feed: Lynn’s Book Blog Lynn’s Book Blog

  • Review: They Say a Girl Died Here by Sarah Pinborough August 27, 2026
ASL blogs:

RSS feed: Sitrep Sitrep

  • Fireweed Sale August 7, 2026

RSS feed: Hong Kong Wargamer Hong Kong Wargamer

  • FT114 Yellow Extract After Action Report (AAR) Advanced Squad Leader scenario April 16, 2025

RSS feed: Hex and Violence Hex and Violence

  • This still exists? March 25, 2025

RSS feed: Grumble Jones Grumble Jones

  • Grumble Jones August Scenario GJ163 Guderian's Foxes August 5, 2026

RSS feed: Desperation Morale Desperation Morale

  • How to Learn ASL March 16, 2025

RSS feed: Banzai!! Banzai!!

  • October North Texas Gameday October 21, 2019

RSS feed: A Room Without a LOS A Room Without a LOS

  • [Crossing the Moro CG] T=0902 -- Rough start July 18, 2015
GURPS blogs:

RSS feed: Dungeon Fantastic Dungeon Fantastic

  • Revised GURPS Basic Set & DF Felltower August 23, 2026

RSS feed: Gaming Ballistic Gaming Ballistic

  • Not Just Breadth: Specialize for Customization July 31, 2026

RSS feed: Ravens N’ Pennies Ravens N’ Pennies

RSS feed: Let’s GURPS Let’s GURPS

  • Review: GURPS Realm Management March 29, 2021

RSS feed: No School Grognard No School Grognard

  • It came from the GURPS forums: Low-Tech armor and fire damage January 29, 2018

RSS feed: The Collaborative Gamer The Collaborative Gamer

  • Thoughts on a Town Adventures System January 18, 2022

RSS feed: Don’t Forget Your Boots Don’t Forget Your Boots

  • GURPS Supers Newport Academy #8: “Invitation to the future.. of the 1970’s: Part II” August 2, 2026

RSS feed: Orbs and Balrogs Orbs and Balrogs

  • Bretwalda - Daggers of Oxenaforda pt.4 - Fallen King May 27, 2017

D8 The Schoolhouse

by Rindis on February 28, 2013 at 12:00 pm
Posted In: ASL

Patch and I both like DASL, and always mean to play more of the big hex scenarios than we do. Combined with my efforts to actually play more of the early scenarios, we ended up looking over the set from Streets of Fire. Patch suggested a couple, headlining with D8 “The Schoolhouse”, and I agreed, and ended up with the defending Russians. We got started in October 2012, and didn’t finish until January, so get ready for a long tale….

It’s a big scenario. Set during the Battle of Kursk, it’s about three DASL boards in physical scope (all of b and d, and just under half of a and c), the Germans start with twenty-six squads (mostly 467s, but with some elite 468s and and 838s mixed in), a bunch of toys, and four Elefants (PzJg Tigers). The Russians get twenty-three squads (mostly 447s with some 458s) and four smaller AT Guns. They also get fifteen more squads and six KV-1S tanks as variable-entry reinforcements.

This last is actually a fairly nice touch. The entry is the usual ‘roll a die and get under a target number which gets better each turn’ that shows up in a fair number of scenarios. However, the German VP goal (mostly measured in stone building hexes) is equal to three times the turn the reinforcements enter. Also, the scenario ends five turns after the reinforcements arrive (well, ROAR shows the scenario unbalanced towards the Russians, so we used the German balance, which shortens that to four turns). Tying the victory conditions and game end to the reinforcements is something I haven’t seen elsewhere, and I think it’s a very neat idea and needs to be picked up by other designers.

In addition to 1VP for each stone building hex on boards b and d, building bI3 is the titular Schoolhouse, and is worth another 3VP if the Germans can hold both hexes, building bE2 is the Tractor Station, and is worth an extra 5VP for holding all five hexes, and dF3/G3/G4 is the Crossroads, worth 7VP for holding all the building hexes adjacent to it (only two of which are also stone; they’re outlined in yellow in our maps). This is a maximum of 52VP, if the Germans held everything at the game end, out of a maximum needed 27 VP if the reinforcements enter on the last possible turn (9). The terrain is a little less ‘urban’ than normal, since rowhouses don’t exist (and infantry Bypass is allowed along the black bars), and buildings are restricted to two levels (0 and 1), with inherent stairwells for every multi-hex building. Also, hex dL3 is considered to have a ‘water tower’ inside the roundabout which blocks LOS and causes all movement in the hex to be Bypass only, and all infantry in the hex to be occupying a particular vertex.

I set up hoping to delay Patch for the first couple turns and fall back (of course), with the final line of defense being the various ‘bonus’ buildings, notably the the Schoolhouse itself, which got two of my fortified building locations, and the Crossroads got my last fortified location. With everyone needed to slow the approach to these locations, I only had one unit in the three fortified locations, and I was a bit worried that a disaster could see Patch get into one for free, and then I’d have to dig him out of the fortified location. Two of the AT guns went in the rear where there was plenty of long LOS down the roads, one went on a flank in the hopes that he’d drive by, and one went in the brush in the center, where it could contest his inevitable advance away from the open roads.

Patch’s first shot revealed my 9-1 and a squad in aA1 on a PTC, and he kept firing on them until they both broke. This had been a worry, but I had hoped the nearer stacks would absorb the shots and let me get off a -1 shot during his MPh. Both of our Snipers were active, with mine breaking a squad in the street, and his pinning one of mine. Thanks to some aggressive movement and searching, Patch revealed a couple of Dummies well before I had hoped, and he escaped any harm from Search Casualties on ‘6’s. Much of my defensive fire was ineffective (Cowering abounded), pinning four units, though I got one HS on a K/1 that activated his Sniper and nearly wounded my 8-1, pinning the squad with him instead.

DFPh was better, though Patch passed a couple of 1MCs in aD3, only for one squad there to pin from my Sniper when it activated later in the phase (we were both two-for-tw0 on Sniper activations this turn), and I managed to break the squad and a half that got into cC4. Patch’s AFPh was much more effective, breaking three squads, and reducing two of them, though he could not manage to break the two squads in aC3, and between that and the pin, he had to avoid going into CC there. In fact, the east flank was proceeding substantially more slowly than the center, or especially the west, where he was already racing onto board d.
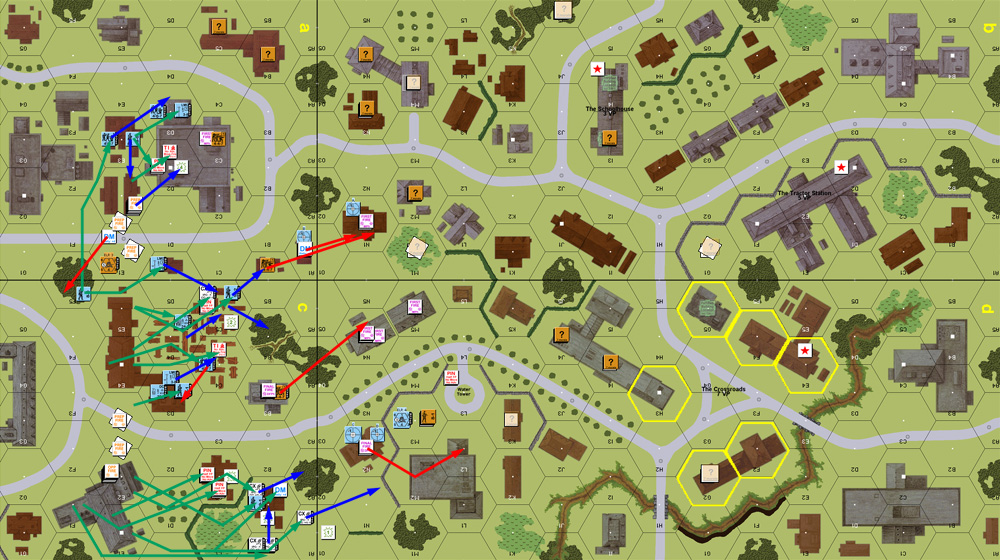
D8 1G
Situation, German Turn 1, showing the full map and my setup. North is to the left.
↓ Read the rest of this entry…
└ Tags: ASL, DASL, gaming, Streets of Fire
 Comment 

J137 No Mercy In Burcy

by Rindis on February 21, 2013 at 12:00 pm
Posted In: ASL

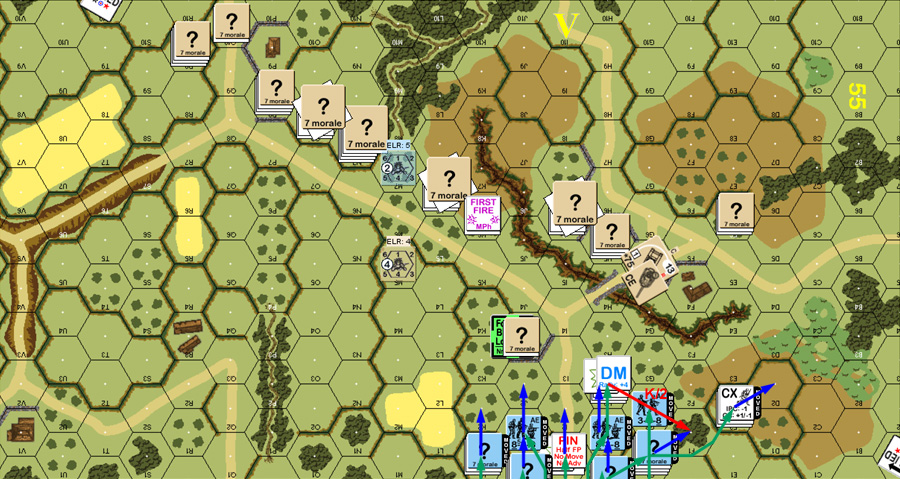
After our short (very short!) foray back to Valor of the Guards, Patch and I decided to switch back to the western front, and try J137 “No Mercy in Burcy” from Journal 9, which I had just gotten, most of a year after it came out. We were both surprised to see that ROAR had it in favor of the Brits so far, since they have to protect a fair amount of ground, and the Germans have a lot of tools with which to do the job. I got the attacking Germans, while Patch figured out a defense for the Germans.

It’s August ’44, and the Brits are defending near Burcy in hedgerow country (about three-quarters of board 55 here) with ten squads, five Shermans, and a mix of LMGs and airborne MTRs, and 80mm OBA. The Germans get nine squads of 838 assault engineers, some MGs, and two flamethrowers, which enter between hexrows G and M on the south side, while another three squads with three halftracks enter anywhere on the south edge on turn 4 of a 5.5 turn scenario. The Germans need to either exit 24 VP off the north edge road hexes, or by controlling two of the three stone buildings on the board.

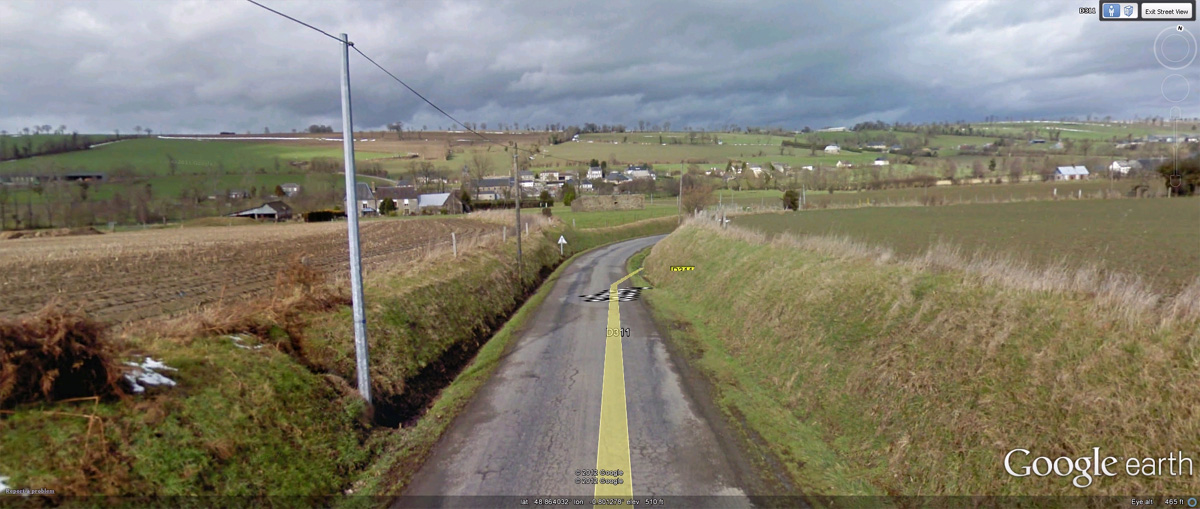
Patch sent me a view of the actual area, looking down my presumed route of attack, that he looked up in Google Earth:
J137 GE

The British set up area is defined by a diagonal down the board that runs right behind one of the major roads on the board and through a gully. One of the stone buildings is off by itself in P8, while another is in H5 with a steeple location (Level 1, but can only take a HS), and the third is outside the main set up area in J3, but is also allowed for the Brits to set up in, and is fortified. Thanks to that diagonal, the west end of the board has a very thin area for the British defense, and Patch set up heavily in that area. I decided to go east, use the FTs to take J3 early, and try to get across/around the gully to either take H5 or work around Patch for the exit.

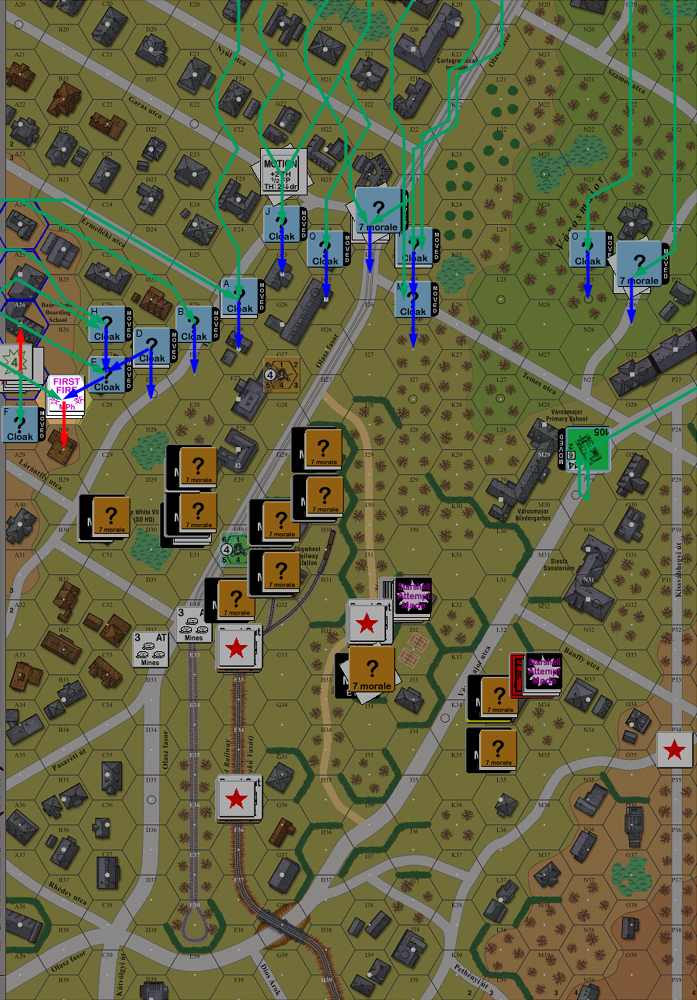
One of the attractions of the scenario is that it was our first chance to try out the new hedgerow boards that came  in Action Pack 5. I haven’t done enough with hedgerows, and nothing else recently, so I had an initial surprise with just how hard it could be to get anywhere…. I also didn’t quite think through my entry correctly, as I started with a HS down the I1 road (well, in the orchards on either side), and Patch fired on it to leave residual for later.

I probably should have been a bit more daring with my first turn entry, but all those tan ‘?’ across the way had me a bit jittery, and staying at the very edge behind the bocage allowed me to keep some of my own concealment. He broke one squad and pinned a HS during movement, and killed a HS during DFPh. His last shot was at the pinned HS, which generated a Hero.

J137 1G
Situation, German Turn 1.
↓ Read the rest of this entry…

└ Tags: ASL, gaming, Journal 9
 Comment 

Space Counties

by Rindis on February 18, 2013 at 12:48 pm
Posted In: Boardgaming

Had a couple people over for gaming on Saturday. Dave was busy with work, so it was just me, Mark and Jason trying out Space Empires 4X.

We went with the straight basic rules and the straight 3-player setup. Personally, I think two of the players are still a little too close to each other compared to the third. I think trimming a couple more hexes off the ‘friendly’ area at the edge of the board for those two, and adding them to edge that’s near the big areas of deep space would be better, and should help encourage everyone to meet towards the middle.

However, the game does seem to do a very good job of delivering on its promise of bringing much of the feel of the computer 4X genre to a board game. (Not that the genre didn’t start with board games in the first place….) You start with a rich homeworld, and explore space, discovering minerals that can be brought back for a one-time bonus, and planets that can be colonized for further income. The colonies slowly grow in production over the course of a few turns, and bases and shipyards (to build more ships) can be built there.

There’s a lot of secret info in the game. The composition of groups of ships is kept secret, though each counter represents just a single ship type (including its various technological bonuses), instead of representing a mixed fleet. Touches like this allow it to walk a fine line between there being too much info to track, and keeping a fair amount hidden.

The first job is exploration, with each hex having a counter turned over as it is explored (reminds me of Conquest of Paradise), revealing the aforementioned new worlds, or minerals, or some terrain (nebulae and asteroids, which slow down movement and affect combat), or hazards. One common, and annoying hazard is the “Danger” marker, which kills all ships in the hex exploring it, and then is removed from the board. There’s two sets of markers, color-coded ones for each player, and white, more dangerous, ones for ‘deep space’, away from the starting areas. But in the three player set up, there’s two of these latter adjacent to two of the homeworlds. Jason didn’t explore his immediately, but I tried one on the first turn and lost my scout.

This, and a pattern that tended to put my planets further away from my homeworld gave me a slower start. When Jason and I drew close to each other, I was feeling vastly underequipped, with hardly any ships built, and Jason (and Mark) both having developed speed upgrades (that I never did get around to purchasing). We had several turns of staring each other down over a Mineral 10 marker that had been discovered between us. He had run me off, but his mining ships were off in another direction, so I had time to act on it.

I decided to go for a quantity of high-quality small ships compared to the larger ships that Jason was showing. Mark pressed towards Jason to distract him, as he seemed to get his economy going the fastest. I sent in a force of seven DDs (one older one, and my ‘good’ ones), with attack and defense bonuses and tactics. Mark and Jason had both developed some of the same technologies, but they don’t seem to have developed all of them.

Between that, and Mark, and some bad die luck, Jason’s fleet was severely curtailed. I got the Mineral 10 marker, but couldn’t get anyone through to try and reduce some of Jason’s colonies. My next effort was in developing a third shipyard planet to start scouting the large area between Mark and me. Mark showed up on Jason’s border with four CAs, and then moved on to my territory, and burned one of my colonies when I let him slip around me.

Exploration near the center was interesting as Mark and I were finding a string of black holes between us, and then I found a derelict spaceship (grants a technology bonus if you can tow it home). I sent a miner after it, Mark managed to send a force through the black hole line to try and intercept me, but I had already sent my newest force into the area – 5xCA in my ‘high quality’ line (+2 attack, +2 defense—still slow though), and seeing those in action surprised both Mark and Jason.

We had to call it about there for time. But we got a pretty good handle on the system, and a much better idea of what to do at the beginning. Mark had found several barren planets in the deep space between him and Jason and had started colonizing them, so he may well have become the main threat soon. After flipping over the remaining markers to see what was out there, we found that Mark and I had a string of four black holes holding us apart (we had discovered three).

We had a good time, and certainly want to try it again. I had wanted to pick up the game for myself before, and now I’m really considering it (and GMT needs all the encouragement we can give for more SF games).

└ Tags: gaming, Space Empires
 Comment 

VotG23 Heroes of the Soviet Union

by Rindis on February 14, 2013 at 12:00 pm
Posted In: ASL

With all the time we were starting to put into Festung Budapest, I mentioned to Patch that maybe we should look at doing more VotG scenarios. Patch immediately mentioned the very odd VotG23 “Heroes of the Soviet Union” from Journal 9. I had been thinking more in terms of going through them systematically, like the FB scenarios, but what the hey…. We started in July 2012:

Five and a half turns on a tiny corner of the VotG map at night. The Germans get a horrible little force of five leaders and 3 vehicle crews (1-2-7), with three machine guns and 24 factors of mines. On turn 1 they get three HS that have to patrol along the roads. Once the action starts, they can act normally, and the Germans get another HS+leader. Oh, and all the German leaders get 1 FP with range four. (Like a hero, but without the Heroic DRM.)

The Russians have… six men. Four wounded heroes, a wounded heroic 9-2 and a heroic 7-0. They need to get 8 VP (exit off the east side, or casualty, as long as at least one VP is from exit).

It’s the tiniest scenario I’ve ever seen, and I doubt anything will ever break that record.

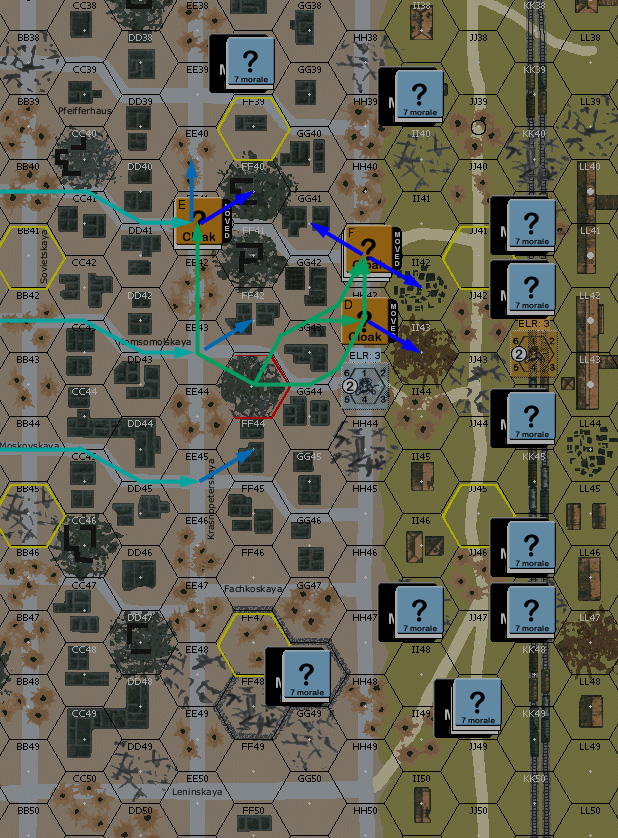
Patch wanted the Germans, though he forgot to check the VotG SSRs, and missed that he didn’t actually get any HIP. I looked at his cordon, and set out for the north-east corner, where things were thinnest. I quickly ran into trouble because roofless buildings cost 3MF, and my Cloaks only have 4MF to begin with (reduced from the normal 6 by SSR), which kept me out on the streets more than I liked.

With no known units out there, all Patch had to do was enter his patrolling HSes and send them down the streets. The only die roll all turn was the Wind Change DR, which promptly lowered the NVR to 1.

VotG23 1
Situation, Turn 1, including the routes of the entering German infantry.
↓ Read the rest of this entry…

└ Tags: ASL, gaming, Journal 9, Valor of the Guards
 Comment 

FB3 Furor Hungaricus

by Rindis on February 7, 2013 at 12:00 pm
Posted In: ASL

Patch and I continued our playthrough of Festung Budapest scenarios on Vassal with FB3 “Furor Hungaricus”, a combined Hungarian/German counterattack on Soviet positions on the outskirts of the city. We’re mostly doing these FtF, but Vassal has some nice tools for night scenarios, so we went over to Vassal for this one in June 2012.

It’s roughly the same area as the previous scenario, with another three hexes added to the east for the Hungarians to cross. For the first time, the Russians are defending, meaning that most of the lessons of how to attack this section have to be tossed out, as the advance is in the opposite direction.

I had the defending Russians, and felt entirely inadequate to the task, with visions of everyone being slaughtered in place. Patch’s comments indicated he wasn’t feeling much better….

The Russians are actually in pretty good shape, with 11 squads (mostly elite), four leaders, a 57mm AT Gun, an OT-34, as well as a few support weapons, mines and wire. However, not only do they have the normal No Move restrictions of a night defender, but they are not allowed to set up more than one MMC per hex. Per Location would have been fine, but no more than a squad per hex really kept me from establishing the concentration around the main victory area that I wanted. Meanwhile the Axis comes in in three groups: The Hungarians get 12 squads, up to half of which can set up HIP on board in building L29 and on the roof of E29 (that last option gave me lots of consternation), and the rest enter on the east (top) edge along with a Bergepanzer III (which has to be SSRed to heck for the stats—why didn’t they provide an actual counter for this?) and Flakpanzer IV. The Germans enter in the north with another six squads, while a couple Hungarian assault guns (Zrinyi IIs, one of which has its MA replaced with a MG) enter on the east or south.

Like FB2, the scenario has six victory conditions, and the Axis needs to satisfy four of them. Two them are for control of buildings C30 and E29, one for controlling hexes F32, F35, and I32 (which all have foxholes with burnt-out wrecks on top of them), one for controlling 10 of 16 building hexes inside a road loop that occupies most of the board (three hexes start under Axis control), one for killing the OT-34, and the last is for getting 25 CVP.

Our first session was slow as we struggled to remember what we’ve forgotten. Both of us had minor setup goofs (quickly fixed). The early tactical goofs went to Patch. He obviously had a nice plan for getting up close before I could do anything, and then partially spoiled it by forgetting and driving a tank into view (you can see [hear] tracked vehicles at twice the range of other units). My two units that could see it couldn’t get a starshell off, and I didn’t think to fire on it before it turned around and got back out of range, but a couple units were free of No Move.

Over on the north side, my setup area actually intersects the edge of the German entry area. I had a hidden unit in there, and he managed to walk right into him, getting revealed and bounced out to his entry hex. I fired (which removed my restrictions on using starshells) and broke the HS+PSK in that Cloak counter. Final Fire also got a 1MC on Cloak F, which turned out to be a Dummy. Then Patch revealed Cloak E as 2 squads+LMG+MMG+8-1 (a third of his north-side force), and the resulting 2MC broke my squad, but also activated my Sniper, who eliminated Cloak K.


Situation, Axis Turn 1, showing full board in play. Also note that at least one unit in E30 is a Dummy.
↓ Read the rest of this entry…

└ Tags: ASL, Festung Budapest, gaming
1 Comment
  • Page 237 of 317
  • « First
  • «
  • 235
  • 236
  • 237
  • 238
  • 239
  • »
  • Last »

©2005-2026 Rindis.com | Powered by WordPress with ComicPress | Hosted on Rindis Hobby Den | Subscribe: RSS | Back to Top ↑