Rindis.com

All my hobbies, all the time
  • Home
  • My Blog
  • Games
  • History

Categories

  • Books (504)
  • Comics (10)
  • Gaming (918)
    • Boardgaming (674)
      • ASL (155)
      • CC:Ancients (83)
      • F&E (78)
        • BvR – The Wind (26)
        • Four Vassal War (9)
        • Konya wa Hurricane (17)
        • Second Wind (5)
      • SFB (78)
    • Computer games (162)
      • MMO (77)
    • Design and Effect (6)
    • RPGs (66)
      • D&D (25)
        • O2 Blade of Vengeance (3)
      • GURPS (32)
  • History (10)
  • Life (82)
    • Conventions (9)
  • News (29)
  • Technology (6)
  • Video (50)
    • Anime (48)
  • Writing (1)

Patreon

Support Rindis.com on Patreon!
Become a patron at Patreon!

Other blogs:

RSS Inside GMT

RSS Playing at the World

  • Playing at the World 2E V2 Arrives May 5, 2025

RSS Dyson’s Dodecahedron

  • Red Knife Hole July 13, 2026

RSS Quest for Fun!

  • The Expense Post May 24, 2026

RSS Bruce Heard and New Stories

  • Pain, Exhaustion, and Morale in D&D BECMI June 7, 2026

RSS Chicago Wargamer

  • The 2 Half-Squads - Episode 310: Cruising Through Crucible of Steel January 27, 2023

RSS CRRPG Addict

  • Al-Qadim: Over, Sideways, and Under July 13, 2026
SF&F blogs:

RSS Fantasy Cafe

  • The Leaning Pile of Books July 5, 2026

RSS Lynn’s Book Blog

  • Top Ten Tuesday: Books I Want to Read by New to Me Authors  July 14, 2026
ASL blogs:

RSS Sitrep

  • Cardinal ASL Sins March 18, 2026

RSS Hong Kong Wargamer

  • FT114 Yellow Extract After Action Report (AAR) Advanced Squad Leader scenario April 16, 2025

RSS Hex and Violence

  • This still exists? March 25, 2025

RSS Grumble Jones

  • Grumble Jones July Scenario GJ162 You Will Engage the Enemy July 1, 2026

RSS Desperation Morale

  • How to Learn ASL March 16, 2025

RSS Banzai!!

  • October North Texas Gameday October 21, 2019

RSS A Room Without a LOS

  • [Crossing the Moro CG] T=0902 -- Rough start July 18, 2015
GURPS blogs:

RSS Dungeon Fantastic

  • Felltower - Monsters Fleeing between Sessions vs. PCs replenishing June 28, 2026

RSS Gaming Ballistic

  • B-Scale at the Table July 13, 2026

RSS Ravens N’ Pennies

RSS Let’s GURPS

  • Review: GURPS Realm Management March 29, 2021

RSS No School Grognard

  • It came from the GURPS forums: Low-Tech armor and fire damage January 29, 2018

RSS The Collaborative Gamer

  • Thoughts on a Town Adventures System January 18, 2022

RSS Don’t Forget Your Boots

  • GURPS Supers Newport Academy #7: “Invitation to the future.. of the 1970’s” July 5, 2026

RSS Orbs and Balrogs

  • Bretwalda - Daggers of Oxenaforda pt.4 - Fallen King May 27, 2017

Babur the Tiger

by Rindis on December 18, 2012 at 10:13 pm
Posted In: Books

Harold Lamb wrote a bunch of very readable and enjoyable historical biographies from the 1920s to ’60s, but is sadly not very well known today. He was an exemplar of a narrative style of popular history writing that seems to have fallen largely by the wayside, but does a great job of bringing people and places to life.

Babur the Tiger: First of the Great Moguls was the last book he wrote; somewhat ironically he considered it as part of a series with Genghis Khan and Tamerlane, which were the first two biographies he wrote. Babur actually wrote his own memoirs, and Lamb quotes from them extensively, making this volume unlike most of his other books, though no less filled with personalities and perhaps more high adventure than most.

Like any of his other books, this isn’t a detailed study, but it is a very good read, and well worth the time.

└ Tags: books, history, reading, review
1 Comment

VotG21 Defending the Voentorg

by Rindis on December 13, 2012 at 12:00 pm
Posted In: ASL

Valor of the Guards came with an impressive number of scenarios. However, still more were under development, and have since appeared in the ASL Journal. Patch and I have tried a couple out, starting in July 2010…:

With the appearance of new VotG scenarios in the latest Journal, a return to Stalingrad was contemplated. This particular scenario is an interesting one. The Germans have three turns to take a single ground-level Location of building Q10 (at the south end of 9th January Square). If they fail, they can try again, needing two Locations in three turns. If they fail that, they get three turns to try to take the entire ground-level of Q10. Each try is preceded by a mini-RePh to clean things up.

For some insane reason, I took the offense in this crazy scenario.

Setup is restricted by the fact that all German MMC must be at least 2 hexes apart. I set up the MTR in the backfield, looking across the square. The HMG and 7-0 was on the second level of M8 to see most of the perimeter of the square without Hindrance from debris. A couple squads were tasked to advance up the west side to the Russian lines. My reinforcements enter from the north end, with the leaders clutching DCs, wondering if they’d ever get close enough to use them (note: by SSR, all the infantry enters as riders—about four months earlier than the rules normally allow).

Patch set up no one actually in the Voentorg (to avoid a pregame PTC, to be sure), and a nice group on both wings of it.

The opening fire isn’t bad, the HMG nails his ATR crew in the S8 trench, breaking him, but can’t force a CR. The bulk of the action of course centers around his efforts to stop the oncoming StuGs and their riders. Amazingly, while three squads pin, and the 9-1 leader breaks, causing them all to Bail Out in open terrain, they all make their Bail Out MCs and SW checks. I was expecting someone to die crossing the square, but it doesn’t happen. Of course, the only planned unloading I get to do is the 9-2 in Q5.

With most of Patch’s fire occupied, I try moving up on the extreme flank of his position in N11. A SFF shot misses the first AMing squad. A second-liner comes untroubled by the residual, but breaks to a HS on a k/2 FPF shot. If the roll had stuck with the rest of Patch’s defensive fire, he should have broken…. Finally, I stroll a squad and leader up from O3 to R6, because there is literally no one left to fire at him.

In AFPh, I put a couple Area Acquisition counters on the Voentorg. I decide to advance into CC in N11 anyway. It should keep him suitably distracted while the FT in O6 moves up. Despite a Russian edge on Ambush, the Final drs are 4-5 (he rolled a 6, and I still couldn’t get it…). And both sides did no damage to the other (H-t-H CC would have CRed me for no return, good thing I didn’t want it).


Situation, German Turn 1, take 1.
↓ Read the rest of this entry…

└ Tags: AAR In Progress, ASL, gaming, Journal 8, Valor of the Guards
 Comment 

DA11 Sicilian Midnight

by Rindis on December 6, 2012 at 12:00 pm
Posted In: ASL

Patch and I had planned to play our previous game on Vassal, but after our FtF session, we had a backup plan—the other scenario we had been considering. We got started in May 2010…:

After our little FtF Italian DASL foray, we went with the only other DASL scenario with Italians for our next Vassal game. DA11 has everything. DASL. Rare nationality (Italians). Mines. Demo charges. Roadblocks and foxholes. Alternate terrain (olive groves). Night.

Well, no tanks and no ordnance.

ROAR has a pretty even record, and since Patch got the Italians last time, I took them this time. ELR 1. sigh My main group sets up on/near the hill on board e. I also get four auto-HIP squads on board h, but one squad and the only available leader must setup with the roadblock, which must be in hH2 or hK2. The former is closer to the rest of the defense, but the latter is also a bit further from the American entry at the bottom of board f. Patch needs to take all four level 2 hexes of the hill and the roadblock in seven turns.

Hmm. The VC mentions that the Americans win at the end of any Game Turn where he controls them, so I’ll always get a final counterattack. Assuming there’s anyone to counterattack with, of course.

I opt to put the roadblock in hK2. I hope it splits up the offensive for a little bit.

Even with DASL boards the first turn is quiet as the first wave of Patch’s troops can’t get to my positions in one turn. (He gets a nearly identical set of troops on turn 2.)


Situation, turn 1, showing my visible setup.

Patch quickly moves into hH2, and finds the roadblock isn’t there. He tries moving around it into J3, but finds a HIP squad who breaks his… HS. He then moves another Cloak directly into H2, revealing the garrison and roadblock… facing the wrong way. SFF breaks that HS. I was worried I’d just malfunction the LMG instead.

One problem with Night is there’s enough things going on that you’re bound to forget something. Patch should have had to roll for straying with one unit. Of course, he forgot road bonus on the first turn.

I’m a little surprised when one of his Cloaks splits off a couple ‘?’ in advance. Obviously, he’s needing to reshuffle a bit to get leaders to the HSs.


Situation, American turn 2.
↓ Read the rest of this entry…

└ Tags: AAR In Progress, Annual 93a, ASL, DASL, gaming
2 Comments

Three Times the Sekigahara

by Rindis on November 29, 2012 at 7:35 pm
Posted In: Boardgaming

As usual, I’ve taken the week after Thanksgiving off, and have been visiting my parents. It’s a nice relax-a-week. (And apparently, there’s been a bunch of rain back home, good timing!)

Also, as usual, I’ve taken a bunch of games with me for me and my dad to play while down here. However, I had a feeling I only needed one of them, and I was right. We’ve played three games of Sekigahara over the last few days. Neither of us are fast players, and my dad was taking a while to consider his moves, so the first two games went over four hours. Today’s game moved much faster, and was no more than three hours.

For the first game, I took Ishida, as Tokugawa is considered the easier side. (But what do I know, I won with them the only other time I’ve played.) I pretty well dominated the game, managing to get a good Uesugi hand early on to take out the Date army and hold down that recruitment center. I was able to scatter the initial Tokugawa armies in the west, but fighting raged over most of the map the entire game before getting a very convincing win on VPs, though it was actually a very close game all the way to the end. My dad certainly put up a good fight, and came up with a clever idea: send pairs of three mon blocks off as detached forces for sieges and the like. Deploy them both, and that’s 7 Impact and a dead block.

The next day, we played again, and switched sides. Yes, Tokugawa is much easier to work with. While our final VPs were about the same as previous, I didn’t really feel concerned after the first couple of turns, while I was struggling to keep all the plates spinning the entire time with Ishida. My dad did manage to assemble the western armies into one big super-force at the beginning, which kept me out of there until it could split up again, and I could start taking on pieces of it. However, I got a good start with the Date army, and knocked Uesugi out of the game early, which gave me a comfortable lead  in resource points, and while he blocked up the Fukushima recruitment (except for the second-to-last turn where he uncovered it for a moment, and I promptly recruited two blocks in there), I took most of the rest of the board and got back in there near the end.

Today, we played our third game, going back to our original sides. Unlike the previous two times playing as Ishida, I didn’t have a strong plan of action going in, and couldn’t think of what I wanted to do. This led to immediate problems, as I frittered away my opportunities in the west and did not manage to get into the Ise Bay area (the two south-western Tokugawa castles) until midway into the game, and I couldn’t get my armies sorted out into anything I liked.

I did muster a couple blocks for Uesugi, and got a strong hand for them on week 3. My dad had mustered even more blocks for Date, and also got a hand full of Date cards at that point, and went first. The battle was very bloody, and reduced the Date army quite a bit, but I still lost, and it wrecked Uesugi power for the rest of the game. I did manage to kill a couple more blocks, and forced him to spend more time finishing Uesugi off when I won a follow up battle with loyalty check card (won 3-0, and the defector was the only block I deployed), and followed that up with a 1-0 win against the remainder of that force.

After my muddled opening, I finally pressed forward in the north, and gave the Maeda army a nasty defeat. I wanted to follow up by taking their castle/recruitment center, but right after that another 4-5 blocks mustered there, and I never followed up on it. This was a good thing—for my dad, who admitted he never had any cards for that army for the rest of the game.

Meanwhile Tokugawa pressed up the center, took Ueda castle, and, with some effort, reformed his main army on the Nakasendo road before moving on to Gifu. Gifu was a huge battle, at 7-8 blocks, and almost everything deployed. My dad had the Tokugawa cards however, and the cumulative bonuses for a mostly homogenous army carried the day. I soon counter attacked, and won that battle (my dad had to be careful not to deploy Tokugawa himself, as he wasn’t sure he could avoid losing him—and the game—on the last turn). I won with my picked force, but didn’t think, and reduced him to two blocks, which retreated into Gifu castle to hold it at the end of the game.

Final total was 10-18, Tokugawa’s favor. The losses favored me all game, though I fell behind on resources after my poor opening, and only drew two bonus blocks all game (my dad got one every turn), though I managed to hold more castles most of the time. I also managed to confine most of my early losses to sieges, which helped the card count. I also paid much more attention to my special attack bonuses, which allowed me to get some good similar type bonuses in a couple important battles.

└ Tags: gaming, Sekigahara
1 Comment

DA8 Gruppo Mobile

by Rindis on November 29, 2012 at 12:00 pm
Posted In: ASL

Patch and I actually ended up getting together for our first face-to-face game of ASL in years in April 2010. I didn’t really have a camera, so he ended up reporting all the visuals…:

Well… it’s been a rough month for gaming. Mark is always busy during April, but this month has been worse than normal, with work putting a lot of extra stress on his schedule. Jason was busy, and Zjonni had some free time, but is already being buried under classes again.

So, our big game day yesterday turned into just me and Patch. In deciding what to do, ASL was initially decided against because of prep and setup time. But, I pointed out we were due to start a scenario Monday night, and we had our setups worked out already. So, we ended up playing DA8, Gruppo Mobile, FtF for the first time in… 5 years (yikes).

Sicily, 1943, six elite American squads versus nine Italian MR/35(f)s. Since they’re worth 6 VP each, the Italians have to exit four of them off the south edge after moving through one and a half deluxe boards lengthwise (22 hexes). They’re not very fast, but the American anti-tank abilities are a little limited: two DCs, two BAZ, and a 37mm ATG that enters on the first turn. Bad news for the Italians is they only have five turns. Bad news for the Americans is that the ATG comes with a HS instead of a crew.

By ROAR, the scenario is tilted towards the Americans, so Patch took the Italians with the balance (8 morale for the Inherent crews). He missed the SSR about the tanks only having half movement on the first turn, so he had to re-do his opening setup and was forced to use both roads onto the board to get everyone into play.

My setup was not bad, but it was a little too forward, and when I had him right in front of me on the first turn, I tried to engage instead of falling back to keep in front of him as I should have. My die luck was not what I could have hoped for. One BAZ went away on its second shot, and while the first shot hit, it failed to penetrate.

However, while things really got away from me on the east side on the second turn, I stunned three of his tanks as they tried to get going on the west side. I did knock one out in the east, but the other three got away from me. I had set up the ATG on the west road, and Patch barely managed an OVR, which didn’t do anything to either side, leaving a MR/35, ATG, 10-2, and Jeep all in the same hex.

On my second turn, I rushed after his fleeing tanks with most of my forces, while leaving a couple squads to deal with the stunned (now flipped to +1) tanks. One squad successfully ran up and placed a DC, blowing his rear tank in the east. (Cool! I’ve only had DCs a couple times, and it’s the first time I’ve used one….)

The third turn really broke things open for him. Patch exited two tanks, and had two more ready to exit. I was only able to reach one of them in my turn, so I would have to kill it and try to stop everything else he had. Not that it had been that easy for him. He had broken the second DC squad on my turn two as it raced up to kill another tank, and I had moved the 10-2 to rally him. Since they were positioned adjacent to the road the three stunned tanks had to use, and he was using CE to get distance, he ate a lot of attacks. With a 667 and 10-2, there was a six resid, and a pair of 2 resids to go through, and they made five FPF attacks against them as they went roaring by. And they threw the DC, but couldn’t connect.

In my turn three, I missed with another BAZ shot, failed PAATCs on two CCs, and failed CC on the tank I had to kill. Game over at the start of turn 4.

It’s actually a nice scenario, I recommend playing it—once. There’s not a lot of great decision making for the Italians, which hurts, but the Americans need thought since the AT capabilities are a bit limited. I also think it’s a bit more balanced than ROAR indicates, because I get the feeling that much of the time the Italians don’t pay enough attention to a tight schedule (don’t let the turn 4 win fool you, there’s not a lot of movement to spare), rather like the typical beginner problem with “Fighting Withdrawal”.


Blind Sniper cheered:

“As always great report! Thanks James :)”


“Ok, as Rindis said, our planned multi-player game fell through, so after some discussion we decided to give our planned VASL game a go instead. We’d been talking about playing a DASL scenario, and I was intrigued by playing with Italians again. We don’t see much of them, and I like getting the little grey counters out now and then.”

“I have the Italians in this one, and I take the balance (8ML AFV crews) as it’s a fairly unbalanced scenario. Once we got my turn 1 movement restrictions sorted out, I took a new look at the board. There’s no way I can enter everyone on the same road, so I have to break this apart. This sucks, as I do not like how things look to the east. I decided to enter 4 tanks and the 9-1AL on the eastern road, and the remaining 5 tanks and the 9-2AL to the west. Both armor leaders are a few tanks back so they don’t die up front, but their modifiers will counter any wrecks they fire past.”

“My thoughts on Rindis’ set-up are below. The 8-1 and MMG is obvious, as it’s the highest stack. The bazookas are trickier. I figure they’re in bI1 and dF2 as I like the LOS from those positions. I place the 8-0 in bF3, and that leaves the DC in bF1 and dF4.”

“The turns are blending in my memory, so the sequence of events may be a little off.”

Turn 1
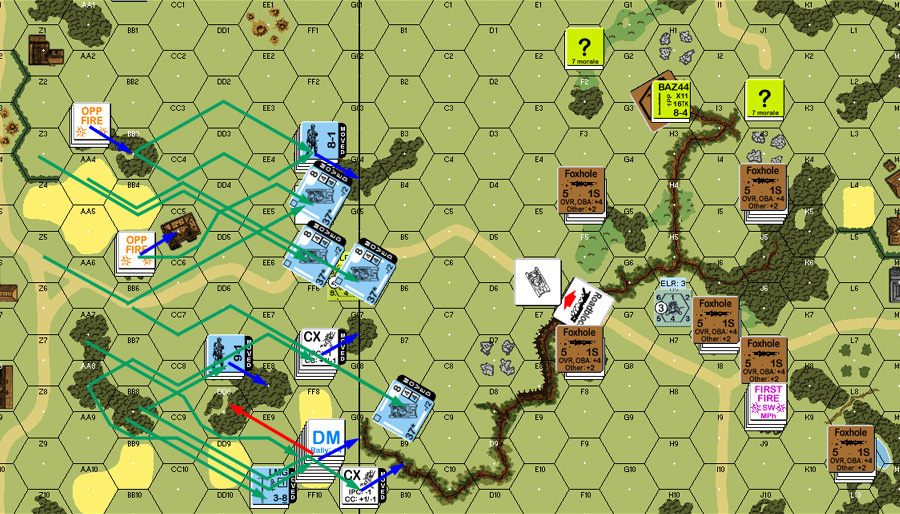
“I enter CE to get those few extra hexes of movement, and button up as soon as I get close to the Americans. Rindis tries a Street Fighting Reaction Fire attack from 8B3 right off the bat, and I’m pleased to see I was right about the 8-0. The tanks pile up behind him, and I stop short of the bridge to the east to prevent a PB bazooka shot. I stop two tanks so I have some firing options, but leave the others in motion. I discover that I was wrong about the bazookas, and one is sitting happily in bF1. Rindis gets a shot off and hits, but the thick French armor saves me. The second time he fires in his turn he rolls a 10 and the bazooka goes away (he was in dF1 with the goal of moving to dG1 to avoid backblast penalties, but t’was not to be). Lots of Street Fighting once again, to no effect. I malfunction the MA of my 9-1 AL’s tank on its first shot of the game. >.< I elect not to repair it, as with the AL on board it’s still worth 7 VP, and I do not want to Recall it. Rindis enters his ATG and unloads it in bO3.”

Turn 1 entry

Turn 2
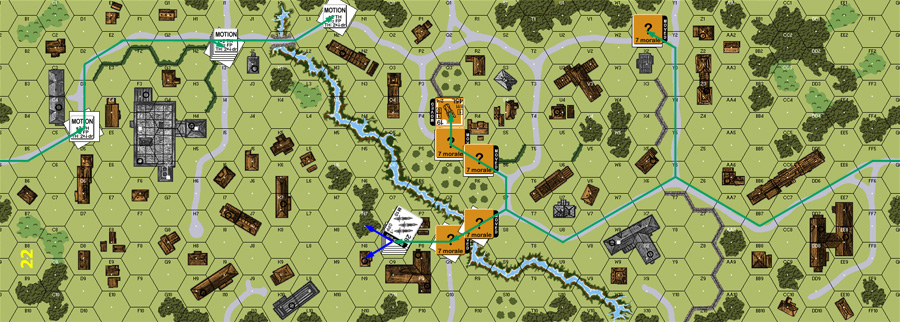
“I push to the east, and find that the bazooka is in dF4 when it fires and misses. On the other hand, Rindis nails a MR/35 with Street Fighting in dG3. With lots of FF counters about, I go CE and make a run for it and get to the orchard road area. To the west, I’m really concerned by that ATG. I decide to swarm it, with the alternative option of stopping before it and getting sandwiched between the ATG and three squads. I get one tank into bypass in dM2 to fire on the ATG later, but use ESB (it’s a final +4 modifier – yes, I was that desperate) to enter dO3 for the overrun. I had to do this while CE, and only then realize that these are 1MT tanks! The 2FP overrun has no effect, and Rindis stuns my 9-2AL when I go CE and try to rush past the northern blockade, along with 2 other tanks! Gaaah! I have swarmed an ATG and a 10-2 with… 2 tanks. I start wondering what our gaming plans will be when this ends in about 30 minutes. I have 5 tanks in a very precarious position. That turns around for me, however. Although Rindis does rush a MR/35 to the east and kills it with a DC, I break a DC squad to the west and he cannot kill the overrunning tank in dO3, and he fails to kill any of the three tanks in dF2/dG2 in CC.”

Disaster! 3 tanks go down

Turn 3
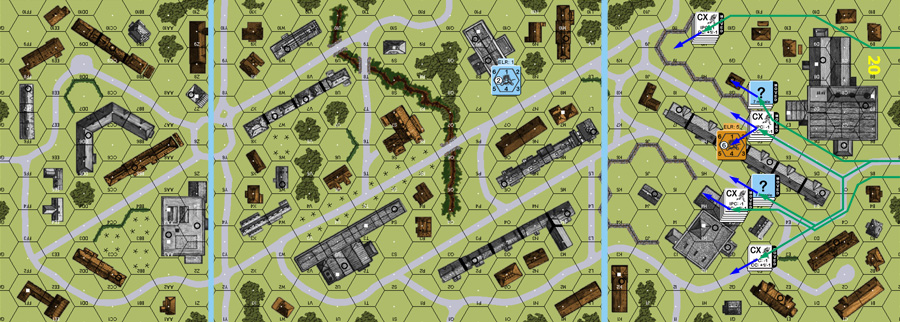
“I break the ATG crew, which opens the door to the west. I exit one tank on the eastern road, and one on the western. Two more tanks are poised to exit. I make another CE blitz and get two more tanks to mid-board, but Rindis is using FPF like mad with a 10-2 and 667 in dK2 and finally gets a double stun result, forcing a Mk/35 into Recall. The Stunned tank is a blessing in disguise, however, as Rindis makes a run at my remaining tanks, but the vehicle in dK2 is enough to keep Rindis from reaching the ones he needs with the units he requires, and in Advance two squads, including one with the 10-2, fail their PAATC. He fails to kill any vehicles, and there’s nothing preventing me from exiting two more tanks in Turn 4, even with the threat of a bazooka he shuffled over to aK1.”

Italian Turn 3 Movement

Conclusions
“Looking at the map now, I think the eastern road offers the better entry option. The bh1-dH4 road is much easier to navigate moving east to west, than west to east. Also, you can switch over from dL4-dL5:dM5-bM1-dM2:dN1-dO2. It will take a turn, but it’s doable. No such straight shot exists for the other direction.”

“The 347 for the ATG crew is a nightmare, making a base +5 TH for any shot against the MR/35s. Knowing that, an overrun of the Gun is certainly the order of the day. I don’t see any really nice other hexes to place it that aren’t OG, and I was on Rindis too fast for him to move it into, say, dN3. Getting it into cB2 on turn 1 is an alternative, with an attempt to push it into cB2 and close off the eastern road, but still… a +5 TH makes the ATG anything but the magic tank killer it appears to be.”

“I think the Americans have to set up in two defensive lines. The first is set to engage the expected end point for the Italian Turn 1 movement (and don’t forget the MMG can boresight to keep those hatched buttoned), and the second is set to intercept the expected turn 2 end point. That way the US can’t get bypassed like I did with Rindis.”

“The Italian needs to movemovemove. A single 667 needs a 5(+1) to kill a moving tank in CC with Street Fighting, which are not bad odds given there are 6 squads on the board. The 8-1 and a squad needs a 6(+0) for a kill. I realized too late how effective the DC can be, and you can expect those nasty blocks of HE on the back of at least one of your tanks. The balance option of the 8ML was a big factor in my decision to remain CE during movement, although it really only affected one result. Neither of the ALs made a difference in the game. When they took MCs, they passed easily or failed miserably. Still, nice to have for those overruns when they pop up.”

“An interesting scenario, but as Rindis points out, there’s not much for the Italians to actually do. It’s much more of a puzzle for the US to figure out”

Victory and a late counterattack


JMichael commented:

“Agree about the lack of fun for the Italians – their biggest point of decision is the CE/buttoned choice. When I played this as the Americans I had a lot more success in killing/immobilizing tanks with Street-Fighting and CC Reaction Fire than anything else.”

└ Tags: Annual 91, ASL, DASL, gaming
1 Comment
  • Page 238 of 315
  • « First
  • «
  • 236
  • 237
  • 238
  • 239
  • 240
  • »
  • Last »

©2005-2026 Rindis.com | Powered by WordPress with ComicPress | Hosted on Rindis Hobby Den | Subscribe: RSS | Back to Top ↑