Rindis.com

All my hobbies, all the time
  • Home
  • My Blog
  • Games
  • History

Categories

  • Books (504)
  • Comics (10)
  • Gaming (918)
    • Boardgaming (674)
      • ASL (155)
      • CC:Ancients (83)
      • F&E (78)
        • BvR – The Wind (26)
        • Four Vassal War (9)
        • Konya wa Hurricane (17)
        • Second Wind (5)
      • SFB (78)
    • Computer games (162)
      • MMO (77)
    • Design and Effect (6)
    • RPGs (66)
      • D&D (25)
        • O2 Blade of Vengeance (3)
      • GURPS (32)
  • History (10)
  • Life (82)
    • Conventions (9)
  • News (29)
  • Technology (6)
  • Video (50)
    • Anime (48)
  • Writing (1)

Patreon

Support Rindis.com on Patreon!
Become a patron at Patreon!

Other blogs:

RSS Inside GMT

RSS Playing at the World

  • Playing at the World 2E V2 Arrives May 5, 2025

RSS Dyson’s Dodecahedron

  • Shrine of the Diseased One July 17, 2026

RSS Quest for Fun!

  • The Expense Post May 24, 2026

RSS Bruce Heard and New Stories

  • Pain, Exhaustion, and Morale in D&D BECMI June 7, 2026

RSS Chicago Wargamer

  • The 2 Half-Squads - Episode 310: Cruising Through Crucible of Steel January 27, 2023

RSS CRRPG Addict

  • The Search for Freedom: Won! July 18, 2026
SF&F blogs:

RSS Fantasy Cafe

  • The Leaning Pile of Books July 5, 2026

RSS Lynn’s Book Blog

  • Friday Face Off: The Raven and the Reindeer by T Kingfisher July 17, 2026
ASL blogs:

RSS Sitrep

  • Cardinal ASL Sins March 18, 2026

RSS Hong Kong Wargamer

  • FT114 Yellow Extract After Action Report (AAR) Advanced Squad Leader scenario April 16, 2025

RSS Hex and Violence

  • This still exists? March 25, 2025

RSS Grumble Jones

  • Grumble Jones July Scenario GJ162 You Will Engage the Enemy July 1, 2026

RSS Desperation Morale

  • How to Learn ASL March 16, 2025

RSS Banzai!!

  • October North Texas Gameday October 21, 2019

RSS A Room Without a LOS

  • [Crossing the Moro CG] T=0902 -- Rough start July 18, 2015
GURPS blogs:

RSS Dungeon Fantastic

  • Felltower - Monsters Fleeing between Sessions vs. PCs replenishing June 28, 2026

RSS Gaming Ballistic

  • B-Scale Detail and Examples July 16, 2026

RSS Ravens N’ Pennies

RSS Let’s GURPS

  • Review: GURPS Realm Management March 29, 2021

RSS No School Grognard

  • It came from the GURPS forums: Low-Tech armor and fire damage January 29, 2018

RSS The Collaborative Gamer

  • Thoughts on a Town Adventures System January 18, 2022

RSS Don’t Forget Your Boots

  • GURPS Supers Newport Academy #7: “Invitation to the future.. of the 1970’s” July 5, 2026

RSS Orbs and Balrogs

  • Bretwalda - Daggers of Oxenaforda pt.4 - Fallen King May 27, 2017

Designers & Dragons: Part 4

by Rindis on June 13, 2018 at 12:00 pm
Posted In: Books

The fourth (and kind-of final) volume of Shannon Appelcline’s massive history of the RPG industry finishes up the project well. However, I can’t help a feeling that this one is less important, and unpolished.

Some of this is my prejudices, but some is caused by the nature of how the books are put together. Since each chapter is a look at the full history of a company, instead of being confined to the decade under study, earlier volumes had histories that covered multiple decades in long histories with a lot of context. Here, all the histories are relatively short, since no company could have more than thirteen years of existence at the time of writing. This is shown by the coverage of 26 companies in this volume, plus thirteen company mini-histories, a quick look at OSR, a short look at Glorantha fanzines, and finally two asides talking about his conception of ‘story games’ (which have been brought up since the first volume).

The format also ill-serves overall industry trends, which was a minor problem before, but really damages coverage of the d20 years. I know it was a big thing, and it comes up a lot as a driving force in a lot of chapters, but I still don’t have a clear picture of how it operated because of the fragmentary coverage. Short of the creation of the RPG itself, it’s probably the biggest industry-wide force there’s been, and I have no idea just how many companies (large and small) published during it (and how that compares to, say, the ’80s boom), and so on.

There’s some good coverage of the indie movement, and trends in it (including a much better picture of how it got going than I’ve seen elsewhere), and some lesser coverage of OSR. Of course, the real problem with all of this, is that with it all being so recent (/ongoing), it’s harder to judge what’s going to be of lasting importance at this point. Moreover, the book was written as D&D 5E was preparing to come out, so current events are still playing havoc with important subjects here, notably Paizo.

└ Tags: books, gaming, history, reading, review, rpg
 Comment 

Konya wa Hurricane Alliance Turn 15

by Rindis on June 9, 2018 at 12:00 pm
Posted In: Konya wa Hurricane

The erosion of the Coalition position led to a hefty 30-point jump in the Alliance’s economy, with the Kzinti getting the most with a 12 EP jump, powered by the recovery of most of their provinces. This allowed for more robust shipbuilding, but specialty ships are still restricted to scouts and some replacement escorts.

Builds:
Federation: DNG, NCA, 12xNCL, 3xDW, 2xDWA, FFB, 11xFF, NCL->NSC, 2xFF->FFS, 2xDD->DE
Kzinti: NCA, 2xCM, LTT, DW, 3xFKE, FF, CM->MEC, EFF->FKE
Gorn: CCH, BC, CM, 3xHD, 2xBD, BDS, DD, FCR, 3xCC->CCH, CL->CCH
Hydran: TG, 2xTR, DWE, 4xCU, 2xHN

They Hydrans raided east Hydran space, picking off an F5, and crippling another, and also hit Lyran space to pick off a POL and disrupt the province. The Kzintis sent two raiders into Lyran space and disrupted provinces, while the Feds picked off an F5 in Kzinti space. A Fed DNL tried to pick off a couple out-of-supply Klingons in western Fed space, but a D6 joined them, and the DNL was only able to cripple an F5. Another DNL tried to take out a patrolling E4, and got a D7C in response, which fought it off (poor roll). The Gorns hit a couple Romulans patrolling Gorn space, and picked off a K4 while a SNB evaded.

The Hydrans did their standard move on the homeworld while pinning down the Lyran reserve force, and the Kzinti made another move against the Lyran border SB. The Federation naturally send the 4th Fleet against the remnant of the Klingon NE Fleet that was holding the major planet in Federation space. Further south, efforts were made to pin most Klingon forces, and send a good combined fleet against the fortified planet in 2715. The group holding the Klingon planet in 1611 mostly bugged out, and attempted to take NZ planet 1910. Byron apparently didn’t realize that the Lyran Fire Squadron was nearby and had no other business, so it reacted onto the planet, along with an adjacent D6, giving him a fight he was not equipped to win.

Early activity on the Romulan front concentrated on taking 3210 back, but a decent force moved on 3711 later, generating a series of separate fights, as various detached forces intercepted pieces of the move. Finally, the Gorns tried a thrust against the SB in 4812, but the 3rd Star Legion intercepted and pinned most of it, and the Gorns halted just inside the border.
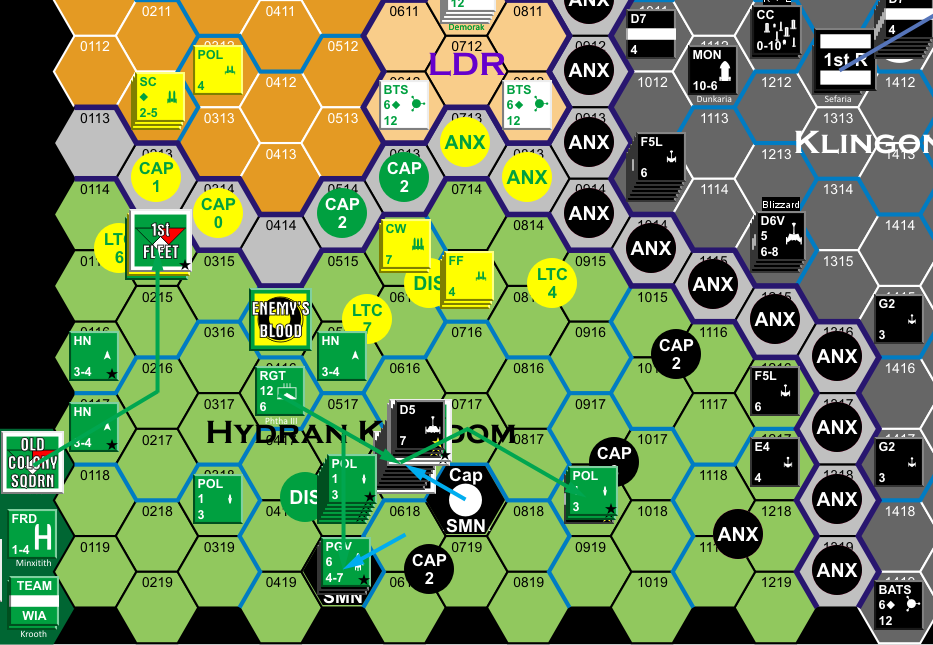

The same old dance.
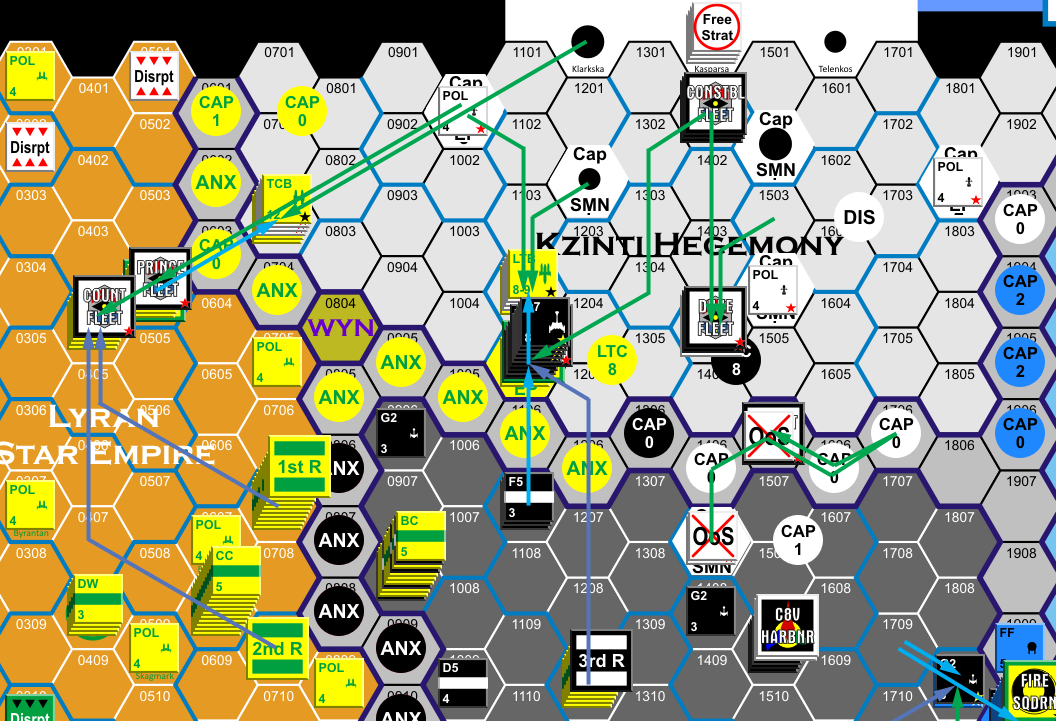

Kzinti expansion.
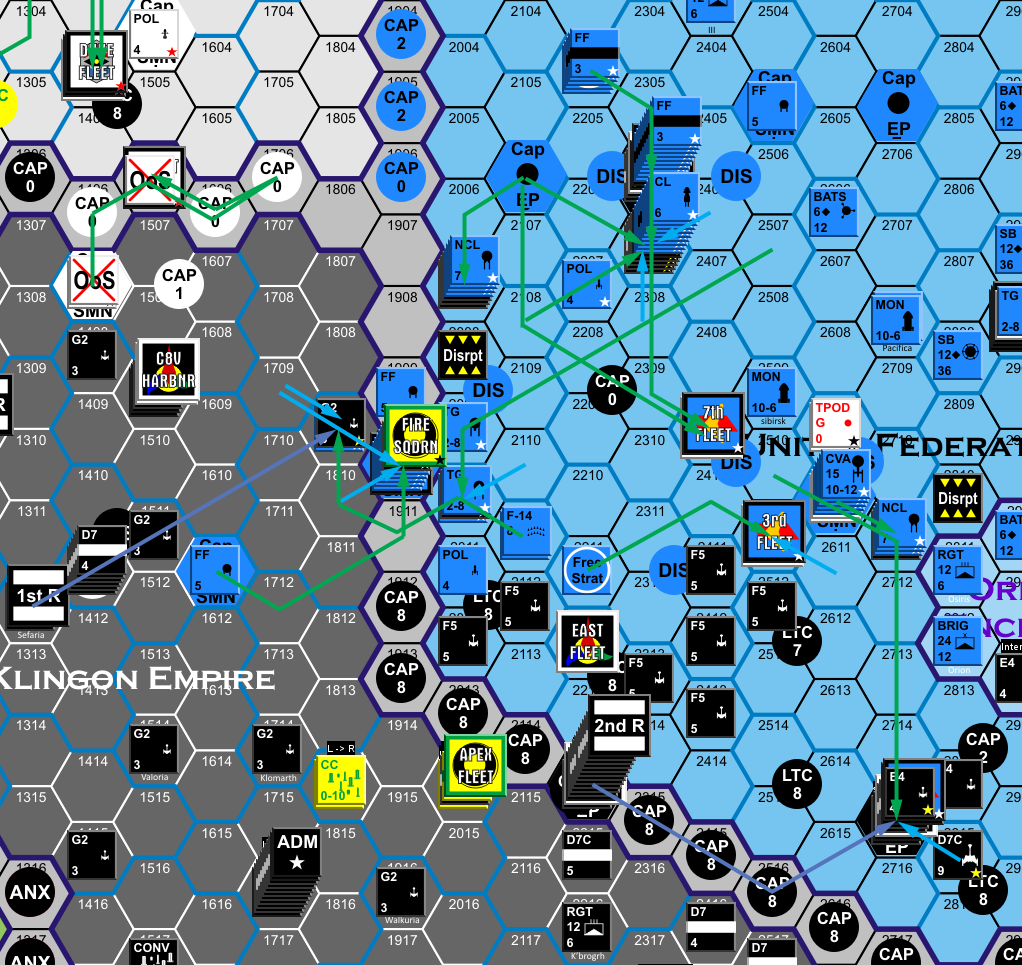

Throwing the Klingons back across the border.
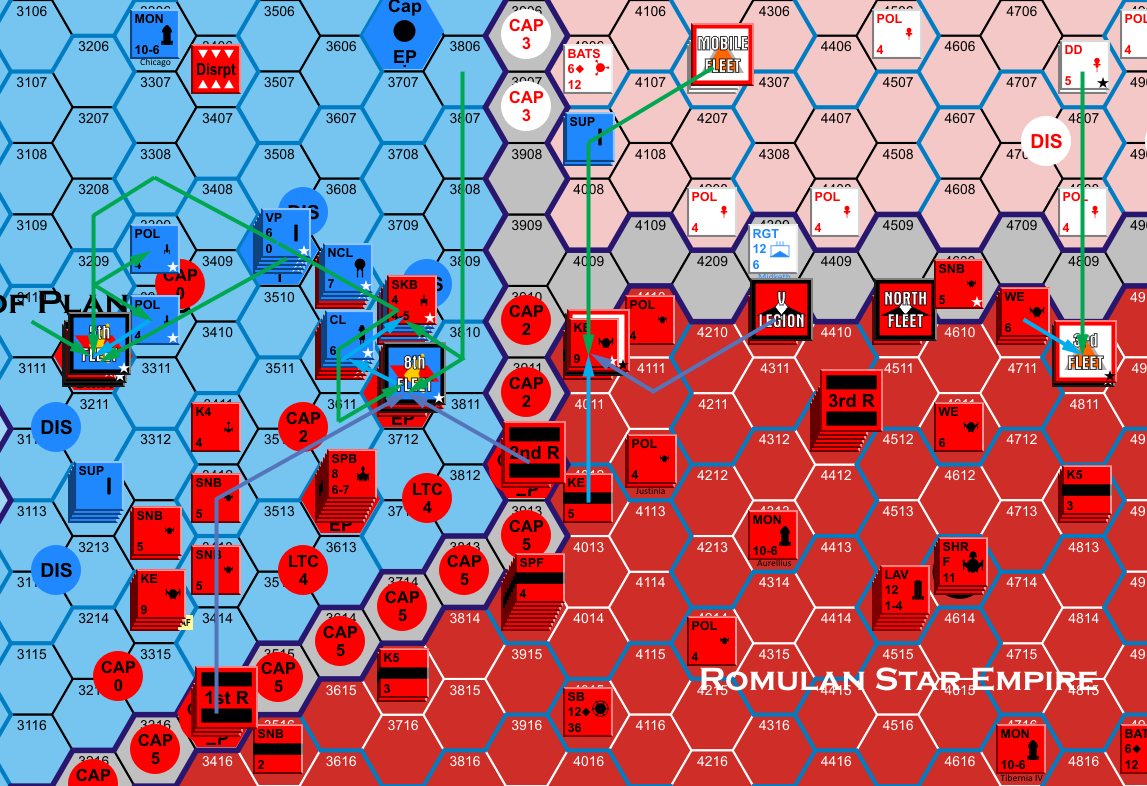

Gnawing on the flanks.

The Lyran reserves naturally went to save the Kzinti border SB again, while the Klingons sent a reserve each to help 1105 and 2715. The 1st Reserve in 1312 was positioned so as to help in Hydran space if they started trying do more near the old border, and so merely sent two ships to fight on the Federation border. The Romulans sent two reserves to save 3711 from a combined Federation-Gorn force, and sent the third to BATS 4010.

Battles:
0918: SSC: Klingon: dest cripF5; Hydran: crip CU
0519: SSC: Klingon: dest F5, crip D6
1809: SSC: Federation: crip FF
0703: SSC: mutual retreat
0214: Lyran: dest CW; Hydran: crip 2xHN
0617: Klingon: dest F5V, E4A; Hydran: dest LN, capture capital
0404: Retreat after declined approach
0504: Lyran: dest DW; Kzinti: crip CM, cap DW
1105: Lyran: dest STL, crip DW; Klingon: dest C9A, FRD, crip D6M; Kzinti: dest MSC, 2xFKE, crip MEC, 2xCL
1404: Klingon: dest F5E, crip D5, AD5, F5; Kzinti: dest FKE, SAD, crip CM
2006: Klingon: crip 2xF5; Federation: crip CL
2307: Klingon: dest cripD6; Federation capture D6
2306: Klingon: dest F5L, E4V, E4A
1910: Lyran: dest DWE, DDG; Federation: dest CA, DW, crip NCL, FF
2010: Klingon: crip F5L; Federation: crip FF
2409: Klingon: dest D5, E4A, crip D6M; Federation: dest DE, crip CC
2711: SSC: Klingon: dest F5
2511: Klingon: dest 2xF5, F5J, crip D7C, AD5; Federation: dest NCL, FFE
2715: Klingon: dest BATS, E4, crip 4xD5, 3xF5; Federation: dest DE, SWAC, crip NCL, planet captured; Gorn: dest BC; crip 2xCM, CLE, 2xLTT, BDE
2814: Klingon: dest E4
3210: Romulan: dest KE, WE, crip FH; Federation: dest CA, crip 3xFF, capture planet
3711: Romulan: dest FHF; Gorn: dest HD, crip 3xBD
3710: Romulan: dest SN
3610: Federation: crip FF
3609: Romulan: dest SNB
4010: Romulan: dest SKE; Gorn: dest BDS, crip BD
4810: Romulan: dest K4, crip K7R, KE, WE; Gorn: dest HD, crip DDG

My surviving F5 from Hydran raids was picked off by a CU+POL pair, but he rolled a 12 to get some revenge and cripple the CU. Meanwhile, he’d sent a PGV and an independent fighter squadron (launched from 6xPOL…) against the garrison of 0519, and they rolled high to nearly get both ships there.

The battle over 1105 was extremely painful. Byron’s real goal was to kill the Klingon FRD sheltering there, but even with 12 points of Kzinti DB, I had a higher ComPot, though the Kzintis could shift me. All the Lyrans had to do was roll equal to the Kzinti to prevent the Kzintis from getting to the planet (and FRD), but rolled one less instead. Worse, the Kzinti did 36 to exactly kill the STL. For the second round, I brought out the C9A, in the hopes of lowering his ComPot enough that he couldn’t kill it and get the FRD. On three attempts the C9A rolled ‘6’ each time, doing absolutely nothing for its efforts. VBIR went down, and the Kzinti did 18 exactly to kill the C9A. And then the mauler shocked, and I lost a PT on a capture attempt. After he killed the FRD, I attempted to pursue to kill a couple of cripples, but failed on that. This was a battle that could have been really painful for the Kzinti (holding him to approach for three rounds would have put him dangerously low on fighters), but instead I lost the FRD and two specialty dreadnoughts for nearly no return.

Planet 2715 needed more defenses, so I had finally gotten around to putting a PDU there to supplement the BATS. I knew this would probably generate an attack to stop it, but failed to shift as many units over there as I had intended (I’m just short everywhere, and got cold feet on weakening the East Fleet over by the 3rd SB). So it got hit by a larger Fed/Gorn force than I had expected, and I didn’t really have a hope of defending it. Except that the first two rounds were 1-6 and 2-6, allowing me to drop a lot of damage on a fleet without any real backup fighters.

Coalition: 417.9 EP (x2) + 570 (bases) + 809 ships (/5) = 1729.4
Alliance: 363 EP (x2) + 485 (bases) + 770 ships (/5) = 1519

The Klingons have been having one disaster after another, and now the Coalition is in the low range for a Major Victory, with no end of the slide in sight. Next turn the entire Coalition goes to 75% economy, on top of the contraction caused by successful Alliance offensives. The Kzinti and Hydrans will also go down to 75%, but their economies are expanding, and the Federation, the real problem will still be at 100% for some time yet.

Worse, the Alliance is nearly at ship parity (…it sure doesn’t feel like it, he has more ships than I do at any point that’s important), and all fleets are continuing to get bigger, with the exception of the Klingons who have net lost ~10/turn for the last two turns.

└ Tags: bgg blog, F&E, gaming, KwH
 Comment 

The Road To Sarikamis

by Rindis on June 5, 2018 at 12:00 pm
Posted In: Boardgaming

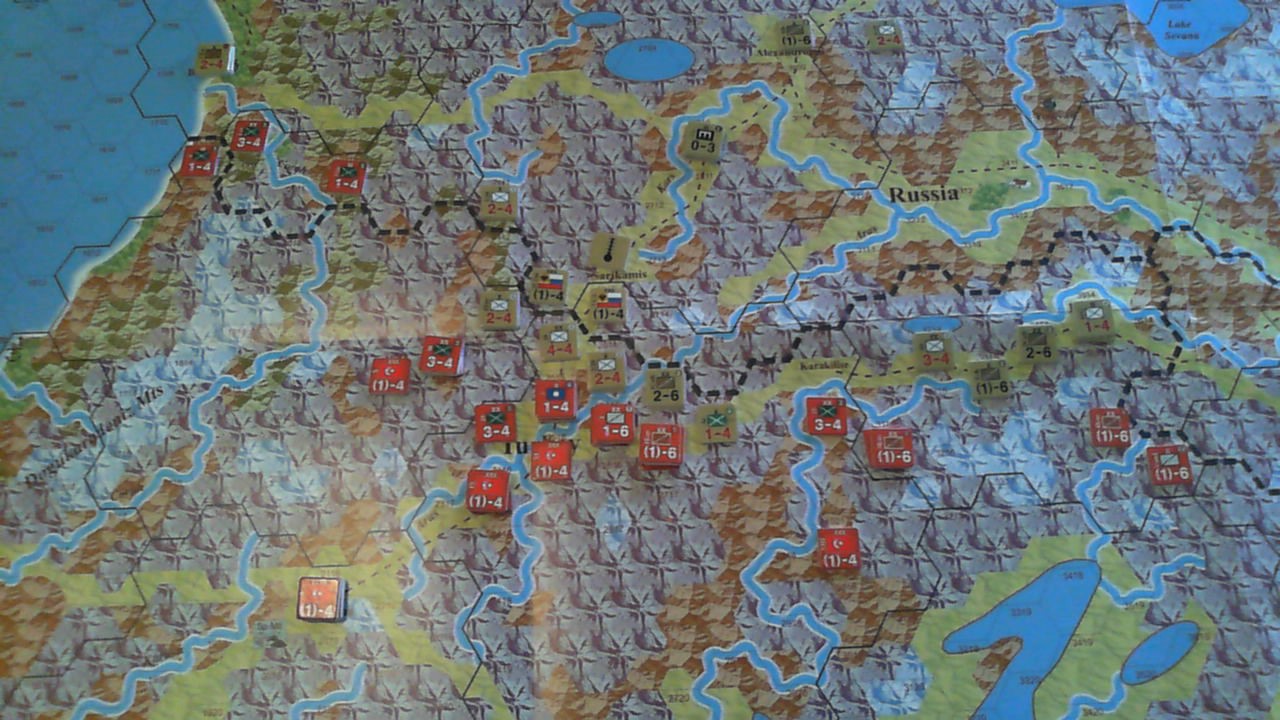
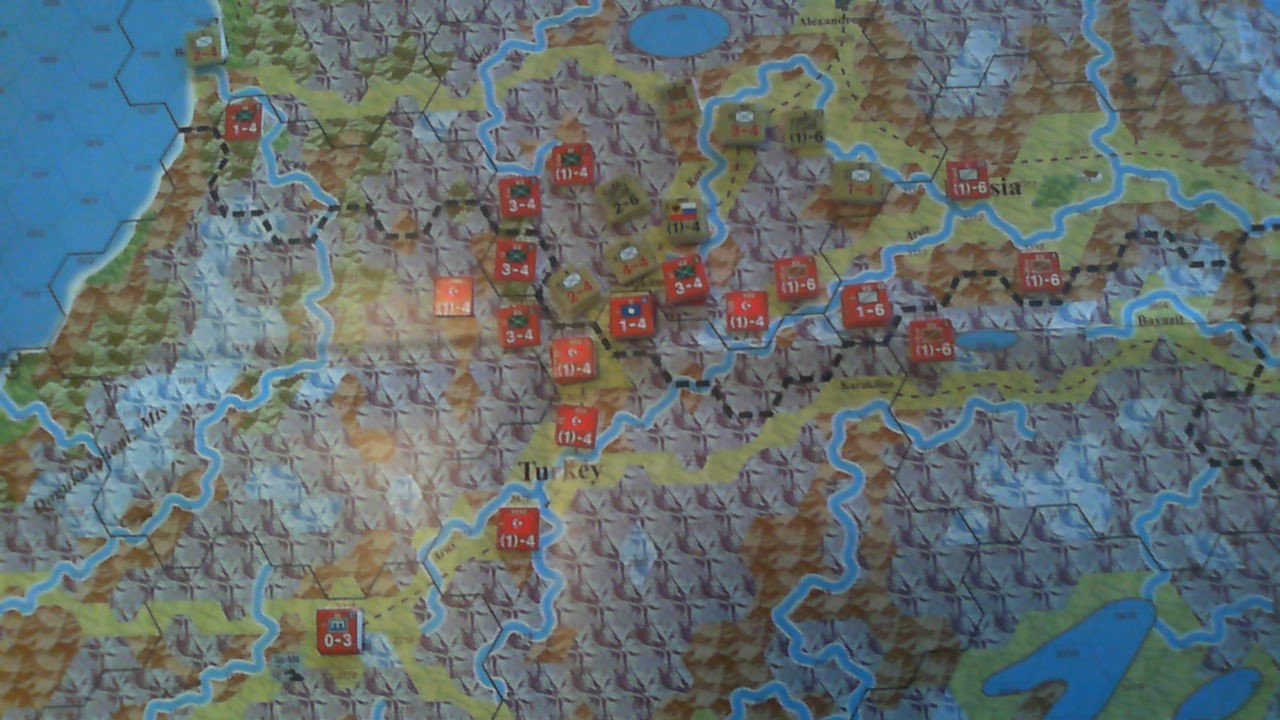
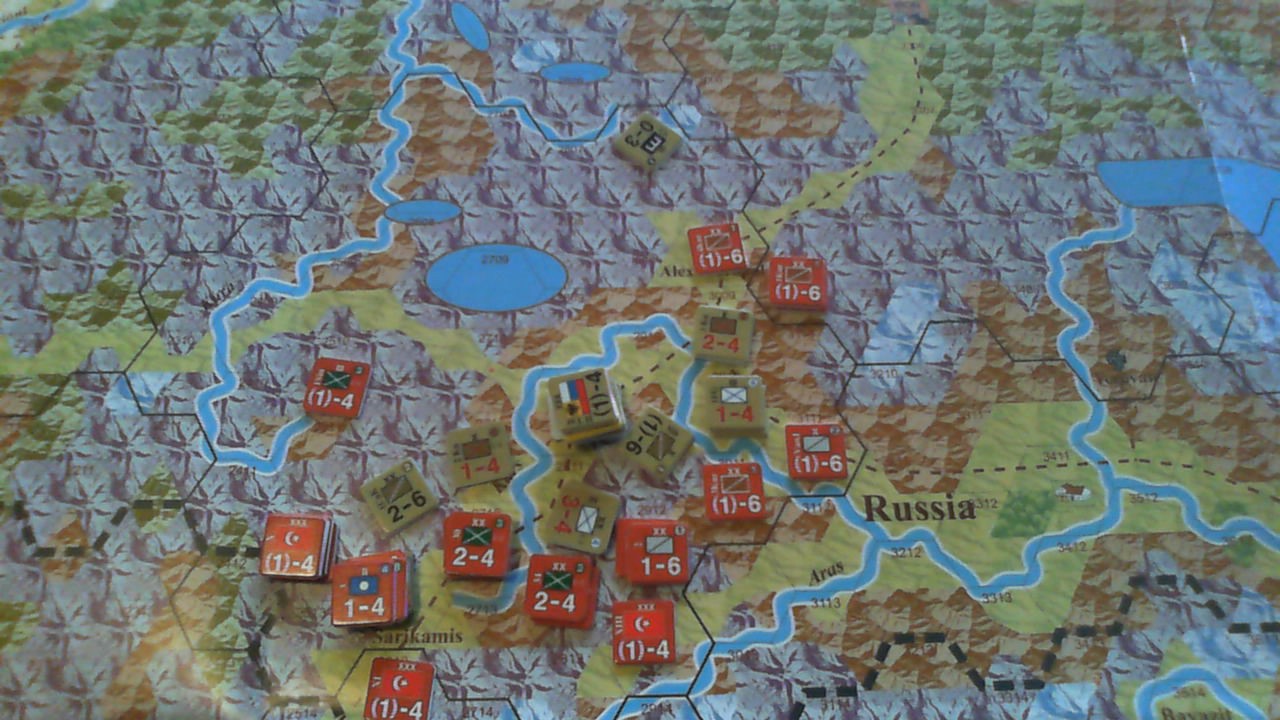
Jason recently made it over for another FtF session last Thursday, and we finally tried out the copy of Osmani Harbi that I picked up nearly two years ago for cheap. Thankfully, we had some time to read through the rules before hand; I was having trouble fitting it all in my head at the same time, even though much of the system is nothing especially new.

I went with the 1915 Caucasus scenario to try it out because, 1) it’s the first one in the book, and 2) it looked to need fewer of the Osmanli-specific rules (since there’s no desert, and it uses the normal Winter turns instead of the Summer turns). With most of my knowledge of this part of WWI still coming from Pursuit of Glory, I needed the victory conditions to confirm that the Ottomans are on the offensive here (the general goals are to take Kars, Sarikamis, and be less demoralized than the Russians). A random roll gave me the Ottomans, and off I went!

The initial look at the situation didn’t seem promising. The Russians have already advanced slightly past the border, and are in good defensive terrain (then again, the terrain in the entire map isn’t good for much other than defense). It sure didn’t seem that I had enough on hand to mount a real offensive. But there were a few possibilities. My main moves were against the ends of the Russian line, and I tried one combat, against a one strength Armenian division, and only took a point of damage myself.

The idea of the defender getting a ‘counterattack’ in which their strength is tripled takes some getting used to. The actual point is to effectively build the combat system around the old idea of a 3-1 attack being equal odds, while using strength factors instead of odds calculations. But it really makes you pause on attacking, and feel it’s so unfair. I needed to remember, that at around 3-1 odds, both sides should take about equal losses, and there’s only a third as many defender to absorb them.

An interesting wrinkle is that it seems that the attacker only ever gets negative modifiers and the defender only positive ones. However, I was usually attacking in mountains, which has no (attacking) modifier, but halves the attacking SP. This gives the attacker the ability to get a wide range of results compared to being stuck with the low ones as some of the other heavy terrain causes.

Jason consolidated his line slightly on his turn and I tried again against the Armenian division, getting a 6-1 die roll to knock it out for no losses. The next turn I moved in on the slightly shorter line, and continued working my way around the west flank, and concentrated on the center. My big attack there had another good set of die rolls, and I pushed the Russians out of a hex.

With things going poorly on the flanks and the center, Jason started pulling back. I think he pulled back too much, and let me take ground while he was reorganizing, instead of trying to make me pay for it, even if he lost a couple units in the process. By the end of December I was repositioning some extra cavalry to continue trying to threaten cutting him off from Batu, and was close to Sarikamis itself.

We ended up calling the day early, but got halfway through January, and could have finished the month if other events hadn’t gotten in the way. Still, by that point there was probably going to be a lot less activity. I took Sarikamis in a large attack from the SE, which meant I was only facing broken ground. This in turn surrounded three 2-4 infantry brigades that ended up surrendering after a failed breakout.

I had a Substantial Victory pretty well in hand, but was rapidly running out of supply, so short of being handed a really tempting target, I was planning on settling on something near the current line and waiting it out. The Ottoman ability to not need supply for defense had already been handy a time or two, and meant that I could basically exhaust my supply while doing this. (To be sure, the Ottomans get less supply to compensate for this.)

We’re both pretty happy with the system so far, and we may be giving it another go soon.

Questions:

Can you inspect enemy stacks? You can’t inspect the supply status on the charts (that is stated), but can you inspect the contents on on-map stacks? (I think you can, but an explicit statement eludes me.)

The depots on the map have no supply points listed, are they supposed to be empty? (I’m pretty sure that’s a yes, but stating ‘0’ in the scenario would have been preferable.)

There’s one railhead marker on the map, which makes it clear where that line ends. The scenario rule about ‘rail lines in Russia’ implies that the branch out to Tabriz exists. Does it stop at the Russian border (i.e., not go in Persia, and not reach the Tabriz depot) too?

Is there anything for the two engineer units in the scenario to do other than perhaps allow a HQ to move into a trench?

A 1-4 unit has (1)-4 on the reverse. Does flipping it resolve a SP of losses? Does removing it after being flipped also satisfy an SP of losses?

Can you supply some units for an attack, but not others? Or can you only provide supply on an ‘all-or-nothing’ basis? (Probably not ‘all-or-nothing’, as supporting a breakout attack is already an exception.) Can you just supply by number of strength points? i.e., provide 5 supply for a 21-point attack, which would then become a 20+0.5*1 attack or 20 SP.

└ Tags: Der Weltkrieg, gaming, WWI
 Comment 

City Fight

by Rindis on June 1, 2018 at 12:00 pm
Posted In: Boardgaming

Patch has been fairly distracted lately by other parts of his life, so for our latest game, we went for one of the simpler scenarios from Up Front, and simple sides—German vs Russian.

I had the Germans, and split my squad into two teams, with B taking most of the better members, the LMG, and the DC, while the SL led A. Patch split his Russians up into four groups, A had his five best guys and the DC, B had five second-best, including the LMG-toting ASL, and C had three morale 3 guys, and D had the last two morale 2 guys. (I’m giving the Fire Strength and all the modifiers that applied to attacks; a ‘C’ refers to a concealment card played on it.)

There was no pre-game terrain, and I led by putting Wire on Patch’s B, which he immediately Moved off of. I Fired anyway at his A (1), which failed to do anything, and I realized just how high-quality his guys there were. I then Moved B up to range 1, and into Buildings (-3), and they then Fired at his B (2; -3C) to pin one man.

Patch finally acted after that, Moving his D up to range 1, and my B immediately Fired on them (3+1), pinning both, while my A Moved forward. Patch put a Brush on my A, and I accepted it. He then put a Wire on my B, but I had no movement available. Then his D went to ground in Brush, and then Rallied, making them the best-protected group he had. My B Fired at his B (3-1), and pinned two men, who were immediately Rallied, while his A and C Moved up. I Moved my A up while he was busy, Patch’s men all halted in open ground, while mine took a Hill.

From my hilltop, I Fired at his A (4+1; -3C), and pinned one man while malfunctioning a machine pistol. (I’ll note the cards were poor enough that I still wouldn’t have outright killed anyone on Strength 5 without the concealment. In fact, I would have only pinned two.) Patch immediately Rallied, and I permanently broke the machine pistol, leaving me with only four weapons in the group. After a pause, my A Fired on his again (3+1), pinning three men. Patch Rallied 2 of them, and his group B finally moved up and into Buildings (-3).

My Sniper pinned a man in his B, and his A Fired at my A (1-1), doing nothing. A little later, his B Fired at my A (3-1; -1C), pinning two men, including the weaponless one, who were immediately Rallied. Patch finally Rallied All to get his men in A and B up again, while I finally Moved off the Wire on my B. Then his A Fired at my A (2-1; -1C) to pin two men, and followed up with Fire from his B at the same group (1-1), to do nothing. I Rallied my two men.

Patch started trying to Entrench all his men out in the open, but didn’t have any immediate success. His B Fired on A (1-1) to pin one man. Reminded that the rest of his men were out there, and relatively low morale, my A Fired on his C (2+1) to pin one man. Wire appeared on the hill to complicate things there. A second attempt Entrenched Patch’s D. Fire from his B at my A (1-1+1; -2C) did nothing, and I finally Rallied the pinned man there. Patch finally Entrenched his groups A and C. His B Fired at A again (2-1+1; -2C), pinning two men, who were immediately Rallied.

Patch’s D Moved up to range 3, and my B Fired at his A (2-1; -1C) to do nothing (I had forgotten about his D, or else I might have fired on them). D stopped in open ground again, and now I Fired on it from B (3) to pin them both, and from A (4) to Rout one man. Patch Rallied the remainder, and then Moved him laterally into Brush. The Russian Sniper failed to do anything to my Group B, who then finally Moved off of the Wire. Patch’s D re-entrenched. My B Fired on his B (3-3) and pinned two men, then my A Fired on B (2+1-3) to pin another man and panic one of the pinned ones, at the cost of the SL malfunctioning his machine pistol. Patch rallied the rest, and then, after my Sniper tried to hit that group, they eliminated him.

Patch’s A Moved forward, and my B fired on them (1+1), pinning two right before they ducked into Buildings (+3). His B then Fired on A (1-1) pinning on one man, then A Fired on them (4-1; -3C) for no effect. My next turn saw the SL in A permanently break his weapon. Patch Rallied his men in A, followed by me doing the same. Patch’s Sniper had no effect on my B. Patch’s B Fired on my A again (3-1; -3C) for no effect. My B Fired at his A (4-3; -1C) for no effect. A little later, my A Fired on his C (1+1-1) to pin one man, followed by my B Firing on them (2-1) to rout the pinned man. Patch’s A Fired on my A (5-1; -2C) to pin two men, followed by his B at my A (2-1) to pin the other three men, and routed one. I Rallied everyone, but Group A was down to four men, with only two serviceable weapons (both rifles), for fairly minimal firepower.

My A Fired on C (1+1-1) to pin one man, and B followed up at the same (2-1) to pin the other. The next turn, B Fired on his C again (2-1) panicing one man, and then Patch Rallied the remaining one. My B then Fired on his A (3-3) to pin one man, and followed it up with the same next turn (3-3; -1C) to do nothing other than malfunctioning another machine pistol. Patch’s A Fired on my A (4-1) to pin one man, and then his B followed up (1-1) for no effect. I Rallied A, and the weapon in B repaired (for once!). Patch Rallied his man in A.

With my Group A being relatively exposed, and lacking in useful firepower, I put Smoke on the hill, and discarded Wire onto Patch’s B, but he immediately Moved off of it. My B Fired on his A (3+2+1-3), and killed one man outright. Patch’s A Fired at my A (2-1-1), to pin one man, and then Fired B at my A (4-1-1) routing the pinned man (taking his weapon with him), and pinning another. I Rallied the pinned man. More Wire showed up on my Group B. And a couple turns later, I put Wire on Patch’s Group A.

Patch’s A Fired on my A (3-1-1-1) to pin two men, and followed up with Fire from his B (5-1-1) to panic one man and pin the remaining good order one. I Rallied the survivors, which were the SL and the one man still with a weapon (in fact, he was the last casualty of the game, and he was the first person who broke his weapon; despite starting with a Morale of 2, Patch had generally drawn low RNC against him). I Moved off the Wire in B, followed by Patch Moving off his Wire.

Patch’s B Fired on my A again (4-1-1) to pin the SL, who I immediately Rallied. My B Fired on his A again (1+1+1-3) for no effect. Patch’s A Fired on my A (3-1-1) for no effect. And after a few more discard rounds, the game ended at the finish of the third deck. Patch won with 4 guys in Group A at Range 2 in Buildings (8 VP), 4 guys in Group B at Range 1 in Buildings (4 VP), two routs (2 VP) and a kill (2 VP) for a total of 16 VP. I had 5 guys in in Group B at Range 1 in Buildings (5 VP), one rout (1 VP), and 4 kills (8 VP) for 14 VP.

Afterword

Patch had a pretty good plan with four groups and an obvious desire to move up and get into good ranges, with the low morale guys way out on the flank where it was harder to reach them. However, he hardly saw any terrain cards at all in the early going, which is what kept him stopping in open ground regularly. I had planned to move around more than I did early on, but once again got choked with a lack of Movement cards. The three Moves to Range 1 and 2 in my two groups, plus getting rid of a Wire or two represents every Movement card I saw until about halfway through deck 2. It’s a good thing I didn’t try a three group setup (which was considered), as I’d never have managed to get all three into motion. I did have some movement possibilities at the end, and if I’d discarded slightly different, might have gotten my nearly useless Group A into a Gully for the final ~1/4 deck of the game.

The dominating thing for me in this game were the weapon failures in Group A. It really left me with one effective group for the final deck or so, though it still managed some effective fire thanks to the +1 strength bonus. The lack of movement kept Group B at Range 1, and meant I never had a chance at the higher power cards, though I could manage 8-12 firepower at various groups.

└ Tags: gaming, Up Front
 Comment 

The Rival Queens

by Rindis on May 28, 2018 at 12:00 pm
Posted In: Books

Nancy Goldstone’s The Rival Queens is one part biography of Marguerite de Valois, half a part biography of Catherine de Medici, and half a part outline of the French Religious Wars. Catherine getting first billing the in subtitle, the focus is largely on Margarite.

In one extent, this makes a lot of sense, as she wrote, or at least started, her own memoirs which were heavily sourced for this book. The Rival Queens effectively starts with the marriage of Catherine to Henri II, so the early part of the book naturally focuses on her; but as Margarite grows up, she becomes the focal point of the book, with Catherine becoming part of the surrounding cast.

Overall, it’s a very well done look at the period from the general viewpoint of the French court. There is talk about various towns and forts trading hands (mostly between the French government and the Hugenots), that could have used a few maps for a grasp of the geography involved, but the politics and personal relations are the focus of the book.

└ Tags: books, history, reading, review
 Comment 
  • Page 151 of 315
  • « First
  • «
  • 149
  • 150
  • 151
  • 152
  • 153
  • »
  • Last »

©2005-2026 Rindis.com | Powered by WordPress with ComicPress | Hosted on Rindis Hobby Den | Subscribe: RSS | Back to Top ↑