Patch and I returned to Budapest for our latest ASL game. We’re approaching the end of the set, and dealing with the final desperate days for the Axis defenders. In fact, this one is something of a direct sequel to FB15, with the final Soviet attempt to take the Central Rail Station. This time, the German defenders are completely cut off, and all the way down to ammo shortage level 5. However, there’s a relieving force on the way, that needs to cross a large, open, park to get there.
This is one of the more prominent features of the FB map, and we’re just now getting to see it used. The Germans (SS) in the Rail Station set up first (five squads, three guns, a single wounded leader, and wire, mines, fortified Locations), with the Russians setting up in two groups around it. Five squads set up in the area directly east of it (with eight “?” as well, which made it look a lot tougher to me), and another ten squads (with all the heavy weapons, including a FT and two T-34/85s) set up to the west. The Axis gets to set up the rest of their forces after them, with three SS squads (each with a MG) setting up SE of the action, and other ten squads (some German, some Hungarian, and including three Hungarian assault engineer squads) get a more extensive set up area that includes the area east of the Field of Blood. These guys are only at ammo shortage level 3. And on turn 1 a Hungarian StuG enters. The Russians need to take all but one Location in the Station in six turns, but the Axis can trump that by getting one or more of the squads from the Station out and off the east edge of the map by the end of the game.
I had a hard time figuring out a defense… or what Patch’s offense was going to look like, so I completely muffed my initial set up. I was more worried about the guys in back than the ones with the heavy weapons, and all my guns were pointed the wrong way. The wire was set to slow down an attack up the rail line, which Patch promptly didn’t do (to be fair, I think that was generally a good idea, as letting him get close under the cover of rail cars would be nasty. The fortified Locations were on the north and south ends of the building, and probably should have been grouped (possibly 3 in one corner and then the fourth separated just to force a split of attention). Most of the mines were visible in SS16/TT15, and it wasn’t until we started that placing them in the exterior building hexes occurred to me. As it was, it helped channel things, but mining the front side of the building would have been a lot smarter.
Patch set up a platoon under the turntable in NN14 (just barely in his area, and I didn’t think of that either). And a special assault force in UU16 with the FT, a DC, and a T-34 to cross the visible mines. All the last set of Germans went in close contact with the eastern Russian force to try and stop them and advance on the Station, while the Hungarians all set up to cross the Vermezo with cover from shellholes, gliders (from a resupply effort), and smoke grenades.
Patch’s first shot was a 8FP ‘2’ to reveal a dummy and ELR/reduce a 658 when they rolled 12. The FT also did well to reveal and break the other 658. Then the T-34 rolled across the mines and broke through the fortified Location and bogged in the hex now that its job was done. The rest of movement was him creeping forward, and I didn’t bother to respond to most of it, but a squad moved into the open street, and I revealed a 20mm AA to break them.
To my surprise, most of the big stack under the turntable stayed in place, but Patch wanted to know more before committing them. Final Fire did nothing other than put my AA under a Low Ammo counter. Advancing Fire didn’t do anything, but he revealed PP14 as fortified in advance, and got into CC with the AA crew, killing them easily.

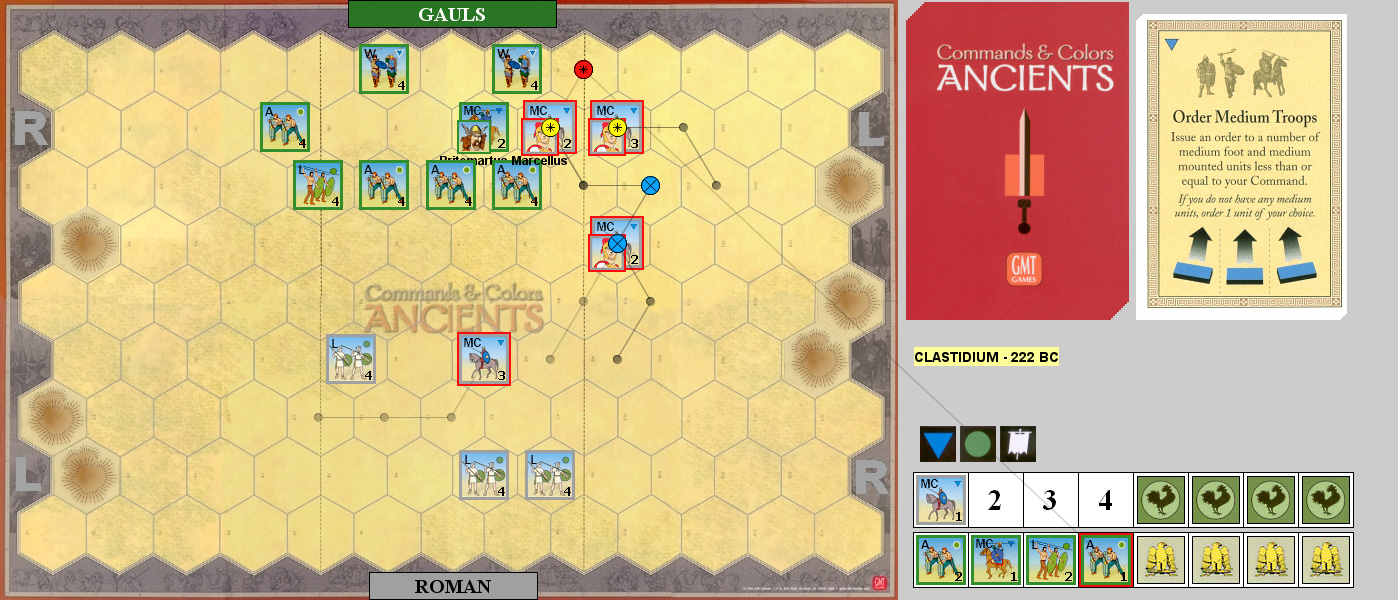
Situation, Russian Turn 1, showing the full board, and hidden elements.
↓ Read the rest of this entry…

 Bowen’s history of the Constitutional Convention is a great read, and makes what at the time would have been endless debates nicely accessible. It breaks into two nearly even parts, where the first is a fairly chronological account of the first half, and the second instead goes topic-by-topic for the second half.