
FB15 The Taking of Object 59
Patch and I finally got back to Budapest recently, starting last December, and finally finishing up at the end of February. Speaking of, the date is 7 February 1945, so the Germans are suffering from food shortage (no double-timing, broken ML is down one), gas shortage (vehicles are immobilized on a 11+ DR when they try to Start), and Ammunition Shortage level 4 (3 for vehicles).
I got the attacking Russians, who are trying to take Object 59—the Southern Rail Station (since re-built). A secondary goal is to instead take three nearby prominent buildings in 6.5 turns. They get eighteen squads (from Assault Engineers, and elites, to 527s), three BVR squads, plenty of leaders, a .50-cal, a MMG, a FT, three DCs (one must go to the BVR), two 122mm ART, three T-34/85s, and one old T-34 M43. They also get 80mm OBA with a HIP observer. The guns come with trucks to haul them around with, and I tried, but as you’ll see, it came to nothing….
The Germans get ten squads (a mix of SS from 658 to 468s), and the Hungarians have six squads (Elite and 1st Line), with a PSK and DC, a 75mm INF, a FlaK 38 (20mm), two each roadblocks and trenches, three wire, and four vehicles: Pz IVH, Hetzer, Zrinyi II, and a Nimrod. They get eighteen mine factors, four fortified building Locations, and one HIP squad.
There’s eight buildings with random rubble checks, and Patch’s rolls knocked down a good part of the city, producing ten rubble counters (at least one of which was falling rubble), and ten debris markers. Patch’s defense largely used this rubble to great effect. There were almost no clear roads through the debris and rubble, and he put his roadblocks on the main two left: narrow streets NN18/OO19 and PP19/QQ20. Way off in the south part of the board were some buildings untouched by the demolitions that could be bypassed for a way for vehicles to get through without Bog (but not for Guns being towed, which I didn’t realize for a bit). He set up almost entirely behind the Kékgolyo utca, giving up a lot of space, but very secure in an extensively built up area. I had to complement him on such a fine cork in the bottle.
With not much visible from my starting line, one ART set up to force him away from PP19. I’d bring up men, tanks, and try to clear the roadblock, getting down the Greguss utca, putting pressure directly on the Rail Station. Five squads would head to the TT19 building to flush him out of there, while the rest would proceed along the south end of the map, though thinly-held territory to BBB15 (one of the secondary objectives) and then continue on to the other two. The primary goal was to take the three secondaries; there was still significant force there, but I could get there with enough time to defeat them. If too much pulled on to defend that section, re-orienting to the Rail Station was still possible.
I failed to contact my OBA on the first turn, and the only Prep was the ART missing ATT on PP19. Patch only had two shots during my MPh, but each one broke a 527; though after one shot, he was disconcerted to see a FT settle in across the street. Most of my advancing fire did little more than put down acquisition markers, but the FT got a result to break a Hungarian squad and the concealed leader with him.
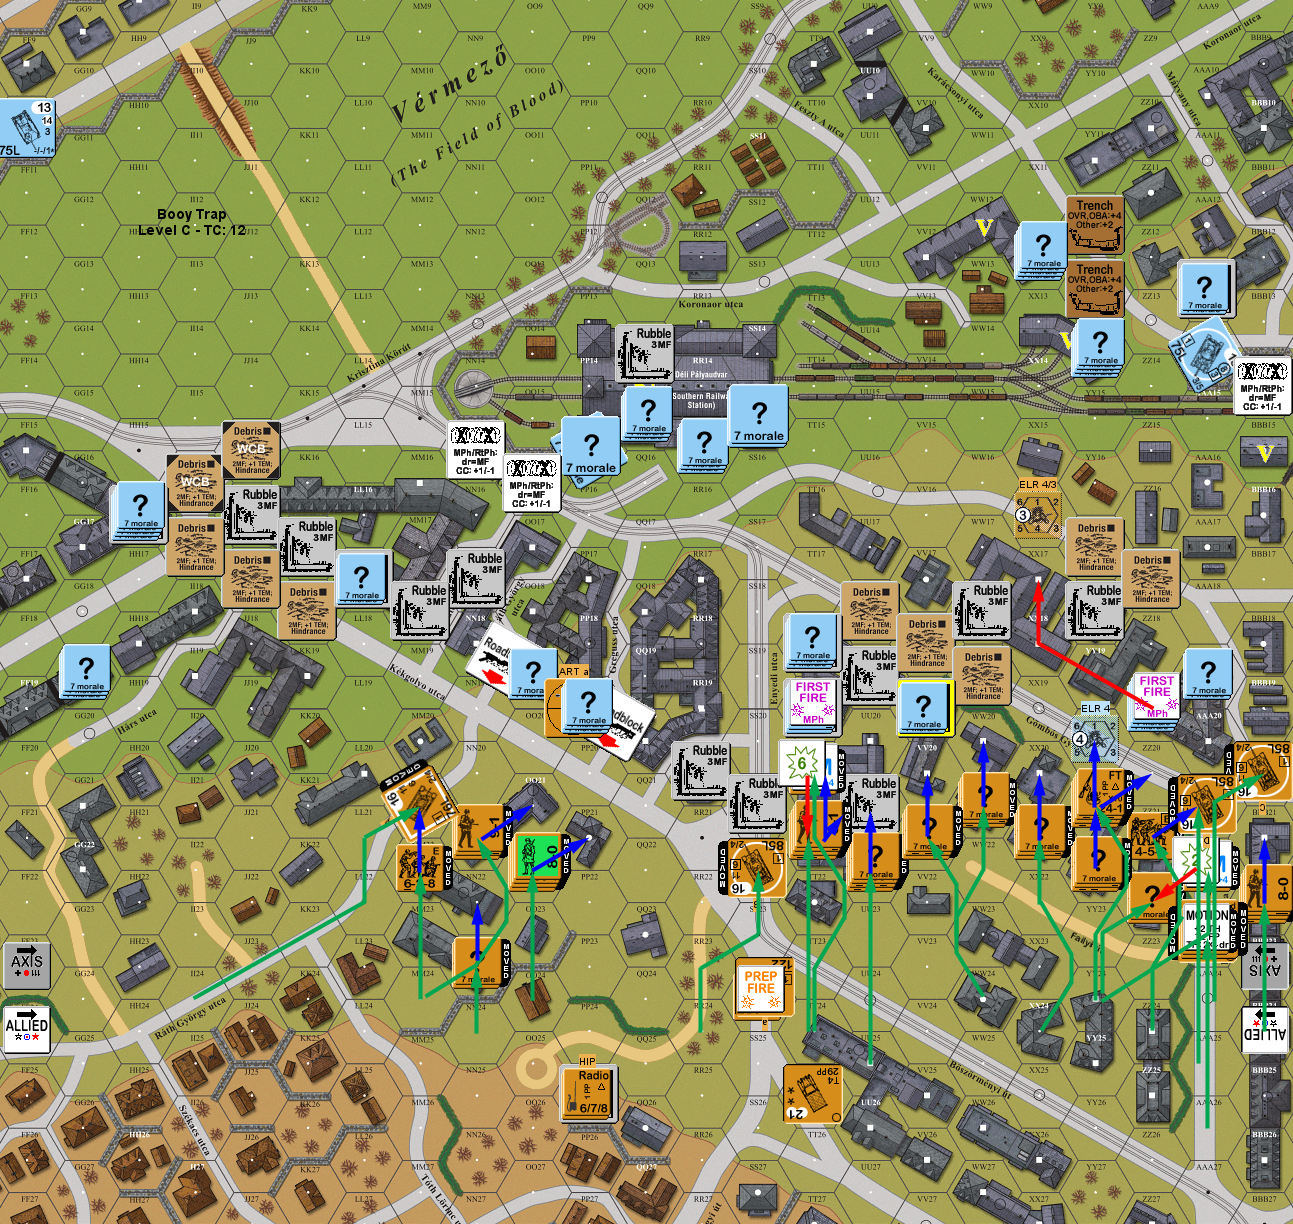
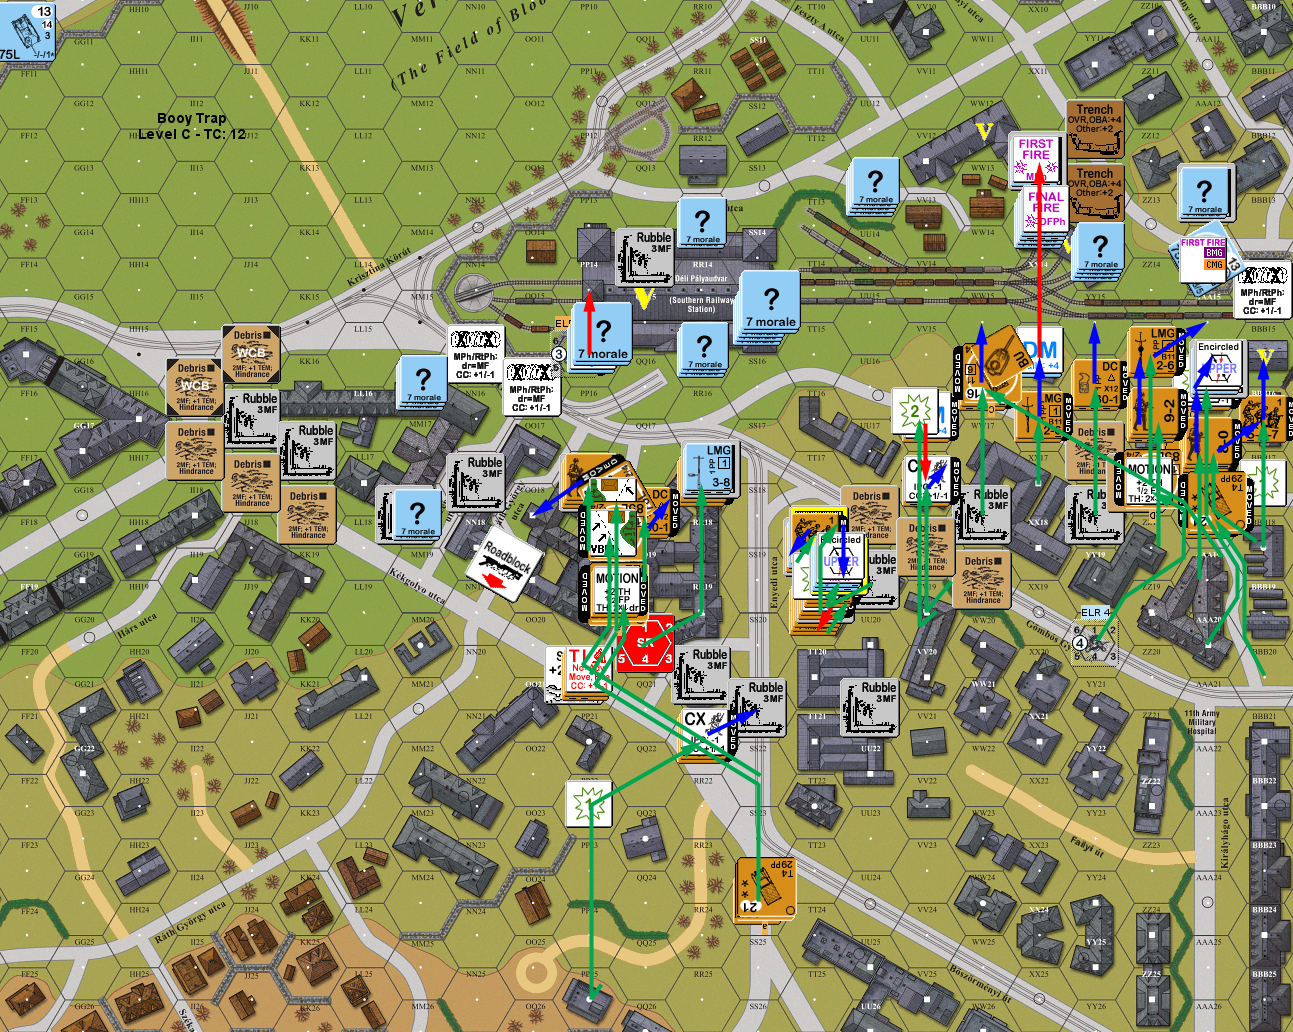
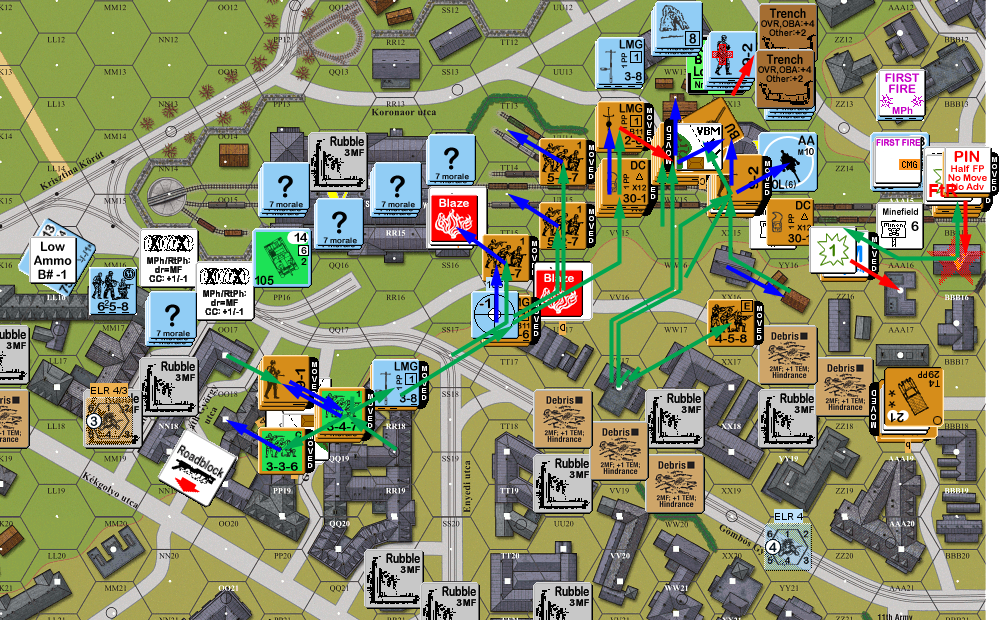
Situation, Russian Turn 1, showing the full board. North is to the left.
Patch rallied his Hungarian 8-0 for his turn, but not the squad, while one of my two squads also rallied. His only Prep sadly broke my FT squad who had advanced into the street. (Visible only due to the rubbling of UU19, which opened up a fair amount of LOS.) He tried moving his other squad out of the TT19 building, but I pinned him before he got far. For the rest, there wasn’t much to do as Patch started reworking his defense to the south, though I did manage to miss the MM19/NN19 crest line, and waste a shot at a target I couldn’t see.
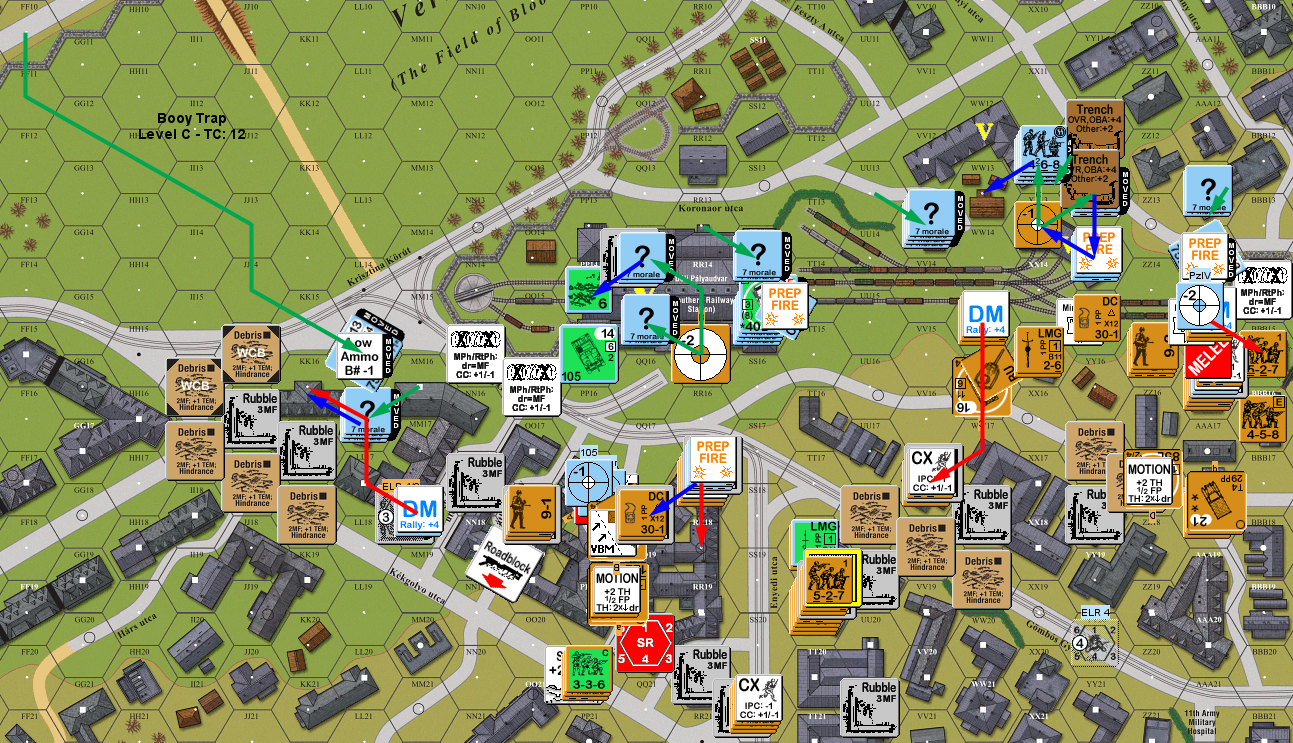
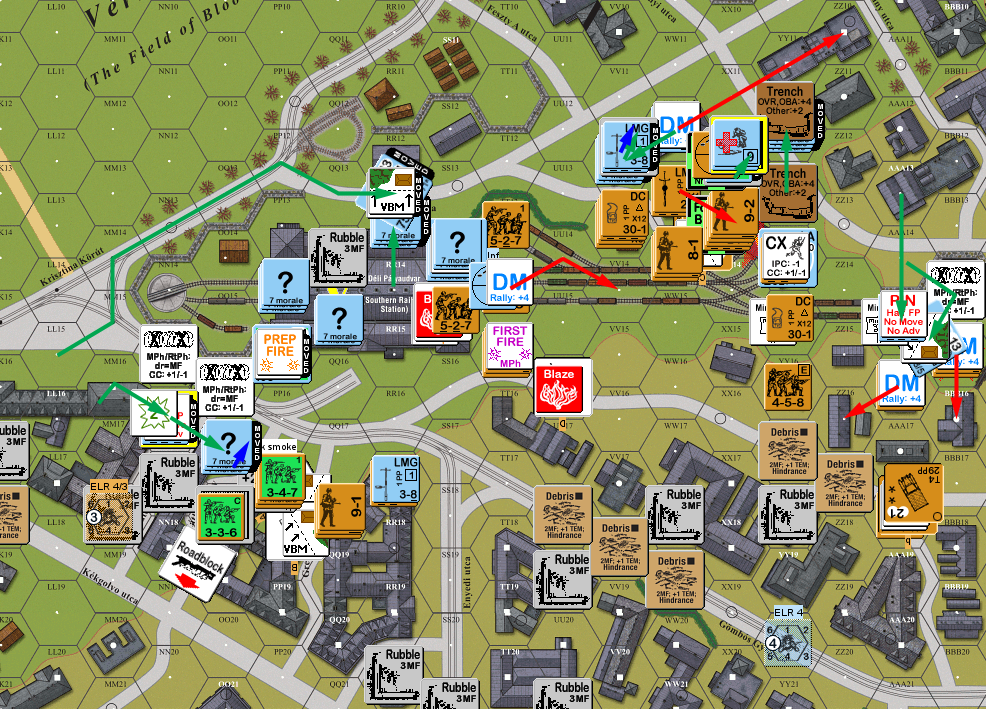
Situation, German Turn 1.
My turn 2 RPh went well, with both of my broken squads rallying, while the broken Hungarian squad in XX17 didn’t. I had completely forgotten my OBA on Patch’s turn (this was a continuing problem through the entire scenario for me), but this time I got contact… but no Access. To my surprise the Russian ART actually has smoke, so SS24 placed Smoke in PP20 to cover my advance across the Kékgolyo utca. My first moves were against VV19h2, who didn’t respond to squads running up outside their room, making me suspect a Dummy (though trying to get a CC Ambush was certainly possible). Moving into the ground floor of TT18 did draw fire, but I passed the 1MC.
Further fire at a squad running up to TT19h1 was ineffective, and a squad Dashing across Gömbos Gyula ut passed a NMC from TT18h2. In the center, I got across the Kékgolyo utca, passing a 1MC, and in position to attempt to dismantle a roadblock on the next turn. Advancing Fire had no results, but a passed NMC against TT18h1 set off my sniper… which pinned TT18h1. I then got into CC there, and eliminated the squad in HtH. I also advanced into VV19h2 to find that it was indeed a Dummy.
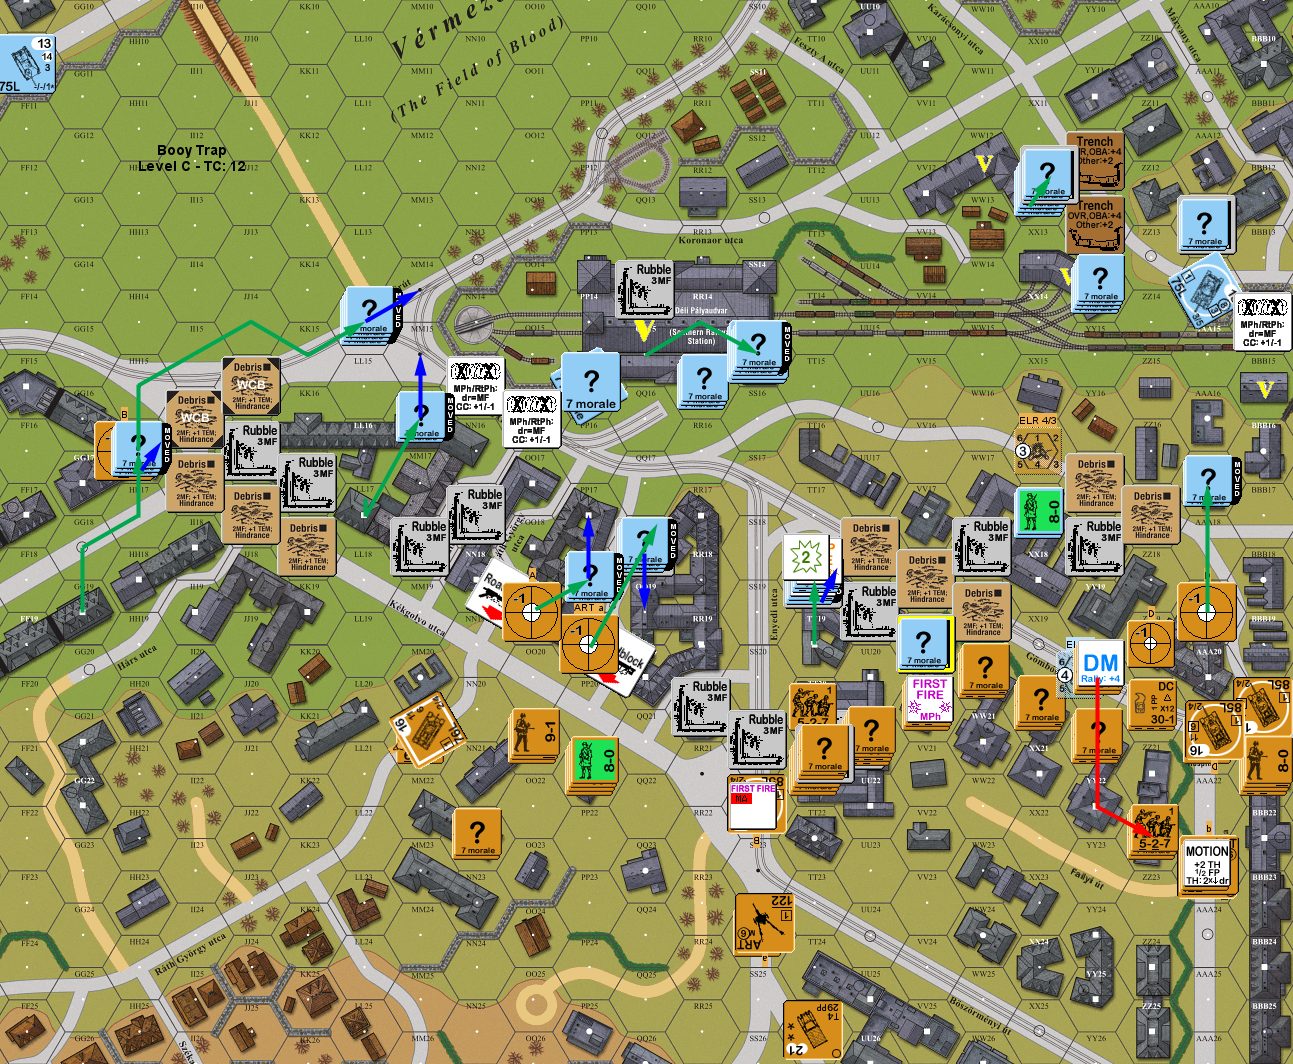
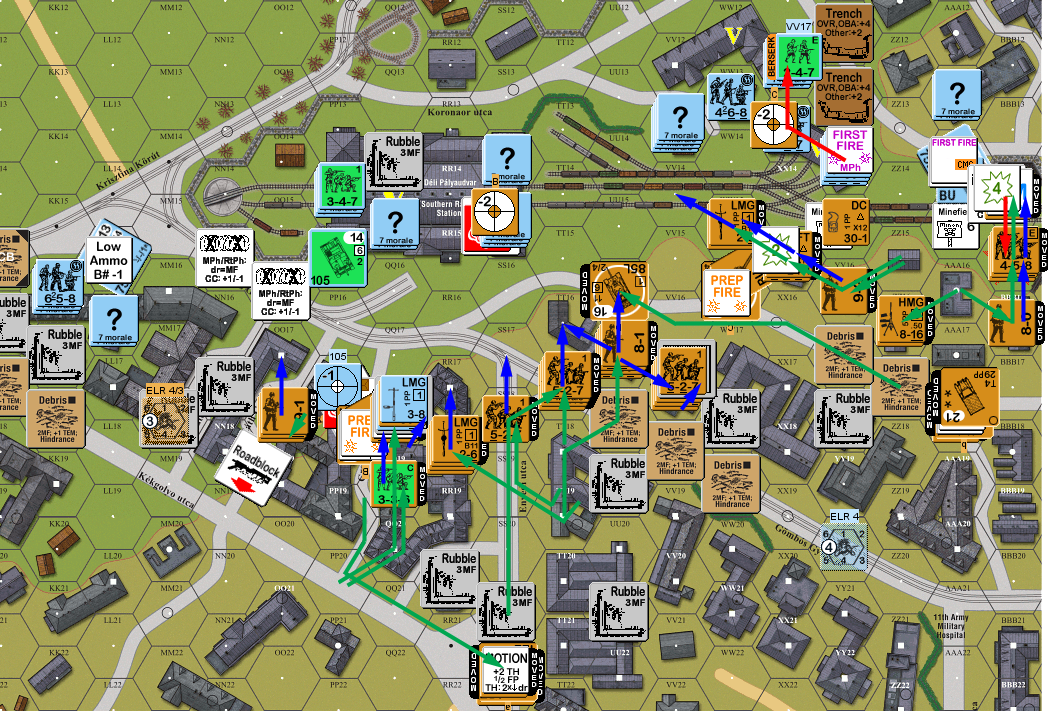
Situation, Russian Turn 2.
Patch’s RPh didn’t do anything (including me failing to recover a Hungarian LMG), but his Prep broke my squad in TT18h1. He continued racing units south, making much better time than I could, as I could not see the lower elevation he was at at all. (Well, maybe a little, with the now-broken TT18h1.) The big surprise was when he revealed a unit in KK19h1, who promptly went downstairs and headed east. I wasn’t headed anywhere near there, and he needed bodies, so he revealed his HIP on turn 2.
This time, I got Access to my OBA, and called for a SR on TT18 (about the only enemy position my spotter could see; Patch: “Does… does your spotter know the guys in brown coats are his army?”), which landed in QQ20.
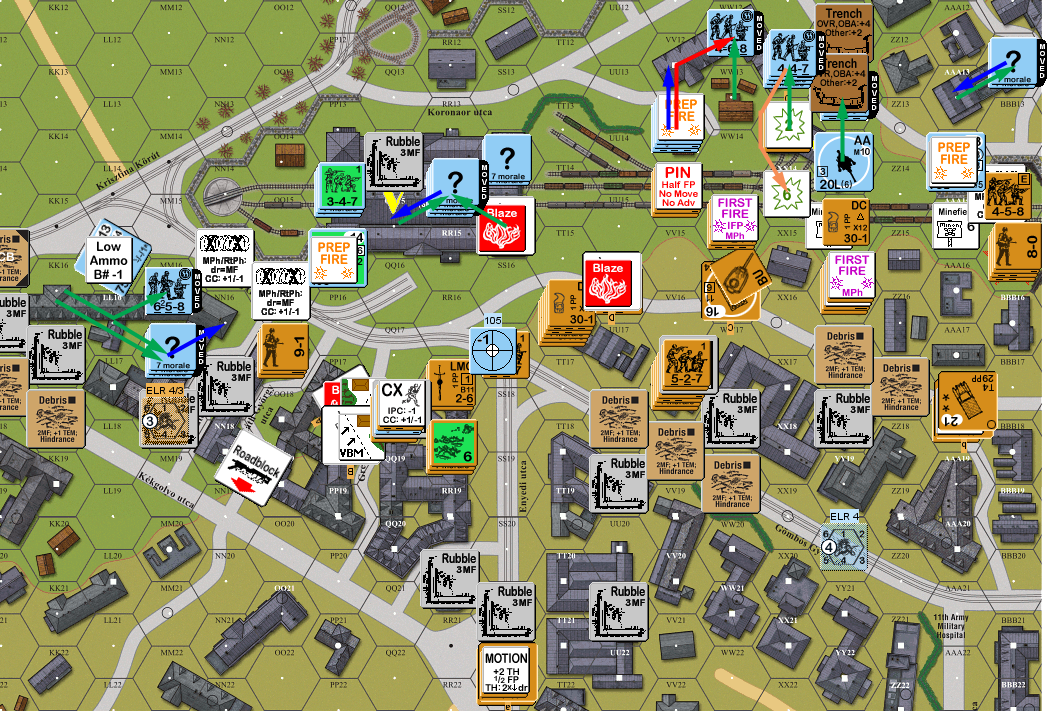
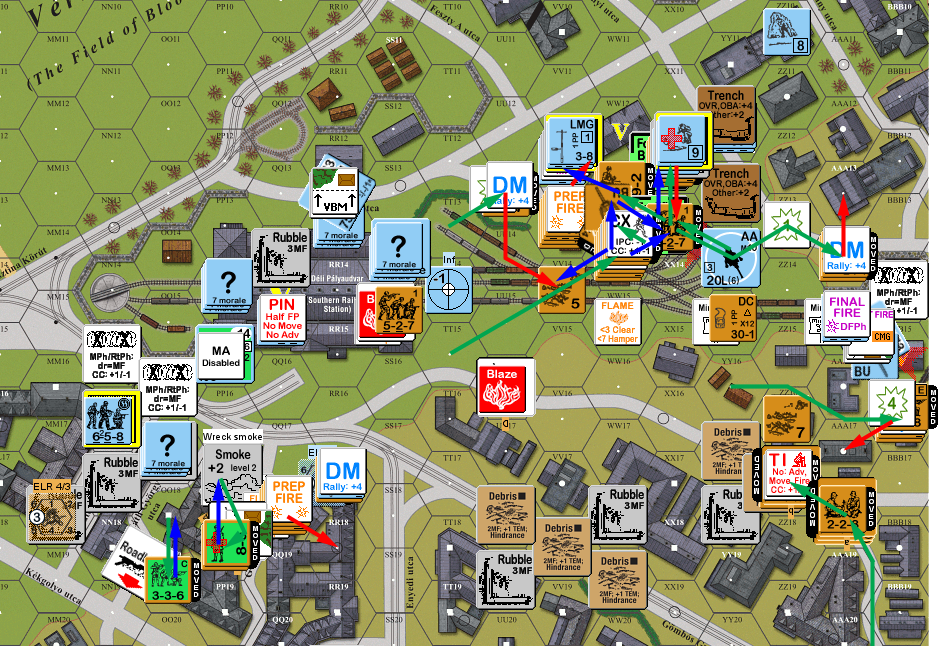
Situation, German Turn 2.
My turn 3 RPh didn’t do anything, and I had no prep (my spotter needed to move; his initial job of driving Patch out of QQ20 was long since done), and my roadblock clearance attempt succeeded with a Final 0! (Two squads in PP20 worked on it, and I would have made a second attempt with the squad in QQ20 if I needed to.) I started my moving squads up to take care of his holdout in TT19h2, but he didn’t fire, keeping them available to be a problem as I moved outside the building. So I raced my DC squad in there, which did draw fire, breaking the squad. It also set off my sniper, who broke a Hungarian squad in PP15.
The 7-0 observer then rushed forward, taking fire from a LMG, but with no result. A rush to and around AAA16 also went in intact, despite fire from h1 and the Pz IV. I rushed a squad from VV19 into the open ground, planning on ending the turn in LOS of the main defensive line I was approaching, but he broke to fire from XX16h1 (which I had forgotten about). A second attempt got into WW16 without trouble. Final fire at RR17 was only a PTC… but a ’12’ set off a booby trap to wound my BVR 8-0, and both units were pinned. The Hetzer shot at the T-34 M43, who’s nose was sticking out of the alleyway, and thankfully missed, going under Low Ammo. Then the Zrinyi II took a shot (from PP15) and burned it. The alley was sealed again.
He malfed his LMG in TT19, which I also pinned in AF. His squad in XX15 was forced to take Interdiction in RtPh, and was reduced. I advanced into, and captured, BBB15, giving me the first of my objectives, with four turns to go. However, advancing into AAA15 and YY15 discovered mines (making it obvious where the third hex was). Worse, my DC squad was wiped out (2 DR). I got a CX 527 into CC in AAA17; I figured the odds would at least keep him tied up in Melee, even with the CX penalty, which is just what happened, with no result. In TT19h2 I got Ambush, declared HtH, and wiped out the 548 there.
Situation, Russian Turn 3. Illegal Gun movement, let me count the ways, though it came to nothing in the end anyway: The ART needed to be limbered (which could have been done last turn), hooking it up is 1/2 MP instead of 1/4. …Which says something about how rare attempting something like this is. Also, I initially tried to send the other truck around the debris… but you can’t use VBM while towing.
I rallied one squad for Patch’s RPh, but missed out on another, and his self-rally failed. My LMG squad had successfully survived the mines, and the Pz IV’s MA merely got a Low Ammo marker firing at them, but the machine guns broke the squad. The MMG squad in YY14 opened fire… and a ’12’ followed by 4,4 RS reduced the squad to a 447 and eliminated the MG from ammo shortage. RR17h1 broke the squad in h0, and the Nimrod in SS15 revealed itself to fire on WW15, breaking them on the third shot. However, my sniper went off, breaking his former HIP squad, which naturally turned out to be a SS 658.
Patch reshuffled some more, avoiding RR15, and pulling out of XX13 (including the Hungarian leader going to the broken Hungarian HS). The Hetzer moved from it’s position across the Field of Blood to get LOS on the ridgeline I’d shortly be using, sadly passing its fuel roll with no trouble. I tried to correct the OBA to SS17 (since I needed to be able to see a Location; otherwise, I’d go for SS15), but since the observer couldn’t see the Germans in RR17h1 (who I hadn’t thought about), that got a Red extra chit draw to lose my access again. The rest of my Final Fire did nothing except raise unusual rules questions (we thought I’d pinned QQ15 for a moment, then I realized my shot was affected by the smoke of my burning T-34).
I was feeling a bit worried as my routs were piling up broken squads where I had no leaders (something I’d avoided earlier, and helped keep momentum up), but at least my 628 got out of the mines okay. Patch went into CC in QQ18 and declared HtH, killing my BVR DC squad, who at least reduced the Germans in return. He also converted the Melee in AAA16h1 to HtH, which eliminated both sides.
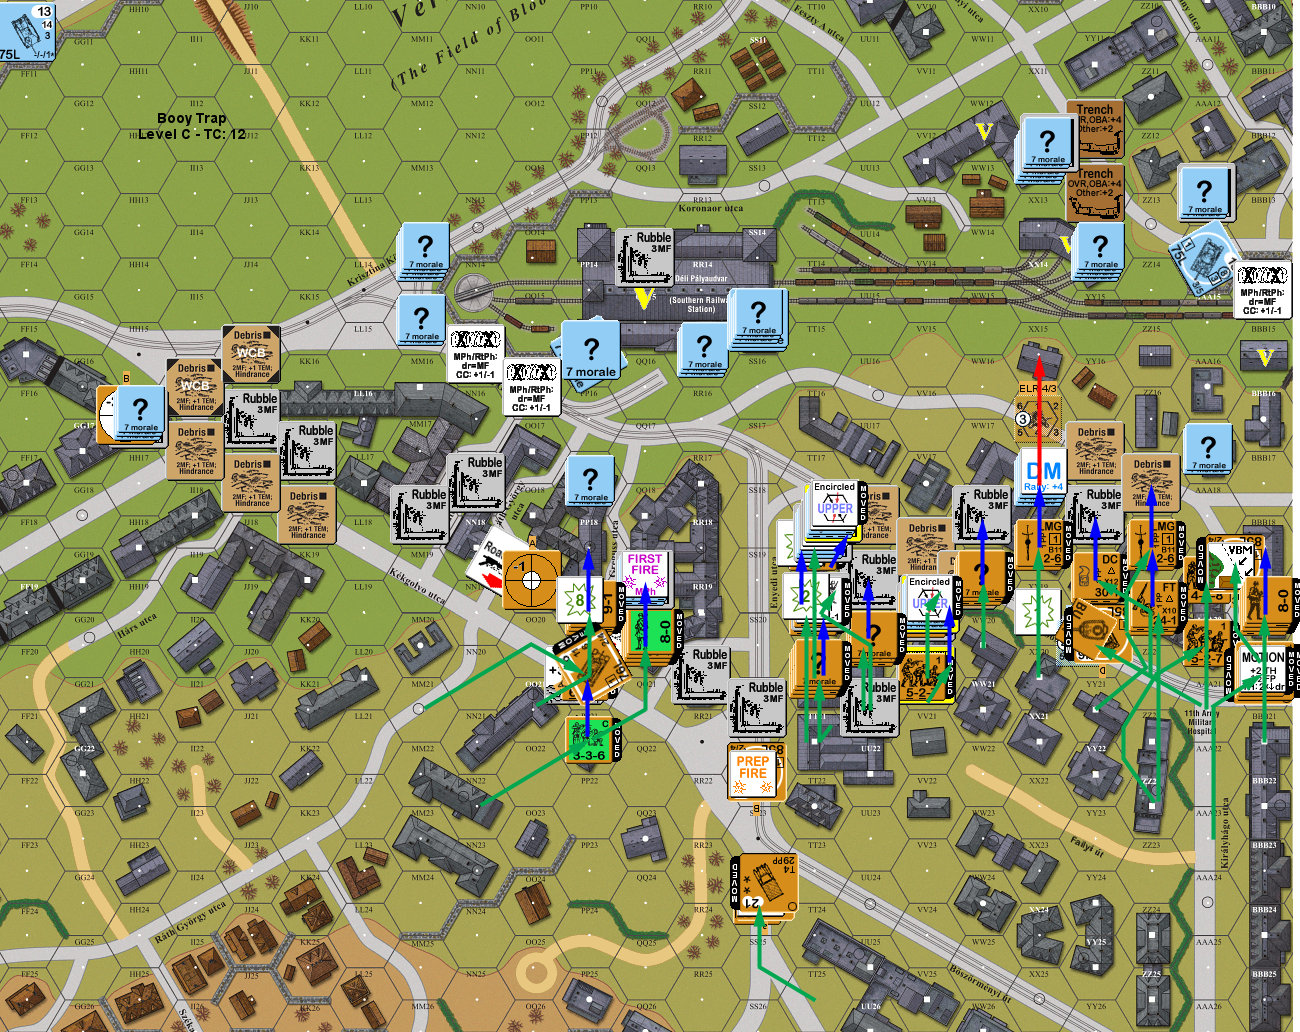
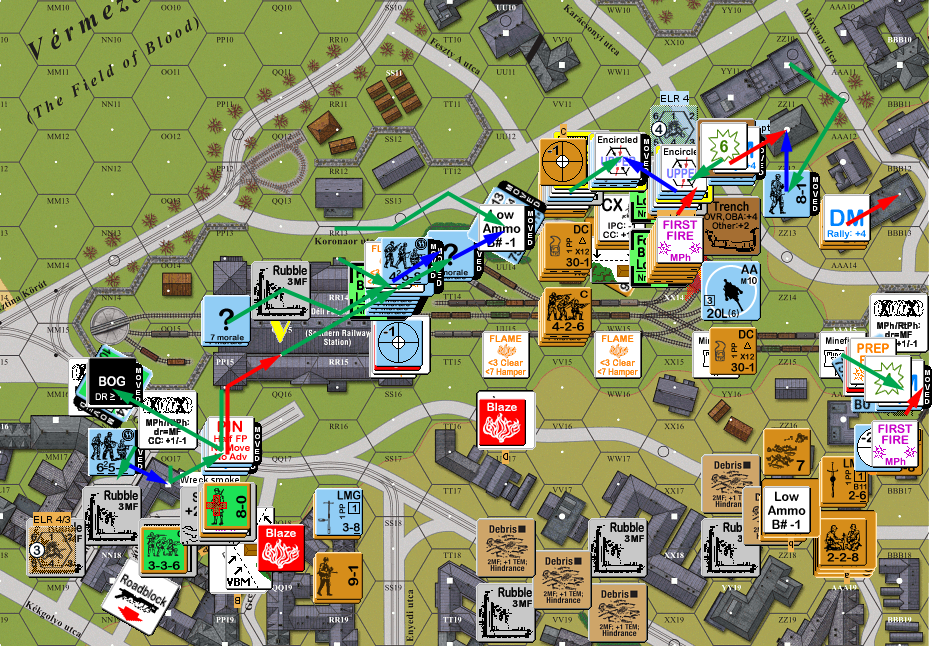
Situation, German Turn 3.
I self-rallied a squad in VV17, and (barely) rallied another in TT19, leaving me with three broken squads (including a BVR). Patch got the SS back in KK16, and the Hungarians in PP14…and the HS in XX12 went berserk! (They could just barely see VV17h1.) For my prep, the remaining T-34 in the alley got a hit on the Nimrod, blasting it to pieces. I did my best to distract his HS in QQ18h1, but they picked up my DC, and dropped it out the window on top of my T-34/85 to kill it. Worse, I parked another in UU16, not realizing that it was in clear view of both the Hetzer and the Pz IV. I sent another squad to try and get at the Pz IV, but its CMG broke them as they entered the hex.
Advancing Fire was pretty good, with my FT getting a 2MC on YY14, breaking his 9-2 and pinning the squad there. Then email came back, and I found out that his 20mm AA was there! The FT broke the crew. Further fire wounded the leader, and then eliminated the Gun crew on a double-break, leaving the 658 there alone. My squad in BBB14 successfully got under the Wire to rout out. I sent a 628 against the HS in QQ18h1, and killed it in CC for no losses.
Situation, Russian Turn 4.
Patch’s 9-2 failed to rally for his turn, but both of my squads in BBB15 rallied, along with the squad in VV17. The Pz IV hit UU16 on the first shot, and burned another T-34, then turned the turret to fire the CMG at my squad in BBB14, getting a NMC which they passed. The Zrinyi missed its shot, and VV13 only pinned my adjacent squad. The berserk charge swung around XX13, surviving HMG fire, and then barely succumbed to an adjacent shot from WW15; I had not wanted to waste the T-34’s shot or the FT on that, and it barely avoided coming down to that.
The final indignity to my OBA attempts was the radio malfunctioned on the contact attempt. I managed to break his 8-1 in VV13, but didn’t affect the squad. I thought I had managed a pin on the squad in XX12, but found out the Location was fortified (probably along with the rest of the ground floor….). Flames spread from the burning Nimrod to the hex, which made my current thoughts about still going after the Rail Station a bit trickier….
Situation, German Turn 4.
I started my turn 5 with some grave concerns. The OBA was out of action, both ART were useless (I continued trying with the nearer one, but pushing through two hexes of debris and unlimbering was just unrealistic to expect), I was down to one tank, and was facing fighting through a nine-Location (plus cellars!) fortified building. By this point, Patch was predicting a win for me, with good reason, but I’d been here before….
I rallied my last squad (RR18), and Patch got his wounded 9-2 back for my RPh. My squad in BBB14 got under the wire, and was joined by another squad and my 8-0. The Pz IV fired the CMG at the first move, and residual affected everything else, but all that happened was my 8-0 was pinned on top of the wire, while the second squad managed to get under by forgoing AM (and surviving residual a second time). The last squad in the area tried racing north along the crest line to get at XX14, but AAA13 caught him with a 1MC to break them (I had figured him as a Dummy, since he hadn’t been doing anything to shore up the defense other than threaten to help out the Pz IV if I could ever get past the wire and mines).
Mostly, I flooded the rail area with as many men as I could. I was going to need a fair number of bodies to suppress Germans and hopefully get access to the final victory building. The Pz IV used the MA in Final Fire, hitting BBB14, and getting a ‘2’ to kill one squad outright, and break the leader and remaining squad. He also broke the LMG squad in VV13, but the stack in WW14 survived a NMC without trouble. In return, the FT got a 2MC/1MC on XX12, breaking the 9-2 again, and reducing the squad on a ’12’ to a broken conscript HS. A good attack also pinned his squad in VV12, revealing that the Location was not fortified.
My best assumption at that point is that he had fortified all of XX12, from cellar to h2. Things took a turn to the complicated when my leader in BBB14 failed to get under the wire, and died of FtR. This left nothing in the area to protect my first victory building, and little chance of anything in the area rallying. The good news was that Patch would have to get past his own mines or wire to retake it. I got another surprise in advance. I got into both hexes of building XX13, and that hex turned out to be fortified. So… Patch had scattered them about?
Situation, Russian Turn 5.
Patch generated Gusts for his turn, and didn’t get any rallies, but I managed to rally a squad in WW14. I had mostly pushed for the last victory building, but I also had four squads in and just outside the Rail Station so he couldn’t just empty it to reinforce the main goal. It turned out his INF was in SS14, and it got a critical hit to reduce TT14 to broken conscripts (‘only’ a 3MC). And then his next shot was a ’12’ to eliminate the MA on the Zrinyi II.
Patch was every bit as alive to the possibility of re-taking BBB15 as I was, and his first cunning plan involved loading AAA13 onto the Pz IV, driving into bypass of BBB15, and using the turret to force a Bail Out into the building. But that took too much movement, so the squad had to Dash into the minefield… where they pinned, giving me an extra turn to find a defense there. He tried to reshuffle in the final building, but was hampered by the fact that the FT was next to the fortified location. I managed to reveal his only remaining concealed squad (without affecting it) in Final Fire, and more importantly, pinned a 658 in YY12, which meant he was stuck outside the building for the next turn. The bad news was that I malfunctioned my HMG. Advancing Fire broke my squad in WW13. Gusts cause fire spread into PP17 and WW15, and normal spread started a flame in QQ18.
Situation, German Turn 5. (Small error, we didn’t think about the fact that BBB16 was still actually adjacent to the Pz IV.)
My turn 6 started with more Gusts. I just barely missed my self-rally in BBB16, but did rally the squad in XX13. Patch had rather thought his defenders would be broken by now, but +3 terrain can be really tough. That said, I was still well set for a try on my turn, and pinned his squad in VV12h0. My MMG finally got a proper result in the Rail Station, revealing and pinning a 468 in QQ15. Unfortunately, his sniper went off, and broke RR17, who I had planned on racing over to ~YY16, where he could be part of a probable final turn push to retake BBB15.
My plans for the turn were a bit delicate, since I needed to get into the building, and try and get at as many of his troops as I could as I only had one more turn to take it. Despite that, moving into XX12 wasn’t a big priority, since the main thing was to be in there at the end of my turn, so YY12 would have trouble moving back in. TT13 moved towards in the hope of taking a lot of fire to stop, but he broke on the first attack. My FT went up the slope to try and burn him out of AAA15 before he could retake the building, and survived two attacks fine, then declared CX to get into AAA15. Patch hated to do it, but declared FPF, and broke me with a 2MC.
Final Fire pinned the contents of VV13, the squad I did put into XX12 broke (keeping them from advancing upstairs). Advancing fire from WW13 got VV12h0 with a ’12’ NMC roll to reduce him to a broken HS; leaving him with a 658, 8-0, broken/wounded 9-2, and two broken HS in the third building. Gusts produced flames in UU15 and SS14, the flame in PP17 went out… and QQ18 converted into a blaze. That forced a self-break and abandonment of my MMG. My advances put a squad into VV12 and XX12, forcing upper-level encirclement for the building, while my PPATC in BBB16 failed, so I couldn’t try to get into the first building to kill the Pz IV and possibly keep the building in a Melee. I also tried to advance into SS14, but found it was the third fortified Location.
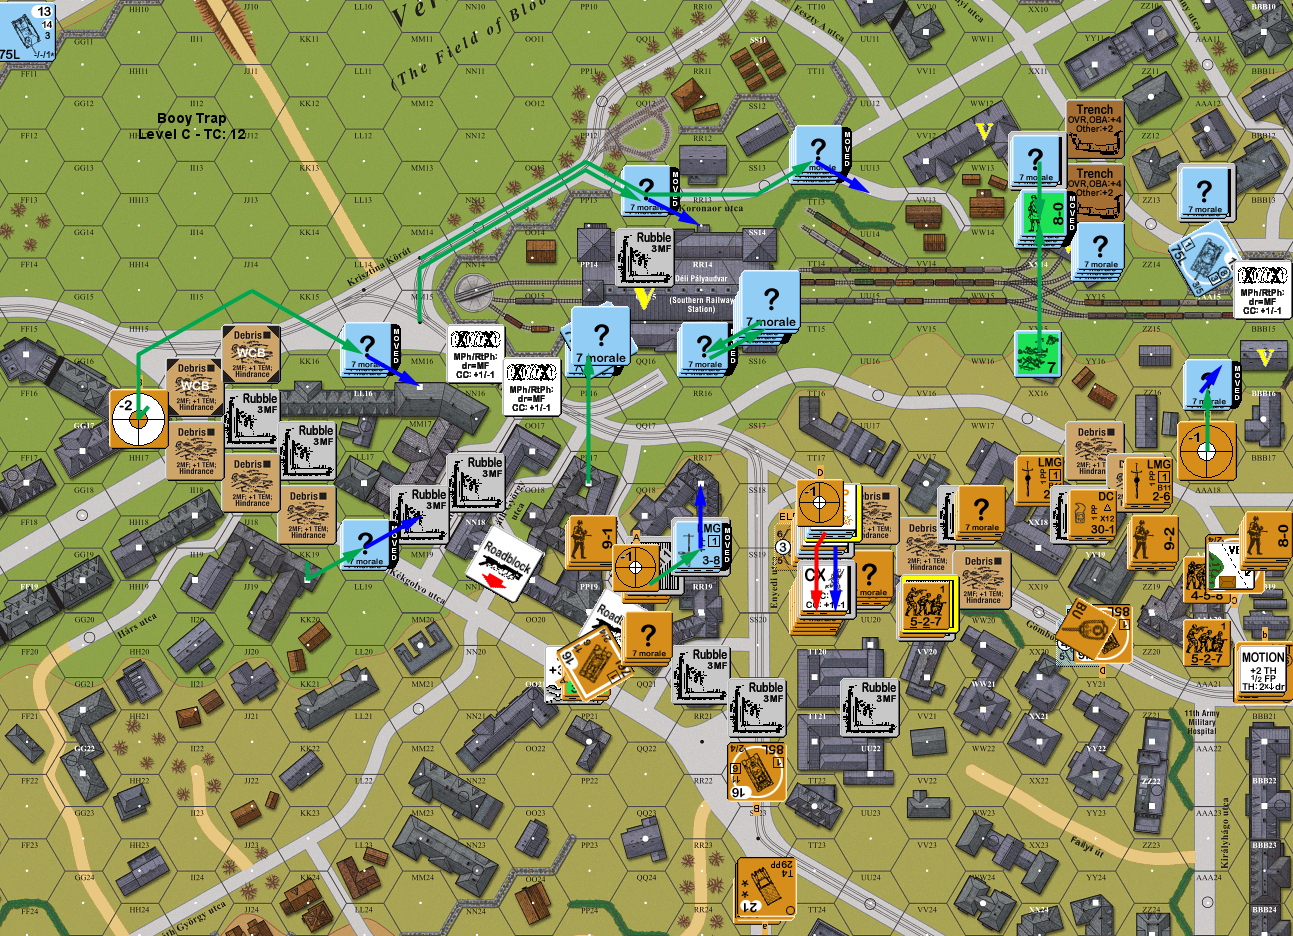
Situation, Russian Turn 6.
Patch managed to rally his wounded 9-2 and his 8-1 for his last turn, while I rallied the squad in XX13, the singed squad in RR18, and both squads in VV14 (one of which battle hardened to a 628… on a 12 HoB, but there were no Germans in sight), as well as repairing the HMG. The INF, out of other targets, turned on SS15, hit through the smoke, and got a 1KIA to eliminate my squad. He then created a problem for himself when the Pz IV fired on BBB16, hit, and the squad went berserk on a HoB! He tried two more ROF shots with the MA, but only managed to malf the MA.
Pat moved into the first building (with a NE from the mines), and my squad rolled another ‘2’ for a 2MC that broke the SS squad. That more-or-less gave me the building back, as I’d charge in, kill the squad for FtR if they went upstairs, and recapture the building (and I’ll note that I think he should have advanced in; moving meant that he’d take it before I could even fire, and is the best move… up until I was berserk, and guaranteed to get in; after that, it was better to avoid the point-blank shot). The defenders of the station started massing to put pressure on me, with the Hetzer moving up to UU13. The Hungarians in OO17 tried to join in, but they were stopped by adjacent fire out of the smoke in PP17. He then tried to get back into the building by placing a DC for a breach attempt from YY12. While he could do it from the comfort of the trench, it was in view of my 9-2 and two squads, who broke the squad with a 2MC.
Final Fire broke and ELRed the Hungarian 8-0. Flames spread to RR18 and PP18, and SS19 only didn’t go up in a blaze because it was fortified (that would have been exciting).
Situation, German Turn 5.
I self-rallied RR17 for my final turn, which was nice, but didn’t do anything for the major problem. There was a squad and 9-2 in WW12h2. With no stairwell in that hex, I needed to move into VV12h2 or XX12h2 for CC or even FtR, if I broke the squad, and there were broken HS in both those locations. My 9-2 came through again with a 1MC that broke everything in WW12. Then the T-34 MA hit VV12h2 for a 2KIA… that thankfully didn’t rubble the building. (That was also the third ‘2’ IFT roll from an Ordnance hit this game… the other two had been Patch’s.)
That left surviving getting up the stairwell into h2. After my ‘zerkie charged into BBB15, and survived a MC from the Pz IV’s CMG, a 628 placed a DC on the Hetzer, entered the building, and started climbing. The Hetzer fired at h1, they survived a 1MC, he tried again with the TT13 stack, they survived another 1MC, the stack fired a PSK, hit, and the squad survived another 1MC.
And that was effectively game. We never did resolve the DC.
Afterword
Well, that was a tense fight from the start, but the pressure just kept ratcheting up. The Pz IV probably gets MVP for the Axis, as it carried a lot of weight by itself, and broke three units with one shot, which led to the entire end-game fight over BBB15. I figured he’d have the game won if he took it, as re-taking it was too unlikely. My final plan was for the squad that went in, the two gun crews, and anything else that I could get in the area would try to swarm the building, and hope I passed enough PAATCs to do something. Going berserk was exactly what I needed, and breaking the 658 just made the job a lot easier.
This is at least the third time I’ve tried to take a large building from Patch, and the first time it worked. If he had stopped my winning 628, I would have had another four squads to try the same thing with. I had nearly tried self-rally on the DM FT squad, but it was too unlikely, and I was looking at a rush at the Rail Station as well.
The fourth fortified location turned out to be PP14. So I wouldn’t have been able to take the Rail Station. It’s a good thing the main attack worked.
I do think one of Patch’s big mistakes here was setting up too far back. I got to move quite far in the first two turns because of that, and things didn’t start until I was uncomfortably close to the goals. Now, the rubble and debris gave him an excellent natural defense line, which he made the most of (and those two roadblocks where highly annoying), but some form further delay in front of them could have done wonders for time pressure.
The other problem was being mostly oriented to defending the Station. With good reason; I suspect the vast majority of games have the Russians going straight for the main objective. But the southern sector was a lot more open, where I could at least get tanks through if not (as turned out) trucks. The mines were well-placed to blunt some of that, but still let me get into the rail line, which was nicely central to all the various goals. I also managed some really good luck, with the best flamethrower use I’ve had, and being able to flush him out of the second building pretty easily, despite the fortification.
The problem with pretty much any ‘big city’ HASL, is that the scenarios are going to come down to ‘how slowly can the defender lose’. Other FB scenarios have tried to distract from that with reinforcement purchases and other clever ideas. This is a big smash up, and take the building in the time allotted scenario. And it’s one of the betters of that type I’ve seen, mostly because of the two possible goals.
Oh, and I would like to point out to the Hungarian Tourism Board that it’s Patch’s fault that the city burned down. Again.
Discussion ¬