
FB16 Crossing the Bloody Meadow
Patch and I returned to Budapest for our latest ASL game. We’re approaching the end of the set, and dealing with the final desperate days for the Axis defenders. In fact, this one is something of a direct sequel to FB15, with the final Soviet attempt to take the Central Rail Station. This time, the German defenders are completely cut off, and all the way down to ammo shortage level 5. However, there’s a relieving force on the way, that needs to cross a large, open, park to get there.
This is one of the more prominent features of the FB map, and we’re just now getting to see it used. The Germans (SS) in the Rail Station set up first (five squads, three guns, a single wounded leader, and wire, mines, fortified Locations), with the Russians setting up in two groups around it. Five squads set up in the area directly east of it (with eight “?” as well, which made it look a lot tougher to me), and another ten squads (with all the heavy weapons, including a FT and two T-34/85s) set up to the west. The Axis gets to set up the rest of their forces after them, with three SS squads (each with a MG) setting up SE of the action, and other ten squads (some German, some Hungarian, and including three Hungarian assault engineer squads) get a more extensive set up area that includes the area east of the Field of Blood. These guys are only at ammo shortage level 3. And on turn 1 a Hungarian StuG enters. The Russians need to take all but one Location in the Station in six turns, but the Axis can trump that by getting one or more of the squads from the Station out and off the east edge of the map by the end of the game.
I had a hard time figuring out a defense… or what Patch’s offense was going to look like, so I completely muffed my initial set up. I was more worried about the guys in back than the ones with the heavy weapons, and all my guns were pointed the wrong way. The wire was set to slow down an attack up the rail line, which Patch promptly didn’t do (to be fair, I think that was generally a good idea, as letting him get close under the cover of rail cars would be nasty. The fortified Locations were on the north and south ends of the building, and probably should have been grouped (possibly 3 in one corner and then the fourth separated just to force a split of attention). Most of the mines were visible in SS16/TT15, and it wasn’t until we started that placing them in the exterior building hexes occurred to me. As it was, it helped channel things, but mining the front side of the building would have been a lot smarter.
Patch set up a platoon under the turntable in NN14 (just barely in his area, and I didn’t think of that either). And a special assault force in UU16 with the FT, a DC, and a T-34 to cross the visible mines. All the last set of Germans went in close contact with the eastern Russian force to try and stop them and advance on the Station, while the Hungarians all set up to cross the Vermezo with cover from shellholes, gliders (from a resupply effort), and smoke grenades.
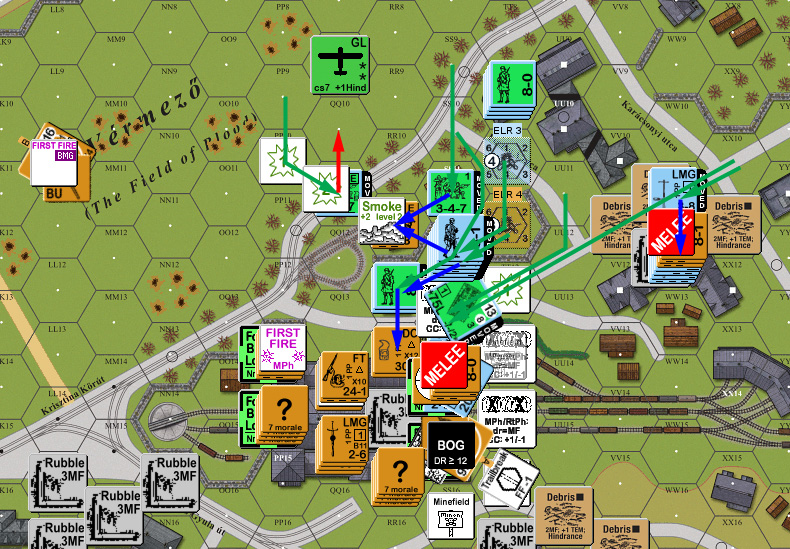
Patch’s first shot was a 8FP ‘2’ to reveal a dummy and ELR/reduce a 658 when they rolled 12. The FT also did well to reveal and break the other 658. Then the T-34 rolled across the mines and broke through the fortified Location and bogged in the hex now that its job was done. The rest of movement was him creeping forward, and I didn’t bother to respond to most of it, but a squad moved into the open street, and I revealed a 20mm AA to break them.
To my surprise, most of the big stack under the turntable stayed in place, but Patch wanted to know more before committing them. Final Fire did nothing other than put my AA under a Low Ammo counter. Advancing Fire didn’t do anything, but he revealed PP14 as fortified in advance, and got into CC with the AA crew, killing them easily.

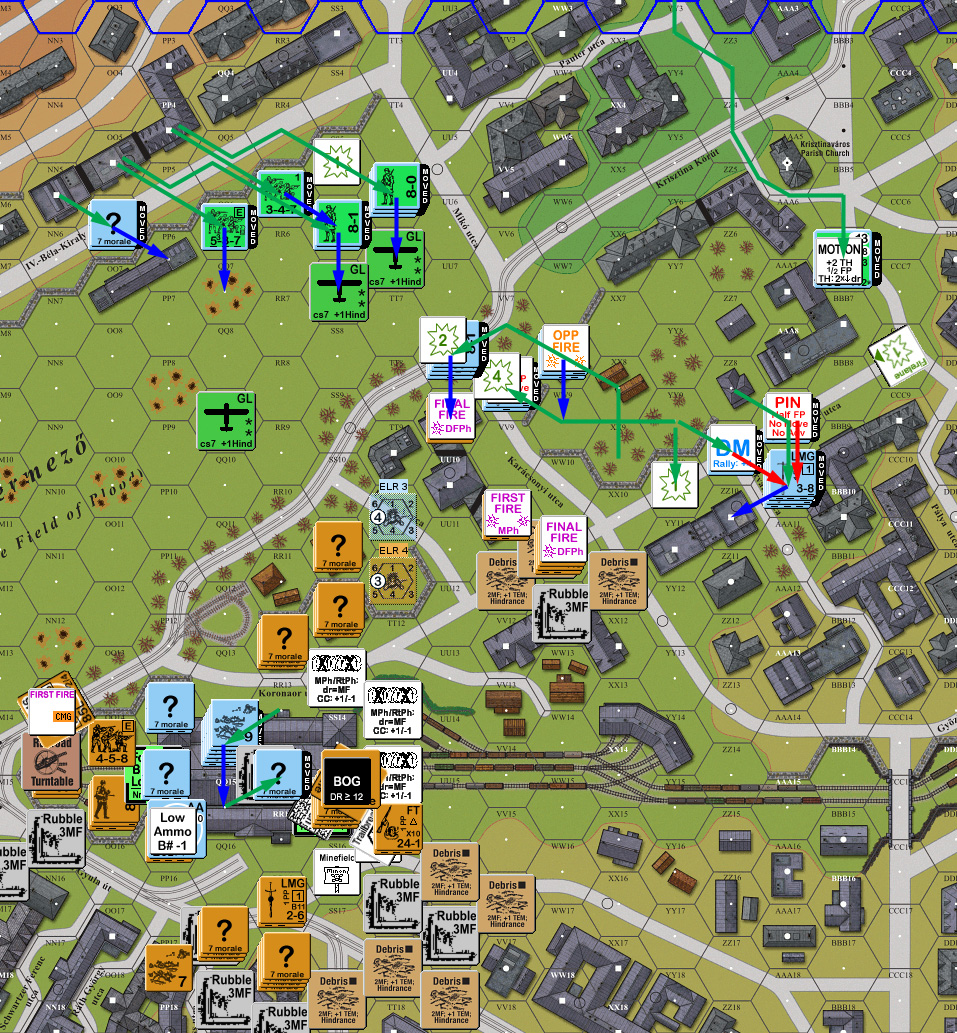
Situation, Russian Turn 1, showing the full board, and hidden elements.
I didn’t manage a self-rally, and Patch grabbed my AA Gun in my RPh. Part of my set up was to go across the Koronator utca, and drive towards the station there. Patch just moved a large “?” into debris looking down it, giving me a much more complicated puzzle for how to advance there. So I put the MMG over there under OpFire for after he revealed most of the initial line of defenders, and I contemplated OpFiring the PSK, but didn’t.
So my first move was a Dash, and Patch set a LMG firelane down the street to break him, but the second squad made it across safely, as well as the third, but my 9-1 was pinned in the street. My next attempt was to move against the other flank, and he pinned my squad in the street. Then I put a stack even further around that flank, which took three shots without being affected. A final Dash across the Koronator ended up malfunctioning the Russian LMG, but then fire from the squad got a 1KIA to eliminate them and their LMG. Meanwhile, the Hungarians started across the vast open… which went slower than expected thanks to having to go over a wall and change elevation.
Final Fire revealed and pinned my squad in PP14, but nothing more, and my advancing fire was ineffective. I self-broke the 9-1 to get him out of the open. Patch considered self-breaking UU9, but figured he’d never get out from under DM, but I Ambushed him in CC to kill him in HtH.
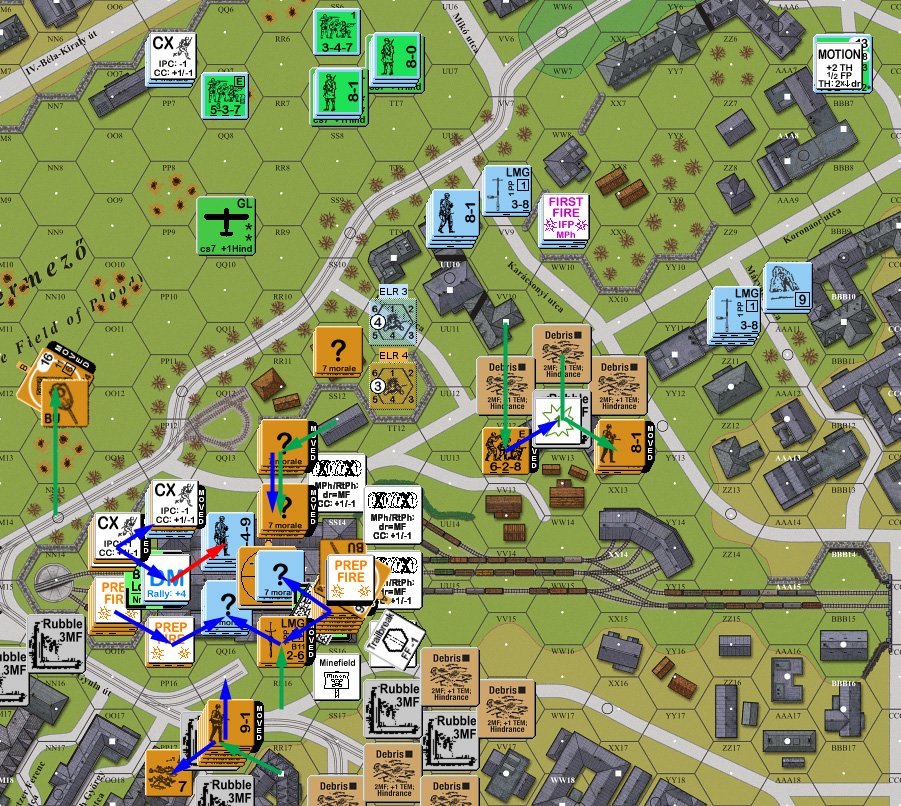
Situation, Axis Turn 1.
I had to reveal my wounded 9-2 for rally on Patch’s turn, but the 658 HoBed to generate a hero, making the situation in the Station much more interesting. Then the broken HS there also HoBed to battle harden to a 348. Patch took two shots at PP14, and broke the squad on the second one. He charged PP15 to place a DC on it, and I stayed hidden to keep it to a 12FP +4 shot, which did nothing. (This caused some rules reading; trying to put a DC on a hex that is not known to be fortified brought up some questions.)
Patch crept towards and into the Rail station, one stack turning out to be Dummies when I fired at them from adjacent. In the east, his forces fell back in front of the advancing Germans. Final Fire revealed a 628 in SS11. I’d hoped for something smaller there, but it was very useful to know. His FT got a 1KIA in AFPh against RR14, which thankfully was just a Dummy (and amazingly, Patch did not set the hex on fire).
He piled two squads into QQ15, where concealment let me get Ambush, and I decided to sacrifice them to try and thin out the Russians, going HtH on a 5:5 attack that killed him. Sadly, the remaining 628 managed a CR even with me concealed to reduce and reveal them.
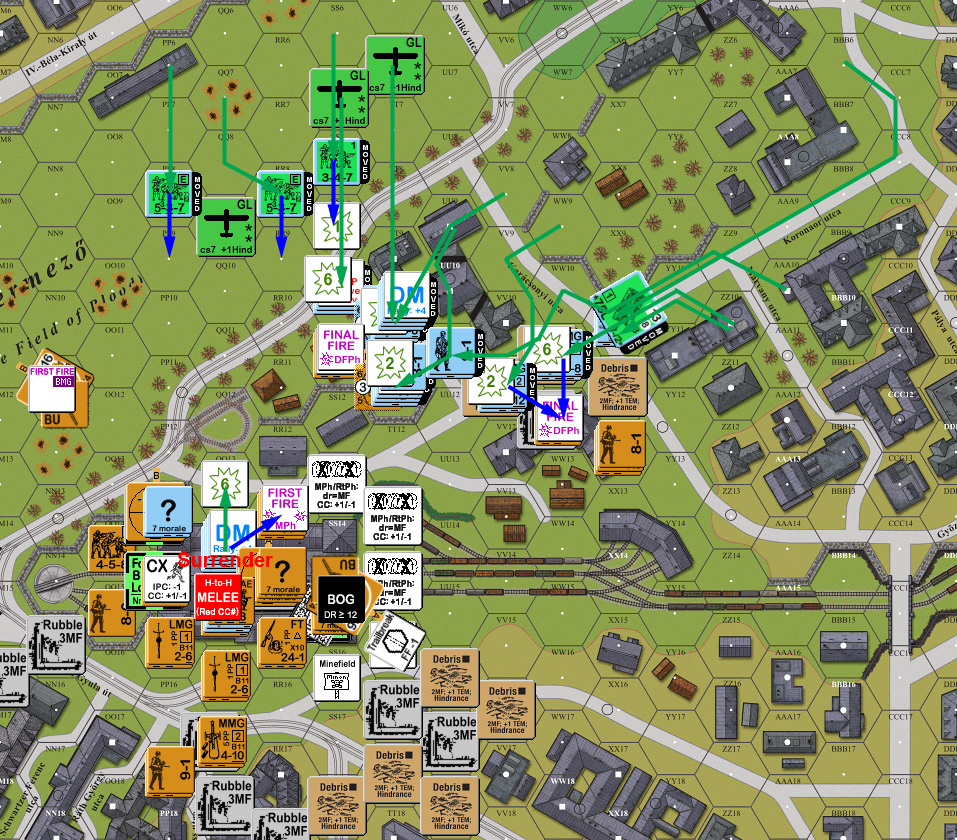
Situation, Russian Turn 2.
I got my 9-1 and squad back in AAA10 for my turn 2 RPh, and Patch rallied his only broken squad. My first effort was to get the Hungarians across the park, and did so, with only pins to defensive fire, despite missing on two smoke attempts. Next, a German squad took a K/2 (passing the 2MC) trying to move up to the next Russian defender. Debris was enough to protect a German squad advancing down the Koronaor, and tying down defensive fire there. I brought in two squads of Hungarians against SS11, but both broke to residual. The next move forced FPF from them, pinning them, while pinning another of my squads.
With things tied up a bit, I got the last couple squads through with inventive use of bypass. (I have apparently taught Patch more about bypass than his entire former ASL club. I considered some of this to be impressive even for me.) I also tried sneaking a HS out of the Station, but it took a 2KIA from the squad in RR13 (he was going for RR11, where he could do encircling fire against SS11). Final fire encircled QQ14 and broke my leader there and wounded the hero, though the squad was fine. A second shot killed the leader and hero… but the squad was still fine (between wound, food shortage, and encircled, the 9-2 was at ML 6!).
The surviving squad advanced into RR13, and got CRed while doing nothing. I put two squads into WW12 (neither of which was a match for the 628), with no results in the CC. The melee in QQ15 finished with me doing nothing more.
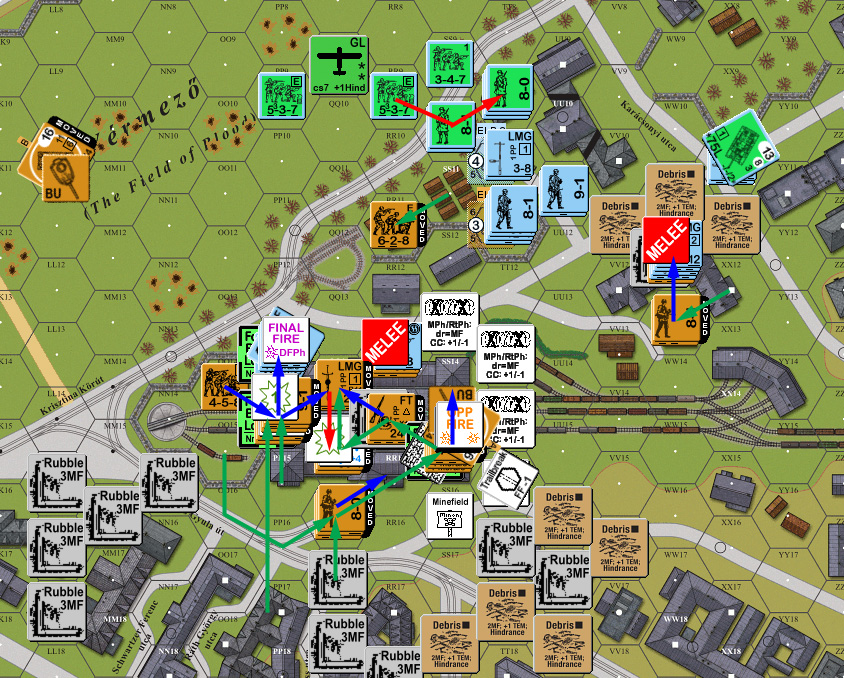
Situation, Axis Turn 2.
Patch’s malfunctioned LMG was eliminated in his turn 3 RPh, while I didn’t manage any rallies. Patch Searched PP13 to reveal the squad there as well as a Gun. Search casualties reduced his squad though. He started moving a DC squad through the station, but fire from PP13 broke him. The squad in front of my relieving force backed off, and in DFPh I spent a PSK round on them, getting a hit and pinning the squad (drat!). The INF in the Station opened up, losing concealment on the second shot but breaking an adjacent squad. I then did an IF shot at the FT, but had no result (including, amazingly, no Low Ammo counter).
Advancing fire broke the squad in PP13, and he finally got a result on SS14 to reveal the fortified location and AA there, then the T-34’s Op Fired MA got a hit… for a PTC, followed by a 1MC on a second shot, but the crew passed both. RR11 managed to ELR an assault engineer into a pair of HS. He sent a squad and 9-1 into PP13, and ambushed my INF crew to kill them, a squad and concealed 8-0 went into SS14, but I avoided ambush, and neither side got anywhere leaving it in Melee. The melee in RR13 ended with the loss of my HS, but I CRed the squad in the process. He also put another 628 and 8-1 into WW12 and missed in two separate attacks against my squads while I missed on one big attack to try and kill one of his.
Situation, Russian Turn 3.
I didn’t get anything back for my turn 3 RPh (thanks to food shortage), and lost a HS to a 12. With Patch in Control of everything he needed, I planned to try one final push before calling it quits. My first move was one of the Hungarian assault engineers, who survived two shots at them, and then tossed smoke grenades on RR11.
What I wanted to do was to send the StuG crashing into SS14 for a dramatic showdown with the T-34, and hopefully eliminate the wire in SS13 on the way in. However, two hexes of debris left me far short of that, and I had to chance ESB for 2 MP just to be able to stop in SS14. Thankfully, it passed the fuel shortage roll, bog rolls in both debris hexes, the ESB attempt and a bog check on the wire.
A lot of what I wanted to do was prevented by not being able to go CX, but I got a squad and 9-1 into SS14 and under the wire after surviving a 1MC. I surrounded RR11 to get encirclement on him, but I was worried that Patch would do the same to RR12, and he would have nowhere to go if he broke. However the HS in RR13, instead of firing on him, threw its DC at SS13… and rolled a 2 for a 2KIA to kill the guys who were about to relieve the gun crew in melee (worse, he easily passed the 3MC on his Location). The BMG of the T-34 in the park broke another assault engineer to a pair of HS.
Amazingly, the melee in SS15 continued without result. The Hungarians went into RR13, got the Russian HS there, and withdrew back out when Patch rolled a 12. In RR11, I got Ambushed, despite a -1 leader; Patch went for HtH against the German squad and leader, and thankfully missed, and I CRed the squad. I threw a third squad into WW12, and Patch got one and the leader while I still missed on a pair of attacks.
Situation, Axis Turn 3.
I rallied one squad in TT9, but also CRed another for Patch’s turn 4 RPh. His FT attack in Prep ELRed the German HS in RR12 (who had nowhere to go), but only battle hardened the Hungarians. Other fire mostly did nothing with high rolls, but the T-34 in LL10 malfunctioned its MA. The other T-34 tried moving, but only ended up mired in the entry to the Station it had created.
Patch reshuffled in the Rail Station a bit, and I hardly had anything to fire at, and there was no more fire with any effect. I finished off the HS in RR11, Patch killed another squad in WW12 while I still couldn’t get a result, and SS14 finally ended as it really should have two turns earlier, with the Russians getting the German gun crew, though they did generate a new 8-0 in the process.
I lost another HS in TT9 during my rally (that was a 12 in that location three turns in a row), and my main move was to bring the veterans from RR11 to try and enter the Rail Station in the still ongoing melee, but a K/2 reduced a squad and broke everyone. That left me with two squads and two leaders in Good Order to try and gain/maintain Control of two hexes in the Station until the end of turn 6, so conceded at that point.
Afterword
I effectively lost the scenario during setup, with all sorts of problems with the defense of the Southern Rail Station. Patch also came up with a nicely daring plan that would have worked even against a better setup, and had some strong dice when he needed them.
My advance on the Station took a lot more risks than I generally would have liked, and they mostly paid off, with a lot less broken units than expected. That part kept the scenario nice and interesting, though as I expected, I needed to get there even faster than I did.
However, Patch has complained that a lot of these scenarios are just about trying to lose more slowly, and the entire Axis rescue effort here really makes this scenario a lot more interesting in general, not just because of my setup problems. I’ve outlined my thoughts on defense near the beginning, and trying this again with that in mind someday would be nice.
Discussion (6) ¬
I just wanted to say how much I appreciate both the time spent playing these scenarios and the truly excellent AARs, they are simply awesome!
All the best!
Bill
James,
Another spectacular AAR!
Thanks for playing so many of these Festung Budapest scenarios over all these years!
All the best!
Bill
It’s been a pleasure! I’m hoping to get to the last one sooner rather than later. 🙂
Don’t forget that there are two more Festung Budapest scenarios in some of the later Journals. 🙂
Since they happen early, they were played early, including, of course, our playtest of FB19.