Rindis.com

All my hobbies, all the time
  • Home
  • My Blog
  • Games
  • History

Categories

  • Books (504)
  • Comics (10)
  • Gaming (918)
    • Boardgaming (674)
      • ASL (155)
      • CC:Ancients (83)
      • F&E (78)
        • BvR – The Wind (26)
        • Four Vassal War (9)
        • Konya wa Hurricane (17)
        • Second Wind (5)
      • SFB (78)
    • Computer games (162)
      • MMO (77)
    • Design and Effect (6)
    • RPGs (66)
      • D&D (25)
        • O2 Blade of Vengeance (3)
      • GURPS (32)
  • History (10)
  • Life (82)
    • Conventions (9)
  • News (29)
  • Technology (6)
  • Video (50)
    • Anime (48)
  • Writing (1)

Patreon

Support Rindis.com on Patreon!
Become a patron at Patreon!

Other blogs:

RSS Inside GMT

RSS Playing at the World

  • Playing at the World 2E V2 Arrives May 5, 2025

RSS Dyson’s Dodecahedron

  • Shrine of the Diseased One July 17, 2026

RSS Quest for Fun!

  • The Expense Post May 24, 2026

RSS Bruce Heard and New Stories

  • Pain, Exhaustion, and Morale in D&D BECMI June 7, 2026

RSS Chicago Wargamer

  • The 2 Half-Squads - Episode 310: Cruising Through Crucible of Steel January 27, 2023

RSS CRRPG Addict

  • The Search for Freedom: Won! July 18, 2026
SF&F blogs:

RSS Fantasy Cafe

  • The Leaning Pile of Books July 5, 2026

RSS Lynn’s Book Blog

  • Friday Face Off: The Raven and the Reindeer by T Kingfisher July 17, 2026
ASL blogs:

RSS Sitrep

  • Cardinal ASL Sins March 18, 2026

RSS Hong Kong Wargamer

  • FT114 Yellow Extract After Action Report (AAR) Advanced Squad Leader scenario April 16, 2025

RSS Hex and Violence

  • This still exists? March 25, 2025

RSS Grumble Jones

  • Grumble Jones July Scenario GJ162 You Will Engage the Enemy July 1, 2026

RSS Desperation Morale

  • How to Learn ASL March 16, 2025

RSS Banzai!!

  • October North Texas Gameday October 21, 2019

RSS A Room Without a LOS

  • [Crossing the Moro CG] T=0902 -- Rough start July 18, 2015
GURPS blogs:

RSS Dungeon Fantastic

  • Felltower - Monsters Fleeing between Sessions vs. PCs replenishing June 28, 2026

RSS Gaming Ballistic

  • B-Scale Detail and Examples July 16, 2026

RSS Ravens N’ Pennies

RSS Let’s GURPS

  • Review: GURPS Realm Management March 29, 2021

RSS No School Grognard

  • It came from the GURPS forums: Low-Tech armor and fire damage January 29, 2018

RSS The Collaborative Gamer

  • Thoughts on a Town Adventures System January 18, 2022

RSS Don’t Forget Your Boots

  • GURPS Supers Newport Academy #7: “Invitation to the future.. of the 1970’s” July 5, 2026

RSS Orbs and Balrogs

  • Bretwalda - Daggers of Oxenaforda pt.4 - Fallen King May 27, 2017

Konya wa Hurricane Alliance Turn 14

by Rindis on March 25, 2018 at 12:00 pm
Posted In: Konya wa Hurricane

Crossposted from the SFU blog on BGG.

Alliance survey rolls were strong this turn; especially the Kzinti who got 16 (+2 from a PT) on three dice, after rolling 15 last turn. Overall Alliance income was up, mostly from the Federation, which had regained a bit more control of their own territory.

Builds:
Federation: TG, NCA, 12xNCL, 4xDW, DWA, 11xFF, DN+->CVA, CW->F-CWE
Kzinti: TGC, 2xCM, LTT, 4xFFK, 1xFKE, 3xFF, CVL->CVD
Gorn: DNG, BC, CM, TG, HD, LTT, 2xBDE, 2xDD, FCR, CL->CV, CL->CLE, CL->CCH

The Alliance continued showing the signs of a cash crunch by subbing a lot of ships to smaller hulls, and much to my surprise, building no new carriers. Instead the Federation converted an existing DN+ into a CVA, while the Kzinti converted a CVL into a CVD. I’m used to seeing the Kzinti occasionally convert their CVLs into the larger CV, but not having played with CVDs before I hadn’t considered that conversion.

As usual, Alliance raids went well. The Hydrans raided province garrisons and the THR took out two Klingon ships for no losses, while the Lyrans fought off the raiding RN with three ships for no losses on either side beyond fighters and a wounded PT. (We recently realized that PTs get wounded much more often in SSC than we’d thought. Raiders with PTs on board is a good way to get a lot of them wounded.) The Kzinti raided two garrisons in their space, killing a DW, while forcing another to cripple and retreat. However, he’d meant to force my garrison off of planet 1202, and there was still a HDD there. The Federation hit two province garrisons in their own space as well as a G2 patrolling an ’empty’ province in the Empire, killing it, a DW, F5, and crippling a second F5. The Gorns hit a Romulan province garrison in Federation space and one in their own space; both ships missed their evasion rolls (again), and were destroyed.

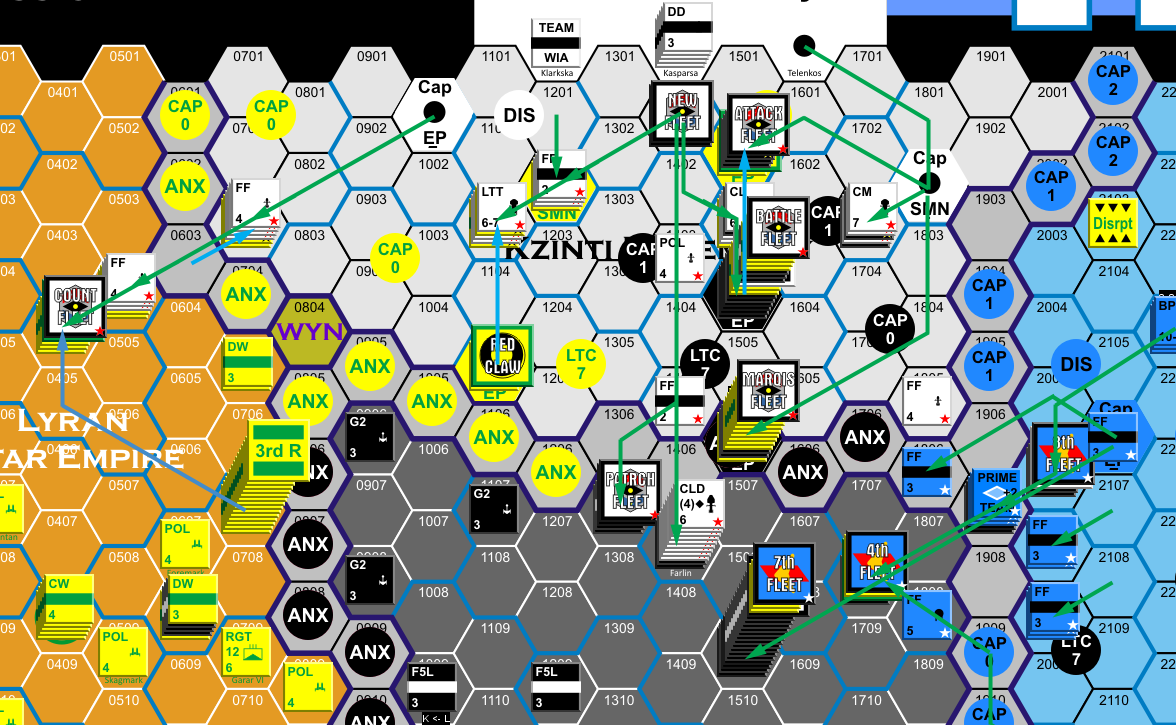
Movement started with the expected every-other-turn Hydran move onto their capital, while also pinning down the Lyran reserve in the area. The Kzinti force in 1001 went after the Lyran SB on their border, leaving pinning forces on the BATS in front of it, and fighting the Lyran garrison in Kzinti space. Next, a force moved out of the Barony, picked up some extra ships over in 1802, and then headed back to the major planet in 1502.

And then everything turned into a disaster.

I had expected (for the last few turns) moves against the string of supply points from the Klingon border into Kzinti space. Certainly, a major move against 1504 was going to happen at some time soon. With how comparatively weak the North Fleet had gotten, I expected to see it last turn. This turn, I had some good reserves in the area, and expected to hold enough things to get the reshuffled FRD facilities into operation. But I had blinded myself to the fact that though I had forces blocking a direct move from the 7th Fleet on 2106, the 4th Fleet could easily pin all of that, allowing Byron to hit the Northern Reserve SB in in 1509, which is just what he did at this point.

Then the 3rd Fleet set out for 1611 again, diverting a few ships to claim NZ hexes and join the 4th Fleet along the way. If I had thought of it at the time, I could have reacted a ship into 2111 as he left, and then sent a reserve to that hex to win the fight, which could have blocked retrograde for the 3rd Fleet (he’d likely retreat off the planet to get in range). But I didn’t think of that until I was looking at reserves.

The western Gorn-Romulan border turned out to be less active than I thought as the Gorn 5th Fleet moved in towards the border, and then stopped to pick off a single SNB, while the Romulan navy stayed in place in case someone else went for the BATS later. Instead, he hit three of the four BATS further away from the Federation frontier.
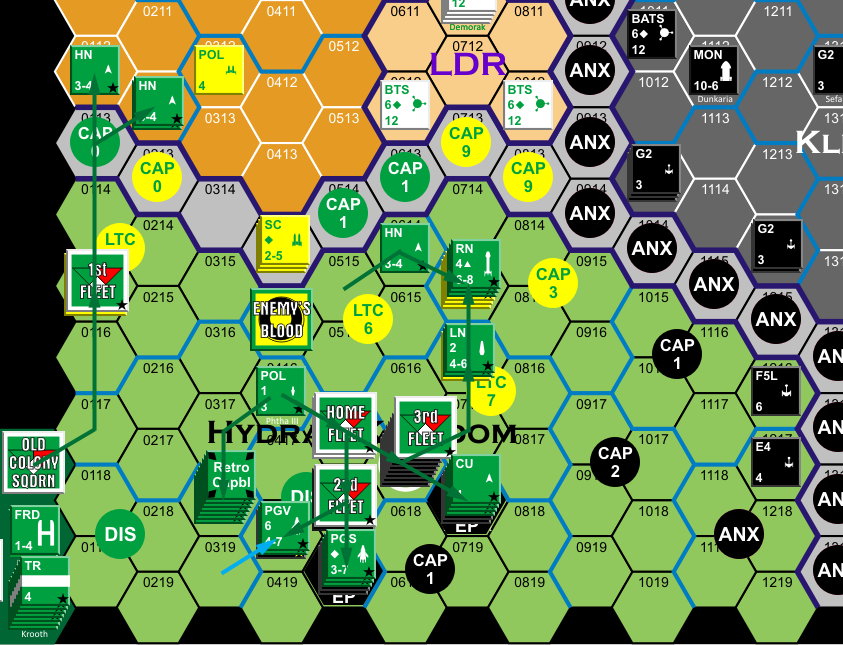

Hydran offensives.

The Kzinti Strike Back
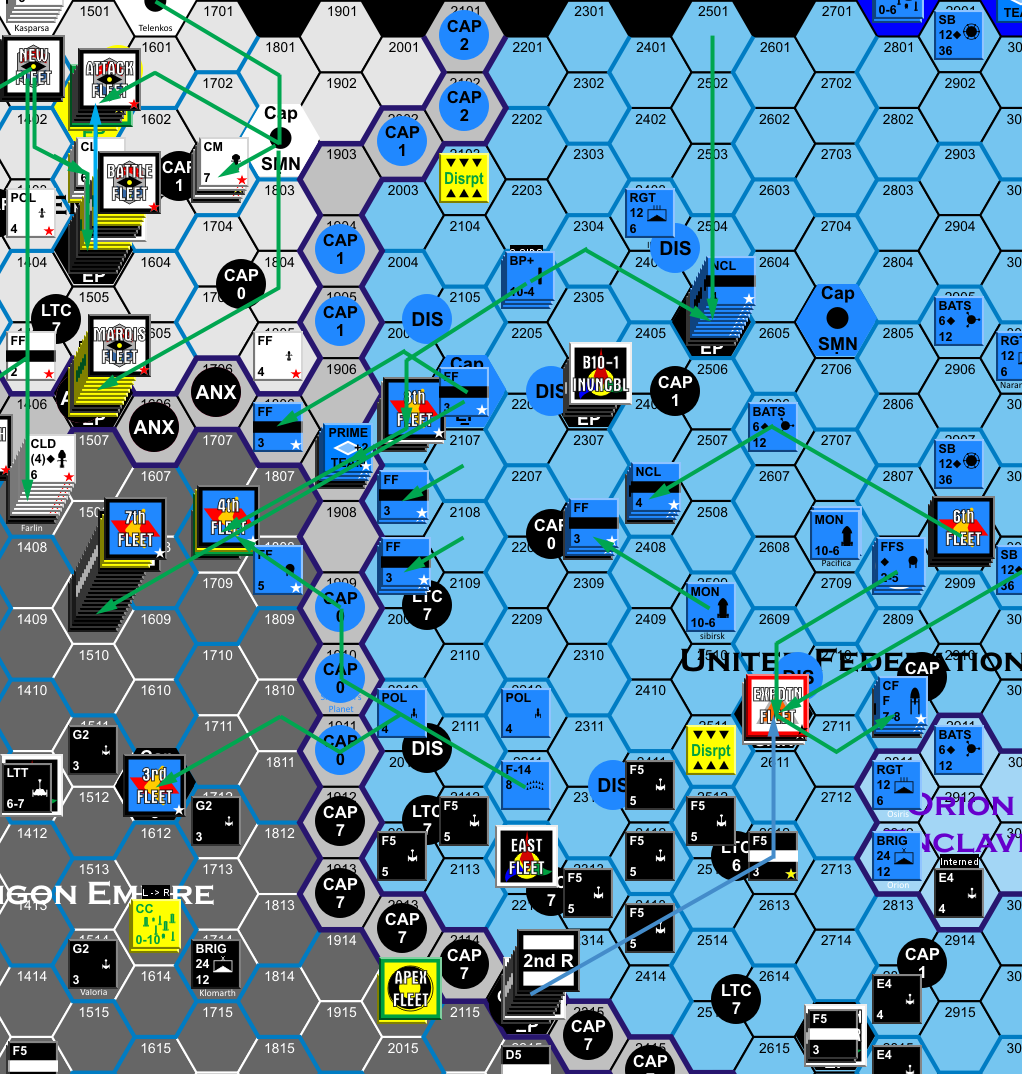

Further trouble in Klingon space.
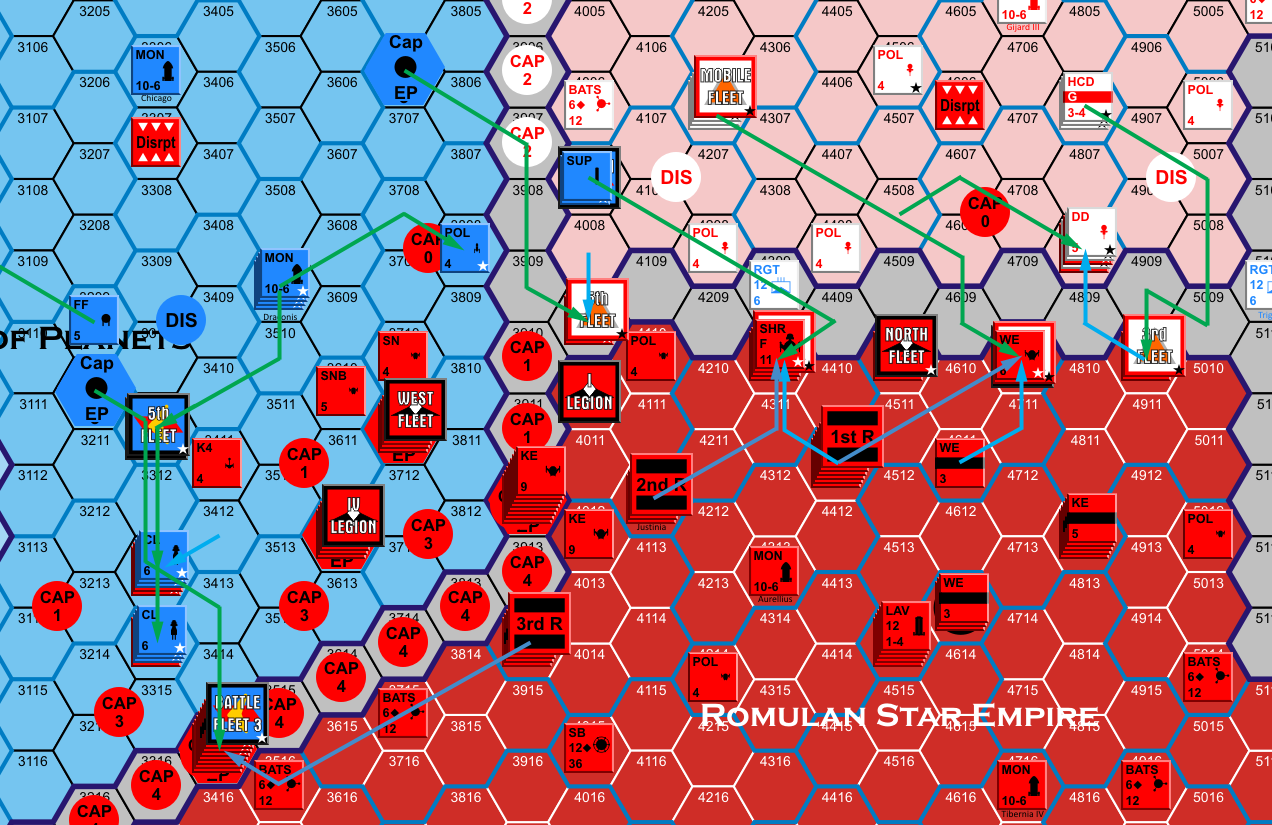

Limited offensives.

Most of my reserves were pinned, but all three Romulan reserves were free to shore up defenses at three of the four spots he hit. The one free Lyran reserve was needed to save their starbase, and the one free Klingon reserve had two choices, but wasn’t sufficient for either one.

Battles:
0519: SSC: Klingon: dest F5L, F5
0418: SSC: Klingon retreat
0718: SSC: Klingon: dest E4A
0716: SSC: Lyran: dest FF
0715: SSC: Hydran retreat
0703: SSC: Lyran retreat
1202: SSC: Lyran: dest HDD
1103: SSC: Lyran: dest cripDW
1503: SSC: Lyran: crip CW; Klingon: crip E4
1703: SSC: Klingon: dest E4
1907: SSC: Klingon: dest TGA
2308: SSC: Klingon: dest F5L
2407: SSC: Klingon: dest F5
4009: SSC: Romulan cloaked evasion
4808: SSC: Romulan cloaked evasion
3313: SSC: Romulan cloaked evasion
3314: SSC: Romulan: crip SNB
2810: SSC: both sides retreat
0617: Klingon: dest E4
0517: Klingon: dest D6M; Hydran: dest LN
0518: Klingon: dest F5E; Hydran: dest LN
0115: Lyran: dest 2xDW, FF, crip CW; Hydran: dest TR, crip CU
0404: Lyran: crip NCA; Kzinti: crip SF
0504: Retreat after denied approach
1407: Klingon: 2xPDU, MON; Kzinti: crip BC, capture planet
1506: Klingon: crip D5, F5; Lyran: dest cripDDG, FRD, crip STT; Kzinti: dest FFK, capture planet
1405: Kzinti: dest cripFF
1307: Klingon: dest BATS, crip D6, 2xF5W; Kzinti: crip 3xCM, 2xDD, SF
1504: Klingon: dest D6M, E4A, LAV, crip D7C, F5, FTL, FTS; Kzinti: crip LTT, SAD, dest CLD, SAD, capture planet
1502: Lyran: crip BC; Kzinti: dest FFK
1509: Klingon: dest F5J; Lyran: dest FRD; Federation: crip 2xFF
1708: Lyran: crip CW, DW; Federation: dest NCL
1611: Klingon: 2xPDU; Federation captures planet
2006: Klingon: dest F5E; Federation: dest NCL
2505: Klingon: crip D6; Federation: crip FF
2610: Klingon: dest MD5, F5L, crip D7C, D5; Gorn: dest CCH; Federation: crip 2xNCL, capture planet
3311: Romulan: dest SKE; Federation: SKE captured
3415: Romulan: crip FHF, KR; Federation: dest 2xNCL, crip FF
3315: Romulan dest cripSNB
4310: Romulan: dest FHF; Gorn: dest HD
4710: Retreat after declined approach
4910: Romulan: dest BATS, WE; Gorn: crip HD
4809: Romulan: dest SK

The small battles around Hydran space picked off a number of ships, but a poor roll in 0715 left the Lyran squadron there, though it couldn’t do more than force a retreat on a good roll. An E4A sacrificed itself over the planet in 0718 while the D5 retreated into the province proper, holding it for the next Coalition turn. The capital battle didn’t follow quite the same script as last time, with the Hydran force staying in place after taking it, even while retreating back to 0416 after the main pinning battle in front of the hex.

I had thought the HDD had survived the battle in 1202 (crippled), since he only had two ships to pursue with. However, he pursued with just a BF, and since the ‘entire force’ was fast, it could automatically catch the cripple and kill it.

The Kzinti had put just enough on 1001 to be able to kill a SB, and as I expected, they hit the Lyran SB in 0404, forcing me to send a reserve to save it. Since the retreat had to go over the BATS 0504, I retreated with him to save that base too, but it forced me to move my cripples off the repair facility as part of the retreat.

I expected Byron to make sure of the Klingon FRD in 1504, during slow retreat if nothing else. But instead he dropped damage at the planet (when it wasn’t even in form) and took out the LAV and its E4A escort during pursuit. This had been the major Klingon staging point for the front, but there was more than enough Kzintis to take the entire (reduced) North Fleet, with 96 fighter factors available.

The Federation had way more in 3311 than the Romulans, who still had too much to withdraw easily, so the left behind a KR as the flagship and two SKEs and K5S, and everything successfully evaded other than one SKE, which was promptly captured. Overall, not too bad for the odds involved, but the capture still stung.

I was surprised by the places Byron did and did not pull out of after combat. The Klingons are in a lot of trouble, with the Kzinti hanging on to the planet in Klingon space they’ve captured, and the Federation leaving a five-ship force on 1611. However, there’s no Gorn ships left in Romulan space. The good news is that the Kzinti reserves are two ships each, but the Federation has reserves full of NCLs and FFs. I’m going to have to find some way to break his momentum in Kzinti space….

Coalition: 436.6 EP (x2) + 575 (bases) + 811 ships (/5) = 1772.6
Alliance: 333.8 EP (x2) + 490 (bases) + 744 ships (/5) = 1455.2

We are solidly into Major Coalition Victory territory now, and I expect the VP slide will continue for a bit yet, and the question is where will it bottom out. Both sides are losing some bases (the Coalition more than the Alliance, naturally), which shows we’re still headed for the middle-war period where offensives are confined to the ‘dead zones’ that are mostly supported by captured planets as sources of supply. At least, I can hope so; this turn has shown that major Coalition offensives are probably over; we’ll see about Alliance offensives. The real worrisome part is that all three Coalition navies are down ships from a turn ago, and worse, about half the Lyran CWs and DWs are currently crippled, with little prospect of getting them all going soon. Meanwhile, the Kzinti stayed at 197 ships, while the other three Alliance navies grew, with the Federation (naturally) leading the way, growing by 15 ships. I’m generally maintaining quality, with new carriers and and FCRs ensuring longer-term survivability, but I’ve got to get them in use better.

└ Tags: bgg blog, F&E, gaming, KwH
 Comment 

1453

by Rindis on March 21, 2018 at 12:00 pm
Posted In: Books

Crowley’s book on the fall of Constantinople doesn’t disappoint. He leads off by giving a good overview of the rise of Islam, and various failed sieges of the city over the centuries, showing how it became something of a recurring ambition that was eventually absorbed by the Turks when they converted to Islam.

From there, the focus moves in to the decade or so before the siege, detailing Murat, and then Mehmet II, before giving Constantine XI’s background. The construction of the Throat-Cutter (an Ottoman castle built to cut Constantinople off from the Black Sea), and the final attempts to heal the Great Schism between Orthodox and Catholic rites are detailed before moving on to the siege itself.

Like Crowley’s Empires of the Sea, this is primarily a readable account of the siege, and not any sort of detailed analysis, but he does provide good information on walls of Constantinople, and just how they were outmoded by the coming of gunpowder and siege artillery. He also goes into the ability to take rubble and earth and create improvised fortifications that serve just as well (though perhaps being less imposing looking) while being much harder for artillery to deal with. The book also talks a bit about two weak points in the walls, which were particular targets for the siege. On the other hand, some details, such as the system of locked gates in the main wall, behind the forward wall where most of the siege was conducted, only come up when dramatically important, and not in the general description of how things were working (which, with a lighter book like this, are a bit lacking as extraneous technical detail anyway).

Crowley freely acknowledges that there’s a number of uncertainties that he cuts through to provide the best version he can. And that may be the best reason for keeping to a very readable format here. There’s enough contradictory legend here to weigh down a narrative so that the events are never seen through the maze of arguments. He does give several of the more prominent alternatives, and admits there’s really no reliable knowledge as to what happened to Constantine XI when the city fell.

└ Tags: books, history, reading, review
 Comment 

A Place to Call Home

by Rindis on March 17, 2018 at 12:00 pm
Posted In: MMO

Smudge and I have spent much of the last couple weeks fiddling with player housing. This is something that most of our other MMOs have not had. Wildstar has a pretty good housing system, but I never got much into it, and Wildstar‘s UI problems meant that it was not a long-term game for us. I understand that WoW has a system now, but that was long after I left, and I don’t even know how it did.

In FF XIV, there’s effectively two and two halves types of housing. There’s apartments, which are effectively infinite, and purchasing one is permanent (other than giving it up so you can get a different one elsewhere), and there are houses, which can either be owned privately or by a Free Company. The housing lots are limited, and exist in one of four areas which have a number of instances (and the building which houses the apartments exist in this zone); a private lot will be demolished and reclaimed if your subscription ends, while a FC house will stay active as long as it is. FC houses can also have ‘private rooms’ for individual members (which will also go away if the subscription lapses, or the player leaves the FC), which is basically an instanced apartment inside the house.

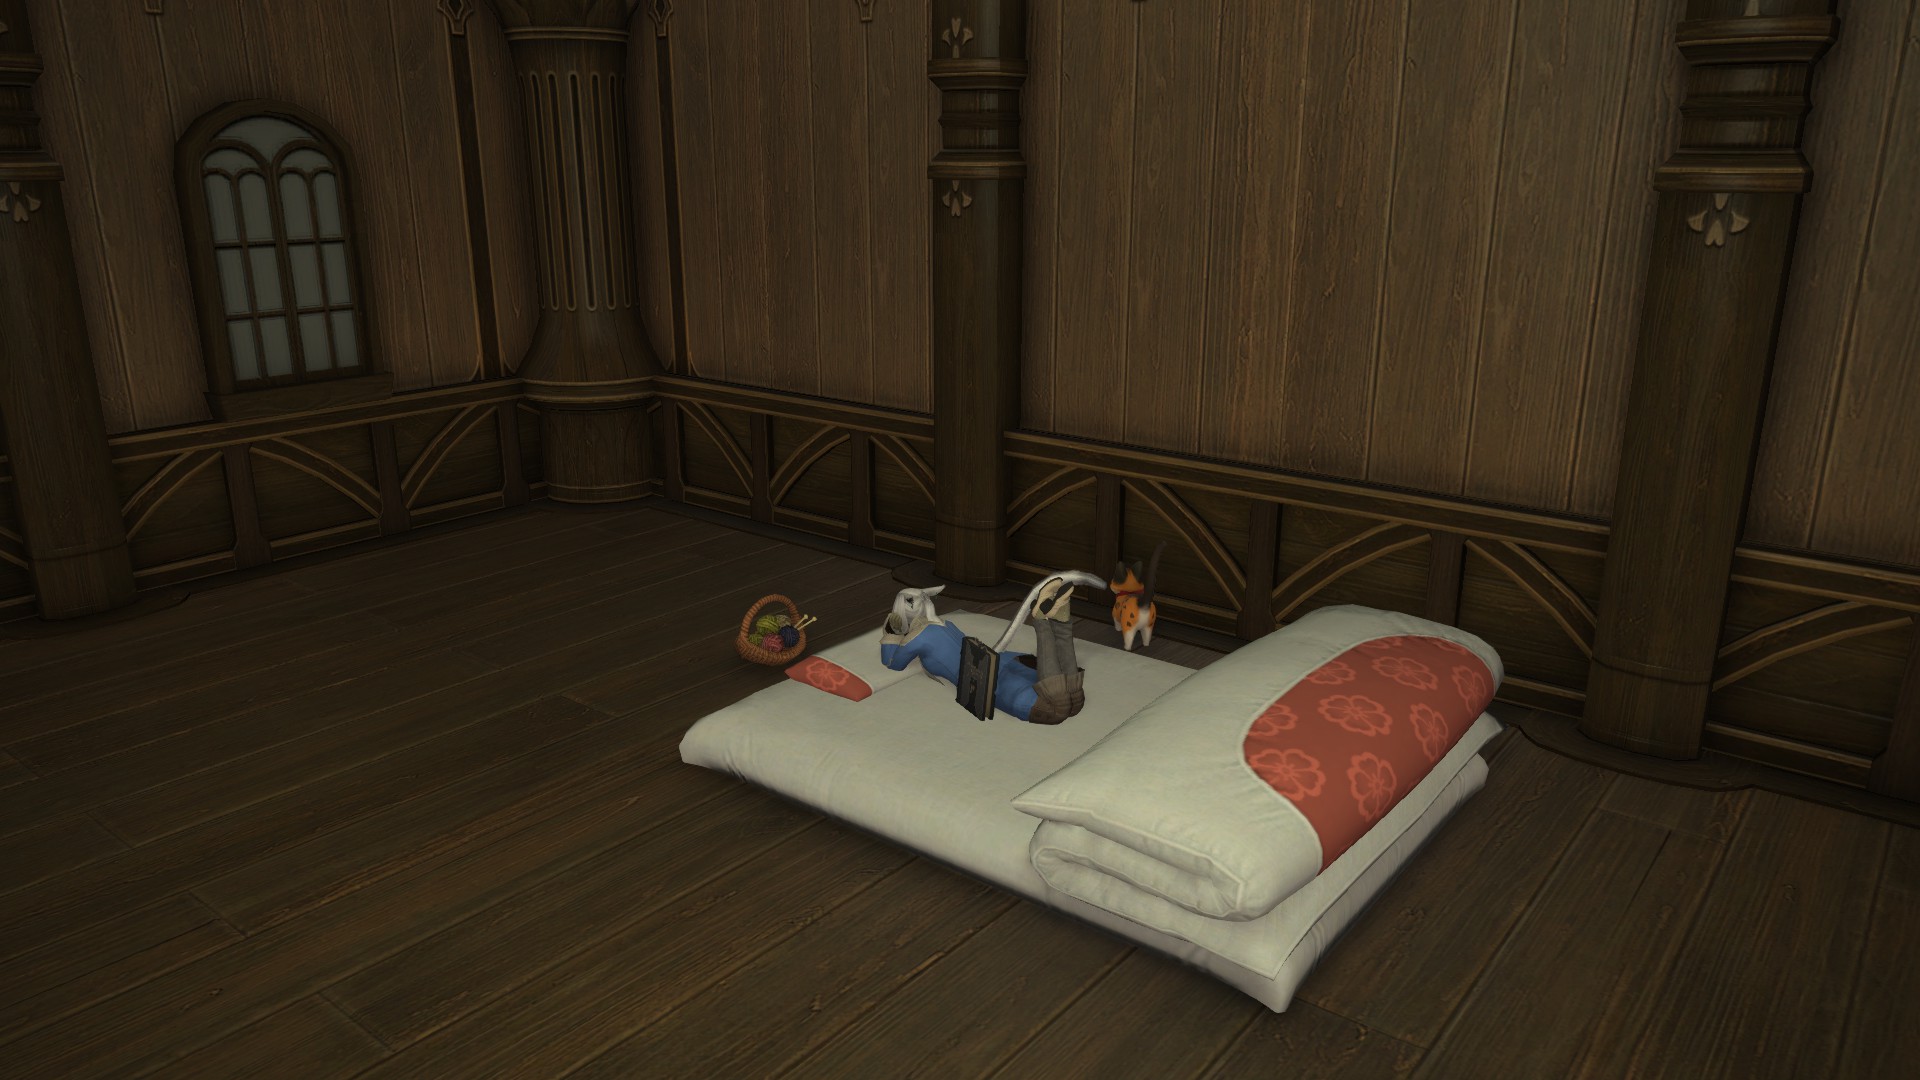
Thayrin had bought an apartment some time back, and decorated it out as the Twin Adder Library. I’d been, for reasons I don’t really understand, resisting doing the same, but a couple weeks ago, Rylea finally paid out the 600K Gil and took an apartment near Thayrin’s (in the same instance). The basic furnishing is a small wooden square room with a single door out, and non-functioning windows along one wall.

Thayrin provided a futon and a basket of yarn as housewarming presents.


↓ Read the rest of this entry…

└ Tags: FFXIV, gaming, MMO
1 Comment

First Test

by Rindis on March 13, 2018 at 12:00 pm
Posted In: Books

There are other books in between, which do get referenced here, but this is a direct follow-up to the Alanna quartet. You have a lone female entering into the boys’ world of knights and military training. The… decade and a half between the publication of the two series shows a lot of how far we’ve come, and how much we’re still struggling with the concept.

Whereas Alanna disguised herself as a boy, and worked through the system, Kel is the first girl to officially get trained as a squire. At the insistence of the training master, Kel is accepted ‘on probation’ for her first year (thus the ‘test’ of the title), helping keep her an outsider to the main group.

Much of the novel deals with the kinds of hazing and bullying that have become all too familiar when the small-minded see their ‘territory’ encroached upon. The plot is naturally strongly character-focused, and mostly deals with internal struggles, even while focusing on the external struggles of the deliberate overwork of training, and the hazing. The ending portion switches gears some, and gives a chance for more old-fashioned adventure.

As with Tamora Pierce’s other books, this is solidly YA, but it’s just as suitable for adults. It is its own thing, and while there’s references to the Alanna and Immortals series, it in no way rests upon them (thank goodness, as I’ve realized I don’t remember the Immortals books well enough).

└ Tags: books, fantasy, reading, review
 Comment 

SM3 The Moray Eel of Space

by Rindis on March 9, 2018 at 12:00 pm
Posted In: SFB

Since I was still in an SFB mood after finishing “Border Incident” with Patch, I soloed my way through the third monster scenario during January as part of my Y160 games. Having just played the Romulans in KRs, and realizing I hadn’t played as the Klingons in a while, I took the D7 for this scenario.

The Moray Eel is the first monster not directly inspired by a TOS episode, though it is definitely a graduate course for the Planet Crusher. While there is an optional variant to use information gathering, the scenario is geared around combat to defeat a monster that is headed for an inhabited planet. It doesn’t do nearly as much damage as the previous monsters (5-10 points per ‘bite’), but is much nastier as it ignores shields, meaning that every attack is doing internals, and suffering too many attacks will destroy the ship in short order. The real twist is that the Eel only attacks after being damaged. After any impulse where it receives damage, it moves to the offender’s hex (instantly, even if that’s several hexes away) and bites that unit. If there’s several ships, and they all do damage at the same time, it moves to each of these hexes, and bites them all, in a random order, in a ‘biting frenzy’.

The eel is 100 hexes from it’s goal, and moves straight towards it at speed 12 (making it the fastest monster so far), which not distracted by a ship. It apparently used to follow close-by ships, akin to the Planet Crusher, but that was removed in Captain’s Edition to keep the time pressure up. Defeating it is also a problem, as the ship has to do 200 points of damage (reduced to 193 here for BPV balance), after which there is a die roll for each separate volley (which will involve a bite) that does 10 points of damage (9 after balancing), and the Eel is killed on a ‘1’. And as usual with these scenarios, the monster can’t be fired on from outside a six-hex range, and it has MCIDS to deal with shuttles and drones.

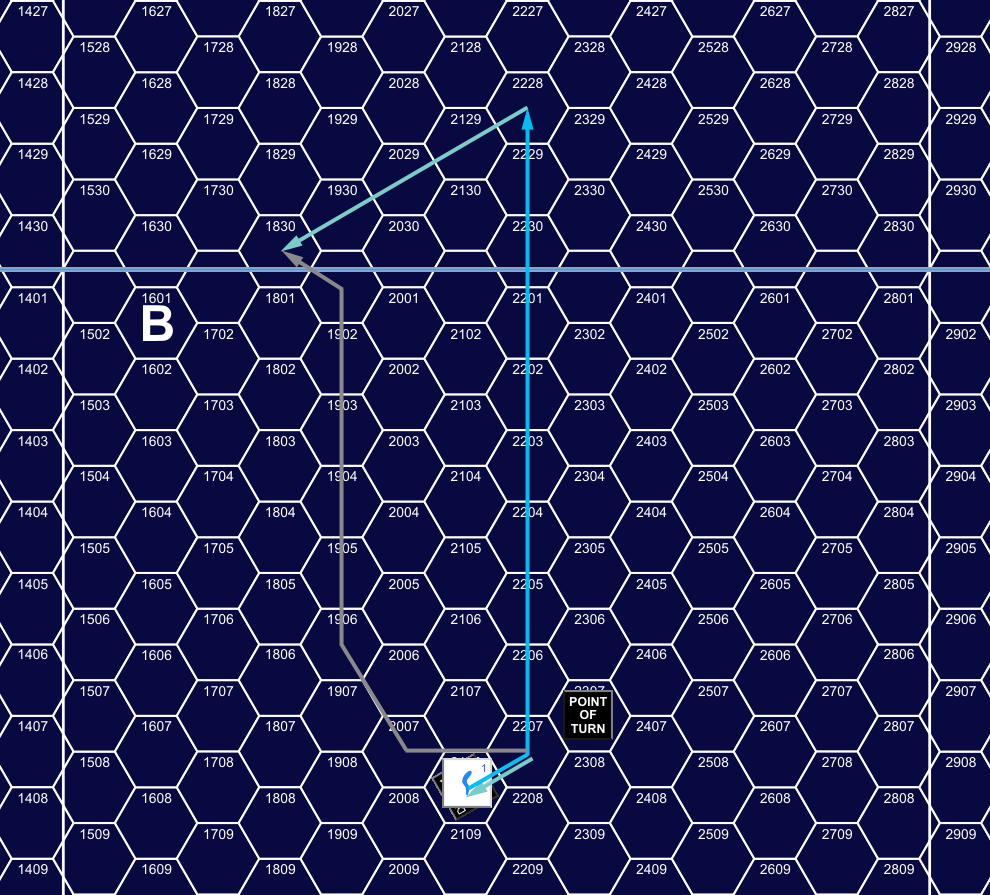
The D7 started 15 hexes away from the Eel in the direction of the planet, and I overloaded all four disruptors as part of a turn 1 alpha strike overrun to do as much damage as possible. I lined up an oblique shot for maximum firepower, and launched a drone as it entered my hex, which was instantly shot down by MCIDS.

One of the tricks with the Eel is to fire at range, and force it to move away from the planet, which is hard to do with the initial approach, especially as I went for a range-0 shot. But I fired just as we were both scheduled to move, so that it moved a hex further away following me, and it gave up its normal move to do it. The phasers rolled a little under average for a total of 77 damage (with 4 disruptors auto-hitting to do 40 of that), and the eel did a minimal 5 points to destroy one phaser and two warp.

For turn 2, I reduced speed from 12 to 9, so that the Eel could get a little in front of me, and be drawn back by my next volley of fire. I fired on Impulse 21 at range 4, hitting with two disruptors and doing three points with the boom phasers (everything else being out of arc) for a running total of 96 damage. The next Impulse, the Eel moved to the D7 and bit for 9 damage, knocking out one drone rack, a phaser, two warp power, and one battery after finishing off the forward hull. The D7 launched a drone from the remaining rack, and MCIDS missed allowing it to hit for 12 more damage the next impulse to bring the total up to 108.


Turn 1, Impulse 24, showing movement from Impulse 23 through Turn 2, Impulse 22. The paler arrows are the Eel’s movement to bite.

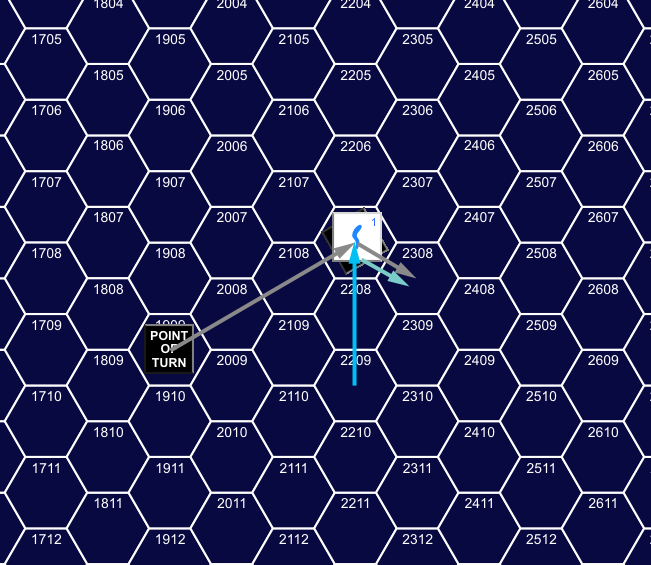
The D7 repaired the first destroyed phaser as of the end of Turn 2, and increased speed to 13 to get another close-range oblique shot. The Eel was sideslipping back to its original course (part of the robot rules), which meant the D7 was drawing slightly ‘ahead’ of it to make this maneuver, but the low speed differential meant it took most of the turn to pull off. The D7 launched another drone as they met at range 0 again, but MCIDS shot it down. On Impulse 31, the D7 fired all bearing weapons to do 40 with overloaded disruptor auto-hits, and the maximum 30 points from 5 phaser-2s for a grand total of 178 damage. On 32, the D7 sideslipped away, and the Eel followed to do 8 damage to take out another phaser, the remaining drone rack, two more warp, the remaining two batteries, and a shuttle. At the end of the turn, the second damaged phaser was repaired.


Turn 3, Impulse 31, showing movement from 25 to 32.

With power continuously dropping, the D7 only went speed 8 for Turn 4, while it prepared to do the last 15 points needed before it started rolling for destroying the Eel. On Impulse 7, the phasers cleared, and the D7 fired four of them at range 1 to do 17 points on poor rolls (grand total 195). On Impulse 8 the bite did 10 points to destroy two phasers, two more warp power, the remaining shuttle, an impulse, and an APR. The D7 turned and moved back into the Eel’s hex after it sideslipped out, and fired an overloaded disruptor on 13 to do 10 points and force a roll to kill the Eel, which failed with a 5. The next impulse, the Eel bit instead of moving, doing 10 damage, which destroyed three phasers, 2 warp power, 1 impulse and 1 APR.

The D7 tried another disruptor on Impulse 15, rolling a ‘3’ for destruction. On 16 it slipped away from the planet, drawing the Eel after it, which did 7 points to take out a disruptor, one warp power, and two impulse. On 18 the D7 fired a boom and waist phaser at the Eel to do 10 points, and rolled a ‘1’ to destroy the Eel!

The 1/6 chance of killing the Eel each time probably makes the end of many plays of this a bit exciting. Certainly the D7 was well through a lot of padding, and was down to 23 power at the time the Eel expired, and that was only on the third attempt. I was very lucky that I didn’t take any ‘torpedo’ hits until the very end, and had two more of those left to try once the D7 was facing it again. In addition to the more important systems listed above, the D7 had lost its bridge (but not any other control spaces), most of the lab, one tractor, and one transporter. Damage was getting up to about column F of the DAC, and another couple of strong damage rolls from the Eel would have been big trouble, with 7’s headed for the ‘phaser’ and ‘any warp’ entries.

The purely deterministic movement makes it less of a maneuvering challenge, though the higher speed adds some interest back there. The tactics section in the rules mentions dragging it away from the planet by firing, but doesn’t mention the fact that you can scrub little bits of movement off just by timing shots around when you are about to move (so you can move even further away), or especially when the Moray Eel is about to move (so it doesn’t move closer to the planet). This is a more interesting and challenging scenario than the previous two simply because the ship will take internals every time it fires, and you have to figure out how to survive the consequences long enough to play the odds.

└ Tags: bgg blog, gaming, SFB, Y160
 Comment 
  • Page 155 of 315
  • « First
  • «
  • 153
  • 154
  • 155
  • 156
  • 157
  • »
  • Last »

©2005-2026 Rindis.com | Powered by WordPress with ComicPress | Hosted on Rindis Hobby Den | Subscribe: RSS | Back to Top ↑