Crossposted from the SFU blog on BGG.
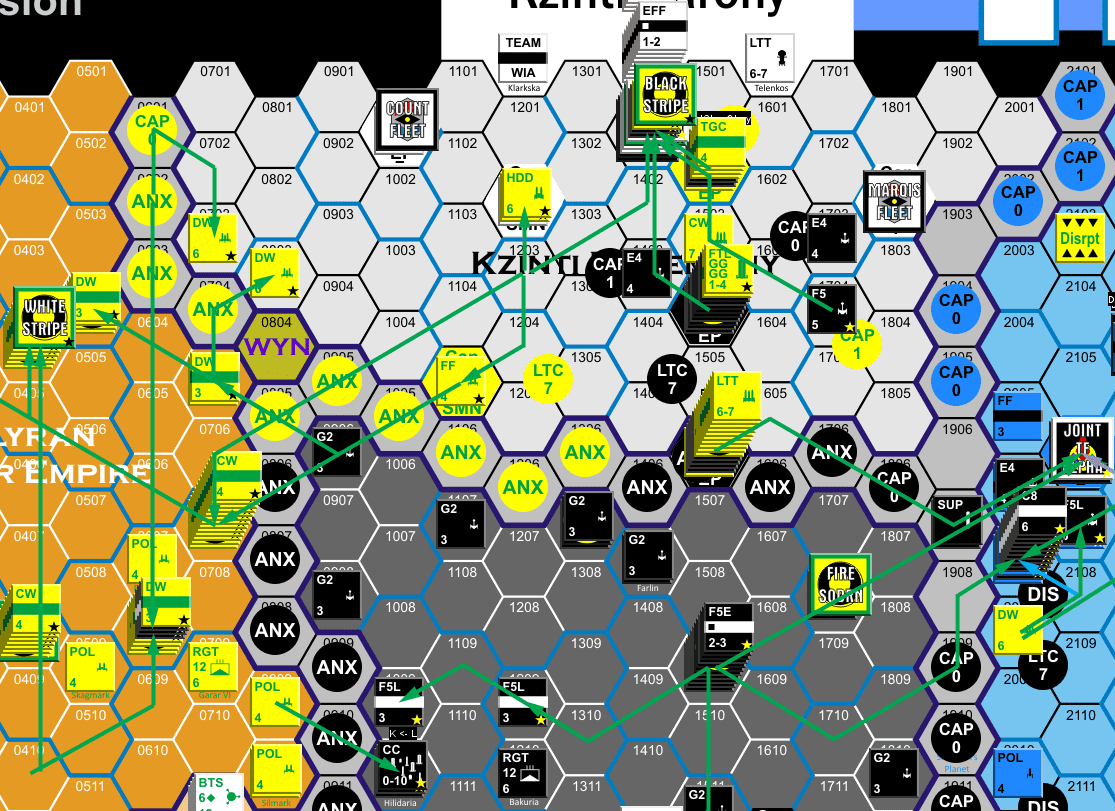
The Lyrans and Romulans finally had good survey rolls this turn, though Klingon survey efforts are still stalled, which generated one extra province for the Lyrans, who were still down for the turn with loss of income from their southern space, and continued problems in Kzinti space. Overall, the Coalition economy was up by 7.2 EP, but that includes 4 EP that were trapped in the Klingon partial grid in NW Federation space.
Builds:
Klingon: C8V, D6M, TGA, D5W, 2xD5, 5xAD5, MD5, 2xF5W, 4xF5, 2xF5E, F5J, E4R, FRD, FTM, PDU, D6->D6D
Romulan: SUB, FHF, SP, 3xSPM, SK, 2xSKE, SEH, WE, SNB, FSD, CL->R-CLE, WB->KE, BH->BHF
Lyran: DN, TGC, NCA, STJ, CVP, CWE, DW, 2xDWE, 2xFF, FCR, FRD, FTM, PDU
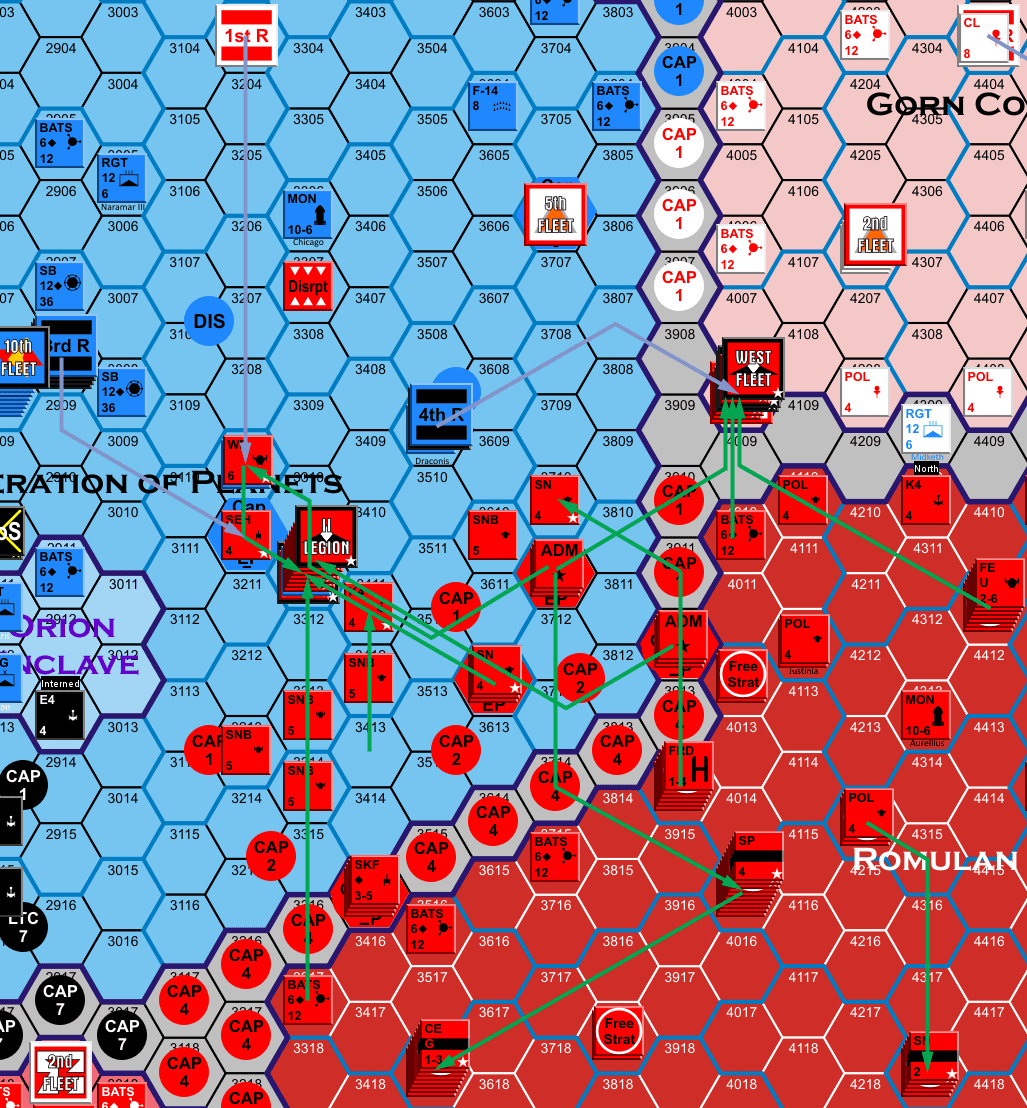
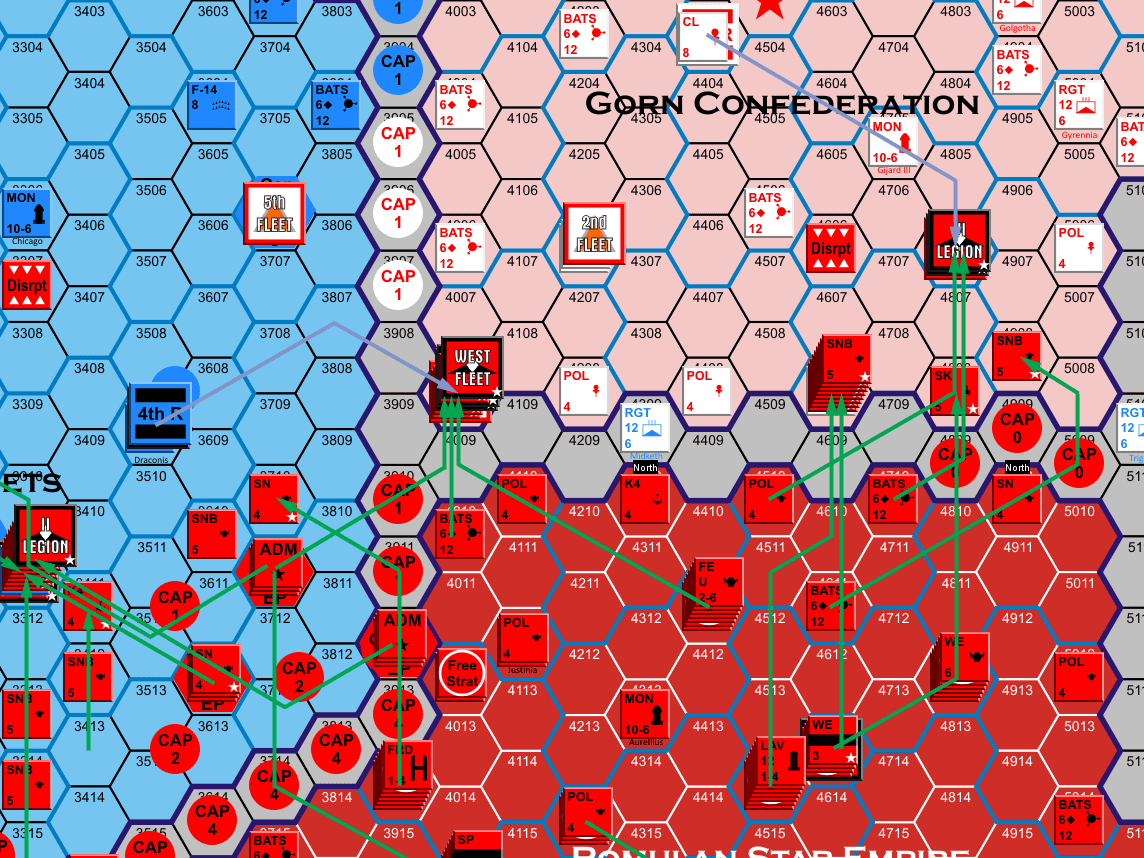
The Klingons have three captured Federation ships now, and scrapped the smallest (a FF) to make their slipping budget work, but are still hoping to convert over a CL and FFE. The Romulans eagerly converted over a captured Gorn CL to CLE as they’ve had no heavy escorts until now, and the CLE is actually more effective than the new SPM. They also activated a Fighter Supply Depot on the Fleet of the North SB, as there will probably be fighting in range of it for some time.
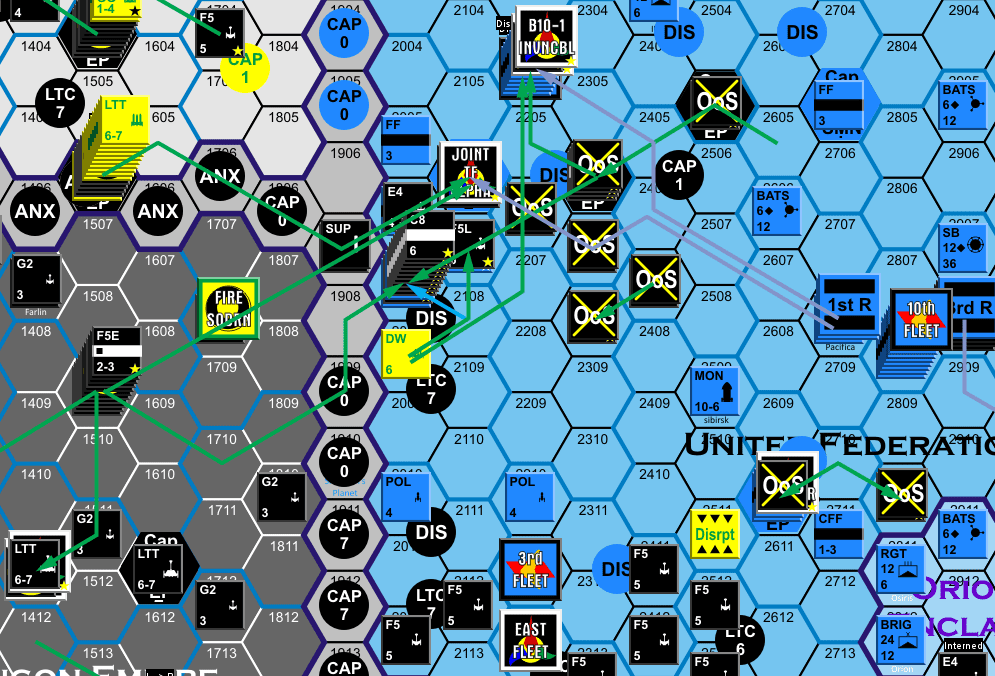
The Lyrans’ raids both targeted Federation provinces, disrupting both. The Klingons were down to one ship in the raid pool, the C5, which attempted to open up supply, but Byron just reacted a second ship into the hex, leaving it to pick on a FF, which retreated on a bad roll, while a new D5W was added to the raid pool, which picked off a patrolling POL. The Romulans sent the FFH to pick off a defending FF on 3210, and drove it off, while the two SPs evaded detection to disrupt a Federation and a Gorn province.
With forces still stuck on 2306 with no movement supply, making a second try at the 4th Fleet SB was a certain item for me. At the same time, it’s been four turns since the opening raid on the Kzinti capital, so it was time to go in and re-devastate everything. I had actually hoped to do that last turn, but there were other problems to take care of; but this time those would have to wait. The good news was that parts of the Kzinti fleet were still deployed outside the capital, so I could be sure the Kzinti reserves would stay there for defense, and not interfere with a small force re-taking 1202. Other Lyran activity was largely restricted to sending cripples home, and reshuffling after the fall of the Enemy’s Blood SB.
The Klingons re-occupied 2610, and considered sending Invulnerable to 2509, but sent it to help out at 4th Fleet instead, which will probably trap it in that region for the next few turns, though the move did get it to a spare admiral. The Romulans tried getting fancy and occupied 3210 with a SEH, while moving the out-of-supply IV Legion past it. They also struck at the SE Gorn SB with what was available, but that didn’t actually include any CR 10 ships (oops, I hadn’t noticed), while sending a very large force after the DNT at the SW corner of Gorn space, and picking off another border BATS.
Back to Kzintai.
Back to the 4th Fleet SB.
Back into supply.
And back across the Gorn border.
I hadn’t been at all sure where the Federation reserves would go. One went to help the 4th Fleet, while another went to help the largely pinning battle on 2106, dropping NCLs on a couple Klingon ships in the way who were making sure supply would stay open. He sent one after planet 3210, instead of the main force nearby, and the last went to help the main Gorn fleet in 4008. The Gorns sent reserves after a small pinning battle in Federation space (admittedly the only thing in range), and their SB (which was necessary; while the Romulan force had problems, it could handle the defending fleet by itself).
Battles:
3209: Romulan: dest WE
3210: Romulan: dest SEH
1202: SSC: Kzinti: crip FF; Lyrans capture planet
0414: SSC: Hydran retreat
2610: Federation: dest 2xcripFF; Klingons capture planet
4608: Gorn: dest BATS; Romulan: crip WE
3311: Federation: dest POL
2204: Federation: 2xSIDS, dest FFE, crip 2xNCL, 5xFF; Klingons: dest D7, D6S, F5L, 2xF5 crip D7C, 2xD5, F5
2307: SSC: Federation retreats; Klingon: dest F5
2107: SSC: Federation: dest FF
2006: SSC: Federation: dest cripFF
2007: Federation: dest POL
2106: Federation: dest CA, crip NCL, 4xFF; Klingon: dest D5 Lyran: dest STT
2005: Federation: dest cripFF
2206: SSC: Federation retreats; Klingon: dest E4
1401: Kzinti: Kuballus: 2xPDU, 2xSIDS, devastated; Keevarsh: devastated; Zabbottish: devastated; Vielsalm: devastated; Zaforma: devastated; Strikus: devastated; Vronkett: devastated; dest LAD, crip CC, CLD, DD, 3xFFK, FH; Lyran: dest STJ, 3xDW, 2xFF, FFE, crip BC, 3xCW, CWE, CWG; Klingon: dest D6, D5, AD5, F5L, crip 2xD7, D5, F5
4806: Gorn: dest BD, BDS; Romulan: dest SP, SNB, SN, crip KE, SP
4008: Gorn: dest BATS; Romulan: dest SPG, crip KE, SP
Trying to get fancy while pulling the IV Legion out cost me an extra ship, and a bigger one than I should have lost. Meanwhile, continued poor rolls in SSC kept the Lyrans from getting an easy kill of a FF in 1202, while a ‘7’ allowed a small Hydran force to retreat out of 0414 after sacrificing its fighters.
The 4th Fleet SB battle only went two rounds, with the natural superiority in Federation firepower and EW, and worse, the Federation rolled much better both times. I stayed on target and damaged the SB, but it will be a long time before this gets anywhere at this rate. I was worried that I’d be out of supply after combat in the area, but the F5 in 2307 came through to force an NCL to retreat, even though an even higher roll destroyed it in the process (10 vs 11), which guaranteed supply would get to 2304 even if the Federation controlled every other contested hex. (Later, an E4 outdid him (11) to force that same NCL and a second one to retreat. Byron might want to cashier that captain.)
Byron had what it took to win in 2005, and then the reserve dropped a bunch of extra NCL and FFs on the fight to make sure of it. For the first time this game, the Klingons had an ‘ideal Kzinti line’, with three carrier groups and a D5 in form, which he directed on, rather than see me take 35 points on 24 fighters and crippling an escort or two. (Even with the Fed high-quality fighters, 24 fighter factors (thanks to an oversized D6U squadron) should be a record that will stand until the Alliance puts up Fed fighters and a CVD.)
The Lyrans put up two lines in the capital, and the Klingons put up one, as I worked my way through the outer systems and tackled the minor in the home system. Since the Lyrans are increasingly homeless in Kzinti space, but their SAF survived slow pursuit from 1202, I sent it in here to hit the BATS over Kuballus, and rolled well after being disrupted to do two SIDS, but the G attack on it failed (he backed up the PDUs), and he backed it up on the second round when I caused a loss while mauling the planet to devastate it. It would be tempting to go back and finish the job next turn, but I’ll probably have bigger emergencies to handle.
Other than the Gorn SB, I hit my main goals for the turn, though I had meant to reclaim NZ planet 1910 again with a couple of ships, and it slipped my mind completely during movement. The raid on the Kzinti capital cost me a bit more than I had hoped, but it needed doing, as the Kzinti economy was set to go up 15 EP otherwise. A big problem has been the breakdown of the repair cycle, and no matter what, I should be getting some important ships back into service next turn, and the Romulans got through their backlog this turn. Now to see if I can keep from losing too much this coming turn….