This is the ninth in a series of reviews looking at the evolution of Europa Universalis IV. See the previous reviews here:
Europa Universalis IV: A Fantastic Point of View
Wealth of Nations: National Trade
Res Publica: A Tradition of the People
Art of War: Reform-Minded Patch
El Dorado: Expansion of Gold
Common Sense: Uncommon Changes
The Cossacks: Cossack Estate
Mare Nostrum: Paradox’s Sea
:strip_icc()/pic7697967.jpg) After Mare Nostrum, the development team for Europa Universalis IV next decided to tackle a game mechanic that had been in place since the original game for the next big patch as well as add a number of new features in the next expansion. Patch 1.18 came out on October 11, 2016, to support the expansion Rights of Man. The follow-up 1.19 patch came out on November 24.
After Mare Nostrum, the development team for Europa Universalis IV next decided to tackle a game mechanic that had been in place since the original game for the next big patch as well as add a number of new features in the next expansion. Patch 1.18 came out on October 11, 2016, to support the expansion Rights of Man. The follow-up 1.19 patch came out on November 24.
Institutional Progress
:strip_icc()/pic7698198.jpg) Ever since the original Europa Universalis computer game, nations had been placed in technological “groups”. Most of Europe was in one, the Ottomans started with better technology, but were in a group that meant that they paid more to advance, and things go downhill the further from Europe you get. It was a fairly simple system meant to showcase Europe’s rise to dominance in the period of the game, and a bit of flexibility was added early on with the ability of countries to “Westernize”, shifting them to a better (cheaper) tech group.
Ever since the original Europa Universalis computer game, nations had been placed in technological “groups”. Most of Europe was in one, the Ottomans started with better technology, but were in a group that meant that they paid more to advance, and things go downhill the further from Europe you get. It was a fairly simple system meant to showcase Europe’s rise to dominance in the period of the game, and a bit of flexibility was added early on with the ability of countries to “Westernize”, shifting them to a better (cheaper) tech group.
Patch 1.18 did away with this system, replacing it with institutions. There are no groups, no fixed cost penalties, and no Westernization. Instead there’s a series of eight institutions, with one active well before the game begins, and the other seven cropping up every fifty years, and not adopting them causes penalties to advancing in technology.
The first institution is Feudalism, which is described as a variety of means of putting together a centralized state. Most, but not all, of the world has embraced Feudalism as the game starts, but tribal areas (most of Sub-Saharan Africa, the New World, and darkest central Asia) have not, and start with a +50% penalty to technology costs.
In 1450, the Renaissance starts, with one Italian capital getting it, and it spreads from there. Any European (with a very generous definition of “European”) province with good development will start embracing the Renaissance on its own, but bonuses from adjacent provinces means it will spread throughout Italy first, and then into Europe before the rest of the world sees it.
Once an institution starts there is a cumulative +1% to technology cost per year for countries that have not embraced it (with a +50% maximum per institution). Even better, each institution grants a bonus when adopted, so it’s not just a race to avoid penalties, but one to get benefits as well. The technology penalties aren’t that bad at first, but it starts adding up, and if you’re still struggling to adopt the Renaissance in 1500 when Colonialism starts, you’re going to have a problem.
There are ways out of the trap. You only need some of your provinces to adopt the institution before you can force your country to adopt it. You just need to spend ducats (money) for all the provinces that haven’t adopted it yet (yes, that is very expensive for a large country). Adding development (introduced in Common Sense, but added to the base game in patch 1.28) to a province also adds to progress towards the next institution to be adopted there, so you could develop a province until it has the institution, and let it spread from there (also expensive—in monarch points, but you’ll be sinking a lot of extra monarch points into technology if you’re behind in all the hot philosophical fashions).
This is one of the bigger changes to core mechanics in EU IV during its post-release development, and a very good one. The overall idea is inspired, and feels a lot more natural than the old tech groups. Its nearly the only feature of the patch, and it overshadows the Rights of Man expansion, which does have a lot of features.
Cultured Court
The other real feature of the patch allowed better internal management. Each province has a culture, and these cultures are arranged in groups. Provinces of “unaccepted” cultures cause trouble, and will never be as productive. It’s always been possible for things to shift around depending on how prevalent a culture is in your borders, but now there’s a way to manually shift this around. Its generally not a big deal, but is a nice extra bit of control when needed.
At the same time, the expansion greatly increases mechanics around the court. Where normally there is the current ruler and his heir (for monarchies at least), there is now a permanent consort position, which takes over when a regency is needed (instead of a generic ‘regency council’). There’s events and such that can happen around the consort, but mostly it’s there for the regency.
Further control was also added in that a monarch can retire in favor of his heir. This is mostly for those very poor-stat monarchs that you just wish would die so his competent son can take over. And there’s a few other wrinkles, such as disinheriting the current (hopeless) heir, so you can try to get a better one.
Additionally, the expansion enables a list of eight great powers, kind of like in the Victoria series. Those that make the list get bonuses, meaning those powerful nations get some extra help with the expansion. What I find interesting is that the ranking is by total development divided by the current institution tech penalty. So Ming starts as the top power, but will quickly drop off as it has no hope of getting Renaissance quickly, and without some very deliberate player actions, no chance at Colonialism either, which combined will eventually reduce its effective development by half.
Traits of Man
:strip_icc()/pic7698348.jpg) All these rulers, heirs, consorts, and military leaders, also got more fleshed out with traits in the expansion. A ruler (or heir) generally has one as soon as they are of age, and then generate a second one after ten years of rule, and a third after twenty-five years in charge. Military leaders get theirs randomly after battles.
All these rulers, heirs, consorts, and military leaders, also got more fleshed out with traits in the expansion. A ruler (or heir) generally has one as soon as they are of age, and then generate a second one after ten years of rule, and a third after twenty-five years in charge. Military leaders get theirs randomly after battles.
This is basically the version of traits seen in Stellaris, mixed with the leader bonuses seen in Hearts of Iron games. Most of these are bonuses to one government statistic or another, but a few are also negative. An interesting twist is the ruler traits will also determine AI behavior. In addition to the five basic personality types in the base game, an Industrious ruler will spend more on building improvements, a Sinner will raze and plunder provinces, and so on. And of course, some traits will open up new options in some events (which will be highlighted, a bit like in Crusader Kings II).
This is a really nice bit of flavor and since it affects everyone, I’d say it is the main reason to get the expansion.
Governments of Man
:strip_icc()/pic7698349.jpg)
:strip_icc()/pic7698346.jpg) The expansion also gives access to two new unique government types. First, the Ottomans get a unique monarchy form. It can’t be voluntarily changed, but the general revolution disaster can change from it, and changing religions will revert it to a despotic monarchy.
The expansion also gives access to two new unique government types. First, the Ottomans get a unique monarchy form. It can’t be voluntarily changed, but the general revolution disaster can change from it, and changing religions will revert it to a despotic monarchy.
The main point of the new type is to keep Osman as the ruling dynasty. There will be no shifting to the dynasty of a royal marriage, if there is no heir for too long, an event will fire to present you with a choice of new heirs.
This doesn’t mean there’s no dynastic worries. There’s a number of new events around scandals in the palace (which can turn into a too-easy source of prestige), or the heir may try to depose the current ruler. This turns into a normal noble revolt, but it is fired by Ottoman-specific events instead of the current revolt system. I’ve only seen the “small” version, which is a fairly typical revolt, but the events imply much bigger ones are possible.
The Prussian Monarchy, meanwhile, has some fairly good bonuses, like most of the unique governments, and also gets a militarization mechanic. This is another percentage scale that grants bonuses to discipline, manpower, and maintenance the higher it goes. Legitimacy and army tradition add to it, while having more provinces causes it to go down. Overall, if Prussia has any reasonable amount of territory, it will tend to go down, so it doesn’t feel like the most useful of bonuses. However, military monarch points can be spent to push it up, and at the historical size of Prussia in say, The Seven Years War, it won’t go down very fast.
Finally, factions were added to revolutionary governments in the expansion. I haven’t done much with that, but it makes a lot of sense for Revolutionary France, or any other government undergoing those kinds of stresses. It also adds an appropriate path from a revolutionary republic to empire, as the diplomatic faction, The Imperials, will shift the government type if they get too powerful.
Coptic Fetish
:strip_icc()/pic7698347.jpg) Two more religions got extra mechanics with this expansion. The Fetishist religion (found in southern Africa) gained cults, which are akin to the Hindu gods in Wealth of Nations. Like them, you pick a bonus from a list every time you get a new ruler. However, it’s not a static list of possible bonuses, and depends on where the particular country is. Also, as they come into contact with other religions they can gain access to new bonuses. So it starts out more limited than Hinduism (there’s typically only three possible bonuses at the start), but can become more flexible over time.
Two more religions got extra mechanics with this expansion. The Fetishist religion (found in southern Africa) gained cults, which are akin to the Hindu gods in Wealth of Nations. Like them, you pick a bonus from a list every time you get a new ruler. However, it’s not a static list of possible bonuses, and depends on where the particular country is. Also, as they come into contact with other religions they can gain access to new bonuses. So it starts out more limited than Hinduism (there’s typically only three possible bonuses at the start), but can become more flexible over time.
Coptic countries get bonuses from holy sites with RoM. There are five provinces considered holy to the Coptic faith (this is an idea from Crusader Kings II), and every Coptic country can get a bonus (“blessing”) for each one held by any Coptic country. Because of this, success for one can breed success for all—if they don’t spend too much time fighting each other instead.
At the start, two holy sites are under Coptic control, with Askum in Ethiopia, and Qasr Ibrim in Makuria, though the province itself is not Coptic. The other three are further away, with the closest being Alexandria, which means conquering the Mamlukes, or taking on the Ottomans. So, don’t expect many powerful AI Coptic empires, but it is not a bad goal for a good human player in search of a challenge.
Conclusion
Patch 1.18 saw another high-level mechanic change to the game. And again, it broke with tradition, and made the game better for the change. Personally, I like the system a lot, but it does seem to be comparatively easier for the rest of the world to keep up on the institutions. Large portions will be behind for long periods, but they do spread, and this means non-European powers can do much better in late-game technology than previously, which robs some of the historical feel, though from a player perspective the decisions around all this are more interesting.
The expansion is overshadowed by all this, but is still a good expansion. I do have problems in that some of it seems too convenient, namely retiring and disowning rulers and heirs. Also, being a great power confers extra power projection (reasonable), which makes it much easier to float over the 25 limit for an extra leader, and at the top end consistently be at 50 to get extra monarch power, which seems too much of a ‘rich get richer’ effect for me. Similarly, the expansion also allows you to debase currency, effectively taking a loan, but getting corruption instead of the usual loan penalties. Since you normally pay monthly money to fight corruption, this is pretty much just extra loans without having to worry about paying it back.
The religious mechanics are expected at this point, and Coptic is certainly a good choice for expanding the mechanics. The two new unique government types are also interesting choices. For me, the biggest draw are the leader traits, which help add another layer of uniqueness, and bit of potential role play to them. I don’t know that I’d recommend the expansion just for that, but it’s a good foundation for deciding if you want the other features.

/pic527789.jpg) TSR’s eighth FR-series module was odd even by the standards of the odder entries in the series. It was a slim boxed set, containing a booklet of advice about how to run city adventures, four sheets of miniatures-scale maps (meant to be cut down into a total of 12 segments), and several cardstock sheets of TSR’s latest round of paper props (like pretty much all of the others, done by Dennis Kauth).
TSR’s eighth FR-series module was odd even by the standards of the odder entries in the series. It was a slim boxed set, containing a booklet of advice about how to run city adventures, four sheets of miniatures-scale maps (meant to be cut down into a total of 12 segments), and several cardstock sheets of TSR’s latest round of paper props (like pretty much all of the others, done by Dennis Kauth). Despite it’s position in the FR series, and the branding on the cover, this supplement has nothing to do with the Forgotten Realms at all. Well, other than the fact that there are cities in it that haven’t been detailed yet that a DM might want to work up. The bulk of the 64-page booklet is an introductory treatise on cities (very introductory at the beginning), starting with likely locations, sizes, governments, and so on. A pair of adventurers discuss the topics themselves (in boxed text), which doesn’t help the presentation. More usefully, an example city is fleshed out during the course of the booklet. One might expect it to serve as an obligatory tie-in to the Forgotten Realms, but it’s an entirely new location, in its own world (in fact, it is described as being on the northern coast of its continent, a location that wouldn’t work with any of TSR’s settings of the time).
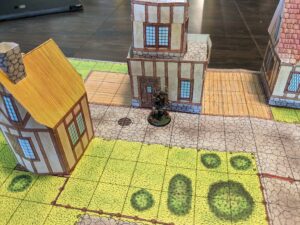 The map sheets are marked in 1-inch square grid, much like the 3D-Adventure products (such as AC3 and AC8), but are double-sided color sheets and meant to be put together in any number of ways as geomorphic boards. The ideas there are probably the highlight of the product, even though all the maps are fairly dense with buildings. The buildings marked on the map are in standard sizes, that can take the various papercraft buildings in the set. Some of these are flat topped, and designed so they can be stacked together to create taller buildings.