
J207 Unhorsed
As we finished up with a supernova, I had Patch look over the list of scenarios from ASL Journal 13, and he picked a Normandy action among the hedgerows. It’s a month after D-Day, and the Iowa National Guard Cavalry is just being committed to the front, attacking between Carentan and Saint-Lô.
The Germans defend half of board 54 with eight SS squads, six “?” and an AT Gun. Patch set up a line across the board at the limit of his setup area, with a second line in the center. The Americans enter from off-board with thirteen squads (in the common mix of 667 and 666), decent support equipment, two M8 armored cars and Stuart. These last are handy thanks to canister rounds, but the ACs can’t cross bocage hexsides, which really limits where they (and the American force overall) can go. There’s only one road through the initial belt of bocage; it’s possible to bypass some woods into that area, but it will eventually dead-end. So I concentrated in the north to seize the initial road. The terrain is dense with a lot of bocage (this board was originally from AP #4; this is at least the second time we’ve used one of it’s hedge-heavy boards, though we still need to get to the Action Pack itself), but the Americans do have seven turns to exit 10 EVP (vehicles don’t count, sadly) off a sixteen hex board.
The immediate goal was to get firm control over the first hedgerow and try to scare Patch off the second. My first unit saw Patch try to put a FL down the entry road, but failed with doubles that still broke my HS. My second move drew fire that pinned me. After that, things calmed down, and he only had one more shot for no effect. Final Fire broke another HS, however. My return fire was largely ineffective, with nothing more than a single pinned result.
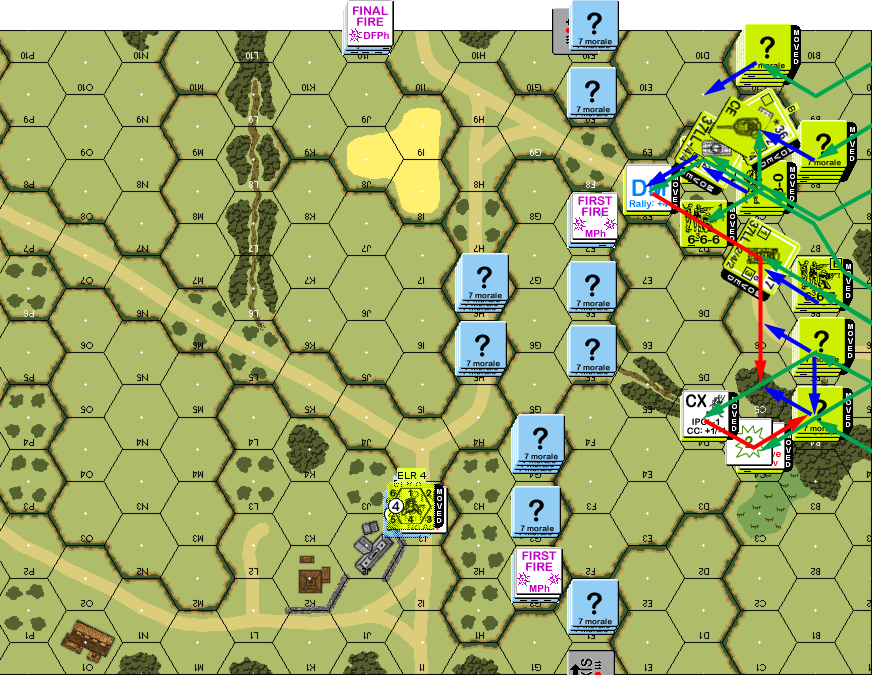
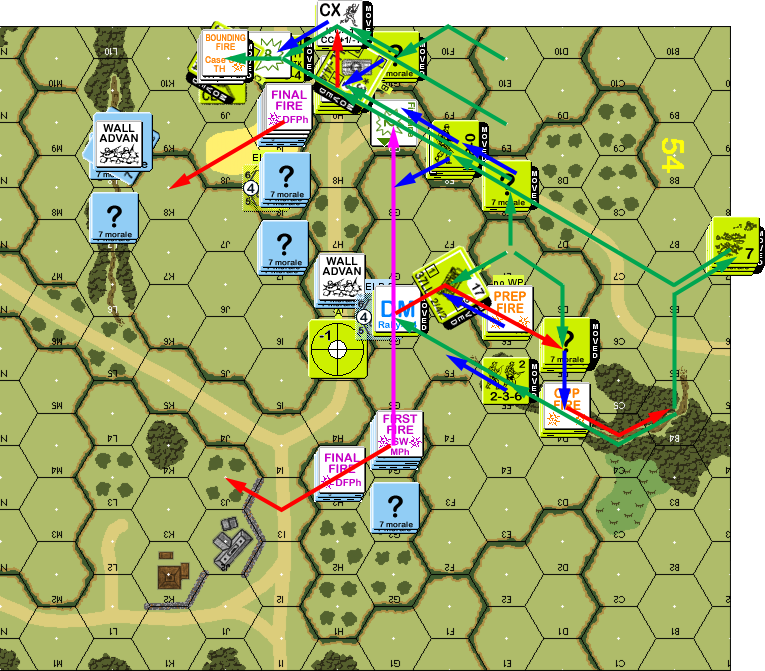
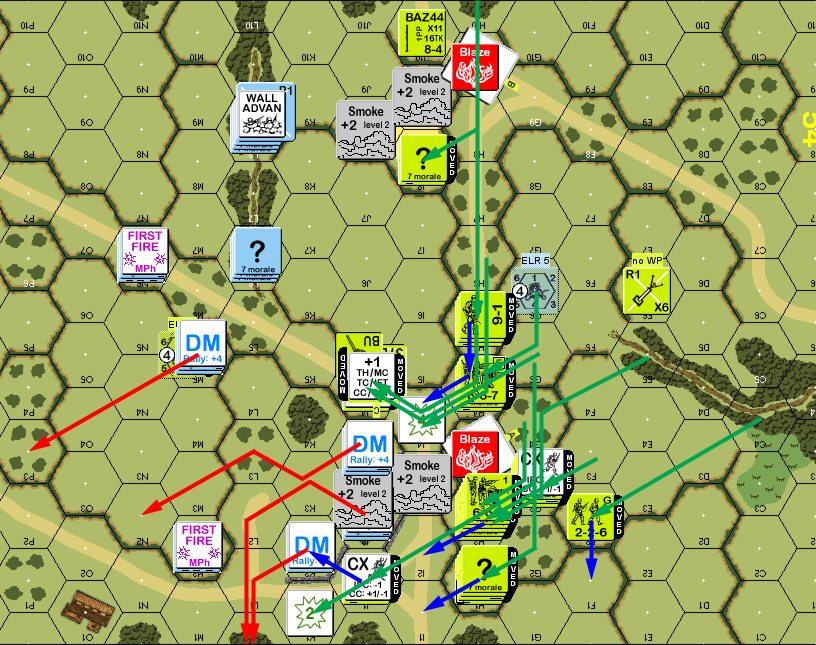
Situation, American Turn 1, showing the full board. There is a mild breeze from the northeast.
As expected, Patch started falling back on his turn, and the best I could do during movement was a PTC that he passed. However, I eliminated a Dummy in F5 during DFPh, and an AC got three hits on G8, but couldn’t get a good effects roll. On the other hand, Patch put a large fire group in G4 for a K/2 that pinned the remnant HS.
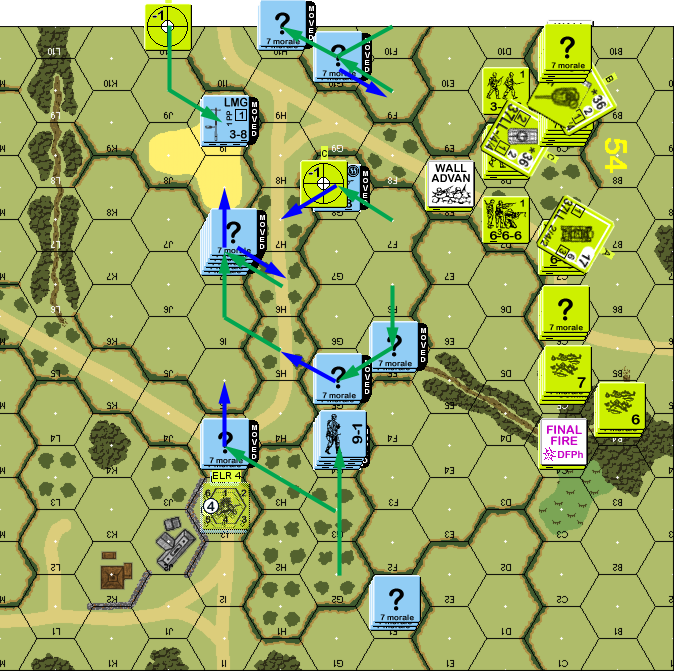
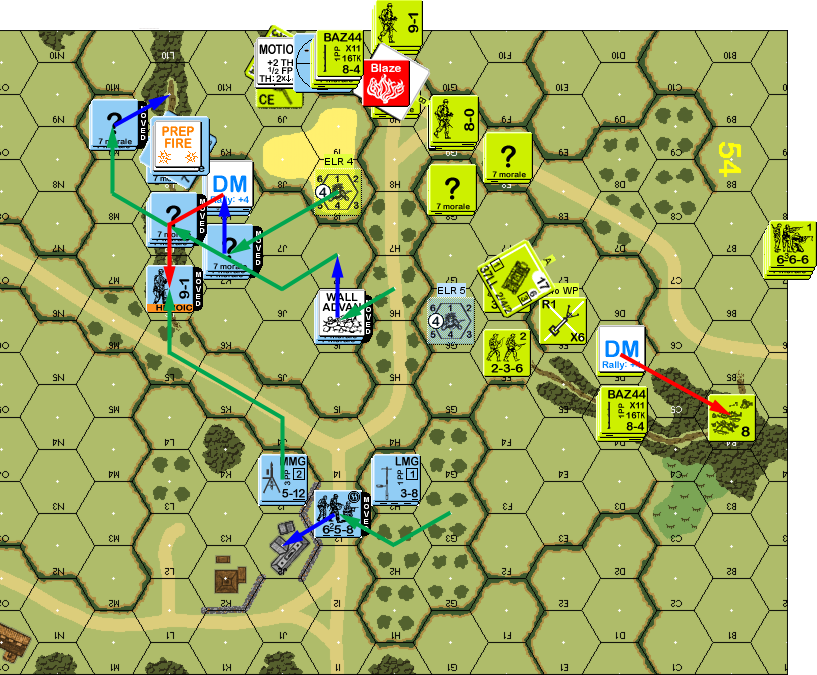
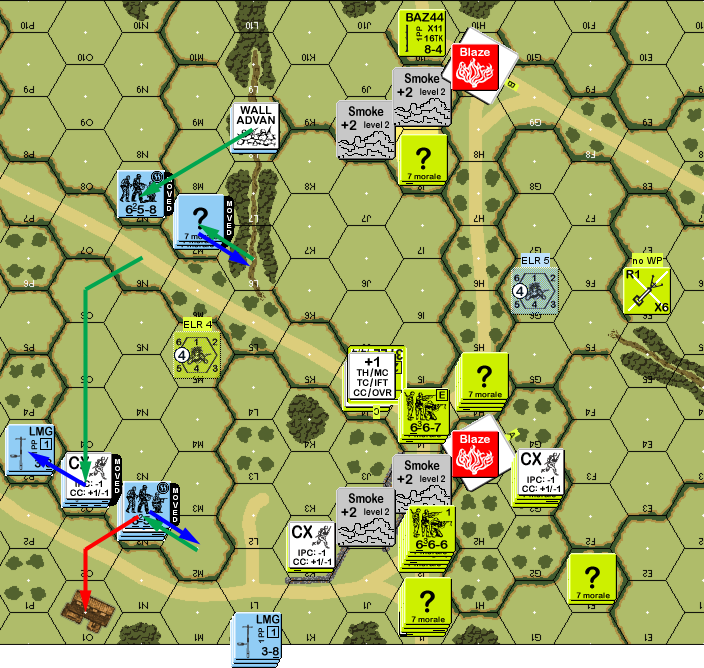
Situation, German Turn 1.
I managed to rally one of my broken HS for my turn 2. I didn’t fire, and my first move was a HS probe that took a 2MC to ELR. The good news was that I found out that F9 was a HS himself, so putting pressure there was a main goal. Sadly, the two follow-up squads pinned to SFF and residual. A third followup finally survived, and forced a FPF pin. A probing HS in the center ELRed again, but it took Patch two shots to do it, so it tied up some fire power.
The developing problem was the big group in G4, which could put a MMG FL out into G9, and needed a way to pry him out of there. They Final Fired at F8, ELRing a squad, breaking two others, stunning a AC, and pinning the 8-0. However, my sniper went off, killing his 8-0 in I8. The main German weakness here is that they only have two leaders; for eight squads, that a decent ratio, but now all he had was the 9-1 in G4. If I could actually get someone to break, it could be trouble. Thankfully, I had a number of good rolls as well, and broke a LMG squad in H6, as well as pinning F9. The one GO squad advanced into F9 and eliminated the German HS for no loss. H5 turned out to be a Dummy when I advanced next to it and claimed WA.
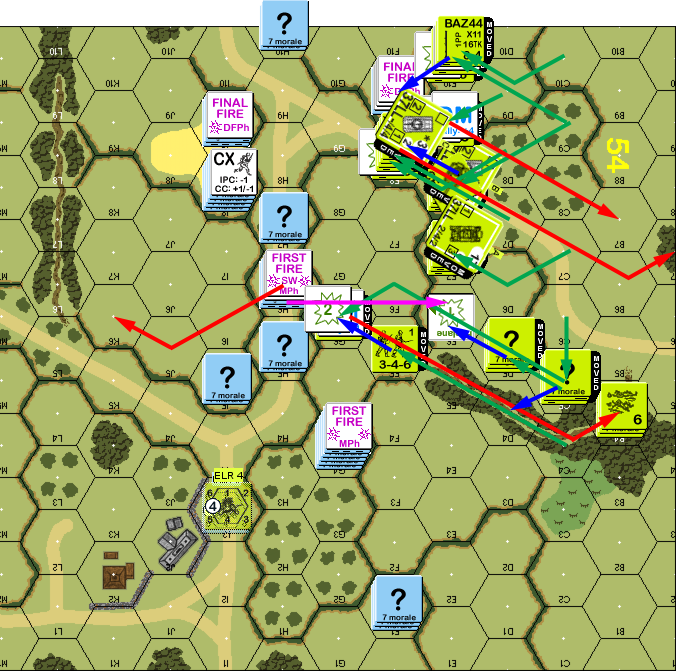
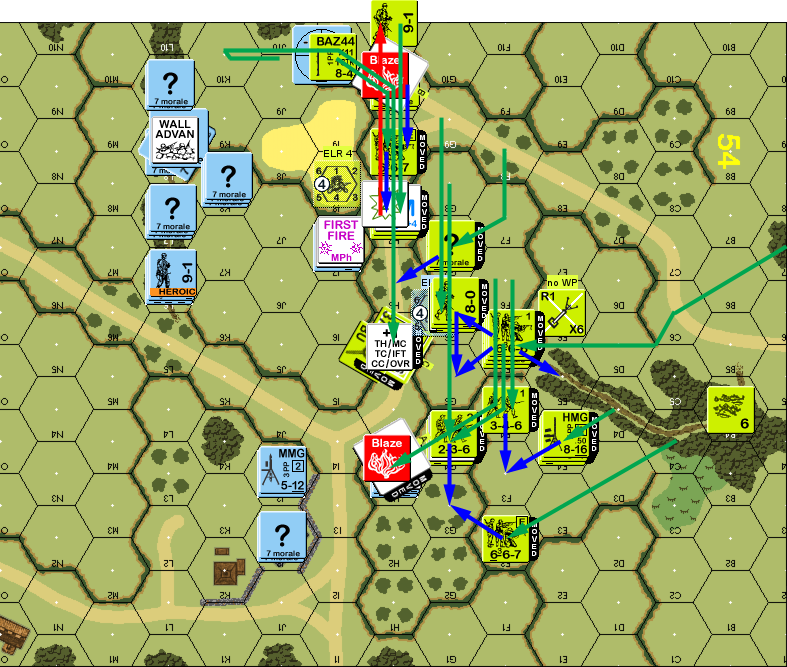
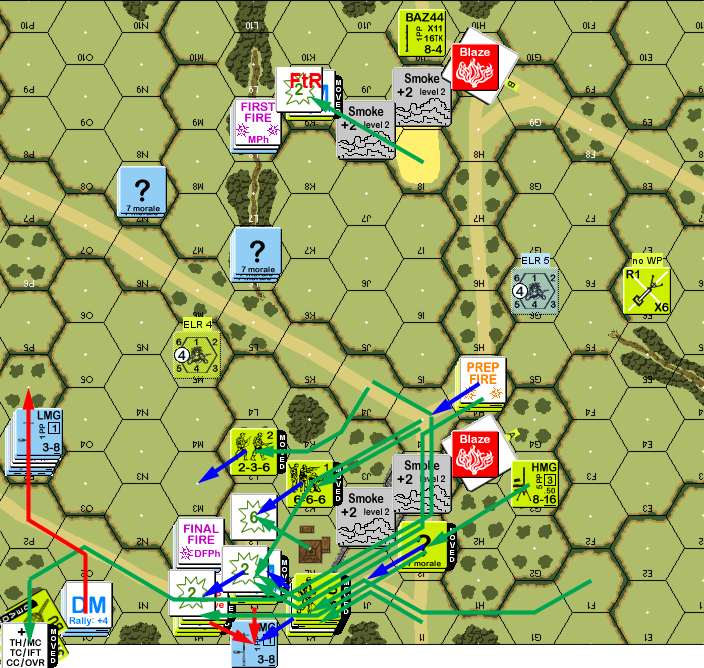
Situation, American Turn 2.
Patch manged to self-rally his squad, and thankfully, my 8-0 had self-broken to rout, and also self-rallied, giving a good opportunity for rallying men in A7 on my turn. G4 Prepped, revealing and pinning my HMG squad in D4, and killing the HS in G6. The ATG revealed itself in L8 to change CA. I managed to pin I9 in DFPh, but that was it.
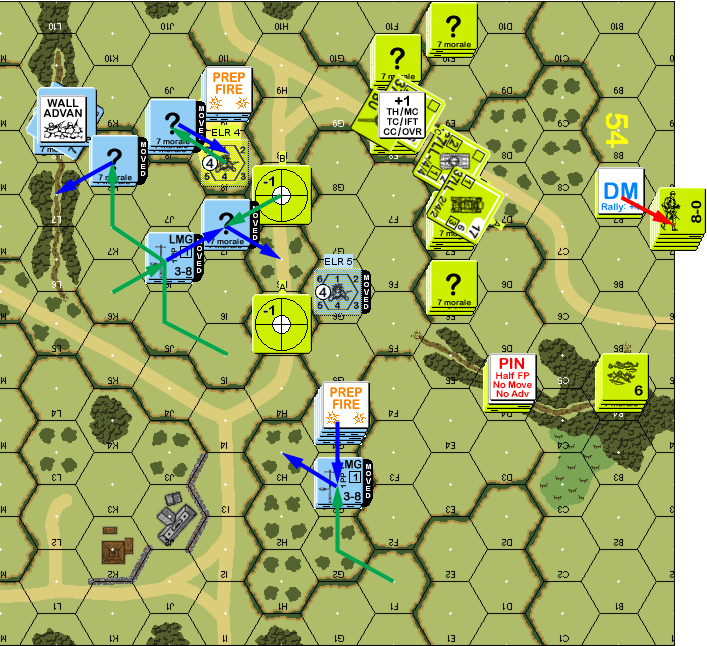
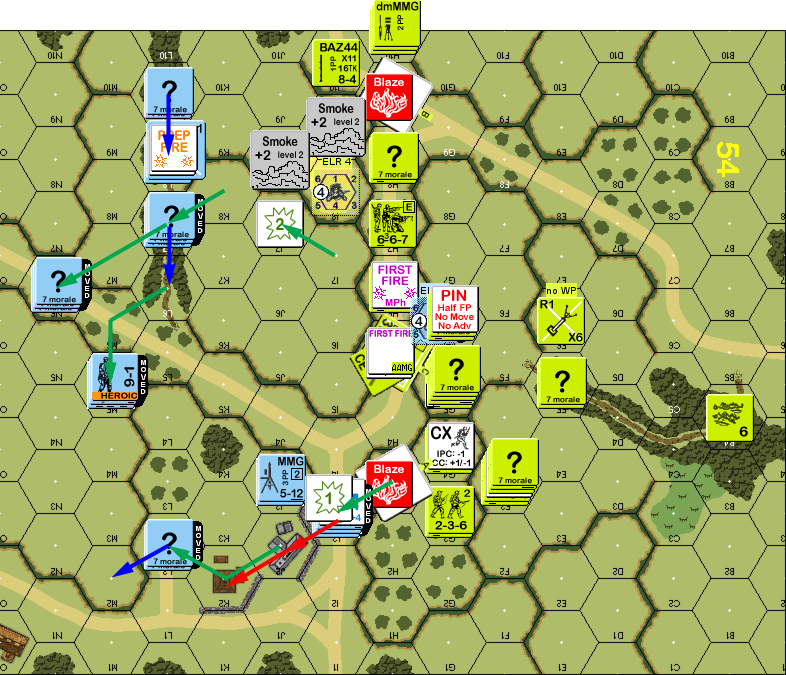
Situation, German Turn 2.
I rallied all but a squad and HS for my turn 3, with a 667 going fanatic. I tried for some WP on his H6 position with the MTR I’d just assembled, but it malfunctioned. The HMG OpFired, since it had a good chance of getting shots at his unconcealed leader+MMG that way. I continued pushing in the north, and Patch had another potential fire lane canceled by cowering. But right afterwards he got a 3KIA to eliminate a squad. A second attempt to get at I9 ELRed a squad. The lead (+1) AC got in behind the hedgerow and pinned I9 with canister, while being just outside the ATG’s CA.
Patch’s final fire broke the HMG squad, while the ATG fired, and missed, at the second AC, which was behind bocage and grain. The Stuart got a cannister shot at his MMG however, breaking the 9-1 and squad. A big shot at I9 got a 2MC… which he passed. But the squad then broke from the second AC’s CMG/AAMG 1MC shot.
Situation, American Turn 3.
Patch got a ‘2’ on his 9-1 to turn him heroic as he rallied, but the MMG squad rolled a 12 to CR to a HS, and the other squad in K8 also failed to rally. I rallied the squad in HS left in A7, with the squad battle hardening to 1st line, and I missed my Recovery attempt on the HMG. The extremes continued as Patch got a CH on the AC parked in H9, and then rolled an 11 to burn it (so close to a Dud…). He then pulled back to reorganize his defense, with the lone leader abandoning the MMG squad to help on the active flank. I only had a couple of shots, and they didn’t do anything.
Situation, German Turn 3.
For my turn 4 RPh, I self-rallied a squad in B4, rallied the squad in H10, and finally recovered the HMG, while Patch rallied the LMG squad in L6. I had been keeping in mind all this time, that I may need to do a lateral shift. With the bulk of Patch’s troops concentrating near the L6-L10 woods, it was time. The major problem at that point was the LMG squad in H3, which could see down the H-column road. I also wanted to have someone there myself to put fire down the diagonal road. To that end, once they fired to establish a FL, I sent the Stuart in for an OVR, barely passing a Bog check, and needing a +2 MP ESB check on the way. Sadly, Patch found a PF and hit to burn it as it entered his hex.
That at least silenced the hex. I contemplated advancing in for CC, but frankly, the odds would not be good, and he’d certainly have to leave.
Situation, American Turn 4.
Patch just missed self-rallying J8 for his turn, and his one Prep Fire malfunctioned the ATG. The squad in H3 tried to evacuate across the road, but a 3MC from a canister round broke it into a pair of HS. Pulling a HS out of I7 drew a K/2. However, there was just no LOS to the central road, and Patch was able to redeploy to both sides of it without trouble.
Situation, German Turn 4.
With a self-rally, I got both broken units back for my turn 5 RPh, while Patch’s only activity was to fail to repair the ATG. With three turns left, Patch’s coverage was thin everywhere, and I decided to orient my push to the south road, hoping to quickly take out the one intact squad there, and keep too much of the rest from interfering. My first probe down the road took a 1KIA, but set off my sniper to kill the heroic 9-1 and break the squad with him.
An initial HS got through I4 fine, but Patch left 4 residual there, which got a 1KIA when I tried sending a squad through. I figured I could afford to rally him, but I kept losing too many men to outright kills.
Situation, American Turn 5.
Patch missed his MMC self-rally, and lost the ATG permanently for his RPh. He lined up for interdicting the two roads, and I shot up his brokies, eliminating both HS in L0.
Situation, German Turn 5.
Nothing happened in my RPh, but I finally assembled the remaining MMG, which was to advance into I4 and keep Patch from crossing the middle road as I continued pressing for the south-side road. I had left a squad in I8 to interdict his movement nearby. Now that was not needed, and I sent the squad to towards an exit, but the crew broke them.
I lost two squads getting next to M2, but that put him at Final Fire. Sadly, FPF then caused a K/2, which pinned my 8-1 and broke the remaining HS. Trying to get the odds for CC, 9-1 went into L1 and wounded on a 12 from residual NMC. The rest was piling up for the push, and the surviving AC circled around to put P3 under fire, since he was about my only chance to keep that part from turning into a gauntlet.
Situation, American Turn 6.
Nothing rallied for Patch’s last RPh. I hadn’t been able to get at M2, but it was still nearly surrounded, and was looking at some open ground shots as it tried to move away. Patch eventually agreed when I opined the best course of action was probably using spraying fire to try and break a couple American squads. Thankfully, that and the shot from P3 rolled high and did nothing. The crew moved adjacent to my MMG squad in I4. N7 tried racing across the middle road, but took a 1KIA as I put down a FL, and that generated another 1KIA when L6 tried to run across. That was just the MMG, so DFPh saw the squad fire at and break the crew. I wasn’t able to affect P3, but did break M2.
I rallied a HS in L0 for my last turn, giving me 17 VP worth of GO units, most of which could just barely exit (a few were closer), and most of which would have to get by Patch’s remaining LMG squad, which had advanced to O3. It was possible for him to put residual into a good number of hexes and force a lot of fire attacks on my way out. However, that got cut down a lot when the AC (having finally used up its canister rounds last turn) managed to pin the squad. His first shot failed to do any damage to my exiting HS… and then his second one was doubles, denying him the ability to leave residual in O1. This meant I could just run around his fire and exit sufficient units for 10 EVP without trouble.
Afterword
The scenario got to a slow start as we re-sorted out the bocage rules. They make for some fairly interesting scenarios (and this is one!), but we don’t do it often enough to not need a refresher course each time.
There was some amazing luck this game. There were a couple of turns that were just brutal because we both consistently rolled low on attacks. Patch tended to come out of that better because of a two point difference in morale, but there’s not much you can do about KIA results. On the other hand, both side’s SAN is 4, and I think both sides rolled SAN a fairly even number of times, but Patch got one pin out of his, while I got one or two pins, and two leader kills out of mine. That last makes my sniper the MVP.
But it certainly wasn’t all luck. Patch probably would have been better advised to put the ATG in J10. The main problem is it’s too obvious, but I didn’t think about that much ahead of time. Certainly, Patch’s location for it was quite clever. Going in, I knew resistance was going to pile up in front of me, so I would be well-advised to have a flexible approach, where I could shift my axis of advance. Part of the initial strategy was to flank the needed route up the main road to keep him from concentrating on it, but it also allowed the turn 5 switch to the south… which was only really possible by taking partial control of the lateral road. Also, I got good use out of all the vehicles.
Discussion ¬