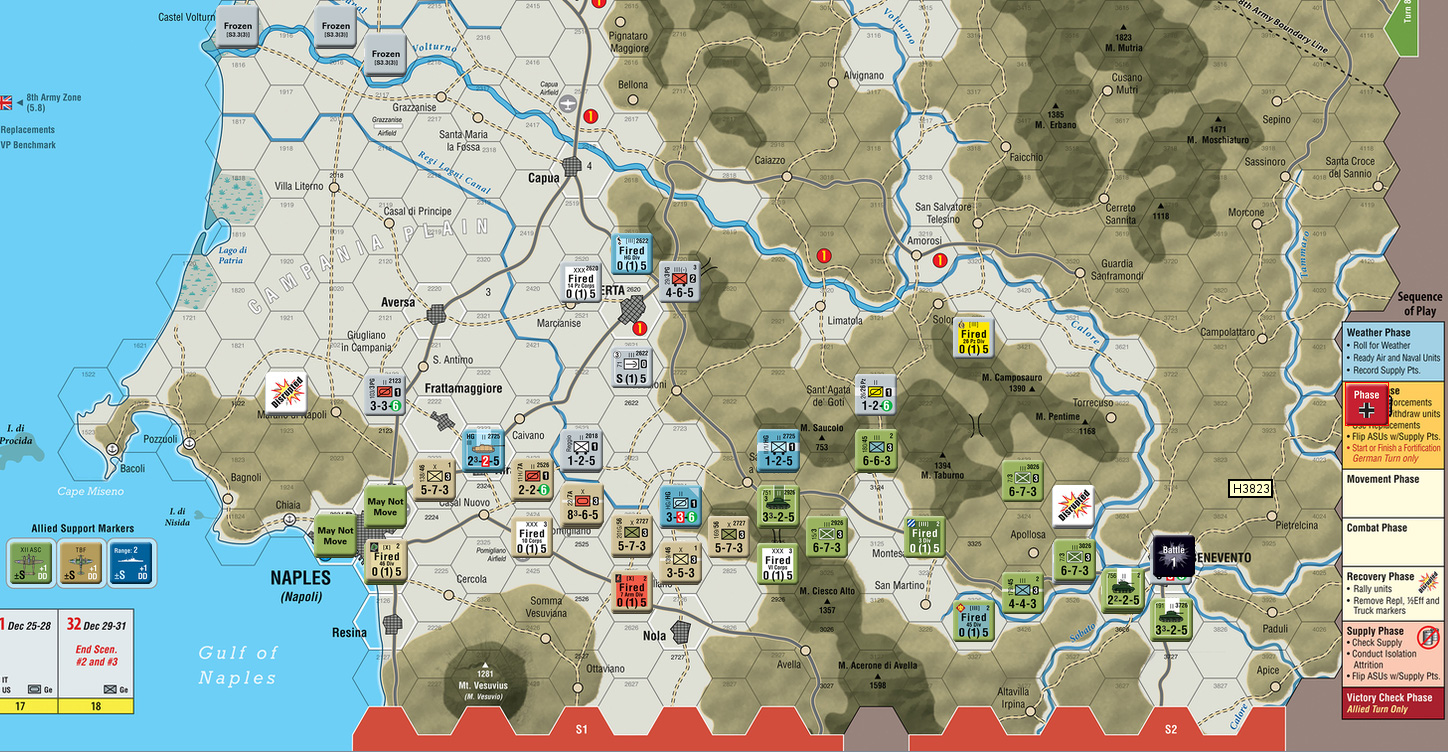
Rindis.com

All my hobbies, all the time
  • Home
  • My Blog
  • Games
  • History

Categories

  • Books (449)
  • Comics (10)
  • Gaming (877)
    • Boardgaming (647)
      • ASL (151)
      • CC:Ancients (78)
      • F&E (78)
        • BvR – The Wind (26)
        • Four Vassal War (9)
        • Konya wa Hurricane (17)
        • Second Wind (5)
      • SFB (75)
    • Computer games (151)
      • MMO (74)
    • Design and Effect (6)
    • RPGs (64)
      • D&D (25)
        • O2 Blade of Vengeance (3)
      • GURPS (31)
  • History (10)
  • Life (81)
    • Conventions (9)
  • News (29)
  • Technology (6)
  • Video (45)
    • Anime (43)
  • Writing (1)

Patreon

Support Rindis.com on Patreon!
Become a patron at Patreon!

Other blogs:

RSS Inside GMT

  • Foreign Intervention in Baltic Empires: Part Two May 8, 2025

RSS Playing at the World

  • Playing at the World 2E V2 Arrives May 5, 2025

RSS Dyson’s Dodecahedron

  • Mermay #2 May 8, 2025

RSS Quest for Fun!

  • Pro Active Price Increases April 5, 2025

RSS Bruce Heard and New Stories

  • D&D Class: The Cryptreaver February 24, 2025

RSS Chicago Wargamer

  • The 2 Half-Squads - Episode 310: Cruising Through Crucible of Steel January 27, 2023

RSS CRRPG Addict

  • Realms of Darkness: #$@* the Lemons and Bail May 7, 2025
SF&F blogs:

RSS Fantasy Cafe

  • Virtual Sci-Fi/Fantasy Book Recommendations Event May 5, 2025

RSS Lynn’s Book Blog

  • Review: Senseless by Ronald Malfi May 8, 2025
ASL blogs:

RSS Sitrep

  • Blockhaus Rock April 1, 2025

RSS Hong Kong Wargamer

  • FT114 Yellow Extract After Action Report (AAR) Advanced Squad Leader scenario April 16, 2025

RSS Hex and Violence

  • This still exists? March 25, 2025

RSS Grumble Jones

  • Grumble Jones May Scenario GJ147 Sturmgewehrs at Schevenhuette May 1, 2025

RSS Desperation Morale

  • How to Learn ASL March 16, 2025

RSS Banzai!!

  • October North Texas Gameday October 21, 2019

RSS A Room Without a LOS

  • [Crossing the Moro CG] T=0902 -- Rough start July 18, 2015
GURPS blogs:

RSS Dungeon Fantastic

  • Rules, Rulings, and Notes for DF Session 208 May 9, 2025

RSS Gaming Ballistic

  • Preview PDF Downloads Suspended due to Bot Spam January 5, 2025

RSS Ravens N’ Pennies

  • Carpe Blogiem: Author, Patreon, and Blog Highlights – February and March 2025 March 30, 2025

RSS Let’s GURPS

  • Review: GURPS Realm Management March 29, 2021

RSS No School Grognard

  • It came from the GURPS forums: Low-Tech armor and fire damage January 29, 2018

RSS The Collaborative Gamer

  • Thoughts on a Town Adventures System January 18, 2022

RSS Don’t Forget Your Boots

  • GURPS Kung Fu Furries #2: “The Chicken Unleashed!” April 6, 2025

RSS Orbs and Balrogs

  • Bretwalda - Daggers of Oxenaforda pt.4 - Fallen King May 27, 2017

Two Rounds of Camalatrum

by Rindis on March 26, 2025 at 12:00 pm
Posted In: CC:Ancients

After Jackpot Jones’ untimely death, Patch and I did our usual pair of games of Commands & Colors: Ancients. Up this time was the Battle of Camalatrum, near the end of Spartacus’ rebellion. Both sides have separate detachments on the “wrong” side of the board. There is a camp that the Romans get a banner for as long as they occupy it. Also the ex-slaves start on hilltop positions, which can make them harder to deal with.

I had the slave army first, and started with Order Mounted to cycle it and move two LC. Patch Ordered Four Left to bring his detached force into contact with my center to take a block off an Auxilia. I Ordered Two Left to transfer a LC to the center and Patch advanced with Order Three Center. Order Two Right moved my detached force into the tree line and Patch used Leadership Any Section to bring his detached force to bear, knocking out my Lights at the corner of the hill, and then doing two blocks to a Warrior on momentum, and he took two blocks in exchange.

I Counter Attacked to drive Patch back off the hill, finishing off an Auxilia, knocking out a Medium, doing three blocks to another, and killing the surrounded Marcius, in exchange for four hits on three units. Patch Ordered Three Left to finish off a Warrior and Inspired Right Leadership let me engage with the remainder of my center to finish off a Medium and do three hits to the only Roman unit left there. Patch Ordered Two Center to kill an evading LC. I Ordered Mediums to bring my flanking force out of the woods (Patch had just advanced their target out of the way…) and finished off his Medium.

Patch Ordered Lights to occupy the camp, and I used Inspired Left Leadership to come down off the other hill and charge my own camp, doing two damage to the Light. Patch Out Flanked to knock out a Warrior and do a block to a Medium, taking one block in the process. I Double Timed my flanking force to the camp and finished off the Light. 6-4

The second game started with moves on my right, with Patch doing a block to a Medium. I Ordered Mediums to assemble a line in there, wipe out a Warrior, and trade a block between Mediums. Inspired Left Leadership had Patch charge in again, finishing off my Medium, but taking four blocks on two units in return. I Ordered Three Center, finishing off a Warrior, a Medium, and an Auxilia, but losing my MC in the process.

Patch Ordered Two Center to get Spartacus to a new Warrior, and we did two blocks to each other. I used Line Command to bring in the separated group, doing one block to two against the corner Light. Patch Ordered Two Right for ineffective ranged combat and I used a second Line Command to envelop the hill, and we traded one block each again. Patch Ordered Three Center, doing four hits across two Mediums, but lost a Warrior. A third Line Command kept me going around the hill, where two attacks finally got the last two hits on his Light. 6-2

Afterword

I generally don’t like ‘set up in the enemy’s rear’ scenarios, because the rules don’t let them operate right. However, with both sides doing it here, it’s easier to take, and is unusual even for those.

I had to be a little cautious at the end of the first scenario, since occupying the camp put him at five banners, and a leader death (he wasn’t going to kill a unit, but the 1-in-36 could still happen) would actually give him the win. Both of us complained of poor cards at the start, and the scattered nature of the armies also hindered things. Once I got going, I kept moving, but the opening had little I could do.

My cards were better than Patch’s in the second game, but more importantly, my dice were amazing. Except for the uphill attacks, I had really good dice, and largely swept everything ahead of me.

└ Tags: C&C Ancients, gaming
 Comment 

The Sand Reckoner

by Rindis on March 22, 2025 at 12:00 pm
Posted In: Books

Okay, lets start by setting expectations: The advertising blurb mentions ‘the life of Archimedes’, suggesting a big, dense, fictional biography via novel. No, this is a tight fairly plot-focused lighter novel taking place over maybe a single year (probably not that long).

As such, some of the most famous incidents of his life are outside the scope of the novel.

Overall, anything outside the central focus of the novel tends to be a bit simplified, and kept in relatively modern terms.

But, outside of that, this is up to Bradshaw’s usual quality. While the most famous incidents aren’t here, plenty is. There are eleven known texts by him that survive today, and bits of pretty much all of them are in here. (Since this is fairly early in his life, generally in the guise of ideas that he is starting to work out, and would presumably get formalized into his works later.) Archimedes himself is presented as unworldly, the son of a mathematician who is somewhere on the high-functioning side of the autism spectrum.

The central binding plot pillar of Syracuse being at war with Rome, and allied with her usual enemy Carthage is just one element of any that drags him into the world of practical machines—and and other grounded realities. The entire family setting around him is fiction—we just don’t know enough about him—but are essential parts of the plot. Also essential is his manservant and effective keeper when Archimedes can’t be bothered with things like money.

As with all her books, The Sand Reckoner is a very deeply character-driven book, and the cast of characters is a bit wider than normal while retaining all the charm and driven personalities of her other books. Like The Beacon at Alexandria, one of the central pillars of the book is the love of a subject. There it was medicine, here it is mathematics. And in both that love is part of the core of book, and help make it shine.

└ Tags: books, history, reading, review
 Comment 

HF6 Jackpot Jones

by Rindis on March 18, 2025 at 12:00 pm
Posted In: ASL

After our time in sunny southern France, Patch and I returned to Hatten, where there’s snow on the ground, and not that many Flames. I took the defending Americans, and regretted it, as I didn’t see any great way to hold the Germans off for five and a half turns.

The Americans are trying to hold the area around “the fort” with nine squads and three M18s (and 9-1 AL Jones). The main setup area only extends three hexes west of the victory area, so there’s not a lot of room to work with. To the north, there’s five hexes, largely orchard and a couple of wooden buildings, as opposed to the stone buildings to the west. Two of the M18s can set up HIP in orchards, or can enter on turn 1. I set up two behind the main area of defense for late-game surprises, with the third (w/Jones) to enter. Two MTRs were set up to cover the north orchard. Two “?” were at the north limit in buildings, with a HS at the corner of the allowed area, and a squad in D20, who should escape into the orchard, and fire on any halftracks that try driving around my rear. G17 and K21 got Dummies, while the main west line had two squads and a BAZ. Two MMGs were sited in K20 and I21. Mistake: I forgot to set up boresighting.

The Germans have twelve squads, two Pz IVs, a Panther, and two 250 HTs. While they have good tools, they do need to take all but one location in the victory area. Or all but two, if they have more functioning AFVs. This keeps them a bit careful about HT rushes, as losing them would be a 3-3 tie; on the other hand, the tank destroyers can only take on the Panther from side or rear, and I know Patch isn’t about to let that happen. They all enter on turn 1, with an extensive entry area.

Patch entered in two large groups, one to the west, and one aimed at the NW corner. To my surprise, he stopped to search in B20 (later, I was thinking that D21, just outside his search area, would have been a good backup to the squad in D20). I had no fire, but Patch poured everything he had into D17 with no result.


Situation, German Turn 1, showing the full board. North is to the left.
↓ Read the rest of this entry…

└ Tags: ASL, gaming, Hatten in Flames
 Comment 

Echoes of Betrayal

by Rindis on March 14, 2025 at 12:00 pm
Posted In: Books

The third Paladin’s Legacy book picks up with a nice bit of action, dealing with Arvid and shenanigans around a necklace that seems part of a deep, dark, legacy. He is not part of the most central plot line, and never gets a chance to interact with the other major plots, which do tangle with each other. He gets lost in the big ensemble cast.

Which is more a pointer to the fact that we’re in the middle of a big overarching story, as opposed to an independent book. Arvid’s arc does flow out of events in the previous book, and on those occasions we return to it, chronicle a person in the middle of a very personal arc, which make his sections memorable and a good read. It’s also quite evident that this will come back to the main events elsewhere soon, probably in the next book.

Meanwhile, the big events of the major plot (Lyonya and the elven court) and its adjunct (Tsaia and the Verrakaien) take up the bulk of the novel. The former part tends to feel like the wheels are spinning, as Kieri doesn’t have enough information to understand just what is wrong, and the cryptic warnings he has gotten. Movement is slow, but some things are learned, providing progress.

The opposite is rather true on Dorrin’s side of things. We don’t really get any more information, but much of the action of the novel (outside of Arvid) comes out of this secondary plot. We find that rooting out the Verrakaien is going to be a much harder and messier job than might have been originally thought. This might be backwards progress, but I get the sense that these two major problems are tied together more tightly than it appears.

At any rate, there is a definite ‘middle novel’ syndrome here, but I think I overall found it moved better than Kings of the North, and I am enjoying the entire ride as much as the original novels.

 Comment 

Fury in the Wilderness

by Rindis on March 10, 2025 at 12:00 pm
Posted In: Boardgaming

After trying A Most Dangerous Time, Mark and I turned our attention to the recent Rebel Fury from GMT. We picked the Wilderness scenario, since that’s always been an interesting battle, and I’ve tended to gravitate to it for the tactical side of the ACW ever since it was the first scenario when my dad got SSG’s Decisive Battles of the American Civil War, Volume III.

Mark had the Confederates, who get six moves before going to the game’s standard back-and-forth on moves. Personally, I think he should have come into contact with Griffin (a)’s division (though that would chew up three moves), and lock up the entire Union army [generally, units are divisions in this game, but this scenario breaks almost all of them into two parts—a and b]. Instead, he got a small line in place further down the Orange Turnpike, Hampton’s cavalry guarding the flank (needed either way), and started down the Orange Plank Road.

As it turned out, this gave me enough rope to hang myself. Before Mark could decide to gum up the works, I got Griffin’s division through to back up Wilson at Parker’s Store. When I sent Barlow’s division from the Chancellorsville position south to secure the goal, F(itzhugh) Lee got in the way, and ended up separating the two parts of the division. I got Wadsworth through and facing off against Rodes, and Getty inched forward into contact with Johnson, who was getting close to the Germanna Ford. There was a nice gap in the marching order, and Mark finally dived into it.

Early a went forward, and Crawford a moved into contact, and then Early b went through the gap, and I protected the Culpeper Mine Ford with part of Wright. The not-engaged part of Rodes then took off into the gap, and I should have moved Torbet to protect Ely’s Ford, but instead moved Wright into contact.

The strategic goal for the Confederates is to take out one or more of the pontoon bridges at the fords. Once that’s done, it’s a strategic victory for them, and I’d basically been fool’s mated into it. Not that we realized that at the time. It’s Mark’s game, so I didn’t have the victory conditions to read and re-read (I merely thought I couldn’t achieve a strategic victory). Also, the language around taking down a pontoon bridge confused us (“can be voluntarily removed … as its entire activation during a Movement Phase“; had us thinking of needing to be there for the full phase—instead it seems to be saying it can’t activate to demolish during battle, which wouldn’t have occurred to us). We played on, even after realizing that Rodes had the opportunity to get the pontoon bridge. (Well… perhaps not: I move as close as I can—ZOI, Rodes switches to battle formation, blowing his move, then I move into contact, and you can’t do it while in ZOC. Still, I blew it there.)

After all that, the Confederates were somewhat short of new divisions to go on long treks with, and Mark passed, leaving me 19 (the maximum possible) moves to finish up my dispositions.


All images are right after movement is done for the turn.
↓ Read the rest of this entry…

└ Tags: ACW, gaming, Rebel Fury
1 Comment
  • Page 3 of 294
  • «
  • 1
  • 2
  • 3
  • 4
  • 5
  • »
  • Last »

©2005-2025 Rindis.com | Powered by WordPress with ComicPress | Hosted on Rindis Hobby Den | Subscribe: RSS | Back to Top ↑