
This is the sixteenth in a series of reviews of Paradox’s empire management games. See the earlier reviews here:
Europa Universalis II: A Tale of Two Europas
Hearts of Iron: Europa of Iron
Victoria: Nineteenth Century Essay
Crusader Kings: A Dynastic Adventure
Hearts of Iron II: Return Engagement
Europa Universalis III: A Whole New World
Europa Universalis: Rome: Make a Desert and Call it a Game
Hearts of Iron III: One Plus Two Equals Three
Victoria II: Same But Different
Sengoku: Shogun: Only War
Crusader Kings II: The Second Crusade
March of the Eagles: A Minor EU
Europa Universalis IV: A Fantastic Point of View
Stellaris: Paradox Among the Stars
Hearts of Iron IV: Heart of Production
:strip_icc()/pic4711318.jpg)
:strip_icc()/pic4711319.jpg) In May 2018, Paradox announced that they were working on a new game. While the title, Imperator: Rome, was brand new, it was a sequel to the poorly-named Europa Universalis: Rome. The idea was to keep the main defining features of the original title (a combination of EU politics, Crusader Kings characters, and Victoria population tracking), while reworking other major systems and of course giving it a lavish presentation on the modern Clausewitz 2 engine.
In May 2018, Paradox announced that they were working on a new game. While the title, Imperator: Rome, was brand new, it was a sequel to the poorly-named Europa Universalis: Rome. The idea was to keep the main defining features of the original title (a combination of EU politics, Crusader Kings characters, and Victoria population tracking), while reworking other major systems and of course giving it a lavish presentation on the modern Clausewitz 2 engine.
Like all of Paradox Development Studio’s games, it is a pausable real-time empire management game. You can control any available country (big or small), and manage its military, diplomatic, and economic development, in a grand strategy game format. It starts 24 years before the previous game, in 304 BCE, and runs to the same end of 27 BCE. The scope is vastly increased, with the map reaching east through India (generally based on the final version of CK II’s map). Both the new map, and new decades help put an early focus on the diadochoi, or successor states to Alexander the Great, which are still major powers fighting each other as the game starts.
The game came out on April 25, 2019, and had two major (and sadly needed) patches before any extra content was done, and I will largely be talking about the state of the game as of patch 1.2, released on August 24.
Currency
One of the things you immediately notice about I:R is that it is currency/resource happy. This is actually not unusual for a Paradox game, but it is more noticeable here, as they aren’t tied into main game systems nearly as well as in, say, EU IV.
The primary currency is, as ever, money. Like in the CK games, the characters all have personal treasuries that can be spent on various events and projects. Unlike those games, governments also have their own treasury, that works like you’d expect, and decidedly as it does in EU IV or Victoria II. Taxation is collected every month, and spent on army maintenance, paying the various officials of the government, and then there’s hopefully a positive amount left to spend on city improvements, recruiting new units, etc.
Manpower works as in most of their games, and acts as a limiter to how much mayhem a country can get up to militarily. Bloody wars will drain this, and when it reaches zero, units in the field will stop getting reinforcements, and you’ll need to rely on mercenaries.
Stability is the usual (for Paradox) measure of internal cohesion, but instead of the discrete levels of the EU series, it is a continual sliding scale that adjusts a little every month. The ruler’s zeal will push it up a bit, and it will naturally decay to a mid-point, like prestige does in EU IV.
Aggressive expansion is the “badboy” rating that has shown up since early games, and has now gotten prominent enough to have a place on the top bar. High values will hurt relations with other nations, cause them to band together to stop you, and can cause domestic problems.
Tyranny is the internal version of aggressive expansion. It represents the effects of various “high handed” decisions, and accumulating lots of it will make various characters less loyal, and make civil wars easier to start.
Political influence replaces influence from Stellaris, or the diplomat ministers in EU IV. It is used to “pay” for diplomatic actions like creating claims on a province, and internal improvements. It comes from a few different places, but the main source is the loyalty of the holders of the top government positions.
Military experience rates the amount of practical experience your country’s military has and is used to purchase military traditions. This is generally dependent on the amount of experience the cohorts/units have, but war exhaustion will also drive it up.
War exhaustion is another statistic borrowed from earlier games (most notably the EU series, though Stellaris also uses a variation on it). Casualties and attrition in war will increase it, and so will raising regional levies, and being at peace will let it slowly go down again. As it goes up, it does contribute to military experience, but more noticeably it will increase unhappiness across the nation, and lower the ruler’s popularity, so that long periods of war exhaustion will at least lower production (of food, technology points, taxes, etc) as that is tied to happiness, and can promote disloyalty and civil wars.
In the initial release of the game, there were four other currencies that had already been removed or replaced by patch 1.2: Military power was used to pay for military traditions, and was generated by the ruler’s martial ability (replaced by military experience). Civic power was used to pay for technology improvement, and was generated by the ruler’s finesse (now paid for by money). Oratory power was used to pay for favors and the like with other characters and many diplomatic options, and was generated by the ruler’s charisma (replaced by political influence). Religious power was used to invoke omens, positive buffs that can be gained on occasion (now a free periodic ability), and was generated by the ruler’s zeal.
These last feel like the three pools of monarch power that are so important to EU IV, in that a better ruler generates these points faster. Unlike that system, they (except oratory power) just feed into one thing, and are not part of widespread central mechanisms of the game. On top of all the other things being tracked, this was one of the big failings of the original release, and had already been improved by their replacement.
Population
:strip_icc()/pic9184087.jpg) Population works largely like in Stellaris (pre-4.0), you only have complete “units” of population (pops), which each have a social strata (noble, citizen, freeman, tribesman, slave), a religion, and a culture. Sudden changes in status and population happen in warfare (pops may be killed, or forcibly taken to another city; also taking over a city generally reduces the status of some pops there).
Population works largely like in Stellaris (pre-4.0), you only have complete “units” of population (pops), which each have a social strata (noble, citizen, freeman, tribesman, slave), a religion, and a culture. Sudden changes in status and population happen in warfare (pops may be killed, or forcibly taken to another city; also taking over a city generally reduces the status of some pops there).
Gradual changes also happen. Also akin to Stellaris’ model, there is either one pop growing, or one pop declining at all times in a city; as soon as one finishes, another starts the process. There is a particular ratio of the five types that population will tend towards over time (this ratio can be changed by a number of means), and this means there will be pops demoting or promoting to adjust towards the “ideal” ratio. Finally, pops will over time assimilate to the controlling empire’s culture and religion. Generally, one pop will be doing each at a time. All pops have a happiness, that in part depends on how their background is treated, and this assimilation will raise happiness in a conquered province as they become part of the mainstream.
Unlike Stellaris, pops don’t have set jobs to produce particular goods, and instead passively generate gold, research, and manpower (with the former two increasing with pop happiness). The upper classes generate research points, while the lower generate tax income (there are other sources of money, notably commerce from trade routes), and the middle ones provide manpower for the army.
This is still pretty close to EU: Rome’s model, but much more refined. It is a lot harder to see just what is going on, and what is really needed are some trends and projections on what is happening to the population. (Though not having access to those is certainly in keeping with that time period.)
Characters
:strip_icc()/pic9184086.jpg) Like the CK series and EU: Rome, most of the actions in this game are done by characters. They have four primary attributes (Martial, Finesse, Charisma, Zeal) that determine ability in various jobs, along with secondary attributes such as prominence, popularity, loyalty, and corruption.
Like the CK series and EU: Rome, most of the actions in this game are done by characters. They have four primary attributes (Martial, Finesse, Charisma, Zeal) that determine ability in various jobs, along with secondary attributes such as prominence, popularity, loyalty, and corruption.
There is a trait system, at about the same level of complexity as Stellaris’ (maybe less so). And in this game, they are grouped into families, and the most prominent ones expect to have a share in the government. If this is not met, the family is considered scorned, and will start losing loyalty. Also, in a Republic, they will start drifting to the populist faction, which tends to lead to populist-led governments, which have worse bonuses than the other factions.
The important element here is instead of everything revolving around the relationship of a character to the ruler as seen in Crusader Kings, it instead looks his loyalty to the state. Rulers may come and go, but they generally don’t cause immediate changes in loyalty. A popular ruler will generate loyalty, and republics have factions with loyalty depending on that. Disloyal characters will block efforts to hold them in check, and may band together in a civil war.
Government
:strip_icc()/pic9184088.jpg) There are three general types of governments, all of which have offices held by various characters. Like in EU: Rome, this is a combination of Crusader Kings and Europa Universalis (pre-Dharma) mechanical underpinnings. There’s subtypes with different bonuses and idea slots (essentially the same system as EU: Rome), but the general mechanics stay the same.
There are three general types of governments, all of which have offices held by various characters. Like in EU: Rome, this is a combination of Crusader Kings and Europa Universalis (pre-Dharma) mechanical underpinnings. There’s subtypes with different bonuses and idea slots (essentially the same system as EU: Rome), but the general mechanics stay the same.
Republics have a senate with one hundred seats, where each seat is associated with a faction. However, they are not associated with particular characters, and the alignment shifting due to a number of factors, including the power of the leaders of each faction (which are characters). Each faction grants bonuses for being in charge, except for the populists, who increase the cost of everything.
Naturally, senate support is needed for a number of actions, like declaring wars. Prominent families generally feel entitled to a number of jobs within the government, and if they don’t get it, they start moving over to the populist party, eventually making them the major power block, and degrading the republic’s ability to get anything done.
And to better represent the elephant wolf in the room, the aristocratic republic sub-type has co-rulers (consuls). This lets the government get traits from both, and the higher attribute from either consul controls government modifiers. Also, they will probably be from different factions, allowing benefits from both. On the other hand, both consul’s corruption will potentially corrode the rest of the government. (Monarchies generally get the same effect with a consort.)
Monarchies just have a number of offices to fill, and allow the ruler(/player) to do as they want. Instead, they need to worry about legitimacy and the succession. A functioning republic will go through major changes every few years, but it won’t affect stability much. A monarchy has to worry about pretenders, which can become very acute whenever a ruler dies. There will always be a loss of stability and loyalty, and a new ruler who is not already popular may easily see a civil war break out.
Tribal governments consist of a number of clans, with one in charge of the nation as a whole (this, and much of the rest, is borrowed from CK II: Horse Lords). Instead of legitimacy, they use centralization, which at high levels can allow them to settle down into one of the other government forms. On the other end, a tribe can become a migratory tribe, allowing pops to turn into light infantry migrant cohorts, which can then settle elsewhere. These governments rely on the tribesmen strata, which will generally be happy, and more productive at the same things as freemen, but that leaves the government with little to no research. An oddity is that each clan will generally have its own retinue, but when the clan leader dies, it’ll devolve upon the state.
Know the Territory
Like all other Paradox games (other than Stellaris), the game uses an area map of territories. Each one provides a trade good (like in Europa Universalis), and produces a bit of food (even if not producing a food-related trade good). They are also the level population is tracked at, and they have a civilization level, which is a measure of the stability and infrastructure of the area, and will slowly grow towards the government’s maximum value (this is largely taken from EU: Rome).
Territories are grouped into provinces, which provide a higher-level organization to work with. The province the capital is in is automatically run by the ruler, but other provinces generally need governors, and policies can be set cause various bonuses in them (such as increasing happiness at the cost of taxes and goods, increasing pop promotion and demotion…). Provinces are also rated for loyalty with both that and governor (character) loyalty being separate ways for a country to descend into civil war, and cause even more problems for large states.
Provinces are also grouped into regions, though they are less important in game terms, though provinces in the home region do get a bonus to loyalty.
The territories are also rated as settlements, cities, and metropolises. Settlements can only have one building, but generally tend towards a high proportion of slaves, which makes them good for trade goods and food, as well as generating taxes and manpower. Cities get a higher population limit and generate trade routes and research with higher populations of nobles and citizens, and have a number of buildings (the exact limit tends to vary quite a bit). Metropolises are rare (the Mauryan capital of Pataliputra is the only one at the start of the game), and are generally just super-cities with stronger modifiers.
This all assumes the territory has been colonized by a semi-stable government. As you go north-east on the map, you run into areas that haven’t been, and have no recognized government. Once an adjacent territory grows populous enough, you can colonize it and claim it as your own. However, there’s also a good number of impassable territories, and some of them (and uncolonized territories) are considered barbarian strongholds.
These will gain barbarian power regularly, and as that goes up, they will spawn traveling barbarian hordes who will roam about the map looting and pillaging. Generally, they need to be hunted down and eliminated, and will provide new slaves, as well as prestige for the victorious general, but in the meantime, they will damage the civilization value of the areas they wander through.
Trade
Each trade good provides a bonus (like food types provide bonuses to growth). All the goods from a single state are pooled together, and their bonuses apply to every province in the state (food supplies work in a similar manner).
If more than one province provides the same good, then there is a surplus. These do have their own bonuses, but they aren’t as strong as the initial bonus for the good. So instead you can trade them from one state to another, like in the original EU:Rome. Like in the original, the number of trade routes is limited, and needs setting up at the start of the game. Unlike there, these also generate commerce, which shows as extra money income. Exports are encouraged as trading with a different country generates more revenue, and generates a third bonus related to the surplus ones, but generally on a different statistic.
Overall, the need to set up trade routes from scratch every game was one of the pain points in EU: Rome, and I’m disappointed to see it return here. The good news is that the computer is good about finding your surpluses and asking to import them, so you’ll get all the export bonuses easily enough, but finding who has the items you want and talking them into it is a real pain.
Technology
There is a technology system in Imperator: Rome, but it’s noticeably different from any other game they’ve done. (Actually, I can’t think of any game that does it like this. And do note this is as of patch 1.2; it would change in 2.0.)
There are four general fields (martial, civic, oratory, and religious), and each month a number of research points are generated. This is modified in each field by the finesse of the head researcher for that field (this is a set offices consistent across government types).
This generates progress in the field, which then turns into a new level. Each level gives a bonus related to the field (e.g., increased omen power for religious advances), and so is worthwhile in itself.
But, the primary effect is that each level unlocks three new advancements that give a permanent bonus. Note that these aren’t all new abilities, but rather modifiers like -10% attrition or +1 import route (in the capital). So, you don’t get to do anything new, but the country will get better at doing things over time. Getting the advances then requires paying money for them.
So, at the start, there will be twelve advances available (three in each field attached to level 0). Once those are bought up, nothing more will happen until roughly twenty years in, when the various fields should hit level one, and new advances become available for purchase. There’s twenty levels in each field, so there’s 240 separate bonuses to buy.
As mentioned under population and government, this is all powered by freemen, so tribal governments have trouble generating research at all, and the eastern countries often have problems generating them fast, so the western non-tribes (Rome, Carthage, et al.) will get ahead in research, and become much more capable as they start buying the new bonuses.
Military
Imperator: Rome armies rest on nine different types of combat units, six of which require provincial access to particular trade resources. Chariots instead require being part of a barbarian or Indian culture group. Naturally, there’s a detailed relationship between all the various types, which complicates things in ways hard to describe. However, light infantry and archers are what’s always available, and while the latter generally do better against other troop types, they also will lose morale faster.
Combat presents itself much like in Europa Universalis, but has important differences. Like other similar games, each unit (cohort) takes one space in the battle line, and largely fights the units opposite it. I’m not at all sure of the math, but morale values are fairly low, and individual units swiftly start retreating. The die roll added to results of each side is a d6, instead of the d10 used in other Paradox games, so there is less variance in results.
Cohorts can attack a number of squares away rated as mobility, so large armies with cavalry (to hit from the flanks) will do well, while both light and heavy infantry have staying power from reduced morale loss.
Past all this, there are military traditions, which are a bit like ideas from other games. There are seven different sets in the game, each tied to a particular culture group, and each one has three paths. You can only choose the next one in line in each path, but you can pick any path each time. Generally, a well-trained military gets you more more military experience with which to buy these, so keeping units drilled, or getting into lots of wars will let you get ahead on these. Getting to the end of a path also generates a second bonus.
Mercenary groups are available for those countries with a shortage of experienced troops. These are a bit like the ones in CK II, but they have a permanent on-map presence. Once hired, they start at 0 morale, and work up from there so you can’t just dump your newly-hired mercenaries on an unsuspecting enemy army.
Sieges work exactly like in Europa Universalis IV, except that the local food situation can affect how long a cycle lasts (with low food shortening it quite a bit). Also, like in EU IV fortresses exert a zone of control that can block enemy movement, and will automatically convert adjacent provinces.
On the naval side, Paradox actually goes into some of the arms race between the various Successors, with military traditions allowing the really big octeres and larger. Most countries, if they need a serious navy will build tetreres and hexeres, and the bulk of any navy will be the more famous biremes and triremes. Somewhat surprisingly, these latter don’t need any particular resources to build (I suppose it’d be too easy to lock someone out of any navy at all), while the others require wood to be available. Generally speaking, a ship will have a combat advantage against anything smaller than itself, but the small ships are much more maneuverable, allowing them to gang up on elements of a smaller heavier force.
Conclusion
The initial release of Imperator: Rome had plenty of problems. Performance was poor, and as seen, there were even more mechanics and currencies scattered around than as of patch 1.2. Sadly, while the bones of a good game were there from the start, there were some bad reviews (though, professional reviews were positive, and the others tended to leave me wondering if the person had ever played grand strategy games before). More to the point, it exceeded Paradox’s sales expectations, but engagement (play hours) was low.
It falls short of Paradox’s previous three games (HoI IV, Stellaris, and EU IV) because they all were at pains to keep the number of independent systems down, even if only by linking everything to one central mechanism. Release (1.0) EU IV in particular was a great study in how to create interesting decisions by having so many things come back to monarch power. Here, we got a mess of separate currencies for a mess of independent systems that don’t drive back to a central theme.
I do find it a worthy successor to EU:Rome, improving on some of that game’s shortcomings, and of course is on a great subject. Given the number of systems that were rewritten for the better in the first two years of EU IV, and Stellaris’ journey to 2.0 in its first year-and-a-half, and the clean up that had already happened in four months, I:R was worth some patience.

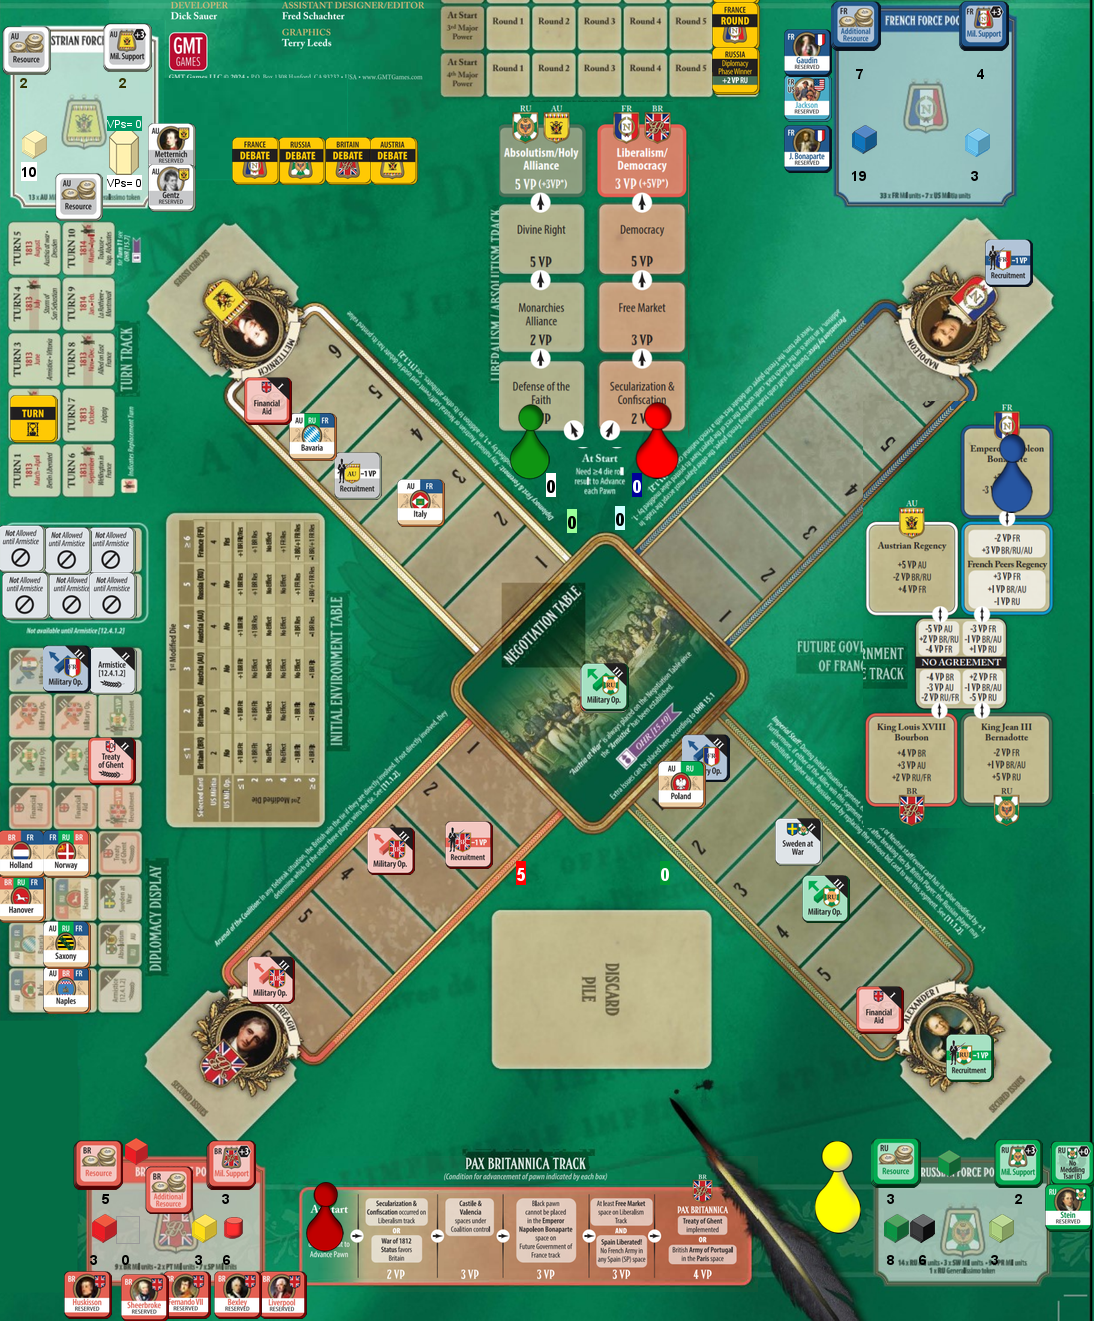 An interesting wrinkle is that everyone has resources, and then spends them to activate the various issues, with a priority system saying what must be done (with British subsidies being the first order of business). With turn 2 being a replacement turn and everyone recruiting (this costs a VP), plenty of new units poured in (this is by design for the introductory scenario…), and there were military ops in almost every legal track/front (A/Poland being the exception). The combat system is nice for a game trying to keep things abstract—you total up modifiers (starting with your army’s size), and roll a d10 as a final modifier, and you each do casualties off that, rather like impact in Sekigahara. However, you only win by doing more casualties than the enemy, and only two places had clear-cut victories: the British got a +8/+2 (1 to 0 casualty) victory in southern Spain, taking Valencia, and a +15/+12 (2/1) victory in the War of 1812. This last moves its status to a British advantage, which gives them +1 VP per turn while it lasts.