
T3 The Lone Gray Wolf Y160 S5-S6
[Scenarios 1 & 2]
[Scenario 3]
[Scenario 4]
Once again, I had hopes of drawing an easy fight as Mark and I got back to “The Lone Gray Wolf” back in May. But, Mark rolled a 1 again, which made me really glad I’d eliminated a CL from it last time, leaving it at a CC, CL, and FF. Even better, that CC was missing most of the padding. However, it’s still not a group to take lightly, especially as that CC has the weaponry to cause some major damage, if it can line up a good shot.
Mark lined up directly astern and went speed 18, while I did my standard speed-20 opening with 1 ECM, while all the Kzintis also put up some ECM. I turned shortly into the turn, while Mark kept his options open by slipping towards me. On impulse 5, I blew batteries to bring my ECCM up and fired phasers at the FF to dent it’s #1 shield, with a mix of rolls doing four damage, three of which registered on the shield. The Kzintis started slipping out, and I continued my turn, bringing disruptors to bear on impulse 24, and I fired two (all I had charged) at the CC’s #2, getting one hit which bounced off of reinforcement, and the turn ended with us back outside the forward arc at about range 22.
I stayed at speed 20 for turn 2, while the Kzintis slowed down to 15 and 14. Mark boosted ECM, while I had a 2/2 split for EW. The Kzinits turned in on impulse 2, and I followed suit on 7. He continued slipping, and I turned towards the Kzinti formation on 18, and the Kzintis launched a full spread of drones on 19, and then turned off. Range was down to 15, so I boosted ECCM to match the FF’s and volleyed the disruptors at it, hitting with three, and then doing one more point with the three bearing ph-1s, doing 9 damage to the #3 shield (after a point of reinforcement). On the next impulse, I tried a couple of ph-2s to do one more point, and exactly collapse the shield. Six impulses later, I turned, bringing more phasers to bear, and was still on the #3 shield, doing three internals with mixed rolls on a ph-1 and 2xph-2, taking out the bridge and a warp box. After that, the FF turned the shield away, and the CC and CL turned the other way.
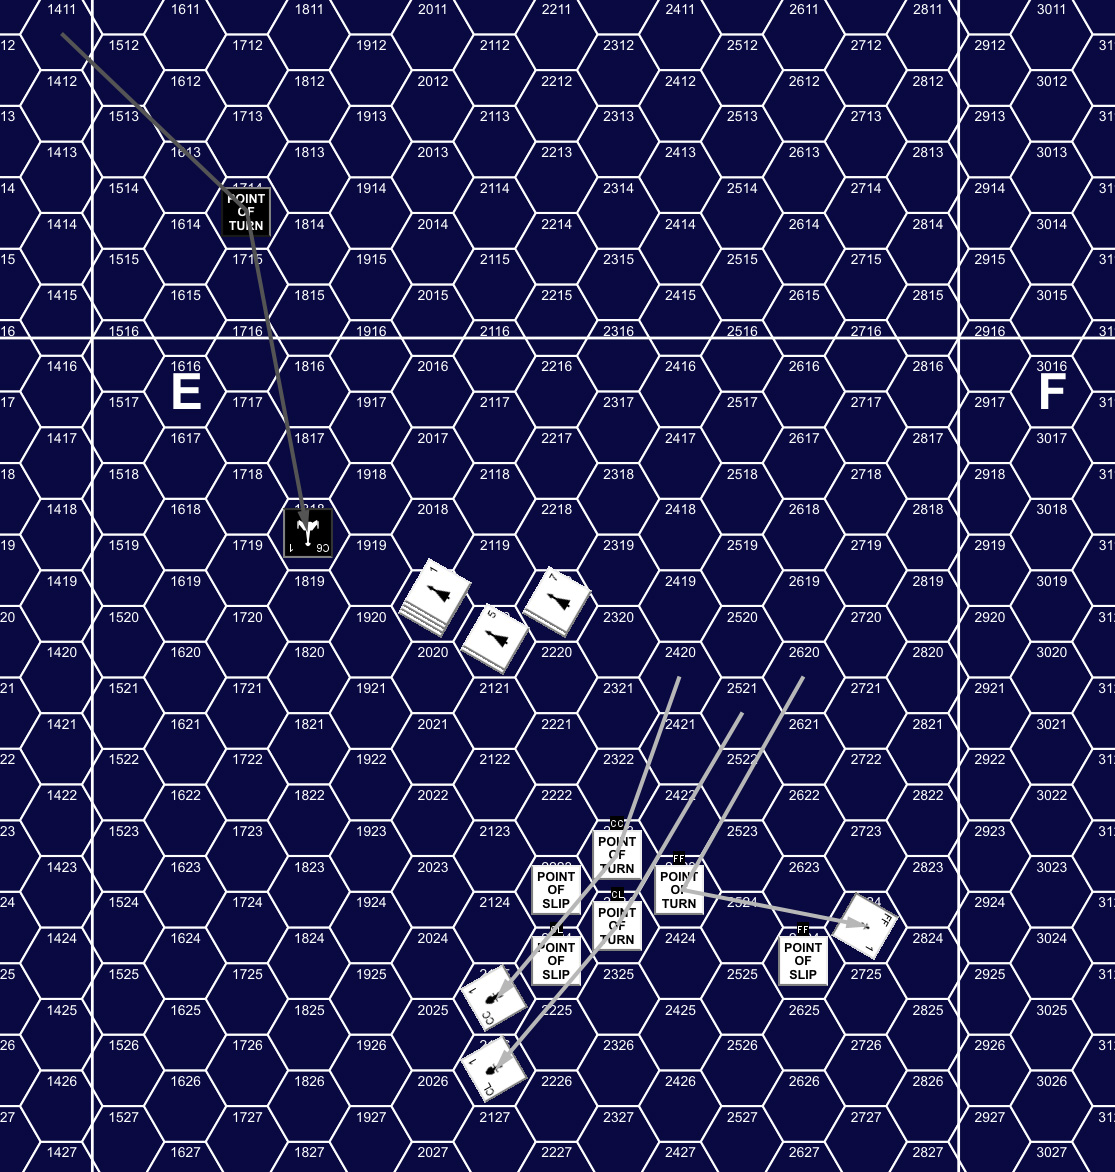
Beginning of Turn 3, showing movement from Turn 2, Impulse 19.
I stayed at speed 20 while the FF boosted to 24, and the CC and CL slowed down to 9(!) and went full ECM, and launched another full wave of drones on impulse 1. As well, he launched two shuttles, and I volleyed the disruptors at the CC, getting two hits, to do 12 damage to the #3 after reinforcement. I then turned off, and a few impulses later the CC and CL turned in; I boosted ECM just as he volleyed all the weapons bore at me (5x disruptors, 5xph-1) for 12 damage from two hits and good phaser rolls, and doing 12 damage to the #5 and one more to the #6 shield. I circled around to the other side for the rest of the turn, with the Kzintis cautiously following, and at the end of the turn, we were on parallel courses a bit under 20 hexes from each other, with the drones still near him, and the FF had swung around to nearly rejoin the formation.
I stayed at 20 for turn 4, while CL went 15, the CC 19, and the FF went up to 27. I shifted to 2/2 EW, while the CC kept up a full 6 ECM, and the CL generated 4 ECM. Mark started the turn by tractoring his shuttles and landing them back aboard ship. On impulse 7, the Kzintis started turning away, and I turned to follow them. As they continued turning, I couldn’t follow suit, thanks to my turn mode, and the fact that it would take me uncomfortably close to the stacks of drones now between us. On 18, I boosted ECCM and fired three disruptors at the CL, getting two hits for 2 damage after reinforcement on its #4. The next impulse, I loaded the last disruptor off of batteries and hit the CL’s #4 again for another two points (the CL burned a battery to reduce it to that). I turned at the last quarter of the turn, and sidestepped the drones, with the CL and CC turning in, I turned again on impulse 29, putting on an intercept course for them, while the FF had again turned off to head in the opposite direction.
At only range 11, I stepped down to speed 17 (for turn mode 4), and overloaded one disruptor, leaving the others at standard and a 2/4 EW split, while the CC went up to 27, the CL went 24, and the FF dropped to 18, all running various amounts of ECM. The CL turned off immediately, but the CC’s speed forced another couple hexes forward, and I fired on impulse 3 with the three standard disruptors, for two hits, but three ph-1s only did one point of damage at range 9, for… nothing to register on the shield.
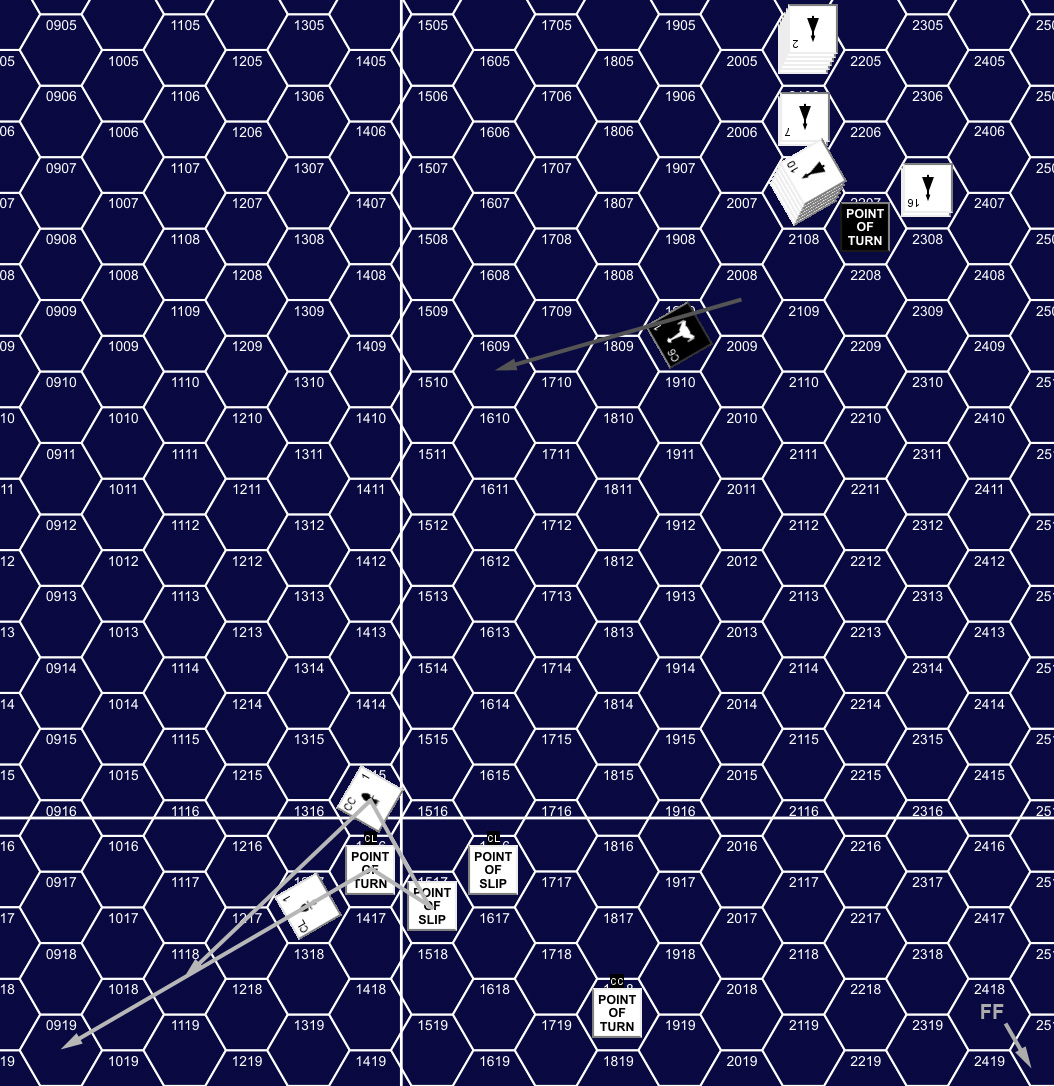
Turn 5, Impulse 3, showing movement for the first eight impulses.
I contemplated going after the FF, especially when it turned to head ‘up’, but when the CC and CL turned to parallel me, I turned back, and then they turned back away. On turn 6, I went back to speed 20 with a 1/5 EW split, and the CC and CL went 27 with the FF at 24. The cruiser’s EW was both 2/0, but the CC boosted ECM to 6 with batteries after seeing my ECCM. With them drawing away, I fired the disruptors at the CL’s #4 at range 15, only getting one hit, with one point of damage registering on the shield. I then tried the bearing ph-1s, but rolled just as bad (5s and 6s) to do no damage. The CC launched a new batch of four drones on impulse 6, and I sidestepped around them near the end of the turn. The cruisers maneuvered back and forth a bit, slowly working around to their left, while the FF did a long turn to start coming in behind me.
I stuck with speed 20 for turn 7, while the Kzintis all went 27, while I maintained 1/5 EW, and only the CC bothered with 4 points of ECM. I took my standard shot on impulse 2, hitting the CC with three disruptors, doing 5 damage to its #5. We stayed on parallel courses for the turn, while the FF completed its loop behind me and came up to range 8 dead astern on impulse 30 (one hex off centerline would have been wiser). I fired the four waist ph-2s at it, doing 4 damage, two of which registered on the #1.
I dropped to 17 again for turn 8, with 1/1 EW, while the Kzintis went 21 (or 24 for the FF) with moderate ECM. To my surprise, the FF turned off without firing a shot, but it turned back after a few impulses and continued shadowing me two hexes off of centerline, and then fired everything on impulse 15, hitting with a standard disruptor and a point with a ph-1, which was exactly matched by the 4 power I’d scraped up to reinforce the #4 in EA. I turned towards the FF, it turned the opposite direction, and I fired all the bearing phasers (3xph-1, 4xph-2) to do 10 damage to the #2 shield. The cruisers turned the opposite way as well, which put me back on an intercept course when I turned back. The cruisers kept turning left, and with the FF turning to shadow me on the other side, they were headed together again. On impulse 29 we got down to range 14, and I fired the disruptors, with all four hitting the CC to register 5 damage on the #1. I turned to a reciprocal course, and on 32, the CC fired a disruptor at range 10, which missed.
With range low and closing, I overloaded two disruptors and went speed 12 with 4/2 ECM, while the cruisers also went 12, and the FF did 18 and they all put up 3 or 4 ECM. I launched an ECM drone on impulse 1, and the CC fired on 3 (just before the drone became active) hitting with one of two overloaded disruptors, a standard disruptor and moderate rolls on ph-1s to do 15 damage to shield #6 (after a point of general reinforcement). The CL turned off, but the CC turned across me, and I turned opposite for an even closer pass. The CC launched another spread of four drones on 8, and I turned back to chase the CC, which launched a shuttle on 15. I fired on impulse 15 at range 5, hitting with three overloaded disruptors, and another 11 damage with ph-1s on the #3, for 19 damage to register, 9 as internals, taking out a drone, a disruptor, a ph-3 and three power.
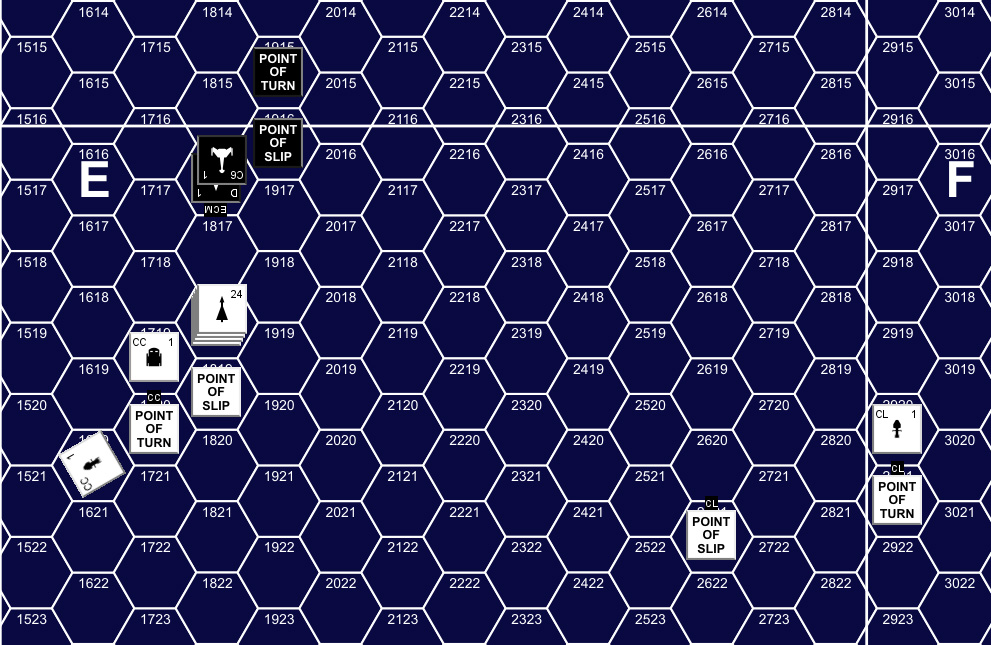
Turn 9, Impulse 15.
Four impulses later, I tractored two of the drones, and killed the other two with pairs of phasers downfired as ph-3. I then tractored the shuttle, not knowing what it was, and it did 4 damage to shield #2 with its phaser (sadly, for once I was going too slow to death-drag it). I turned to follow the CC, ending up with both the FF and CL coming in behind me.
With the CC only three hexes away, I stayed at speed 12, and overloaded all the disruptors and could only spare two power for ECCM (needing to recharge the batteries), though the ECM drone put me at 3/2. The CC went 14 with 3 ECM, the CL 12 with 4 ECM, and the FF 18 with 3 ECM. I dropped all tractors in EA, and the CC launched two more drones, and I boosted ECCM to 3, and fired everything that bore, while the CC boosted ECM by one (keeping the shift), and fired an overload disruptor and a standard disruptor with 3xph-1 and 4xph-3. Good rolls for everything but the overload did 18 damage to my #6, while I did 42 in return (only one bad ph-1 roll and one bad ph-2 roll) to the #5 shield, leading to 23 internals, which savaged his systems since the padding was already largely gone, hitting 8 power, all the batteries, three phasers and another drone rack.
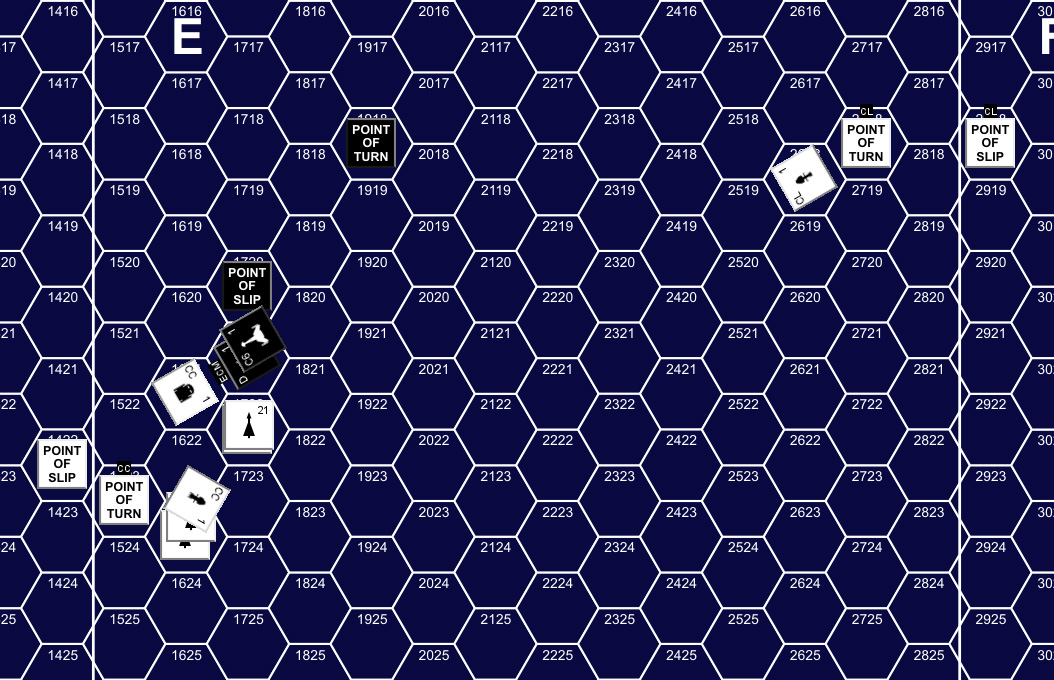
Turn 10 Impulse 1.
On impulse 6, the FF was at range 5, and fired the disruptor (missing) and ph-1s, doing 6 damage to the #3. The next impulse the CC turned (further) away, and I fired the off-side ph-1 at the FF, doing 4 damage to it’s #1. The CL fired the bearing disruptor on 8, hitting shield #4, which took 1 point after reinforcing with batteries. The FF and CL turned to parallel me, with the CL’s second disruptor coming into arc, which missed. The CC and FF circled left and right to head towards each other while the CL shadowed the C6, which slowly moved to follow the CC while avoiding the drones.
On turn 11, I stuck with speed 12 again (the ECM drone was still running…) with 1/4 EW (4/4 with the drone), while the CC sped up to 21, and CL went up to 15, while the FF stayed at 18. The CL fired at range 7 on impulse 9 (just off of centerline, which also meant he was just out of my FA), missing with the disruptor, and only doing three points with the ph-1s, which hit a general reinforcement, and I spent two batteries for reinforcement on the other two. I had to maneuver around the latest set of drones still, but turned to get an oblique shot on 18, hitting with two disruptors and good ph-1 rolls to do 18 damage to the CL’s #6 shield, causing one internal (drone). The next impulse I tried the ph-2s, and got excellent rolls for another 10 internals, knocking out two power and two ph-3s. The CL turned off, and so did I, leaving the CC paralleling me at about range 25, and the other Kzintis moving away.
I had about the same plot for turn 12, but boosted EW to 2/4, while the Kzintis all went 21 with the CL powering 2 ECM and the FF 1. I did a right loop during an inactive turn, while the FF and CL joined up again, and the CC headed for them. I stayed the same for turn 13, but the CL and FF sped up to 24, and the CC generated 2 ECM. The drones that I’d been maneuvering around for the last few turns finally expired at the start of the turn, and on impulse 3 I took a range 12 shot at the FF, hitting with two disruptors, and collapsing the repairs to the #3 shield I’d shot up near the start of the fight for three internals, getting a sensor box and a pair of hull. The CL and FF turned off to head directly for the CC, and then turned to join it, while I headed away. The Kzintis turned in to chase, but much of the later part of the turn was spent at range ~30.
The ECM drone would burn out in another turn, so with the ranges being long, I went back to speed 20, while the CC went 23 and the CL and FF went 27 for turn 14. The Kzintis angled towards me, and I turned across their path, causing them to angle off. I turned towards them and volleyed the disruptors at the CC, missing with all four at range 21. I kept up pursuit for a bit, and then turned directly away from the Kzintis near the end of the turn.
The Kzintis started coming back around, and the FF went speed 30 for turn 15, while the CL went 27 and and the CC 24 while turning off fire control. I went flat out at speed 31, prepared to run for range on the last few turns before the turn 20 break point (the rules for the campaign break the scenarios into 20-turn segments, and I can be at above speed 20 for six turns in each segment. Kzinti pursuit took a bit to shake out, and I turned back in with me and the CL and FF headed right for each other at the end of the turn. I kept up my charge for turn 16, while the CL slowed down to 24, the FF to 21, and the CC to 21. The FF fired its disruptor on impulse 5, doing three points to the #6. I chased after it, while the CL got out of the way, and FF couldn’t maneuver because it’d show the #3 shield to me, or get really close as it crossed my path. Finally, on impulse 27 I fired the disruptors at range 4 hitting with all four for 16 damage; after reinforcement and the #4 shield, this did six internals, taking out two warp. The FF turned off, and I didn’t get another clear shot until impulse 31, when I put 3xph-1 and 2xph-2s into it for 22 internals (great phaser-1 rolls, 6,6 for the ph-2s). This crippled the FF, reducing sensors to “3”, and leaving it two warp and one APR for power.
The FF made its best speed, 6, for turn 16, with the CC at 20 and CL doing 24, while I continued my speed 31 sprint. I launched a drone to finish off the FF, but it launched a shuttle which had enough time to shoot it down. (I should have shot up the shuttle….) The turn was mostly administrative as I went straight and we checked to see what the range was by the time the CL could get turned around to give chase.
The CL finally got on course for a true stern chase on impulse 22 with a range of 28, which would open up to 30 by the end of the turn. It couldn’t do better than 24 with two warp out and other power demands (like sensors for lock on…), so it was loosing 7 range every turn, and I would hit range 51 on impulse 29 of turn 20. At the end of turn 20, Mark would roll for reinforcements, but I barely managed a disengage by separation right before that.

We checked to see what the group would be for the sixth and final scenario, but there wasn’t much hope of anything that could really stop it with both good groups being severely shot up. It turned out to be group 2, a lone CS. We didn’t bother to set that up, as at worst, the C6 could sprint to catch up to it, and shoot it up, since it only has 27 warp, for a top speed of 28, and once the C6 got close, no shield on the CS was likely to last long.

Afterword
Mark did a lot better this time with a strategy of keeping at moderate ranges and forcing me to think about time. If that CS had joined the group from scenario 5, it could have complicated things for me; and it does well operating next to the CL, which its very similar to.
Certainly, for the first half of the scenario, I was worried, and having to play smart. However, I fired off my disruptors almost every turn, and that started wearing the Kzintis down. Once again, the FF was my primary target. The CL is always a bit short of warp power, and the CC only needed one good hit to disable, since it was still down 12 hull from last time. But Mark was too cautious, and didn’t answer my disruptors in kind most turns (a total of six disruptors fired at me every turn—I’m discounting an off-side CL shot here—would add up). The biggest waste was when the FF got in behind me at range 8. It should have dumped everything into an overload shot on impulse 1, along with ph-1s and power to ECCM. I figure it could have still turned off at speed 15 after that, and it I didn’t start turning, it could still shadow me to get another range 8 shot in a couple turns. I could take that for a while, but the #4 would start getting dangerously thin for anything else that got a rear shot.
I get a substantial victory just for having escaped all six scenarios intact. I get a bonus for doing 300 points by the standard victory conditions, but only scored 148.7 (I needed to blow up more than one CL, or maybe capture something.)
I did up a worksheet for drone storage for the campaign, and spent some time figuring out what I wanted. The campaign rules allow me 3x Type III-ECM drones, which I took, and, including the three reloads, used most of. One rack was initially full of standard Type I drones, in case I took a drone hit, and the remaining nine spaces had Type IIs, four of those having extended range, and one of those had a half-space of armor.
We used the MRS option, so both the C6 and the CC had one available, but they never got deployed. I never got quite desperate enough to (presumably) sacrifice it, though scenario 4 could have gotten there. It comes with extra drone storage, and I took the two-space drone as a Type V-X, all the single space drones as Type II, three of them with extended range, and two with a half-space of armor. Without those spares, I would have been completely dry of reloads by the end of the campaign,
Mark stuck with all standard Type Is, which I had figured out by the end, but he says he’s learned a lot about drone handling through these scenarios, and has a much better idea of what the specialized drones would be for now. At the same time, I had to pull out every trick I could think of over the course of the campaign. The big thing for the Klingon here is to be unpredictable; a dreadnought has the resources for a lot of options, and not letting the Kzinti player know what he’s going to see next is essential. I’ll also say that the C6 probably does better against the lineup of Y160 ships than the C8 would against the Y175 lineup. The C6 is darn close to being a C8, and Kzinti ships improve a lot in the next 15 years.
This was the end of the group’s Y160 scenarios, so we’re going on to Y161… but Mark and I will actually be spending quite a bit of time in the past for our next several SFB games.
Discussion ¬