
T3 The Lone Gray Wolf Y160 S3
Mark and I returned to the “Lone Gray Wolf” mini campaign a bit ago, as my C6 dreadnought continued making its way back to friendly lines. This time was a proper challenge, as the pursuit group came up ‘4’, which is the second-best Kzinti group. In the original, this is a CVL+ carrier group (basically modified BC, CL, FF with nine fighters); in this Y160 variant, there’s no fighters (of course), and the ships are their regular unrefitted equivalents of a CS, CL, and FF. By straight BPV, this is 195 vs 262 (and by F&E ratings 10-12 vs 17-18), though there are some serious advantages to having one large ship instead of three smaller ones (it being easier to punch through a shield to destroy weapons on a smaller ship being the main one).
As ever with this campaign, setup is the C6 in the middle of the board, with the Kzinti 14 hexes behind it; in this case Mark started his ships one hex apart, with the CS in the middle. I started at speed 20 and no EW, while the Kzintis all went speed 18 with 1 ECCM running. The first few impulses got us going, and I slipped and then turned on Impulse 5. The Kzinti generally slipped over to keep in line with me, and I turned in late in the turn, and used the good arcs on the ph-1s to hit the FF’s shield #1 for 8 points at range 12 (5 registered).
With the range staying closer than I might have liked, and Kzintis turning to intercept on impulse 32, I decided on a somewhat risky maneuver: going down to speed 12, and launching an ECM drone (actually done on Impulse 32). The Kzinti went to speed 21 (except the FF, which stayed at 18), and used varying amounts of ECCM, while I generated 6 ECM (with another three from drone when it came on-line during impulse 4).
I turned in at the start of the turn, and Mark tried to clear the ECM drone with a pair ph-3s on impulse 7, but failed to get any hits at range. He launched drones on 8, the FF slipped out, and the CS turned in for nose-to-nose confrontation. I tried tractoring the CS on 10, but gave it up after three points of power. The CS then launched from its remaining two drone racks, and I launched two drones, and then we unloaded into each other (with the CL adding in). Phasers knocked down all the just-launched drones and the ECM drone, and the CS and CL boosted ECCM enough to get the shift down to a +2. Two of four of his disruptors missed, and mixed phaser performance added up to 23 damage, or just over half my shield #1. One of my disruptors missed, but three overloads, 4xph-1 and 2xph-2 did a total of 50 damage, crashing through the #1 for 24 internals. This ripped through the forward hull, and took out the batteries, along with the usual scattering of weapons and power.
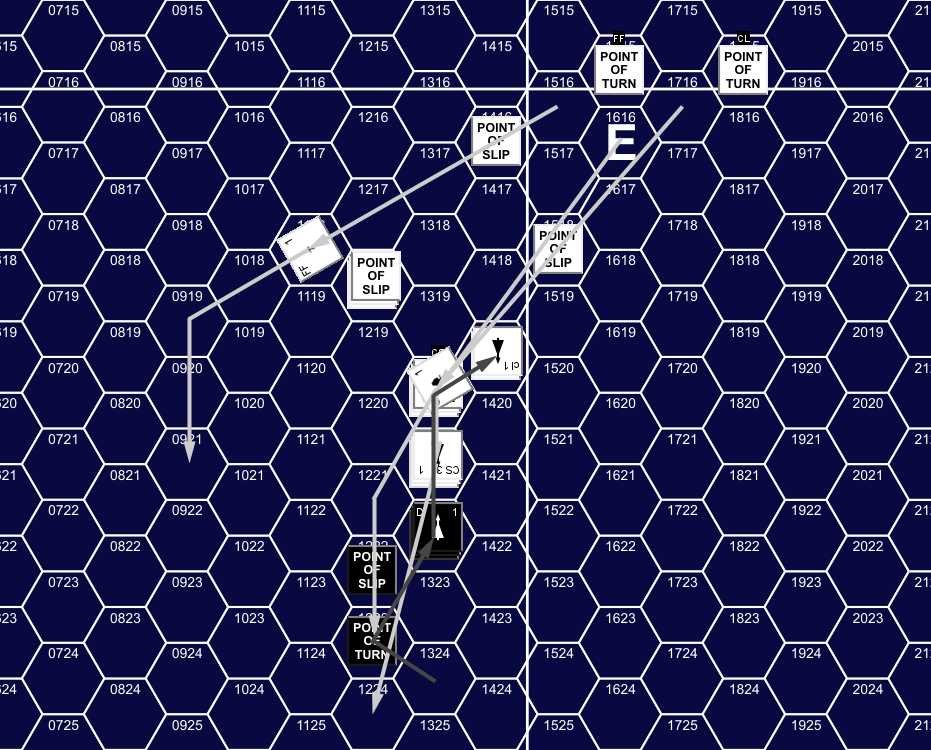
Turn 2, Impulse 10, showing movement for the first 16 impulses.
On 11 various ships moved forward and the CS slipped to the left. I tractored the latest two CS drones, and launched another drone at one of the ones further out. The CS fired all available (6!) ph-3s, doing 22 damage to shield #5. On Impulse 13, the CL slipped in behind me and fired two ph-3s on #5 for 7 damage (one blocked by a battery), while I downfired a phaser to knock down a drone (and then the other one of that pair was destroyed my drone the next impulse). On 15 the FF turned to parallel the other Kzinti ships and fired its 360-ph1, doing 2 points to exactly bring shield #5 down. On 16, I finally turned (now that the drones to my starboard were gone), getting that shield away from everyone, and then spent the rest of the turn dodging the remaining drones and pulling away from the Kzinti.
The Kzinti turned again on Impulse 20, I turned to parallel them on on 27, and the Kzinti turned in on 28 so that the closest ships (CL & C6) were at range 5 at the end of the turn. I boosted to speed 16 for turn 3, while the CS went 14 and the other two ships went 15, and all of us dropped all EW. I turned in on Impulse 4, and the CL and CS both launched a pair of drones. The next impulse, the CL turned in, and the FF launched a pair of drones. On 6, the CS launched another pair of drones, and I launched a pair, both targeted on the CL, but pointed in different directions, to cut down his maneuvering options. The Kzinti fired all bearing weapons, with the CL and CS’s disruptors missing, and the FF’s hitting. All told, I took another 4 points on shield 1, and and 13 on #2.
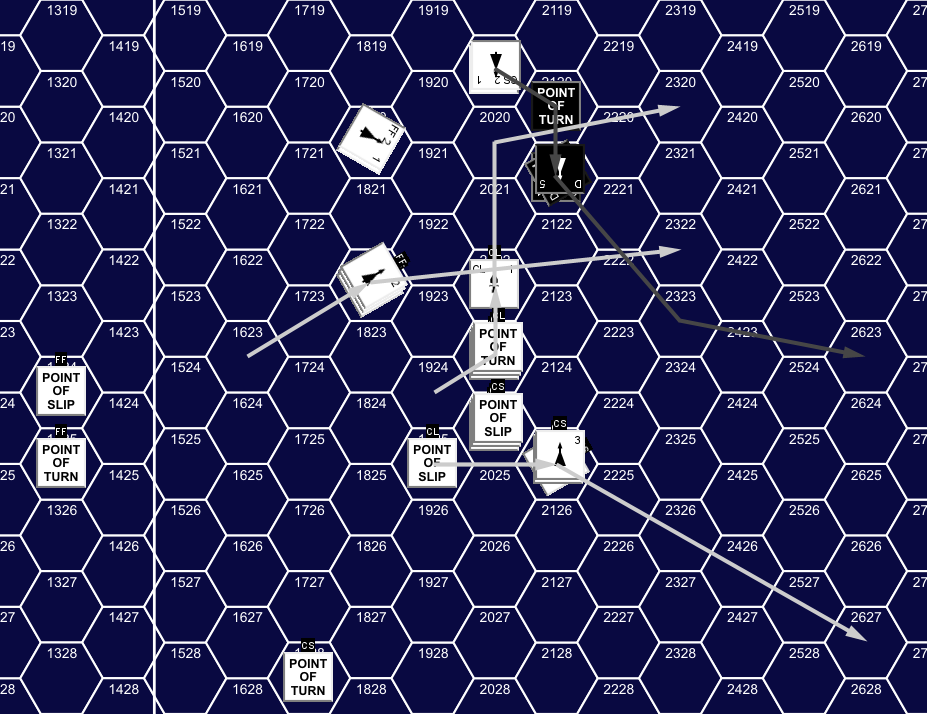
Turn 3, Impulse 5, showing movement from Impulses 1-16.
On Impulse 6, I slipped out, and fired all four disruptors at the CL, while Mark fired ph-3s at my drones to kill one and damage the other (finishing it off with another ph-3 next impulse). Three disruptors hit, doing 12 damage, nine of which registered on the CL’s #2 shield. I started turning off, with the drones in pursuit, and on Impulse 12, the FF fired ph-1 and disruptor at range 3 to do 6 damage to the #4 shield. It slipped closer the next impulse, and I fired 2xph-2 at it, for 8 damage, 5 of which registered on its #2 shield. Two impulses later, I followed that up with two more ph-2s, for another 8 damage, which knocked down the #2 and did a forward hull to the FF.
By Impulse 23, both the CL and FF had turned in pursuit of me, and the CS was paralleling me three hexes off my shield #2, so transported a dummy transporter bomb two hexes in front of the CL, and dropped a real one out the shuttle hatch. On Impulse 27 I transported out a real TB in front of the CL and FF. The Kzinti overran the dummy, but the FF turned off rather than hit the one I dropped. The CL and FF were able to avoid the third mine as well, but only with a bunch of slipping, and they started falling behind, which was largely the point. Drones encountered the dropped mine on Impulse 32, which detonated destroying one pair.
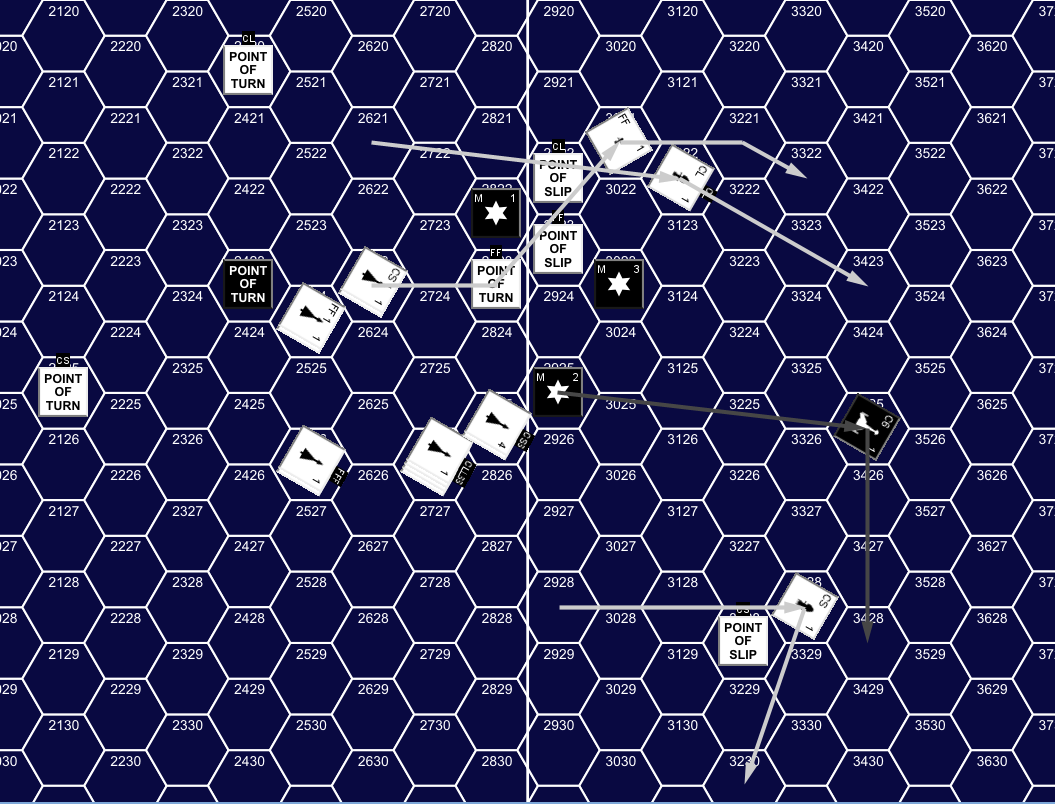
Turn 4, Impulse 1, showing movement from Turn 3, Impulse 23, through Turn 4, Impulse 6.
I repaired two boxes on my #5 at the end of the turn, and went speed 18, with the Kzintis spread from 18 (CL) to 21 (FF). Mark continued with no EW, but I put up two points of ECM. I turned towards the CS on impulse 2, and it turned away, with the CL and FF still getting around the third transporter bomb. On Impulse 6 I fired two disruptors (the only ones I’d charged) at the CS, hitting with one to do 4 points to shield #5.
I continued turning, keeping ahead of the CL and FF’s turn radius, and on Impulse 15 the CL fired its disruptors and ph-1s at range 5 with one disruptor hit and good phaser rolls to do 11 points on the #3 shield. On Impulse 24 the CL managed to turn inside me, and it took some slipping to get it back behind me again. On 27, I fired a pair of ph-2 at the FF, but poor rolls meant I did no damage. The FF turned in pursuit and fired 2xph-1 and ph-3 on 28 to do 7 points to my #3. I turned again on 29 and tractored the CL (at range 2, spending all the batteries on a 4-point tractor).
The CL and I then launched pairs of drones at each other, and I launched the suicide shuttle that I’d spent the first three turns preparing. The CL fired 2xph-3, doing 8 points of damage to #3, while I fired 3xph-1 and 2xph-2 (with overall poor rolls) to do 20 points, which knocked down shield #2 and did 13 internals, costing him two power, two phasers and a drone rack. Sadly, I’d done the movement wrong, and my seeking weapons ended up going past in front of the CL on their first move (when they have to go straight).
I repaired one box each on my #4 and #5 shields, and budgeted for a fairly strong tractor attempt on the CL in EA, and went over my budget, and still didn’t manage to hold it. I burned 18 power on a range-2 tractor attempt, leaving me with no weapons charging (and three energy in the capacitors), and only two energy going back into batteries, but at speed 20 with 1 ECM running. The CS and FF were a few hexes behind me (range 5), and the CL had spent nine power resisting the tractor (out of twenty-one available), so it wouldn’t be able to fire and keep up with me.
The CS and FF went speed 18 for turn five, while the CL went 12, meaning that my EA had worked: I would pull away a bit this turn into moderate-close range. Better, Mark didn’t use any EW, and my +1 shift would help keep me from taking much damage. The real saga of the turn was the CL, which was going speed 12 with a speed-6 shuttle, a speed-8 drone, and a speed-12 drone targeted on it, and adjacent. The CL ended up slipping away from me (his first thought was to give chase, but that’d end up with range one and his down shield to me). My drones HETed, and then went forward, temporarily putting them directly between me and the CL. This caused the CL to be herded away from the action by the speed-12 drone, as it was always hanging off his starboard, and would hit if turned in. He finally shot it with a ph-3 on impulse 17 and killed it (if I’d known how this’d end up, it might have been an armored drone…), and then turned toward the rest of the action.
I went back towards my transporter bombs from a couple turns ago, mostly hoping to give Mark trouble avoiding them as he perused me. Mark went around the mines, but the bulk of the drones had ended up collected into one big mass, and eight of them tripped the third mine on Impulse 32, destroying them, and just left the last two drones from the CL, which were following two hexes behind the rest.
For turn 6, I dropped to speed 17, while all the Kzintis boosted to 21. Mark stayed with no EW, while I put up 4 ECM. I continued a look around the remaining (dummy) transporter bomb. On Impulse 5, the CS fired a overloaded disruptor and ph-1 at range 4, missing with the disruptor, and only doing 2 points through the ECM, which was exactly countered with the reinforcement I’d allocated on my #5. On Impulse 11, the FF fired both ph-1s and its disruptor at range 3, collapsing the weak #5 and doing four internals, knocking out one power and three hull. The CL was approaching from the front, and as I prepared to pass off it’s starboard side, I came upon its drones from last turn, which I killed with a pair of downfired phasers on Impulse 12.
On 13, the CL got to range 3 on its down shield, and I fired 3 disruptors (all I’d powered, in case one was lost to internals), of which one hit, 4 ph-1s, which did 12 damage on some poor rolls, and 2 ph-2s, which did 7 damage on average rolls, to do 22 internals and gut the CL.
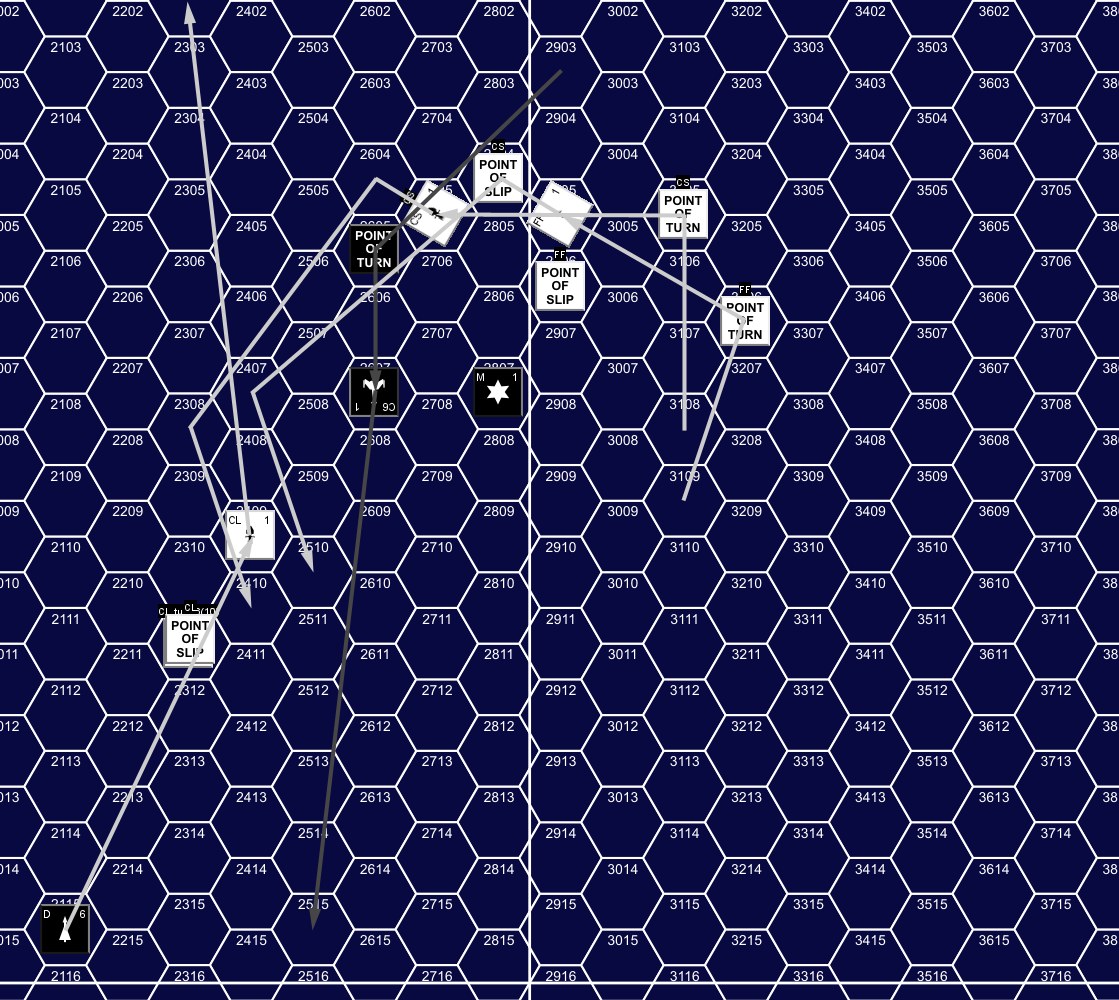
Turn 6, Impulse 13, showing movement from 1-27.
On Impulse 14, I went forward while the CL slipped away, and, still on the #2 shield, I fired another ph-2s for eight more internals. The CL and the C6 both continued straight after the pass, with the CS and FF coming back around in pursuit, and about five hexes behind the C6.
For turn 7, the CS and FF maintained speed 21, while the CL dropped to speed 9, while the C6 sprinted at speed 26. This involved shutting down everything but 2 ECM, full damage control on shield #3, charging five batteries, and charging one phaser (and the capacitors were otherwise dry). Mark fired on Impulse 2, doing a total of 10 damage to shield #4 with a pair of disruptor hits, and one good ph-1 roll (the FFs ph-1 shot missed entirely). On Impulse 14, the CL was 36 hexes away from the C6, and my seeking weapons (one drone and the suicide shuttle) lost tracking and went inert. On 28, the CL was 51 hexes away from the C6 and disengaged by separation.
At the end of the turn, I was ten hexes in the lead of the CS and FF, and did the second part of my plan. I went speed 0, and allocated for the maximum of four tactical warp maneuvers and one impulse tactical while charging everything to full (except for one disruptor kept off line), and put five points of reinforcement on the weak #3 shield in case Mark should fire before I could turn it away. Mark was expecting more high-speed chase, going 22 in the CS and 24 with the FF, and no EW.
Mark turned off and did not try to engage, circling around a bit near the end, and we were at range 17 at the end of the turn. The CS shifted down to speed 14, and the FF to 15 for turn 9. I went my maximum speed of 10, with 14 points of reinforcement on the #1 shield, and standard loads on all disruptors. The Kzinti effectively crossed my ‘T’ during the turn, and the FF started turning to maintain an orbit around my position, and I turned towards it. I fired disruptors at range 13 on Impulse 25, getting three hits for nine damage to the #6. The FF then turned off, paralleling the CS again. At the end of the turn, I continued repairing shields (#1 and 2 this time), and the Kzintis each repaired one box on down shields.
For turn 10, I boosted to speed 18, while the Kzinti went 15. I had a bit of a quandary at this point. I would have dearly loved to actually destroy one of the group-4 ships, but Mark was now generally playing keep-away, and it looked like I wasn’t going to be able to force another close pass at any time soon. I could try peppering him with moderate-range disruptor shots, but even against the FF, that would take time to take effect, and in another 10 turns, he would get to roll to see if another pursuit group showed up. Even the damaged FA-L of group 6 would be a help, and the pair of FFs in group 5 could be dangerous at this point.
So I shadowed the Kzinti for a bit, then turned towards them. After a few impulses the Kzinti turned away, I fired disruptors at the FF for one hit to do four damage to it’s #4. The Kzinti turned off of my course… and the turn ended with us back down to about range 11.
On turn 11, I went 19 while the Kzintis went 24, and both launched drones on impulse 1. The Kzinti turned away again, and I fired disruptors at the FF for all for to hit at range 12, and do five internals (after five shields and two reinforcement), which got one warp and two batteries. I turned to go around the drones, and the FF turned to get the down #4 away from me. The CS turned to stay with the FF… and I turned the opposite way.
This was an opportunity I had been looking for. We were now headed directly away from each other, and the range would open up dramatically before Mark could turn back around and give chase. In fact, we ended the turn at range 25, and I plotted to sprint at speed 31 to keep opening up the range. I had five more turns allowed at speed 21+, and the CS was only capable of 24 at best, giving me at least three hexes per turn, and it still had to finish turning around. …I had forgotten at that point that separation is range 50 (instead of the 35 of losing seeking weapon tracking). On the other hand, I’m not sure how practical even speed 24 was with the need to power other systems, and certainly me dropping speed suddenly again was a possibility. Even at 24, that’s six hexes times 5 turns to open up the range at least another thirty hexes and disengage by separation around turn 16 or 17.

After the scenario, I was able to repair what damage I had taken, but I am down six drones, two transporter bombs, one dummy bomb, and one shuttle (that last one hurts the most, I had been hoping to drive him off and recover it). The FF was able to repair everything but two forward hull boxes. The CS is down all its forward hull, two rear hull, a tractor, a transporter, a bridge box, a RS ph-3, and the topmost sensor ‘6’ box. Even after repairs, the CL is a mess, still out three center warp, two impulse, an APR, all the batteries, all hull, two lab, a tractor, a transporter, both drone racks, the RS ph-3 and RF+R ph-1.
Mark’s initial mistakes came during the the turn 2 pass. First, he fired on the ECM drone two early, as the ph-3s just didn’t have the range, and they missed. Then he killed it while doing his big strike, instead of an impulse before (or even ignoring it, and letting me worry about being stuck at speed 12 or abandon it). Also, the FF didn’t come in with the other two ships. He needed the extra firepower, and he needed to distract me from the CS. Even losing the FF outright (which he was rightfully worried about) would be worth having the CS in good shape for the rest of the battle.
Admittedly, that pass went better than I thought even with all of that. I expected to take a lot more than half of my #1 on that shot. The +3 shift from the ECM drone helped, but it’s just that the CS is a lackluster cruiser. Trying that against the Kzinti CC (which leads group #1) would end a lot differently, as it has a lot more firepower. It still might not get through the shield, but there would be very little left. (It also has three more warp power, so my end-game sprint wouldn’t work against it.)
The CL also was mismanaged. First, it should also have followed the CS in on turn 2 for a centerline shot. On 5, it needed to kill my speed-12 drone a lot sooner so it could maneuver. Second, he needed to make me work for the turn 6 shot at it. Turning across my path would have worked. I could overrun it and then fire the (lots of) rear phasers after going by it, but getting the shield #2 shot might have been tricky, and the disruptors wouldn’t have a shot. Instead, I’d probably take the approach shot, leaving it with two down shields but fewer internals. Also, the intact left-side weapons would get to fire at close range.
We’re off to other things for the moment, but we’ll be checking on scenario 4 soon!
Discussion ¬