
T3 The Lone Gray Wolf Y160 S4
[Scenarios 1 & 2]
[Scenario 3]
As Mark and I sat back down to the “Lone Gray Wolf” mini-campaign, I wondered if it might wrap up quickly. Most of the groups available to the Kzinti can’t match the power of an uninjured DN, and a couple more fights like that would leave me able to just disengage at will from the sixth and final scenario.
And then Mark rolled a 1 for the fourth group; the best Kzinti group of the set. One that in the original version I’d be tempted to just disengage from immediately, even on the first scenario, just not to have to tangle with a full carrier group and squadron of fighters.
In Y160, it’s ‘merely’ the equivalent ships: a CC, 2xCL, and FF. In this era, Kzinti cruisers are a bit lackluster, except for the CC. It nicely ups the firepower of the regular CS class, has the full amount of warp power something that size should have, and may be the only ship around right now that has 180-degree arcs on disruptors (expanded disruptor arcs will become a lot more common in a decade, but right now they’re almost all limited to 120-degree arcs). So, this is something of a more dangerous repeat of the third scenario, which featured group 4.
The Kzinti group lined up behind me and all went speed 24 for turn 1, while the C6 went speed 20, and only the CC put up EW, with four points of ECCM. I immediately turned off to the left, hoping to maneuver for a moderate-range shot, and the Kzinti followed suit a few impulses later. I continued my turn, and brought the main weapons to bear at range 8 one impulse 20. By impulse 23, range was down to 3 and the Kzintis started launching drones. On 24, I slipped in and ended up nose-to-nose with the CC, which is something I’d been trying to avoid, but the ranges had been a lot shorter than I’d anticipated. I tractored the two drones in front of me, and we both launched more right before firing. I shot down the two new drones from the CC, and hit the CC itself with four disruptors (one overloaded), four ph-1s, and 2 ph-2s, for a total of 58 damage. The CC fired one disruptor and 4xph-1, at me, and five more ph-1 came from the other ships, for a total of 49 damage (with some poor phaser rolls).
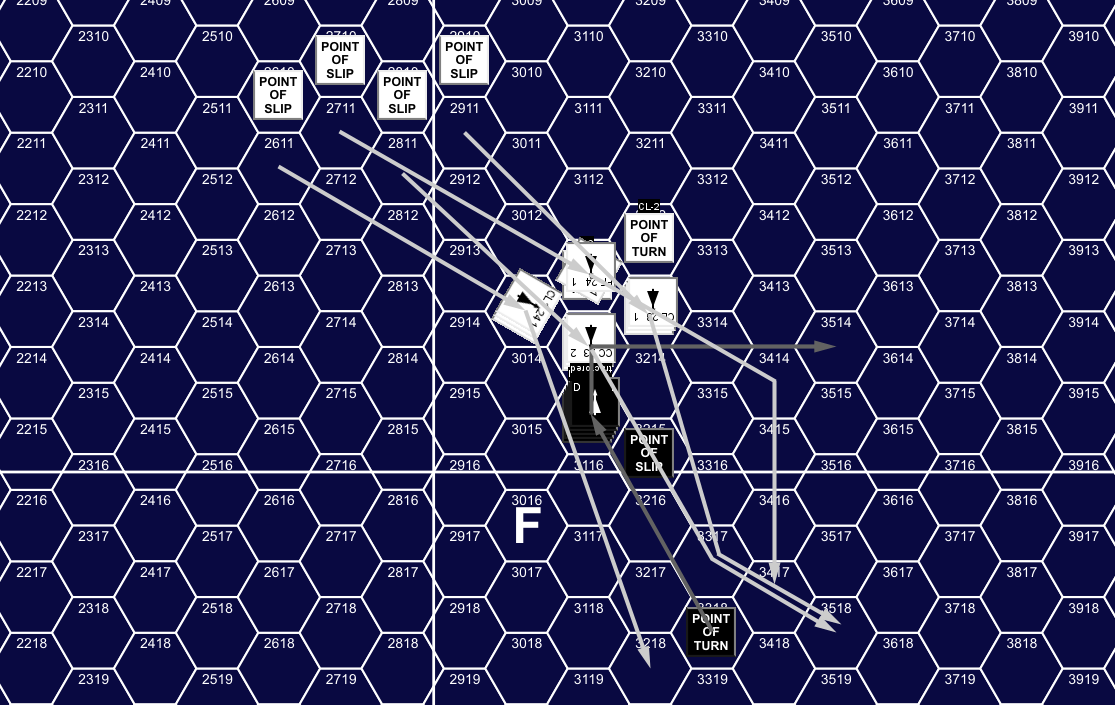
Turn 1, Impulse 24, showing movement in Impulses 20-32, and ships largely hidden underneath the cloud of drones.
This did five internals to me, knocking out a phaser and one warp box. The CC took 25 internals, losing one drone, one disruptor, and multiple phasers, and blasting through the forward hull to start losing batteries. The next impulse, the FF launched a drone, putting everyone at maximum launches for the turn (short of the C-racks on the CC, which couldn’t do their second fire until the next turn anyway).
With drones all around, I shot down the two from the CL on 26, giving me a chance to maneuver out (and that was partially due to the fact that drones have to go straight—or HET in place—on their first move). For turn 2, I dropped to speed 16 (partially recharging phasers and starting repairs on the #1 shield), while the Kzintis dropped to speed 21, with the CC at 20. I dropped the tractored drones, and put up 1 ECM, while the Kzinti didn’t use any EW. With everyone drawing apart, I fired a ph-1 one at the rear shield of the FF on Impulse 2, doing one box to it.
We roughly paralleled each other for the first half of the turn, with my drones in between us (and slowly falling behind). On Impulse 14, the greater speed of the Kzintis put CL-2 into my FA and I fired four disruptors at it (two off of battery), getting two hits and doing three boxes to its #5. After that, the Kzintis started slipping out, and ranges climbed to 9-11 by the end of the turn, but were still in my FA arc. The CC repaired one box on its #1 compared to my three.
For turn 3, the Kzinti CLs dropped to speed 20, while the CC and FF maintained their speeds, and I stayed at 15 (but with the phasers largely charged, I shifted power to disruptors and EW). I boosted ECM to 4, and everything other than the CC put up one or two points of ECM. On Impulse 3, I boosted ECCM to 1 (matching CL-2s ECM) and fired disruptors at it, getting three hits, and doing seven more boxes to its #5. On impulse 10, the two CLs turned in. On 13, I turned the opposite way, setting up to pass behind both groups. All the Kzintis turned on 16, with the CLs nearly on the oblique, and they fired at range 6 (Mark would have liked to fire all the main weapons, but was stymied by the RF+R and LF+L setups on the CLs), and hit with one overloaded disruptor and a pair of ph-1s to do 9 damage to the #6 shield.
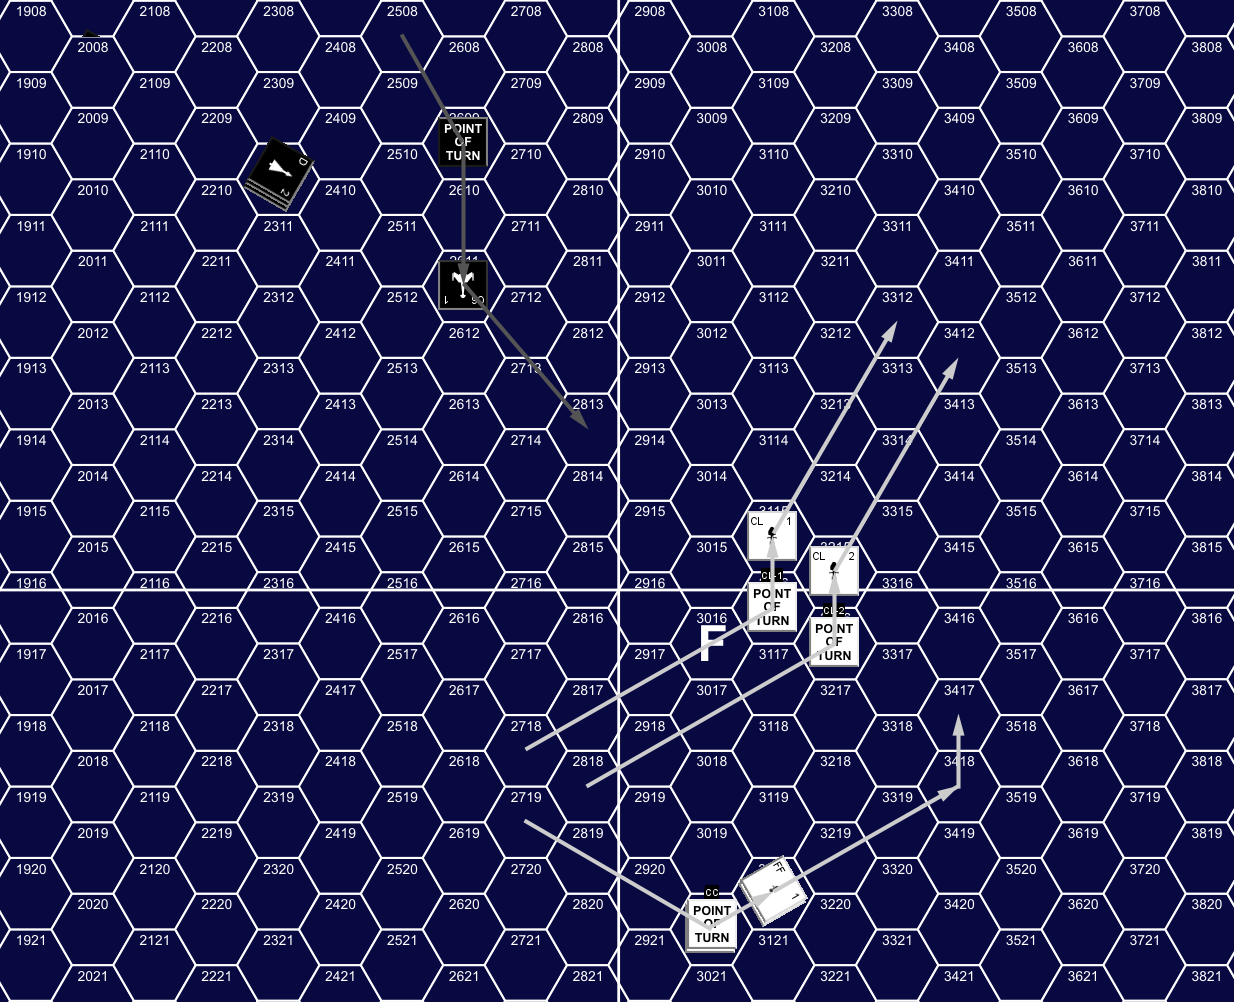
Turn 3, Impulse 16, showing movement in Impulses 9-22. The CC is under the FF.
On 18, the CC and FF each launched one drone. On 22, the FF turned in and fired an overloaded disruptor, which missed, and a ph-1, for another 3 points on shield #6. At the same time, I fired the boom phasers at CL-2, for good rolls to 9 damage on shield #5, collapsing it and doing three internals, which took out the right-side disruptor and the left-side ph-3. I continued slipping in, and the fight started spiraling left, until I turned in near the end of the turn (finally having cleared the possibility of him hitting my #1), and the FF and CC turned right at the end of the turn, while the CLs continued left. The CC repaired another shield box, while I repaired three more on shield #1.
The Kzinits slowed down to speed 15, while I boosted to 16 for turn 4. CL-1 generated 2 ECCM, CL-2 generated 1 ECM, and the FF generated 2 of each, while the C6 generated 4 ECM and 1 ECCM. The CLs turned again on impulse 3, and fired a ph-1 each on 5, doing 3 damage to shield #4 (after a point of general reinforcement). The CLs turned to direct centerline behind me on 9, and fired the remaining ph-1s and an overloaded disruptor at range 5. The phasers rolled well, but had a shift, and the disruptor missed, for 7 more damage on my #4.
I turned to get them off the shield, and chase the CC & FF, and the CC launched a shuttle an impulse later. Later in the turn, I got close to it and it fired, doing 2 damage to my #1… which was blocked by reinforcement. I then tractored it to kill it by death dragging. The CLs got close, thanks to my turning, and passed behind me, and I turned back to parallel them. They still were a bit back, so late in the turn I volleyed my disruptors at the FF, getting three hits to do seven damage to the FF’s #5. On impulse 32, the CLs turned in again, I slipped out, ending the turn at range 3. The CC and CL-2 both repaired a shield box, while I repaired one box each on the #1 and #6 as well as the warp engine hit.
For turn 5, the Kzintis stayed at speed 15, while I downshifted to 12. The CC put out 2 ECM and the FF 4, while CL-1 generated 4 ECCM and CL-2 generated 2, and the C6 generated 6 ECM. On impulse 1 I launched an ECM drone, and on impulse 3, the CLs each launched two drones. On 4 they moved to range 1 of me, sorely limiting my maneuver options, and a launched a pair of drones to take out two of them, and fired ph-2 on the other two to destroy them. On 5, the ECM drone started generating 3 ECM and loaning it to the C6, giving it 9 points, and a +3 shift for anyone without ECCM (this would turn off and on a few times over the next few impulses as maneuvering restrictions kept it from always being in my hex), and CL-1 launched a shuttle. Then the CLs boosted ECCM and fired the right-side ph-1s and disruptor (CL-2’s was out), for 8 damage on shield #4 (decent, if shifted, phaser rolls; the disruptor missed).
The CLs turned away after that, and I tractored CL-2 at range 2, costing me 8 power in the auction, 5 of which came from batteries. A combined movement cost of 2 1/6 put us both at speed 4. On 9, the CC launched three drones, and the FF launched a pair (which surprised me, given the range between us). During the rest of the turn, the CC and FF turned around and started heading back towards the action, while CL-1 moved to join them. I slowly turned around, tractored two drones from turn 3 that had caught up, and fired on CL-2 on impulse 24.
Four overloaded disruptors hit, followed by good rolls for 3xph-1, for 49 damage. This crashed through the 16-point shield #3 for 33 internals that wrecked the ship. Over the next impulses, the CL launched its remaining shuttle, and I launched a drone at CL-2. The drone hit on impulse 30 through the down shield for another 12 internals, that left it with the off-side phasers and seven power. I repaired the lost phaser, and three more boxes on shield #1, while the CC repaired another box of its shield #1, and CL-2 repaired a box of shield #5.
For turn 6, CL-1 and the FF went speed 21, the CC went 18, and the CL could only manage speed 6 with fire control off. I stuck with speed 12 to keep the ECM drone functioning, dropped the tractors in EA. For EW, only the CC and CL-2 put up two ECM, and the C6 put up one point of ECM. I shot down the two (ex-)tractored drones, and one of the shuttles fired at point-blank to do three damage to the #1. On impulse 3, I moved to range 1, boosted ECCM to 2, and fired three overloaded disruptors into shield #2 of CL-2 with 2 hits to blow down the shield and do another four internals, killing two power. On four, one of the shuttles got a good hit on the ECM drone, destroying it, and I fired two ph-1 into CL-2, doing eight internals and taking out three more power. On five, I launched a new drone at CL-2 and started maneuvering past it.
On impulse 10, CL-1 got to range 4, and fired the right-side disruptor, ph-1 and ph-3s, doing 6 damage, of which 4 registered on shield #4. I turned the shield away, also hemming in CL-2, who was trying to avoid my drone. On 17, the FF shot down the drone with a range-5 ph-1 shot just before it could catch the CL. On 22, I finally put CL-2 back in a forward arc, fired the last disruptor into shield #5, which took two points and collapsed for three more internals, killing a phaser and the probe. The next impulse I did 5 more damage with a ph-2, killing the last phaser, APR, and getting onto the excess damage track. Then I slipped out to range 2, and downfired a pair of ph-3s into it for six damage, with the fifth point finally destroying the ship.
This still left me at low speed with all the remaining Kzintis getting in on the weak #4, and on impulse 28 the FF fired a ph-1 and disruptor at range 4, thankfully rolling poorly for 3 damage, only one of which registered on the shield. Ranges were down to 3 (CL-1) to 5 (CC) at the end of the turn, and I dropped a mine out the shuttle hatch on impulse 32 to try and shake off the Kzinti ships. I repaired one box on #4 (I had been quite aware that it could go down, and made sure I could reinforce it next turn).
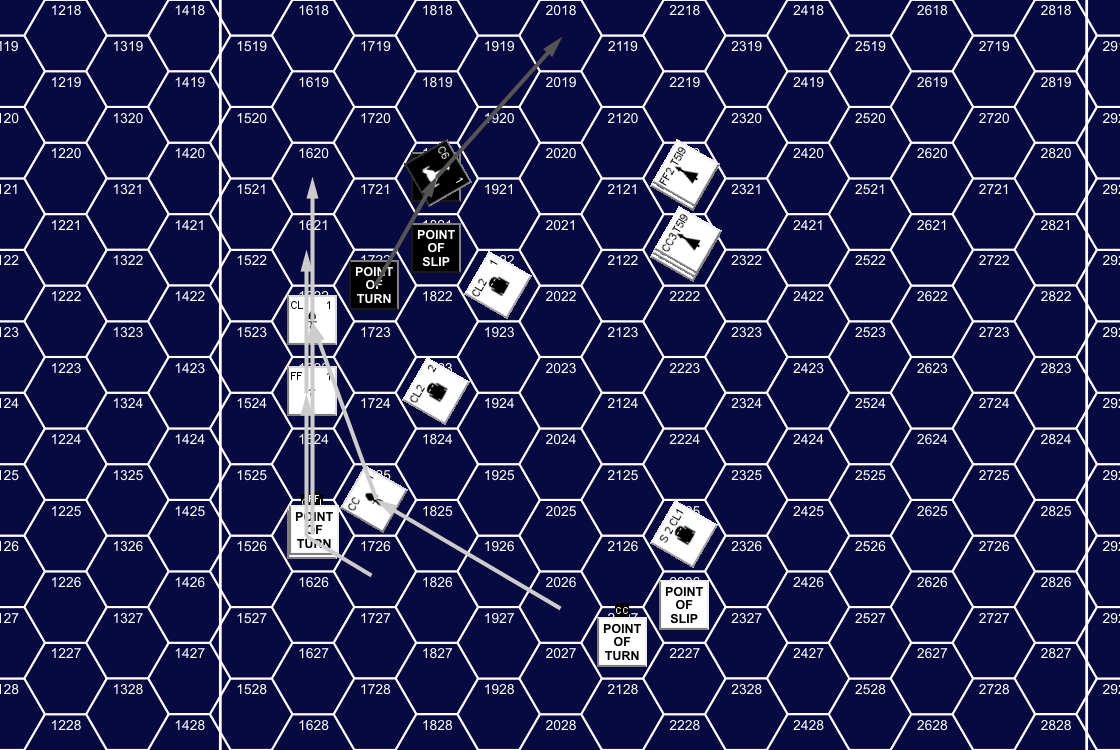
Turn 7, Impulse 1, showing movement from T6I28 to T7I6.
For turn 7, I boosted to speed 20, the CC stayed at 18, and CL-1 and the FF dropped to 15. The CC put up 2 ECM, while the remaining CL generated 1 ECCM, and I put up 1 ECM. The CL and FF immediately unloaded all bearing weapons, and the FF boosted to 1 ECCM. One overloaded disruptor missed, but the second hit, and the ph-1s rolled well, for a total of 24 damage on the #4 shield. Between reinforcement and batteries, I only took 9, which caused one internal (hull).
I sidestepped the drones from last turn, he sidestepped the mine I’d dropped, and the CC got on shield #4 on impulse 6, and fired, thankfully missing with all three disruptors, and only doing 3 damage with a pair of ph-1s to destroy a disruptor and a phaser. On 7, a shuttle got a rear shot, and rolled well (1) to do an internal, hitting Aux Con.
The rest of the turn was spent with me trying to get some range and shake the Kzintis from my #4 shield for next turn. On impulse 24, I tried a shot with the boom ph-1s at the CC, doing four damage that bounced off of reinforcement on his #1. By the end of the turn, range had opened up to 7 (still a lot closer than I’d like), but I’d gotten the Kzintis progressively further from the #4 shield boundary. And I repaired one box on the #4 shield.
With the #4 down and #1 still weak, it was going to be impossible to continue without slowly bleeding internals. Just separating into two groups would let him get there at some point. So for turn 8, I went speed 30 (all I could manage with a warp box out) and plotted to disengage by acceleration. We played out the turn to see if he could get a good shot in before I left, but he never quite managed it.

The bad news is that I can only disengage by acceleration once in the campaign. The hope is always to save that for the last scenario, and just declare it over at that point. Now, I have to destroy the opposing ships or force them to disengage. Or catch them at a long range at some point and force the range over 50 hexes. I don’t think Mark will let me pull that trick twice.
The good news is that I went into this with the goal of making sure this group would be weaker if I faced it again. The initial plan was to pepper the FF with moderate-range disruptor shots until it’s shields collapsed, and then finish it off. But destroying a CL certainly works. I managed to only use one transporter bomb this time, but the drone reloads are starting to empty, and I fired off nine drones this time, which is a rate I can’t really keep up (well, okay, eighteen drones in two scenarios would work, but I’m expecting to use more, not less, if I get another serious fight).
The FF and CL-1 never took internals, and I was able to repair everything in the between-rounds segment, though it was pressing up to my limit of 18 boxes. However, the CC is still down 13 boxes. All the vital systems are repaired, but it’s only got one forward hull, four aft hull, and is down a tractor beam. If it shows up again, getting through the ‘padding’ won’t take long at all.
Neither of us really wanted a point-blank pass first thing this time, but it happened anyway. As I predicted earlier, the CC made a big difference; it survived the pass in a lot better shape than the CS could, and instead of losing half of shield #1, it went down. Mark was probably too cautious with the CC after that. He made sure I didn’t get another shot at its #1, but it didn’t contribute much either. It might have been better to slow down, keep it further away, and repair the shield faster (and make sure to keep those disruptors charged for moderate-ranged shots).
Mark also ran into trouble with the LF+L and RF+R arcs of older Kzinti ships here, which with two CLs made a difference. For the closer passes, he should have either been looking to centerline, or approach a hex or two off, fire one side’s weapons, turn across me, and fire the other side as he goes by. At longer ranges, keeping one side uncharged helps movement.
Again, we’re off on other games for a little bit, but we’ll back for the rest soon.
Discussion ¬