After freezing in the great white north, it was time for Patch and I to return to Budpest for FB9 “The Shooting Gallery”, where it’s early February and there’s also still snow on the ground. I don’t recall how we decided, but I ended up with the Russians who are attacking into the Ganz Works that was on the periphery of the action in “Red Banner Days“.
The Germans get a fairly nice defending force, with 8 1/2 squads, including a pair of 838 Assault Engineers and otherwise split between 468/467s, all from Pz Div 13, with the usual support weapons, with some concealment/Dummies, Wire, mines, a Hungarian Bofors AA, an 88… and a Panther. However, the Panther is Out of Gas, and therefore Immobile, and the Axis troops are at Ammo Shortage Level 4, the worst we’ve seen, and the second-worst possible in FB.
The Russians enter with 11 squads and 4 T-34/85s, plus three squads (and 8-0 leader) of the Buda Volunteer Regiment. These are Hungarians who have joined up with the Russians, and use the standard Hungarian/Axis Minor stats, except with counters bordered with Russian brown instead of German blue. The primary goal is to take ten stone buildings in the central area of the map in seven turns, but both sides have a CVP cap of 35.
The Russians enter in the west, but can also enter along most of the north edge if they wait until turn 2. Both sides get six ‘purchase points’ of reinforcements for each of the first three turns, with the Russians entering in the north and west and the Axis entering in the east and some of the south. Oh, and the Axis gets a couple squads of conscript Hungarians and a 7-0 when/if the Panther dies.
My general plan was to enter everything immediately, and try to drive for the far end of the victory area, where there’s more, smaller buildings. I would buy all the BVR troops available on the second turn, and enter them in the rear of the German lines; if they got lucky, they might get into the area. If not, they would keep Patch’s attention divided, and the BVR units do not count against my CVP cap, so a lone platoon getting cut off and killed was not a real worry, so long as it kept Germans busy. Since all the BVR troops together cost seven points, I needed to save one from the first turn, and I decided to go for the 100+mm OBA module… partly to get the 8-0 leader with it. This meant my other goal was to find an observation post for him as soon as possible. My setup was a little hurried, which lead to two of the T-34s being a hex further out than needed (J18 & K19 instead of I18 & J18), but they didn’t have far to go the first turn anyway.
The bulk of Patch’s setup was within the victory area, but the first thing I had to deal with was a pair of “?” in H13h2, but Patch didn’t force me to strip concealment on anyone approaching him. Until the last move, when he opened fire from F11h1, who had also been quiescent until that point. The resulting 8 -4 shot broke my squad, but it also malfunctioned Patch’s HMG.
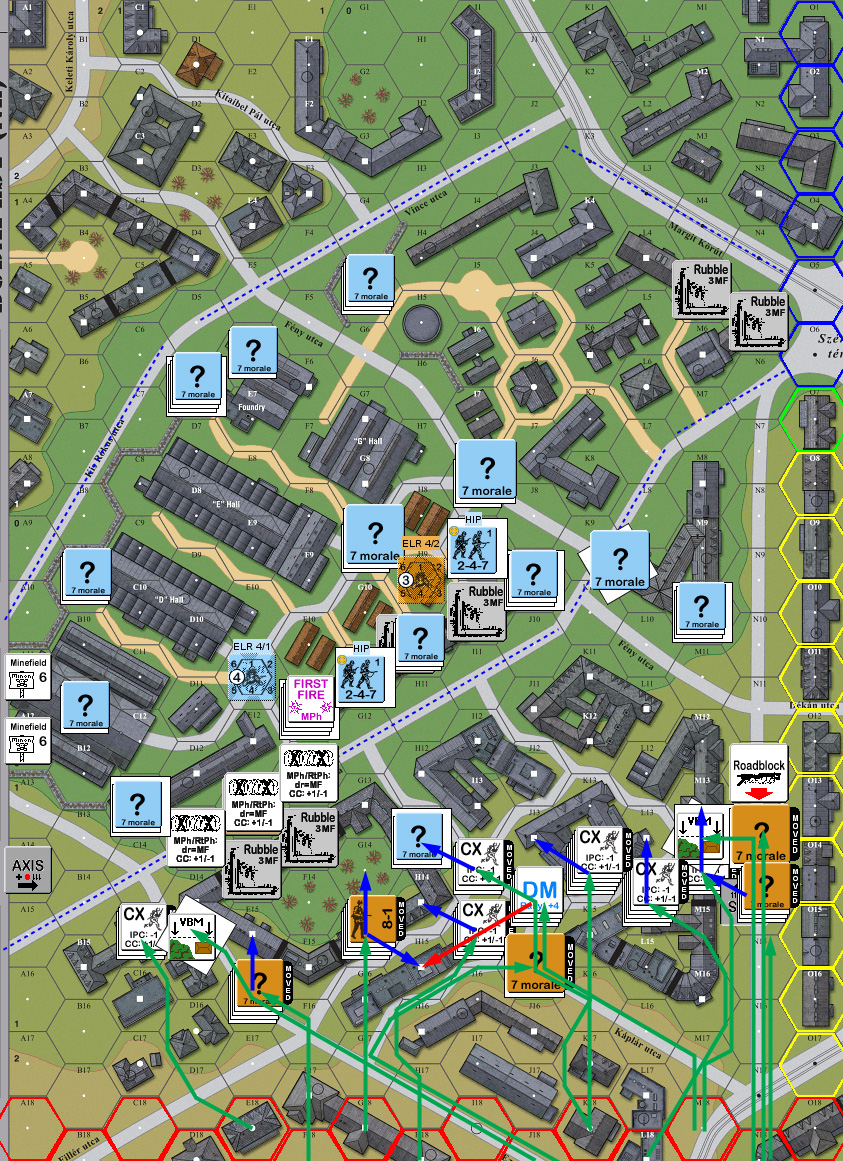
Situation, Russian Turn 1, showing full playing area; north is to the left. Red hexes are the Russian entry area, blue hexes are the German entry area, the blue dashed lines define the victory area. Patch’s hidden mines and pair of HS are also shown.
↓ Read the rest of this entry…