Rindis.com

All my hobbies, all the time
  • Home
  • My Blog
  • Games
  • History

Categories

  • Books (504)
  • Comics (10)
  • Gaming (918)
    • Boardgaming (674)
      • ASL (155)
      • CC:Ancients (83)
      • F&E (78)
        • BvR – The Wind (26)
        • Four Vassal War (9)
        • Konya wa Hurricane (17)
        • Second Wind (5)
      • SFB (78)
    • Computer games (162)
      • MMO (77)
    • Design and Effect (6)
    • RPGs (66)
      • D&D (25)
        • O2 Blade of Vengeance (3)
      • GURPS (32)
  • History (10)
  • Life (82)
    • Conventions (9)
  • News (29)
  • Technology (6)
  • Video (50)
    • Anime (48)
  • Writing (1)

Patreon

Support Rindis.com on Patreon!
Become a patron at Patreon!

Other blogs:

RSS Inside GMT

RSS Playing at the World

  • Playing at the World 2E V2 Arrives May 5, 2025

RSS Dyson’s Dodecahedron

  • Scavengers’ Deep – Map 33 July 16, 2026

RSS Quest for Fun!

  • The Expense Post May 24, 2026

RSS Bruce Heard and New Stories

  • Pain, Exhaustion, and Morale in D&D BECMI June 7, 2026

RSS Chicago Wargamer

  • The 2 Half-Squads - Episode 310: Cruising Through Crucible of Steel January 27, 2023

RSS CRRPG Addict

  • Game 581: Dragon Quest (1982) July 15, 2026
SF&F blogs:

RSS Fantasy Cafe

  • The Leaning Pile of Books July 5, 2026

RSS Lynn’s Book Blog

  • Review: The Tinder Box by MR Carey July 16, 2026
ASL blogs:

RSS Sitrep

  • Cardinal ASL Sins March 18, 2026

RSS Hong Kong Wargamer

  • FT114 Yellow Extract After Action Report (AAR) Advanced Squad Leader scenario April 16, 2025

RSS Hex and Violence

  • This still exists? March 25, 2025

RSS Grumble Jones

  • Grumble Jones July Scenario GJ162 You Will Engage the Enemy July 1, 2026

RSS Desperation Morale

  • How to Learn ASL March 16, 2025

RSS Banzai!!

  • October North Texas Gameday October 21, 2019

RSS A Room Without a LOS

  • [Crossing the Moro CG] T=0902 -- Rough start July 18, 2015
GURPS blogs:

RSS Dungeon Fantastic

  • Felltower - Monsters Fleeing between Sessions vs. PCs replenishing June 28, 2026

RSS Gaming Ballistic

  • B-Scale Detail and Examples July 16, 2026

RSS Ravens N’ Pennies

RSS Let’s GURPS

  • Review: GURPS Realm Management March 29, 2021

RSS No School Grognard

  • It came from the GURPS forums: Low-Tech armor and fire damage January 29, 2018

RSS The Collaborative Gamer

  • Thoughts on a Town Adventures System January 18, 2022

RSS Don’t Forget Your Boots

  • GURPS Supers Newport Academy #7: “Invitation to the future.. of the 1970’s” July 5, 2026

RSS Orbs and Balrogs

  • Bretwalda - Daggers of Oxenaforda pt.4 - Fallen King May 27, 2017

Empires and Barbarians

by Rindis on October 29, 2015 at 12:00 pm
Posted In: Books

I picked up Peter Heather’s 2009 book simply because it was cheap on Kindle at one point. I’m now thinking I want to get a proper hard copy book. This is mostly a measure of how much I liked the book, but there are a number of good maps that I’d like a better look at too.

The primary purpose of this book is to re-examine Europe from the Roman to Dark/Early Middle Ages, and argue against the cultural continuity/no migration stance that has gained popularity from the 70s onward. The main new thing brought to the analysis is concepts from modern migration studies (it was highly appropriate that I started this book about the time the Syrian migration crisis started hitting the headlines). These have identified a lot of trends in how and why migration happens, and Heather then applies those concepts to Roman narratives and archaeological evidence.

Starting around 1 AD, he notes that the areas the Romans conquered were relatively prosperous and well developed; Roman expansion in Europe pretty much petered out when it reached (largely Germanic-speaking) areas that were less well developed with less intensive agricultural patterns. In fact, agriculture still relied on picking up and moving every couple of generations as the land was exhausted. Heather points out that migration studies show that people who have migrated once are likely to do it again, and that the next couple generations retain the habit. So, if there’s an entire cultural system that has to pack up and move every so often, it’s likely that migration will be a major answer to any new problems that come up.

One of major motivators of migration is economic disparity. More prosperous areas draw people from less prosperous areas. Not only was the Roman Empire the most developed part of Europe, but the Empire spent a fair amount of money and effort in promoting power structures on the frontier, and occasionally breaking them apart when they got too big. Heather shows that the fall of the Western Empire started when this system failed (and argues that this had to happen at some point, but the actual event was earlier than it had to be). Rome’s wars in the east drew off troops, and allowed the short-lived Hunnic Empire to form in central Europe, causing all sorts of groups to migrate to get out of the way, and then it came apart, causing all sorts of groups to migrate away from the resulting chaos.

After tracking how the late fourth and fifth centuries play out, Heather continues with the evolution of central and eastern Europe through the year 1000. This involves the Avar Empire, the spread of Slavic speakers through much of Eastern Europe, the Viking era of Scandinavian migration, and briefly the Magyars, and why they didn’t set off any noticeable migrations.

So, it is a study of the fall of the Roman Empire, from outside of the Empire, and a study of the demographic changes that happened across most of Europe over a thousand years. I think it does a lot to correct current scholarly wisdom (which, itself, was a much-needed correction), and I found it very informative and well argued.
└ Tags: books, history, reading, review
1 Comment

Crossing Chickamauga Creek

by Rindis on October 25, 2015 at 12:00 pm
Posted In: Boardgaming

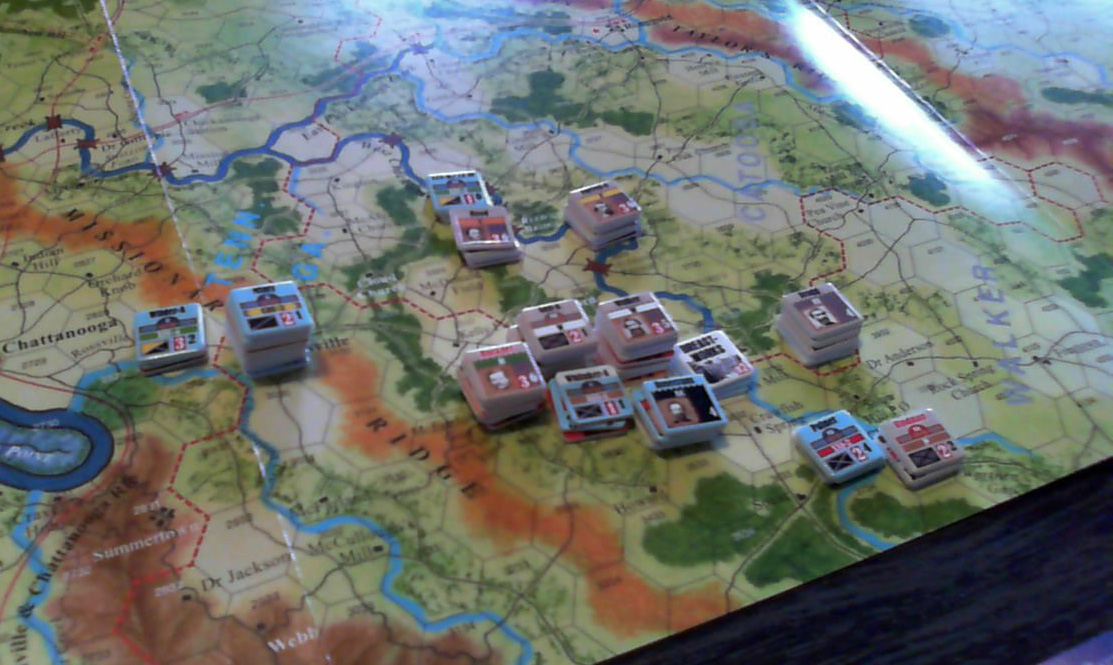
After a long silence, Mark gave me a call Friday night, and we arranged a game for the next day. After some discussion, we decided to do another scenario from Battle Above the Clouds. At first we were looking at something moderate-sized, but ended up going for the one-turn “Crossing Chickamauga Creek” scenario. Since we did a fair amount of catching up before and after the game, this worked out fairly well.

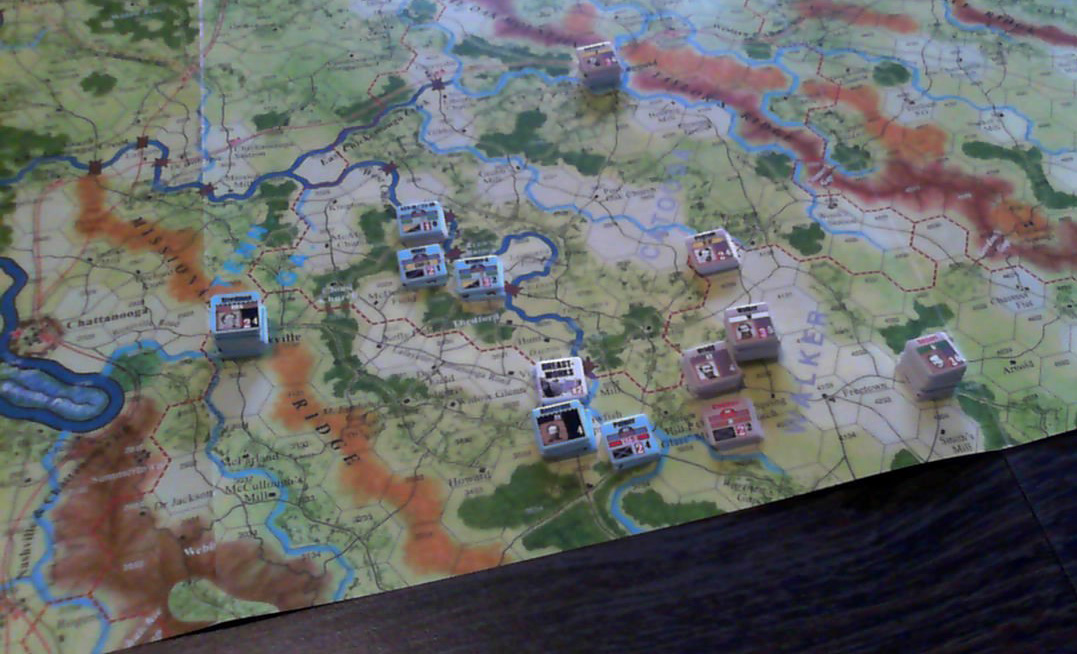
Not only is it one turn, but it takes place in less than one quarter of the northern map, just covering the Confederate attempt to Missionary Ridge near Rossville and interpose themselves between Chattanooga and the bulk of the Union Army. Confederates occupying a section of the Lafayette-Chattanooga road is worth 6 VPs, occupying a parallel road to the south is worth 10, taking Rossville itself is 3 VP, and casualties are also worth a fair amount at this scale (with Confederates being worth more). I ended up with the Confederates, trying to figure out how to dislodge the Union position.

Chickamauga-Creek-1

One thing I had forgotten was that the dice that came with BAtC are very uneven (the red die has a strong tendency to roll low and the white one has a strong tendency to roll high—after lunch we switched to other dice). I tended to take the white die for activations, and got to do whatever I wanted for quite a while (though it took quite a while to roll a ‘5’ so that Hood showed up to speed along Bushrod Johnson). I started by moving up Forrest’s cavalry to either side of Wilder’s mounted infantry and tried to one-two punch him out of there.  I had a small flanking bonus, so Davidson attacked with an overall -1 that I hoped would at least force some fatigue onto the defenders, and then Scott (with Forrest) would hit on the other side with an even roll (due to Forrest’s better tactical rating). One or the other should do something.

Instead, I grabbed the red die for the attack, and 6-1 roll ended up with Davidson’s brigade being wiped out, loosing the small flank bonus. I went ahead with the second attack anyway, and rolled poorly for that too, putting Scott at Fatigue 4 while losing another strength point.

3 losses in the hole, and nothing to show for it.

Lots of little maneuvers followed, trying to find a way to get a decent attack. Hood finally showed up, and I sent Johnson forward and across Lambert’s Ford, and his attack finally dislodged Wilder. This was the opening I needed, and immediately parked part of Walker’s Corps on the closer (lower value) road. Things were a little stable at that point, with me not wanting to stick my neck out any further, but trying to figure how to get onto the next road.

Mark sent Whitaker’s brigade forward to extend the line, and I managed to get part of Buckner’s Corps up to him, and defeat him before Mark could send anything else forward. This got me onto the second road, and things kind of petered out at that point, with no good opportunities left.

Chickamauga-Creek-2

I had 16 points in objectives, and 2 from one Union manpower loss, but I lost six manpower doing it for 18 VP, and a total of 0 is a Union Substantive Victory. If the beginning hadn’t been quite so bad, it would have been a Minor Victory… for someone, depending on the details.

I’ve played some tiny scenarios from other GCACW games before, but this one turned out to be better than the others. It’s still not a great show of the strengths of the system, but there’s just enough maneuver there to sink your teeth into.

└ Tags: gaming, GCACW
 Comment 

Two Rounds of Anapus River

by Rindis on October 21, 2015 at 12:00 pm
Posted In: CC:Ancients

Last night, Patch and I did our usual between-games round of C&C:A. Up this time was “Anapus River 415 BC” from Expansion #6. This deals with the beginning of the Athenian campaign on Syracuse, so while it features orange blocks, they’re not Spartans. (Being Greek colonists, I suppose the orange set is more apropos than the brown Carthage set.) The Syracusans are at a decided disadvantage, with four cards to six, only one leader, and one of their MH stuck behind the line. But they do have the first MC we’ve seen in a long while, and if they can (somehow) get into the Athenian camp, they can loot it for banners.

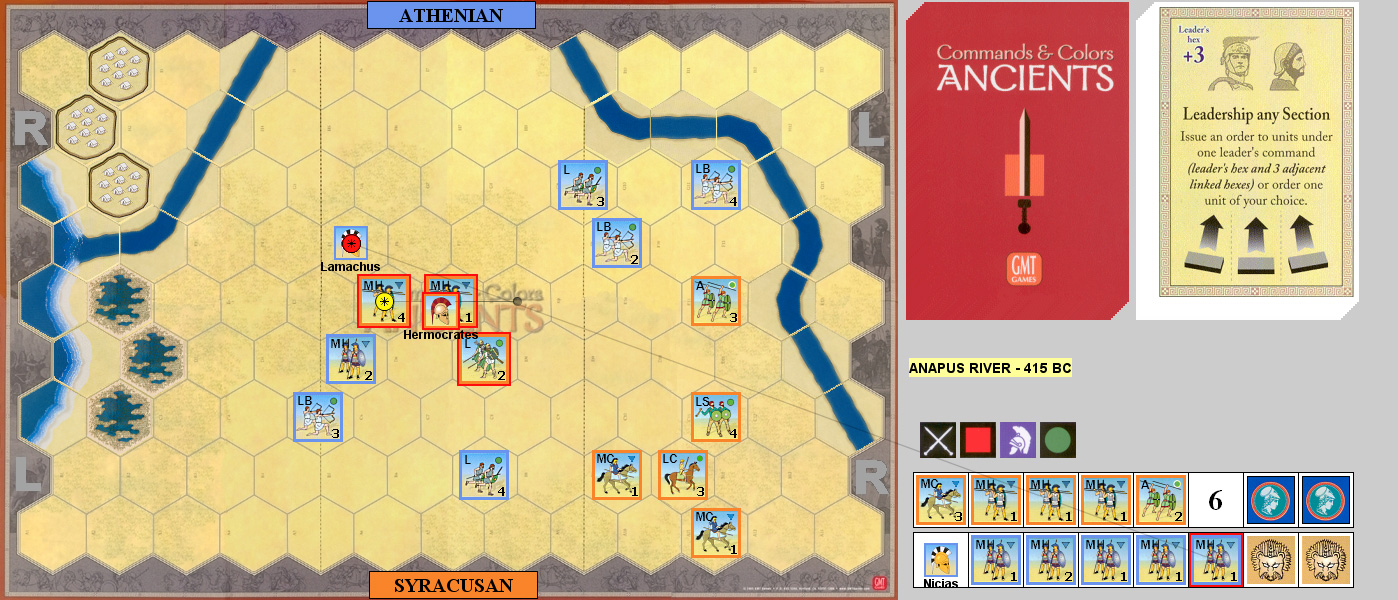
I had Athens the first time, and we started out skirmishing on my right (near the camp), before I used a Line Command to bring my entire army up. Annoyingly, I was concentrating so much on my right, that I forgot to do ranged attacks with the bows on my left. I did eliminate an MC by rolling four triangles as it evaded.

Patch used Mounted Charge to get his main line into contact, and did seven blocks damage, not knocking anyone out, but killing a leader, and forcing two units to retreat, so I only did three damage to one unit in return. I Counterattacked, and wrapped around his line, and managed to wipe out the forward line (3xMH), leaving his leader’s unit intact, while reducing a Auxilia and taking six blocks myself.

Patch used Order Medium to get his leader in action with his two remaining MC while bringing the rear MH up, and knocked out my two weakest units while only taking one block in return. I played Mounted Charge, and knocked out the Auxilia while forcing of the MC to evade, and forcing a Light to the baseline. Patch Counterattacked to knock out another two MH while I weakened his MC and drove them to the baseline.

Since Patch had the only good MH units left, I started trying archery to whittle a few things down, while trying to figure out how to get at all the juicy targets at his baseline. Patch got his two MH together and moved his weak units out of the way before assembling together. I got his leader-led MH from four blocks to one, but just couldn’t get hits on the weaker units in range. Patch moved up the MHs with a Light in support, and finished up the game in two turns. 5-6

Anapus-1

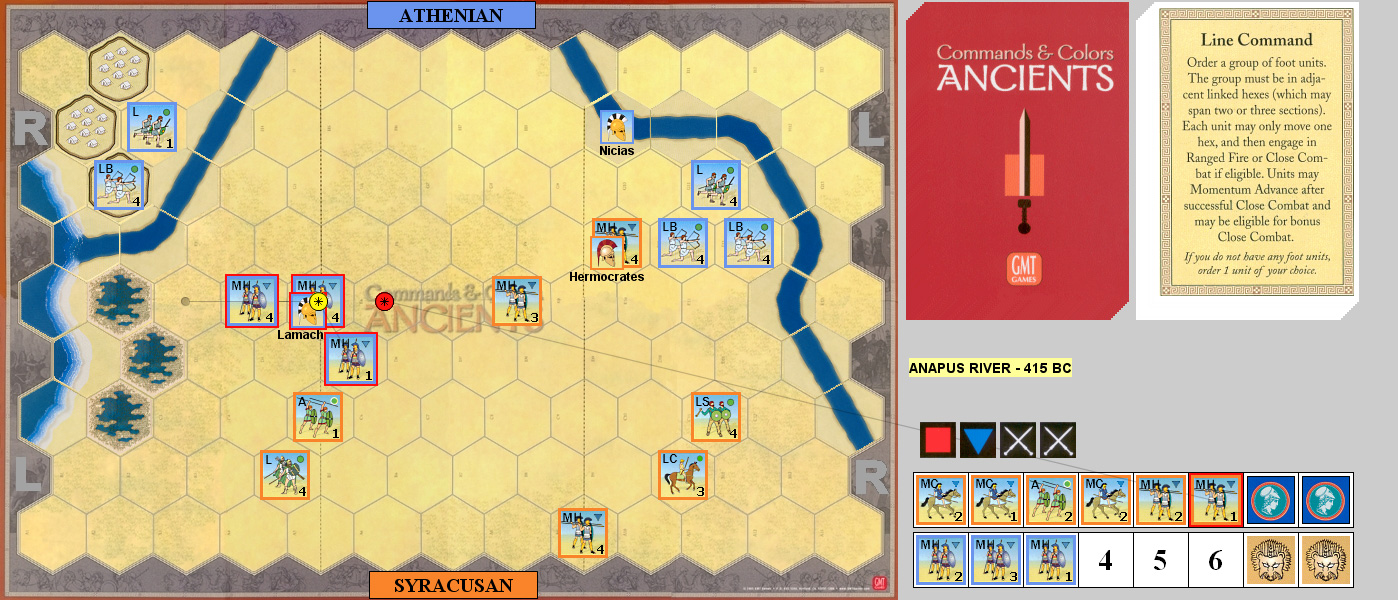
Patch opened the second round with Order One (Order Heavies…), and did a point of archery damage to an Auxilia. With four cards, my hand was not great, but I had two left cards, so I started with sending my MC against the light units on his flank. They evaded across the river into the camp, and I followed into the river, and nearly knocked out his Light.

Patch used Double Time to bring half of his MH over to deal with this, and knocked one MC out. I used Leadership to bring the bulk of my MH into range, and then Ordered Light to straighten out the flanks. Patch knocked out the other MC and forced my Light to evade before I used Line Command to head for the gap in his line, and knocked out one unit in return for two blocks. Patch Out Flanked me to eliminate an Aux, while reducing the other to one block and forcing it back.

I Ordered Mounted to attack two detached MH, but a bad sequence of rolls saw me lose a MC (took two banners) and a MH while only doing three blocks. Patch Ordered Three Center (only had two left there), and traded three blocks for three on one side, while doing one block and forcing a retreat on the other. Center Leadership killed both MH of Patch’s MH on the right, but failed to get his leader.

Line Command got Patch’s remaining MH in motion, and he killed a separated MH. 3-6

Anapus-2

Afterword:

The first game was brutal. The end dragged out a bit as we were both at five banners and didn’t have a lot left. Patch should have moved a bit faster with his intact MHs, but archery just wasn’t enough for me to finish him off. The four cards for Syracuse is bad, but the one leader just makes it worse. Half of my hand was Left/Right Leadership. Outside of that, they technically have a decent force, with just as much MH as the Athenians and three MC, but it starts in poor shape, and I was never able to move the MH on the baseline (I certainly wanted to bring it up before using the Line Command!).

└ Tags: C&C Ancients, gaming
 Comment 

FB10 Return of the Black Company

by Rindis on October 17, 2015 at 12:00 pm
Posted In: ASL

After going up the hill in Tunsia, Patch and I decided to go back to Budapest for our next round of ASL in Europe with FB10 “Return of the Black Company”. Patch didn’t want to have to deal with Ammo Shortage again, so I got the defending Germans.

It’s now Feb 3, and things are getting desperate for the Axis forces. The special rules for lack of food and fuel kick in a day or two after this scenario, but Axis forces are still at Ammo Shortage level 4. Both sides have largely variable forces as they struggle over an area near the Kiralyhgo ter on the SW board (which is an area we haven’t seen before, though it’s not too far from a couple of the ‘big hill’ scenarios). Oddly, both sides have a 5 SAN, but a ‘1’ SAN roll is either treated as a ‘2’ (pin/wound), or it can be used to battle harden your own troops.

The Germans get six SS squads (split between 658 and 468), MGs, a DC, and a few concealment markers. They get a leadership choice between a 9-2 and two 7-0 with a FT and a more mixed set with a HMG and PSK. For me, choice A2 was obvious, since even with the shortage, an HMG would be a big help, and I didn’t want most of my leadership as 7-0s. They have a supplemental infantry choice of 3.5 447 SS squads with a leader and LMG, or 5 Hungarian 347s with two leaders and two MGs. This was a tough choice, and even though I felt short of bodies, I went with B1 as I felt I needed a flexible defense, and I didn’t want to have to worry about keeping the Hungarian units together. There’s a Gun/Vehicle choice, and I went with C2 for an extra M15/42(i), as they are part of the victory conditions and the 105 gun on the Zrinyi II, though a 75mm AT as part of the final defense may have been a better idea. For the fortification choice, I went with D2 for two fortified building Locations and mines instead of wire, even though the fanatic unit that comes with the latter was tempting.

The Russians enter along the west or most of the north side on turn 1, and have a (pre-game) choice between three victory conditions. They can go for 18 CVP, or for a pair of buildings, or for a pair of hexes (and all the hexes adjacent to them). In all cases, the Russians only win if the Axis do not control XX29, and have a functioning M15/42(i) in the hex at the end of the Game Turn. With 5.5 turns, I felt I had to try and slow the Russians down for a couple turns before going to the final defenses, and with such a large entry area, I was worried he’d just find a way around one flank and make good progress on the first turn. I especially gave some thought to entry at the NE extreme and going downhill around the bulk of the level 1 playing area, and straight at one of the option 2 victory buildings from behind.

Pre-game rubble checks did very little (three hexes, one of which fell into the street, but that was well out of the likely area of action), and I ended up positioning my mines for a west entry as there were a couple hexes that seemed inevitable if the Russians were in the area at all. I put my roadblock in YY33/YY34 to block access to the heart of the VC area and provide cover for the AA gun, which went behind it. One fortified building Location went in YY30, next to the German victory hex, and the other in CCC32, one of the hexes the Russians needed for their third option. My Zrinyi II went in AAA32, where it was very hard to get at, but could protect CCC32. The HMG went in YY28h1, where it had some decent LOS down the main north-side street, and could protect against an east-side thrust.

Patch ended up going for a NW corner setup. A lot entered along the west side, but three large stacks were at the west side of the north edge. He had contemplated the main north-south road in the middle of the north edge, but decided it was too vulnerable. He chose A2 (fewer leaders, but with a hero), B2 (more men, no Assault Engineers, and only one FT), and C2 (two T-34/85s instead of four vulnerable SU-76s). His first unit found the mines in ZZ38, but were unharmed by them. Despite some fire from BBB36h1, his entire west force entered without incident.

His first two units from the north edge Searched near my “?” but while the first found a HS+DC, the second rolled poorly and failed to search anything, preserving my Dummies. TT35 threw his DC in DFPh at TT36, breaking one squad and ELRing another while staying unharmed. AFPh broke my squad in BBB36 and revealed the Dummy in VV36 on a PTC. Beyond that, his two T-34/85s got acquisition on the buildings flanking my roadblock, which I considered the anchor of my defense in that direction.

He advanced into the street on the south side, and got his squad out of the mines without incident. There was only one squad left adjacent to TT35, but he was concealed and killed the HS in a successful Ambush.

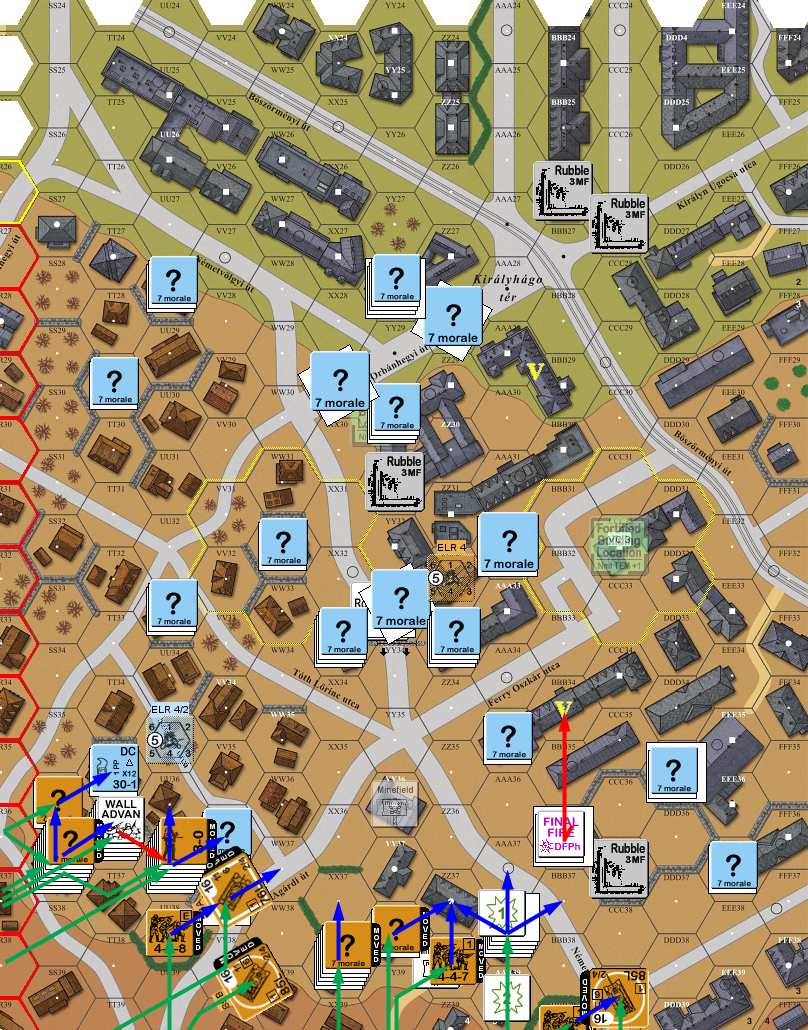
FB10-1R
Situation, Russian Turn 1, showing the full playing area, and the hidden parts of my setup. North is to the left; yellow ‘V’s are the second option victory buildings, and the yellow circles are the third option victory areas.
↓ Read the rest of this entry…

└ Tags: ASL, Festung Budapest, gaming
 Comment 

Wooden Rose

by Rindis on October 13, 2015 at 12:00 pm
Posted In: Comics

Smudge picked this up at APE 2015 last week. It’s a self-published graphic novel of a webcomic that finished up a couple years ago.

The general high concept is Victorian fantasy, and it delivers on that quite well. The art is the best part of the book, and is very good and clean. Page layouts are generally good, but do seem to wander a bit, and I had occasional problems picking out where I was to look next. I think part of that is the pages weren’t conceived with an idea of how they’d look in a book, and things occasionally go into the gutter. Smudge also feels that this should have been noticeably shorter, and I agree; this shows all the signs of a typical write as you go comic story, so this is really a first draft, and some further thought could have tightened the pacing up nicely.

The story is good at its elements. But there’s only four characters, and we only get to know the two sisters at all well, both of the men in their lives continue to be blank slates. The villain in particular is inscrutable. This may be at least partly on purpose, but there’s no sense of how he was motivated. Was this pure survival? Instinct? Did he, in some way, actually mean what he said?

On the other hand, for a story about four people, with no real action to speak of, it never devolves into talking heads either.

└ Tags: fantasy, graphic novel, reading, review
 Comment 
  • Page 198 of 315
  • « First
  • «
  • 196
  • 197
  • 198
  • 199
  • 200
  • »
  • Last »

©2005-2026 Rindis.com | Powered by WordPress with ComicPress | Hosted on Rindis Hobby Den | Subscribe: RSS | Back to Top ↑