Rindis.com

All my hobbies, all the time
  • Home
  • My Blog
  • Games
  • History

Categories

  • Books (504)
  • Comics (10)
  • Gaming (918)
    • Boardgaming (674)
      • ASL (155)
      • CC:Ancients (83)
      • F&E (78)
        • BvR – The Wind (26)
        • Four Vassal War (9)
        • Konya wa Hurricane (17)
        • Second Wind (5)
      • SFB (78)
    • Computer games (162)
      • MMO (77)
    • Design and Effect (6)
    • RPGs (66)
      • D&D (25)
        • O2 Blade of Vengeance (3)
      • GURPS (32)
  • History (10)
  • Life (82)
    • Conventions (9)
  • News (29)
  • Technology (6)
  • Video (50)
    • Anime (48)
  • Writing (1)

Patreon

Support Rindis.com on Patreon!
Become a patron at Patreon!

Other blogs:

RSS Inside GMT

RSS Playing at the World

  • Playing at the World 2E V2 Arrives May 5, 2025

RSS Dyson’s Dodecahedron

  • Scavengers’ Deep – Map 33 July 16, 2026

RSS Quest for Fun!

  • The Expense Post May 24, 2026

RSS Bruce Heard and New Stories

  • Pain, Exhaustion, and Morale in D&D BECMI June 7, 2026

RSS Chicago Wargamer

  • The 2 Half-Squads - Episode 310: Cruising Through Crucible of Steel January 27, 2023

RSS CRRPG Addict

  • Game 581: Dragon Quest (1982) July 15, 2026
SF&F blogs:

RSS Fantasy Cafe

  • The Leaning Pile of Books July 5, 2026

RSS Lynn’s Book Blog

  • Review: The Tinder Box by MR Carey July 16, 2026
ASL blogs:

RSS Sitrep

  • Cardinal ASL Sins March 18, 2026

RSS Hong Kong Wargamer

  • FT114 Yellow Extract After Action Report (AAR) Advanced Squad Leader scenario April 16, 2025

RSS Hex and Violence

  • This still exists? March 25, 2025

RSS Grumble Jones

  • Grumble Jones July Scenario GJ162 You Will Engage the Enemy July 1, 2026

RSS Desperation Morale

  • How to Learn ASL March 16, 2025

RSS Banzai!!

  • October North Texas Gameday October 21, 2019

RSS A Room Without a LOS

  • [Crossing the Moro CG] T=0902 -- Rough start July 18, 2015
GURPS blogs:

RSS Dungeon Fantastic

  • Felltower - Monsters Fleeing between Sessions vs. PCs replenishing June 28, 2026

RSS Gaming Ballistic

  • B-Scale Detail and Examples July 16, 2026

RSS Ravens N’ Pennies

RSS Let’s GURPS

  • Review: GURPS Realm Management March 29, 2021

RSS No School Grognard

  • It came from the GURPS forums: Low-Tech armor and fire damage January 29, 2018

RSS The Collaborative Gamer

  • Thoughts on a Town Adventures System January 18, 2022

RSS Don’t Forget Your Boots

  • GURPS Supers Newport Academy #7: “Invitation to the future.. of the 1970’s” July 5, 2026

RSS Orbs and Balrogs

  • Bretwalda - Daggers of Oxenaforda pt.4 - Fallen King May 27, 2017

SM1 The Planet Crusher

by Rindis on November 30, 2015 at 8:53 pm
Posted In: Boardgaming, SFB

Crossposted from the SFU blog on BGG.

I’ve been thinking of doing a bit more SFB for a little bit. And then airjudden talked about having gone through all the monster scenarios from the Commander’s rulebook some time ago, and posted a solo game against against a new one.

I’ve occasionally thought about trying some of the solo monster scenarios out. And with some vacation time available, he inspired me to go through with it.

This is part of my group’s plays, so the date is Y158. Starting at the beginning, I went with SM1, which features a monster inspired by the episode “The Doomsday Machine” (but not nearly so tough). I’ve been wanting to get back to the Kzinti, and went with their main cruiser of the era, the Strike Cruiser. (The better CA and CC classes exist, but there’s more CSs than CCs and CAs put together. The first BC will be converted from a CS in about two years.) This meant ignoring SM1.432, which states all drones are speed 20 (such technological marvels are a decade away).

Paying for Type II/V drones wasn’t worth considering. With MCIDS swatting down up to three drones an impluse, speed 12 wasn’t worth the 0.5 BPV per drone. (In general, I’d think speed 12 should be 0.25 instead of the same 0.5 of speed 20, but I suppose the idea is that ships are slower in this era.)

Speaking of slow ships, the CS only has 27 warp, limiting it to speed 28 (with the one point of impulse thrown in). And it only has two disruptors and two ph-1s; the main weapon is pretty much the drones, which I can’t count on.

Starting to wonder if this was really a good idea, I looked over the details. You can’t fire on the monster unless at range six or closer (there goes the idea of softening it up first). And it fires at range six or less, with no adjustments for range, and no effect from EW. At the top end, it does 35 damage—ouch! That’s starting to look like a ph-4.

But the low end is only 10 damage… and it only fires once per turn. Since there’s no reason not to go to point-blank range, the real primary weapon of the CS comes out: 10 ph-3s. And at speed 6, it’s much slower than the CS. The robot rules move it towards the planet unless a ship is within two hexes, at which point it’ll pursue that ship like a seeking weapon.

I pondered loading up on transporter bombs. It wouldn’t be too hard to get the planet crusher to run over them, but the extra BPV cost would up the amount of damage I needed to do to defeat it. So I went no frills; just a stock CS with no commander’s options. With a BPV of 116, the balance formula said I needed to do 186 damage to it, while I would lose if it did 200 damage to the planet it was headed for. I contemplated that if things went poorly, and I needed time, I could let it get to the planet, and chew on it for at least five turns. Assuming the inhabitants were non-Kzinti natives, this should be acceptable to the Hegemony—unless the natives were especially tasty.

With little to fear with a set up on the far side of the map (with the target planet at the upper middle; I went speed 23, charging phasers, fire control on, shields at minimum and no disruptors. I headed more-or-less straight at it, while it mostly headed straight up, with a couple hexes of direction B thrown in, ending at range 16.

I randomly rolled for all planet crusher movement that had two possibilities. One thing I’m not sure of is where in the movement order it goes. I judged it as a ship, so it went first, as I was always moving faster—except when it was in range two of me and ‘pursuing’ my ship, then it gets the ‘no you go first’ exception. It might make sense to rate it as a seeking weapon (targeted on the planet) at all times.

For turn 2, I put disruptors to standard loads, planning on overloading them off of battery unless I took a bad hit, put shields to full, and went speed 25. I immediately turned to heading F to get ahead of the planet crusher and came in, showing my #6 shield. We both moved on impulse 16 and hit range 5.

A ‘3’ did 25 points on the 22-point shield. I spent one battery on reinforcement, planning on using the other 4 to overload the disruptors. Disaster! The two internals hit a phaser and disruptor! I took the left side disruptor and ph-1, since the next pass would certainly be off the right side.

I turned in, and on impulse 22, entered its hex. The planet crusher would have also moved, but in pursuit of my ship stayed where it was. I launched four drones and all forward-facing weapons.

Well, almost. I forgot about the two 360 ph-3s until I noticed my power wasn’t balancing on the follow up shot.

MCIDS fired at the first three drones… and missed! My overloaded disruptor automatically hit at range 0 for 10, the ph-1 did 7, and the ph-3s did 15. The next impulse, the drones hit for another 48. The impulse after that, I finished my overrun and did another 21 points with the remaining 6xph-3.

101 damage and delayed the monster a hex. Not a bad turn’s work.
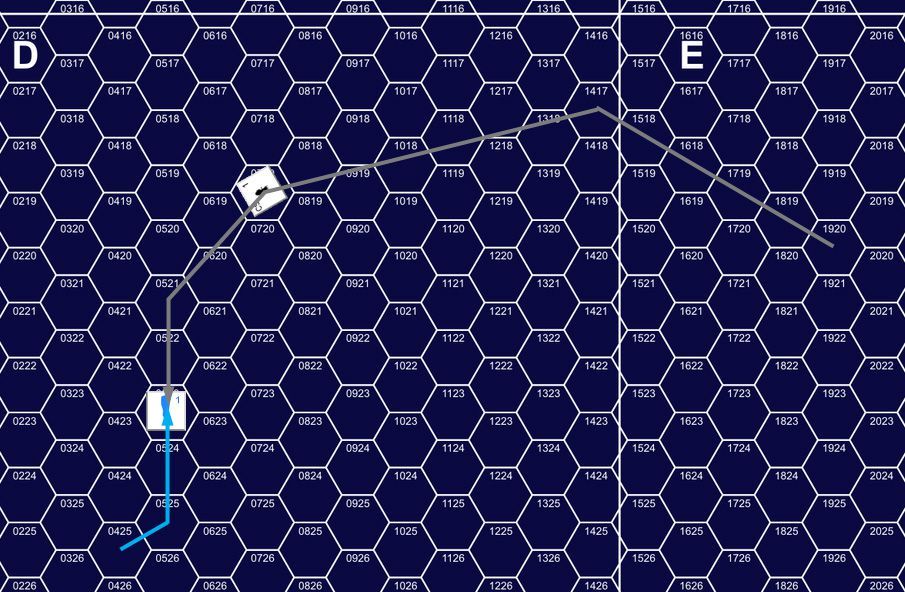

Turn 2, showing Impulse 16, with movement from beginning to contact on impulse 22.

At the end of the turn, I was still at range 6, which meant I knew it would fire on impulse 1, and hit my #4 shield. I partially recharged phasers, overloaded the disruptor, recharged batteries, went speed 9 and put 8 extra power in the the shield. That would block anything but a ‘1’, and the five batteries would stop that if needed.

A ‘5’ did 15, putting 7 points on the shield. I turned around, executed a snap-turn (slip in one direction followed by a turn in the opposite direction, and then fired at range three on impulse 25 (which kept the weapons clear for turn 4…). The disruptor missed, but the bearing phasers did another 10 points of damage.
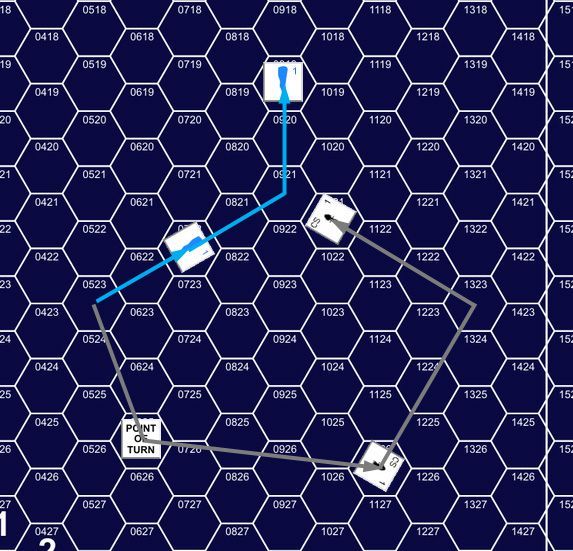

Positions at end of turn 2 and turn 3 impulse 25.

The planet crusher went in direction B for its next move allowing me to slip into range 2, and then get to range 1 on impulse 32. It moved into my hex for the end of the turn, where I launched a second set of drones, only to watch the MCIDS instantly kill three of them….

Wanting to be able to get back out of its seeking range, I went speed 13, overloading the disruptor, charging all phasers, and putting 8 onto #1 for the same plan as last time (it had been a stronger shield, until I dinged it with that overload on the first pass…).

The planet crusher did 20, putting 12 on the #1 shield, and I immediately added two more with feedback from an overloaded disruptor. That did 10, the ph-1 did 6 and the six bearing phasers did another 22. On impulse 3, I moved out of the hex and did another 15 with the rear ph-3s for a total 65 damage for the turn.

Sadly, while it followed me, it chose a direction that didn’t lead away from the planet. I danced ahead of it a little, but finally got out of seeking range and paralleled its course until the end of the turn, where I turned in to get to range 2 off my shield #2.

I went with much the same plan as the last two turns, with speed 9 and 10 reinforcement on shield #2. The planet crusher rolled ‘6’ to not even hurt the shield, and moved into it, doing another 40 damage with the right-side weapons.

Total, 216 damage. Creature destroyed.
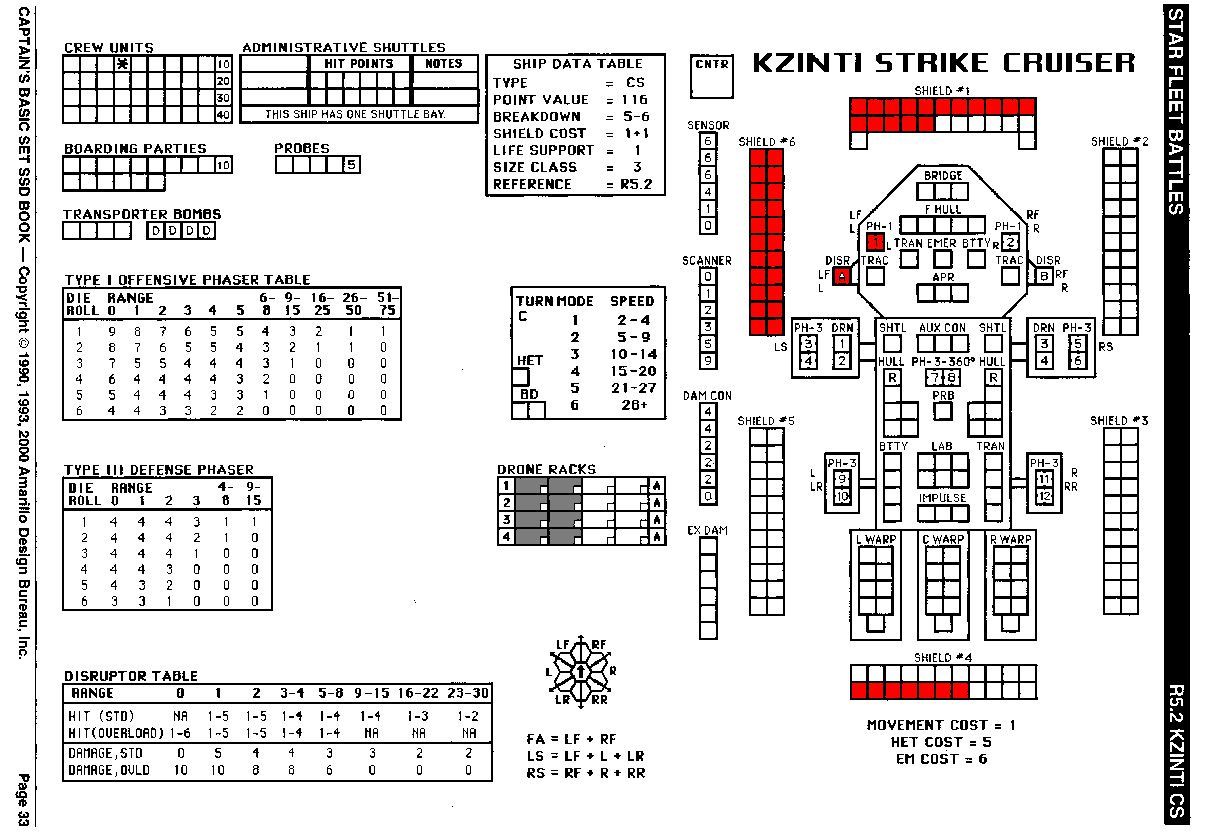
It really is a pretty simple creature to deal with. Slightly random movement helps give it some more interest. I thought I was in trouble when those two internals took out important weapons, but the complete failure of MCIDS after that more than made up for it. The fact that it never rolled less than a ‘3’ also helped a lot, but I was reasonably well prepared for that after the first pass.

I note that the rules state that the creature gets one shot per turn at each ship present (when it gets within six hexes), so I’d think taking a frigate squadron against it might be a pretty stiff challenge.

└ Tags: gaming, SFB
 Comment 

R vs B Coalition Turn 12 in Review

by Rindis on November 21, 2015 at 12:00 pm
Posted In: BvR - The Wind

Crossposted from the SFU blog on BGG.

After two turns of picking on the Klingon Empire, it’s time to face the music. The Romulans are done with two turns of peace, and have gone over to a Wartime footing.

I’m not entirely sure if going to Peacetime was a good idea or not. Forgoing Romulan involvement for two turns has hurt the Klingons a lot. On the other hand, it forced my hand, and the Gorns will not be involved, letting the Romulans focus on the Federation. Also, two turns of peace delays economic exhaustion three turns, so we’re even further away from Romulan economic collapse. Since they are usually the weak link of the Coalition, shoring up their position could really pay off.

At any rate, Romulan fleets came across the border, hitting three border stations, one interior BATS, the 6th Fleet SB, an adjacent planet (and both neutral zone planets), as well as forcing the Orion Enclave neutral, though they stayed out of range of the 5th Fleet Reserve.


The Romulan invasion begins.


Battles along the Klingon-Federation Neutral Zone.


Kzinti space.

Battles:
3212: Fed: dest BATS, crip FF; Rom: crip 3xSP
3612: Rom: dest K4
3611: Fed: dest CL, DE, FFE, crip 2xCC, NEC, NCD, DD, DE, 3xFF, 5xSIDS; Rom: dest CON, KR, 3xSP, SK, SKF, 8xWE, K5L, 2xK5, 3xSNB, SN, crip 2xK7R, KR, SP, SK, FAL
3810: Fed: dest BATS; Rom: dest SK, crip 2xSK
3912: Neutral: 2xPDU; Rom: crip WE, capture planet
3415: Neutral: 2xPDU; Rom: crip WE, capture planet
3414: Fed: dest BATS
3215: Fed: dest BATS; Rom: crip 2xSN
0117: Hydran: dest LB, crip RN; Lyran: dest STT, crip BC
0116: SSC: Hydran retreat
0803: SSC: Kzinti: dest 2xFF
1303: SSC: Kzinti dest CL; Klingon: retreat
1001: Kzinti: crip SF; Lyran: crip BC, 2xCL
1105: Klingon: dest 2xE4A
1107: SSC: Kzinti: retreat
1803: Kzinti: crip 2xCL; Klingon: dest F5, E4, crip D7C, D5
1704: Klingon: dest D5, F5E
1805: Fed: crip NCL, FF; Klingon: dest D5
1514: SSC: Fed: dest FF; Klingon: crip E4
1714: Klingon: dest D7C
2615: Fed: dest BATS, crip 3xFF; Klingon: dest 2xE4, crip D7, D5
2417: SSC: Fed: dest CL
2518: Fed: crip FF; Klingon: dest 2xF5, crip F5
1811: SSC: Fed: crip DD, retreat; Klingon: dest D5, crip D5, retreat
2012: Klingon: dest D7, crip D7
2010: Fed: crip NCL; Klingon: dest D7, FV, E4A
1609: SSC: Fed: dest FF; Klingon: crip D7, retreat
1708: SSC: Kzinti: dest CL
1808: SSC: Fed: retreat
1909: Fed: crip 4xFF
1807: Fed: crip NCD; Klingon: dest 2xE4

In general, the higher quality Romulan ships are a problem, but they weren’t enough help at the 6th Fleet SB fight where I had a CVA and CVB on the line to help boost ComPot, along with multiple CCs (initial Federation ComPot was 155, including the SB and some drone bombardment). The SB fight went seven rounds, with the Federation outrolling the Romulans overall (we had a couple 6-6 rounds), which along with killing the only scout in the first round made sure I could hold the hex, though the 6th Fleet is going to need a lot of help next turn.

I sent a reserve to 1105 to save it from a small Klingon force; Bel put up a D6V group, and I couldn’t do enough damage to get at the carrier.

He made an attempt at the Marquis area infrastructure, but I had enough in the area that I was able to cover the Kzinti base going up in 1805, and sent a reserve to protect the BATS in 1803. He also raided the SB hex, where the Feds are setting up a MB to extend their supply net, but the CVA MacArthur showed up, and he wasn’t capable of facing that.

Given the number of Klingons out there, the the length of the border, it’s inevitable that some of the Federation border BATS would go down, and I was surprised that I only lost one last turn. 2012 did take two SIDS then, so it was a natural candidate for a push this turn. Instead, I lost 2615, which was guarding a minor planet right behind it (which has a full defense brigade and one of the F-15 squadrons, and so is a tougher defense installation (12(26)).

I’m surprised to still be holding the Klingon major planet at 2518, but while he’s sent enough down to forstall further offensive operations with my available forces, it just doesn’t match what I have in Carrier Fleet 3, so his attempt on the planet just hurt him a lot more than it hurt me. (a 2-5 roll in favor of the Feds didn’t hurt either).

1811 was a nearly even SSC fight: NCL and DD vs 2xD5. The Federation rolled 12 to get four casualties and nearly wipe out the Klingons while the DD was crippled and retreated. I figure the DD got the Federation Jackpot of four overloaded photon torpedoes into a D5 when they got too close trying to take out the DD. (The current SSC system really is an amazing improvement over the previous versions.)

Bel’s retrogrades didn’t have any surprises, but he used the new Lyran BATS in the Klingon home system to deliver 20EPs to the Klingons. This is something he probably should have been doing for a while, but recent events are certainly forcing him to pay more attention.

Meanwhile, all Lyran new production went to the Kzinti border, but a pair of tugs have hauled a stored MB and FRD into Hydran space at the SB in 0416.

The Romulans paid to move elements of the Home Fleet up to the border as well as new construction, and split them between three stacks along the entire Fed border. Klingon new construction went to planet 1916, while the large number of repairs stayed on the capital (formed into two reserves).

└ Tags: BvR Wind, F&E, gaming
 Comment 

The Battle of Chickamauga

by Rindis on November 17, 2015 at 12:00 pm
Posted In: Boardgaming

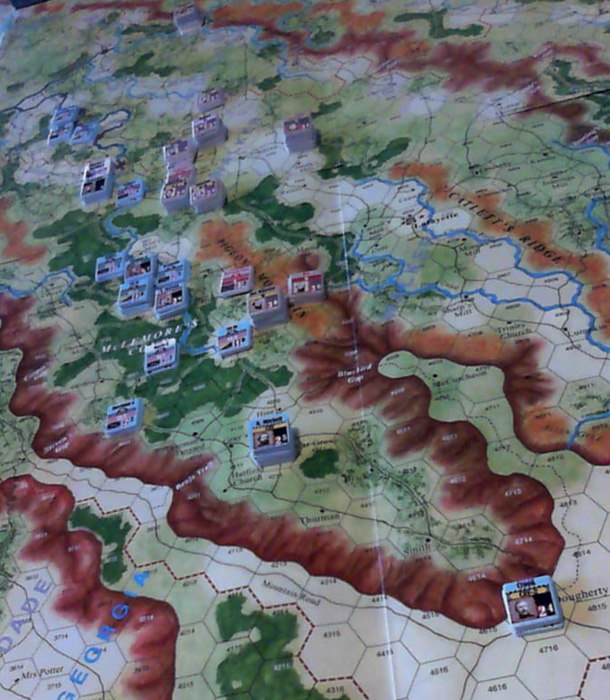
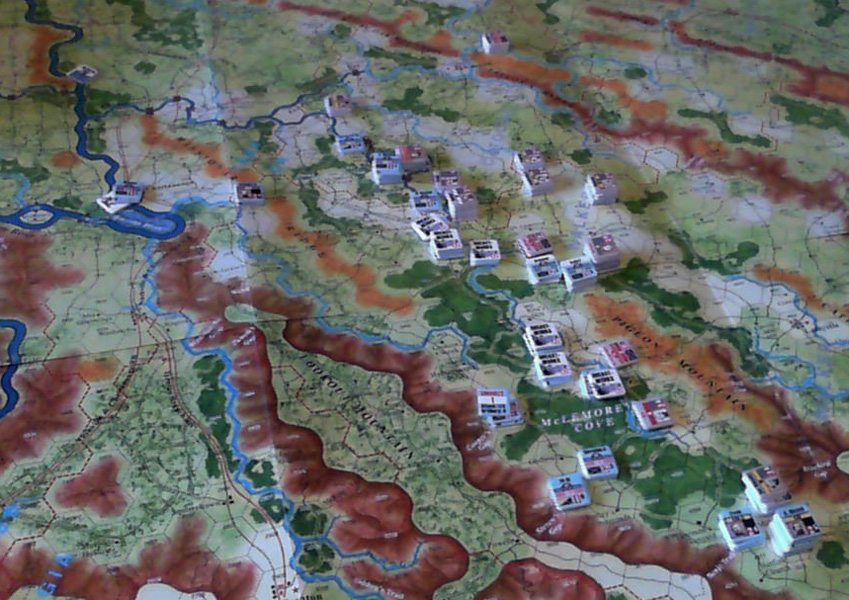
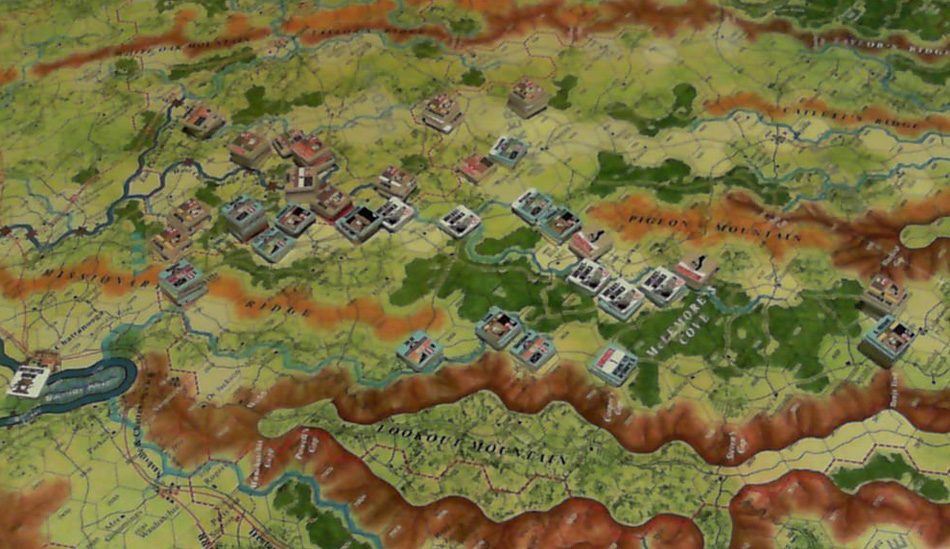
Mark came over Saturday as we try to catch up on some gaming. We went with Battle Above the Clouds scenario 3 “The Battle of Chickamauga”. It’s effectively an expanded version of the second scenario, going for three days and bringing in all the action to the south. We decided to switch sides from last time, giving me the Union forces.

Chickamauga-1
Beginning of the game.

Towards the beginning of the turn, I decided to secure the center by sending part of the XIV Corps into Wicker Gap. Light Confederate forces were in the area, and I aggressively pushed an attack, and with good die rolls carried the day. Reynolds rolled 6-1 on a 1:1 attack against Wharton’s division for a 1DR, with the resulting Demoralization putting them out of action for the rest of the battle. Then Brannan’s division came up and rolled 3-1 in a follow up 2:1 attack, which pushed Armstrong’s division back and gave me a position behind a creek. Mark counterattacked with Hindman’s Division vs Brannan but a 1D to the attacker halted that.

There was a lot of maneuvering after that, and Mark came up against the same problem I had in the earlier scenario: The north flank of the Union position, while not superb, is still fairly good, and getting across the East Chickamauga Creek was giving him trouble. Once Hood had shown up and everyone was in contact, he attempted an assault (with a plan to try for a grand assault) to force a crossing, but rolled a ‘6’ to do nothing more than wear out the men. Buckner tried an assault with his corps against a couple divisions of the XIV Corps in the Wicker Gap, but got a high roll that meant only Stewart’s division went in, and both sides took 1D from that attack.

Chickamauga-2
End of turn 1.

Things ground to a halt after that, but early the next morning, Bragg pulled off a grand assault, and forced a crossing at Thedford’s Ford, forcing McCook’s brigade back with a 1DR* (I don’t think we’ve seen a Demorilize-2 marker in action before…). I started trying to pull my southern flank in, but I was out of position with most of my cavalry, and couldn’t do much without letting units get cut off. Crittenden managed an assault that cost me one strength point to nothing, but both sides were worn out by the fighting (‘D’), which was useful in keeping  a good amount of Confederate infantry from advancing further. Meanwhile, Confederates were moving across the East Chickamauga at Lambert’s Ford, and the cavalry was moving around the north end of my line. Liddell’s division attacked the right end of my northern line near Thedford (about where I’d gotten across last time), and got a 6-1 roll to send Wilder’s brigade of the XIV Corps and some smaller units retreating from a 1Dr.

Chickamauga-3
End of turn 2.

We had to call it a day at the end of the second turn. However, we had a decent idea of where things were going. My line had had to pull south, leaving the northern trail over Missionary Ridge (5 VP) and Chattanooga uncovered (10 VP). McAfee Church had already been occupied by his cavalry, but presumably an infantry unit would be by the next day to take it on the way to Chattanooga (5 VP), and he’d already taken Jay’s Mill (5 VP). He had lost 6 strength points (-18 VP) and had inflicted 7 on me (14 VP). So the total was looking like a Union marginal victory, though there would have been further fighting for Kelly Field, and Rossville.

The initial wildly successful Union attacks set the tone for quite some time, and kept Mark a bit extra cautious. It took both of us quite a while to realize that all the VPs were up north, and there’s very little reason for the Union to not pull back the south flank so as to shorten the line and possibly feed units to where the action is, which really hampered me the second day. I’d really like to give this one another try.

└ Tags: gaming, GCACW
 Comment 

Halftrack Shoot-em-up

by Rindis on November 13, 2015 at 12:00 pm
Posted In: Boardgaming

After our last FtF session of Up Front, Patch and I decided to come back to it on Vassal after we’d had a chance to study the vehicle rules some. So for the last couple of weeks, we’ve been playing scenario E “Armored Recon Patrol”, with me as the attacking Germans and Patch as the defending Russians. We have three decks to get four people into protective terrain at Range 4, though the defenders win by default if that doesn’t happen. (I’m still figuring out how I want to report this game, and have gone overly-verbose this time, giving all the fire attack values and concealment, and the final effects numbers, but not the modified fire strength.)

I set up in three groups; two four-man sections with the Sdkfz 251/1 halftrack in between, figuring to use it for the defense bonus to adjacent groups as much as I could. Patch set up his 15(!) men in three groups with four on each flank and seven men including the ASL/LMG in the center. For initial terrain, I placed a Stream on Patch’s Group B.

Some turns passed before there was any activity. I tried a Sniper to no effect (and no effect from Patch’s subsequent Sniper Check), and finally a Fire 1 (Conceal -1) at his big group for no effect (-1, -3, 2, 0, 0, -4, 1). Right after that, Patch Forded with Group B, and I hit with another Fire 1 (Conceal -3) to pin one person (1, 1, 0, -2, 5, -1, -2). Patch then moved into Woods and Rallied the pinned man.

I then got my Group C into motion, drawing a Fire 2 (Concealed -1) from Patch’s B, pinning two (0, 3, 2, 1), before they could get into some Buildings (my earlier fire had burned through 3 of the 4 ‘removed’ cards, and Patch had tossed one earlier).

Patch moved up Group A, and I hit them with Fire 3+2 (Concealed -3) from the HT to pin two of them (3, 3, 5, -1) while Rallying group C. Patch got his men behind a Wall, but the HT hit them again before they could rally with Fire 2 for no effect (-3, 1, 0, 3). A couple turns later, he Rallied All in Group A, and then started Group B forward again. With everyone else under cover, the HT Fired 1 on Patch’s Group C for no damage (1, -3, 0, -1).

His Group B moved into some Brush and then Fired 4+1 (Concealed -2) on my Group C, pinning one (-1, 1, 3, -5). I put Smoke on my own Group A before moving them up, and Patch’s Group B moved up again. The HT Fired 2 on them, but did no damage (3, 1, 2, 0, 0, 1, -1), and they went on top of a Hill while my Group A ducked into a Gully. With both of my infantry groups advanced to Range 1, the HT followed suit, but was forced back to 0 by a Marsh from Patch. My Group A Fired 1 on his B (gully -> hill) to pin two men (-4, 4, 0, 0, 1, 5, -4). Patch Rallied 1 of them and the HT moved up to Range 1 again, while my Group C finally Rallied. Patch Fired 4 (Conceal -2) from the hill at the approaching HT, but couldn’t affect it (1).

Patch moved Group C up to Range 1 (now everyone was at 1 except his B at 2), and my HT parked in some Brush. Group C Fired 1 (Concealed -1) at his C to pin one person (-1, 1, 2, 7) just before they ducked into a Gully. The last pinned man in Patch’s Group B finally Rallied, and my Group A moved up, drawing Fire 5 from the hill to pin the entire section (7, 4, 5, 5). Rally 6 was sufficient for that, and the HT returned Fire 5 (Concealed -1-1) to pin three men (2, -2, 4, 2, 0, 3, 2). Patch put some Wire on Group A, which they immediately Moved out of, and the HT continued Fire 3 at the hill, routing one man, and pinning another (2, 3, 1, 2/6, 5, 2, 1).

That fire round finished off the first deck, and the next turn Group A (finally) moved onto a Hill. Patch Rallied Group C while I placed some Wire on his Group B. Group A then Fired 3 along the hill, pinning the LMG assistant gunner, but also malfunctioning my SL’s SMG (3, 6, -3, 1, 0, 0). The HT followed up with Fire 3+1 pinning the rest of the group, including the LMG/ASL (6, 4, 0, 1, 4, 1).

Patch’s Group A Fired 3 at my A, pinning one (2, 2, 4, 7) while his C started moving out of the gully. My SL desperately tried to repair his SMG with no luck, while being Fired 3 (Concealed -1) on again from his Group A, which pinned him (6, 0, 4, 0). Patch’s group C moved into Buildings. I Rallied Group A before I took a card hit, and then failed to repair the SMG a third time before Firing 1+1 (Concealed -3) at Group B panic/kill one person (2, 1, 0, 0, -2, 2/1).

Patch responded with Fire 2 at my Group A for no effect (-3, -4, 2, -1). I failed to repair the SMG again, and Patch rallied his ASL/SMG. Finally getting another movement card, my Group C moved up to Range 2 as I finally repaired the SMG in Group A. (Patch: Huzzah! –I mean, crap!) Patch then pinned the HT with a Sniper and put a Stream on my Group C. I was able instantly Rally the HT.

Patch Fired 2 at my Group C to pin two men(5, 5, 0, -2). I Rallied that as well, followed by Patch Rallying two of his Group B. My Group C tried to go around the stream, but failed, following that up with Fire 4 (Conceal -2) from the HT at Patch’s Group B, which malfed the MG on the second resolution (-1, -4). I had hoped to do more before following up with Fire 1 from Group B, but tried it anyway and pinned the LMG again (6, 3, 1, 0, 0).

I got going again with a Ford on Group C and a successful repair of the HT’s MG, and Fired 2 with Group A at Group B to rout one man and kill another (-1, -1, 7/8, 3/5, 0). That trimmed his big group down to three people, and the ASL/LMG was still pinned, and the entire group was still under the wire. It was getting pretty obvious that I’d win, since there was still over a deck to go before the end, but since he was at range 2 on group C, and my Group B was the HT (and unable to win on it’s own), only Group A was capable of maneuvering to a win. Which left shooting Patch’s squad to pieces.

But it wasn’t going to be easy, as Patch put a Marsh on by Group C, leaving me the choice of accepting terrain that required two move cards to get out of, or going back to the stream that I had to ford. I figured taking my chances one card at a time was better than seeing if I could get up to two move cards at a time and went back to the stream. The HT Fired 4 (Concealed -2) on Group B again routing the ASL and killing the third man outright (6/6, 3, 8).

Needing two more kills/routs to break his squad, I switched to picking on his Group A at this point, with the HT pinning one man on a Fire 2+1 (2, 3, 2, -2), who immediately Rallied. Meanwhile Patch’s man in Group B went out of assistant crewman status and recovered the LMG. My Group C attempted to re-ford the stream and failed, while the HT Fired 5 (Concealed -1) at B for no effect (4), ending the second deck.

I put some Wire on Patch’s Group A, and a Sniper took a shot at my HT for no effect. Instead of using another Move card to attempt to move C off the stream, I moved the HT forward and parked it on a Hill (with everyone now Range 2) before making another attempt with C, which failed to ford the stream again. Patch then Fired 3 at them with his Group C, pinned one person, and killed another (2, 3, -1, 8). The pinned man felt Heroic enough to rally, and the HT Fired 3 (Concealed -1) at A again for no damage (2, 2, 2, 1). My Group C then forded the stream again, and finally got into a Gully.

Patch moved Group A off the wire, and a Sniper attempt on my HT failed. He then put Wire on my Group A, but they moved off it immediately. The HT Fired 3 at A, killing the SL and one other (8, 7, 4, 8) to end the game as Patch’s squad routed with 8 out of 15 men gone.

Afterword: The MG on the halftrack is just nasty. 8 firepower at RR 0 allows for a lot of effective long-range shooting. I had a hard time moving up, as I didn’t see much in the way of Move cards, and Patch managed to gum up Group C’s efforts for a long time. The large Range 2 group on the hill was set to do a lot of punishment, and apparently the first big break on them came right before they fired, and Patch had to discard the Fire cards in a quest for Rally cards. Worse, I got that Wire on them, which he never got rid of, and it negated the Hill (and gave a bonus to my Group A once they got on their Hill).

I was disappointed with the results of a lot of early attacks. I figured with seven targets one result would be high, and get a result, but I kept getting low RNCs. The pair of malfunctions came right after Patch’s situation started going south, and could have been a lot more serious but for that.

└ Tags: gaming, Up Front
 Comment 

Mild Weather

by Rindis on November 9, 2015 at 1:56 am
Posted In: Boardgaming

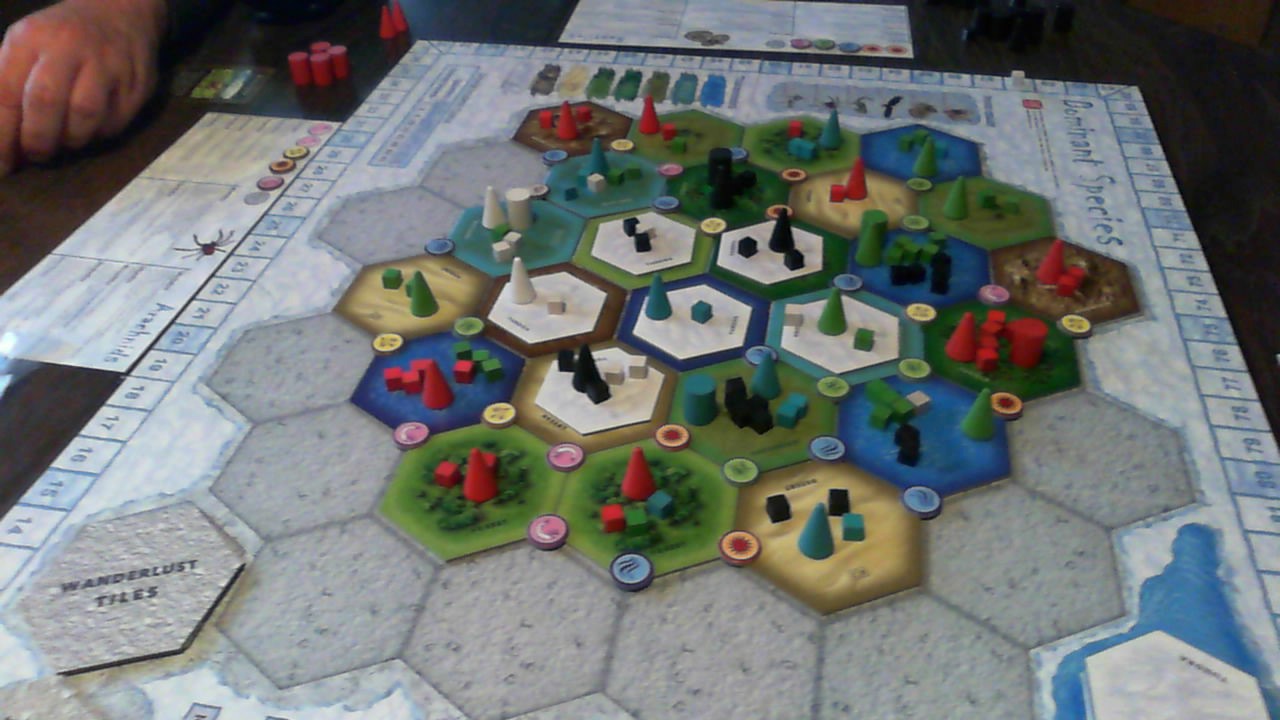
Had the gang over for gaming on Sunday. With five people in the house, we went for Dominant Species, with our usual random selection of animals leaving out the Birds (I think we’ve had them selected once).

I ended up the Amphibians (I think that’s a first for me), and accomplished nothing I wanted to do on the first turn. Three water did allow for some good dominance, but I didn’t end where I wanted, and lost most everything I gained. And I scored well, putting myself into a nice early lead.

Most of my attention got taken by Dave (Insects), who, like me in my last game (as the Insects) struggled with a grass-water capacity that lead into parity with my water-grass adaptation. In the mid-game we actually hit true parity (me 3/2 water/grass while he was 2/3), which lead to a lot of tied Dominances, and we were pretty well intertwined in oceans and wetlands as he separated from the pack to gain a strong second behind me.

I was going to try to keep Dave from getting (alone) an extra action by scoring his only Dominance for him (I had none at that point), but it turns out that he’d get the card at that point anyway. We’ve had that right in the past, but I keep forgetting it. On the other hand, we discovered a rule we’ve done wrong all along. A Regression action just keeps that player from regressing, we thought that it removed an element from the box so that regression wouldn’t happen.

In the meantime, Patch’s Mammals ended up struggling as most of the meat sources died out on a wasteland action. I never got a good sense of what Jason (Reptiles) and Mark (Arachnids) were up to for much of the game.

My consistent lead and good scoring drew a lot less fire than I was expecting for most of the game, though I did take some hits near the end. I then had an excellent turn, where things went right, and my new adaptation gave me a round of new Dominances across the board.

It was a real pity that was the second to last turn.

Instead, I got hit by Niche Biomes (by second-place Dave) for 9 VP, which put me a lot closer to everyone else. Mark suddenly turned into the Dominance machine as we went through the final turn, and there wasn’t a lot any of us could do as he picked up a end-of-game 8 Bonus Points, and second place.

Dave got some good scoring, and decent Dominance to win at 111 VP. Mark got 95, squeezing past my 94. Jason got 89, with Patch taking up the rear at 59 VP after never recovering from the mid-game collapse.

WIN_20151108_151824
End of game.

A couple unusual notes for us is that we only had one glaciation action in the beginning game, though it got more popular later on. (This while it was raining outside, in the first of what we might hope is several storms over winter). And no one really came close to running through their species stock (and Hibenation came up early when nearly no one had any eliminated species to bring back).

└ Tags: Dominant Species, gaming
 Comment 
  • Page 197 of 315
  • « First
  • «
  • 195
  • 196
  • 197
  • 198
  • 199
  • »
  • Last »

©2005-2026 Rindis.com | Powered by WordPress with ComicPress | Hosted on Rindis Hobby Den | Subscribe: RSS | Back to Top ↑