Patch was wanting to see some regular American squads (as opposed to Elite 667 or 747s) in action for our next ASL game, so I looked through the new Yanks collection, and found 185 “Not Out of the Woods Yet”, which uses a mix of those and 2nd Line 546s. It originally appeared in Annual ’95W (as A73, and was in Rout Report before that), which I’ve also meant to play more from anyway.
It is July ’44, and American forces have recently taken a dominating hill, but the advance has been getting delayed by a reverse-slope defense, and attacks on the flanks. This turns into a board 39 setup with 13 squads (about evenly split between 666 and 546, and Lax to boot), 3 MMGs, and 4 M4A1s needing to take five of seven buildings on half of board 6 (with the manor replaced by grain) in 8 turns. The Germans get seven 548s (plus two HS), some “?”, two 50mm ATG, six foxholes and another two and a half squads enter from the side on turn 3. By SSR, the hill woods are level 2 obstacles which the Shermans can enter at 4 MP per hex, with no Bog (kind of a light pine woods; there’s still a lot of double-crest lines that vehicles can’t cross).
I had the defending Germans, and figured there was probably no way I was keeping Patch out of the forward four buildings for eight turns. The amount of firepower he’d be able to throw at the front line would make sure of that. But, if I slowed him down long enough, I should be able to keep him from the back three, R9 and P9 especially. Keeping him out of C10 could be a bigger problem, but if he went hard for that, I’d just have to hang on tight at K4.
I put the two HS (and two Dummies) on the part of the hill in my setup area to encourage some caution, and hopefully block a path for a turn. The real units got foxholes for better protection, while two more anchored the ends of my line. Another went in 6J2 to give covered access between adjacent woods, and the last went in K5 where it could give me another hex of cover near building K4. Also, with all the bocage around, those last two were going to need a lot of attention thanks to the lack of LOS they could cause. I figured I would be fighting to maintain the center as long as I could and possibly let him loose for hide-and-seek in the orchard in preference to giving up the K4 area.
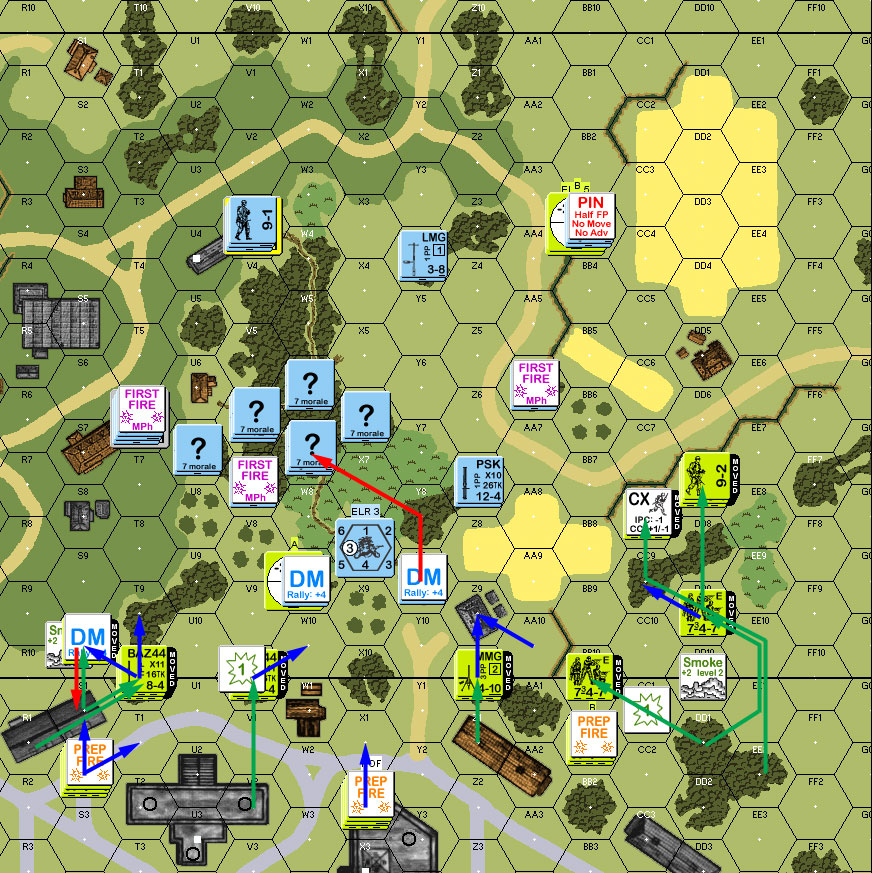
Patch lined up on the crest of the hill at the limit of his setup, and started feeling his way down some really rough terrain. Searching revealed the two HS, but missed on some Dummies thanks to being Lax, while I completely missed on my casualties rolls. Defensive fire did manage to break a scouting HS, and reveal a concealed squad that had come up behind them in 36R6, but there wasn’t much for me to do past that.
Patch did some ranging shots with the Shermans, and my sniper went off to reduce his SAN to a 2. He found that W8 was a Dummy in CC, and eliminated R7 with no problems, but failed to eliminate Y8, and took a HS in casualties there.
Situation, American Turn 1, showing the entire board. Note that this is ‘mismatched’ halves of 36 and 6.
↓ Read the rest of this entry…