
AP53 Far From Home
For my next ASL game with Patch, I ended up looking at the earliest scenario I had available, which is set in the Spanish Civil War (this is actually our second scenario set there, though this one is even earlier than “Italian Brothers“). Patch easily agreed to another SCW scenario, and I took the Nationalist side as it may be my only real chance to drive Pz Is.
“Far From Home” is from Action Pack #6, and is set in December 1936 during the Madrid campaign. The Republicans set up six first line (Russian) squads and three HS on the bulk of board 2a with Control of three of five victory buildings. The Nationalists set up in/near the town on board 2a with nine elite (Axis Minor) squads, a MMG, and an ATR. On turn 2, they get another 10 squads, better leadership, another MMG, a DC, and six mobile machine gun nests Pz IBs. The Republicans then get a pair of T-26s (with an AL) on turn three, and then twelve squads, a Commissar, MMG, two DCs (and two crews… for the DCs?) as well as another pair of T-26s. Each side also has one British 51mm MTR which doesn’t count as captured (representing a common Spanish design?).
Victory is by a custom schedule of points. You get one VP for each of five buildings there is a GO MMC in at the beginning of your first three turns, and then a point for each one you Control at the end of the game. There’s also a bridge in the Republican area and a crossroads in the Nationalist area that are worth 5VP each at the end of the game (only). Since everything but the crossroads is out of the Nationalists setup area, they can’t get any VPs on their turn 1, and it is physically impossible to take one of the Republican buildings on the first turn. Taking the two ‘unoccupied’ buildings isn’t hard, but with Patch’s setup, getting at the second one on the first turn would mean braving a 4 -2 shot. That implies a standard opening of 3 VP for the Nationalists and 9 for the Republicans. Staying like that would be a 10-17 loss, but taking the bridge would make it 15-12; or taking the buildings without the bridge is 13-14…. Not liking the idea of throwing everything into taking and holding the bridge (and I had real doubts about that), I went against every instinct I had from looking at Patch’s set up, and came up a plan to try and disrupt Patch’s control of his initial buildings before the beginning of his turn 3. The Nationalists win on ties, so just lowering the Republican VP total opens up possibilities.
And a word about those Pz IBs… They use the Axis Minor version of the counter, which is exactly the same as the normal German one, but the scenario makes them much less useful. First of all, they have no radios (and neither do the T-26s), and second, they have Inexperienced Crews. Normally, that’s bad enough with the 6 ML and all, but the CMGs are also the MA, so the +1 applies to every shot it makes. This is a +2 TH (since a 1MT must be buttoned up to fire), and CMG use is 6 +1, plus any TEM…. The good news is that they do still have the two TK rolls against tanks; the base TK# is low, but Patch wasn’t happy with taking the two rolls on each hit….
Oh, I should note that it is snowing at the start of the scenario, so the boards are in winter colors to remind us of that, even though Ground Snow is not in effect. Of course the snow stopped on the first roll of the game….
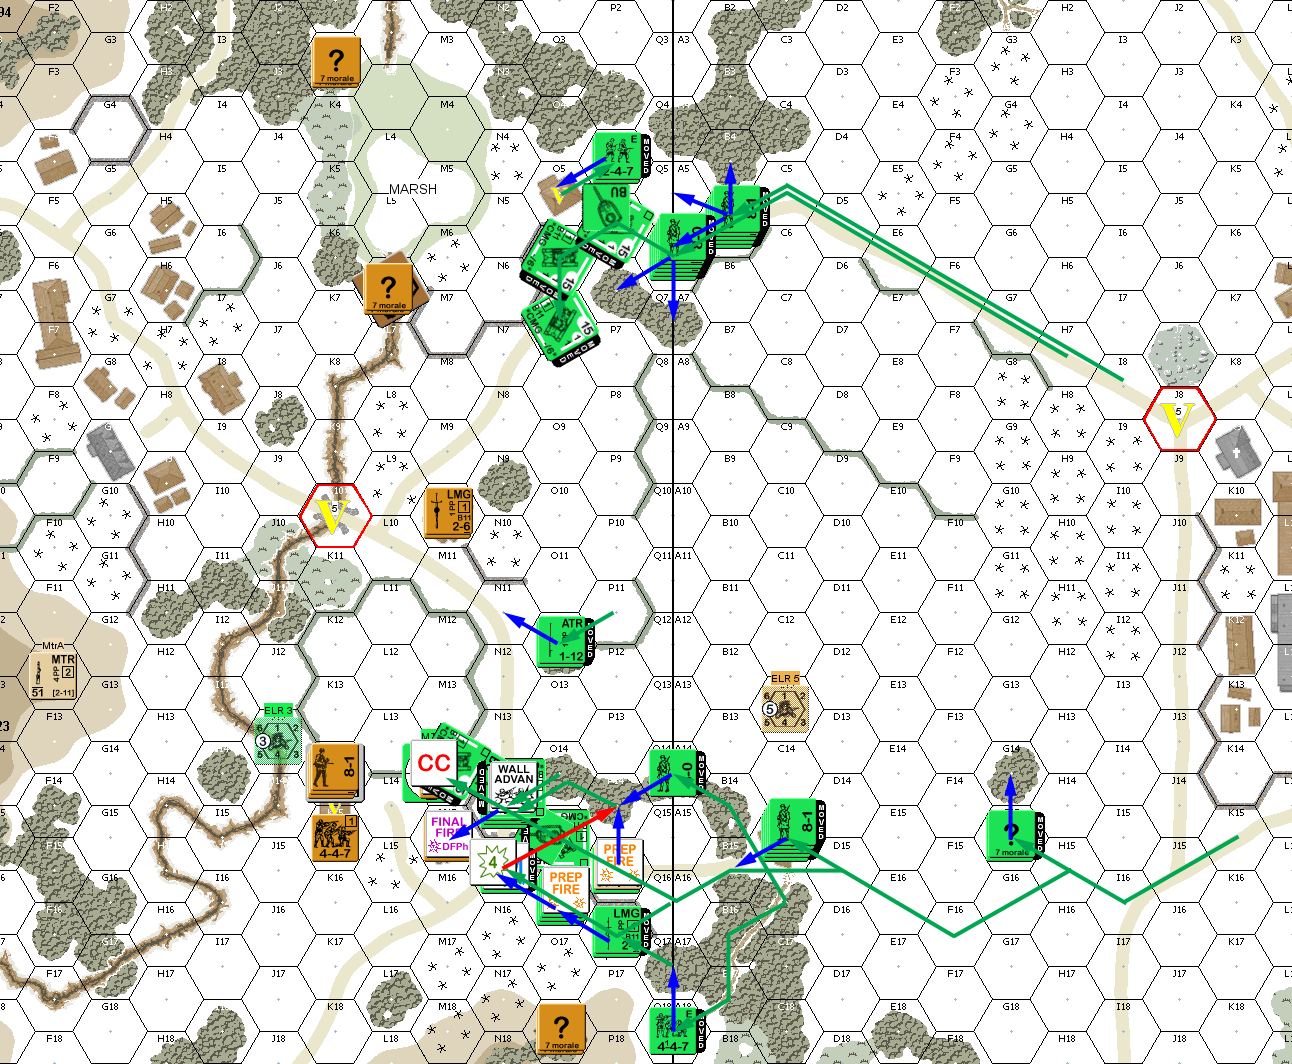
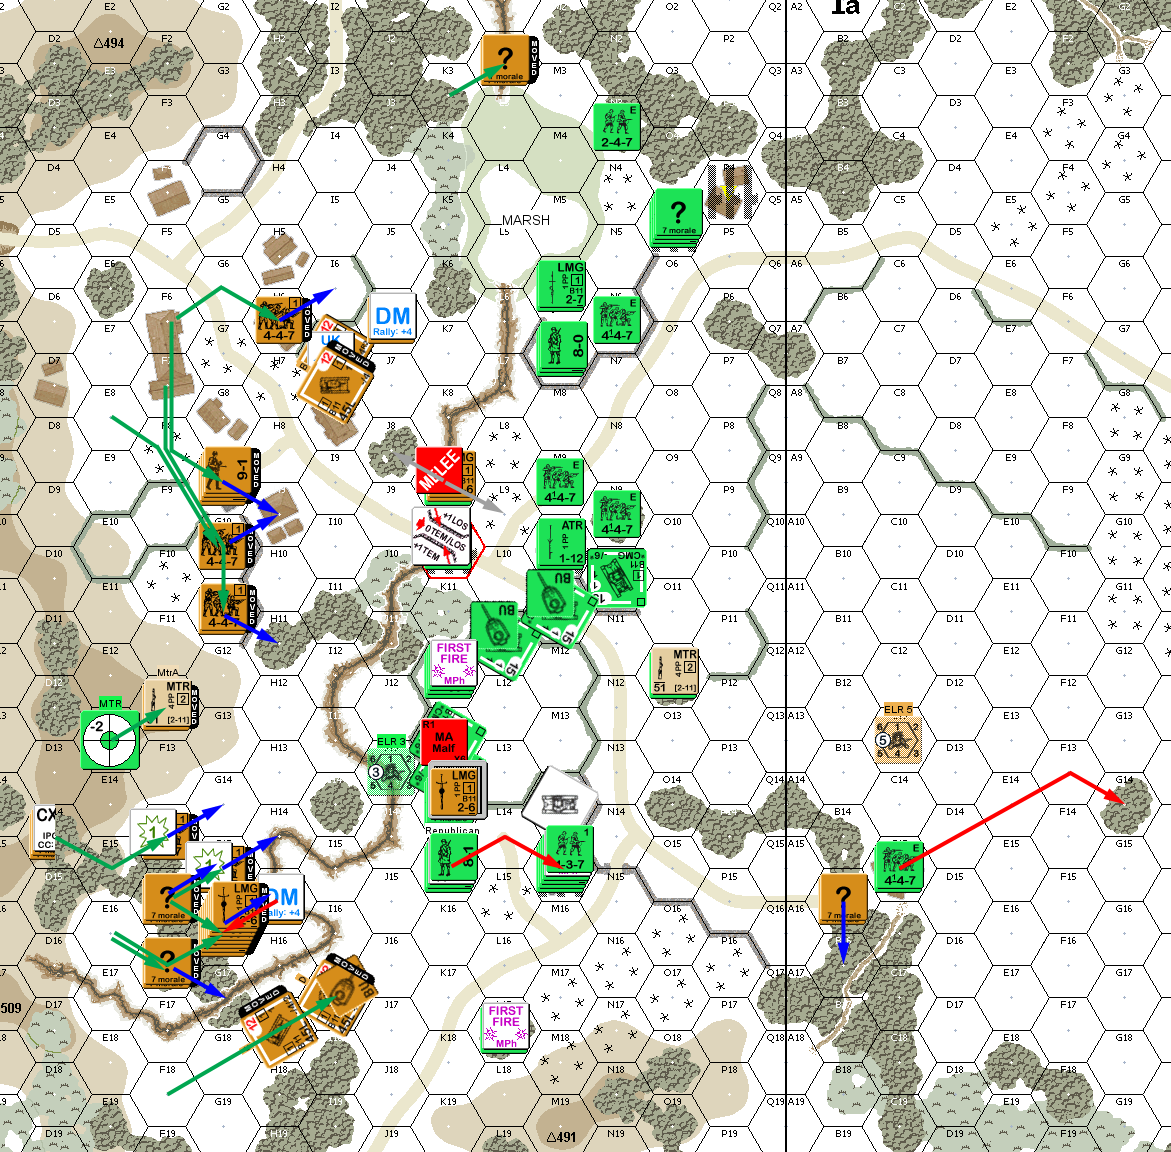
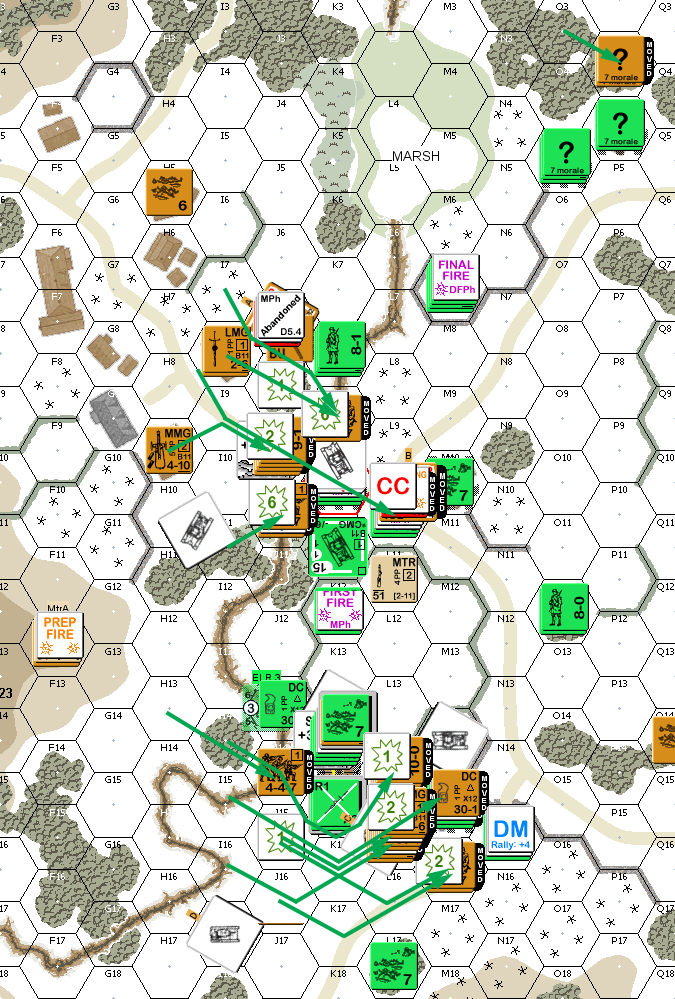
Having decided to go after Patch’s victory buildings from the start, the bulk of my troops lined up and headed for some woods that would be a good jumping-off point for the main assault. Despite the cover, there was a gap through all the trees where Patch could fire, and he promptly caused an ELR failure in my 8-1 leader, which also pinned a squad. In addition, my squads set off his Sniper while passing the same 1MC, and he pinned my ATR squad. In DFPh his MTR zeroed in on 2aQ17, which was a natural place to want to advance, and to emphasize the problem, his second hit was a CH (not that that meant anything, but…).
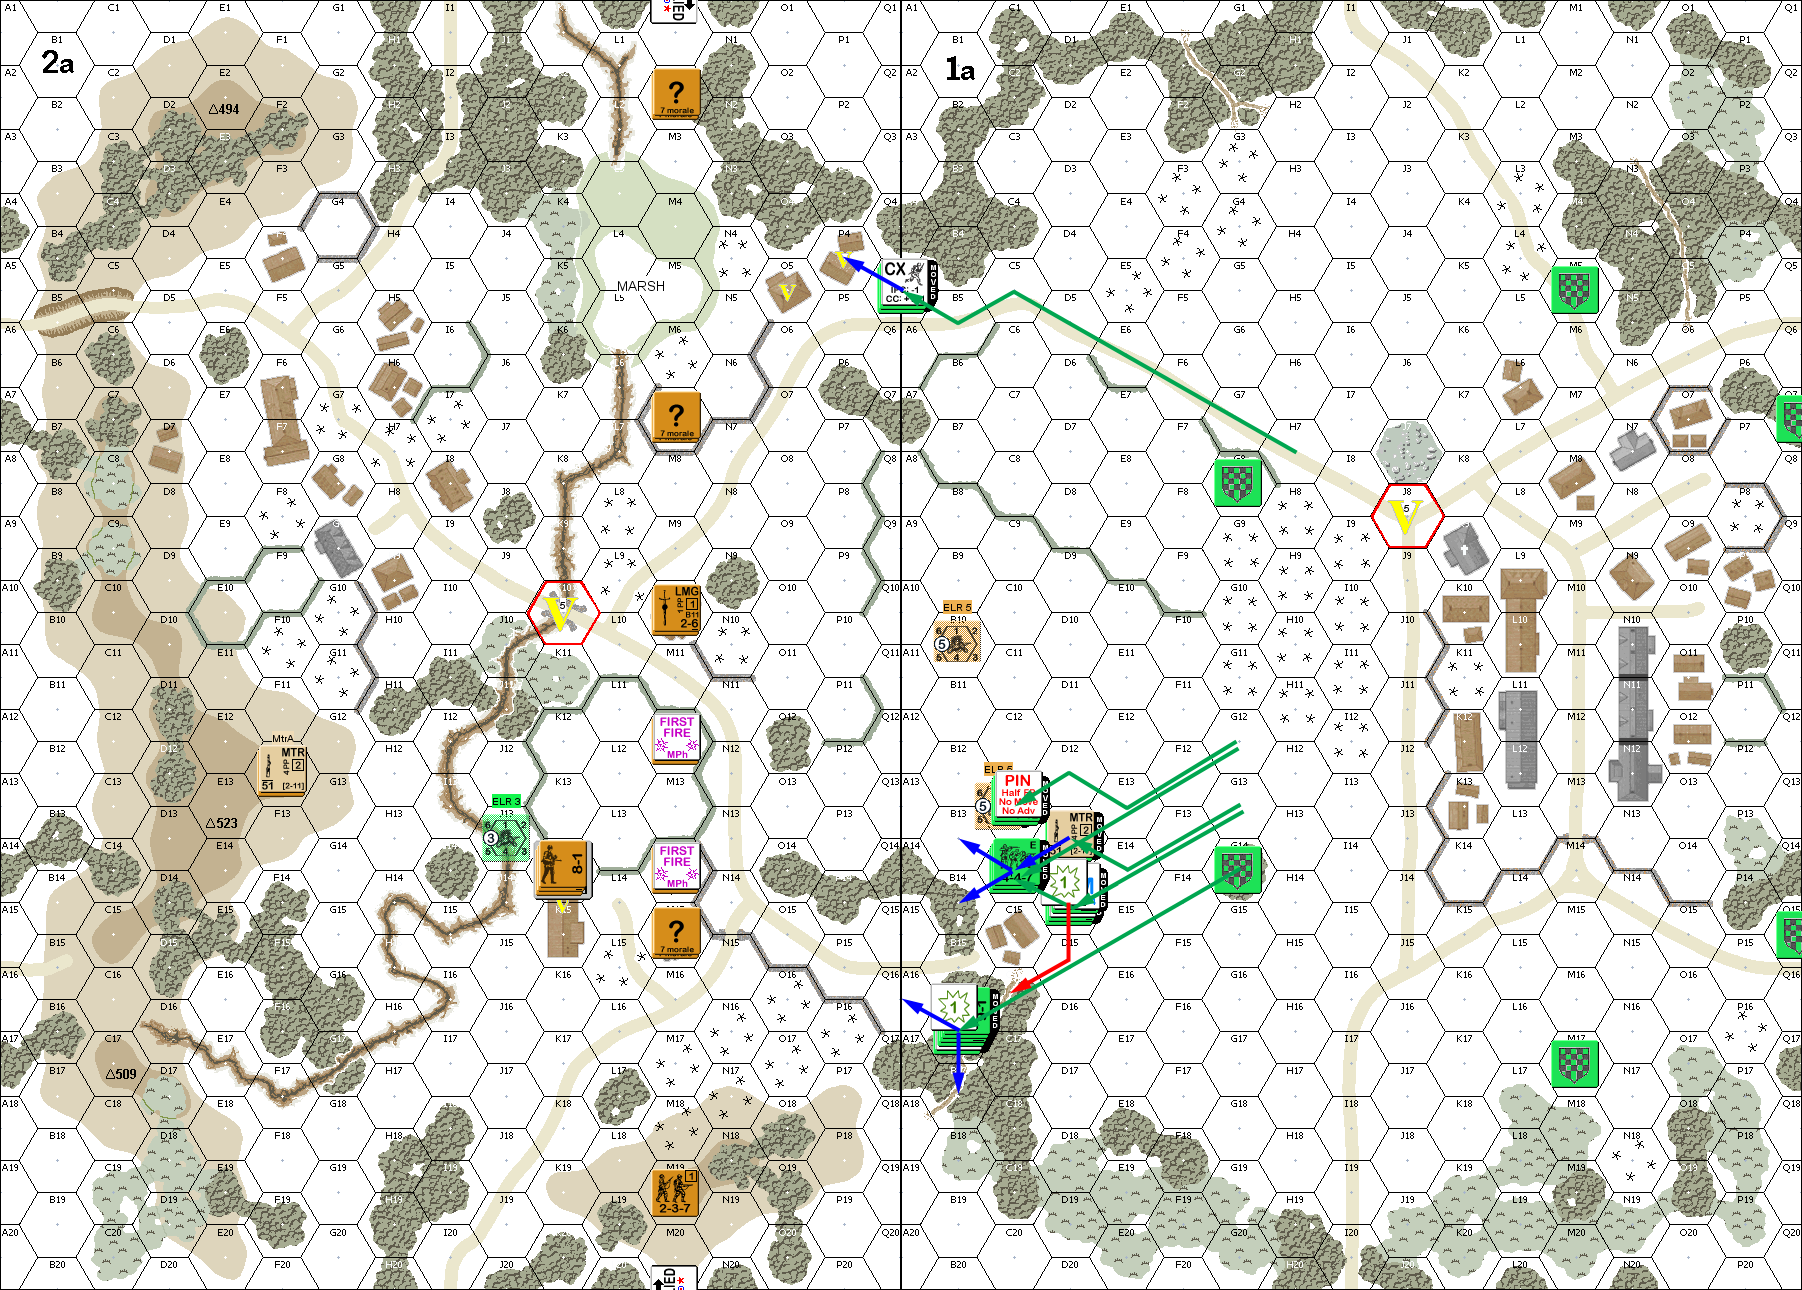
Situation, Nationalist Turn 1, showing the full board. North is to the left, and remember the winter colors are purely a reminder of falling snow (which has already stopped).
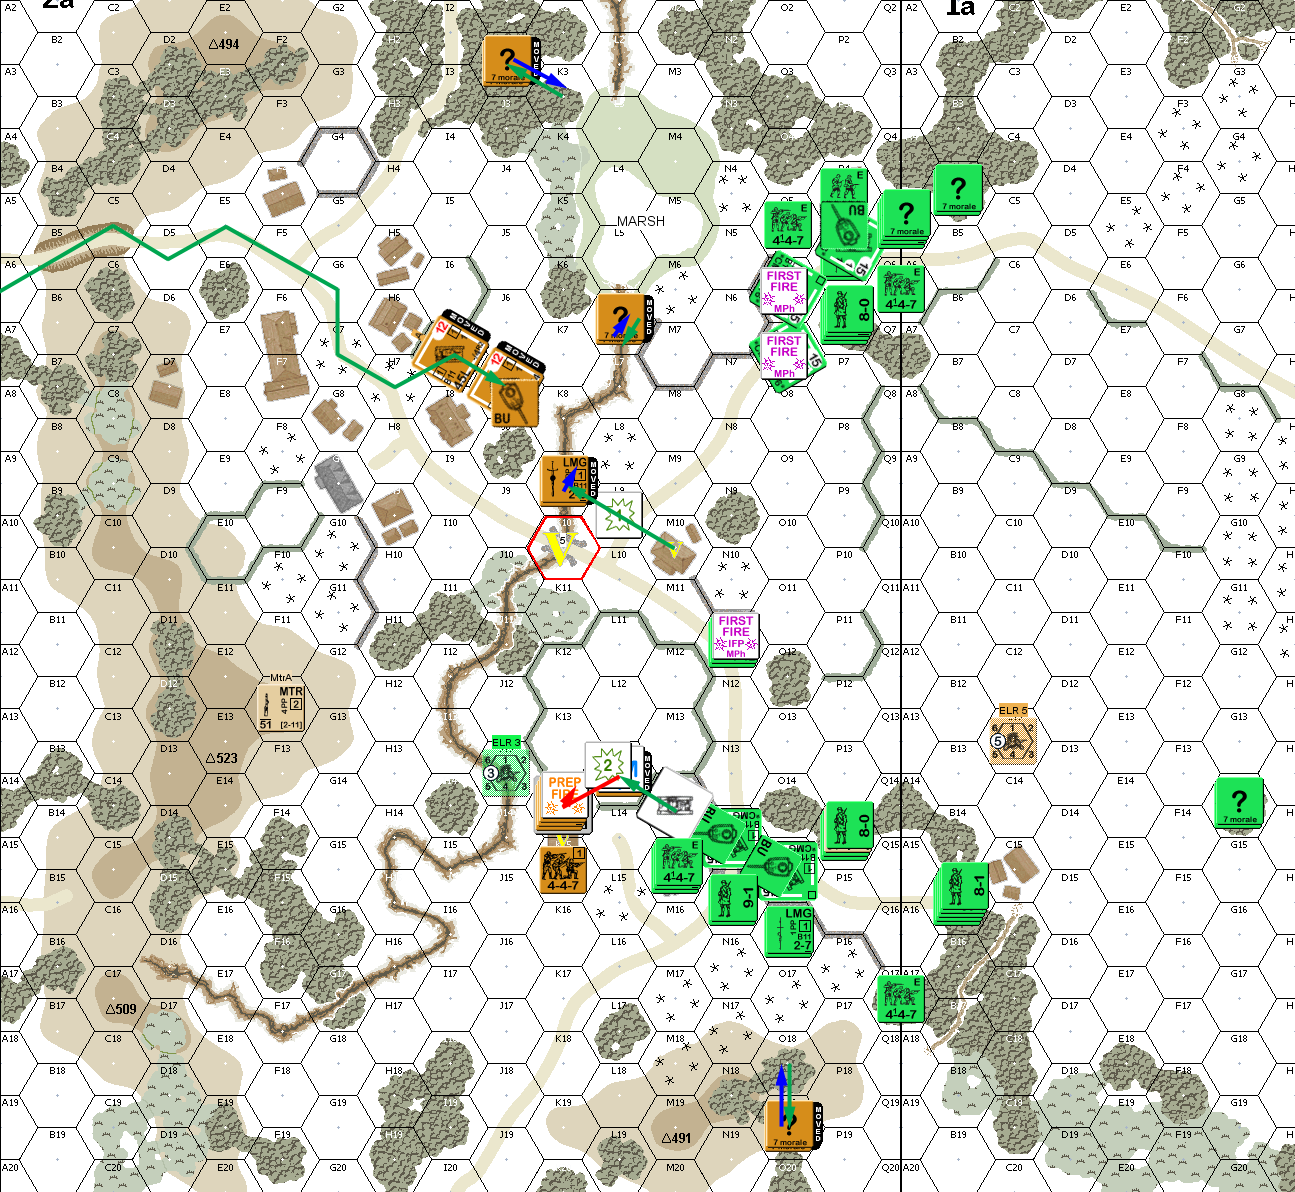
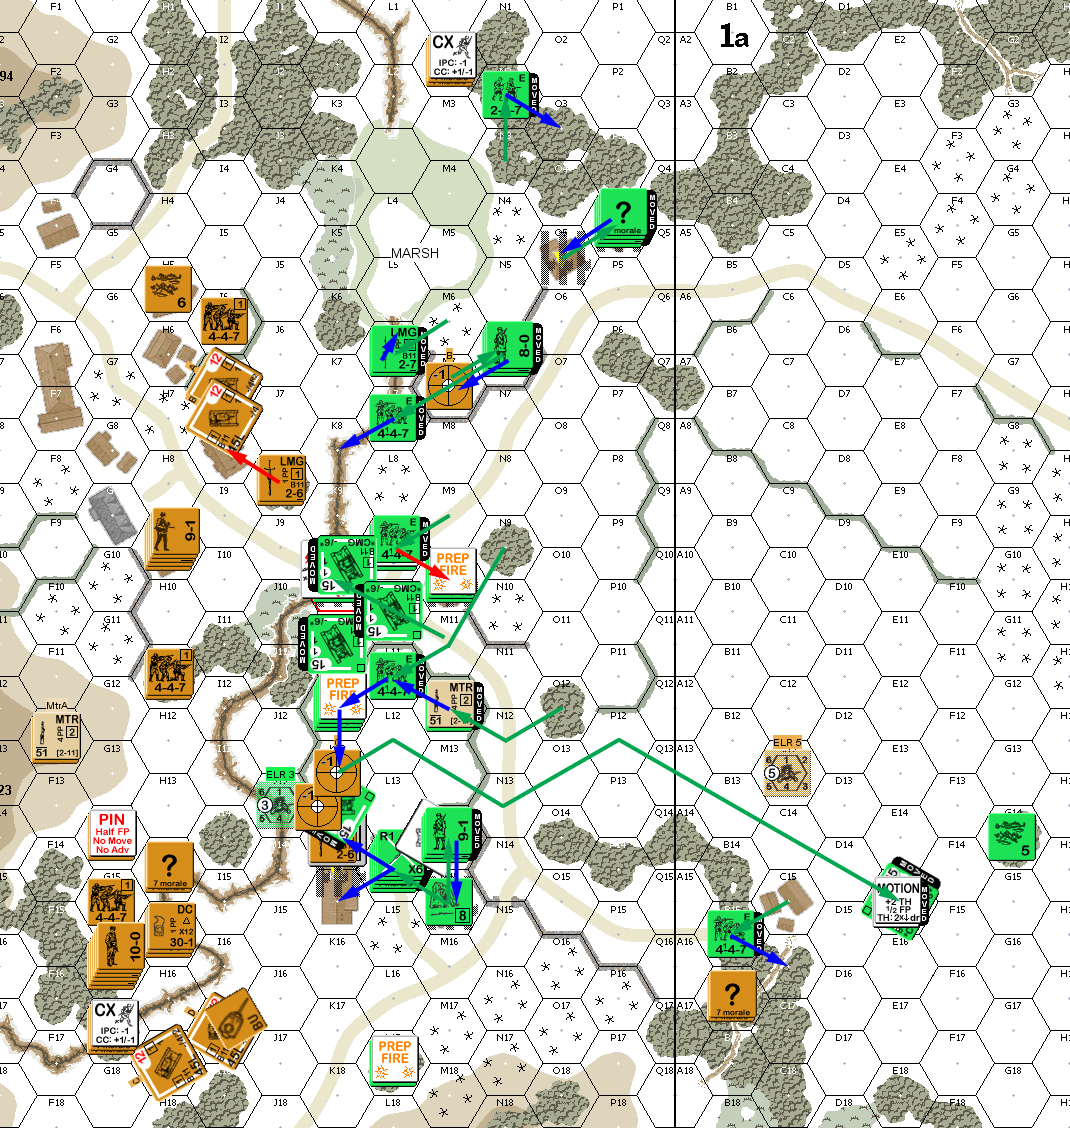
My leader failed self-rally for Patch’s turn, and he skulked with no fire. His eastern squads(?) pulled back to the gully line where they could still be trouble, but they didn’t contest the mere squad and a half that I had in the area either. However, my one DFPh attack was on his MTR position, and the HS rolled a ’12’ on a 1MC to immediately make my life much easier as all the woods became much safer. (“Knew I should have put a spare 237 up there as a reserve.”)
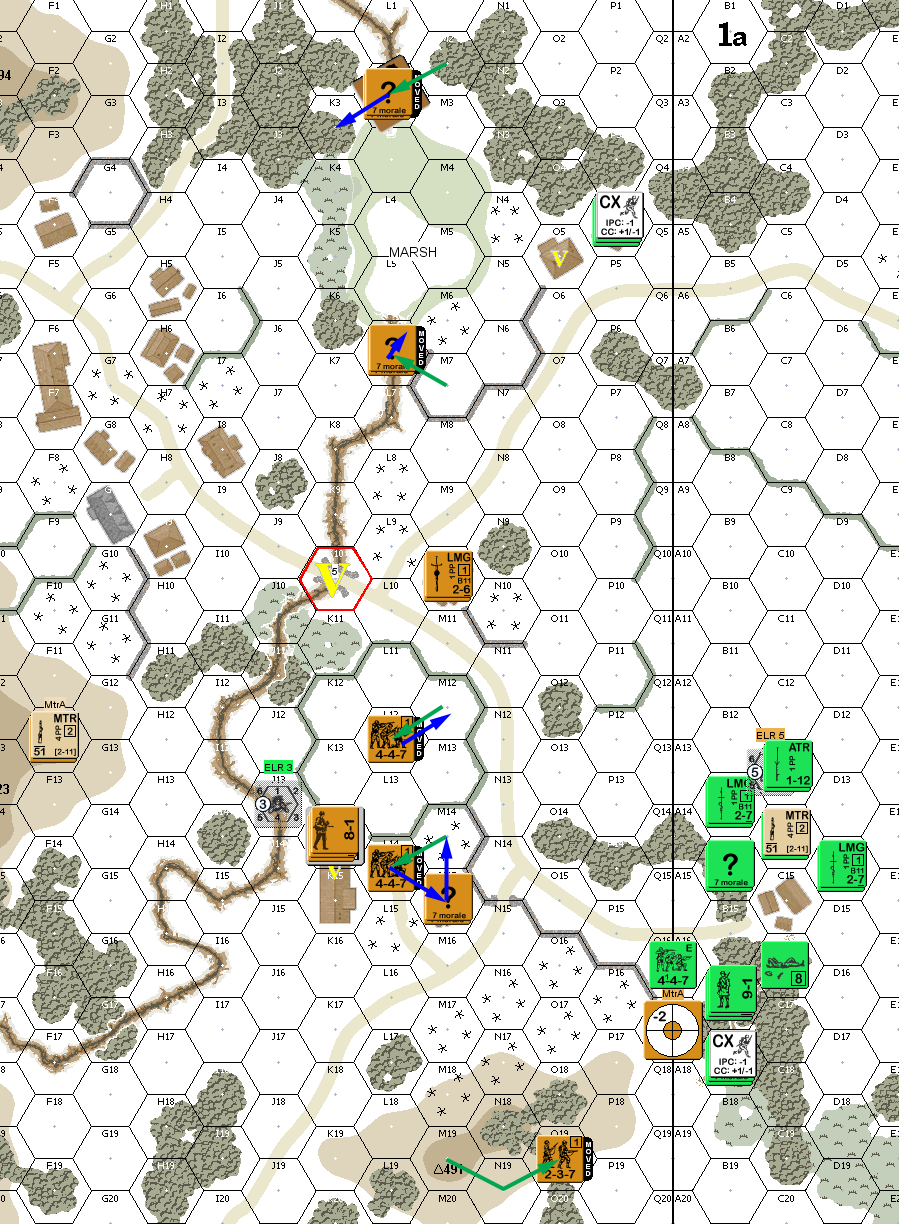
Situation, Republican Turn 1.
I set up my turn 2 reinforcements in two roughly equal groups of a three Pz Is (as one platoon) each, two three squad stacks with a leader each in the east, and a similar stack in the west, with one spare squad trailing behind, all entering on south-edge roads. If I had thought, I’ve have set up the tanks CE to speed along the roads, and BU as they got closer; as it was, the east force went CE as moving as there was little danger from Republican forces, but I needed them to get further in the west. I tried approaching 1aM15 with what was on hand, but Patch barely broke both of my squads (Final 8 on both), and I reverted to a more cautious approach. Patch didn’t have any effective fire after that, though we traded a couple shots that we passed the various MCs and TCs of.
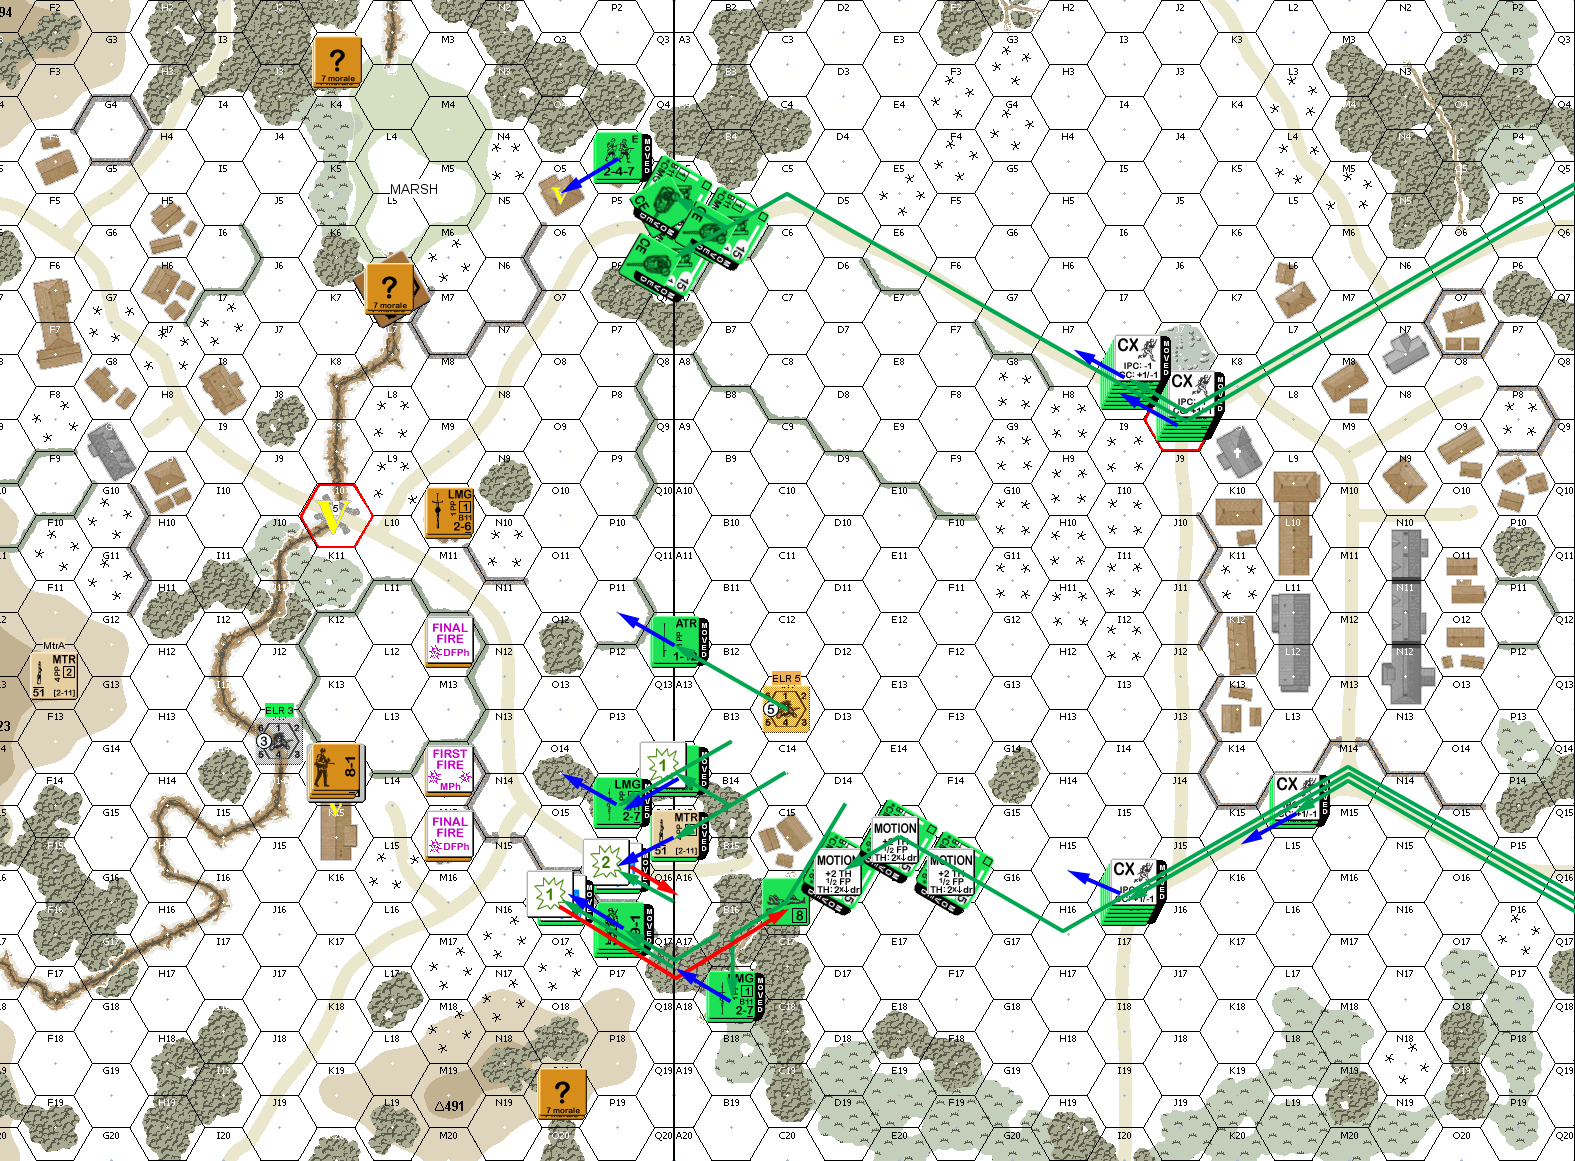
Situation, Nationalist Turn 2.
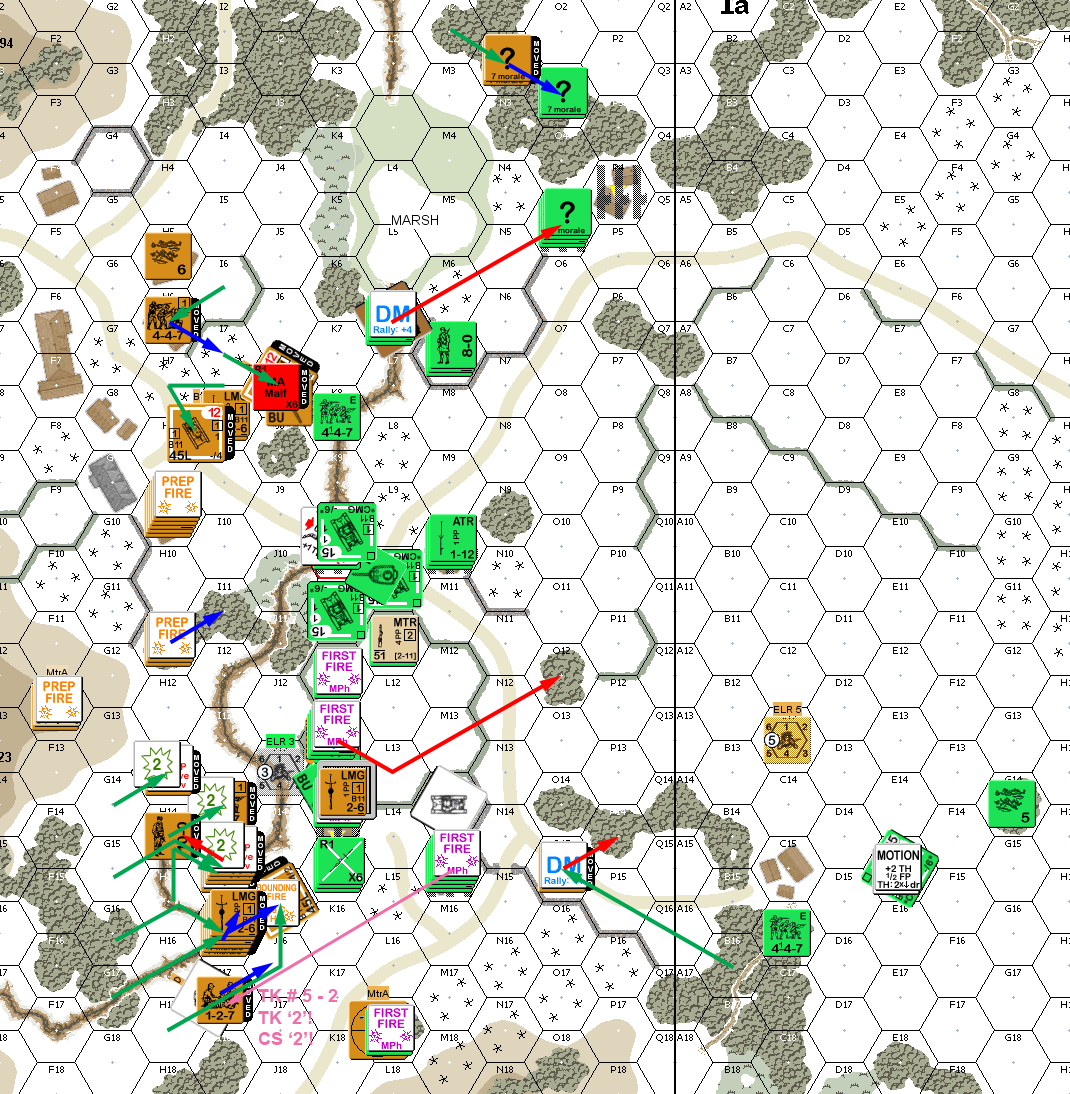
My leader rallied for Patch’s turn 2, and while he didn’t rally the squad with him, he’d be there and not DM for my turn. He had a couple shots that did nothing, and skulked a bit. I had a couple shots that did nothing more than pin the LMG squad in 2aK14h1 (who’d already fired, and wasn’t going anywhere).
Situation, Republican Turn 2.
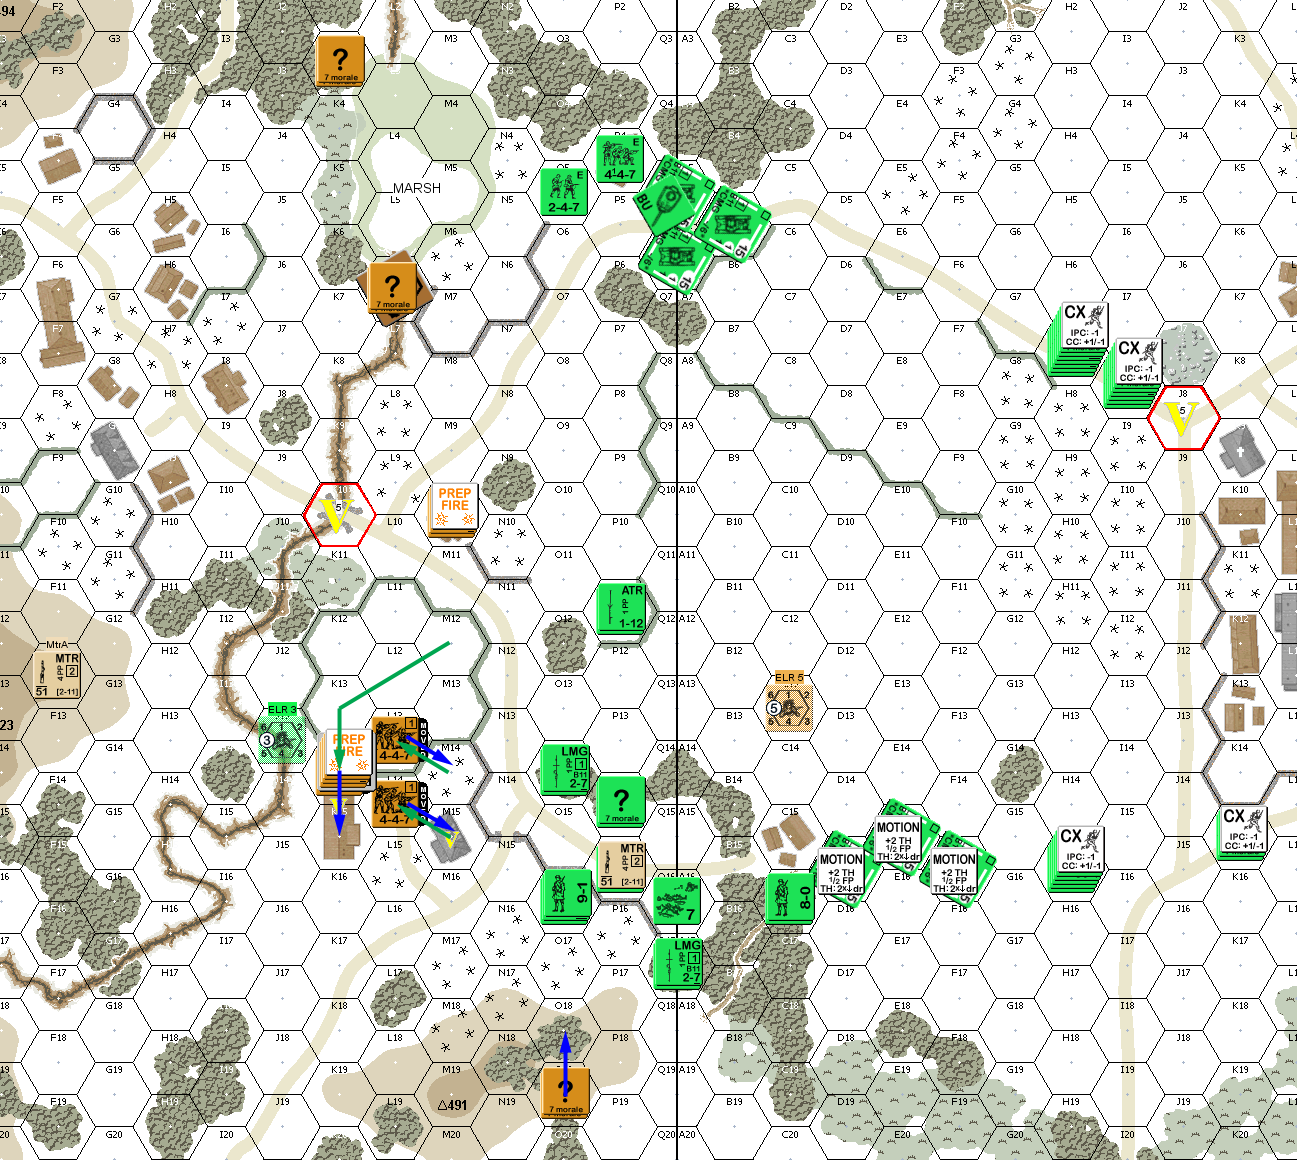
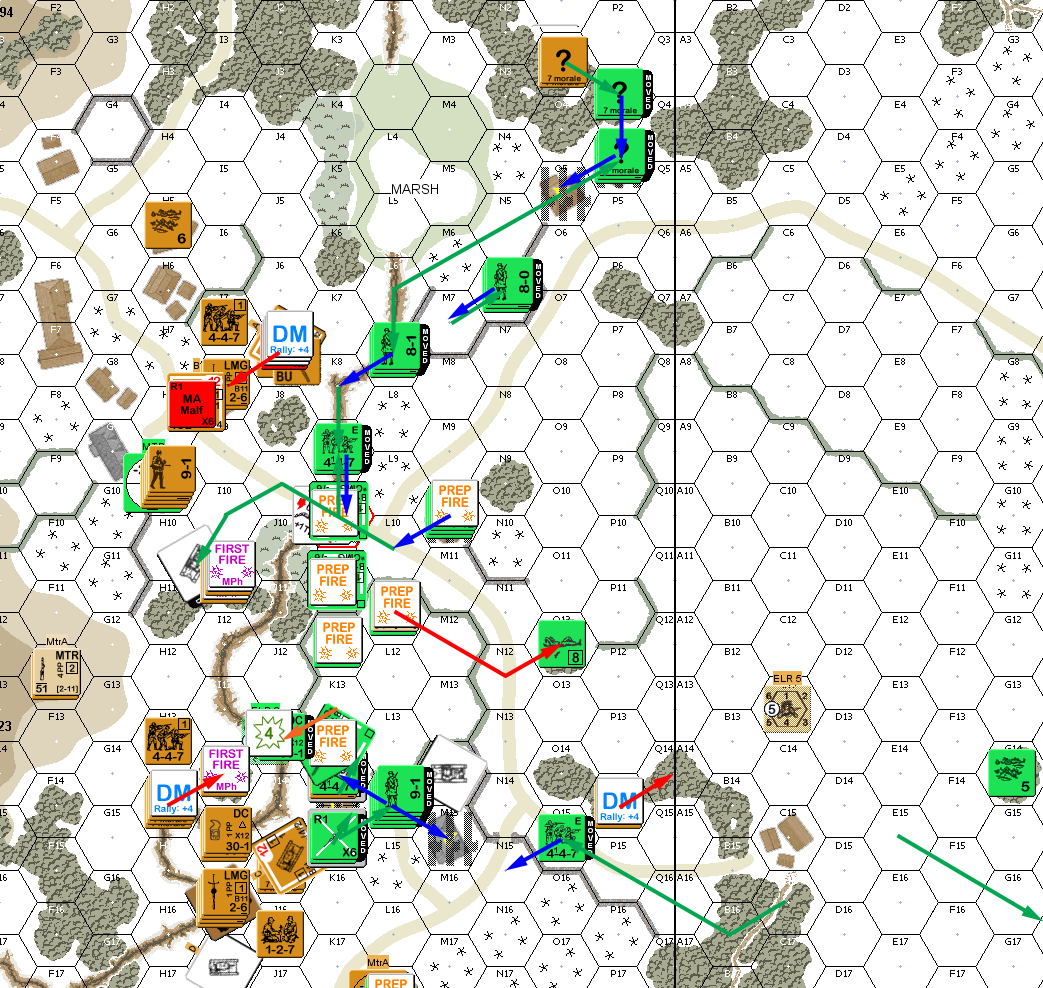
My squad in 1aA16 self-rallied, and my other broken squad was rallied by the 8-0 in C16 for my turn 3. Prep wasn’t nearly as good as my MTR hit with no rate and no effect, and my MMG malfunctioned. The Western platoon didn’t get as far as I wanted thanks to Platoon Movement through bypass of C15 to get into the victory area. The lead tank ended on top of his squad in 2aM14, and then attempted to advance on the squad holding M15. Patch broke (and sadly ELRed) the first move, but two more squads moved adjacent safely with the cover of the adjacent wall. Over in the east, the reinforcements came up, and the Pz I platoon there tried to find positions with decent cover that could hold the approaches.
I had a couple good rolls in AFPh, and pinned 2aM15. Patch got a ‘4’ to kill the Pz I in M14 in CC. However, I got Ambush in M15 and wiped out the squad there for no loss.
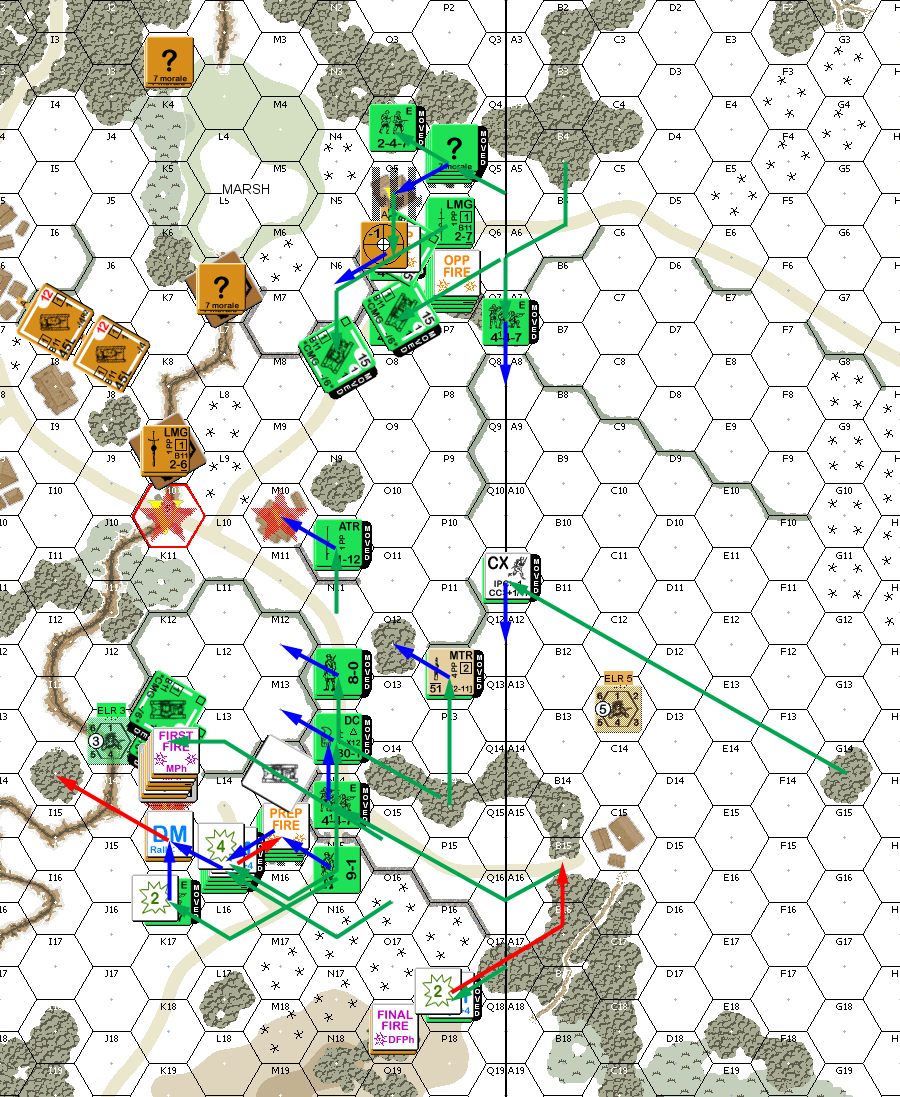
Situation, Nationalist Turn 3.
I rallied my one broken squad for Patch’s turn 3, but I lost my MMG permanently. Patch’s two T-26s entered on the main road from the north. He prepped with K15h1 again, but didn’t get any result. An attempt by M14 to get out of the area failed when a clear shot from N11 broke him. The LMG squad in M10 ran for the gully behind him, and I was unable to affect him as he Dashed across the road. The T-26s got into the village before moving off-road and setting up to keep me away from the bridge. I took one possible shot as he moved, but as I expected it was blocked by the far vertex of a wall I had taken cover behind. DFPh managed to pin his 8-1 in K15, but that was it.
Situation, Republican Turn 3.
The only action for my Turn 4 RPh was Patch failing to rally the squad I broke last time. He had had a HS on top of the western mini-hill giving me trouble, so I finally sent a squad after them, and they survived adjacent First Fire, but then rolled a ’12’ for a NMC on Subsequent FF to be reduced to a broken 1st Line HS. The assault on K14 was mixed. I sent the first tank of the remaining platoon into bypass of K14 so the upper-level LMG nest could only get one shot, and then concentrated on the west end away from them. The first squad got adjacent okay, but the next one rolled a ’12’ after a SFF shot to get reduced to a broken HS. However, a third squad moved up, and Patch’s squad broke on FPF.
Elsewhere, I pressed towards the bridge. Patch abandoning M10 not only allowed me to move to and claim it, but I did so with the ATR squad, which, if he could hold on, was also a good place for trying to pick off tanks. I also managed to get the rearmost tank in the east platoon to move on its own, and it took the new ‘lead’ in the formation. Patch’s DFPh was poor, but that was matched by my poor dice, so his one decent roll pinned my squad in 2aO7. I did manage an unlikely AFPh NMC on K14h1, but everyone there passed.
Situation, Nationalist Turn 4.
Patch’s main reinforcements lined up near the two north roads, with the tanks preparing to enter in the NW corner. With everything under DM, it was no surprise that no one rallied for Patch’s turn 4. Prep was lousy for him, with his lowest roll a ‘6’, and three rolls in the 10-11 range. He only fired one of his on-board T-26s, and managed the TC for the other one to reverse back into bypass of 2aI8 (though it did nearly fail the reliability check). Part of his eastern group was the 9-1 and a platoon with the MMG, who hurried down the road, while another group bypassed behind the village and never entered my line of sight. In the west, he stayed out of my LOS completely (not hard to do with all the woods), and entered in two main groups, and two single counters, one obviously headed for his MTR. The tanks went over the west shoulder of the hill, on the far side of the gully from everyone else.
I peppered the two earlier tanks with shots in my DFPh, but couldn’t get close to the low TK#s I needed. I got a couple low rolls on other shots, and broke the 8-1 in K14h1, but the squad with him was fine. However, he had nowhere to go in RtPh, and was lost to FtR, and that broke the squad.

Situation, Republican Turn 4.
On my turn 5, the snow finally started up again, in time to possibly hinder shots at Patch’s advance. The ATR managed to Shock the T-26 in 2aI7 in Prep, and then the squad rolled a ‘2’ to pin K9 (that squad gets a medal if I have anything to say about it), and another squad managed to break K6.
Now that I had all the buildings, the initial plan was holding on to them for a 13-13 win, which was still challenging with all of Patch’s reinforcements heading in. But I saw a good chance to take the bridge and keep Patch from focusing on any one thing. One squad headed for the gully, while another charged at his pinned squad in K9, and somewhat surprisingly survived all fire, including a 2MC. I was kind of hoping that that move might also attract fire from the T-26 still active in the center, but it kept its sights on N7. The east platoon moved out (with the T-26 sending a round into the wall between them), to cover the bridge more directly, as well as move closer to the surviving members of the other platoon.
While MPh went well, Patch revealed two squads + 2xLMG + Commisar in F15 for 1MC/NMC that pinned a leader and squad, and broke another squad. I fired the CMGs of the west platoon in AFPh (if only I’d realized I didn’t have anywhere for them to go…), and malfunctioned one of them. I took Control of the Bridge by advancing under it, but CC with K9 went badly as I missed, and Patch reduced me to a HS despite attacking at 1:2.
Situation, Nationalist Turn 5.
Snow stopped again for Patch’s Turn 5. I rallied a HS in M15 as the only successful action of the phase, as my CMG stayed malfunctioned and Patch’s Shocked T-26 flipped over to UK. Patch skipped Prep, even with his lone T-26, which I figured would try to do something about all my infantry around, and it promptly failed the radioless TC.
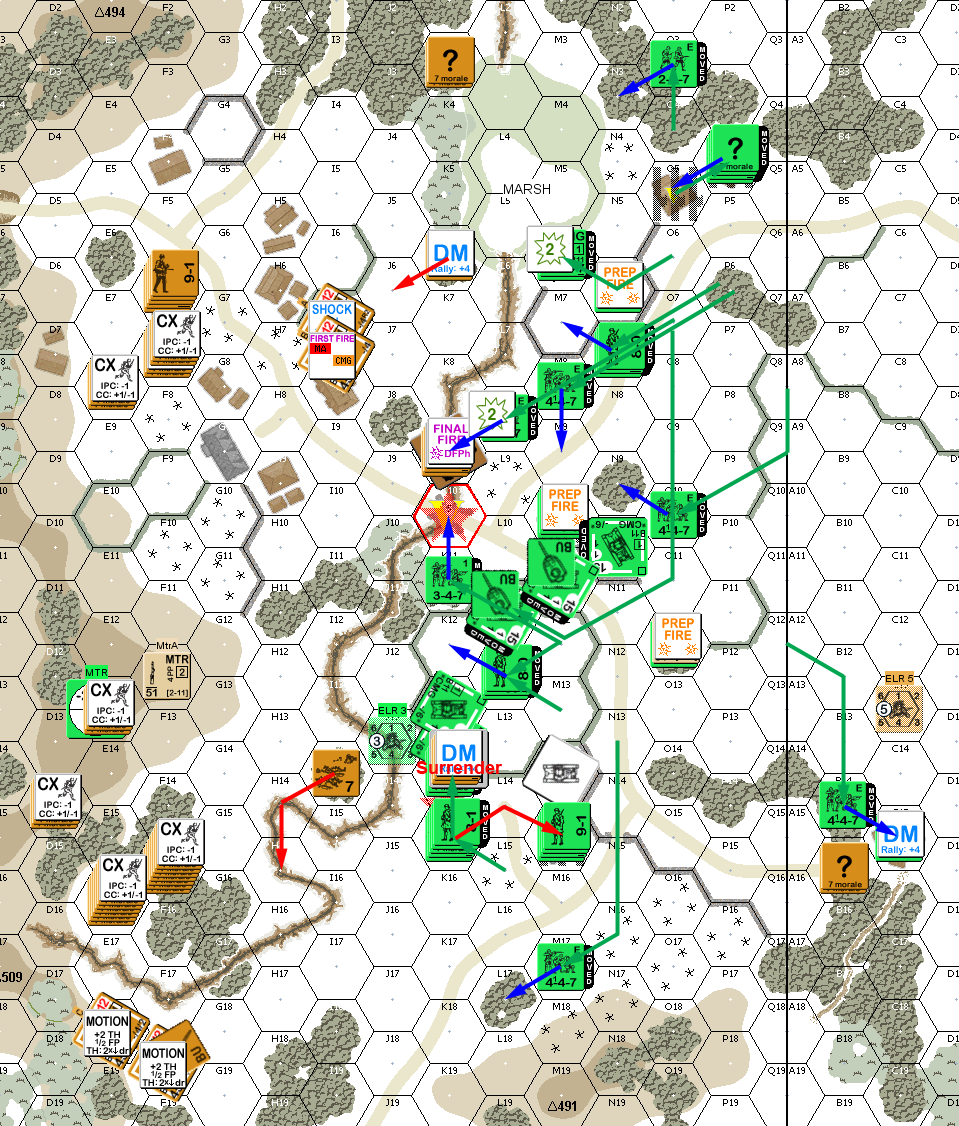
Mostly, Patch moved up slowly, and started feeling dread as some very large stacks got closer. I had a couple of semi-decent shots, but couldn’t do anything. The new T-26s moved up a bit and stopped just out of point-blank range of the first building, and he recovered his MTR with a crew. The other one turned out to be with the main force holding two DCs. I malfunctioned a LMG during DFPh, but also stripped concealment on 1aB15, and broke both sides of the Melee in 2aK9. Advancing Fire broke everything in K15 (reducing my prisoners in the process).
A squad and the DC-toting HS advanced into the gully while two more squads advanced into the open. The prisoners decided to try taking on their broken guards and eliminated the squad (!) before being eliminated themselves. while the K9 Melee dissolved as both sides Withdrew out.
Situation, Republican Turn 5.
I got a squad back in M15 for my Turn 6 rally, and the HS there recovered the malfunctioned LMG (dropped by the ex-guards), but my Pz I Recalled by permanently losing his CMG, and Patch’s T-26 recovered from UK. At least his squad in G16 failed to rally, and the Commissar reduced him to conscripts. The ATR just missed a shot at the T-26, and while a couple other shots were good, Patch passed the resulting MCs with no more than a pin in G14.
I partially skulked, and set up for another round of defense in building K15, while slipping more guys towards the bridge. The intact Pz I platoon moved forward slightly so that the lead tank was on the bridge. The T-26s would certainly have to move to engage them (it was a real pity that one recovered…), I should have decent shots at anyone lining up for a shot clear of the bridge TEM, and of course, while he was still alive, Patch would need to pass a PAATC just to get infantry into the hex to take Control… if he could get my infantry out.
Patch showed just how much trouble I could be in by hitting the final tank of the other platoon in DFPh with a Final TK #9. And then rolled a Dud. Still, the Pz Is are really outclassed here. A lot of the rest of his fire was poor (three ‘9’s in a row, among other things), but he did get a 1MC and NMC on L9 that eliminated my broken HS, and then broke the squad coming up to reinforce in the gully. The other good news is that the ex-Shocked T-26 malfunctioned its MA.
Situation, Nationalist Turn 6.
Patch’s only result for his Turn 6 RPh was for the Commissar to reduce a squad to HS, while I rallied my leader in M15. He had a few shots in Prep, which promptly broke my LMG squad in 2aL6 and the leader in K13, but the squad with the latter went Berserk! The good T-26 in the east circled around to the other side of the building it had been bypassing, giving it a bead on the bridge. The other platoon started up, my LMG in M15 opened up… and killed it with a ‘2’ TK! The crew did survive however. The remaining tank moved to range one and then tried a shot at K15 which had no effect.
Naturally, the entire force facing K15 moved forward. Patch took it slow, not going CX with anyone to try and make it in one turn, and used the gully for as much cover as it could give. I pinned one squad in the open before it could get far, and broke another in the gully. The crew+DCs moved in there after, and thankfully pinned to the residual. DFPh did nothing (one off of shocking another T-26 with the ATR was as good as it got). Patch malfed the MA of the second east T-26 in AFPh, removing the biggest threat to my tank on the bridge. In APh, the little drama in the easternmost woods came to a showdown as he finally went for my screening unit there. …Or it could have. Neither of us got Ambush, and then we both decided not to attack to preserve “?”.
Situation, Republican Turn 6.
Snow started again for my last turn. I rallied the LMG squad in O5, but that was it, other than Patch’s Commisar reducing another squad to conscripts. The ATR got another hit in Prep, immobilizing a T-26, whose crew promptly bailed out and broke to fire from the squad. I had a fair amount of other fire (largely on the remaining T-26), but couldn’t get any results.
The berserk charge didn’t go far. They got into the gully in J13, took a 1MC, and rolled ’12’ to be eliminated. And that was the start of a fairly bad turn. Part of that was realizing too late that 2aM15 was close enough to his offensive that I needed extra guys in there, and as a one-Location building it was easier to take Control of in one turn than the four-Location K15. So the spare squad that had been uselessly dueling with his HS on the flank ended up a hex too far away. I had two Pz Is on the line at the bridge, and one in the rear where, with Inexperienced, and Hindrances it wasn’t going to do me any good (the +1 Inexperienced was making it hard for them to do anything with good shots). So, I tried driving it over the bridge and parking it in bypass of I11, in hopes of tying them up in CC, and/or having a field of fire at H9 if it tried moving out. I probably should have just concentrated on the latter and parked in H10. Double-parking on the bridge might also have been interesting. Easier to kill one, but Patch only had so many shots he could take at them. As it was, he passed PAATC, and killed the tank in MPh.
The MMG in H9 got a hit on the Pz I in K10 in DFPh, and killed it on the bridge, severely compromising an essential part of the defense. It kept rate and took a shot at the other Pz I next door, but couldn’t penetrate. A shot at the MTR HS broke it, another pinned K12, both the squad and HS on level 1 of building K15 broke, and the squad in L17. His remaining fully-functional T-26 finally got a hit on my Pz I in bypass of K14 and killed it.
Patch had, rightfully, been down on his chances for some time, and figured he just could get to victory in one turn. But this one fire phase was brutal, and left me very thin in places where he could throw a lot of men at the problem.
Situation, Nationalist Turn 7.
For Patch’s final turn, the snow came down Heavier than before. Patch’s vehicle crew self-rallied, and the squad in I14 rolled a ‘2’ for a +4 HoB, which caused…. Battle Harden? Patch really wanted a Berserk result, for good reason. While everyone on level 1 of building K15 was broken, I had a squad in K14h0, and no matter what he did (well, short of a KIA) he’d be unable to force FtR on K14h1 with him there, and I’d retain Control. A ‘zerkie could change that, but Patch’s rolls were too good. I managed to self-rally my leader in O12, but that was it.
Patch used his MTR to put down Smoke in J9 and K14, shutting down more defensive options (I usually find no one brought smoke for my MTRs…). The remaining east T-26 charged across the bridge and overran my ATR squad (the ATR missed a 10 +1 shot…). A horrible OVR roll was only a PTC, but of course they pinned; and then Patch used ESB for a MP to Stop on them. Patch moved a squad from I11 adjacent to the bridge, and the remaining Pz I broke them, and then the second squad took a 2MC from the residual and passed. Then he fed the platoon in H9 into the Smoke in J9, and the covering MMG in M7 (and its residual) couldn’t get a result. He then moved the vehicle crew and a squad into the gully in K9, but my adjacent fire at least killed the squad with a ’12’ on a K/3.
The west assault started with the T-26 over there starting, and obviously heading to lock up M15. However, he went through L15, which counts as a road between two buildings, so the defending squad managed a Street Fighting CCRF and killed it there. The DC-toting crew then charged M15, and the most I could do was a pair of PTCs that he passed. A squad moved into M16, and N15, not having anything more constructive to do, broke on FPF, while putting down 2 residual, and causing a NMC that he passed. His other vehicle crew went in there, and was unaffected by the residual. Two LMG squads went into L15, and one pinned to residual. Two squads + Commissar bypassed around the south end of the building, and K14 fired out of the smoke at the adjacent target… and rolled a ’12’ for nothing more than malfunctioning a LMG. They ended in L14, which gave K12 a decent shot for a 1MC, which pinned one squad. This finally set off Patch’s sniper (we’d had a number of SANs during the game, but this was only the second time a Sniper had actually done anything), who DMed my broken HS in G14. (Okay, ‘doing something’ might still be an overstatement.) K14 tried again after that for a second ’12’ in a row from them to do nothing.
After that, there wasn’t much Final fire, but I did manage to pin the remaining squad in J10 with further fire from K11. Ironically, after bad shots from everyone else, that pinned squad generated a 1MC that broke my defenders under the bridge (on a ’12’ for the elite squad of the pair). The DC in M15 pinned, but did not break, everyone. That left a 20 +3 shot from everyone else there (excluding the crew, which was CX) for 2MC that broke the leader, but not the squad. He then shoved three squads and the Commissar in there, and with 3:1 odds got my squad, who tried to take them all out (2:9 = 1:8… or a ‘1’, but I figure the only thing was to clear him out, and leader creation on a ‘2’ might work), to no avail. Patch won at 14-12.
Republican Turn 7, through the end of Movement.
Afterword
Patch also tried for P4, but couldn’t get Ambush or a result against a concealed HS in CC.
I was worried about where this was going almost the entire time, because of the things that helped him win it in the end: There’s a lot of bodies out there, and I was spread thin trying to protect everything. In fact, the two extreme flanks were a serious problem, because I let him keep a unit out there to threaten Control, or even getting by and taking the crossroads in 1aJ8, and tying down my guys on that was something I really couldn’t afford.
Still, the initial assault went well, and ran out of steam right after I took my objectives. By turn 6, I was think I had this too, as time was running out quickly, and Patch needed to take two things for a win. Everything breaking during my turn 7 was a surprise, and left the door wide open for Patch. It’s not hard to imagine how different that last charge might have been if L17 hadn’t broken. So it was close. That said, there were some real mistakes in there. I should have had another squad in N15, I shouldn’t have thrown away the Pz I (I don’t think double-parking on the bridge had occurred to me, but it’d probably have been a good idea), though the MMG taking out the one on the bridge was low-odds enough that it seriously surprised both of us. Making Patch roll PAATC for everyone who wanted to go into the bridge would have been real tough… though the rest of my dice say the tank might still have been alone vs whatever did make it.
At any rate, it was a good scenario, with a really exciting and tense finish. The main knock against it is that understanding the implications of the VC schedule takes some doing.
Discussion ¬