
WO1 French Toast and Bacon
Patch and I got back to ASL at the end of January, and went for the first Winter Offensive scenario, “French Toast and Bacon”. Early in the Battle of the Bulge, a small German force tries to seize a river bridge from a small American force.
I had the defending Americans, who have eight half-squads, a single M18 TD, and a pair of 76mm AT, as well as the ability to keep their three BAZ hidden. An interesting SSR gives them an off-board 105mm ART (akin to “Regalbuto Ridge“, but self-spotting this time), which can declare its using what’s normally a long-range charge to get a CH on a 2 or 3, even if it would normally be a miss. That last is low-odds enough I never got around to declaring it. Anyway, they’re defending half of boards 44 and 59, and a stream overlay on 44 hooks up with 59, with everything past the stream effectively out of play. The Germans get four squads and three each Panthers and Pz IVs. Some GameSquad Q&A points out a vehicle can’t control a hex with a bridge as it can’t control the Location under it (even though that Location is inaccessible here), so the infantry must get to the bridge, as the goal is to Control the bridge hex as well as the hexes adjacent to it.
I had a heck of a time coming up with a defense, as there’s not a lot to work with, and the Germans have two possible entry hexes. With 5.5 turns, part of the goal must be to slow down the Germans, and that means a hopefully cautious entry as a first step. But there’s a lot of open ground near the entries. The two ATs were set up in the back where they could support each other, and cover the main gaps that the tanks had to go through as they got into board 55. The TD takes a TC at the start of every turn (with a penalty equal to the turn number), and recalls when it fails, so it set up forward where it could see both entry areas. The MMG set up nearby, where there was a decent rout path.
Patch used the south-edge entry (as opposed to the west-edge one), and started with a squad and his only leader, who shrugged off a 1MC from my MMG. He nearly searched to reveal the HS in 44Y3, but realized taking search casualties could be really bad. The next squad armor assaulted with a Panther. I fired to put down residual, and bounding first fire… malfunctioned his CMG. The Panther stopped in LOS of the TD, which turned out to have no APCR. He kept his Pz IVs out of sight, while the Panthers started covering the rest of the board.
The TD bounced a couple shots off the front of a Panther (-1 Final TK). The AAMG pinned a squad, and the ART put an Acq on his leader (including the extra six hexes range from SSR, a range 27 shot, for a 4TH +1). Patch’s advancing fire mostly went wild with high rolls, including a MA malf, but he managed a 1 MC on the TD to stun it. He also got an improbable hit on CC4 to reveal the HS, but it passed the resulting NMC. He piled two squads and the 9-1 into Y3, and got ambushed. Sadly, I didn’t see the HS living long after ducking out either, so he stayed for a 1:2 and missed, while the Germans got him.
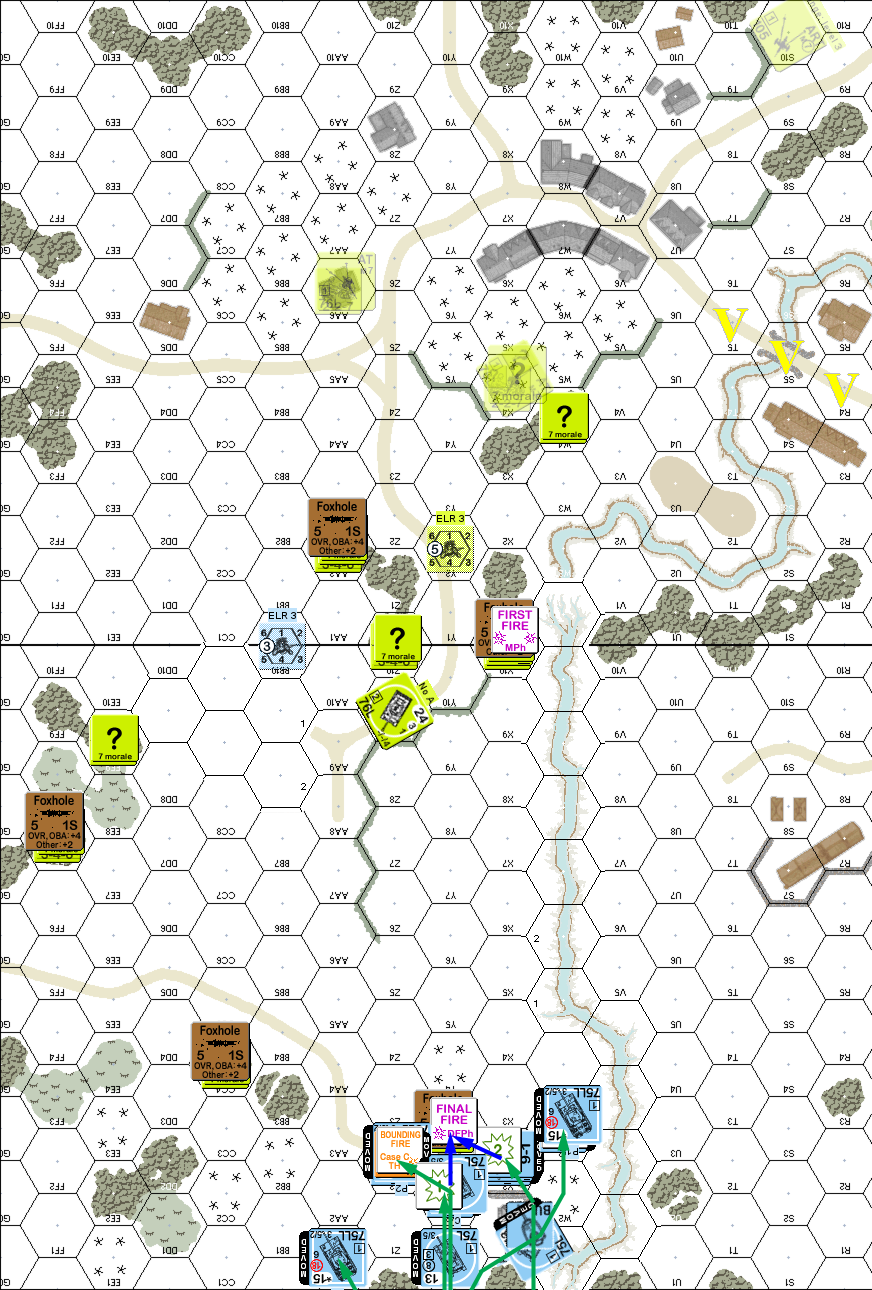
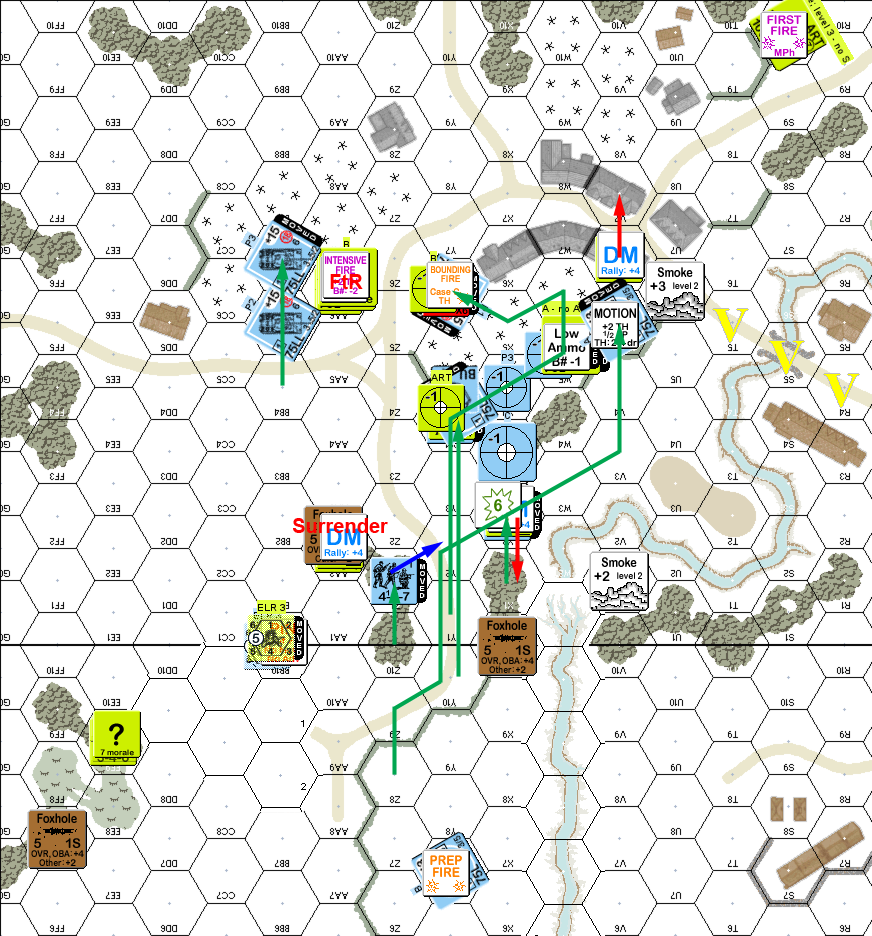
Situation, German Turn 1, showing the entire board and my guns.
The TD failed its initial recall check, but Patch’s repairs failed. The ART and MMG prepped for no effect, and my attempts to bug out of forward positions ran into a pair of 2s from Patch for a KIA and ELR failure. His only bad roll was on an attempt to turn the recalled TD into a smoke generator. Most of his final fire did nothing, but he got a hit on the broken HS to CR them to non-existence.
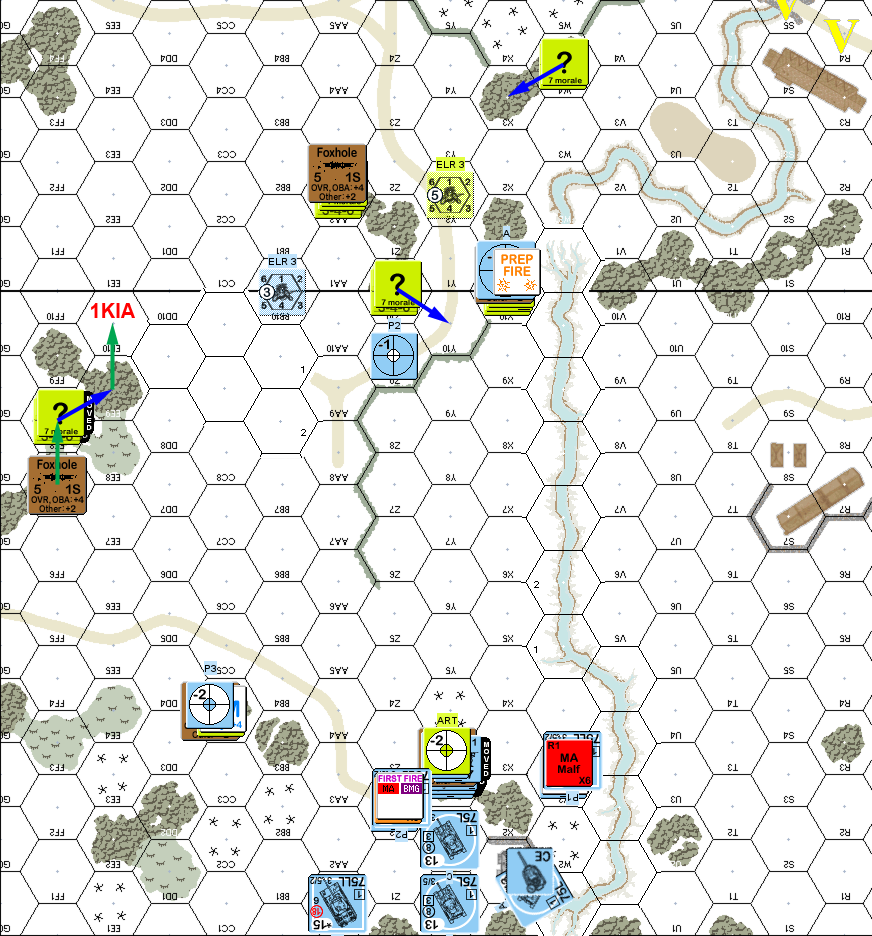
Situation, American Turn 1.
Patch still failed his repairs on his turn, and smoked in the MMG with fire from a Pz IV. He then started an armored assault, presumably towards the MMG, but setting up a fire lane gave him pause (well, he “hm”ed after that shot, so I assume he hadn’t counted on a fire lane). At the end of the move, he failed a sN smoke attempt, and then broke my BAZ HS with bounding first fire. This allowed him to move up the rest of the armor (including a couple Pz IVs going through the first tank’s hex; firing the ART at that for the overstacking penalty was tempting), and he got smoke in X6. Then the infantry ran forward, with one squad CXing to the hedge, and the leader proceeding more slowly.
My only defensive fire was the MMG and the ART, which missed, but advancing fire killed my BAZ HS with another break, and he took a ranging shot in preparation for more smoke in 59V1.
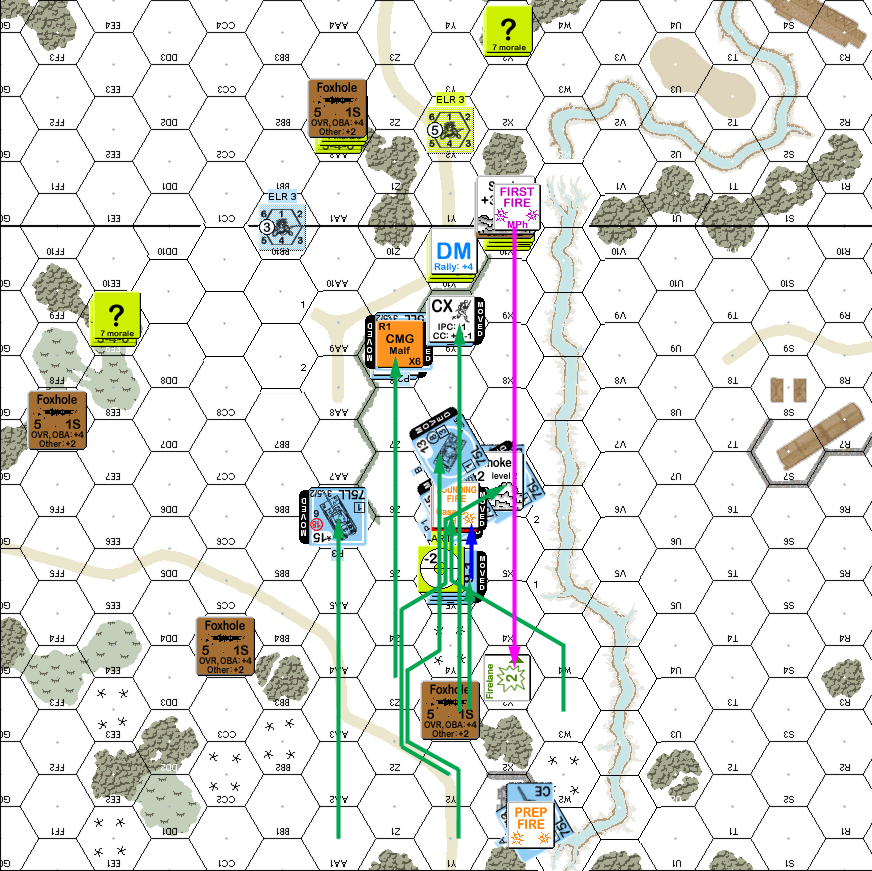
Situation, German Turn 2.
My turn came up gusts, removing one Smoke and dispersing the other. The ART finally hit, causing a 4MC on his only leader, and the accompanying squad, which both failed. I tried pulling the MMG back, but the HS broke to a 1MC from a Panther’s MGs. Worse, he revealed the 8-0 and HS in 59AA2, and then got a K/1 on the position to kill the HS and ELR the leader to a 7-0.
Patch finally repaired his CMG for his turn 3 (he was avoiding rolling for the MA), while nothing rallied. He put down new Smoke on V1, and then went into movement, with the Panther with the bad MA leading the way into 59Y1 to DM my broken HS, while a squad claimed my abandoned foxhole. One of the Panthers moved west around the center woods, and gave an ATG a nice side shot. Sadly, it only had limited time in LOS, and it missed on two tries (I went for APCR to get the double roll). It then parked out of LOS… and adjacent to, but out of CA, of the second ATG.
This also left my MMG crew trapped with no rout. I tried opening it up with smoke from the ART on 59Y1, but forgot that the MGs from the two Panthers could still interdict. The only workable choice would have been X2, but that was likely blocked. The southern Panther of the pair got a PTC on the ATG, pinning the crew (we had thought it was a break at first, and then remembered the orchard hindrance). The MMG HS surrendered, and then the squad went in and eliminated my 8-1 in CC.
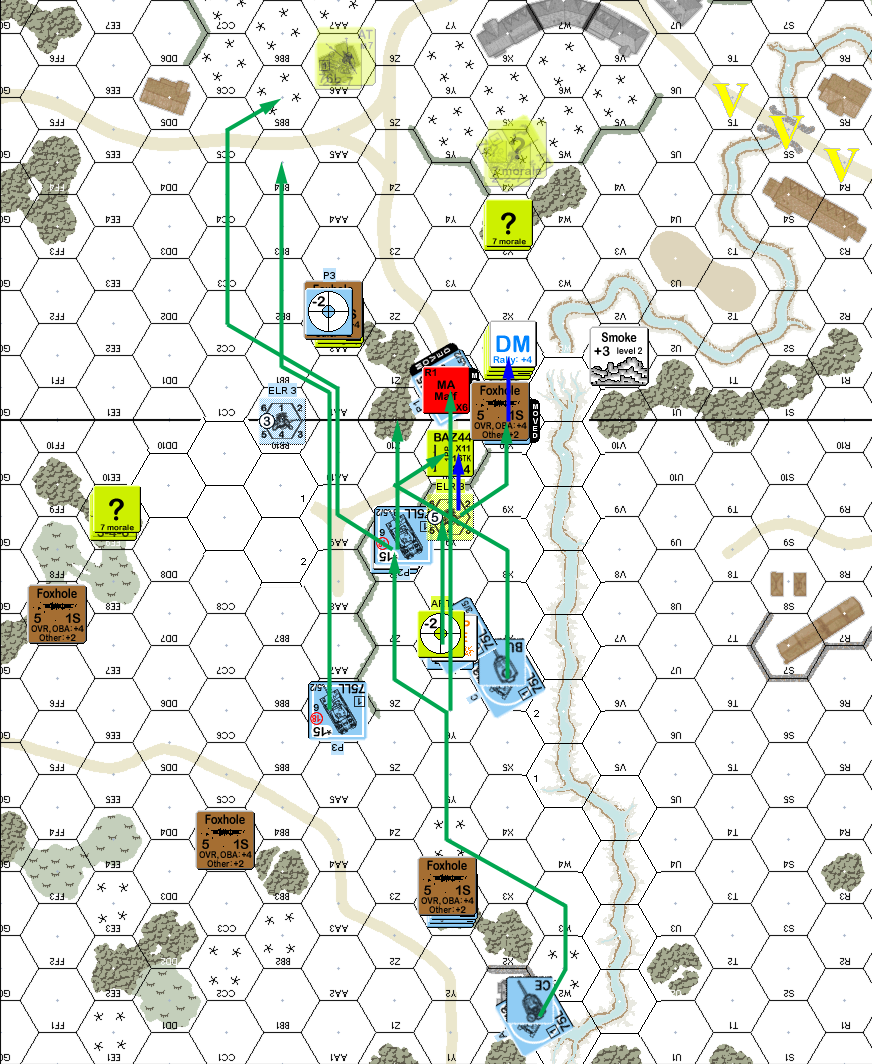
Situation, German Turn 3.
Patch recovered my MMG for my turn 3, but his leader failed to rally. I pushed the ATG back to W5, where it could see the final approach to the bridge, and get an extra hex of hindrance from BB5, who broke the crew on a 2MC MG shot. EE10 was stuck where he was, bypassed and becoming irrelevant, but with too much looking his way. Defensive fire stripped “?” from W4 and then broke the HS, and he started preparing for Smoke on U6.
Patch’s leader and squad failed to rally on his turn 4, putting them permanently out of range of the bridge. Patch put Smoke on U6, and then headed for the bridge. Patch had been thinking the second ATG was in 59U7 or S8 (that last is an interesting idea), and was surprised when I revealed AA6 to put residual on X2, while breaking his lead squad and eliminating the prisoners. His MA-less Panther went to overrun the other gun, and AA6 intensive fired, bouncing a shot off the turret (I needed a hull hit…).
The next squad armor assaulted up to 59Y4, and the ART took a shot, and missed. The last one merely went to Z1 to DM my 7-0. Advancing fire was all against the remaining ATG, revealing it on the third try with a PTC, and then encircling it and breaking it on a NMC (a 2 on a 2FP +3 shot…).
Situation, German Turn 4.
Patch rallied his 9-1 and squad on my turn 4. While they were too far away for the victory location, they could see EE9, and they got a KIA when I tried to run him up to the center woods, making my only intact unit the offboard ART, who missed in prep.
The broken squad in 59X1 missed a self-rally attempt, giving Patch two squads in range of the bridge. Patch moved the Panthers up, and generated smoke in T6 with one. The Y2 squad charged up to the bridge entry and the ART missed again. Since there were way to many vehicles to deal with, and he could advance to Control the one thing the tanks couldn’t, that was the game.
Afterword
This is a heck of a puzzle for both sides, and definitely an interesting small situation. I probably set up too much forward, but I do think you have to put something near the entry areas to keep the Germans honest. Certainly, only getting three hexes (after advance) in on the first turn was a good start for me, as the name of the game is delay.
The other name of the game is to try and break infantry, and put the Germans in danger of being unable to win. Breaking his only leader was big, but I was having a lot of trouble affecting him at all.
Patch was tending to have a lot of really high or really low rolls. I think he rolled at least four 11s for the Panthers start up DRs. That was making Patch nervous for good reason, and the early-game malfunctions didn’t help.
On the other hand, I think I passed all of two, maybe three, morale checks all game. Much of my force was just CRed out of existence as I couldn’t pass a MC to keep from breaking, or keep from being eliminated. I nearly didn’t move the BAZ crew up to Y10 on turn 1 to keep out of sight, but I figured anyone who fired wouldn’t move (delay), and I’d rout back to AA2 for the 8-0 to rally. I wasn’t expecting to lose him to a double-break straight off, but it set the tone for the rest of my game.
I think my ATG positions are not the best, but they are good ones, as they cover a fair amount of open ground, and each other. A last-ditch position in S8, U7 or V6 makes a lot of sense, but won’t slow the Germans down until very late, and you’ll have to fall back a lot better than I did to protect it.
Discussion ¬